USER MANUAL KD-R971BT JVC
KD-R971BT / KD-R871BT / KD-R774BT / KD-R771BT
CD RECEIVER
INSTRUCTION MANUAL
RéCEPTEUR CD
MANUEL D'INSTRUCTIONS
CD-RECEIVER
BEDIENUNGSANLEITUNG
CD-PECUBEP
INHCTPYKUINIO 3KCNLYATAUIN
JVCKENWOOD Corporation
Made for

iPod

iPhone

Bluetooth

TECHNOLOGY


Information on Disposal of Old Electrical and Electronic Equipment and Batteries (applicable for countries that have adopted separate waste collection systems)
Products and batteries with the symbol (crossed-out wheeled bin) cannot be disposed as household waste.
Old electrical and electronic equipment and batteries should be recycled at a facility capable of handling these items and their waste byproducts.
Contact your local authority for details in locating a recycle facility nearest to you. Proper recycling and waste disposal will help conserve resources whilst preventing detrimental effects on our health and the environment.
Notice: The sign "Pb" below the symbol for batteries indicates that this battery contains lead.
The marking of products using lasers
The label is attached to the chassis/case and says that the component uses laser beams that have been classified as Class 1. It means that the unit is utilizing laser beams that are of a weaker class. There is no danger of hazardous radiation outside the unit.
Declaration of Conformity with regard to the R&TTE Directive 1999/5/EC
Declaration of Conformity with regard to the EMC Directive
Declaration of Conformity with regard to the RoHS Directive 2011/65/EU
Manufacturer:
JVC KENWOOD Corporation
3-12, Moriya-cho, Kanagawa-ku, Yokohama-shi, Kanagawa, 221-0022, Japan
EU Representative:
JVC Technical Services Europe GmbH
Konrad-Adenauer-Allee 1-11, D-61118 Bad Vilbel, Germany
Hereby, JVC KENWOOD declares that this unit KD-R971BT/KD-R871BT/KD-R774BT/KD-R771BT is in compliance with the essential requirements and other relevant provisions of Directive 1999/5/EC.
Français
1 Cancel the demonstration
2 Set the clock
3 Set the basic settings
RADIO 5
AUX 6
CD/USB/iPod/Android 7
BLUETOOTH 9
AUDIO SETTINGS 14
DISPLAY SETTINGS 18
REFERENCES 20
Maintenance
More information
TROUBLESHOOTING 22
SPECIFICATIONS 24
INSTALLATION /
CONNECTION 25
BEFORE USE
IMPORTANT
- To ensure proper use, please read through this manual before using this product. It is especially important that you read and observe Warning and Caution in this manual.
- Please keep the manual in a safe and accessible place for future reference.
Warning
Do not operate any function that takes your attention away from safe driving.
Caution
Volume setting:
- Adjust the volume so that you can hear sounds outside the car to prevent accidents.
- Lower the volume before playing digital sources to avoid damaging the speakers by the sudden increase of the output level.
General:
- Avoid using the external device if it might hinder safe driving.
- Make sure all important data has been backed up. We shall bear no responsibility for any loss of recorded data.
- Never put or leave any metallic objects (such as coins or metal tools) inside the unit to prevent a short circuit.
- If a disc error occurs due to condensation on the laser lens, eject the disc and wait for the moisture to evaporate.
How to read this manual
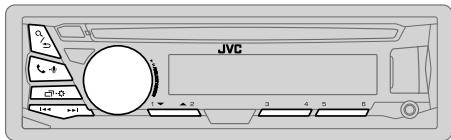
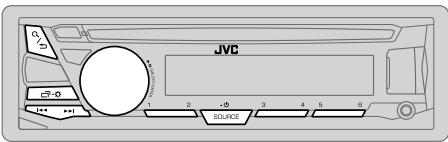
- Operations are explained mainly using buttons on the faceplate of KD-R971BT.
- English indications are used for the purpose of explanation. You can select the display language from the menu. ( 4)
- [XX] indicates the selected items.
- ( XX) indicates references are available on the stated page.
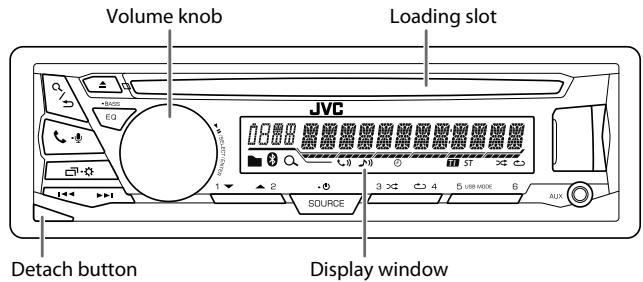
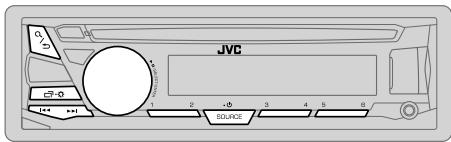
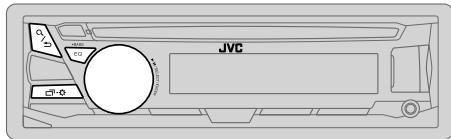
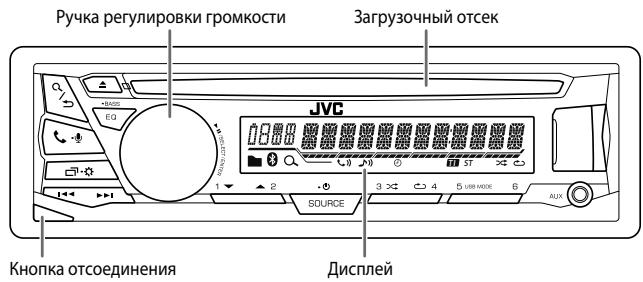
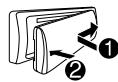
Faceplate
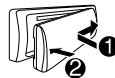
Attach
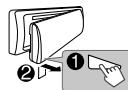
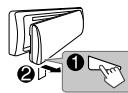
Detach

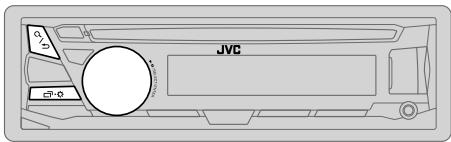
How to reset
Press the switch twice within 5 seconds after detaching the faceplate.
| To | On the faceplate |
| Turn on the power | Press SOURCE-⊙.
• Press and hold to turn off the power. |
| Adjust the volume | Turn the volume knob. |
| Press the volume knob to mute the sound or pause playback.
• Press again to cancel. |
| Select a source | • Press SOURCE-⊙ repeatedly.
• Press SOURCE-⊙, then turn the volume knob within 2 seconds. |
| Change the display information | Press ☑-⊙ repeatedly. (⇒ 21) |

Cancel the demonstration
When you turn on the power for the first time (or [FACTORY RST] is set to [YES]), the display shows: "CANCEL DEMO" "PRESS" "VOLUME KNOB"
1 Press the volume knob.
[YES] is selected for the initial setup.
2 Press the volume knob again.
"DEMO OFF" appears.

Set the clock
1 Press and hold
2 Turn the volume knob to select [CLOCK], then press the knob.
3 Turn the volume knob to select [CLOCK SET], then press the knob.
4 Turn the volume knob to make the settings, then press the knob.
Day Hour Minute
5 Turn the volume knob to select [24H/ 12H], then press the knob.
6 Turn the volume knob to select [12 HOUR] or [24 HOUR], then press the knob.
7 Press to exit.
To return to the previous setting item, press Q .
3
Set the basic settings
1 Press and hold
2 Turn the volume knob to select an item (see the following table), then press the knob.
3 Repeat step 2 until the desired item is selected or activated.
4 Press to exit.
To return to the previous setting item, press / .
Default: XX
| SETTINGS |
| BEEP | (Not applicable when 3-way crossover is selected.)ON: Activates the keypress tone.; OFF: Deactivates. |
| SRC SELECT |
| AM* | ON: Enables AM in source selection.; OFF: Disables. |
| AUX* | ON: Enables AUX in source selection.; OFF: Disables. |
| F/W UPDATE |
| SYSTEM |
| F/W xxxx | YES: Starts upgrading the firmware.; NO: Cancels (upgrading is not activated).For details on how to update the firmware, see: <http://www.jvc.net/cs/car/>. |
| FACTORY RST | YES: Resets the settings to default (except the stored station).; NO: Cancels. |
| CLOCK |
| CLOCK SYNC | AUTO: The clock time is automatically set using the Clock Time (CT) data in FM Radio Data System signal.; OFF: Cancels. |
| CLOCK DISP | ON: The clock time is shown on the display even when the unit is turned off.;OFF: Cancels. |
| ENGLISH |
| PUSCHKIM | Select the display language for menu and music information if applicable.By default, ENGLISH is selected. |
| ESPANOL |
- Not displayed when the corresponding source is selected.
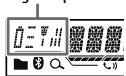
"ST" lights up when receiving an FM stereo broadcast with sufficient signal strength.
Search for a station
1 Press SOURCE- repeatedly to select FM or AM.
2 Press / to search for a station automatically. (or)
Press and hold / until "M" flashes, then press repeatedly to search for a station manually.
Settings in memory
You can store up to 18 stations for FM and 6 stations for AM.
Store a station
While listening to a station....
Press and hold one of the number buttons (1 to 6). (or)
1 Press and hold the volume knob until "PRESET MODE" flashes.
2 Turn the volume knob to select a preset number, then press the knob. The preset number flashes and "MEMORY" appears.
Select a stored station
Press one of the number buttons (1 to 6). (or)
1 Press /
2 Turn the volume knob to select a preset number, then press the knob to confirm.
Other settings
1 Press and hold
2 Turn the volume knob to select [TUNER], then press the knob.
3 Turn the volume knob to select an item (see the following table), then press the knob.
4 Repeat step 3 until the desired item is selected/ activated or follow the instructions stated on the selected item.
5 Press to exit.
To return to the previous setting item, press / .
Default: XX
| RADIO TIMER | Turns on the radio at a specific time regardless of the current source.
1 ONCE/DAILY/ WEEKLY/OFF: Select how often the timer will be turned on.
2 FM/ AM: Select the band.
3 01 to 18 (for FM)/ 01 to 06 (for AM): Select the preset station.
4 Set the activation day*1 and time.
“◎” lights up when complete.
Radio Timer will not activate for the following cases.
• The unit is turned off.
• [OFF] is selected for [AM] in [SRC SELECT] after Radio Timer for AM is selected. (⇒ 4) |
| SSM | SSM 01 – 06 / SSM 07 – 12 / SSM 13 – 18: Automatically resets up to 18 stations for FM. “SSM” stops flashing when the first 6 stations are stored. Select SSM 07 – 12 / SSM 13 – 18 to store the following 12 stations. |
*1 Selectable only when [ONCE] or [WEEKLY] is selected in step 1.
Default: XX
| LOCAL SEEK | ON: Searches only FM stations with good reception. ; OFF: Cancels.
• Settings made are applicable only to the selected source/station. Once you change the source/station, you need to make the settings again. |
| IF BAND | AUTO: Increases the tuner selectivity to reduce interference noises from adjacent FM stations. (Stereo effect may be lost.) ; WIDE: Subjects to interference noises from adjacent FM stations, but sound quality will not be degraded and the stereo effect will remain. |
| MONO | ON: Improves the FM reception, but the stereo effect will be lost. ; OFF: Cancels. |
| NEWS-STBY*2 | ON: The unit will temporarily switch to News Programme if available. ; OFF: Cancels. |
| REGIONAL*2 | ON: Switches to another station only in the specific region using the “AF” control. ; OFF: Cancels. |
| AF SET*2 | ON: Automatically searches for another station broadcasting the same program in the same Radio Data System network with better reception when the current reception is poor. ; OFF: Cancels. |
| TI SET*2 | ON: Allows the unit to temporarily switch to Traffic Information if available (“TI” lights up). ; OFF: Cancels. |
| PTY SEARCH*2 | Select a PTY code (see below).
If there is a station broadcasting a program of the same PTY code as you have selected, that station is tuned in. |
PTY code: NEWS, AFFAIRS, INFO, SPORT, EDUCATE, DRAMA, CULTURE, SCIENCE, VARIORED, POP M (music), ROCKM (music), EASY M (music), LIGHT M (music), CLASSICS, OTHER M (music), WEATHER, FINANCE, CHILDREN, SOCIAL, RELIGION, PHONE IN, TRAVEL, LEISURE, JAZZ, COUNTRY, NATION M (music), OLDIES, FOLK M (music), DOCUMENT
*2 Only for FM source.
AUX
Use a portable audio player
1 Connect a portable audio player (commercially available).
3.5 mm stereo mini plug with "L" shaped connector (commercially available)

2 Select [ON] for [AUX] in [SRC SELECT]. ( 4)
3 Press SOURCE- repeatedly to select AUX.
4 Turn on the portable audio player and start playback.

Use a 3-core plug head stereo mini plug for optimum audio output.
Start playback
The source changes automatically and playback starts.
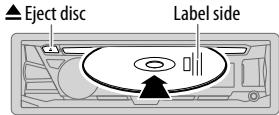
CD
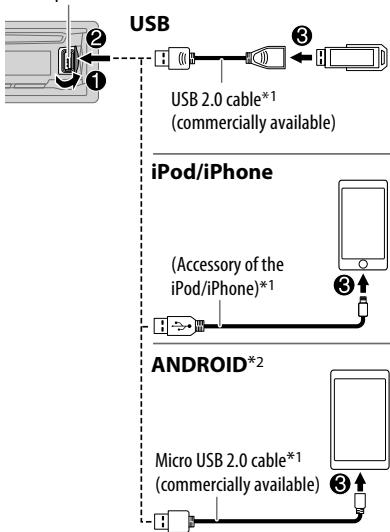
USB input terminal
Selectable source:
KD-R971BT / KD-R871BT: CD/ USB/ USB-IPOD/ ANDROID
- KD-R774BT / KD-R771BT: CD/USB/Android
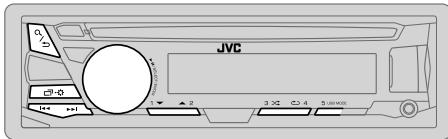
| To | On the faceplate |
| Reverse / Fast-forward*3 | Press and hold ↓/▶. |
| Select a track/file | Press ↓/▶. |
| Select a folder*4 | Press 2▲/1▼. |
| Repeat play*5 | Press 4 ⊙ repeatedly. |
| TRACK RPT/ ALL RPT : Audio CD |
| TRACK RPT/ FOLDER RPT/ ALL RPT : MP3/WMA/AAC/WAV/FLAC file |
| ONE RPT/ ALL RPT/ RPT OFF : iPod or ANDROID |
| Random play*5 | Press 3 > repeated. |
| ALL RND/ RND OFF : Audio CD |
| FOLDER RND/ ALL RND/ RND OFF : MP3/WMA/AAC/WAV/FLAC file |
| SONG RND/ ALL RND/ RND OFF : iPod or ANDROID |
1 Do not leave the cable inside the car when not using.
2 When connecting an Android device, "Press [VIEW] to install JVC MUSIC PLAY APP" is shown. Follow the instructions to install the application. You can also install the latest version of JVC MUSIC PLAY application on your Android device before connecting. (→ 20)
3 For ANDROID: Applicable only when [AUTO MODE] is selected. (→ 8)
4 For CD: Only for MP3/WMA/AAC files. This does not work for iPod/Android.
*5 For iPod/Android: Applicable only when [HEAD MODE]/[AUTO MODE] is selected. (→ 8)
Select control mode
While in USB-IPOD source, press 5 USB MODE repeatedly.
HEAD MODE: Control iPod from this unit.
IPHONE MODE: Control iPod using the iPod itself. However, you can still play/ pause or file skip from this unit.
While in Android source, press 5 USB MODE repeatedly.
AUTO MODE: Control Android device from this unit via JVC MUSIC PLAY application installed in the Android device.
AUDIO MODE: Control Android device using the Android device itself via other media player applications installed in the Android device. However, you can still play/pause or file skip from this unit.
Select music drive
Press 5 USB MODE repeatedly.
Stored songs in the following drive will be played back.
- Selected internal or external memory of a smartphone (Mass Storage Class).
- Selected drive of a multiple drives device.
Select a file from a folder/list
1 Press /
2 Turn the volume knob to select a folder/list, then press the knob.
3 Turn the volume knob to select a file, then press the knob.
Quick Search
If you have many files, you can search through them quickly.
Turn the volume knob quickly to browse through the list quickly.
Alphabet search (applicable only for iPod):
You can search for a file according to the first character.
Press 2 ▲/1▼ or turn the volume knob quickly to select the desired character (A to Z/0 to 9/Others).
-
Select "OTHERS" if the first character is other than A to Z, 0 to 9.
-
To return to the previous setting item, press Q / .
To cancel, press and hold Q /
- For iPod, applicable only when [HEAD MODE] is selected.
- ForAndroid,applicable only when [AUTO MODE] is selected.
BLUETOOTH - Connection
Supported Bluetooth profiles
- Hands-Free Profile (HFP)
- Advanced Audio Distribution Profile (A2DP)
- Audio/Video Remote Control Profile (AVRCP)
- Serial Port Profile (SPP)
- Phonebook Access Profile (PBAP)
Supported Bluetooth CODECS
- Sub Band Codec (SBC)
- Advanced Audio Coding (AAC)
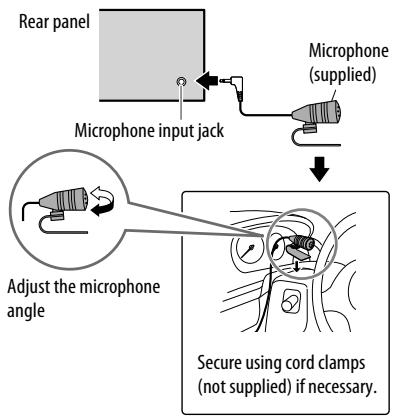
Connect the microphone
Pair and connect a Bluetooth device for the first time
1 Press SOURCE- to turn on the unit.
2 Search and select "JVC UNIT" on the Bluetooth device.
"BT PAIRING" flashes on the display.
- For some Bluetooth devices, you may need to enter the Personal Identification Number (PIN) code immediately after searching.
3 Perform (A) or (B) depending on what scrolls on the display.
For some Bluetooth devices, pairing sequence may vary from the steps described below.
(A) "[Device Name]" "XXXXXX" "VOL - YES" "BACK - NO"
"XXXXXXXX" is a 6-digit passkey randomly generated during each pairing.
1 Ensure that the passkey which appears on the unit and Bluetooth device is the same.
Press the volume knob to confirm the passkey.
3 Operate the Bluetooth device to confirm the passkey.
(B) "[Device Name]" "VOL-YES" "BACK-NO"
Press the volume knob to start pairing.
2. If "PAIRING" "PIN 0000" scrolls on the display, enter the PIN code "0000" into the Bluetooth device.
You can change to a desired PIN code before pairing. ( 13)
- If only "PAIRING" appears, operate the Bluetooth device to confirm pairing.
"PAIRING COMPLETED" appears when pairing is completed and "8" will light up when the Bluetooth connection is established.
Lights up to show the battery strength and signal strength.*
Auto Pairing
When you connect the following device to the USB input terminal, pairing request (via Bluetooth) is automatically activated. KD-R971BT / KD-R871BT: iPhone/ iPod touch/ Android device
KD-R774BT / KD-R771BT: Android device
Press the volume knob to pair once you have confirmed the device name.
Automatic pairing request is activated only if:
BLUETOOTH — Mobile phone
Receive a call
When there is an incoming call:
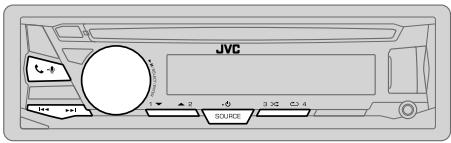
- For KD-R971BT: The buttons will blink in the color you have selected in [RING COLOR]. ( 11) For KD-R871BT / KD-R774BT / KD-R771BT: The buttons will blink in the blinking pattern you have selected in [RING ILLUMI]. ( 11)
- The unit answers the call automatically if [AUTO ANSWER] is set to a selected time. (→ 11)
During a call:
- For KD-R971BT: The buttons stop blinking and illuminate in the color you have selected in [RING COLOR]. ( 11) For KD-R871BT / KD-R774BT / KD-R771BT: The buttons stop blinking.
- If you turn off the unit or detach the faceplate, the Bluetooth connection is disconnected.
To
On the faceplate
First incoming call...
| Answer a call | Press ↓ - Ⓞ or the volume knob. |
| Reject a call | Press and hold ↓ - Ⓞ or the volume knob. |
| End a call | Press and hold ↓ - Ⓞ or the volume knob. |
While talking on the first incoming call...
| Answer another incoming call and hold the current call | Press ↓ or the volume knob. |
| Reject another incoming call | Press and hold ↓ or the volume knob. |
| To | On the faceplate |
| While having two active calls... |
| End current call and activate held call | Press and hold ↓ - ↓ or the volume knob. |
| Swap between the current call and held call | Press ↓ - ↓. |
| Adjust the phone volume [00] to [35] (Default: [15]) | Turn the volume knob during a call.
• This adjustment will not affect the volume of the other sources. |
| Switch between hands-free and private talk modes | Press ↓ / ↓ during a call.
• Operations may vary according to the connected Bluetooth device. |

Improve the voice quality
While talking on the phone....
1 Press and hold
2 Turn the volume knob to select an item (see the following table), then press the knob.
3 Repeat step 2 until the desired item is selected or activated.
4 Press to exit.
To return to the previous setting item, press .
Default: XX
| MIC LEVEL | -10 — +10 (4): The sensitivity of the microphone increases as the number increased. |
| NOISE RDCT | -5 — +5 (0): Adjust the noise reduction level until the least noise is being heard during a phone conversation. |
| ECHO CANCEL | -5 — +5 (0): Adjust the echo cancellation delay time until the least echo is being heard during a phone conversation. |

Make the settings for receiving a call
1 Press to enter Bluetooth mode.
2 Turn the volume knob to select an item (see the following table), then press the knob.
3 Repeat step 2 until the desired item is selected or activated.
To return to the previous setting item, press Q / .
Default: XX
| SETTINGS |
| AUTO ANSWER | 01 SEC — 30 SEC: The unit answers incoming call automatically in the selected time (in seconds).; OFF: Cancels. |
| RING COLOR | (For KD-R971BT)
COLOR 01 — COLOR 49 (COLOR 08): Selects the notification light color for the buttons when there is an incoming call and during a call. ; OFF : Cancels. |
| RING ILLUMI | (For KD-R871BT / KD-R774BT / KD-R771BT)
BLINK 1 — BLINK 5 (BLINK 2): Selects the notification blinking pattern for the buttons when there is an incoming call. ; OFF : Cancels. |
Make a call
You can make a call from the call history, phonebook, or dialing the number.
Call by voice is also possible if your mobile phone has the feature.
1 Press to enter Bluetooth mode.
2 Turn the volume knob to select an item (see the following table), then press the knob.
3 Repeat step 2 until the desired item is selected/activated or follow the instructions stated on the selected item.
To return to the previous setting item, press / .
| RECENT CALL | (Applicable only if the phone supports PBAP)
1 Press the volume knob to select a name or a phone number.
·“<” indicates call received, “>” indicates call made, “M” indicates call missed.
·“NO HISTORY” appears if there is no recorded call history or call number.
2 Press the volume knob to call. |
| PHONEBOOK | (Applicable only if the phone supports PBAP)
1 Press 2▲/1▼ to select the desired letter (A to Z, 0 to 9, and OTHERS).
·“OTHERS” appears if the first character is other than A to Z, 0 to 9.
2 Turn the volume knob to select a name, then press the knob.
3 Turn the volume knob to select a phone number, then press the knob to call.
·The phonebook of the connected phone is automatically transferred to the unit when pairing.
·This unit can display only non-accent letters. (Accent letters such as “U” is shown as “U”). |
| DIAL NUMBER | 1 Turn the volume knob to select a number (0 to 9) or character (×, #, +).
2 Press ↓← / ▷→ to move the entry position.
Repeat steps 1 and 2 until you finish entering the phone number.
3 Press the volume knob to call. |
| VOICE | Speak the name of the contact you want to call or the voice command to control the phone functions. (⇒ Make a call using voice recognition) |
Make a call using voice recognition
1 Press and hold to activate the connected phone.
2 Speak the name of the contact you want to call or the voice command to control the phone functions.
- Supported Voice Recognition features vary for each phone. Refer to the instruction manual of the connected phone for details.
- This unit also supports the intelligent personal assistant function of iPhone.
Settings in memory
You can store up to 6 contacts into the number buttons (1 to 6).
1 Press to enter Bluetooth mode.
2 Turn the volume knob to select [RECENT CALL], [PHONEBOOK], or [DIAL NUMBER], then press the knob.
3 Turn the volume knob to select a contact or enter a phone number.
If a contact is selected, press the volume knob to show the phone number.
4 Press and hold one of the number buttons (1 to 6).
"MEMORY P(selected preset number)" appears when the contact is stored.
To erase a contact from the preset memory, select [DIAL NUMBER] in step 2 and store a blank number.
Make a call from memory
1 Press to enter Bluetooth mode.
2 Press one of the number buttons (1 to 6).
3 Press the volume knob to call. "NO PRESET" appears if there is no contacts stored.
Bluetooth mode settings
1 Press and hold
2 Turn the volume knob to select [BLUET00TH], then press the knob.
3 Turn the volume knob to select an item (see the following table), then press the knob.
4 Repeat step 3 until the desired item is selected/activated or follow the instructions stated on the selected item.
5 Press to exit.
To return to the previous setting item, press .
Default: XX
| PHONE*1 | Selects the phone or audio device to connect or disconnect. |
| AUDIO*1 | "×" appears in front of the device name when connected. |
| APPLICATION*1 | Shows the connected phone name using the JVC Smart Music Control*2 app. "×" appears in front of the device name when connected. |
| DELETE PAIR | 1 Turn the volume knob to select a device to delete, then press the knob.
2 Turn the volume knob to select [YES] or [NO], then press the knob. |
| SET PINCODE (0000) | Changes the PIN code (up to 6 digits).
1 Turn the volume knob to select a number.
2 Press▶/▶to move the entry position.
Repeat steps 1 and 2 until you finish entering the PIN code.
3 Press the volume knob to confirm. |
| AUTO CNNCT | ON: The unit automatically reconnect when the last connected Bluetooth device is within range.; OFF: Cancels. |
| AUTO PAIR | ON: The unit automatically pair supported Bluetooth device (iPhone/iPod touch/Android device) when it is connected through USB input terminal. Depending on the operating system of the connected device, this function may not work.; OFF: Cancels. |
| INITIALIZE | YES: initializes all the Bluetooth settings (including stored pairing, phonebook, and etc.); NO: Cancels. |
| INFORMATION | MY BT NAME: Displays the unit name (JVC UNIT).; MY ADDRESS: Shows address of this unit. |
1 You can only connect a maximum of two Bluetooth phones and one Bluetooth audio device at any time.
2 JVC Smart Music Control is designed to view JVC car receiver status and perform simple control operations on Android smart phones.
For JVC Smart Music Control operations, visit JVC website: http://www.jvc.net/cs/car/.
Bluetooth compatibility check mode
You can check the connectivity of the supported profile between the Bluetooth device and the unit.
- Make sure there is no Bluetooth device paired.
1 Press and hold
"BLUETOOTH" "CHECK MODE" appears. "SEARCH NOW USING PHONE" "PIN IS 0000" scrolls on the display.
2 Search and select "JVC UNIT" on the Bluetooth device within 3 minutes.
3 Perform (A), (B) or (C) depending on what appears on the display.
(A) "PAIRING" "XXXXXX" (6-digit passkey): Ensure that the same passkey appears on the unit and Bluetooth device, then operate the Bluetooth device to confirm the passkey.
(B) "PAIRING" "PIN IS 0000": Enter "0000" on the Bluetooth device.
(C) "PAIRING": Operate the Bluetooth device to confirm pairing.
After pairing is successful, "PAIRING OK" "[Device Name]" appears and Bluetooth compatibility check starts.
If "CONNECT NOW USING PHONE" appears, operate the Bluetooth device to allow phonebook access to continue.
"TESTING" flashes on the display.
The connectivity result flashes on the display.
"PAIRING OK" and/or "H.FREE OK"1 and/or "A.STREAM OK"2 and/or "PBAP OK"*3: Compatible
1 Compatible with Hands-Free Profile (HFP)
2 Compatible with Advanced Audio Distribution Profile (A2DP)
*3 Compatible with Phonebook Access profile (PBAP)
After 30 seconds, "PAIRING DELETED" appears to indicate that pairing has been deleted, and the unit exits check mode.
- To cancel, press and hold SOURCE- to turn off the power, then turn on the power again.
BLUETOOTH—Audio
Audio player via Bluetooth
1 Press SOURCE- repeatedly to select BT AUDIO.
2 Operate the Bluetooth audio player to start playback.
| To | On the faceplate |
| Playback / pause | Press the volume knob. |
| Select group or folder | Press 2▲/1▼. |
| Reverse / Forward skip | Press ↓/▶l. |
| Reverse / Fast-forward | Press and hold ↓/▶l. |
| Repeat play | Press 4 repeatedly.
TRACK RPT, ALL RPT, RPT OFF |
| Random play | Press 3 repeatedly.
GROUP RND, ALL RND, RND OFF |
| Select a file from a folder/list | Refer to “Select a file from a folder/list” on page 8. |
Operations and display indications may differ according to their availability on the connected device.
AUDIO SETTINGS
Select a preset equalizer
Press EQ-BASS repeatedly. (or)
Press EQ-BASS, then turn the volume knob within 5 seconds.
Preset equalizer:
FLAT (default)/ HARD ROCK / POP / HIP HOP / R&B / JAZZ / CLASSICAL / USER
Store your own sound settings
1 Press and hold EQ-BASS to enter EASY EQ setting.
2 Turn the volume knob to select an item, then press the knob. Refer to [EASY EQ] for setting ( 15) and the result is stored to [USER].
To return to the previous setting item, press / .
To exit, press EQ-BASS.
Other settings
1 Press and hold
2 Turn the volume knob to select an item ( 15) , then press the knob.
3 Repeat step 2 until the desired item is selected/activated or follow the instructions stated on the selected item.
4 Press to exit.
To return to the previous setting item, press / .
Default: XX
| EQ SETTING |
| EQ PRESET | Select a preset equalizer suitable to the music genre. (Select [USER] to use the settings made in [EASY EQ] or [PRO EQ].)FLAT / HARD ROCK / POP / HIP HOP / R&B / JAZZ / CLASSICAL / USER |
| EASY EQ | Adjust your own sound settings. The settings are stored to [USER].The settings made may affect the current settings of [PRO EQ].SUB.W SP*1*2: 00 to +06 (Default: 03SUB.W*1*3: -50 to +10 00BASS LVL: -09 to +09 00MID LVL: -09 to +09 00TRE LVL: -09 to +09 00) |
| PRO EQ | Adjust your own sound settings. The settings are stored to [USER].The settings made may affect the current settings of [EASY EQ]. |
| 62.5HZ |
| LVL -09 to +09 (00): Adjusts the level to memorize for each source.(Before making an adjustment, select the source you want to adjust.) |
| BASS EXT ON: Turns on the extended bass.; BASS EXT OFF: Cancels. |
| 100HZ / 160HZ / 250HZ / 400HZ / 630HZ / 1KHZ / 1.6KHZ / 2.5KHZ / 4KHZ / 6.3KHZ / 10KHZ / 16kHz |
| LVL -09 to +09 (00): (Refer above) |
| Q FACTOR |
| Q 1.35/ Q 1.50/ Q 2.00: Adjust the quality factor. |
| AUDIO |
| BASS BOOST | +01 — +05: Selects your preferred bass boost level. ; OFF: Cancels. |
| LOUD | 01 / 02: Boosts low or high frequencies to produce a well-balanced sound at low volume. ; OFF: Cancels. |
| SUB.W LEVEL*1 | SPK-OUT*2 | (Not applicable when 3-way crossover is selected.)
00 to +06 (+03): Adjusts the output level of the subwoofer connected via speaker lead. (⇒ 27) |
| PRE-OUT*3 | -50 to +10 (00): Adjusts the output level of the subwoofer connected to the lineout terminals (SW or REAR/SW) through an external amplifier. (⇒ 27) |
| SUB.W*3 | ON / OFF: Turns on or off the subwoofer output. |
| FADER | (Not applicable when 3-way crossover is selected.)
R15 — F15 (00): Adjusts the front and rear speaker output balance. |
| BALANCE*4 | L15 — R15 (00): Adjusts the left and right speaker output balance. |
| VOL ADJUST | -15 — +06 (00): Preset the initial volume level of each source (compared to the FM volume level). Before adjustment, select the source you want to adjust. |
| AMP GAIN | LOW POWER: Limits the maximum volume level to 25. (Select if the maximum power of each speaker is less than 50 W to prevent damaging the speakers.) ; HIGH POWER: The maximum volume level is 35. |
| SPK/PRE OUT | (Not applicable when 3-way crossover is selected.)
Depending on the speaker connection method, select the appropriate setting to get the desired output. (⇒ 16, Speaker output settings) |
| SPK SIZE | Depending on the crossover type you have selected (see [X' OVER TYPE] below), 2-way crossover or 3-way crossover setting items will be shown. |
| X' OVER | (⇒ 17, Crossover settings)
By default, 2-way crossover type is selected. |
| X' OVER TYPE | Caution: Adjust the volume before changing the X' OVER TYPE to avoid the sudden increase or decrease of the output level. |
| X' OVER 2-WAY | (Displayed only when [X' OVER 3-WAY] is selected)
YES: Selects two way crossover type. ; NO: Cancels. |
| X' OVER 3-WAY | (Displayed only when [X' OVER 2-WAY] is selected)
YES: Selects three way crossover type. ; NO: Cancels. |
1 Displayed only when [SUB.W] is set to [ON].
2 For 2-way crossover: Displayed only when [SPK/PRE OUT] is set to [SUB.W/SUB.W]. (→16)
3 For 2-way crossover: Displayed only when [SPK/PRE OUT] is set to [REAR/SUB.W] or [SUB.W/SUB.W]. (→ 16)
4 This adjustment will not affect the subwoofer output.
AUDIO SETTINGS
| SND EFFECT |
| ENHANCE | (Not applicable for TUNER source.) SML/ MED/ LRG: Virtually enhances the sound space. ; OFF: Cancels. |
| RESPONSE | LV1/ LV2/ LV3: Virtually makes the sound more realistic. ; OFF: Cancels. |
| SOUND LIFT | LV1/ LV2/ LV3: Virtually adjust the sound position heard from the speakers. ; OFF: Cancels. |
| VOL LINK EQ | ON: Boosts the frequency to reduce the noise heard from outside the car or running noise of the tyres. ; OFF: Cancels. |
| K2 | (Not applicable for TUNER source and AUX source.) ON: Improve the sound quality of compressed music. ; OFF: Cancels. |
Speaker output settings
(Only for X' OVER 2-WAY)
Select the output setting for the speakers [SPK/PRE OUT], base on the speaker connection method.

Connection via lineup terminals
For connections through an external amplifier. ( 27)
(For KD-R971BT)
| Setting on [SPK/PRE OUT] | Audio signal through lineout terminal |
| FRONT | REAR | SW |
| REAR/REAR (default) | Front speakers output | Rear speakers output | Subwoofer output |
| REAR/SUB.W | (Not available) | (Not available) | (Not available) |
| SUB.W/SUB.W | Front speakers output | L (left): Subwoofer output R (right): (Mute) | Subwoofer output |
(For KD-R871BT)
| Setting on [SPK/PRE OUT] | Audio signal through lineout terminal |
| FRONT | REAR/SW |
| REAR/REAR | Front speakers output | Rear speakers output |
| REAR/SUB.W (default) | Front speakers output | Subwoofer output |
| SUB.W/SUB.W | Front speakers output | Subwoofer output |
(For KD-R774BT / KD-R771BT)
| Setting on [SPK/PRE OUT] | Audio signal through lineout terminal |
| REAR/SW |
| REAR/REAR | Rear speakers output |
| REAR/SUB.W (default) | Subwoofer output |
| SUB.W/SUB.W | Subwoofer output |

Connection via speaker leads
For connections without using an external amplifier. However, with this settings you can also enjoy the subwoofer output. ( 27)
| Setting on [SPK/PRE OUT] | Audio signal through rear speaker lead |
| L (left) | R (right) |
| REAR/REAR | Rear speakers output | Rear speakers output |
| REAR/SUB.W | Rear speakers output | Rear speakers output |
| SUB.W/SUB.W | Subwoofer output | (Mute) |
If [SUB.W/SUB.W] is selected:
-HIGH 120HZ] is selected in [SUB.W LPF] and [THROUGH] is not available.
- [R02] is selected in [FADER] and selectable range is [R15] to [00].
Crossover settings
Below are the available setting items for 2-way crossover and 3-way crossover.
Caution
Select a crossover type according to how the speakers are connected. ( 27)
If you select a wrong type:
- The speakers may damage.
- The output sound level may be extremely high or low.
SPK SIZE (speaker size)
Selects according to the connected speaker size for optimum performance.
- The frequency and slope settings are automatically set for the crossover of the selected speaker.
- If [NONE] is selected for [TWEETER] of [FRONT], [REAR] and [SUBWOOFER] for [SPK SIZE], the [X'OVER] setting of the selected speaker is not available.
X'OVER (crossover)
[FRQ]/[HPF FRQ]/[LPF FRQ]:
Adjusts the crossover frequency for the selected speakers (high pass filter or low pass filter).
- If [THROUGH] is selected, all signals are sent to the selected speakers.
[SLOPE]/[HPF SLOPE]/[LPF SLOPE]:
Adjusts the crossover slope.
- Selectable only if a setting other than [THROUGH] is selected for the crossover frequency.
[PHASE]:
Selects the phase of the speaker output to be in line with the other speaker output.
[GAIN LEFT]/[GAIN RIGHT]/[GAIN]:
Adjusts the output volume of the selected speaker.
2-way crossover setting items
| SPK SIZE |
| FRONT | SIZE | 8CM/ 10CM/ 12CM/ 13CM/ 16CM/ 17CM/ 18CM/ 4×6"/5×7"/6×8"/6×9"/7×10" |
| TWEETER | SML/ MID/ LRG/ NONE (not connected) |
| REAR*1 | 8CM/ 10CM/ 12CM/ 13CM/ 16CM/ 17CM/ 18CM/ 4×6"/5×7"/6×8"/6×9"/7×10" / NONE (not connected) |
| SUBWOOFER*2*3 | 16CM/ 20CM/ 25CM/ 30CM/ 38CM OVER/ NONE (not connected) |
| X' OVER |
| TWEETER | FRQ | 1KHZ/ 1.6KHZ/ 2.5KHZ/ 4KHZ/ 5KHZ/ 6.3KHZ/ 8KHZ/10KHZ/12.5KHZ |
| GAIN LEFT | -08DB to 00DB |
| GAIN RIGHT | -08DB to 00DB |
| FRONT HPF | FRQ | 30HZ/ 40HZ/ 50HZ/ 60HZ/ 70HZ/ 80HZ/ 90HZ/ 100HZ/120HZ/ 150HZ/ 180HZ/ 220HZ/ 250HZ/ THROUGH |
| SLOPE | -06DB/ -12DB/ -18DB/ -24DB |
| GAIN | -08DB to 00DB |
| REAR HPF*1 | FRQ | 30HZ/ 40HZ/ 50HZ/ 60HZ/ 70HZ/ 80HZ/ 90HZ/ 100HZ/120HZ/ 150HZ/ 180HZ/ 220HZ/ 250HZ/ THROUGH |
| SLOPE | -06DB/ -12DB/ -18DB/ -23DB |
| GAIN | -08DB to 00DB |
| SUB.W LPF*2*3 | FRQ | 30HZ/ 40HZ/ 50HZ/ 60HZ/ 70HZ/ 80HZ/ 90HZ/ 100HZ/120HZ/ 150HZ/ 180HZ/ 220HZ/ 250HZ/ THROUGH |
| SLOPE | -06DB/ -12DB/ -18DB/ -22DB |
| PHASE | REVERSE (180°)/ NORMAL (0°) |
| GAIN | -08DB to 00DB |
1 Displayed only when [SPK/PRE OUT] is set to [REAR/REAR] or [REAR/SUB.W]. (→ 16)
2 For KD-R871BT / KD-R774BT / KD-R771BT: Displayed only when [SPK/PRE OUT] is set to [REAR/ SUB.W] or [SUB.W/SUB.W]. (→ 16)
*3 Displayed only when [SUB.W] is set to [ON]. (⇒ 15)

3-way crossover setting items
SPK SIZE
| TWEETER | SML/ MID/ LRG |
| MID RANGE | 8CM/ 10CM/ 12CM/ 13CM/ 16CM/ 17CM/ 18CM/ 4×6" / 5×7" / 6×8" / 6×9" |
| WOOFER* | 16CM/ 20CM/ 25CM/ 30CM/ 38CM OVER/ NONE (not connected) |
| X' OVER |
| TWEETER | HPF FRQ | 1KHZ/ 1.6KHZ/ 2.5KHZ/ 4KHZ/ 5KHZ/ 6.3KHZ/ 8KHZ/ 10KHZ/ 12.5KHZ |
| SLOPE | -06DB/ -12DB |
| PHASE | REVERSE (180°)/ NORMAL (0°) |
| GAIN | -08DB to 00DB |
| MID RANGE | HPF FRQ | 30HZ/ 40HZ/ 50HZ/ 60HZ/ 70HZ/ 80HZ/ 90HZ/ 100HZ/ 120HZ/ 150HZ/ 180HZ/ 220HZ/ 250HZ/ THROUGH |
| HPF SLOPE | -06DB/ -12DB |
| LPF FRQ | 1KHZ/ 1.6KHZ/ 2.5KHZ/ 4KHZ/ 5KHZ/ 6.3KHZ/ 8KHZ/ 10KHZ/ 12.5KHZ/ THROUGH |
| LPF SLOPE | -06DB/ -12DB |
| PHASE | REVERSE (180°)/ NORMAL (0°) |
| GAIN | -08DB to 00DB |
| WOOFER* | LPF FRQ | 30HZ/ 40HZ/ 50HZ/ 60HZ/ 70HZ/ 80HZ/ 90HZ/ 100HZ/ 120HZ/ 150HZ/ 180HZ/ 220HZ/ 250HZ/ THROUGH |
| SLOPE | -06DB/ -12DB |
| PHASE | REVERSE (180°)/ NORMAL (0°) |
| GAIN | -08DB to 00DB |
- Displayed only when [SUB.W] is set to [ON]. (⇒ 15)
DISPLAY SETTINGS

KD-R971BT

KD-R871BT / KD-R774BT / KD-R771BT
1 Press and hold
2 Turn the volume knob to select an item (see the following table), then press the knob.
3 Repeat step 2 until the desired item is selected/activated or follow the instructions stated on the selected item.
4 Press to exit.
To return to the previous setting item, press Q .
Default: XX
| DISPLAY |
| DIMMER | Dim the display and buttons illumination.
OFF: Dimmer is turned off.
ON: Dimmer is turned on. Brightness changes to [NIGHT] setting.
(↔ 19, [BRIGHTNESS])
DIMMER TIME: Set the dimmer on and off time.
1 Turn the volume knob to adjust the [ON] time, then press the knob.
2 Turn the volume knob to adjust the [OFF] time, then press the knob.
(Default: [ON]: 18:00 or 6:00 PM
[OFF]:6:00 or 6:00 AM)
AUTO: Dimmer turns on and off automatically when you turn off or on the car headlights.*1 |
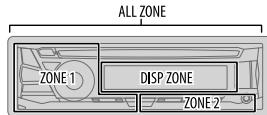
| BRIGHTNESS | Set the button and display brightness for day and night separately. |
| 1 DAY / NIGHT: Select day or night. |
| 2Select a zone. (⇒ 18) |
| 3 Set the brightness level (00 to 31). |
| (Default: KD-R971BT: DAY: 31; NIGHT: 11 |
| KD-R871BT / KD-R774BT / KD-R771BT: |
| BUTTON ZONE: DAY: 25; NIGHT: 09 |
| DISP ZONE: DAY: 31; NIGHT: 12) |
| SCROLL*2 | ONCE: Scrolls the display information once.; AUTO: Repeats scrolling at 5-second intervals.; OFF: Cancels. |
| COLOR (for KD-R971BT) |
| PRESET | Select color for display and button illumination separately. Default color: ALL ZONE: [COLOR 08], DISP ZONE: [COLOR 01], ZONE 1: [COLOR 08], ZONE 2: [COLOR 46]1 Select a zone. (→ 18)2 Select a color for the selected zone. COLOR 01 to COLOR 49USER: The color you have created for [DAY COLOR] or [NIGHT COLOR] is shown. COLOR FLOW01 to COLOR FLOW03: Color changes at different speeds.GROOVE/ TECHNO/ EMOTION/ RELAX/ SPECTRUM/ SWEEP/POP: The selected color pattern is shown.*3 (Selectable only when [ALL ZONE] is selected in step 1.) |
1 The illumination control wire connection is required. (→ 27)
2 Some characters or symbols will not be shown correctly (or will be blanked).
*3 If one of these color pattern is selected, the [ZONE 1], [DISP ZONE], [ZONE 2] illumination color will change to the default color.
| DAY COLOR | Store your own day and night colors for different zone.
1 Select a zone. (→18)
2 RED / GREEN / BLUE: Select a primary color.
3 00 to 31: Select the level. |
| NIGHT COLOR | Repeat steps 2 and 3 for all the primary colors.
• Your setting is stored to [USER] in [PRESET].
• If [00] is selected for all primary colors for [DISP ZONE], nothing appears on the display. |
| COLOR GUIDE | ON: Changes the button and display illumination when settings are performed on menu and list search. Display zone will automatically change depending on volume level. ; OFF: Cancels. |
[NIGHT COLOR] or [DAY COLOR] is changed by turning on or off your car's headlight.
■ Maintenance
Cleaning the unit
Wipe off dirt on the faceplate with a dry silicone or soft cloth.
Cleaning the connector
Detach the faceplate and clean the connector gently with a cotton swab, being careful not to damage the connector.
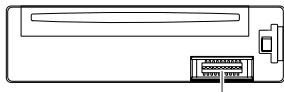
Connector (on the reverse side of the faceplate)
Handling discs:
- Do not touch the recording surface of the disc.
- Do not stick tape etc. on the disc, or use a disc with tape stuck on it.
- Do not use any accessories for the disc.
- Clean from the center of the disc and move outward.
- Clean the disc with a dry silicone or soft cloth. Do not use any solvents.
- When removing discs from this unit, pull them out horizontally.
- Remove burrs from the center hole and disc edge before inserting a disc.
Visit also the following website for:
- Latest firmware updates and latest compatible item list
Android™ application JVC MUSIC PLAY
- Any other latest information
General
- This unit can only play the following CDs:

- DualDisc playback: The Non-DVD side of a "DualDisc" does not comply with the "Compact Disc Digital Audio" standard. Therefore, the use of Non-DVD side of a DualDisc on this product cannot be recommended.
- Detailed information and notes about the playable audio files are stated in an online manual on the following website http://www.jvc.net/cs/car/.
Playable files
- Playable audio file:
KD-R971BT / KD-R871BT: MP3 (.mp3)/WMA (.wma)/AAC (.aac)
KD-R774BT / KD-R771BT: MP3 (.mp3)/WMA (.wma)
- Playable disc media: CD-R/CD-RW/CD-ROM
- Playable disc file format: ISO 9660 Level 1/2, Joliet, Long file name.
- Playable USB device file system: FAT12, FAT16, FAT32
Even when audio files comply with the standards listed above, playback may be impossible depending on the types or conditions of media or device.
The AAC (.m4a) file in a USB device or a CD encoded by iTunes cannot be played on this unit.
Unplayable discs
- Discs that are not round.
- Discs with coloring on the recording surface or discs that are dirty.
- Recordable/ReWritable discs that have not been finalized.
- 8 cm CD. Attempting to insert using an adapter may cause malfunction.
About USB devices
- This unit can play the following files stored on a USB mass storage class device: KD-R971BT / KD-R871BT: MP3/ WMA/ AAC/ WAV/ FLAC
KD-R7748T / KD-R771BT: MP3/ WMA/ WAV/ FLAC
- You cannot connect a USB device via a USB hub.
- Connecting a cable whose total length is longer than 5m may result in abnormal playback.
- This unit cannot recognize a USB device whose rating is other than 5V and exceeds 1.5A .
About iPod/iPhone
Made for
- iPod touch (2nd, 3rd, 4th, and 5th generation)
- iPod classic
- iPod nano (3rd, 4th, 5th, 6th, and 7th generation)
- iPhone 3G, 3GS, 4, 4S, 5, 5S, 5C, 6, 6 Plus
- It is not possible to browse video files on the "Videos" menu in [HEAD MODE].
- The song order displayed on the selection menu of this unit may differ from that of the iPod/ iPhone.
- Depending on the version of the operating system of the iPod/iPhone, some functions may not operate on this unit.
About Android device
This unit supports Android OS 4.1 and above.
- Some Android devices (with OS 4.1 and above) may not fully support Android Open Accessory (AOA) 2.0.
- If the Android device supports both mass storage class device and A0A 2.0, this unit always playback via A0A 2.0 as priority.
About Bluetooth
- Depending on the Bluetooth version of the device, some Bluetooth devices may not be able to connect to this unit.
- This unit may not work with some Bluetooth devices.
- Signal conditions vary, depending on the surroundings.
Available Cyrillic letters

Available characters
Display indications
| A | B | B | F | Д | Е | Ж | З | И | Й | К | Л | М | Н | О | П | |
| I | E | B | F | I | E | W | 3 | I | I | I | K | I | I | H | O | P |
| C | Т | У | Ф | X | Ч | Ч | Ш | Ч | b | b | b | З | Ю | Я | E | |
| C | T | Y | Y | Y | Y | U | L | U | U | Y | Y | b | b | H | R | E |
Each time you press the display information changes.
- If the information is unavailable or not recorded, "NO TEXT", "NO NAME", or other information (eg. station name) appears.
| FM or AM | Frequency ↔ Day/Clock |
| (For FM Radio Broadcast Data System stations only) Station name (PS) ⇌ Frequency ⇌ Program type (PTY) ⇌ Radio text + ⇌ Day/Clock ⇌ Level meter ⇌ Level meter with brightness synchronisation*1 or Level meter with color synchronisation*2 ⇌ (back to the beginning) |
| CD or USB | (For CD-DA) Playing time ⇌ Day/Clock ⇌ Disc name ⇌ Track title ⇌ Level meter ⇌ Level meter with brightness synchronisation*1 or Level meter with color synchronisation*2 ⇌ (back to the beginning) |
| (For MP3/WMA/AAC/WAV/FLAC files) Playing time ⇌ Day/Clock ⇌ Album title/Artist ⇌ Track title ⇌ Folder/file name ⇌ Level meter ⇌ Level meter with brightness synchronisation*1 or Level meter with color synchronisation*2 ⇌ (back to the beginning) |
| USB-IPOD or ANDROID | Playing time ⇌ Day/Clock ⇌ Album title/Artist ⇌ Track title ⇌ Level meter ⇌ Level meter with brightness synchronisation*1 or Level meter with color synchronisation*2 ⇌ (back to the beginning) |
| AUX | AUX ⇌ Day/Clock ⇌ Level meter ⇌ Level meter with brightness synchronisation*1 or Level meter with color synchronisation*2 ⇌ (back to the beginning) |
| BT AUDIO | Playing time ⇌ Day/Clock ⇌ Album title/Artist ⇌ Track title ⇌ Level meter ⇌ Level meter with brightness synchronisation*1 or Level meter with color synchronisation*2 ⇌ (back to the beginning) |
1 For KD-R871BT / KD-R774BT / KD-R771BT: The brightness of the button illumination changes and synchronises with the sound level.
2 For KD-R971BT: The color of the button illumination and display illumination changes and synchronises with the sound level.
TROUBLESHOOTING
| Symptom | Remedy |
| General | Sound cannot be heard. | ·Adjust the volume to the optimum level.
·Check the cords and connections. |
| "MISWIRING CHECK
WIRING THEN PWR ON"
appears. | Turn the power off, then check to be sure the terminals of
the speaker wires are insulated properly. Turn the power
on again. |
| "PROTECTING SEND
SERVICE" appears. | Send the unit to the nearest service center. |
| Source cannot be selected. | Check the [SRC SELECT] setting. (→4) |
| Radio | ·Radio reception is poor.
·Static noise while
listening to the radio. | Connect the antenna firmly. |
| O/USB /Pod | Disc cannot be ejected. | Press and hold▲to forcibly eject the disc. Be careful not
to drop the disc when it is ejected. |
| "IN DISC" appears. | Make sure nothing is blocking the loading slot when you
eject the disc. |
| "PLEASE" and "EJECT"
appear alternately. | Press▲, then insert the disc correctly. |
| Playback order is not as
intended. | The playback order is determined by the file name (USB)
or the order in which files were recorded (disc). |
| Elapsed playing time is
not correct. | This depends on the recording process earlier. |
| "Not SUPPORT" appears
and track skips. | Check whether the track is a playable format. (→20) |
| "READING" keeps flashing. | ·Do not use too many hierarchical levels and folders.
·Reload the disc or reattach the USB device. |
| Symptom | Remedy |
| CD/USB/iPod | “CANNOT PLAY” flashes and/or connected device cannot be detected. | ·Check whether the connected device is compatible with this unit and ensure the files are in supported formats. (⇒20)
·Reattach the device. |
| The iPod/iPhone does not turn on or does not work. | ·Check the connection between this unit and iPod/iPhone.
·Detach and reset the iPod/iPhone using hard reset. |
| “LOADING” appears when you enter search mode by pressing Ⓞ. | This unit is still preparing the iPod/iPhone music list. It may take some time to load, try again later. |
| Correct characters are not displayed. | ·This unit can only display uppercase letters, numbers, and a limited number of symbols.
·Depending on the display language you have selected (⇒4), some characters may not be displayed correctly. |
| ANDROID | ·Sound cannot be heard during playback.
·Sound output only from the Android device. | ·Reconnect the Android device.
·If in [AUDIO MODE], launch any media player application on the Android device and start playback.
·If in [AUDIO MODE], relaunch the current media player application or use another media player application.
·Restart the Android device.
·If this does not solve the problem, the connected Android device is unable to route the audio signal to unit. (⇒21) |
| Cannot playback at [AUTO MODE]. | ·Make sure JVC MUSIC PLAY APP is installed on the Android device. (⇒7)
·Reconnect the Android device and select the appropriate control mode. (⇒8)
·If this does not solve the problem, the connected Android device does not support [AUTO MODE]. (⇒21) |
| “NO DEVICE” or “READING” keeps flashing. | ·Switch off the developer options on the Android device.
·Reconnect the Android device.
·If this does not solve the problem, the connected Android device does not support [AUTO MODE]. (⇒21) |
TROUBLESHOOTING
| Symptom | Remedy |
| ANDROID | Playback is intermittent or sound skips. | Turn off the power saving mode on the Android device. |
| “CANNOT PLAY” | ·Make sure Android device contains playable audio files.
·Reconnect the Android device.
·Restart the Android device. |
| Bluetooth® | No Bluetooth device is detected. | ·Search from the Bluetooth device again.
·Reset the unit. (⇒3) |
| Pairing cannot be made. | ·Make sure you have entered the same PIN code to both the unit and Bluetooth device.
·Delete pairing information from both the unit and the Bluetooth device, then perform pairing again. (⇒9) |
| Echo or noise occurs. | ·Adjust the microphone unit's position. (⇒9)
·Check the [ECHO CANCEL] setting. (⇒11) |
| Phone sound quality is poor. | ·Reduce the distance between the unit and the Bluetooth device.
·Move the car to a place where you can get a better signal reception. |
| Sound is being interrupted or skipped during playback of a Bluetooth audio player. | ·Reduce the distance between the unit and the Bluetooth audio player.
·Turn off, then turn on the unit and try to connect again.
·Other Bluetooth devices might be trying to connect to the unit. |
| The connected Bluetooth audio player cannot be controlled. | ·Check whether the connected Bluetooth audio player supports Audio/Video Remote Control Profile (AVRCP). (Refer to the instructions of your audio player.)
·Disconnect and connect the Bluetooth player again. |
| Symptom | Remedy |
| Bluetooth® | “PAIRING FULL” | The number of registered devices has reached its limit.
Retry after deleting an unnecessary device. (→ 13, DELETE
PAIR) |
| “PLEASE WAIT” | The unit is preparing to use the Bluetooth function. If the
message does not disappear, turn off and turn on the unit,
then connect the device again. |
| “NOT SUPPORT” | The connected phone does not support Voice Recognition
feature. |
| “ERROR” | Try the operation again. If “ERROR” appears again, check if
the device supports the function you have tried. |
| “H/W ERROR” | Reset the unit and try the operation again. If “H/W ERROR”
appears again, consult your nearest service center. |
If you still have troubles, reset the unit. ( 3)
SPECIFICATIONS
| Tuner | FM | Frequency Range | 87.5 MHz — 108.0 MHz (50 kHz step) |
| Usable Sensitivity (S/N = 26 dB) | 0.71 μV/75 Ω |
| Quieting Sensitivity (DIN S/N = 46 dB) | 2.0 μV/75 Ω |
| Frequency Response (±3 dB) | 30 Hz — 15 kHz |
| Signal-to-Noise Ratio (MONO) | 64 dB |
| Stereo Separation (1 kHz) | 40 dB |
| MW | Frequency Range | 531 kHz — 1 611 kHz (9 kHz step) |
| Usable Sensitivity (S/N = 20 dB) | 28.2 μV |
| LW | Frequency Range | 153 kHz — 279 kHz (9 kHz step) |
| Usable Sensitivity (S/N = 20 dB) | 50 μV |
| CD player | Laser Diode | GaAlAs |
| Digital Filter (D/A) | 8 times over sampling |
| Spindle Speed | 500 rpm — 200 rpm (CLV) |
| Wow & Flutter | Below measurable limit |
| Frequency Response (±1 dB) | 20 Hz — 20 kHz |
| Total Harmonic Distortion (1 kHz) | 0.01 % |
| Signal-to-Noise Ratio (1 kHz) | 105 dB |
| Dynamic Range | 90 dB |
| Channel Separation | 85 dB |
| MP3 Decode | Compliant with MPEG-1/2 Audio Layer-3 |
| WMA Decode | Compliant with Windows Media Audio |
| AAC Decode | AAC-LC ".aac" files (Except KD-R774BT / KD-R771BT) |
| USB | USB Standard | USB 1.1, USB 2.0 (Full speed) |
| Compatible Devices | Mass storage class |
| File System | FAT12/ 16/ 32 |
| Maximum Supply Current | DC 5 V --- 1.5 A |
| Digital Filter (D/A) Converter | 24 Bit |
| MP3 Decode | Compliant with MPEG-1/2 Audio Layer-3 |
| WMA Decode | Compliant with Windows Media Audio |
| AAC Decode | AAC-LC“.aac” files
(Except KD-R774BT / KD-R771BT) |
| WAV Decode | Linear-PCM |
| FLAC Decode | FLAC files |
| Auxiliary | Frequency Response (±3 dB) | 20 Hz — 20 kHz |
| Input Maximum Voltage | 1 000 mV |
| Input Impedance | 30 kΩ |
| Bluetooth | Version | Bluetooth Ver.2.1+EDR/ Bluetooth 3.0 |
| Frequency Range | 2.402 GHz — 2.480 GHz |
| Output Power | +4 dBm (MAX), 0 dBm (AVE) Power Class 2 |
| Maximum Communication Range | Line of sight approx. 10 m (32.8 ft) |
| Pairing | SSP (Secure Simple Pairing) |
| Profile | HFP1.6 (Hands-Free Profile)
A2DP (Advanced Audio Distribution Profile)
AVRCP1.5 (Audio/Video Remote Control Profile)
PBAP (Phonebook Access Profile)
SPP (Serial Port Profile) |
SPECIFICATIONS
| Audio | Maximum Output Power | 50 W × 4 or
50 W × 2 + 50 W × 1 (Subwoofer = 4 Ω) |
| Full Bandwidth Power
(at less than 1 % THD) | 22 W × 4 |
| Speaker Impedance | 4 Ω — 8 Ω |
| Preout Level/Load (CD/USB) | 4 000 mV/10 kΩ load |
| Preout Impedance | ≤ 600 Ω |
| General | Operating Voltage
(10.5 V — 16 V allowable) | 14.4 V |
| Maximum Current Consumption | 10 A |
| Operating Temperature Range | -10°C — +60°C |
| Installation Size (W × H × D) | 182 mm × 53 mm × 158 mm |
| Weight | 1.1 kg |
Subject to change without notice.
INSTALLATION / CONNECTION
Warning
- The unit can only be used with a 12VDC power supply, negative ground.
- Disconnect the battery's negative terminal before wiring and mounting.
- Do not connect Battery wire (yellow) and Ignition wire (red) to the car chassis or Ground wire (black) to prevent a short circuit.
- Insulate unconnected wires with vinyl tape to prevent a short circuit.
- Be sure to ground this unit to the car's chassis again after installation.
Caution
- For safety's sake, leave wiring and mounting to professionals. Consult the car audio dealer.
- Install this unit in the console of your vehicle. Do not touch the metal parts of this unit during and shortly after use of the unit. Metal parts such as the heat sink and enclosure become hot.
- Do not connect the wires of speakers to the car chassis or Ground wire (black), or connect them in parallel.
- Connect speakers with a maximum power of more than 50W . If the maximum power of the speakers is lower than 50W , change the [AMP GAIN] setting to avoid damaging the speakers. ( 15)
- Mount the unit at an angle of less than 30^ .
- If your vehicle wiring harness does not have the ignition terminal, connect Ignition wire (red) to the terminal on the vehicle's fuse box which provides 12 V DC power supply and is turned on and off by the ignition key.
- Keep all cables away from heat dissipate metal parts.
- After the unit is installed, check whether the brake lamps, blinkers, wipers, etc. on the car are working properly.
- If the fuse blows, first make sure the wires are not touching car's chassis, then replace the old fuse with one that has the same rating.
Basic procedure
1 Remove the key from the ignition switch, then disconnect the terminal of the car battery.
2 Connect the wires properly. See Wiring connection. ( 27)
3 Install the unit to your car. See Installing the unit (in-dash mounting).
4 Connect the terminal of the car battery.
5 Press SOURCE- to turn on the power.
6 Detach the faceplate and reset the unit within 5 seconds. ( 3)
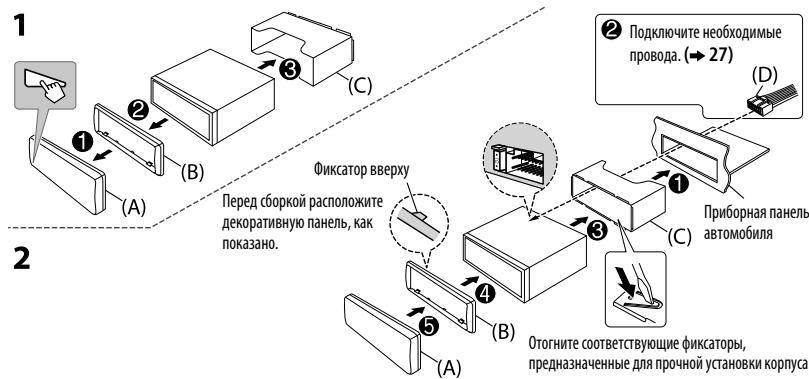
Installing the unit (in-dash mounting)
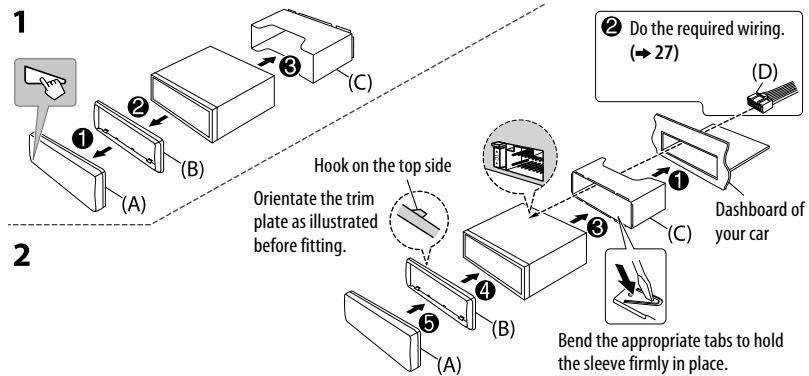
When installing without the mounting sleeve
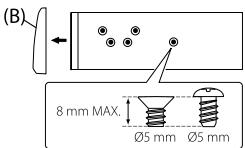
1 Remove the mounting sleeve and trim plate from the unit.
2 Align the holes in the unit (on both sides) with the vehicle mounting bracket and secure the unit with screws (commercially available).
Use only the specified screws. Using wrong screws might damage the unit.

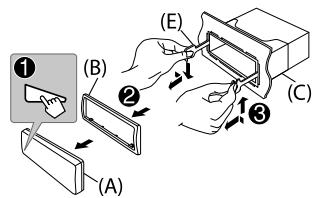
How to remove the unit
Part list for installation
(A) Faceplate
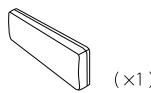
(B) Trim plate
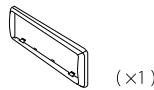
(C) Mounting sleeve
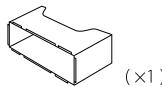
(D) Wiring harness
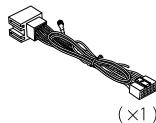
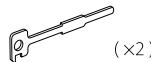
(E) Extraction key
Output terminals
For 2-way crossover setting
| 3 pairs | REAR : Rear output
FRONT : Front output
SW : Subwoofer output |
| 2 pairs | FRONT : Front output
REAR/SW : Rear/subwoofer output |
| 1 pair | REAR/SW : Rear/subwoofer output |
For 3-way crossover setting
| 3 pairs | REAR : Tweeter output
FRONT : Mid Range output
SW : Woofer output |
| 2 pairs | FRONT : Mid Range output
REAR/SW : Woofer output |
| 1 pair | REAR/SW : Woofer output |
Wiring connection
When connecting to an external amplifier, connect its ground wire to the car's chassis to avoid damaging the unit.
Output terminals ( 26)


KD-R871BT


KD-R774BT/ KD-R771BT

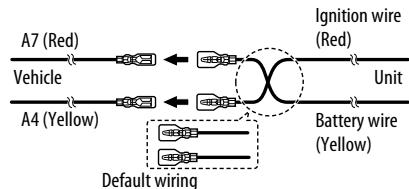
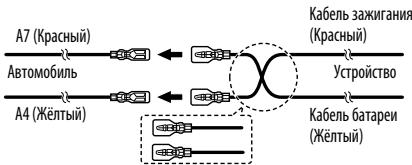
Connecting the ISO connectors on some VW/Audi or Opel (Vauxhall) automobiles
You may need to modify the wiring of the supplied wiring harness as illustrated below.
- You can also connect a subwoofer speaker directly without an external subwoofer amplifier. For setting, 16.
If your car does not have an ISO terminal We recommend installing the unit with a commercially avail custom wiring harness specific for your car and leave this job professionals for your safety. Consult your car audio dealer.
Yellow (Battery wire)
Red (Ignition wire)
Red (A7)
Yellow (A4)
ISO connectors
If no connections are made, do not let the wire come out from the tab.
Light blue/yellow
(Steering remote control wire)
STEERING WHEEL REMOTE
To the steering wheel remote control adapter
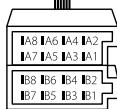
| Pin | Color and function |
| A4 | Yellow | : Battery |
| A5 | Blue/White | : Power control |
| A6 | Orange/white | : Car light control switch |
| A7 | Red | : Ignition (ACC) |
| A8 | Black | : Earth (ground) connection |
| B1 | Purple ⊕ | : Rear speaker (right) |
| B2 | Purple/black ⊢ | For 3-way crossover: Tweeter (right) |
| B3 | Gray ⊕ | : Front speaker (right) |
| B4 | Gray/black ⊙ | For 3-way crossover: Mid range speaker (right) |
| B5 | White ⊕ | : Front speaker (left) |
| B6 | White/black ⊙ | For 3-way crossover: Mid range speaker (left) |
| B7 | Green ⊕ | : Rear speaker (left)* |
| B8 | Green/black ⊢ | For 3-way crossover: Tweeter (left) |
TABLE DES MATIERES
CD/USB/iPod/Android 7
BLUETOOTH 9
RéGLAGES AUDIO 14
RéGLAGES D'AFFICHAGE 18
RÉFERENCES 20
Entretien
Plus d'informations
GUIDE DE DÉPANNAGE 22
SPECIFICATIONS 24
INSTALLATION /
RACCORDEMENT 25
AVANT L'UTILISATION
IMPORTANTES
Source selectiontable:
KD-R971BT/KD-R871BT:CD/USB/USB-IPOD/Android
KD-R774BT/KD-R771BT:CD/USB/Android
[SLOPE]/[HPF SLOPE]/[LPF SLOPE]:
CD/USB/iPod/Android 7
BLUETOOTH 9
BLUETOOTH - Verbinding
[SLOPE]/[HPF SLOPE]/[LPF SLOPE]:

DIGITAL AUDIC
Recordable

DIGITAL AUDIO
ReWritable
OCHOBHbIE CBEDEHnIa 3
HAUYALO 3KCNJYATALUN 4
1 OTmeha demOHCTpaun
2 HacrpoKa yacOB
3 3aahanhe6a3OBbIXHaCTpoEK
PAIIOINPIEMHNIK 5
AUX 6
CD/USB/iPod/Android 7
BLUETOOTH 9
3BYKOBbIE HACTPOIKI 14
HACTPOIKIINCPIIE 18
CIPABOCHbIE MATEPNAJIbl 20
06cnyxmbaHne
DOnOJIHnTeIbHaN INHΦOpMaun
YCTPAHEHNE IPOBJIEM 22
TEXHUNECKNE
XAPAKTEPNUCTUKU 24
YCTAHOBKA M
ПОДКЛЮЧЕНЕ 25
ПОДГ罗ВКАКЭКСПЛУATAЦИ
BAXHO
B cIeXbO6cIeHnA hndLeKxuieE kcxIpyaUauHn, noKJyIcTae, nKeAp Tk KpIcTyIb K kCILyAutaZn DaHORo I3dEINr, BHMaTeBNo pOHTe HctOauey peKoYBOCTBc. Oco6HeN BO BaxHO, YTO6bI bI pOOnu oCoBIOaJI N BcYka3HnB DAHHOM pyKOBoDCTBE, OTMeueHN CIOABAMI PteDyNPExdHne I BHMHaNe.
- Пожалуйста, Держinte данhoe руковodctв В наденин И достуном месгд образець К Нем за спраьамв 6уduшем.
IpeDynpKdHne
He nCnoIb3yIte yHKnUIM, KOToPbIe OTBJIeKAIOBT BHMmaHne I MeuaIOt 6e3OnaChOMy BOXdEHHIO.
BHHMaHHe
HactpoKa rPomKocTn:
- OtperynnpyTe rpmkocTb TaKIM 6pa30m, yTo6bl CbIwaTb 3ByKu 3a npedeLamn ABTomO6nla DnI npedOTBpaueHna abapn.
UHMbIHTe PROMKOTb neped BOCpOuN3BeDHeMm, Tc06bI pNeDTBpaNTb NOBpeKdHeHne DnHaAMKOB 13-3A BHEaTHoR OBOHIIyue YPOB8I PROMKOTb HbXoDE.
06uhe xapaKTePnCTnK:
He nCnoNb3yIe BHeuHne yCTpoiCtBa,ecn 3TO MOKeT OToPuaTeNbHO IOBnIaRb Ha 6e3OnaChOcTb DbNxKeHna.
Y6eJInteBbTOMTOcO3aHbIpe3epBbIeKOINBCExBaKbIxdAHbIX.MbIHe HecemOTBETCBENHOCTb3aNOTEPIO 3aNCAHbIX DAHNbIX.
HKnOgda He octabTne MetaIIneCKNe pIeMTeB (HaPnIMep, MOHetb IIN MToAInuYeCKNe HCTpyMeHTb) BHYTPN yucpntCbTA BO I36KHeAnOp KOTKINZ 3AmblkAHIN.
EcnI om6KbTHeNnDnKBa 03HmKnla n3-3a oBpa3oBaHn KOHehCata Ha n3apehBx IINH3x, INBNeKeKte DnCK n DOxNtEcB, noka BnAra hncapntrCa.
KaK nOJIb3OBAtbcra DaHHbIM pyKOBOdCTBOM
- Onpaunn 06barchonT B OCHOBHm C nCIOB3OBAHmE KHOJOK Ha nepeDne nnHee moJei KD-R971BT.
B o6b3rHNTeBbX bceIAX cNcONb3yIOCTc HnDnKauCm HA anHfnnckOM 3bIke. Bb M0KETe Bb6paTb 3bIK OTo6paeHnI 3M MeHO. (一4)
- [XX]обздауает Вьбразнные заимеHTbl.
( ) 03Naaet, tO MaTePnAbI DoCTynHbI Ha yKa3aHHoTcpaHnce.
Pepednna naheb
PpKpennneHne
OToeHHeHne

PpOaOKc6poca
IbAaBbIb HAnMMte nepeKIOuHateBb TceHenE 5cEyHn oocneOToEOeHNHeNNEpeHednnaHenn.
- He oTo6paJaTaC, ecn Bb6paan Co0TBeCTbTyOuIIN MTOUHNIK.
IepBbI BxOJaun Bbl3OB...
3aadaHa nepedne nane
Unyuushne KaueCTBa roLOOCBOB CB83N
Bo Bpempa3roBopa no Tenefohy....
1 HaXMMTe uYdepxkBaaiTe HaxaToN KhoNky
2 TTo6bI Bb6paTb 3aIeMeH, NOBepHnTe pyKy peryu npOBKn rPOMKOcTn (cm. cnedyuOyTOabNtu), 3aTeM haxMtE ee.
3 NOBTOPRAJE DEICTBME 2 Do Tex Nop, POKA He 6yDat BbI6paH mnn AKTMBPOBAH HEO6XoIMMBI JEMENT.
4 Haxmnte 7nBbXoJa.
BbInonHeHne Bbl3Oba n3 naMaTn
1 Haxmnte -ДЯв BKIOUeHnpeXIMa Bluetooth.
2 HaXMMTe Ody nX HymepoBaHHbIX KHOJOK (1-6).
3 HaxMMte pyKy peryIrpOBOKn rpoMOKoCTn, qTO6bI BblONHHTb BBIO3B.
ПиОТСТВИС COXPAHEHbIX B NAMETI KOHTAKTOB OTOБРаЯТССCOOSEHENE“NO PRESET”
HactpoynupeXmua Bluetooth
1 Haxmnte nydepknaite HaxaToi KhONky
2 Повернite руку ретуновский за воста за лемента [BLUT00TH], a 3aTeM нахштete ee.
3 4to6bI bbl6paTb 3JIeMeH, NOBepHnTe pykU pyerynIpOBKn rPOMKoCTn (cM. cnEduOuSyIO Ta6Ntu), 3aTeM haxMtne ee.
4 NIOBTOPAIte DeiCTBnE 3 Do Tex nop, noka He 6yDet BbIbpaH/akTbNUPoBaH JeHaembl 3JEMENT, ININ CJIeDyIte INHCTpyKzUAM, pINBdeEHbIM DInA BbIbpaHOrO 3JEMENTa.
5 Haxmnte DnBbXoDa.
EcnBbIb6paHo [SUB.W/SUB.W]:
-HIGH 120HZ]BbIbpaHO B [SUB.W LPF] n onuia [THROUGH] Heoctynha.
-R02)Bb6paHO[BFADER]nДЯВb6opaDocTyneHdnaNa3oHc[R15]do[00].
HactpoiKkpoccoBepa
HnHex npBBeHeBb DoCTyHbIe 3neMeHtbl HaCTpoKn Dn2-NOLOCOBOrO KpoccoBepa n3-nolocoBOrO KpoccoBepa.
BHHMaHHe
Bb6paTe TnKpoccoBa B COOTBeCTBnC KOHpyauee IPOKnIOUeHnAHHAMNKOB. ( 27)
EcnBbBb6epnte HnpaBnBhTIN:
-ДиhamukmMOryT NOBpeuNTbca.
- YpOBeHbBIXoDHOrO3ByKa MoXeT 6blTb Upe3MepHO BbICOKIM NIN HN3KIM.
SPK SIZE (pa3Mep DInHaMnKa)
Bb6ipaETcB CO BOOTCTCBNc C p3aMEPOm POnkIOHIOHNO DnHAMMnKa IЯ O6bcNEuHONOTMHAbNbX xapaKTeprctIK.
- HacpoiKu NaCTObI IN KpyTn3HbI dIg KpocCobepa Bby6paHHOrO DnHaMnKa yCTaHAbNtBaIoTcA bOTMaTHueCKN.
Korda [NONE] Bыбрано дя [TWEETER] B [FRONT], [REAR] n [SUBWOOFER] dny [SPK SIZE], NaCTpoиka [X'OVER] Bыбраного ДИнампа He doctуна.
X'OVER (KpoccoBep)
[FRQ]/[HPF FRQ]/[LPF FRQ]:
PerynIOBka qactoTbI KpocCOBepa IyI Bb6paHHbIX INHaMnKOB (fNlbTp BblcOKnx qactOT INIIN fNlbTp H3KNX qactOT).
EcnBb6paHO [THROUGH],Bce CnHaJIbI IpepeaOTcHa Bb6paHHbIe DInHaMKN.
[SLOPE]/[HPF SLOPE]/[LPF SLOPE]:
PeynpobkA kpytn3HbI KpoccoBepa.
- Доступно дя Вьбopa, толъ сснл дя часты Крочовера Вьбра на ругая Настюка, крOME [THROUGH].
[PHASE]:
Bb6op f3aB bXoHOrO cHnHaA dHAmKa B COOTBETCTBN C bXoHbMc CnHAnol aDpyrO dHnAmKa.
[GAIN LEFT]/[GAIN RIGHT]/[GAIN]:
PerynupOBKa ypOBHb BbIXoHOro CunHaNla BbIbpaHOro DInHaMnka.
3JIeMeHbI NaCtpoiKn 2-Nonochoro KpoccoBepa
| SPK SIZE |
| FRONT | SIZE | 8CM/10CM/12CM/13CM/16CM/17CM/18CM/4×6" / 5×7" / 6×8" / 6×9" / 7×10" |
| TWEETER | SML/MID/LRG/NONE (he nodknoqueno) |
| REAR*1 | 8CM/10CM/12CM/13CM/16CM/17CM/18CM/4×6" / 5×7" / 6×8" / 6×9" / 7×10" / NONE (he nodknoqueno) |
| SUBWOOFER*2*3 | 16CM/20CM/25CM/30CM/38CM OVER/NONE (he nodknoqueno) |
| X'OVER |
| TWEETER | FRQ | 1KHZ/1.6KHZ/2.5KHZ/4KHZ/5KHZ/6.3KHZ/8KHZ/10KHZ/12.5KHZ |
| GAIN LEFT | 0T -08DB do 00DB |
| GAIN RIGHT | 0T -08DB do 00DB |
| FRONT HPF | FRQ | 30HZ/40HZ/50HZ/60HZ/70HZ/80HZ/90HZ/100HZ/120HZ/150HZ/180HZ/220HZ/250HZ/THROUGH |
| SLOPE | -06DB/-12DB/-18DB/-24DB |
| GAIN | 0T -08DB do 00DB |
| REAR HPF*1 | FRQ | 30HZ/40HZ/50HZ/60HZ/70HZ/80HZ/90HZ/100HZ/120HZ/150HZ/180HZ/220HZ/250HZ/THROUGH |
| SLOPE | -06DB/-12DB/-18DB/-24DB |
| GAIN | 0T -0BDB do 00DB |
| SUB.W LPF*2*3 | FRQ | 30HZ/40HZ/50HZ/60HZ/70HZ/80HZ/90HZ/100HZ/120HZ/150HZ/180HZ/220HZ/250HZ/THROUGH |
| SLOPE | -06DB/-12DB/-18DB/-24DB |
| PHASE | REVERSE (180°)/NORMAL (0°) |
| GAIN | 0T -08DB do 00DB |
^1 OTo6paJaaTcTOIbKO B TOM CIyue,ecNI npaMeTp [SPK/PRE OUT] IMeET 3HaueHme [REAR/REAR] mN [REAR/SUB.W]. ( 16)
JN KDR-8871BT/CD-R774BT/CD-R771BT:OTo6paKaTeTbONKbTOmCtnyue,ecnI npaMeTp [SPK/PR OUT] mEmet 3haeHne[REAR/SUB.W]nI [SUB.W/SUB.W]. ( 16)
3 0tobpaKaetaTc TOnbKoB TOM clyae,ecnnapaMetp [SUB.W]mMeet3HaueHHe[ON].(→15)

3nemtblhctpoikn 3-nolochoro kpcocobepa
SPK SIZE
| TWEETER | SML/MID/LRG |
| MID RANGE | 8CM/10CM/12CM/13CM/16CM/17CM/18CM/4×6" / 5×7" / 6×8" / 6×9" |
| WOOFER* | 16CM/20CM/25CM/30CM/38CM OVER/NONE (HE NOДКLOЧЕNO) |
| X'OVER |
| TWEETER | HPF FRQ | 1KHZ/1.6KHZ/2.5KHZ/4KHZ/5KHZ/6.3KHZ/8KHZ/10KHZ/12.5KHZ |
| SLOPE | -06DB/-12DB |
| PHASE | REVERSE(180°)/NORMAL(0°) |
| GAIN | 0T -08DBД00DB |
| MID RANGE | HPF FRQ | 30HZ/40HZ/50HZ/60HZ/70HZ/80HZ/90HZ/100HZ/120HZ/150HZ/180HZ/220HZ/250HZ/THROUGH |
| HPF SLOPE | -06DB/-12DB |
| LPF FRQ | 1KHZ/1.6KHZ/2.5KHZ/4KHZ/5KHZ/6.3KHZ/8KHZ/10KHZ/12.5KHZ/THROUGH |
| LPF SLOPE | -06DB/-12DB |
| PHASE | REVERSE(180°)/NORMAL(0°) |
| GAIN | 0T -08DBД00DB |
| WOOFER* | LPF FRQ | 30HZ/40HZ/50HZ/60HZ/70HZ/80HZ/90HZ/100HZ/120HZ/150HZ/180HZ/220HZ/250HZ/THROUGH |
| SLOPE | -06DB/-12DB |
| PHASE | REVERSE(180°)/NORMAL(0°) |
| GAIN | 0T -08DBД00DB |
* OTo6paJaeTcra ToJIbKO b TOM cIyue, eCNn napaMeTp [SUB.W] IMeET 3HaueHne [ON]. ( 15)
HACTPOIKN IINCJIPE
KD-R971BT

KD-R871BT / KD-R774BT / KD-R771BT
1 HaKmTe n ydePknBaIte HkaToN KhoNky
2 Tc0b6IbB6a9b7eMnENT, NOBEPHIne pyuKy peryunpOBKn rpoMkOCTn (cm. cneDyuOuyoTo Ta6niU), 3atEm NaMKmte ee.
3 NtBTOPHTe DeCTBE 2 Do TEx NOP, NOKA He 6yET BbI6paH/ aKTNBOPAHJXeAEMbI 3JeMOT, INI CNEUYTE HNCTpyKUaM, NpIBBeHbHbIM DnAR BbI6paHHOJIeMENTa.
4 Haxmnte DnBbXoDa.
AUTO:3aTeMHeHNe BkJIIOuAeTcN bBkJIIOuAeTcABTOMaTHUeCKN pINbBkJIIOUeHIM N BkJIIOUHm AP ABTOMO6JNA.
BRIGHTNESS Hacrpoika arkocn Khoonok n dncnnpe Jrae DnebHoro n HooHOr BpeMeHn no OtdbeHoctn.
1 DAY/NIGHT:BbI6OpIeBHOrO HINHouHOro BpeMeHN.
2 Bb60p30Hbl. ( 18)
3 3aadHne ypOBHЯKoCTn (ot 00 do 31).
(Поумоганно: KD-R971BT: DAY:31;NIGHT:11 KD-R871BT/KD-R774BT/KD-R771BT: BUTTON ZONE:DAY:25;NIGHT:09 DISP ZONE:DAY:31;NIGHT:12)
SCROLL*2 ONCE:0dHokpaTHaI npOkpyTKa OTO6paKaeMoI HNΦopMaIu. ; AUTO: NOBtOpHaI npokpyTKa Chepe 5-CEkyndIbe IHTepBaIbI. ; OFF:OTmHeA.
COLOR (dya KD-R971BT)
PRESET OTeBnblb BbOpbetaTNOaBcETKN DnAHCINNEH NHOIOK. IEBtNo YMOnuAHmO:
ALL ZONE: [COLOR 08], DISP ZONE: [COLOR 01]
ZONE 1: [COLOR 08], ZONE 2: [COLOR 46]
1 Bbl60p30Hbl. ( 18)
2 BbIbeIpTe cBET dAe BbIb6paHHO 3OHe.
COLOR 01-COLOR 49
- USER: 0t6paxaetcqaBET, co3daHHbB BAMN DnA [DAY COLOR] nnn [NIGHT COLOR].
- COLOR FLOW01-COLOR FLOW03:UBeTnM3MeHaETcCpa3HoiCKoPoCTbO.
GROOVE/TECHNO/EMOTION/RELAX/SPECTRUM/SWEEP/POP:
OTo6paXaTcRA Bb6paHnaIeTeB0aKOM6nHaauu. ^3 (IOctynHO IJra Bb6opa, TOnbKO KOrJaB dIeCTBm1 Bb6pHaOnIaN [ALL ZONE].)
^1 Heo6xoDMIO noKKnIOueHne npOBOa peRyIaTopa oCbeUeHNOCTN. ( 27)
96 HteOpoble 6yBkYnnnHmCMBonBy He 6yDyt OTo6paKaTbca npaBnBuHO (nnn He 6yDyt OTo6paKabTa)Ha dnCnnee.
^3 EcnBbBpaHa OndaH 3Tnx CBETOBbXK COM6bHaa, CBET NOcBcTK [ZONE 1], [DISP ZONE], [ZONE 2] IN3MeHReTcHa cBT No yMOJUaHIO.

Digital Audio ReWritable
- Bocnpo3BedeHne DualDisc: CtopoHaJDCka DualDisc, OTMmHnAaT o DVD, HE COBMeCTMaCo CTAnDAPTOm "Compact Disc Digital Audio". ПOTOMY He peKOMeHnyetcRa Na dAHHom UyctpoHCTBe HcNtOBaBtbe HE-DVD CtopoHy JMcKa "DualDisc".
- Podno6heBc CbeHEnn nPmHnAeHOTOHOCHTNHO 28YbOKBxIaJOB, cOnyTbDyIbIbIbCPOB3BEHdN, pIeCTABENHeB u HIEPTAKBTHNOH yPOKOBCTBe h NaChyEOUHbE6-baIehttp://www.jvc.net/c/s/cur/
Bocnpon3BQoMblc foaiJIbI
BocnpoIm3Bovmbl 3BykOB0f aHn:
KD-R971BT / KD-R871BT: MP3 (.mp3)/WMA (.wma)/ AAC (.aac)
KD-R774BT / KD-R771BT: MP3 (.mp3)/WMA (.wma)
Bocnpon3Bovdmbte nckn:CD-R/CD-RW/CD-ROM
Bocnpn3BODmblΦopMaTΦaIIOB Ha nDcKax: ISO 9660, ypoBeHb 1/2, Joliet, dINHHbIe IMHaΦaIIOB.
Bocnpo3B0DImmaaaiNoBaCnTeMa yctpoiCTB USB:FAT12,FAT16,FAT32
JaEae cyuNnHbOaBtCOBTETCTBYOTNEPECHINHMblBvIeAeCTNDAPTAM, pRiHKETOPBxTHINAXIHNCOCTOBHXX HOCHTENEOBPCNO3BDEHEMOKOTOKA3bTcREHO3MOHbXm.
Фйь AAC (.m4a) hy uctpoiCTBE USB ninn KOMnKt-DnKcke, 3akOdnpObaHbIe c nOmoIbI OITunes, He MoryT BocnpIOBDOUITcBa hy daHONM yctpoiCTBe.
ДиCKN, KOTOpbIe HeNb3Я BOCnPOn3BecTu Ha DaHHOM yCTpoiCTBe
ДиСКИнЕКУРТLOй ФОмMbI.
ДИСКИ,ЗАпсанная ПОВерхноctь КOTOBIX OKpaшena,ИЛN ДИСКИ CO CJIeДами 3aRp3HeHIM.
3ainnbIaBaeMbIe nckn, KOtOpbIe He 6bln fHaHnImNoBaHbI.
KOMNAKT-KIACK DIAETMOP 8 cm. PONITKBA BCTABKNI KIACA N CMOUIOO ADANTPA KO MOKET PIHBECTN K EHNPCAPBNOY TCTPOJIBA.
06 yctpoiCtbax USB
Данhoeу учсггост BOМERT BOCPONB3BODHIT bceDyUOUIE Фдын, coхааненьname haZaOMINHAIOUem YCTPOIGTBE USB 60bMEN EMKOTKTOI
KD-R971BT / KD-R871BT: MP3/ WMA/AAC/WAV/FLAC
KD-R774BT / KD-R771BT: MP3/WMA/WAV/FLAC
- 3anpeaetcnoikouatb USB-Hocntenb uee3 USB-KonctepaTop.
Плковские Кавеля,обая Злина Которо рпөльашт 5 M, может пьовецк K ekpopртkiTomoy Bocpinorshel'demino.
• ὀτη γιρόβους έν βροσηλεαι γγκροβαγβα USB C hΟΜΗΠΑν ΜΗΜΙΝΑΝΑΚΕΝΑΜΕ, σθήμαύΜιν ΜΟΤ Ε Λ Σ, Α
HOMΗΠΑνΗΜΙΚΟ ΚΥΜΑΜΙΣ 1,5 A.
06 iPod/iPhone
Made for
- iPod touch (2nd, 3rd, 4th & 5th generation)
- iPod classic
- iPod nano (3rd, 4th, 5th, 6th, 7th generation)
iPhone 3G, 3GS, 4, 4S, 5, 5S, 5C, 6, 6 Plus
-ПоссмтвдюфайловВ мени"Video"B рекиме[HEAD MODE]HEBO3MOxhen.
- Порадк OTбобрахени СЕСЕВ МБОН БУбОР ДАнгОНΥСТРСТВ мОКЕТΟПИЗСТСТВ ONТРДКÀСЕСВ B
npoурьгате iPhone/Android.
B 3aBcHcMOnCTO BTBCN ONepaMOHHo CnCTembI iPod/iPhone HeKOTOpbIE fYHKUIM MOyT He pa60TaTb Ha daHHOM yCTpOHTBE.
06 yctpoictbax Android
-ДанhoeустбюноржmaeAndroid OS 4.1иВьиe.
- Hekotophe yctrojcbra Android (c OS 4.1 n BvIe) Moryt He noJdePjkmbatb nnnoctbO Android Open Accessy (A0A) 2.0.
- Ecnu yctpoiCTBO Android odHOBpeMeHHo NOdAepKMBaET a3ZOMIMHaUQIe UyctpoiCTBA 60bIoo EMKOCTn H AOA 2.0, daHnooe YcTPOICTBO BceI da BOcnpIOB3BOOHT uepe3 AOA 2.0 bKaueCTBe npOHPTeta.
O yhknnnu Bluetooth
B 3aBcIMMOCTH OT BEpCN BluTeeth HooTeHT BHeoTbe H MeOYt 6bTy NdoKInNoeHb K TcOmyyCTPOBCTBA.
- UcpoTbMoKTeHpea60TaBcHeKoToPbIMUyCtPoIcTBAMnBluetooth.
- Okpykaiouaa cpea OKa3bBaet BInHHe Ha COCTOHN He CmHaHa.
Docynhble Knpnnnueckne CMBoJIbI

DonyCTMlbE CMB0Bbl
0To6paXeHne HnDnKAtopoB
TEXHnueCKNE XAPAKTEPNUCTNKN
TEXHIMUCKNEXAPAKTEPUCTUKN
Ctanhaptnna npoceypa
1 3NBJEKNITE KIOHU 3M4MAK3AOKJARHNA, 3aTEM OTOOEINHTe PA3bEM ABTOMOJIbHORO AKyMKYIPTOA.
2 IpaBnIbHo nOdkJIIOUHTe npOBoJa. Cm.pa3dEn "PiokKIOUHcHMe npOBoOB" ( 27)
3 UctahOBInTe yCTpoINCTBO B BaIeM ABTOMoBnIe. Cm. pa3dJe "UcTaHOBKa YCTPOINCTBa (yCTaHOBKa B npIn6OpHyIO nAHeJIb).
4 Npoknoute Klemmy aBtOMo6nbHoro aKKymyTota.
5 HaxmTe SOURCE-①, yTo6bI BKJIOUHTb NtTaHne.
6 OToCoeMHInTe nepeHIOI paHeJI b BbINOJIHInTe c6poc yCTpoiCTBa B TeueHne 5ceyHd. ( 3)
UctahOBka yctpoictBa (yctahOBka B npn6OpHyo naHeIb)
PpynyctaHOBke 6e3 nocaoHoro Kopnyca
1 CHMME NOcaOuChb KOpNc u NdeKopatmbHyo NaHJIe C yctpOCTBa.
2 CoBMeCTIte OTBepCTnB yCTpOJIcTBe (C o6eHX CTOpOH) C MOHTAXHOH KOHCOLbO ABOTOMuI N 3aKpeINTe yCTpOJIcTBO BUNTAmO (KOTOpBie MOXHO pNIOBPeCTn B MArzInHe).
McnoIb3yIe TOnBko CneuAaJIbHMe BnHTbI. McnoIb3OBAHHe HenoIxDxaIIMX BnHTOB MOKET nPiBECTN K NOBpeKeDHeINU YcTPOITBA.
IopdoK n3BneueHn yctpoiCTBa

Cnncok detanei yctahOBKn
(A)Передимаяншь

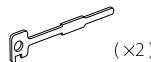
(E) KIIOU Dnla DEMOHTaKa
BbIXoHbIe pa3beMbl
Дянсторки 2-nolochoro КрoccoBepa
BbIXOaHbIe pa3beMbI (→ 26)


D


KD-R871BT


KD-R774BT/ KD-R771BT
Пдклоченп pa3бемOB ISO на Н ekToportbix abTomob6nIx VW/Audi Иин Opel (Vauxhall)
B03MkoHoo, noptyefc3n 3mHtivbXcmy coedinneHnn da pinnaraemoro xryta npobod, kok naka3a h naPcyhce
Cxema coedinhen no ymonuahnIO
XeTbI (Ka6enb 6aTepe)
K Janaetny pIaTauTHaONHOrO npAynBaeN cPyaJ

Copyright (C) 2000,2001,2002,2003,2004,2005,2006,2007,2008,2009 Josh Coalson Redistribution and use in source and binary forms, with or without modification, are permitted provided that the following conditions are met:
- Redistributions of source code must retain the above copyright notice, this list of conditions and the following disclaimer.
- Redistributions in binary form must reproduce the above copyright notice, this list of conditions and the following disclaimer in the documentation and/or other materials provided with the distribution.
- Neither the name of the Xiph.org Foundation nor the names of its contributors may be used to endorse or promote products derived from this software without specific prior written permission.
THIS SOFTWARE IS PROVIDED BY THE COPYRIGHT HOLDERS AND ONTRIButors "AS IS" AND ANY EXPRESS OR IMPLIED WARRANTY, INCLUDING, BUT NOT LIMITED TO, THE IMPLIED WARRANTYES OF MERCHANTABILITY AND FITNESS FOR A PARTICULAR PURPOSE ARE DISCLAIMED. IN NO EVENT SHALL THE FOUNDATION OR CORRESPONENTS BE LIABLE FOR ANY DIRECT, INDIRECT, INCIDENTAL, SPECIAL, EXEMPLARY, OR CONSEQUENTIAL DAMAGES (INCLUDING, BUT NOT LIMITED TO, PROCEDURE OF SUBSTITUTE GOODS OR SERVICES; LOSS OF USE, DATA, OR PROFITS; OR BUSINESS INTERRUsION) HOWEVER CAUSED AND ON ANY THEORY OF LIABILITY, WHETHER IN CONTRACT, STRICT LIABILITY, OR TORT (INCLUDING NEGLIGENCE OR OTHERWISE) ASING IN ANY WAY OUT OF THE USE OF THIS SOFTWARE, EVEN IF ADVISED OF THE POSSIBILITY OF SUCH DAMAGE.
- Microsoft and Windows Media are either registered trademarks or trademarks of Microsoft Corporation in the United States and/or other countries.
- "Made for iPod," and "Made for iPhone" mean that an electronic accessory has been designed to connect specifically to iPod, or iPhone, respectively, and has been certified by the developer to meet Apple performance standards. Apple is not responsible for the operation of this device or its compliance with safety and regulatory standards. Please note that the use of this accessory with iPod or iPhone may affect wireless performance.
- iPhone, iPod, iPod classic, iPod nano, iPod touch and iTunes are trademarks of Apple Inc., registered in the U.S. and other countries.
Lightning is a trademark of Apple Inc.
Android is trademark of Google Inc.
- The Bluetooth® word mark and logos are registered trademarks owned by Bluetooth SIG, Inc. and any use of such marks by JVC KENWOOD Corporation is under license. Other trademarks and trade names are those of their respective owners.