Easy Soup BL8411 - Blender TEFAL - Free user manual and instructions
Find the device manual for free Easy Soup BL8411 TEFAL in PDF.
| Product type | Heating blender |
| Brand | Tefal |
| Model | Easy Soup BL8411 |
| Bowl capacity (max) | 1,2 L (for soup), 800 g of fruit (for compote) |
| Automatic programs | Smooth soup (P1), Soup with chunks (P2), Compote (P3), Self-cleaning (P4), Blend (P5) |
| Maximum temperature | 100 °C |
| Keep warm | 40 minutes after programs P1, P2, P3 |
| Knife type | 4 stainless steel blades |
| Power supply | Mains, removable cord |
| Safety | Overfill sensor, motor overload protection, automatic stop if motor block is removed |
| Maintenance | Self-cleaning program (P4), external cleaning with damp cloth, do not immerse, do not put in dishwasher |
| Included accessories | Bowl, motor block, 4-blade knife, recipe booklet |
| Dimensions (approx.) | Height ~30 cm, width ~20 cm (estimate) |
| Weight (approx.) | ~2 kg (estimate) |
Frequently Asked Questions - Easy Soup BL8411 TEFAL
User questions about Easy Soup BL8411 TEFAL
0 question about this device. Answer the ones you know or ask your own.
Ask a new question about this device
Download the instructions for your Blender in PDF format for free! Find your manual Easy Soup BL8411 - TEFAL and take your electronic device back in hand. On this page are published all the documents necessary for the use of your device. Easy Soup BL8411 by TEFAL.
USER MANUAL Easy Soup BL8411 TEFAL
natural_image
Illustration of a modern electric kettle with control panel and buttons (no text or symbols visible)
text_image
P2 P1 automatic programs P3 P4 creamed soup soup with pieces concepts easy cleaning P5 P6 blend keep warm P7 start stop A P E F G I H J MAX MIN D C K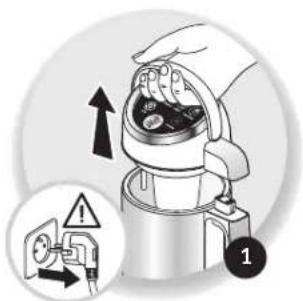
text_image
Diagram illustrating a hand pouring liquid into a container with an upward arrow and warning symbol, labeled '1'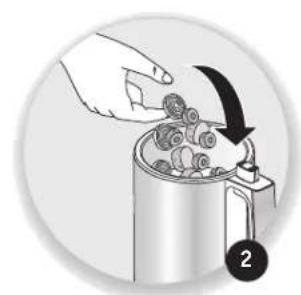
natural_image
Illustration of a hand pouring liquid into a cylindrical container with a curved arrow indicating process (no text or symbols)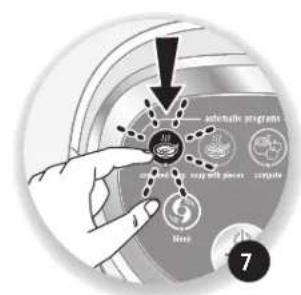
text_image
No Yes No Yes No Yes No Yes No Yes No Yes No Yes No Yes No Yes No Yes No Yes No Yes No Yes No Yes No Yes No Yes No Yes No Yes No Yes No Yes No Yes No Yes No Yes No Yes No Yes No Yes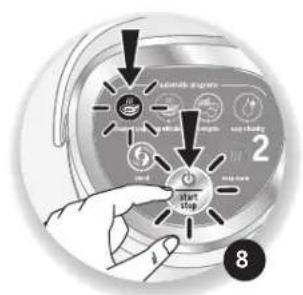
text_image
Start Stop 2 8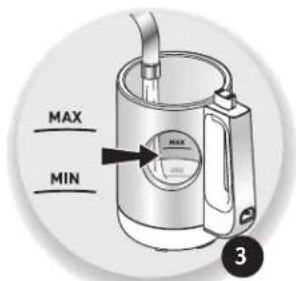
text_image
MAX MIN 3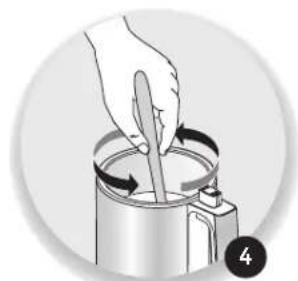
natural_image
Illustration of a hand using a spatula to lift a cylindrical container with rotating arrows (no text or symbols)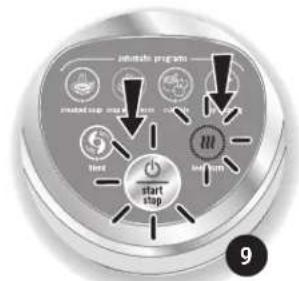
text_image
start stop 9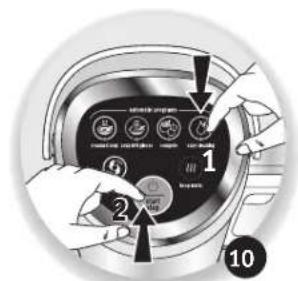
text_image
Diagram showing hands operating a device with labeled buttons and icons, including '1' and '2' labels.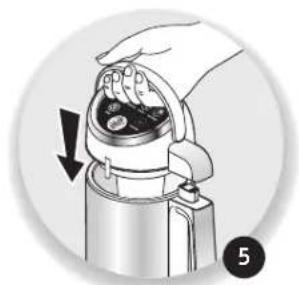
natural_image
Illustration of a hand opening a thermospan with a downward arrow indicating compression (no text or symbols)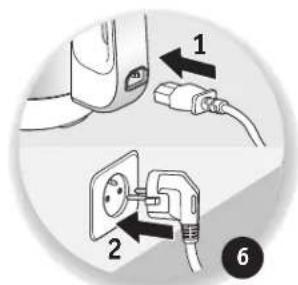
text_image
Diagram showing two electrical installation steps: one with plug and cable, the other with socket plug and plug, labeled with numbers 1 and 2.
natural_image
Illustration of a kitchen sink with a hand pouring liquid from a pipe into a container (no text or symbols)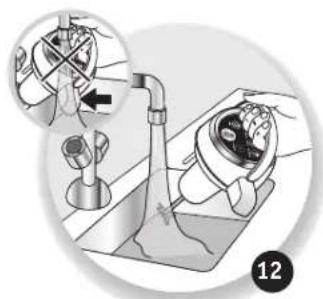
natural_image
Illustration of a medical procedure showing a patient undergoing surgery with an inset close-up of the procedure (no text or symbols present)DESCRIPTION DE L'APPAREIL (FIG 1)
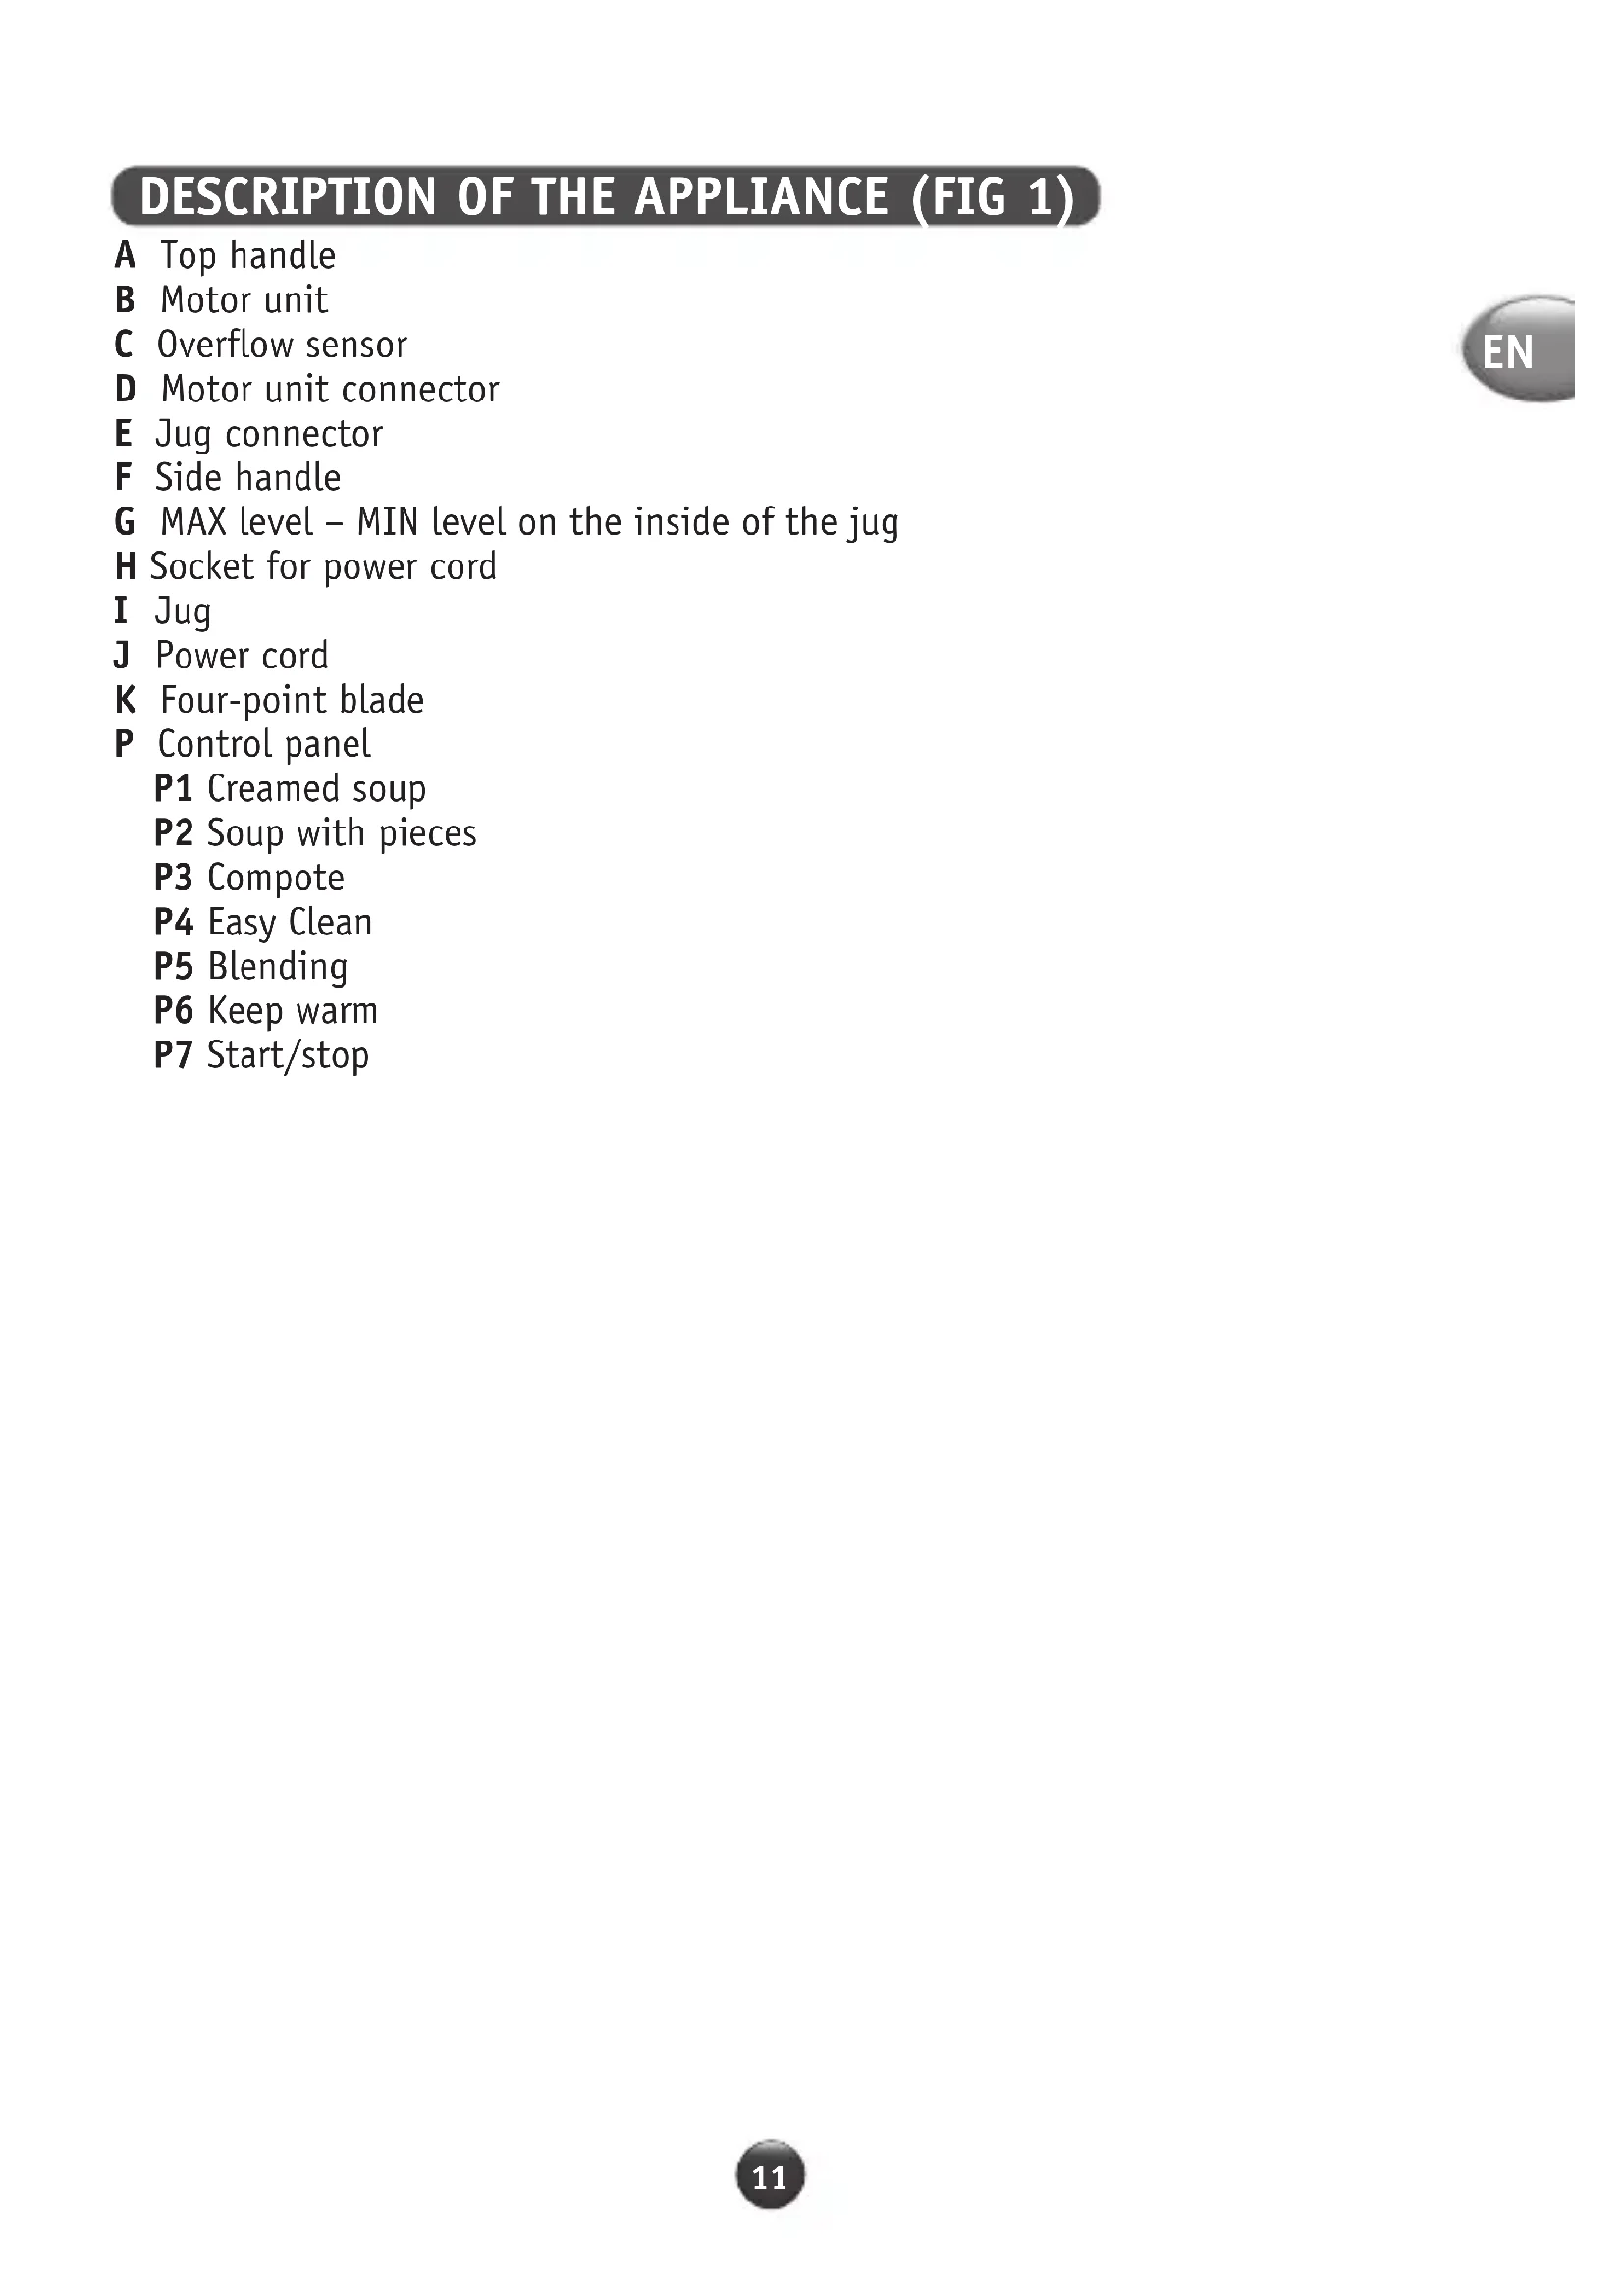
DESCRIPTION OF THE APPLIANCE (FIG 1)
A Top handle
B Motor unit
C Overflow sensor
D Motor unit connector
E Jug connector
F Side handle
G MAX level - MIN level on the inside of the jug
H Socket for power cord
I Jug
J Power cord
K Four-point blade
P Control panel
P1 Creamed soup
P2 Soup with pieces
P3 Compote
P4 Easy Clean
P5 Blending
P6 Keep warm
P7 Start/stop

USING YOUR APPLIANCE
- Clean the appliance before the first use, as indicated in the cleaning section.
- Your appliance has 5 automatic settings which can be chosen from the control panel (P).
| Temperature (Max) | Preparation time | Blending | ||
 | P1 - Creamed soup (creamy texture) | 100°C 23 | min | 5 times 20 secs ON - 10 secs OFF |
 | P2 - Soup with pieces (coarser texture with some small bits) | 100°C 25 | min No blending | |
 | P3 - Compote (stewed fruit) | 100°C 20 | min | 2 x 3 secs / 5 secs OFF 2 x 10 secs / 5 secs OFF |
 | P4 - Easy Clean Heat up | 3 min | 6 times 15 secs ON - 15 secs OFF | |
 | P5 - Blending No heating | 4 min | 5 times 25 secs ON - 15 secs OFF | |
USE
- Hold the side handle of the jug with one hand and remove the motor unit by pulling up the top handle with the other hand (fig 1).
- Put the ingredients into the jug (fig 2).
Tips:
- Defrost the the ingredients before putting them in the jug.
- Cut the ingredients into 2cm pieces.
- Always put the vegetables in first, followed by the other ingredients (rice, meat).
- Then add the water, ensuring that you respect the MIN and MAX levels marked on the jug (fig 3) for settings P1 and P2. For the P3 setting, you can add up to
800g of fruit as a maximum, using a minimum of 150ml liquid.
- Stir the liquid and ingredients together manually (fig 4).
- Place the motor unit back on the top of the jug, ensuring that the two connection points (parts D and E) fit together properly (fig 5).
- Plug one end of the power cord into the side handle and connect the other end to the mains socket (fig 6).
- All the settings on the control panel will flash.
USING THE SETTINGS
- Choose your preferred setting by pressing the corresponding button (fig 7). Only the chosen setting will flash.
- Press the start button to start the programme. The appliance will beep, and the start button and chosen setting will stay lit up until the programme has finished (fig 8).
- Once the programme has finished, the appliance will beep again. After settings P1, P2 and P3, the appliance will automatically switch to keep-warm mode for 40 minutes and the button will light up (fig 9).
Note: You can stop the programme at any time by pressing the start/stop button again.
If a soup-making cycle is interrupted by pressing the start/stop button or by opening the motor unit, preparation should be restarted and you should wait 20 mins for the appliance to cool down, before restarting the programme.
- Unplug the cord from the mains socket, and then remove the jug.
- Hold the side handle of the jug with one hand and remove the motor unit by pulling up the top handle with the other hand (fig 1).
- You can now pour the soup, smoothie or compote into a container.
Tip: For a smoother soup, you can then press the blend setting (P5) to give it a creamy texture.
To familiarise yourself with the appliance, we suggest you try out one of the recipes from the recipe booklet.
CLEANING YOUR APPLIANCE
- Before first use or to clean the appliance as indicated below:
- Open the appliance (fig 1) and fill the jug with 1.2 L of hot water from the tap (up to the MAX level) (fig 3). Do not add washing-up liquid to the jug.
- Put the top back on (fig 5) and plug it in (fig 6).
- Press the P4 Easy cleaning button (fig 10).
-
When you hear the beep indicating the programme has finished, open the appliance (fig 1), empty the water and rinse inside the jug (fig 11).
-
Do not immerse the appliance in water. Do not place the motor unit (B) or the jug (I) under running water.
- If necessary, once the appliance has cooled down, wash the blade under the tap

(fig 12) and finish by cleaning the inside of the jug and the motor unit with a damp sponge.
- If there are still stains on the inside of the jug, leave it to soak for a few hours in hot soapy water, then remove the residue with a plastic scourer.
- Rinse the bowl.
- Be careful when you remove the motor unit (B) and when cleaning the blade, which is extremely sharp.
- To clean the outside of the motor unit (B) and the walls of the jug (I), use a damp cloth. Dry carefully.
- Do not put washing-up liquid in the jug while the easy-cleaning programme is running (risk of overflowing during the cleaning cycle).
- The appliance is not designed to be cleaned in a dishwasher.
- TIP: Some foods may stain the bowl of your appliance. This poses no risk whatsoever to your appliance or to your health. To remove stains, add some water mixed with a small amount of cleaning product intended for use in your dishwasher (e.g. a tablet, liquid, powder) to the bowl of your appliance. Leave overnight to soak. Then, gently scrub with a sponge and the stains will disappear.
WHAT TO DO IF YOUR APPLIANCE DOESN'T WORK
| PROBLEMS CAUSES SOLUTIONS | ||
| The appliance does not work. | The plug is not connected or switched on at the mains power socket. | Plug your appliance into a power socket. Ensure that the power cord is correctly inserted into the socket on the side handle and mains socket. |
| The motor unit (B) is not correctly positioned or locked in. | Remove some of the ingredients.Check that the contents to not exceed the MAX level and ensure that the ingredients are spread evenly over the base of the jug. | |
| Excessive vibrations | The appliance has not been placed on a flat surface; the appliance is not stable. | Place your appliance on a stable,flat heat-resistant, clean, and dry surface. |
| Volume of ingredients is too high. | Reduce the quantity of ingredients processed. | |
| Leak at the top of the jug. | Overflow sensor (C) is clogged up. | Clean sensor (C). |
| Volume of ingredients is too high. | Reduce the quantity of ingredients processed. | |
| Poorly-mixed preparations. | Pieces of food are too large or too hard. | Reduce the size or quantity of ingredients processed. |
| Stop the motor using the motor overload protector. | Leave your product to cool down for at least 20 minutes and reduce the size or quantity of ingredients processed.Add liquid. | |
| The appliance has cut the electricity supply. | Appliance is damp. | Leave the appliance to dry for 24 hrs before trying to connect again. |
| Your appliance continually beeps and all the LEDs are flashing. | Fouled up overflow sensor (C)Your appliance is equipped with a level sensor (C). | Clean the sensor (C)Reduce the quantity of ingredients. |
| The food is not properly cooked or something is caught at the base of the jug. | Volume of ingredients is too great. | Do not exceed the maximum level (fig 3) of ingredients. |
| You have not selected the right programme. | Start again, choosing the right programme. | |
| Not enough or too much liquid. | Check that the liquid is between the MIN and MAX levels for settings P1 and P2 (fig 3).For P3, ensure there is between 150ml and 300ml of liquid. | |
| Ingredients not blended properly. | Stir the liquid and ingredients together manually (fig 4). | |
| You have used the appliance to heat up milk. | The soup-maker is not appropriately-designed to do this. | |

My appliance still does not work
Go to an authorised service centre (see list in the service booklet).

RECYCLING
- Disposal of the appliance and its packaging materials

The packaging exclusively contains materials that are not dangerous to the environment, which can be disposed of in accordance with the recycling regulations in force in your area.
• Expired electronic or electric products:

Think of the environment!
① Your appliance contains valuable materials which can be recovered or recycled.
Leave it at a local waste collection point for it to be processed.
Directive 2012/19/EU on waste electrical and electronic equipment (WEEE) stipulates that used household appliances must not be disposed of in normal unsorted municipal waste. Used appliances must be collected separately to increase the re-use and recycling rate of the materials they are made from and to reduce the impact on the environment and human health.
BESCHRIJVING VAN HET APPARAAT (FIG 1)
UW APPARAAT WERKT NIET. WAT NU?
natural_image
Recycling symbol icon with three chasing arrows forming a triangle (no text or labels)• لصلاحية:
natural_image
Recycling symbol icon with three chasing arrows forming a triangle (no text or labels)• شده مى