
407455 - Lifting accessory SILVERLINE - Free user manual and instructions
Find the device manual for free 407455 SILVERLINE in PDF.
| Product type | Hoist support arm |
| Brand | Silverline |
| Model | 407455 |
| Load capacity (hoist on support bar) | 600 kg |
| Load capacity (hoist on extension) | 300 kg |
| Mounting bar diameter | 48.3 mm |
| Maximum extension | 1100 mm |
| Weight | 6.2 kg |
| Rotation | 180° on pivot |
| Compatible hoists | Silverline electric hoist 500 W, 250 kg; Silverline electric hoist 900 W, 500 kg |
| Usage | Support for horizontal scaffold tube, lifting loads |
| Installation | Two people required, mounting on 48.3 mm tube |
| Safety | Wearing helmet, gloves, safety glasses, hearing and respiratory protection recommended |
| Maintenance | Cleaning with damp cloth and mild detergent; regular lubrication of moving parts |
| Warranty | Lifetime warranty subject to registration within 30 days |
| Recycling | Do not dispose of with household waste, follow local WEEE regulations |
Frequently Asked Questions - 407455 SILVERLINE
User questions about 407455 SILVERLINE
0 question about this device. Answer the ones you know or ask your own.
Ask a new question about this device
Download the instructions for your Lifting accessory in PDF format for free! Find your manual 407455 - SILVERLINE and take your electronic device back in hand. On this page are published all the documents necessary for the use of your device. 407455 by SILVERLINE.
USER MANUAL 407455 SILVERLINE
Hoist Support Arm 600kg Max Load
natural_image
Metal mechanical lever assembly with diagonal support and mounting bracket (no text or symbols visible)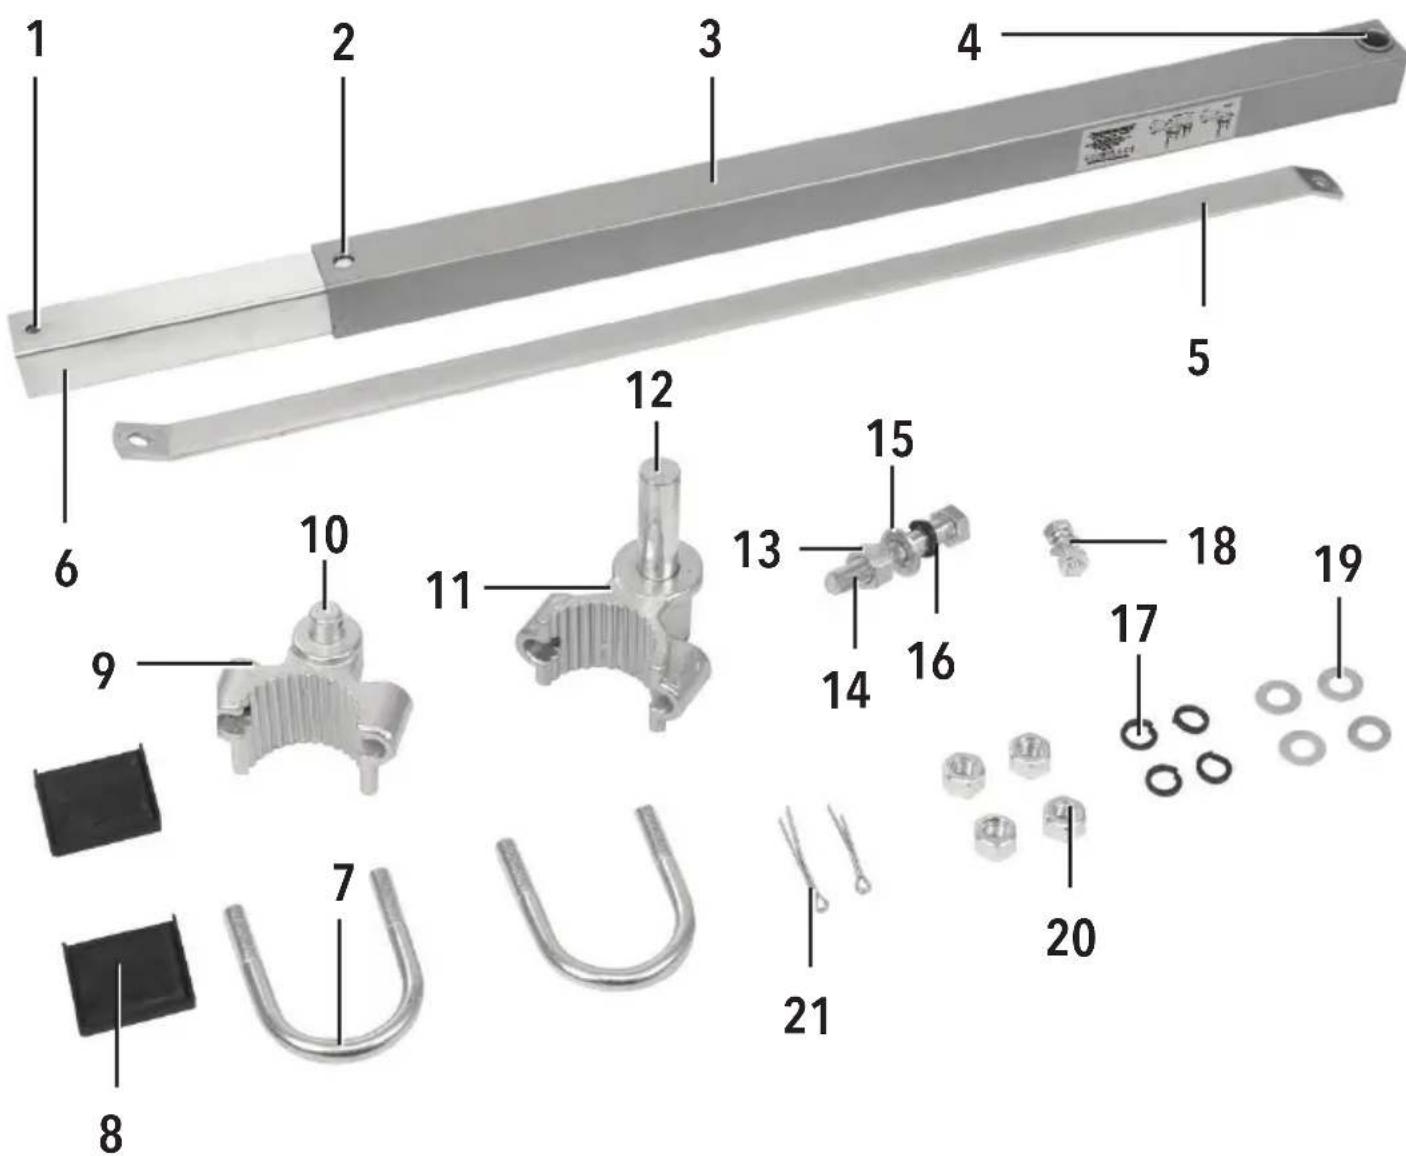

natural_image
Close-up of a metallic mechanical component with a small cylindrical part attached, labeled 'A' in the top-left corner (no other text or symbols visible)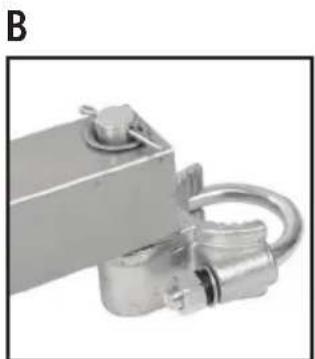
natural_image
Close-up of a metallic mechanical component with a curved handle and a square base (no visible text or symbols)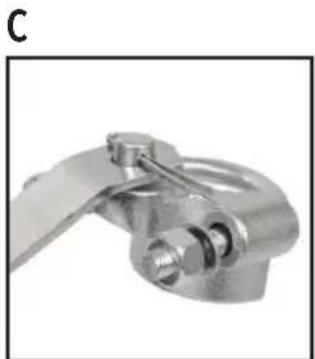
natural_image
Close-up of a metallic mechanical clamp or bracket component (no visible text or symbols)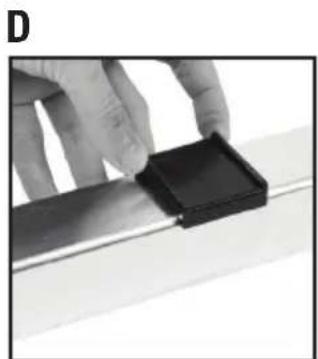
natural_image
Close-up of a hand holding a black square component on a metallic surface (no text or symbols visible)English ......4
Français ......8
Deutsch......12
Español......16
Italiano ......20
Nederlands ......24
Polski ......28
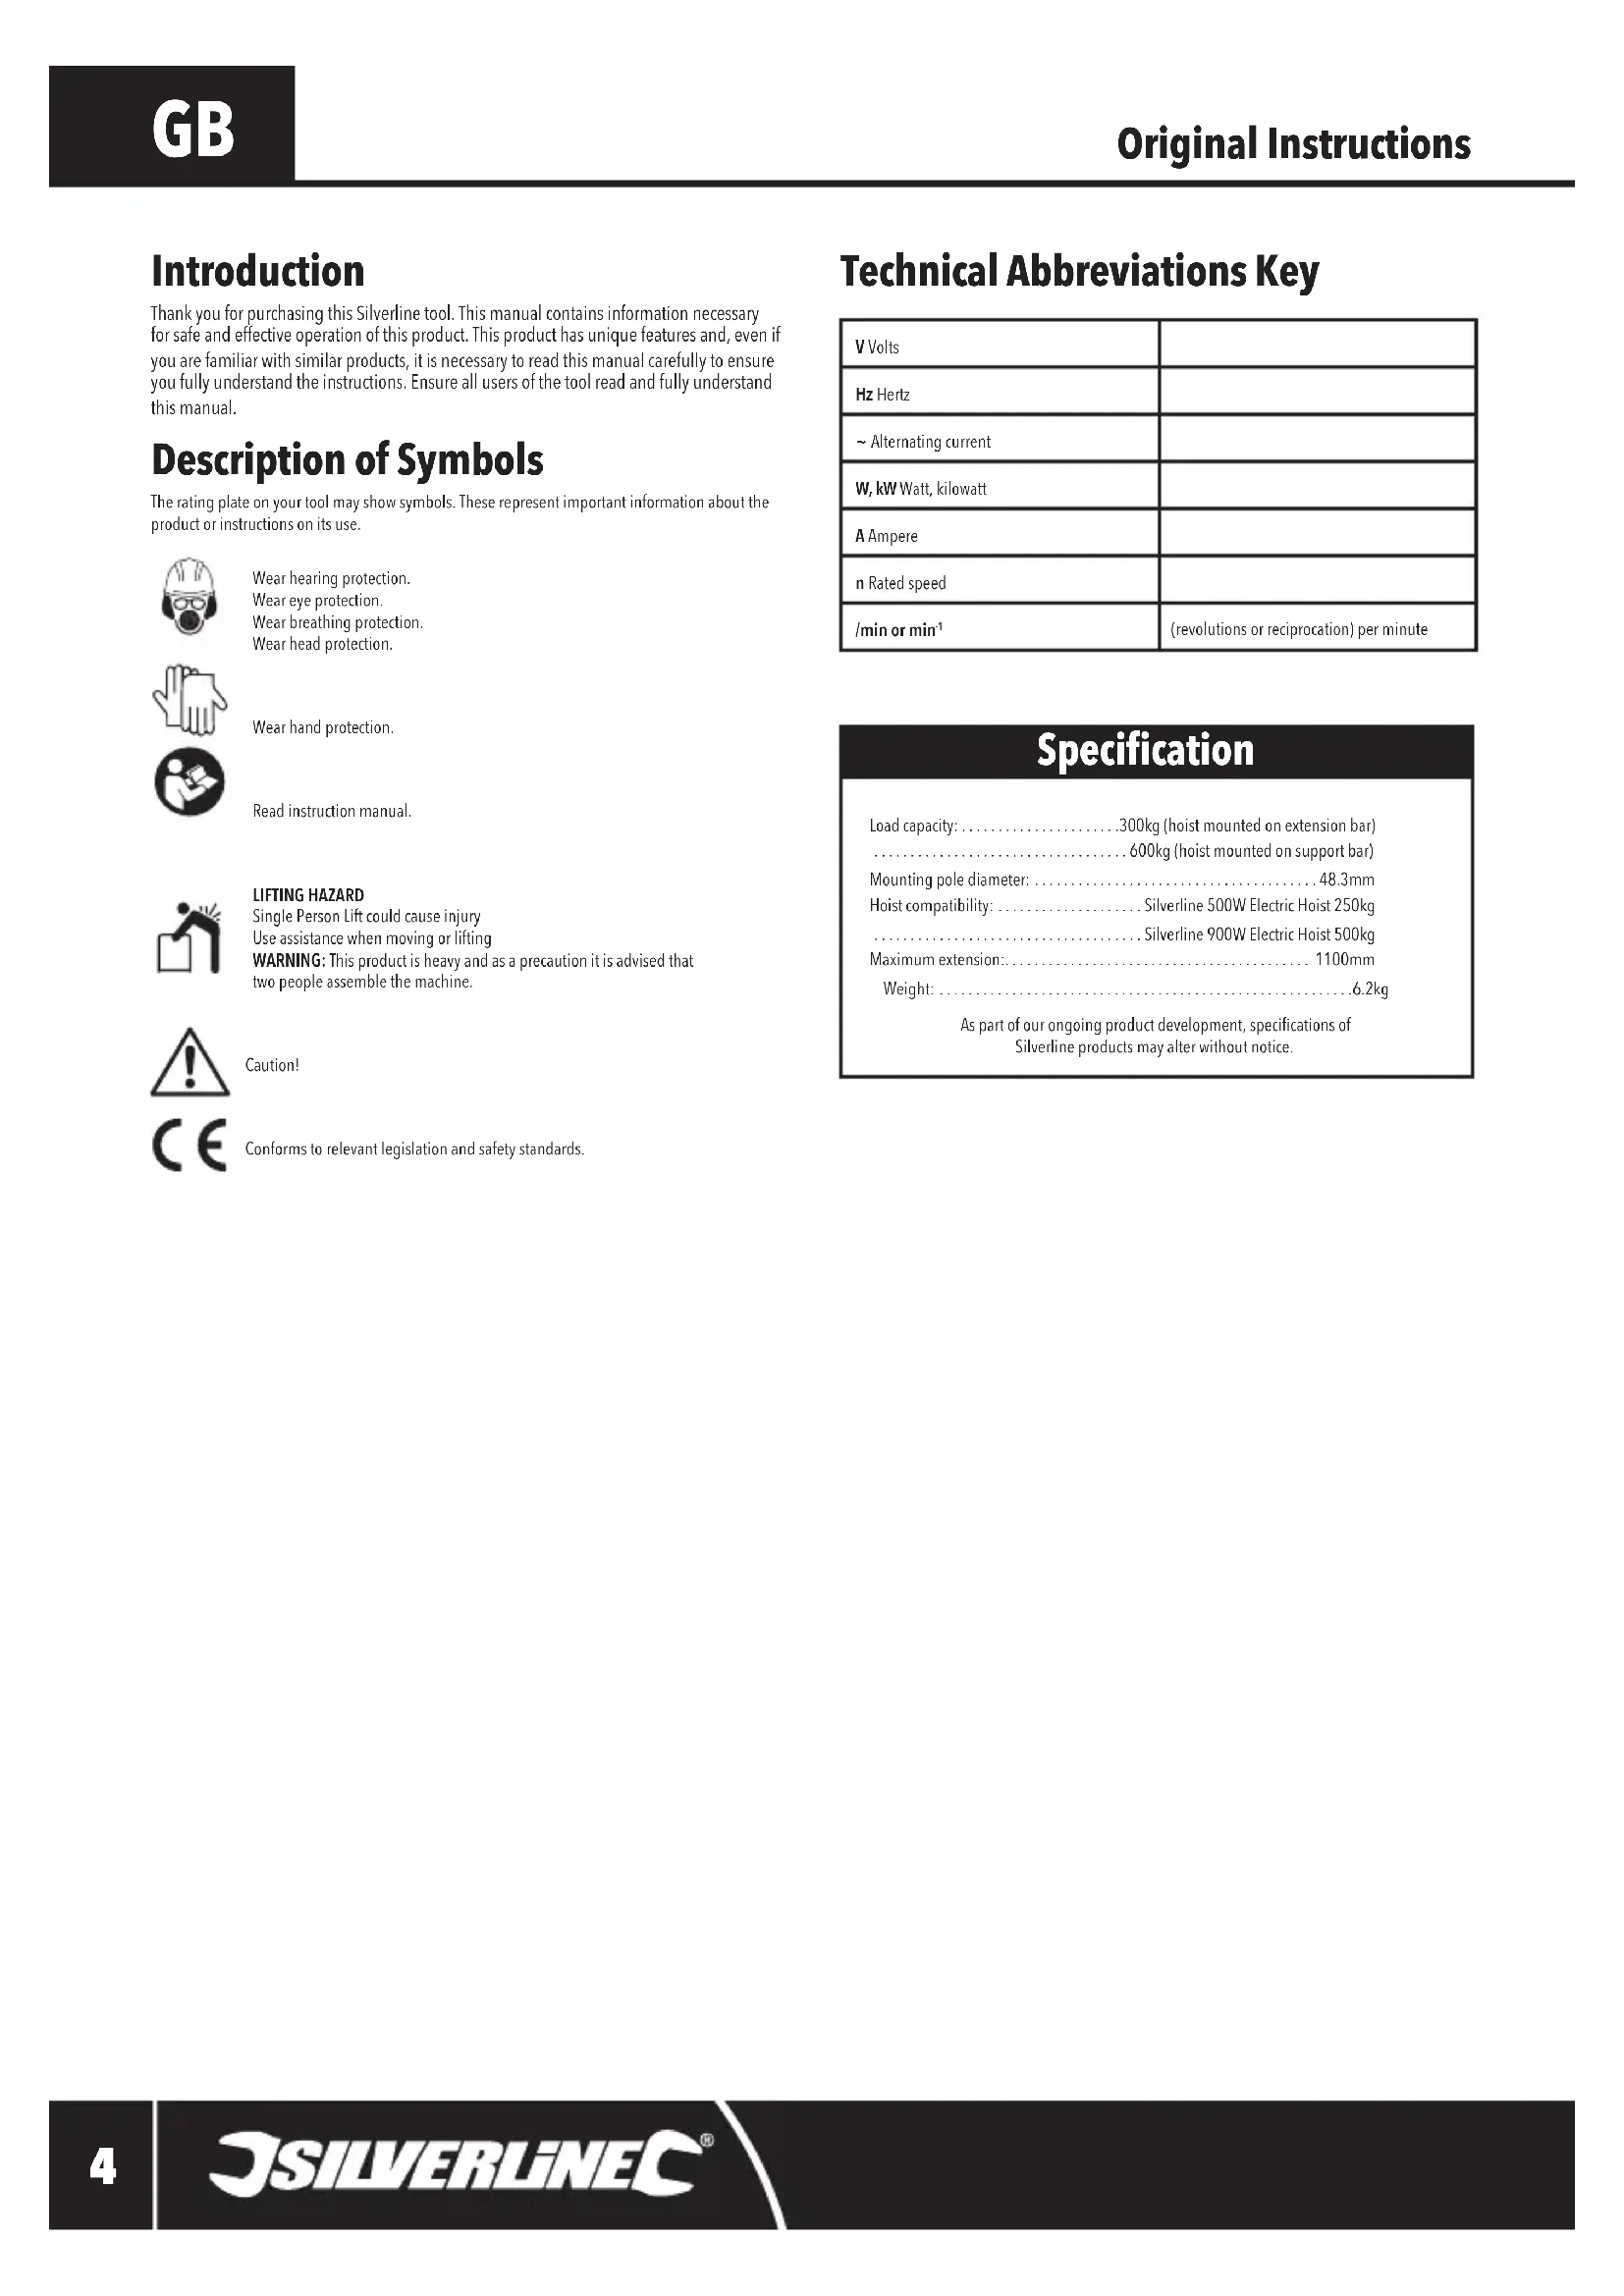
Introduction
Thank you for purchasing this Silverline tool. This manual contains information necessary for safe and effective operation of this product. This product has unique features and, even if you are familiar with similar products, it is necessary to read this manual carefully to ensure you fully understand the instructions. Ensure all users of the tool read and fully understand this manual.
Description of Symbols
The rating plate on your tool may show symbols. These represent important information about the product or instructions on its use.

Wear hearing protection.
Wear eye protection.
Wear breathing protection.
Wear head protection.

Wear hand protection.

Read instruction manual.

LIFTING HAZARD
Single Person Lift could cause injury
Use assistance when moving or lifting
WARNING: This product is heavy and as a precaution it is advised that
two people assemble the machine.

Caution!

Conforms to relevant legislation and safety standards.
Technical Abbreviations Key
| V Volts | |
| Hz Hertz | |
| ~ Alternating current | |
| W, kW Watt, kilowatt | |
| A Ampere | |
| n Rated speed | |
| /min or min ^-1 | (revolutions or reciprocation) per minute |
Specification
Load capacity: 300kg (hoist mounted on extension bar) 600kg (hoist mounted on support bar)
Mounting pole diameter: 48.3mm
Hoist compatibility: Silverline 500W Electric Hoist 250kg
Silverline 900W Electric Hoist 500kg
Maximum extension: 1100mm Weight: 6.2kg
As part of our ongoing product development, specifications of Silverline products may alter without notice.
General Safety
WARNING Read all safety warnings and all instructions. Failure to follow the warnings and instructions may result in electric shock, fire and/or serious injury.
WARNING: This appliance is not intended for use by persons (including children) with reduced, physical or mental capabilities or lack of experience or knowledge unless they have been given supervision or instruction concerning use of the appliance by a person responsible for their safety. Children must be supervised to ensure that they do not play with the appliance.
Save all warnings and instructions for future reference.
1) Work area safety
a) Keep work area clean and well lit. Cluttered or dark areas invite accidents.
b) Do not operate tools in explosive atmospheres, such as in the presence of flammable liquids, gases or dust.
c) Keep children and bystanders away while operating a powered tool. Distractions can cause you to lose control.
2) Personal safety
a) Stay alert, watch what you are doing and use common sense when operating a powered tool. Do not use a powered tool while you are tired or under the influence of drugs, alcohol or medication. A moment of inattention while operating a powered tool may result in serious personal injury.
b) Use personal protective equipment. Always wear eye protection. Protective equipment such as dust mask, non-skid safety shoes, hard hat, or hearing protection used for appropriate conditions will reduce personal injuries.
c) Prevent unintentional starting. Ensure the switch is in the off-position when not operating the tool and make use of other safety features which prevent unintentional starting
d) Remove any adjusting key or wrench before turning the powered tool on. A wrench or a key left attached to a rotating part of the tool may result in personal injury.
e) Do not overreach. Keep proper footing and balance at all times. This enables better control of the tool in unexpected situations.
f) Dress properly. Do not wear loose clothing or jewelry. Keep your hair, clothing and gloves away from moving parts. Loose clothes, jewelry or long hair can be caught in moving parts.
g) If devices are provided for the connection of dust extraction and collection facilities, ensure these are connected and properly used. Use of dust collection can reduce dust-related hazards.
WARNING: User exposure to tool vibration can result in loss of sense of touch, numbness, tingling and reduced ability to grip. Long term exposure can lead to a chronic condition. If necessary limit the length of time exposed to vibration. Use the figures provided in the specification relating to vibration if provided to calculate the duration and frequency of operating the tool. The 2002/44/EC directive relating to vibration in the workplace may provide useful information even for domestic use of tools. In the first instance of feeling uncomfortable due to vibration STOP using the tool immediately.
WARNING: Always wear ear protection where the sound level exceeds 85dB(A) and limit the time of exposure if necessary. If sound levels are uncomfortable even with ear protection stop using the tool immediately and check the ear protection is correctly fitted and provides the right level of sound attenuation for the level of sound produced by your tool.
3) Tool use and care
a) Maintain tools. Check for misalignment or binding of moving parts, breakage of parts and any other condition that may affect the tool's operation. If damaged, have the tool repaired before use. Many accidents are caused by poorly maintained tools.
b) Keep cutting tools sharp and clean. Properly maintained cutting tools with sharp cutting edges are less likely to bind and are easier to control.
c) Use the tool's accessories and tool bits etc. in accordance with these instructions, taking into account the working conditions and the work to be performed. Use of the tool for operations different from those intended could result in a hazardous situation.
4) Service
a) Have your tool serviced by a qualified repair person using only identical replacement parts. This will ensure that the safety of the tool is maintained.
Hoist Support Arm Safety
- Ensure use of personal protective equipment (PPE) when installing/operating this device. Wear a hard hat and protective gloves at all times.
- Before installation, ensure the mounting facility fits the requirements for the support arm. Assess whether the fitting is the correct dimensions, height, and position for lifting loads, and no obstructions will interfere with the hoist's path when operational.
- Frequently check all fastening components, the components of this support arm will be under large amounts of strain. Assemble using all mounting components, do not omit any components during assembly.
- Do not assemble alone. The support arm is heavy and may require being configured at a height, always seek help when installing/setting-up.
- Ensure compatibility and secure fitment with the hoist. Corresponding load capacities are detailed within the instruction manual and need to be adhered to.
- When selecting a mounting pole, check the pole is capable of supporting the load of the hoist when under full load. A secure mounting base is required, seek security in a firm mounting base of concrete with gusset supports if possible.
- Never lift people or animals using the hoist. When operating the hoist always keep bystanders, and animals away from the load.
Product Familiarisation
| 1 | Transport Securing Hole |
| 2 | Extension Bar Securing Hole |
| 3 | Supporting Bar |
| 4 | Pivot Hole |
| 5 | Support Arm |
| 6 | Extension Bar |
| 7 | U-Clamp |
| 8 | Plastic Brace |
| 9 | Support Arm Clamp |
| 10 | Support Arm Mounting Shaft |
| 11 | Supporting Bar Clamp |
| 12 | Supporting Bar Mounting Shaft |
| 13 | M12 Nut |
| 14 | M12 Bolt |
| 15 | Large Washer |
| 16 | Large Spring Washer |
| 17 | Small Spring Washer |
| 18 | Transport Fastener |
| 19 | Small Flat Washer |
| 20 | M10 Nut |
| 21 | Split Pin |
Intended Use
Support arm with 180° swinging positional adjustment for converting horizontal scaffold poles to a compatible mounting frame for lifting hardware. For use with Silverline 900W Electric Hoist 500kg and Silverline 500W Electric Hoist 250kg.
Unpacking Your Tool
WARNING: This product is heavy and as a precaution it is advised that two people assemble the machine.
- Carefully unpack and inspect your tool. Fully familiarise yourself with all its features and functions
- Ensure that all parts of the tool are present and in good condition. If any parts are missing or damaged, have such parts replaced before attempting to use this tool
Before Use
⚠ WARNING: ALWAYS wear head protection, suitable gloves, and seek help when setting-up this tool.
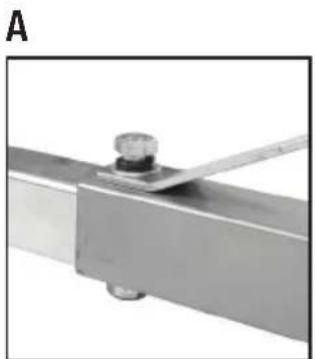
Support arm assembly
- Place the Supporting Bar (3) and Extension Bar (6) on a secure flat surface, and remove the Transport Fastener (18) from the end
- Pull the Extension Bar half of its overall length from the Supporting Bar, until the Extension Bar Securing Hole (2) is aligned with the hole located halfway along the length of the Extension Bar
- Align the end of the Support Arm (5) with the Extension Bar Securing Hole (2), and fasten into place using the M12 Bolt (14), Large Washer (15), Large Spring Washer (16) and M12 Nut (13) (Image A)
Pole installation
WARNING: Do not install the hoist support arm to a pole of the incorrect diameter. The supporting bar clamps are designed to fit the standard scaffold tube diameter of 48.3mm. Ensure the pole in use is of the correct diameter before installation.
-
Hold the Supporting Bar Clamp (11) against the pole at the desired height for hoist installation Note: Refer to the hoist's instruction manual for maximum height extension of the tool.
-
Insert the U-Clamp (7) through the holes in the Supporting Bar Clamp and around the pole Secure in place by inserting the U-Clamp into the Supporting Bar Clamp, and using the Small Flat Washer (19), Small Spring Washer (17) and M10 Nut (20) to fasten into place.
- Using the procedure described in steps '1-3', install the Support Arm Clamp (9) 380mm above the Supporting Bar Clamp, measuring from U-Clamp to U-Clamp (Fig. I)
- With assistance from another person, carefully lift the arm assembly so it is aligned with the Supporting Bar Clamp. Mount the Supporting Bar (3) to the Supporting Bar Clamp by sliding the Pivot Hole (4) over the Supporting Bar Mounting Shaft (12) (Image B)
- Mount the free end of the Support Arm (5) on to the Support Arm Mounting Shaft (10), and secure both mounting shafts with the Split Pins (21) provided (Image C)
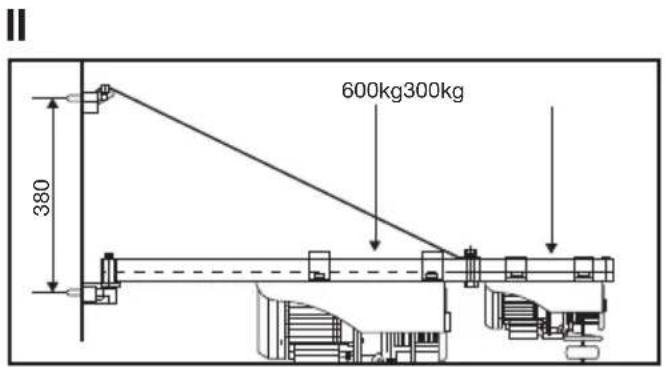
Hoist installation
WARNING: The maximum load of the hoist support arm with the hoist mounted on the Extension Bar (6) is 300kg. The maximum load of the hoist support arm with the hoist mounted on the Supporting Bar (3) is 600kg. This is inclusive of the hoist's own weight (Fig. II).
Note: Ensure the hoist support arm is securely fastened to the mounting pole before installing the hoist.
• Use the Plastic Braces (8) when installing the hoist to the Extension Bar (6) (Image D)
- Sandwich the Plastic Braces between the Extension Bar (6) and the mounting brackets on the hoist when mounting
- If mounting the hoist to the Supporting Bar (3), it is not necessary to use the Plastic Braces
Operation
Note: The hoist support arm is capable of freely moving 180° about the axis of the mounting shafts.
- When lifting loads, use the support arm's ability to move on an axis to transfer your load securely to the desired location
Accessories
- A range of accessories and consumables, including Electric Hoist 500kg, Expert Rigger Gloves and Safety Hard Hat, is available from your Silverline stockist. Spare parts can be obtained from toolsparesonline.com
Maintenance
General inspection
• Regularly check that all the fixing screws are tight
Cleaning
- Keep your tool clean at all times. Dirt and dust will cause internal parts to wear quickly, and shorten the machine's service life. Clean the body of your machine with a soft brush, or dry cloth. If available, use clean, dry, compressed air to blow through the ventilation holes
- Clean the tool casing with a soft damp cloth using a mild detergent. Do not use alcohol, petrol or strong cleaning agents
- Never use caustic agents to clean plastic parts
Lubrication
- Slightly lubricate all moving parts at regular intervals with a suitable spray lubricant
Storage
- Store this tool carefully in a secure, dry place out of the reach of children
Disposal
Always adhere to national regulations when disposing of power tools that are no longer functional and are not viable for repair.
- Do not dispose of power tools, or other waste electrical and electronic equipment (WEEE), with household waste
- Contact your local waste disposal authority for information on the correct way to dispose of power tools
Silverline Tools Guarantee
This Silverline product comes with a forever guarantee
Register this product at www.silverlinetools.com within 30 days of purchase in order to qualify for the forever guarantee. Guarantee period begins according to the date of purchase on your sales receipt.
Registering your purchase
Registration is made at silverlinetools.com by selecting the Guarantee Registration button. You will need to enter:-
- Your personal details
• Details of the product and purchase information
Once this information is entered your guarantee certificate will be created in PDF format for you to print out and keep with your purchase.
Terms & Conditions
Guarantee period becomes effective from the date of retail purchase as detailed on your sales receipt.
PLEASE KEEP YOUR SALES RECEIPT
If this product develops a fault within 30 days of purchase, return it to the stockist where it was purchased, with your receipt, stating details of the fault. You will receive a replacement or refund.
If this product develops a fault after the 30 day period, return it to:
Silverline Tools Service Centre
PO Box 2988
Yeovil
BA21 1WU, UK
The guarantee claim must be submitted during the guarantee period.
You must provide the original sales receipt indicating the purchase date, your name, address and place of purchase before any work can be carried out.
You must provide precise details of the fault requiring correction.
Claims made within the guarantee period will be verified by Silverline Tools to establish if the deficiencies are related to material or manufacturing of the product.
Carriage will not be refunded. Items for return must be in a suitably clean and safe state for repair, and should be packaged carefully to prevent damage or injury during transportation. We may reject unsuitable or unsafe deliveries.
All work will be carried out by Silverline Tools or its authorized repair agents.
The repair or replacement of the product will not extend the period of guarantee
Defects recognised by us as being covered by the guarantee shall be corrected by means of repair of the tool, free of charge (excluding carriage charges) or by replacement with a tool in perfect working order.
Retained tools, or parts, for which a replacement has been issued, will become the property of Silverline Tools.
The repair or replacement of your product under guarantee provides benefits which are additional to and do not affect your statutory rights as a consumer.
What is covered:
The repair of the product, if it can be verified to the satisfaction of Silverline Tools that the deficiencies were due to faulty materials or workmanship within the guarantee period.
If any part is no longer available or out of manufacture, Silverline Tools will replace it with a functional replacement part.
Use of this product in the EU.
What is not covered:
Silverline Tools does not guarantee repairs required as a result of:
Normal wear and tear caused by use in accordance with the operating instructions eg blades, brushes, belts, bulbs, batteries etc.
The replacement of any provided accessories drill bits, blades, sanding sheets, cutting discs and other related items.
Accidental damage, faults caused by negligent use or care, misuse, neglect, careless operation or handling of the product.
Use of the product for anything other than normal domestic purposes.
Change or modification of the product in any way.
Use of parts and accessories which are not genuine Silverline Tools components.
Faulty installation (except installed by Silverline Tools).
Repairs or alterations carried out by parties other than Silverline Tools or its authorized repair agents.
Claims other than the right to correction of faults on the tool named in these guarantee conditions are not covered by the guarantee.
Introduction
Silverline Tools Service Centre
PO Box 2988
Yeovil
Silverline Tools Service Centre
PO Box 2988
Yeovil
BA21 1WU, GB
Silverline Tools Service Centre
PO Box 2988
Yeovil
BA21 1WU, GB
Silverline Tools Service Centre
PO Box 2988
Yeovil
BA21 1WU, UK
natural_image
Metal mechanical lever assembly with articulated arms and mounting feet (no text or symbols visible)GB Guaranteed Forever. Register online within 30 days. Terms and Conditions apply.
- Hoist Support Arm 600kg Max Load
- Introduction
- Description of Symbols
- Specification
- General Safety
- Save all warnings and instructions for future reference.
- Hoist Support Arm Safety
- Product Familiarisation
- Intended Use
- Unpacking Your Tool
- Before Use
- Support arm assembly
- Pole installation
- Hoist installation
- Operation
- Accessories
- Maintenance
- General inspection
- Cleaning
- Lubrication
- Storage
- Disposal
- Silverline Tools Guarantee
- This Silverline product comes with a forever guarantee
- Registering your purchase
- Terms & Conditions
- PLEASE KEEP YOUR SALES RECEIPT
- Silverline Tools Service Centre
- PO Box 2988
- Yeovil
- BA21 1WU, UK
- What is covered:
- What is not covered:
- BA21 1WU, GB
Brand : SILVERLINE
Model : 407455
Category : Lifting accessory