NETX II - Lighting Chauvet - Free user manual and instructions
Find the device manual for free NETX II Chauvet in PDF.

| Product Type | Ethernet to DMX converter, DMX splitter and Art-Net™/sACN node |
| Brand | Chauvet |
| Model | NETX II |
| Category | Network lighting |
| Dimensions (W x D x H) | 483 mm x 158 mm x 44 mm (19 x 6.22 x 1.73 in) |
| Weight | 2.1 kg (4.6 lb) |
| Power Supply | 100-240 VAC, 50/60 Hz (universal switching) |
| Power Consumption | 11-14 W depending on voltage |
| Fuse | T 250 mA 250 V (replaceable) |
| DMX Input Connectors | 2 x XLR 5-pin (male) |
| DMX Output Connectors | 8 x XLR 5-pin (female), assignable as input/output |
| Network Connectors | 2 x Seetronic® etherKON® (RJ45, pass-through) |
| Power Connector | Seetronic® powerKON® (input) |
| Trigger Connector | 5-pin Phoenix connector (4 triggers + ground) |
| Main Functions | Art-Net™/sACN ↔ DMX converter (up to 8 universes), optical DMX splitter, HTP/LTP merging, recording of 10 scenes (100 steps each), built-in web server, RDM over Ethernet support |
| Display and Control | LCD screen with rotary encoder (navigation and selection) |
| Supported Protocols | Art-Net™ 4, sACN (ANSI E1.31), DMX512, RDM over Art-Net |
| Operating Modes | 8 ports (with RDM) or 2+8 ports (DMX merging, without RDM) |
| Maximum Ambient Temperature | 40 °C (104 °F) |
| Cooling | Convection (fanless) |
| Protection Rating | IP20 (indoor use only) |
| Maintenance | Regular cleaning with vacuum and soft cloth; disconnect before cleaning |
| Safety | Do not open (no user-serviceable parts); avoid direct eye contact; use on grounded circuit |
| Spare Parts and Repairability | User-replaceable fuse; any other repair by certified technician |
| Warranty | Limited warranty (see Chauvet website for terms) |
Frequently Asked Questions - NETX II Chauvet
User questions about NETX II Chauvet
0 question about this device. Answer the ones you know or ask your own.
Ask a new question about this device
Download the instructions for your Lighting in PDF format for free! Find your manual NETX II - Chauvet and take your electronic device back in hand. On this page are published all the documents necessary for the use of your device. NETX II by Chauvet.
USER MANUAL NETX II Chauvet
natural_image
Line drawing of a rectangular electronic device with multiple ports and mounting flanges (no text or symbols)Edition Notes
The Net-X II User Manual includes a description, safety precautions, installation, programming, operation, and maintenance instructions for the Net-X II as of the release date of this edition.
LIMITED WARRANTY
FOR WARRANTY REGISTRATION AND COMPLETE TERMS AND CONDITIONS PLEASE VISIT OUR WEBSITE.
For Customers in the United States and Mexico: www.chauvetlighting.com/warranty-registration.
For Customers in the United Kingdom, Republic of Ireland, Belgium, the Netherlands, Luxembourg, France, and Germany: www.chauvetlighting.eu/warranty-registration.
Chauvet warrants that this product shall be free from defects in material and workmanship under normal use, for the period specified in, and subject to the exclusions and limitations set forth in the full limited warranty on our website. This warranty extends only to the original purchaser of the product and is not transferable. To exercise rights under this warranty, you must provide proof of purchase in the form of an original sales receipt from an authorized dealer that shows the product name and date of purchase. THERE ARE NO OTHER EXPRESS OR IMPLIED WARRANTIES. This warranty gives you specific legal rights. You may also have other rights that vary from state to state and country to country. This warranty is valid only in the United States, United Kingdom, Republic of Ireland, Belgium, the Netherlands, Luxembourg, France, Germany, and Mexico. For warranty terms in other countries, please consult your local distributor.
Trademarks
CHAUVET, the Chauvet logo, and Net-X II are registered trademarks or trademarks of Chauvet & Sons, LLC (d/b/a Chauvet and Chauvet Lighting) in the United States and other countries. Other company and product names and logos referred to herein may be trademarks of their respective companies.
Copyright Notice
The works of authorship contained in this manual, including, but not limited to, all designs, texts, and images are owned by Chauvet.
© Copyright 2021 Chauvet & Sons, LLC. All rights reserved.
Electronically published by Chauvet in the United States of America.
Manual Use
Chauvet authorizes its customers to download and print this manual for professional information purposes only. Chauvet expressly prohibits the usage, copy, storage, distribution, modification, or printing of this manual or its content for any other purpose without written consent from Chauvet.
Document Printing
For best results, print this document in color, on letter size paper (8.5 x 11 in), double-sided. If using A4 paper (210 x 297 mm), configure the printer to scale the content accordingly.
Intended Audience
Any person installing, operating, and/or maintaining this product should completely read through the guide that shipped with the product, as well as this manual, before installing, operating, or maintaining this product.
Disclaimer
Chauvet believes that the information contained in this manual is accurate in all respects. However, Chauvet assumes no responsibility and specifically disclaims any and all liability to any party for any loss, damage or disruption caused by any errors or omissions in this document, whether such errors or omissions result from negligence, accident or any other cause. Chauvet reserves the right to revise the content of this document without any obligation to notify any person or company of such revision, however, Chauvet has no obligation to make, and does not commit to make, any such revisions. Download the latest version from www.chauvetprofessional.com.
Document Revision
This Net-X II User Manual is the 8th edition of this document. Go to www.chauvetprofessional.com for the latest version.
TABLE OF CONTENTS
1. Before You Begin .... 1
What Is Included 1
Claims 1
Manual Conventions 1
Symbols 1
Safety Notes.... 2
2. Introduction ...... 3
Description 3
Features 3
Product Overview.... 3
Product Dimensions 4
3. Setup 5
AC Power 5
Fuse Replacement.... 5
Mounting 5
Orientation.... 5
Mounting Diagram.... 6
Installation Guidelines.... 6
Signal Connections 6
Art-Net™ Connection 6
sACN Connection.... 6
Signal Connection Diagrams.... 7
Input Connections Diagram 7
4. Operation 8
Control Panel Operation.... 8
Control Knob 8
Programming...... 8
Menu Map 8
Operating Settings Configuration 12
Home Screen 12
Primary Home Screen 12
Secondary Home Screen 13
Custom Device Name 14
Set IP Mode 14
Static IP 14
Manual IP 14
Set Netmask.... 14
Operating Mode 14
NetWork Timeout 15
On Source Loss 15
Set DMX Port 15
Disp Type 15
DMX Status 15
DMX Mode 16
Protocol 16
Framerte/fs 16
Network 16
1st Universe.... 17
LCD Backlight 17
User Preset 17
Factory Reset.... 18
Record Scenes.... 18
Scene Name.... 18
Scene Steps 18
Add Step.... 18
Delete Step.... 18
Timing.... 18
Trigger Settings.... 19
Trigger Setting Diagram 19
Backup 19
Firmware Version 19
Exit 19
Web Server 20
Web Server Overview 21
DMX Port Overview - Input Status 21
DMX Port Overview - Output Status 21
Firmware Update/Backup 21
- Technical Information 22
Product Maintenance 22
-
Technical Specifications 23
-
Returns.... 24
-
Contact Us 25
-
Antes de empezar.... 27
Qué va incluido 27
Programmation.... 60
Plan du Menu 60
Carefully unpack the product immediately and check the container to make sure all the parts are in the package and are in good condition.
If the box or the contents (the product and included accessories) appear damaged from shipping, or show signs of mishandling, notify the carrier immediately, not Chauvet. Failure to report damage to the carrier immediately may invalidate your claim. In addition, keep the box and contents for inspection.
For other issues, such as missing components or parts, damage not related to shipping, or concealed damage, file a claim with Chauvet within 7 days of delivery.
Manual Conventions
CONVENTION MEANING
| 1-512 A range of values |
| 50/60 A set of values of which only one can be chosen |
| A button on the product's control panel |
| Settings A product function or a menu option |
Symbols
| SYMBOL MEANING | |
 | Critical installation, configuration, or operation information. Not following these instructions may make the product not work, cause damage to the product, or cause harm to the operator. |
 | Important installation or configuration information. The product may not function correctly if this information is not used. |
 | Useful information. |
Safety Notes
Read all the following safety notes before working with this product. These notes contain important information about the installation, usage, and maintenance of this product.

This product contains no user-serviceable parts. Any reference to servicing in this User Manual will only apply to properly trained, certified technicians. Do not open the housing or attempt any repairs.

All applicable local codes and regulations apply to proper installation of this product.
Personal Safety
- Avoid direct eye exposure to the light source while the product is on.
- Always disconnect the product from the power source before cleaning or replacing the fuse.
- Always connect the product to a grounded circuit to avoid the risk of electrocution.
- Do not touch the product's housing when operating because it may be very hot.
Mounting
- This product is for indoor use only! To prevent risk of fire or shock, do not expose this product to rain or moisture. (IP20)
- CAUTION: When transferring product from extreme temperature environments, (e.g. cold truck to warm humid ballroom) condensation may form on the internal electronics of the product. To avoid causing a failure, allow product to fully acclimate to the surrounding environment before connecting it to power.
- Make sure there are no flammable materials close to this product while it is operating.
- Never carry the product by the power cord.
Power and Wiring
- Make sure the power cord is not crimped or damaged.
- Always make sure you are connecting this product to the proper voltage in accordance with the specifications in this manual or on the product's specification label.
- To eliminate unnecessary wear and improve its lifespan, during periods of non-use completely disconnect the product from power via breaker or by unplugging it.
- Never connect this product to a dimmer pack or rheostat.
- Never disconnect this product by pulling or tugging on the power cable.
Operation
- Do not operate this product if there is damage on the housing or cables. Have the damaged parts replaced by an authorized technician at once.
- Do not cover the ventilation slots when operating to avoid internal overheating.
• The maximum ambient temperature is 113 °F (45 °C). Do not operate the product at higher temperatures. - In the event of a serious operation problem, stop using this product immediately!

If your Chauvet product requires service, contact Chauvet Technical Support.
2. Introduction
Description
Net-X II is a reliable and versatile rack-mountable ethernet-to-DMX adapter with an integrated optical DMX splitter and Ethernet switch capability. It has two 5-pin DMX In ports and eight 5-pin DMX Output/input ports, all optically isolated. It takes up to 8 Art-Net™ or sACN universes simultaneously. The eight 5-pin DMX Out ports can be assigned to either of the DMX In ports or to one of the Art-Net™ or sACN universes. Seetronic® etherKON® ports are through ports that allow daisy chaining of Net-X II units. Net-X II provides a reliable, highly customizable network infrastructure for complex control systems. Merge two controllers into the Net-X II via DMX, Art-Net™, or sACN, supporting both LTP (Latest Takes Precedence) and HTP (Highest Takes Precedence) functions. Record function allows you to record looks from a controller and save them into memory and it is Web server supported for remote configuration and backup/update.
Features
• 5-pin DMX splitter/distributor
- Art-Net™/sACN to DMX converter, up to 8 universes
- DMX to Art-Net™/sACN converter, up to 8 universes
- Merge two 5-pin DMX universes into a single universe, or merge two NET controllers (Art-Net™ or sACN) into the same universe, then convert to standard 5-pin DMX for the outputs
- HTP (Highest Takes Precedence) and LTP (Latest Takes Precedence) merge functions supported
- Backup settings and configurations with same or other Net-X IIs
- Web server supported for remote configuration and backup/update
- Integrated Record function allows you to record looks from a controller and save them into memory (10 shows in memory, 100 steps each) to trigger up to 4 shows/zones simultaneously using the 5-wire Phoenix cold contacts on the rear of the unit
• Supports RDM over Art-Net™ for remote fixture management
Product Overview
text_image
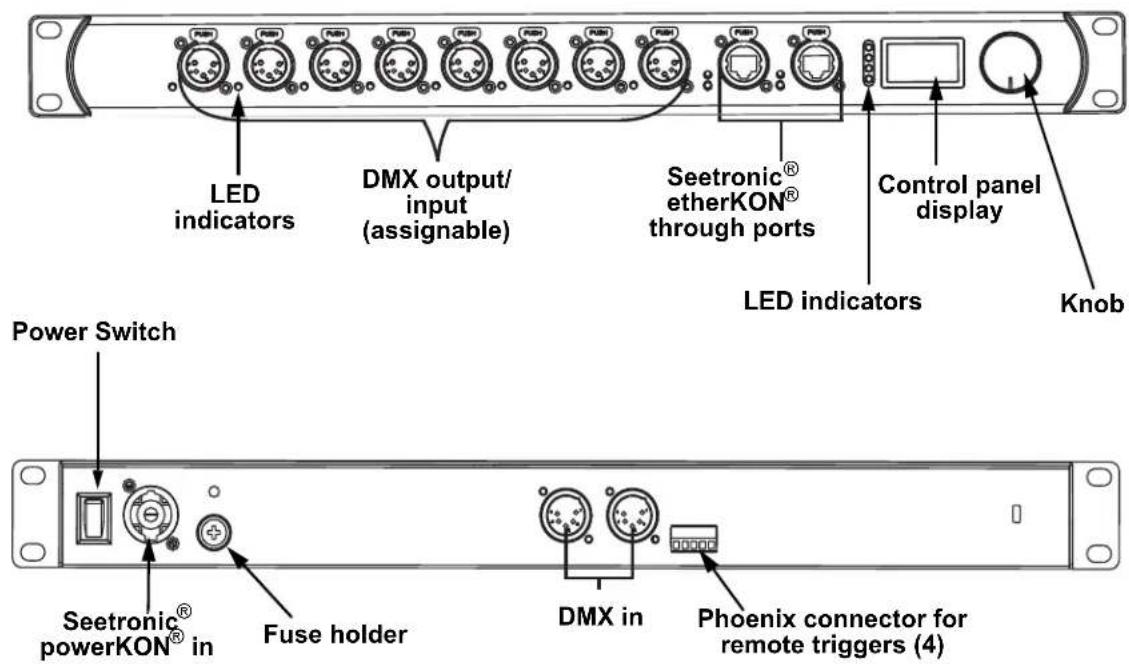
LED indicators DMX output/ input (assignable) Seetronic® etherKON® through ports Control panel display LED indicators Knob Power Switch Seetronic® powerKON® in Fuse holder DMX in Phoenix connector for remote triggers (4)Product Dimensions

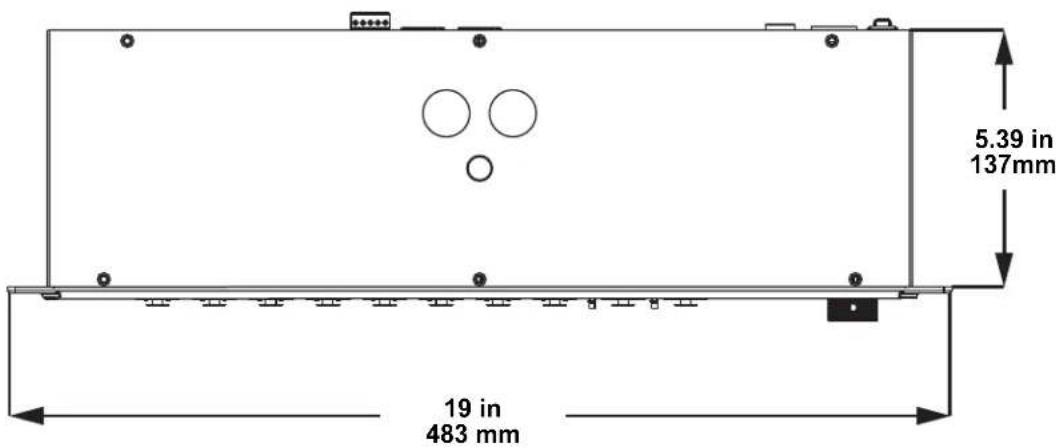
text_image
5.39 in 137mm 19 in 483 mm3. Setup
AC Power
Each Net-X II has an auto-ranging power supply that works with an input voltage range of 100 to 240 VAC, 50/60 Hz. To determine the power requirements for each Net-X II, refer to the label affixed to the product. You can also refer to the Technical Specifications chart in this manual.
The listed current rating indicates the maximum current draw during normal operation. For more information, download Sizing Circuit Breakers from the Chauvet website: www.chauvetprofessional.com.

• Always connect the product to a grounded and protected circuit. Make sure the product has an appropriate electrical ground to avoid the risk of electrocution or fire.
• To eliminate unnecessary wear and improve its lifespan, during periods of non-use completely disconnect the product from power via breaker or by unplugging it.

Never connect the product to a rheostat (variable resistor) or dimmer circuit, even if the rheostat or dimmer channel serves only as a 0 to 100% switch.
Fuse Replacement
The Net-X II uses a F 1 A, 250 V fuse accessible from the back of the product. To change the fuse, do the following:
- Disconnect the product from power.
- With a Phillips head screwdriver, unscrew the fuse holder cap from the housing.
- Remove the blown fuse.
- Replace with a fuse of the same type and rating.
- Screw the fuse holder cap back in place and reconnect power.

- Disconnect the product from power before replacing the fuse.
• Always replace a blown fuse with another of the same type and rating.
Mounting
Before mounting this product, read and follow the Safety Notes. For our Chauvet line of mounting clamps, go to www.trusst.com/productcategory/accessories-clamps/.
Orientation
Always mount this product in a safe position. Ensure that the menu and the ports are accessible, and there is adequate room for ventilation, configuration, and maintenance. The Net-X II fits nicely in a standard 19" rack, can be suspended upright or upside down, or it can be placed on its rubber feet on a flat level surface. Use the following guidelines when mounting the Net-X II:
- When selecting an installation location, consider easy access to this product for operation, programming adjustments, and routine maintenance.
• Make sure to mount this product away from any flammable material as indicated in the Safety Notes. - Never mount in places where rain, high humidity, extreme temperature changes, or restricted ventilation may affect the product.
- If hanging this product, make sure that the mounting location can support the product's weight. See the Technical Specifications for the weight-bearing requirements of this product.
- When hanging this product, always secure to a fastening device using a safety cable.
- Leave enough slack on the cables to prevent tension and pull on the plugs.
Mounting Diagram
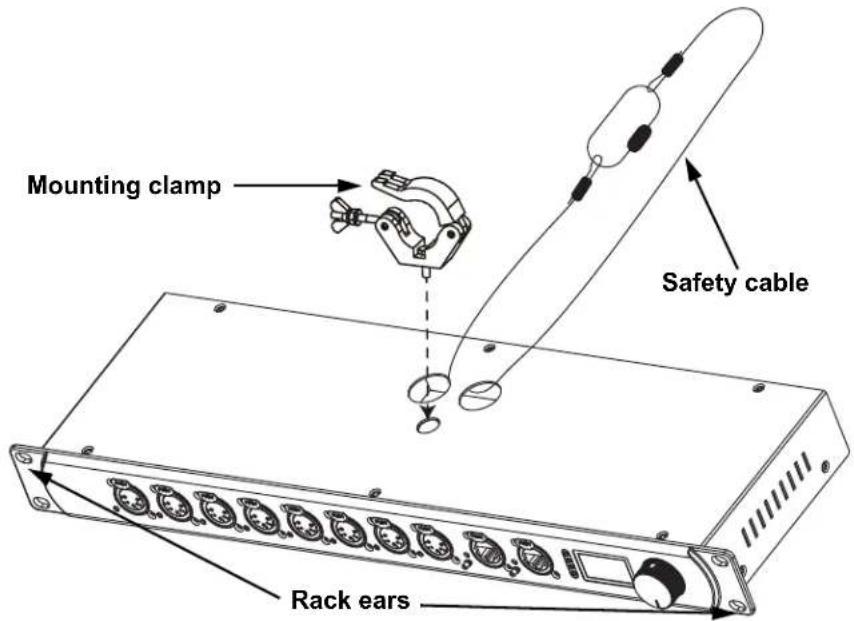
text_image
Mounting clamp Safety cable Rack earsInstallation Guidelines
The Net-X II is used as part of a control system for operating various lighting and multimedia products. The physical and digital construction of the control network is determined by the location and signal needs of the products.
When designing a control system that uses the Net-X II, consider the following:
- Placing the Net-X II so the menu and ports can be accessed
- Running the cables so there is no tension or pull on the cables or plugs
- Planning a large control system carefully before configuring the components, so IP address, DMX address, and other identifiers are not duplicated.
The NET-X II supports setting the 8 output ports as inputs. Male to female gender adapters will need to be used for the 5-pin XLR connectors for this scenario. When using this setup, it is not recommended to use RDM in the system along with HTP/LTP signal merging. The architecture of the RDM protocol is not suited for this scenario.
When using 2 controllers to merge signal into a fixture through the NET-X II, it is recommended to use ArtNet Art-RDM protocol via Ethernet from both controllers feeding into the NET-X II, not DMX/RDM over a RS-485 line feeding from the controllers.
Signal Connections
The Net-X II receives signal though 2 DMX In ports and one of two Seetronic ^® etherKON ^® ports. It sends signal out through eight DMX out ports and the other Seetronic ^® etherKON ^® port.
Art-Net™ Connection
Art-Net™ is an Ethernet protocol that uses TCP/IP to transfer a large amount of DMX512 data using an etherKON® RJ45 connection over a large network. An Art-Net™ protocol document is available from www.chauvetprofessional.com. Art-Net™ designed by and copyright Artistic Licence Holdings Ltd.
sACN Connection
Also known as ANSI E1.31, streaming ACN is an Ethernet protocol that uses the layering and formatting of Architecture for Control Networks to transport DMX512 data over IP or any other ACN compatible network.
Signal Connection Diagrams

text_image
1 2| # CONNECTIONS PURPOSE | |
| 1 DMX output/input | Receive or send DMX input/output to or from controllers or products. Can receive DMX to be converted to Art-NetTM or sACN. |
| 2 Ethernet input/throughput | Link to an Art-NetTM or sACN network; also used to access Web server |
Input Connections Diagram
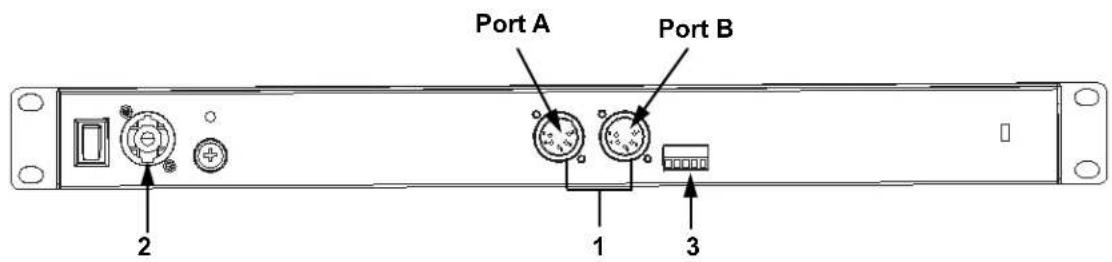
text_image
Port A Port B 2 1 3| # CONNECTIONS PURPOSE | |
| 1 DMX in DMX ports A and B. | |
| 2 Seetronic ^ powerKON ^ in Power in | |
| 3 Phoenix connector To trigger recorded scenes |

- The Seetronic ^ etherKON ^ ports are through ports. Each port can be either an input or an output port.
- The Phoenix connector has four inputs (triggers 1–4) and a ground terminal.
4. Operation
Control Panel Operation
The Net-X II is configured through the control panel, using the control knob. Once the Net-X II is properly configured it operates without user intervention.
The Net-X II can be used as a DMX splitter, in which case the DMX In ports must be assigned to the DMX output/input ports, but the Net, Subnet, and IP address settings may not need configuration.
The Net-X II can be used as an Art-Net ^™ node, in which case the Art-Net ^™ universes must be assigned to the DMX output/input ports, and the Net, Subnet, and IP address settings must be configured.
The Net-X II can be used as an sACN node, in which case the sACN universes must be assigned to the DMX output/input ports, and the IP address settings must be configured.
The Net-X II can be used as both a DMX splitter and either an Art-Net ^™ or sACN node simultaneously, in which case both the DMX assignments and the Art-Net ^™ or sACN settings must be configured.
The Net-X II can be used to merge two DMX, Art-Net ^™ , or sACN signals from different controllers and output as one signal, using LTP (latest takes precedence) and HTP (highest takes precedence) functions.
The Net-X II has backup settings and configurations with same or other Net-X II products.
The Net-X II is Web server supported for remote configuration and backup/update.
The Net-X II's record function allows you to record looks from a controller and save them into memory.
These can be deployed via the Phoenix triggers.
Control Knob
The Net-X II has a knob that is used to scroll through the options in the menu. Press the knob to make a selection.
Programming
Refer to the Menu Map to understand the menu options. The menu map shows the main level and a variable number of programming levels for each option.
- To access the menu from the Home Screen, press the knob.
- To scroll through the options on each level of the menu, turn the knob. Turn it clockwise to scroll down, and turn it counter-clockwise to scroll up.
- Press the knob to select the highlighted option. This will take you to the next programming level for that option, or it will highlight a value that can be edited.
- To increase a selected number value, turn the knob clockwise. To decrease a selected number value, turn the knob counter-clockwise.
- Press Exit/Cancel to the previous main level.
- Press the knob for 3 seconds to return to the Home Screen.
Menu Map
Refer to the Net-X II product page on www.chauvetprofessional.com for the latest menu map.
| MAIN LEVEL | PROGRAMMING LEVELS | DESCRIPTION | |||
| 1. Custom Device Name | -------- | Cancel | Inputs a custom device name | ||
| Enter | |||||
| 2. Set IP Mode | 1. Static IP ____ | -------- | Default address-cannot be changed | ||
| 2. Manual IP ____ | -------- | Cancel | Sets the IP Addresses | ||
| Enter | |||||
| 3. Exit Exits to previous screen | |||||
| 3. Set Netmask | A. 255.000.000.000 Sets Netmask A | ||||
| B. 255.255.000.000 Sets Netmask B | |||||
| C. 255.255.255.000 Sets Netmask C | |||||
| Exit Exits to previous screen | |||||
| MAIN LEVEL | PROGRAMMING LEVELS | DESCRIPTION | |||
| 4. Operating Mode | 1. 8 Port | Assigns each port as an output/input (this also supports RDM over Ethernet) | |||
| 2. 2 + 8 Port | Supports DMX merging with the two DMX inputs (disables RDM function) | ||||
| 3. Exit Exits to previous screen | |||||
| 5. NetWork Timeout | 1. Disabled Disables the timeout | feature | |||
| 2. 1 Seconds | 1 second time delay to stop receiving commands from a console connected to the network | ||||
| 3. 2 Seconds | 2 seconds time delay to stop receiving commands from a console connected to the network | ||||
| 4. 5 Seconds | 5 seconds time delay to stop receiving commands from a console connected to the network | ||||
| 5. Exit Exits to the previous screen | |||||
| 6. On Source Loss | 1. Hold output | Holds the last value received before the source console/ controller stops sending signal | |||
| 2. Blackout | Sets all DMX channels to a value of 000 | ||||
| 3. Stop DMX Disables the port | |||||
| 4. Exit Exits to previous screen | |||||
| MAIN LEVEL | PROGRAMMING LEVELS | DESCRIPTION | |||
| 7. Set DMX Port | DMX Ports 1-8/DMX Input A-B(Inputs A and B only when Operating Mode is set to 2 + 8 Port) | 1. Disp Type | HEX Hexadecimal values | ||
| DEC Decimal values | |||||
| 2. DMX Status | OUTPUT Sets the port as output | ||||
| INPUT | Sets the port to receive DMX from a controller that can be routed to another DMX port | ||||
| DISABLE Disables the output port | |||||
| 3. DMX Mode | SINGLE(OUTPUT Status only) | Disables Ethernet signal merging | |||
| LTP(OUTPUT Status only) | Sets Ethernet signal merging to Latest Takes Precedence | ||||
| HTP(OUTPUT Status only) | Sets Ethernet signal merging to Highest Takes Precedence | ||||
| NORMAL(INPUT Status only) | Sets input ports acting as a primary controller | ||||
| BACKUP(INPUT Status only) | Sets input ports acting as a backup controller | ||||
| 4. Protocol | ArtNet | Sets the output/input source for the DMX port to Art-NetTM | |||
| sACN | Sets the output/input source for the DMX port to sACN | ||||
| 5. Framerte/fs 010-040 Sets rate of speed for output ports | |||||
| 6. Network | 00H-7FH (Hex)000-128 (Dec) | Sets the net settings | |||
| 7. 1st Universe | 00H-FFH (Hex)000-256 (Dec) | Sets the primary input/output universe | |||
| 8. Exit (Option 8 for Input Status or Output Status in Single Mode) | Exits to the previous screen | ||||
| 8. LCD Backlight | 1. On Backlight on | ||||
| 2. 10 Seconds Display turns off after 10 seconds | |||||
| 3. 30 Seconds Display turns off after 30 seconds | |||||
| 4. Exit Exits to the previous screen | |||||
| 9. User Preset | 1. Art-net 8-port DMX | Sets all 8 ports to receive 8 universes of Art-NetTM from 0-7 | |||
| 2. sACN to 8-port DMX | Sets all 8 ports to receive 8 universes of sACN from 1-8 | ||||
| 3. 1x8 DMX Splitter | Sets the product to operate as a DMX splitter with all 8 outputs receiving DMX from input A | ||||
| 4. 2x4 DMX Splitter | Sets 1-4 outputs to input-port A and the 5-8 outputs to input-port B | ||||
| 5. Exit Exits to previous screen | |||||
| 10. Factory Reset | NO | Resets to factory settings | |||
| YES | |||||
| 11. Record Scenes <1-10> | 1. Name Scene _ _ _ _ _ _ _ _ _ _ _ _ _ _ _ _ _ _ _ _ _ _ _ _ _ _ _ _ _ _ _ _ _ _ _ _ _ _ _ _ _ _ _ _ _ _ _ _ _ _ _ _ _ _ _ _ _ _ _ _ _ _ _ _ _ _ _ _ _ _ _ _ _ _ _ _ _ _ _ _ _ _ _ _ _ _ _ _ _ _ _ _ _ _ _ _ _ _ _ _ | Cancel | Customize scene name | ||
| Enter | |||||
| 2. Step: (0/0) 000-100 | Scroll to the step that you prefer to edit | ||||
| 3. Add Step | Adds steps to scene and takes a snapshot of all 8 ports and records step to memory | ||||
| 4. Delete Step | NO | Delete current step from scene | |||
| YES | |||||
| 5. Timing | 1. Save Step Saves | timing for the selected step | |||
| 2. Fade In Time | 0.10S-9M59S | Selects fade in time | |||
| 3. Fade Out Time | 0.10S-9M59S | Selects fade out time | |||
| 4. Delay Time | 0.10S-9M59S | Selects delay time | |||
| 5. Exit Exits to previous screen | |||||
| 6. Exit Exits to previous screen | |||||
| 12. Trigger Settings | 1. Trigger 1 Scene 1-10 | Assigns trigger 1 to one of the 10 scenes | |||
| 2. Trigger 2 Scene 1-10 | Assigns trigger 2 to one of the 10 scenes | ||||
| 3. Trigger 3 Scene 1-10 | Assigns trigger 3 to one of the 10 scenes | ||||
| 4. Trigger 4 Scene 1-10 | Assigns trigger 4 to one of the 10 scenes | ||||
| 5. Exit Exits to previous screen | |||||
| 13. Backup | 1. Save Preset 1-10 | Saves and loads configurations | |||
| 2. Load Preset 1-10 | |||||
| 3. Exit Exits to previous screen | |||||
| 14. Firmware Version | ____ Displays firmware version | ||||
| 15. Exit Exit Exits to main screen | |||||
Operating Settings Configuration
Home Screen
The Net-X II has 2 home screens which display the current status of all ports. The home screen is displayed when the menu is not being accessed.
To access the menu from the home screen, press the knob. To return to the home screen from the menu, select 13. Exit and press the knob, or press & hold the control knob for 3 seconds (this can be done from any position in the Menu map)
Primary Home Screen
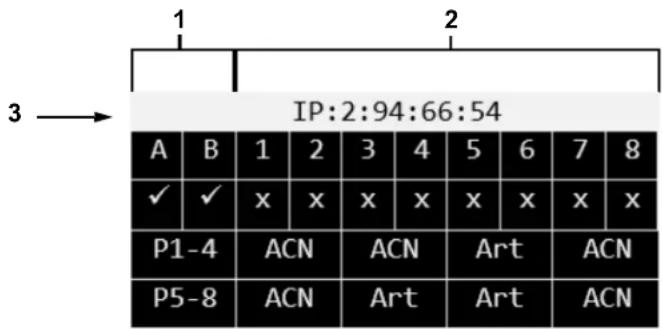
text_image
3 → IP:2:94:66:54 A B 1 2 3 4 5 6 7 8 ✓ ✓ x x x x x x x x P1-4 ACN ACN Art ACN P5-8 ACN Art Art ACN| # SYMBOL DESCRIPTION | ||
| 1 | A-B Ethernet in/through ports | |
| - or x(EtherNET ports status) | x is connected | |
| - is disconnected | ||
| P1-4 Ports 1-4 universe label | ||
| P5-8 Ports 5-8 universe label | ||
| 2 | 1-8 5-pin female port number label (1-8) | |
| √ or x(ports 1-8 signal sensor) | √ is detecting a signal | |
| x is no signal detected | ||
| Art, ACN, or DMX(Art-NetTM, sACN, or DMX) | Defines output or input port protocol for outputs 1-4 | |
| Art, ACN, or DMX(Art-NetTM, sACN, or DMX) | Defines output or input port protocol for outputs 5-8 | |
3 IP: Displays the device IP address
Secondary Home Screen
To access the secondary home screen, rotate the knob when viewing the main home screen.
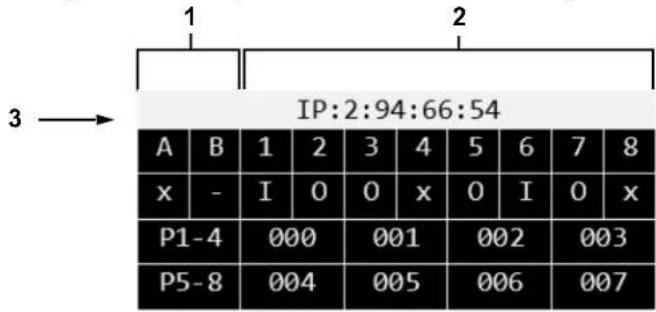
text_image
1 2 3 → IP:2:94:66:54 A B 1 2 3 4 5 6 7 8 x - I 0 0 x 0 I 0 x P1-4 000 001 002 003 P5-8 004 005 006 007| # SYMBOL DESCRIPTION | ||
| 1 | A-B 5-pin male input port (A/B) | |
| - or x(A/B input port status) | x is connected | |
| - is disconnected | ||
| P1-4 Ports 1-4 universe label | ||
| P5-8 Ports 5-8 universe label | ||
| 2 | 1-8 5-pin female port number label (1-8) | |
| I, O, or x(ports 1-8 direction mode) | Input (I) | |
| Output (O) | ||
| Disabled (x) | ||
| 000-256 Defines output or input port universe for outputs 1-4 | ||
| 000-256 Defines output or input port universe for outputs 5-8 | ||
3 IP: Displays the device IP address
Custom Device Name
To assign the Net-X II a custom device name, do the following:
- Use the knob to select 1. Custom Device Name.
- Press the knob.
- If there is no name set for this product, press the knob. If there is a name set for this product, use the knob to select which letter to edit, then press the knob.
- Use the knob to select the letter, number or symbol, from A-@. There are 63 options.
- Repeat until the name is set as desired.
- Use the knob to select either Enter to save the name, or Cancel to exit without saving.
- Press the knob.
Set IP Mode
The Net-X II can use a pre-set static IP address, or it can be set manually.
Static IP
To set the Net-X II to a pre-set static IP address, follow the instructions below:
- Use the knob to select 2. Set IP Mode.
- Press the knob.
- Use the knob to select 1. Static IP.
- Press the knob.
Manual IP
To set the IP address manually, do the following:
-
Use the knob to select 2. Set IP Mode.
-
Press the knob.
-
Use the knob to select 2. Manual IP.
-
Press the knob.
-
The manual IP address can be set from 000.000.000.000 to 255.255.255.255 by using the knob to scroll and select the desired numbers 000–255 for each byte (set of three numbers). Use this process to set each of the four bytes.
-
Use the knob to select Enter to save the chosen IP address or Cancel to exit without saving.
Set Netmask
To set the Netmask, follow the instructions below:
- Use the knob to select 3. Set Netmask.
- Press the knob.
- Use the knob to select one of the following options:
• A. 255.000.000.000
• B. 255.255.000.000
• C. 255.255.255.000 - Exit (to cancel).
Operating Mode
The Net-X II can operate as a splitter/converter, or a DMX merger. To switch between the 2 modes, do the following:
- Use the knob to select 4. Operating Mode.
- Press the knob.
- Use the knob to select either 1.8 Port (used to activate RDM over Ethernet support for transport of RDM to/from lighting fixtures via 5-pin DMX to a lighting controller via Ethernet, e.g., Art-Net™, Art-RDM) or 2.2 + 8 Port (required for DMX splitter mode via the 2 male DMX ports on the back of the NET-X II; disables all RDM functionality; adds DMX Input A & B under the Set DMX Port menu option).
- Press the knob.
-
- Exit (to cancel).
NetWork Timeout
The network timeout sets the time delay for the Net-X II to stop receiving commands from a console connected to the network. This can only be applied to HTP/LTP DMX merge modes via Art-Net ^™ or sACN protocols.
- Use the knob to select 5. NetWork Timeout.
- Press the knob.
- Use the knob to select either 1. Disabled, 2. 1 Seconds, 3. 2 Seconds, or 4. 5 Seconds.
- Press the knob.
-
- Exit (to cancel).

If set to Disabled, the Net-X II will remain locked into the network lighting controller even if the controller stops sending data.
On Source Loss
This option is used to determine what happens when a console suddenly stops sending data to or through the Net-X II. To configure this setting, follow the instructions below:
- Use the knob to select 6. On Source Loss.
- Press the knob.
- Use the knob to select from 1. Hold output (holds the last value received), 2. Blackout (sets all DMX channels to a value of 000), 3. Stop DMX (disables the port), or 4. Exit (to cancel).
- Press the knob.
Set DMX Port
The Net-X II has 8 DMX ports that can be set as outputs or inputs. To select a DMX port to configure, follow the instructions below:
- Use the knob to select 7. Set DMX Port.
- Press the knob.
- Use the knob to select the desired DMX port, from DMX Port 1–8 / DMX Input A–B (DMX inputs will only display if Operating Mode is set to 2 + 8 Port), or Exit (to cancel).
- Press the knob.
Disp Type
The display type determines whether the selected port universe displays as either decimal or hexadecimal values. The display type will alter the menu options for Network and Universe ranges.
- Select the DMX port to configure as instructed in Set DMX Port .
- Use the knob to select 1. Disp Type.
- Press the knob.
- Use the knob to select either DEC (decimal) or HEX (hexadecimal).
- Press the knob.
DMX Status
The DMX status determines whether the selected port functions as an input, an output, or is disabled. The selected status will alter the menu options for DMX Mode and Universe merging.
- Select the DMX port to configure as instructed in Set DMX Port.
- Use the knob to select 2. DMX Status.
- Press the knob.
- Use the knob to select the desired port mode from, DISABLE, OUTPUT, or INPUT.
- Press the knob.
DMX Mode
The Net-X II is capable of merging two signals of the same protocol into one, using HTP (Highest Takes Precedence), or LTP (Latest Takes Precedence) logic when the DMX Status is set to Output. When the DMX Status is set to Input, Normal and Backup must be set to the same Output universe.
- Select the DMX port to configure as instructed in Set DMX Port.
- Use the knob to select 3. DMX Mode.
- Press the knob.
- Use the knob to select the desired mode:
• SINGLE (OUTPUT Status only) - Disables Ethernet signal merging
• HTP (OUTPUT Status only) - Highest Takes Precedence
- LTP (OUTPUT Status only) - Latest Takes Precedence
• NORMAL (INPUT Status only) - Input port acts as a primary controller
- BACKUP (INPUT Status only) - Input port acts as a backup controller; the Net-X II will NOT start accepting changes from the backup port until the normal port with the same Universe assignment stops broadcasting control signal
- Press the knob.
Protocol
Set the protocol to either Art-Net™ or sACN:
- Select the DMX Port to configure as instructed in Set DMX Port.
- Use the knob to select 4. Protocol.
- Press the knob.
- Use the knob to select the desired settings from ArtNet or sACN.
- Press the knob.

The sACN priority value (1–200) from the consoles will be ignored if using the merging functions of HTP or LTP with the sACN control protocols.
Framerte/fs
The frame rate, in milliseconds (ms), is the speed at which the DMX packets are sent out of the 8 DMX ports. This only applies when the ports are set to Output.
- Select the DMX Port to configure as instructed in Set DMX Port.
- Use the knob to select 5. Framerte/fs.
- Press the knob.
- Use the knob to set the frame rate from 010-040.
- Press the knob.

This feature is useful for fixtures unable to receive high-speed DMX.
Network
To set the net setting, do the following:
- Select the DMX port to configure as instructed in Set DMX Port.
- Use the knob to select 6. Network.
- Press the knob.
- Use the knob to select from range options (differs based on Disp Type and Protocol selections):
• 000–127: When Disp Type is set to DEC & Protocol is set to ArtNet.
• 001–128: When Disp Type is set to DEC & Protocol is set to sACN.
• 00H-7FH: When Disp Type is set to HEX & Protocol is set to ArtNet.
• 01H-80H: When Disp Type is set to HEX & Protocol is set to sACN.
- Press the knob.

This is implemented in very few consoles and only applies to the ArtNet 4 protocol.
1st Universe
Sets the primary Input/Output universe.
- Select the DMX port to configure as instructed in Set DMX Port.
- Use the knob to select 7. 1st Universe.
- Press the knob.
- Use the knob to select from range options (differs based on Disp Type and Protocol selections):
• 000–255: When Disp Type is set to DEC & Protocol is set to ArtNet.
• 001-256: When Disp Type is set to DEC & Protocol is set to sACN.
• 00H-7FH: When Disp Type is set to HEX & Protocol is set to ArtNet.
• 01H–80H: When Disp Type is set to HEX & Protocol is set to sACN.
- Press the knob.
LCD Backlight
To set the amount of time after inactivity before the display backlight turns off, follow the instructions below:
- Use the knob to select 8. LCD Backlight.
- Press the knob.
- Use the knob to select from the following options, 1. On (does not turn off), 2. 10 Seconds (turns off after 10 seconds of inactivity), 3. 30 Seconds (turns off after 30 seconds of inactivity), or 4. Exit (to cancel).
- Press the knob.
User Preset
This option saves 4 different preset menu option configurations. To set these presets, follow the instructions below:
- Use the knob to select 9. User Preset.
- Press the knob.
- Use the knob to select one of the four following presets:
• 1. Art-net 8-port DMX (Sets all 8 ports to receive 8 universes of Art-Net™ from 0–7).
• 2. sACN to 8-port DMX (Sets all 8 ports to receive 8 universes of sACN from 1–8).
• 3. 1x8 DMX Splitter (Sets the product to operate as a DMX splitter with all 8 outputs receiving DMX from input A).
• 4. 2x4 DMX Splitter (Sets 1–4 outputs to input-port A and the 5–8 outputs to input-port B).
- 5. Exit (to cancel).
- Press the knob.

When using the DMX splitter presets, DO NOT connect a network to the product.
Factory Reset
To restore the Net-X II to factory default settings, do the follow:
- Use the knob to select 10. Factory Reset.
- Press the knob.
- Use the knob to select NO (do not reset) or YES (reset to factory settings).
- Press the knob.

This will erase any existing recorded scenes.
Record Scenes
The Net-X II has the capability to record up to 10 scenes. To record scenes, follow the instructions below:
- Use the knob to select 11. Record Scenes.
- Press the knob.
- Use the knob to select from Scene 1-10.
- Press the knob.
Scene Name
The Net-X II allows you to customize the name of each scene. To name a scene, do the following:
- Select the Scene to configure as instructed in Record Scenes.
- Use the knob to select 1. Name:Scene_1-10.
- Press the knob.
- Use the knob to select the letter, number or symbol, from A-@. There are 96 options.
- Repeat until the name is set as desired.
- Use the knob to select either Enter to save the name, or Cancel to exit without saving.
- Press the knob.
Scene Steps
This feature displays the amount of steps saved to the scene. To view previously saved steps, follow the instructions below:
- Select the Scene to configure as instructed in Record Scenes.
- Use the knob to select 2. Step:(0/0).
- Press the knob.
- Turn the knob to cycle through the saved steps.
Add Step
This function adds a step to the scene. To add a step to the scene, do the following:
- Select the Scene to configure as instructed in Record Scenes.
- Use the knob to select Add Step.
- Press the knob.
Delete Step
This function deletes a step from the scene. To delete a step from the scene, follow the instructions below:
- Select the Scene to configure as instructed in Record Scenes.
- Use the knob to select Delete Step.
- Press the knob.
Timing
This function sets the intervals between steps, as well as a fading effect if desired.
- Select the Scene to configure as instructed in Record Scenes.
- Use the knob to select 5. Timing.
-
Press the knob.
-
Use the knob to select:
• 2. Fade In Time:0.10S—9M59S.
- Press the knob.
• 3. Fade Out Time:0.10S—9M59S.
- Press the knob.
• 4. Delay Time:0.10—9M59S.
- Press the knob.
- 5. Exit (to cancel).
- Select 1. Save Step menu option to save timing settings.
Trigger Settings
The Net-X II can assign a trigger to an external dry contact switch to trigger a recorded scene. When the trigger is turned on, the Trigger Info will display on the display screen with the scene name, amount of steps, and the timing set for that scene.
- Use the knob to select 12. Trigger Settings.
- Press the knob.
- Use the knob to select Trigger 1-4.
- Press the knob.
- Use the knob to select the desired Scene 1-10.
- Press the knob.
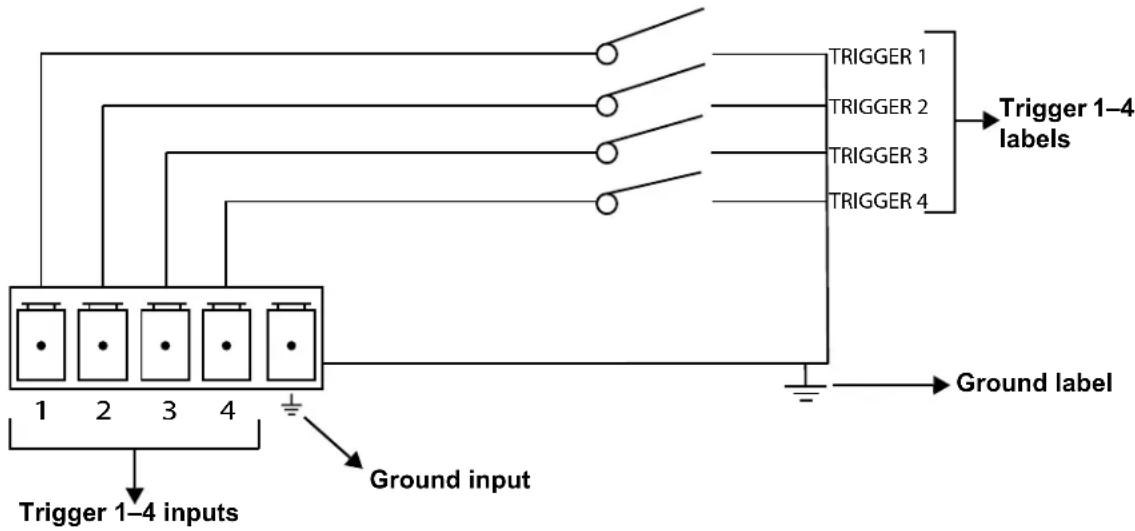
Trigger Setting Diagram
The Net-X II can set recorded scenes to a trigger using the 5-wire Phoenix connector on the rear of the unit. Up to 4 triggers can be connected for momentary functionality.
A latching switch will be necessary to run indefinitely.
flowchart
graph TD
    A["Trigger 1-4 inputs"] --> B["Ground input"]
    B --> C["Trigger 1"]
    B --> D["Trigger 2"]
    B --> E["Trigger 3"]
    B --> F["Trigger 4"]
    C --> G["Trigger 1-4 labels"]
    D --> G
    E --> G
    F --> G
    G --> H["Ground label"]
Backup
The Net-X II has a backup setting that allows the product to save and load configurations.
- Use the knob to select 13. Backup.
- Press the knob.
- Use the knob to select 1. Save.
- Press the knob.
- Use the knob to select 2. Load.
- Press the knob.
- Use the knob to select 3. Exit (to cancel).
- Press the knob.

This will backup to the internal memory, and does NOT include the recorded scenes. The use of the webserver backup method will be needed to backup to an external source.
Firmware Version
This function displays the firmware version of the product.
- Use the knob to select 14. Firmware Version.
- Press the knob. The firmware version will display: B1.0 V2.3.
- Press the knob to exit.
Exit
This function exits out of the menu to the main screen.
- Use the knob to select 15. Exit.
- Press the knob. The product returns to the home screen.
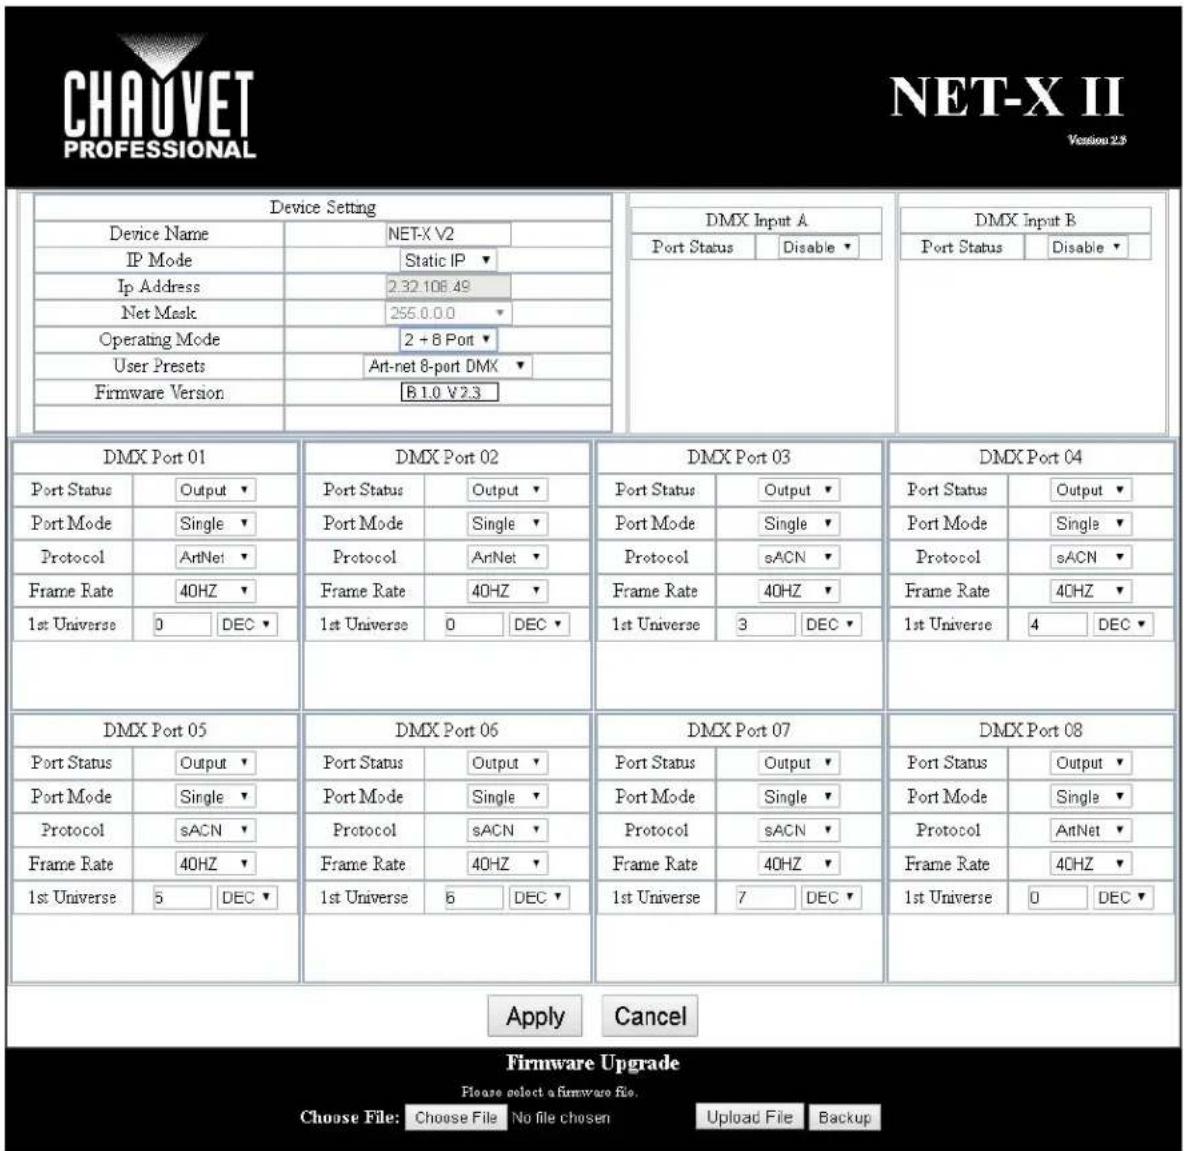
Web Server
The Net-X II Web server can be accessed by any computer on the same network as the product. It allows network access to system information, settings such as control setup, backup, manual testing of all functions, and firmware updates. To access the Web browser:
- Connect the product to a Windows computer with a network cable.
- Enter the IP address of the product into the URL bar of a web browser on the computer and press enter.
text_image
CHADUVET PROFESSIONAL NET-X II Version 2.3 Device Setting Device Name NET-X V2 IP Mode Static IP ▼ Ip Address 2.32.108.49 Net Mask 255.0.0.0 ▼ Operating Mode 2 + 8 Port ▼ User Presets Art-net 8-port DMX ▼ Firmware Version B1.0 V2.3 DMX Port 01 DMX Port 02 DMX Port 03 DMX Port 04 Port Status Output ▼ Port Mode Single ▼ Protocol ArtNet ▼ Frame Rate ArtNet ▼ 1st Universe 40HZ ▼ 1st Universe 0 DEC ▼ DMX Port 05 DMX Port 06 DMX Port 07 DMX Port 08 Port Status Output ▼ Port Mode Single ▼ Protocol sACN ▼ Frame Rate sACN ▼ 1st Universe 40HZ ▼ 1st Universe 7 DEC ▼ Apply Cancel Firmware Upgrade Please select a firmware file. Choose File: Choose File No file chosen Upload File BackupWeb Server Overview
text_image
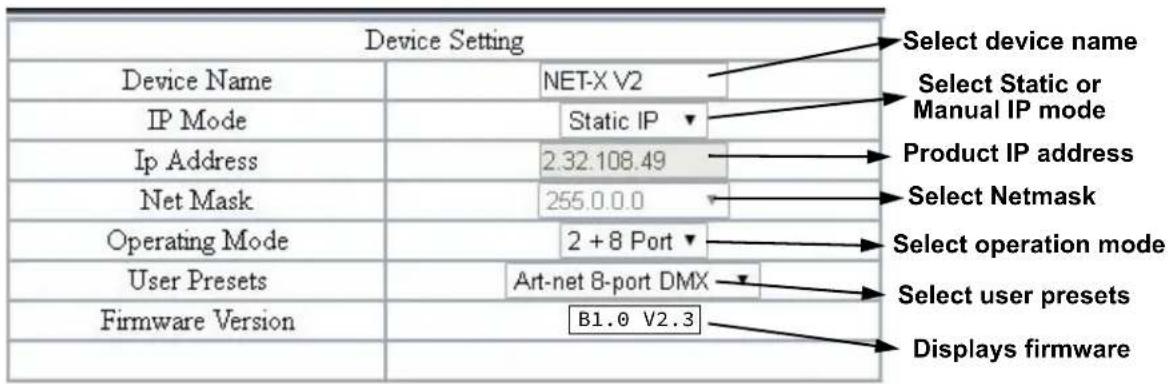
Device Setting Device Name NET-X V2 IP Mode Static IP ▼ Ip Address 2.32.108.49 Net Mask 255.0.0.0 Operating Mode 2 + 8 Port ▼ User Presets Art-net 8-port DMX ▼ Firmware Version B1.0 V2.3 Select device name Select Static or Manual IP mode Product IP address Select Netmask Select operation mode Select user presets Displays firmwareDMX Port Overview - Input Status
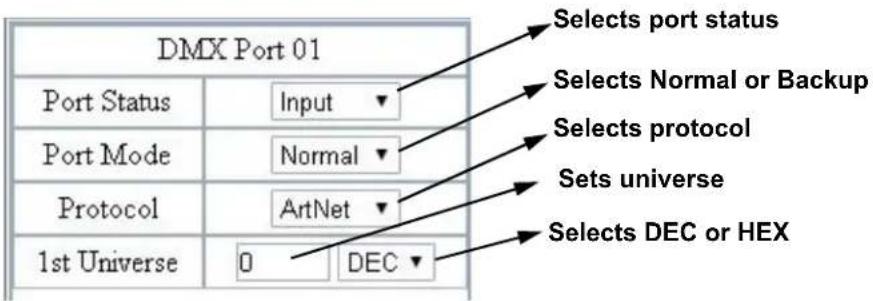
text_image
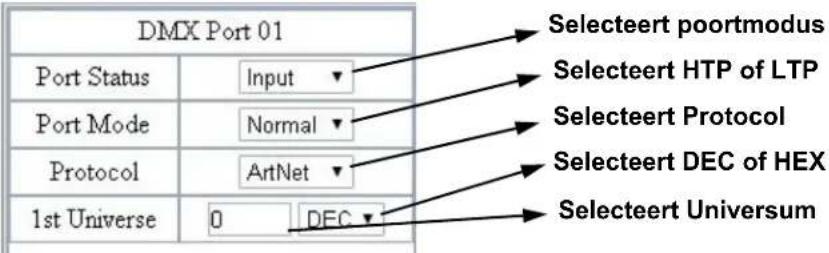
DMX Port 01 Port Status Input Port Mode Normal Protocol ArtNet 1st Universe 0 DEC Selects port status Selects Normal or Backup Selects protocol Sets universe Selects DEC or HEXDMX Port Overview - Output Status
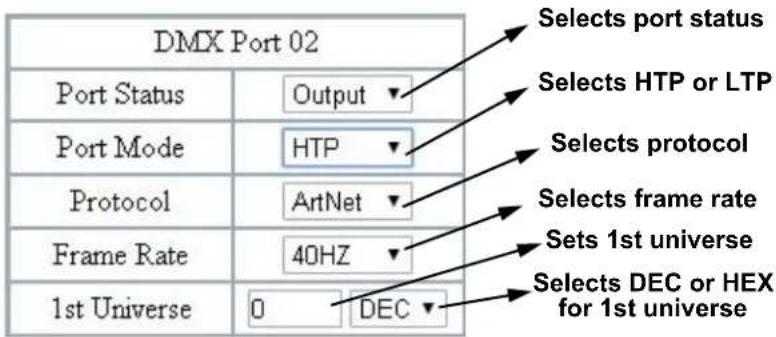
text_image
DMX Port 02 Port Status Output Port Mode HTP Protocol ArtNet Frame Rate 40HZ 1st Universe 0 DEC Selects port status Selects HTP or LTP Selects protocol Selects frame rate Sets 1st universe Selects DEC or HEX for 1st universeFirmware Update/Backup
The Net-X II has a backup setting that allows the product to save and load configurations from the Web server. The Net-X II also has firmware upgrades that allow the product to be updated to the latest firmware. To use these functions, follow the instructions below:
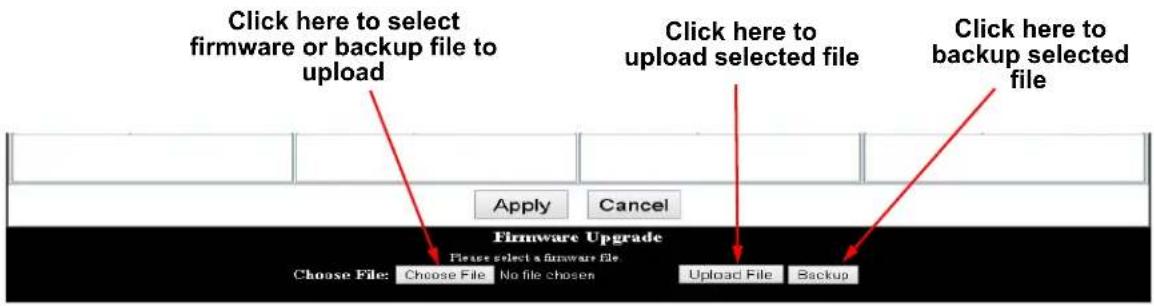
text_image
Click here to select firmware or backup file to upload Click here to upload selected file Click here to backup selected file Apply Cancel Firmware Upgrade Please select a firmware file Choose File: Choose File No file chosen Upload File Backup5. Technical Information
Product Maintenance
To maintain optimum performance and minimize wear, clean this product frequently. Usage and environment are contributing factors in determining the cleaning frequency.
Clean this product at least twice a month. Dust build-up reduces performance and can cause overheating. This can lead to reduced life and increased mechanical wear.
To clean the product:
- Unplug the product from power.
- Wait until the product is at room temperature.
- Use a vacuum (or dry compressed air) and a soft brush to remove dust collected on the external vents.
- Clean all transparent surfaces with a mild soap solution, ammonia-free glass cleaner, or isopropyl alcohol.
- Apply the solution directly to a soft, lint-free cotton cloth or a lens-cleaning tissue.
- Softly drag any dirt or grime to the outside of the transparent surface.
- Gently polish the transparent surfaces until they are free of haze and lint.

Always dry the transparent surfaces carefully after cleaning them.
6. Technical Specifications
Dimensions and Weight
| LENGTH | WIDTH | HEIGHT | WEIGHT |
| 19 in (483 mm) | 6.22 in (158 mm) | 1.73 in (44 mm) | 4.6 lb (2.1 kg) |
Note: Dimensions in inches rounded to the nearest decimal digit.
Power
| POWER SUPPLY TYPE | RANGE | VOLTAGE SELECTION | |
| Switching (internal) 100 to 240 VAC, 50/60 Hz Auto-ranging | |||
| PARAMETER | 120 V, 60 Hz | 208 V, 60 Hz | 230 V, 50 Hz |
| Consumption | 11 W | 14 W | 14 W |
| Operating current | 0.09 A | 0.06 A | 0.06 A |
| POWER I/O | U.S./WORLDWIDE | UK/EUROPE | |
| Power input connector | Seetronic® powerKON® A | Seetronic® powerKON® A | |
| Power cord plug | Edison (U.S.) | Local Plug | |
Connections
| INPUTS | OUTPUTS/INPUTS (ASSIGNABLE) | THROUGHPUTS |
| Seetronic® etherKON®(1 total)5-pin XLR (2 total) | 5-pin XLR (8 total) | Seetronic® etherKON®(1 total) |
Thermal
| MAXIMUM EXTERNAL TEMPERATURE | COOLING SYSTEM |
| 104 °F (40 °C) | Convection |
Ordering
| PRODUCT NAME | ITEM NAME | ITEM CODE | UPC NUMBER |
| NET-X II | NETXII | 09111455 | 781462218034 |
Returns
Send the product prepaid, in the original box, and with the original packing and accessories. Chauvet will not issue call tags.
Call Chauvet and request a Return Merchandise Authorization (RMA) number before shipping the product. Be prepared to provide the model number, serial number, and a brief description of the cause(s) for the return.
To submit a service request online, go to www.chauvetprofessional.com/service-request.
Clearly label the package with an RMA number. Chauvet will refuse any product returned without an RMA number.

Write the RMA number on a properly affixed label. DO NOT write the RMA number directly on the box.
Once you have the RMA number, provide the following information on a piece of paper and place it inside the box:
- Your name
- Your address
- Your phone number
• RMA number
• A brief description of the problem
Be sure to pack the product properly. Any shipping damage resulting from inadequate packaging will be your responsibility. FedEx packing or double-boxing are recommended.

Chauvet reserves the right to use its own discretion to repair or replace returned product(s).
Contact Us
General Information Technical Support
Chauvet World Headquarters
Address: 5200 NW 108th Ave. Voice: (844) 393-7575
Sunrise, FL 33351 Fax: (954) 756-8015
Voice: (954) 577-4455 Email: chauvetcs@chauvetlighting.com
Fax: (954) 929-5560
Toll Free: (800) 762-1084 Website: www.chauvetdj.com
Chauvet Europe Ltd
Address: Unit 1C Email: UKtech@chauvetlighting.eu
Brookhill Road Industrial Estate
Pinxton, Nottingham, UK Website: www.chauvetdj.eu
NG16 6NT
Voice: +44 (0) 1773 511115
Fax: +44 (0) 1773 511110
Chauvet Europe BVBA
Address: Stokstraat 18 Email: BNLtech@chauvetlighting.eu
9770 Kruishoutem
Belgium Website: www.chauvetdj.eu
Voice: +32 9 388 93 97
Chauvet France
Address: 3, Rue Ampère
91380 Chilly-Mazarin
France Website: www.chauvetdj.eu
Voice: +33 1 78 85 33 59
Chauvet Germany
(Entrance by Calle 2)
Zona Industrial Lerma Website: www.chauvetdj.mx
Visit the applicable website above to verify our contact information and instructions to request support.
Outside the US, the UK, Ireland, Mexico, France, Germany, or Benelux, contact the dealer of record.
Notas de la Edición
text_image
17,40" 442 mm 6,20" 157.5 mm
text_image
1,73" 44 mm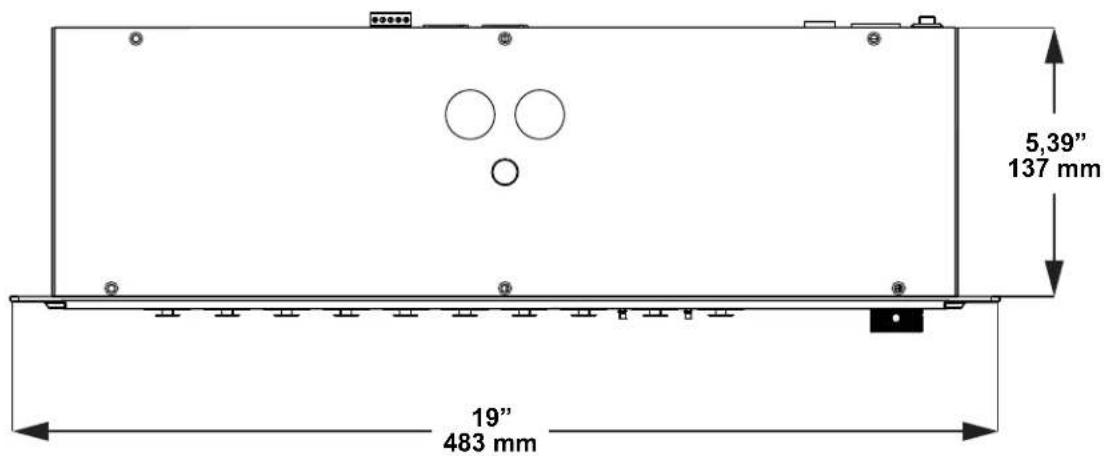
text_image
5,39" 137 mm 19" 483 mm3. Instalación
Corriente alterna
Chauvet World Headquarters
Address: 5200 NW 108th Ave. Voice: (844) 393-7575
Sunrise, FL 33351 Fax: (954) 756-8015
Voice: (954) 577-4455 Email: chauvetcs@chauvetlighting.com
Fax: (954) 929-5560
Toll Free: (800) 762-1084 Website: www.chauvetdj.com
Chauvet Europe Ltd
Address: Unit 1C Email: UKtech@chauvetlighting.eu
Brookhill Road Industrial Estate
Pinxton, Nottingham, UK Website: www.chauvetdj.eu
NG16 6NT
Voice: +44 (0) 1773 511115
Fax: +44 (0) 1773 511110
Chauvet Europe BVBA
Address: Stokstraat 18 Email: BNLtech@chauvetlighting.eu
9770 Kruishoutem
Belgium Website: www.chauvetdj.eu
Voice: +32 9 388 93 97
Chauvet France
Address: 3, Rue Ampère
91380 Chilly-Mazarin
Email: FRtech@chauvetlighting.fr
France Website: www.chauvetdj.eu
Voice: +33 1 78 85 33 59
Chauvet Germany
(Entrance by Calle 2)
Email: servicio@chauvet.com.mx
Zona Industrial Lerma Website: www.chauvetdj.mx
Please select a firmware file.
Choose File: Choose File No file chosen
Upload File Backup
5. Informations Techniques
Please select a firmware file.
Choose File:
Choose File
No file chosen
Upload File
Backup
Overzicht Web Server

text_image
Device Setting Device Name NET-X V2 IP Mode Static IP Ip Address 2.32.108.49 Net Mask 255.0.0.0 Operating Mode 2 + 8 Port User Presets Art-net 8-port DMX Firmware Version B1.0 V2.3 Selecteer apparaatnaam Selecteerof handmatige IP-modus Selecteer IP-modus Selecteer Netmask Selecteer bedieningsmodus Selecteer gebruikersvoorkeuren Toont de firmwareOverzicht DMX Poort - Ingangsstatus