COA7002 - Oven Vollrath - Free user manual and instructions
Find the device manual for free COA7002 Vollrath in PDF.

| Product Type | Professional gas barbecue oven |
| Brand | Vollrath |
| Model | COA7002 |
| Usage | Commercial food service |
| Service Types | Medium and heavy duty |
| Cooking Configuration | Radiant heat or lava rock (kit sold separately) |
| Fuel | Natural gas or propane (conversion possible) |
| Clearance Required | Minimum 6" (15 cm) at rear, 4" (10 cm) legs |
| Adjustable Legs | Yes, for leveling |
| Burners | Gas burners with pilot light |
| Ignition | Manual by flame |
| Included Accessories | Grills, drip tray, radiant heat covers |
| Daily Maintenance | Clean hot grills, empty drip tray |
| Weekly Maintenance | Inspect and clean radiant bars or lava rocks |
| Initial Break-in | Heat for 30 minutes at max power to burn off residues |
| Grill Seasoning | Oil and heat for 30 minutes, repeat twice |
| Regulator | Included, configured for natural gas |
| Gas Connection | 3/4" NPT male |
| Safety | Manual shut-off, leak detection, ventilation clearance |
| Warranty | See full statement on Vollrath.com |
| After-sales Service | Contact Vollrath technical services with item number and proof of purchase |
Frequently Asked Questions - COA7002 Vollrath
User questions about COA7002 Vollrath
0 question about this device. Answer the ones you know or ask your own.
Ask a new question about this device
Download the instructions for your Oven in PDF format for free! Find your manual COA7002 - Vollrath and take your electronic device back in hand. On this page are published all the documents necessary for the use of your device. COA7002 by Vollrath.
USER MANUAL COA7002 Vollrath
Medium-DutyandHeavy-DutyGasCharbroilers
ThankyouforpurchasingthisVollrathequipment.Beforeoperatingthe equipment,readandfamiliarizeyourselfwiththefollowingoperating andsafetyinstructions.SAVETHESEINSTRUCTIONSFORFUTURE REFERENCE.Savetheoriginalboxandpackaging.Usethepackagingto shiptheequipmentifrepairsareneeded.
SAFETYPRECAUTIONS
Toensuresafeoperation, read the following statements and understand their meaning. This manual contains safety precautions which are explained below. Please read carefully.

WARNING
Warningisusedtoindicatethepresenceofahazardthatwillorca causeseverepersonaljuryordeath.

CAUTION
Cautionisusedtoindicate the presence ofahazardthatwillcause minormajorpersonalinjuryifthecautionisignored.
NOTICE:Noticeisusedtonoteinformationthatisimportantbutnot hazard-related.
Toreduceriskofinjuryordamageotheequipment:
-Cleanthequipmentpertheinstructionsinthisismanual.
- Donotstoreorusegasolineorotherflammablevapororsliquidsin thevicinityofthisoranyotherequipment.
- Keepthequipmentareafreeandclearofcombustibles.
- Donobstructtheflowofcombustionandventilationair. Theback of the equipment must have a minimum of space.
- Useasoftclothdampenedwithwarm,soapywatertocleanthe controlsandthesidesofthecquipment.
NOTICE: Donotcleanthegriddleplatesurfacewithsoapwater. Soapwaterwillcorrodethegriddesurface.
-Allowwhotequipmentcoolbeforecleaningormoving.
- Use equipment onaflat, level positiononly.
- Donotoperatunattended.

WARNING
Fire, Injury, DeathHazard
Correct precautions, procedures, and regulations for usage must be followed. Operationandsafetytrainingisnecessary for all users of this equipment.
FUNCTIONANDPURPOSE
This equipment is intended to be used for charcoal broiling foodsin commercial foodservice operationsonly. It is not intended for household, industrial, or laboratory use.
MediumDuty
HeavyDuty

Conforms to ANSI STD ZB3.11-2016 Certified to CSA STD 1.8-2016

Conforms to NSF/ANSI STD 4
| Item/ModelNumberDescription | |
| CBGMD-12Medium-Duty,Radiant,12" | |
| CBGMD-24Medium-Duty,Radiant,24" | |
| CBGMD-36Medium-Duty,Radiant,36" | |
| CBGMD-48Medium-Duty,Radiant,48" | |
| CBGMD-60Medium-Duty,Radiant,60" | |
| CBGHD-18Heavy-Duty,Radiant,18" | |
| CBGHD-24Heavy-Duty,Radiant,24" | |
| CBGHD-36Heavy-Duty,Radiant,36" | |
| CBGHD-48Heavy-Duty,Radiant,48" | |
| CBGHD-60Heavy-Duty,Radiant,60" | |
| CBGHD-72Heavy-Duty,Radiant,72" |
CLEARANCEANDENVIRONMENTREQUIREMENTS
- Mustbeinstalledadjacenttonon-combustiblesurfacesonly,with a minimumspacingof6"onthebackoffthequipment.
Adequateclearancemustbemaintainedtoallowforproperventilationandservicing.4"legsmustbeinstalledtoallowairflow.
Register your product at www.Vollrath.com/registration and become eligible to win a free 10" Vollrath Tribute ^© frypan.
INSTALLATION


WARNING
Improperinstallation, adjustment, alteration, serviceor maintenancecausepropertydamage, injuryordeath. Readtheinstallation, operatingandmaintenanceinstruct- tionsthoroughlybeforeinstallingservicingthisequipment.


WARNING
Fire, Injury, Death Hazard
This equipment must be installed by a qualified installer in accordance with all federal, state, and local codes. Failure to install this equipment properly can result in injury or death.


WARNING
FireHazard
Donotinstallorusewithout4"legs.Useofthisequipment withoutlegscancausetheapplianctooverheatandcause afire.

CAUTION
Anyloosedirtormetalparticlesthatareallowedtoenterthegas linesonthisappliancewilldamagethevalveandaffectits operation.Wheninstallingthisappliance,allpipeandfittingsmustbefreefromanyinternalcontaminates.Itisrecommendedthatasedimenttrapbeinstalledin-linebeforetheregulator.
ApplicableCodesandStandards
United States
Vollrathrecommendsthatallcommercialcookingequipmentbeprovided withventilationsystemincompliancewithNFPA96:
Cookingequipmentthatusesorproducesgrease(e.g.fryer,griddle), mustbeprovidedwithhoodsthataredesignedtocapturegreaseand providefireprotection.
- Equipmentmustbeinstalledinaccordancewiththerequirementsand approvaloftheAHJ"AuthorityHavingJurisdiction."
NOTICE: Postinstructionstobefollowedintheeventheusersmells gas. Consultyourlocalgassupplierfortheseinstructionsand posttheminaprominentlocation.
NOTICE: The installation of this equipment must conform with local codes, or the absence of local codes, with the National Fuel GasCode, International Fuel Gas Code, ANSI Z223.1/NFPA54, or the Natural Gas and PropanelstallationCode, CSAB149.1, as applicable.
InstallandLeveltheLegs
Ensurethequipmentislevelinaldirections.Beginbytighteningeachleg securely.Then,asneededateachcorner,rotatetheadjustablefoot.
GasPiping
Gaspingmustbesizedtoensuresufficientpressureandflowtomeet thefull-ratedgasinputofthequipment.
- Connectiontoanexistingsystemrequires that the existing system have capacity equal to greater than the full-rated gas input of the equipment.
Jointcompound(pipedope)shouldbeusedsparinglyandonlyonthe malethreadsofthepipejoints.Suchcompoundsmustberesistantto theactionofliquidpropane(LP)gases.
PressureRegulator
NOTICE: All commercial cooking equipment must have pressure regulator on the incoming serviceline for safe and efficient operation.
NOTICE: Priortoconnectingtheregulator, checkthe incoming line pressure. Theregulatorcanonlywithstandamaximum pressure of 12 PSI (14*WC). If the line pressure is beyond this limit, astep-downregulatorbeforetheregulatorprovidedwill berequired.
NOTICE:Theapplianceanditsindividualshutoffvalvemustbe disconnectedfromthegassupplypipingsystemduringany pressuretestingothatsystemmattestpressuresinexcessof1/2psi(3.5kPa).
NOTICE:Theappliancemustbeisolatedfromthegassupplypiping systembyclosingsitsindividualmanualshutoffvalveduring anypressuretestingofthegassupplypipingsystematemttest pressuresequaltolessthan1/2psi(3.5kPa)
Thearrowforgedintothebottomoftheregulatorbodyshowstegas flowdirection,andshouldpointdownstreamtothequipment.
- Theregulatorprovidedwiththisequipmentsisconfiguredforusewith naturalgas. FollowingtheinstructionsintheLPConversionKit, it can bereconfiguredforusewith LP gas.
Theequipmentcomesfittedwitha 3 / 4 N.P.T.maleadapterforconnection tothepressureregulator.
- Check the pressure of the incoming gasline. Theregulator can withstand maximum pressure of 14"WC (1/2 PSI). If the line pressure is beyond this limit, astep-downregulator will be required.
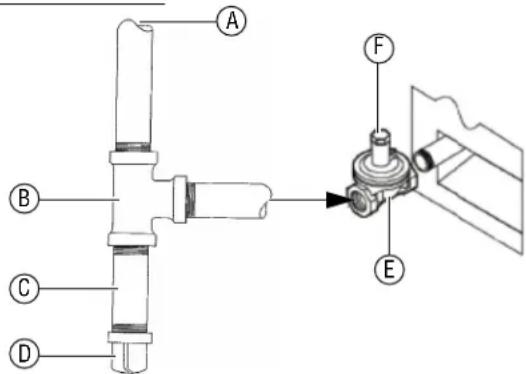
RegulatorConnection
ATogassupplywiththeinstallationofB,C,andDinavertical orientationasshowntprovidedebriscapture.
BTEEsuppliedRegulator
CNipple(anylength)FVent
DCap
OrificeSizing
NOTICE:RefertotheInternationalFuelGasCodeforproperorificesizing.
- Installerisresponsibleforcorrectorificesizing.
Theorificesizeismarkedonteorifice/spud. - Equipmentism manufactured for 1035BTU per cubic foot theat value of natural gas.
GasConversion
- Conversion from natural gastoliquid propane(LP) or viceversamust beperformedbyaqualifiedtechnicianorserviceagentperthe InternationalFuelGasCode.
- Refertotheconversionkitinstructionsincludedwiththisequipment.
ManualShut-OffValve
Amanualshutoffvalveshouldbeinstalledinanaccessiblelocation within6ft.(1.8m)ofthequipment.
TesttheEquipment
CheckforGasLeaks
NOTICE:Matches, candleflame, oranyotherpotentialsource of ignitionshallnotbeusedforthispurpose.
1.Rotatethegascontrolknobsforthemainburner(s)totheOFF position.
2. Removethegascontrolknob(s).
3.Usea5/16'nutdrivertoremovethe4screwssecuringthefront panel.Removethefrontpaneltoaccesssthepilotburnercontrol valve(s).
4. Locatethepilotburnercontrolvalvesforeachpilotlightandturn themOFFbyturningthesmallforward-facingscrewclockwiseuntil tight.
5. Connect the equipment to the gas supply.
6. Apply soapaywatertoachconnection.
7. TurnONthemsainsupplyvalve.
8.Lookforbubblesattheconnections.
9.Tightentheconnectionsasneeded.
LightthePilotBurners
1.Wait5minutestoallowanygastodissipate.
2.Tolightthepilotburners,holdaflamesourceoverthedesiredpilot burnerwhileslowlyturningitscontrolvalvescrew counterclockwise,adjustingtheflametothehedesiredintensity. RePEATforallpilotburners.
TesttheMainBurners
Afterlightingallofthepilotburners,ensurethateachmainburner functionscorrectly.
Afterthelightingthe pilots, themainburnerscanbeignitedbypushing andturningthecontrolknobfromthe"off"positiontothedesired setting. Visuallycheckthathepilotlightignitesthemainburner.
Themainburnerscanbeextinguishedbyturningthecontrolknobback tothe"off"position. The pilotlightscanbeextinguishedbyshutting off thegassupplyattheshut-offvalveinstalledonthegasline.
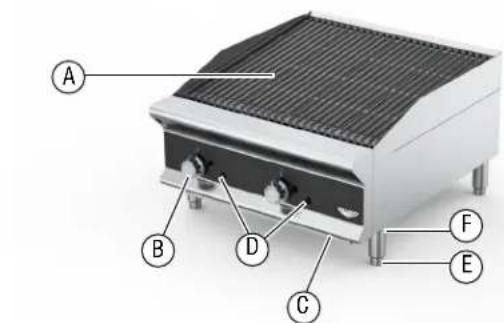
AGrillGrates.Anglecanbeadjusted.
BGasControlKnob. Usedtoadjustthetemperatureofthegrilling surface.
CDripTray.Collectsgreaseandoil.Thistraycanberemovedfor cleaning.Itisrecommendedtohaveathinlayerofwaterinthe driptraytoreduceflare-upsandsmoking,whilstillallowing plentyofvolumefordrippings.
DPIilotLightAccessHole. Allowsaccesssthepilotlight.
EAdjustableFoot. Usedtoadjusttheleveloftheequipment.
FLeg.Supportstheequipment.
BEFOREFIRSTUSE
SetupForLavaRockorRadiantHeat
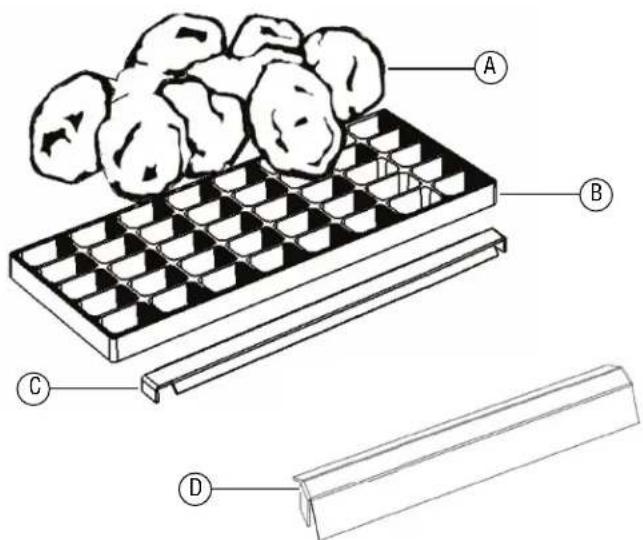
ALavaRock. Helpstodeliverevenheatingacrosstheentire surface, and alsoservletocollectdrippingsandtoprovidesome smokeflavoringtothefood. Shouldbereplacedwhenthey are nolongerporous.
BWaffleGrate(s).Usedwiththelavarocksetup.
CLavaRockCover(s).Usedwiththelavarocksetup. NOTICE:Usedforheavydutymodelsonlytoreplaceheavy dutyradiants.
NOTICE:Lavarockkitscanbepurchasedseparatelyasan accessory.
DRadiatorCover(s).Usedaloneintheradiantsetupotprotectthe burner(s)andtohelpdistributetheheatfromtheburner(s). NOTICE:Canbeleftinplaceformediumdutymodels.
ConverttoRadianHeatConverttoLavaRock
-
Removethelavarockandsave forfuturereuse.
-
Removetheradiantcover(s)and saveforfuturereuse.
-
Removethewafflegrate(s)and saveforfuturereuseifstill sufficientlyporous;otherwise, discard.
2.Placethelavarockcover(s)over theburnertube(s).
- Removethelavarockcover(s) andsaveforfutureuse.
3.Setthewafflege(s)into place.
- Placetheradiantcover(s)over theburnertube(s).
4.Setthelavarockontothewaffle grate(s)andspreadoutevenly.
Burn-IntheEquipment
- Rotatethegascontrolknob(s) tothemaximumsetting.
- Allow charbroilerto heat and burn-infor approximately 30 minutes. NOTICE: You may noticesmoking during this initialburn-in; this is normal.
3.RotatetegascontrolknobstoOFF.
SeasoningGrillGrates
- Allow the charbroilertocoolerheattoawarmingtemperature of approximately 200^ .
2.Rubcookingoil,shortening,beefsuet,orthelikeonthecharbroiler grateswithacleancloth. - Heatthecharbroilertomediumhighandallowittooperatefor approximately 30 minutes.
- Adjust the burnerdial(s) to the lowest setting and allow the charbroilertocoolandstabilize atalowheat.
- Removeanyexcessoilandwipeclean.
6.Repeattheprocess:oil,heatfor30minutes,cool,andwipeclean.
OPERATION


WARNING
Fire, DeathHazard Ifyousmellgasfollowtheinstructionsprovidedbythegas supplier. Donotouchanyelectricalswitches;donottrytolightthe burner;donotuseatelephoneincloseproximity.


CAUTION
BurnHazard Hotsurfacedandfoodcanburnskin. Allowthehotsurfaced to coolbeforehandling.Donotdroporspillwateronto the cookingsurfaceasitcansprayersplatter.
TIP:Setthegrillgratesatanangle.Thiswillenableliquidstorundn thegratesandintothedripray,whichwillreduceflare-ups.
1.Verifyhedriprayisinplace.Addwatertothedripray.Water vaporrisingfromthedriprayandthroughthecombustionchamber willhelptoreduceflare-ups.
2. Lightlyoilandwipethegratescleantoremoveanycontaminants that may have accumulated or have seeped from the grilland/or perimetersincelastuseandtoensureaccleaner-stickcooking surface.
3.Rotatethegascontrolknobstoignitethemainburner(s).Adjustthe knob(s)tothedesiredheatlevel.
4.Preheatthegrillgratesfor15minutes.
5.Cookthefood
6. Emptythrieprayperiodicallytoensureitdoesnotoverflow. Checkthedriprayfrequentlyandaddwaterasnecessary.
7.Donotallowoilorgreasetobuilduponthegrillgrates.Wipedown thegrillgratestoppreventcarbonbuild-up,whichcouldaffectthe performanceofthegrill.
AdjustingthePilotLight
Fromtimetotimethepilotlightintensitymayneedtobeadjustedto properlyignitethemainburners.
- With the pilot lightignited, useaflatheadscrewdriver turn the exposed slotted brass screw. Turn the screw clockwise to decrease intensity and counter-clockwise to increase intensity.
2.Determine the proper intensity toignitetheburner flames. Burners shouldignitefrompilotinunder4seconds.
CLEANING


CAUTION
BurnHazard
Hotsurfacedandfoodcanburnskin.Allowthehotsurfacesto coolbeforehandling.Donotdroporspillwateronto the cookingsurfaceasitcansprayersplatter.
Topreventflare-upsandtomaintaintheappearanceandincreasethe servicelife,cleanyouequipmentdaily.
NOTICE: Donotcleantheequipmentwithsteelwool.
NOTICE: Donotusecleaningchemicalsorsoapsasthesecanbe absorbedbythecookingsurfaceandaffecttheflavorofthe food. Ifnecessary, useonlycleanwater, oil, and/or arofood gradedegreaserforthecleaningprocess.
NOTICE:Topreventcorrosion, donotallowthegrate(s)toremain unseasonedorwithoutathincoatingofcookingoil.
Daily
- While the grates are hot (approximately 300^ ), use a drill brush or grill brick to scrub them clean.
2.Inspectthegratesanddetermineiftheyneedtobere-seasoned.If theygratedonotneedseasoning,applyathincoatofcookingoilto thegratestpreventcorrosion. - Allow the charbroilertocool.
4.Remove,empty,andcleanthedripty.
5.Cleanthexterioroftheunit.
WeeklyOrMoreOftenIfNeeded
RadiantBars
1.Removetheradianbars.
2.Inspectforwear.lfbarsareworn,orderreplacements.
NOTICE: Donotoperatethecharbroilerwithwornradianbars. Thiswillreduceperformanceofthecharbroilerandmay causeflare-ups.
3.Washtheradiantbarsinasolutionofwarm,soapywater.
4. Thoroughly drytheradianbars.
5.Placetheradiantbarsinthecharbroiler.
LavaRock
1.Flipoverthelavarocks.Thiswillenableanygreasethathasc accumulatedonthetopoftherockstoburnoff.
2.Inspecttthewafflegeforwear.lfthegrateisworn,ordera replacement.
NOTICE: Donotoperatethecharbroilerwithaworngrate. This willreduce the performance of the charbroiler and may cause flare-ups.
3.Inspecttherocksforwear.Vollrathrecommendssreplacingtherocks whenthesurfaceisnolongerporous.Eventually,ashand contaminantswillplugtheholesandthelavarockwillnolonger capturethedrippingsandconvertthemtosmoke.Instead,the drippingswillrunoffandriskaflare-up.
PREVENTATIVEMAINENCE

WARNING
Fire, Injury, DeathHazard Contactaqualifiedtechnicianorserviceagentforany adjustments,maintenance,orrepairs.Thisapplianceisnot userserviceable.
Aqualifiedservicecompanyshouldchecktheunitforsafeanddeficient operationnonanannualbasis.Contactthefactoryrepresentativeorlocal servicecompanytoperformmaintenanceandrepairs.
TROUBLESHOOTING
| ProblemMightbeCausedByCourseofAction | ||
| Gassmell.Unknowcause. | Turnoffthemainsupplyvalve,ventthearea, callaqualifiedserviceagent. | |
| Burnerdoesnotlight.Pilotburnernotlit. | Wait5minutesallowgastodissipate,then lighthepilotburner. | |
| Cookingsurfacesmokesexcessively.Cookingsurface | cenotcleaned. | Allowthecookingsurfacetocouldnand cleanwhilestillwarm,thenseasononthetop. |
| Cookingsurfaceistoohot.Insufficientventilation. | Ensureaminimumof6"ofspaceisallowedon thebackoftheequipment. | |
| Unevencookingsurfacetopheating. | Insufficientventilation. | Ensureaminimumof6"ofspaceisallowedon thebackoftheequipment. |
| Airshutternotproperlyadjusted.ContactVollratthe | chnicalservice. | |
| Burnernotoperatingproperly. | Orificecontaminated. | Contactanaauthorizedserviceagenttoservice theburner. |
| Airshutternotproperlyadjusted.ContactVollratthe | chnicalservice. |
Thispageintentionallyleftblank.
SERVICEANDREPAIR
Serviceablepartsareavailableonwww.vollrath.com.
To avoid serious injury or damage, never attempt to repair the unit yourself. Either contact a qualified service agent for the repair or contact Vollrath TechnicalServicesforinstructions.Theappropriatephonenumerislistedatthebottomofthepage.
When contacting Vollrath Technical Services, please be ready with the item number, model number (if applicable), serial number, and proof of purchaseshowingthedatetheunitwaspurchased.
WARRANTYSTATEMENTFORTHEVOLLRATHCO.L.L.C.
This warranty does not apply to products purchased for personal, family or household use, and The Vollrath Company L.L.C. does not offer a written warranty to purchasersforsuchuses.
The Vollrath Company L.L.C. warrants the products it manufactures or distributes against defects in materials and workmanship as specifically described in our full warranty statement. In all cases, the warranty runs from the date of the end user's original purchase date found on the receipt. Any damages from improper use, abuse, modification or damage resulting from improper packaging during return shipment for warranty repair will not be recovered under warranty.
Forcompletewarrantyinformation/productregistrationandnewproductannouncement,visitwww.vollrath.com.

Conforms to ANSI STD 283.11-2016 Certified to CSA STD 1.8-2016

Conforms to NSF/ANSI STD 4

Conforms to ANSI STD Z83.11-2016 Certified to CSA STD 1.8-2016

Conforms to NSF/ANSI STD 4
| Núm. art./modelo Descripción | |
| CBGMD-12 | Servicio mediano, radiante/piedra volcanica, 12° (30,5 cm) |
| CBGMD-24 | Servicio mediano, radiante/piedra volcanica, 18° (45,7 cm) |
| CBGMD-36 | Servicio mediano, radiante/piedra volcanica, 24° (61 cm) |
| CBGMD-48 | Servicio mediano, radiante/piedra volcanica, 36° (91,4 cm) |
| CBGMD-60 | Servicio mediano, radiante/piedra volcanica, 48° (121,9 cm) |
| CBGHD-18 | Servicio mediano, radiante/piedra volcanica, 60° (152,4 cm) |
| CBGHD-24 | Servicio pesado, radiante/piedra volcanica, 24° (61 cm) |
| CBGHD-36 | Servicio pesado, radiante/piedra volcanica, 36° (91,4 cm) |
| CBGHD-48 | Servicio pesado, radiante/piedra volcanica, 48° (121,9 cm) |
| CBGHD-60 | Servicio pesado, radiante/piedra volcanica, 60° (152,4 cm) |
| CBGHD-72 | Servicio pesado, radiante/piedra volcanica, 72° (182,9 cm) |