
MultiSync LCD195VXM+ - Monitor NEC - Free user manual and instructions
Find the device manual for free MultiSync LCD195VXM+ NEC in PDF.

| Brand | NEC |
| Model | MultiSync LCD195VXM+ |
| Product type | Color LCD monitor |
| Screen size | 19 inches (diagonal) |
| Net weight | 5.0 kg (max) |
| Power supply | 100-240 V AC, 50/60 Hz (estimated) |
| Power consumption | Not specified |
| Video inputs | Analog D-SUB 15-pin, digital DVI-D |
| Audio output | Headphone jack (3.5 mm) |
| Built-in speakers | Yes |
| OSM settings | Brightness, contrast, position, color, volume, etc. |
| Auto adjustment | Auto contrast, auto image adjustment |
| Tilt | Yes (forward/backward) |
| Height adjustable | Yes (raise/lower) |
| Wall mount | VESA compatible (100 x 100 mm) |
| Included accessories | Power cord, D-SUB cable, DVI-D cable, audio cable, CD-ROM, cable covers |
| Safety | Compliant with CE standards (EN60950, EN55022, etc.) |
Frequently Asked Questions - MultiSync LCD195VXM+ NEC
User questions about MultiSync LCD195VXM+ NEC
0 question about this device. Answer the ones you know or ask your own.
Ask a new question about this device
Download the instructions for your Monitor in PDF format for free! Find your manual MultiSync LCD195VXM+ - NEC and take your electronic device back in hand. On this page are published all the documents necessary for the use of your device. MultiSync LCD195VXM+ by NEC.
USER MANUAL MultiSync LCD195VXM+ NEC
MultiSync LCD175VXM+
MultiSync LCD195VXM+
User's Manual
Bedienerhandbuch
Manual del usuario
Manuel Utilisateur
Manuale utente
PykoBoDCTBO PONb3OBaTeJIa
NEC


TCO'03
TcODevelopment
TCODevelopment
Tc0'03
DISPLAYS
www.tcodevelopment.com
Congratulations!
The display you have just purchased carries the TCO'03 Displays label. This means that your display is designed, manufactured and tested according to some of the strictest quality and environmental requirements in the world. This makes for a high performance product, designed with the user in focus that also minimizes the impact on our natural environment.
Some of the features of the TCO'03 Display requirements:
Ergonomics
- Good visual ergonomics and image quality in order to improve the working environment for the user and to reduce sight and strain problems. Important parameters are luminance, contrast, resolution, reflectance, colour rendition and image stability.
Energy
Energy-saving mode after a certain time - beneficial both for the user and the environment
- Electrical safety
Emissions
- Electromagnetic fields
- Noise emissions
Ecology
- The product must be prepared for recycling and the manufacturer must have a certified environmental management system such as EMAS or ISO 14 001
-
Restrictions on:
-
chlorinated and brominated flame retardants and polymers
- heavy metals such as cadmium, mercury and lead.
The requirements included in this label have been developed by TCO Development in co-operation with scientists, experts, users as well as manufacturers all over the world. Since the end of the 1980s TCO has been involved in influencing the development of IT equipment in a more user-friendly direction. Our labelling system started with displays in 1992 and is now requested by users and IT-manufacturers all over the world.
For more information, please visit
www.tcodevelopment.com
Manufacturer's Recycling and Energy Information
NEC DISPLAY SOLUTIONS is strongly committed to environmental protection and sees recycling as one of the company's top priorities in trying to minimize the burden placed on the environment. We are engaged in developing environmentally-friendly products, and always strive to help define and comply with the latest independent standards from agencies such as ISO (International Organisation for Standardization) and TCO (Swedish Trades Union).
Disposing of your old NEC product
The aim of recycling is to gain an environmental benefit by means of re-use, upgrading, reconditioning or reclamation of material. Dedicated recycling sites ensure that environmentally harmful components are properly handled and securely disposed. To ensure the best recycling of our products, NEC DISPLAY SOLUTIONS offers a variety of recycling procedures and gives advice on how to handle the product in an environmentally sensitive way, once it has reached the end of its life.
All required information concerning the disposal of the product and country-specific information on recycling facilities can be found on our following websites:
http://www.nec-display-solutions.com/greencompany/ (in Europe),
http://www.nec-display.com (in Japan) or
http://www.necdisplay.com (in USA).
Energy Saving
This monitor features an advanced energy saving capability. When a VESA Display Power Management Signalling (DPMS) Standard signal is sent to the monitor, the Energy Saving mode is activated. The monitor enters a single Energy Saving mode.
LCD175VXM+
| Mode Power | consumption LED colour | |
| Normal Operation Approx. 34W Green | ||
| Energy Saving Mode | Less than 2W Orange | |
| Off Mode Less than 1W Unlit | ||
LCD195VXM+
| Mode Power consumption LED colour | |
| Normal Operation Approx. 40W Green | |
| Energy Saving Mode Less than 2W Orange | |
| Off Mode Less than 1W Unlit |
WEEE Mark (European Directive 2002/96/EC)
Within the European Union
EU-wide legislation, as implemented in each Member State, requires that waste electrical and electronic products carrying the mark (left) must be disposed of separately from normal household waste. This includes monitors and electrical accessories, such as signal cables or power cords. When you need to dispose of your NEC display products, please follow the guidance of your local authority, or ask the shop where you purchased the product, or if applicable, follow any agreements made between yourself and NEC.
The mark on electrical and electronic products only applies to the current European Union Member States.
Outside the European Union
If you wish to dispose of used electrical and electronic products outside the European Union, please contact your local authority so as to comply with the correct disposal method.
4
WARNING
!
TO PREVENT FIRE OR SHOCK HAZARDS, DO NOT EXPOSE THIS UNIT TO RAIN OR MOISTURE. ALSO, DO NOT USE THIS UNIT'S POLARIZED PLUG WITH AN EXTENSION CORD RECEPTACLE OR OTHER OUTLETS UNLESS THE PRONGS CAN BE FULLY INSERTED REFRAIN FROM OPENING THE CABINET AS THERE ARE HIGH VOLTAGE COMPONENTS INSIDE. REFER SERVICING TO QUALIFIED SERVICE PERSONNEL.

CAUTION

RISK OF ELECTRIC SHOCK·DO NOT OPEN
CAUTION: TO REDUCE THE RISK OF ELECTRIC SHOCK, DO NOT REMOVE COVER (OR BACK). NO USER SERVICEABLE PARTS INSIDE. REFER SERVICING TO QUALIFIED SERVICE PERSONNEL.

This symbol warns user that uninsulated voltage within the unit may have sufficient magnitude to cause electric shock. Therefore, it is dangerous to make any kind of contact with any part inside this unit.

This symbol alerts the user that important literature concerning the operation and maintenance of this unit has been included. Therefore, it should be read carefully in order to avoid any problems.
Declaration of the Manufacturer
We hereby certify that the colour monitors MultiSync LCD175VXM+ (L174F1)/LCD195VXM+ (L194F2) are in compliance with
Council Directive 73/23/EEC:
- EN 60950-1
Council Directive 89/336/EEC:
-EN55022
-EN61000-3-2
EN61000-3-3
-EN55024
and marked with

NEC Display Solutions, Ltd. 4-13-23, Shibaura,
Minato-Ku
Tokyo 108-0023, Japan
Contents

User's
Manual

Audio
Cable
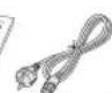
Power
Cord
Cable management
cover
CD-ROM
15-pin mini D-SUB
male to 15-pin mini
D-SUB male

e management
cover
(
CD-ROM
DVI-D to DVI-D
(LCD195VXM+
only)
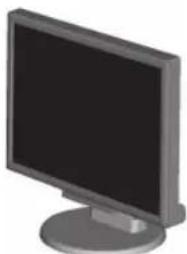
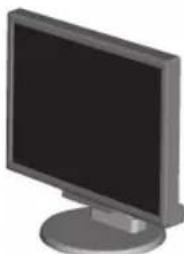
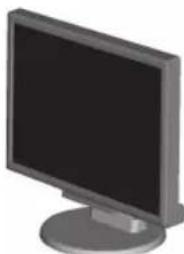
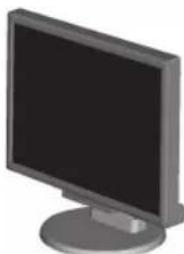
MultiSync LCD monitor
Your new NEC MultiSync LCD monitor box* should contain the following:
MultiSync LCD monitor with tilt base
Audio Cable
- Power Cord
V ideo Signal Cable (15-pin mini D-SUB male to 15-pin mini D-SUB male)
- V ideo Signal Cable (DVI-D to DVI-D) (LCD195VXM+ only)
- User's Manual
CD-ROM
- Cable management cover
Remember to save your original box and packing material to transport or ship the monitor.
Quick Start
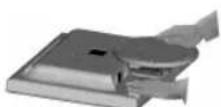
Figure 1 Figure 2
Macintosh Cable Adapter (not included)
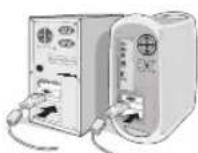
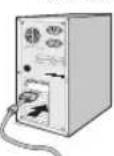
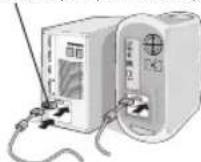
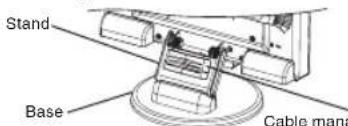
Figure A.1 Figure A.2
Figure A.3
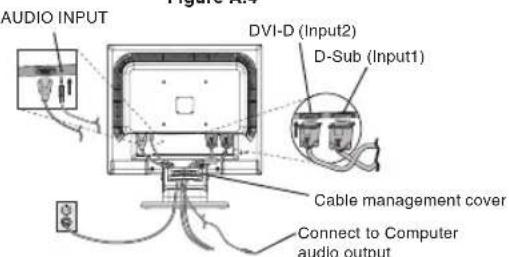
Figure B.1
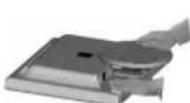
Topull the stand, follow these instructions:
- Place monitor face down on a non-abrasive surface (Figure 1).
- Pull the stand holding the monitor with the other hand until the stand clicks (Figure 2).
NOTE: Handle with care when pulling the stand.
NOTE: Reverse this procedure if you need to re-pack the monitor.
Toattach the MultiSync LCD monitor to your system, follow these instructions:
1. Turn off the power to your computer.
2. For the PC or MAC with DVI digital output: Connect the DVI-D signal cable to the connector of the display card in your system (Figure A.1). Tighten all screws.
For the PC with Analog output: Connect the 15-pin mini D-SUB signal cable to the connector of the display card in your system (Figure A.2). Tighten all screws.
For the Mac: Connect the MultiSync Macintosh cable adapter (not included) to the computer. Attach the 15-pin mini D-SUB signal cable to the MultiSync Macintosh cable adapter (Figure A.3). Tighten all screws.
NOTE: Some Macintosh systems do not require a Macintosh cable adapter.
3. To attach the Cable management cover: Insert the tabs of the Cable management cover into the holes of Stand neck and slide the Cable management cover downward into place (Figure A.4).
NOTE: Please confirm that the tabs are completely secure.
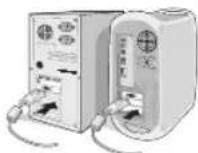
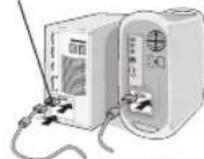
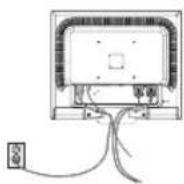
4. Connect all cables to the appropriate connector on the back of the monitor (Figure B.1). Connect the Headphone (not included) to the appropriate connector at the rear side of the monitor (Figure C.1).
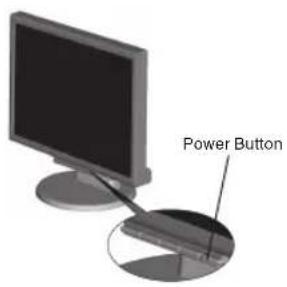
Figure C.1
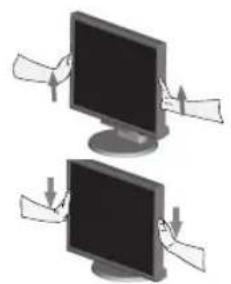
Figure RL.1
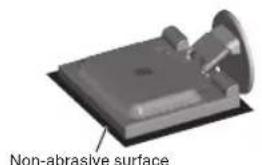
Figure R.1

Figure R.2
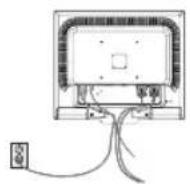
Figure R.3

Figure TS.1
Specifications
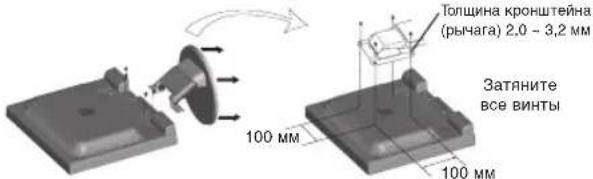
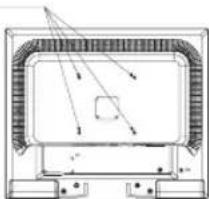
4-SCREWS (M4)
MAX depth:
LCD175VXM+ - 7.0mm
LCD195VXM+ - 8.5mm
If use other screw,
check depth of hole.
Weight of LCD assembly: 3.8kg -LCD175VXM+ (MAX)
5.0 kg - LCD195VXM+ (MAX)
- Connect one end of the power cord to the monitor and the other end to the power outlet. Place the Video Signal Cable, Audio cable and power cord to the Cable management cover (Figure B.1).
NOTE: Adjust position of cable that place under the Cable management cover to avoid damage for cable or monitor.
NOTE: Please refer to Caution section of this manual for proper selection of power cord.
-
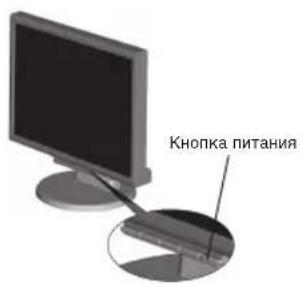
Turn on the monitor with the front power button and the computer (Figure C.1).
-
No-touch Auto Adjust automatically adjusts the monitor to optimal settings upon initial setup for most timings. For further adjustments, use the following OSM controls:
-
Auto Adjust Contrast
-
Auto Adjust
Refer to the Controls section of this User's Manual for a full description of these OSM controls.
NOTE: If you have any problem, please refer to the
Troubleshooting section of this User's Manual.
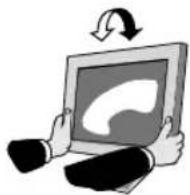
Raise and Lower Monitor Screen
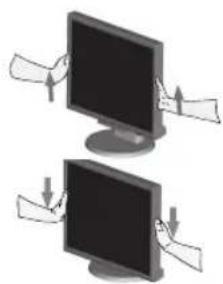
The monitor may be raised or lowered. To raise or lower screen, place hands on each side of the monitor and lift or lower to the desired height (Figure RL.1).
NOTE: Handle with care when raising or lowering the monitor screen.
Tilt
Grasp both sides of the monitor screen with your hands and adjust the tilt as desired (Figure TS.1).
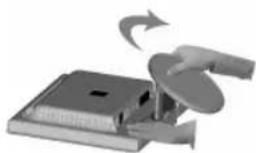
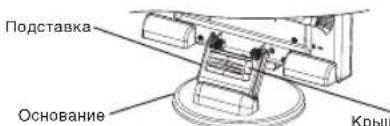
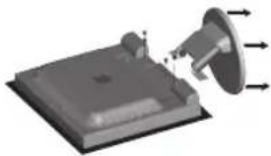
Remove Monitor Stand for Mounting
To prepare the monitor for alternative mounting purposes:
-
Disconnect all cables.
-
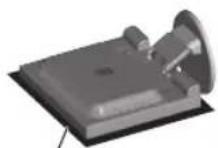
Place monitor face down on a non-abrasive surface (Figure R.1).
-
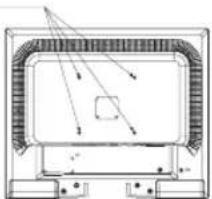
Remove the 4 screws connecting the monitor to the stand and remove the stand as indicated (Figure R.2). The monitor is now ready for mounting in an alternative manner.
-
Connect the AC cord and signal cables to the back of the monitor (Figure R.3).
-
Reverse this process to re-attach stand.
NOTE: Use only VESA-compatible alternative mounting method.
NOTE: Handle with care when removing monitor stand.
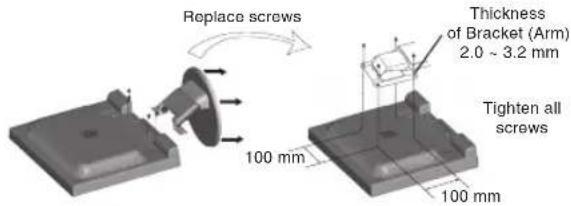
Connecting a Flexible Arm
This LCD monitor is designed for use with a flexible arm. Please use the attached screws (4pcs) as shown in the picture when installing. To meet the safety requirements, the monitor must be mounted to an arm which guarantees the necessary stability under consideration of the weight of the monitor.
The LCD monitor shall only be used with an approved arm (e.g. GS mark).
Controls
OSM (On-Screen Manager) control buttons on the front of the monitor function as follows:
- Basic function at pressing each key
| Button | SELECT | - | + | 1<-2 / RESET |
| At No OSD showing | Showing OSM. Shortcut to Bright adjust window. | Shortcut to Volume adjust window. | Input signal select. | |
| At OSD showing (Icon selection stage) | Go to Adjustment stage. Cursor goes to left. Cursor goes to right. | |||
| At OSD showing (Adjustment stage) | Go to Icon selection stage. Adjust value decrease or Cursor for adjust goes to left. | Adjust value increase or Cursor for adjust goes to right. | Reset operation. Mute off/on switch on Volume adjustment window. | |
2. OSM structure

AUDIO
Control the sound volume of speakers and headphone. Tomute the speaker sound, press the 1<-2/RESET key.
BRIGHTNESS
Adjusts the overall image and background screen brightness.
CONTRAST
Adjusts the image brightness in relation to the background.
AUTO AUTO CONTRAST (Analog Input only)
Adjusts the image displayed for non-standard video inputs.
AUTO \3 \1\ AUTO ADJUST (Analog Input only)
Automatically adjusts the Image Position, the H. Size and Fine setting.
LEFT/RIGHT (Analog Input only)
Controls Horizontal Image Position within the display area of the LCD.
DOWN/UP (Analog Input only)
Controls Vertical Image Position within the display area of the LCD.
H. SIZE (Analog Input only)
Adjusts the horizontal size by increasing or decreasing this setting.
FINE (Analog Input only)
Improves focus, clarity and image stability by increasing or decreasing this setting.
930 COLOUR CONTROL SYSTEMS
Four colour preset (9300/7500/sRGB/USER/NATIVE) select the desired colour setting.
The sRGB and NATIVE, colour presets are standard and cannot be changed.
COLOUR RED
Increase or decreases Red. The change will appear on screen.
G COLOUR GREEN
Increase or decreases Green. The change will appear on screen.
B COLOUR BLUE
Increase or decreases Blue. The change will appear on screen.
TOOL
Selecting TOOL allows you to get into the sub menu.
FACTORY PRESET
Selecting Factory Preset allows you to reset all OSM control settings back to the factory settings. The RESET button will need to be held down for several seconds to tage effect. Individual settings can be reset by highlighting the control to be reset and pressing the RESET button.

EXIT
Selecting EXIT allows you exit OSM menu/ sub menu.

LANGUAGE
OSM control menus are available in nine languages.

OSMTURNOFF
The OSM control menu will stay on as long as it is in use. In the OSM Turn OFF submenu, you can select how long the monitor waits after the last touch of a button to shut off the OSM control menu. The preset choices are 10 - 120 seconds by 5 seconds step.

OSM LOCK OUT
This control completely locks out access to all OSM control functions without Brightness and Contrast. When attempting to activate OSM controls while in the Lock Out mode, a screen will appear indicating the OSM are locked out. To activate the OSM Lock Out function, press "1<-->2/RESET", then "+" key and hold down simultaneously. To de-activate the OSM Lock Out, press "1<-->2/RESET", then "+" key and hold down simultaneously.

RESOLUTION NOTIFIER
If ON is selected, a message will appear on the screen after 30 seconds, notifying you that the resolution is not at optimal resolution.

DDC/CI
Turns ON or OFF the two way communication and control of the monitor.

MONITOR INFO
Indicates the model and serial numbers of your monitor.
OSM Warning
OSM Warning menus disappear with SELECT button.
NO SIGNAL: This function gives a warning when there is no signal present. After power is turned on or when there is a change of input signal or video is inactive, the No Signal window will appear.
RESOLUTION NOTIFIER: This function gives a warning of use with optimized resolution. After power is turned on or when there is a change of input signal or the video signal doesn't have proper resolution, the Resolution Notifier window will open. This function can be disabled in the TOOL menu.
OUT OF RANGE: This function gives a recommendation of the optimized resolution and refresh rate. After the power is turned on or there is a change of input signal or the video signal doesn't have proper timing, the Out Of Range menu will appear.

WARNING

SETZEN SIE DAS GERAT WEDER REGEN NOCH FEUCHTIGKEIT AUS, DA ES ANDERNFALLS ZU FEUER ODER STROMSchLagen KOMMEN KANN. VERWENDEN DEN SIE NETZSTECKER DIEGS ERGAE KINESEAFLLS MIT EINEM VELRANGERSKABEL ODER EINER STECKDOSENLEISTE, WENN DIE STECKERSTIFTE NICTVOLLSTANDIG EINGEFUHRT WERDEN KONNEN.
OFFEN SIE DAS GEAUHE NICTHT, DA SICH IM INNEREN COMPOONENTEN BEFINDEN, DIE UTERHER CHOSC PANNUNG STEHEN. Lassen SIE WARTUNGSRABEITEEN VON QUALIFIZIERENTWARTUNGSTECHNIKERN DURCHFHRYN.

VORSICHT
EG-Directive 89/336/EG: EN 55022
EN61000-3-2
-EN61000-3-3
-EN55024

NEC Display Solutions, Ltd. 4-13-23, Shibaura,
Minato-Ku
Tokyo 108-0023, Japan
MultiSync LCD-Monitor
Kurzanleitung
NEC Display Solutions, Ltd.
4-13-23, Shibaura,
Minato-Ku
Tokyo 108-0023, Japon
Contenido

Manual del usuario

Cable de audio
NEC Display Solutions, Ltd.
4-13-23. Shibaura.
Minato-Ku
Tokyo 108-0023, Japan
Sommaire
(LCD195VXM+
uniquement)
Monilaur LCD MultiSync
Démarrage rapide
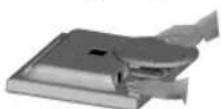
Figure 1 Figure 2
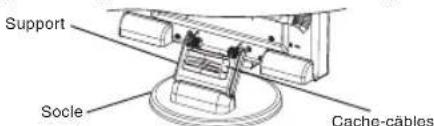
Figure A.1 Figure A.2
Figure A.4
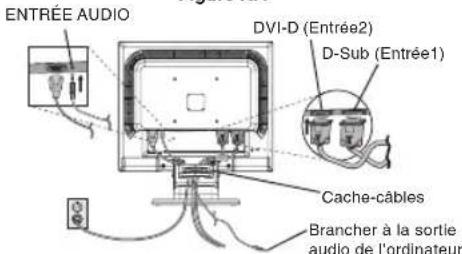
Figure B.1
NEC Display Solutions, Ltd. 4-13-23, Shibaura,
Minato-Ku
3aBHeHne n3roTOBnTeJIa
HactoIIM NoTBePckJaem, TcU BoTeHbE KK-MOnHTOpbI MultiSync LCD175VXM+(L174F1) uLCD195VXM+(L194F2) coOTBeTCTByIO
DnpeKtnBe CoBeta 73/23/EEC: n coepknt OTmTeKy
-EN60950-1
DuplekTneBcOBeTa89/336/EEC:
-EN55022
-EN61000-3-2
-EN61000-3-3
-EN55024

BZ02

NEC Display Solutions, Ltd.
4-13-23. Shibaura.
Minato-Ku
Tokyo 108-0023, Japan
Copepkmoe

CYKOBIDCTBO nonl308aten

Kabenb
ayDnOcnHana
Ka6enb NITAHM

CD-ROM

KbIkaOta OKcTaKaPncpeJeHnHa Kaoben
15-KOHTAKTHB MHHH-Pa3eM D-SUB
DV-D- DV-D-
(TolbKaOJIN)
LCD15YSMXN
KK-3kpah MultiSync
Kpatkoe pykoBoDCTBO no haay pa60TbI
PncyHOK 1 PncyHOK 2
AanTepKaBenaMaCintosh(HeBXoDnT B KOMnNeKT)
PucyHok A.1 PucyHok A.2

Pucyok A.3
Pncyok A.4
Kpbilka otceka
pacnpedeeneHHKaBenei
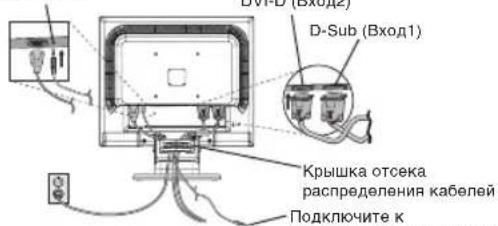
AynobXoJ
Pucyok B.1
Bynakobouho Kopo6ke HOBOROMOHITOPA NEC MultiSync LCD dONKHO 6bIb CnEduoee:
- MonHotop MultiSync LCD c wapnphon onopo
KaebbaynocnHa
Ka6eIb nTaHn
Bndeokakb (15-kohtaKTHbMmH-pa3bEM D-SUB) - Bndeokabenb (DVI-D-DVI-D) (tonko nla LCD195VXM+)
PykoBOCTBO noJb3OBaTeNA - Dnck CD-ROM
Kpbuoka oTceka pacnpedeJeHnKa6eNei
*O63aTeHbHO coOpAHBeKOKbKbN y uNaKoBcHbMaTePmHaJn TAPChONTOPOBKBUN JIepeBcKbMOnHToPA.
TObbI BvIDBHyTB NOCTABKy, BvINONHITe CneJeIOUne JeNCTBNA:
1.Noonxnte MOHITOP 3KpaHOM BHN3 Ha NOBepXHOCTb, KOtopaH Noapanaet 3KpAH (PcyHOK 1).
2.Пидержьагонй рко монитор,dpyro рко bblHTHNT noCTabkydo ueNka(PcyhoK2).
IPMMEUAHNE. BbDnraTe noCTabKy octopoXHO.
PIMMEAHNE. Yo6bI ynakOBaTb MOHITOp, NOBTOpNTe DeiCTBnB B 06paTHOMnopAKe.
TTO6bI NOKIOHHTB KKKMOHOTop MultiSync LCD K CNTEMe, BINONHInTe CnEduOuue HNCTpykUnn:
1.OTKIOHNTe NITAHNE KOMNBIOTepa.
2.ДиКOMNbIOTepa PC HnMaCintosh c uHpOBoIM BbIXoDM DVI: PdKnHOHTe Ka6eBb VbDEocINHa DVI-D K pa3bemy NnTbI BnDeoAanTepa B KomNtBepe (PncyHOK A.1).3aTaNHTe BCE BNHTb. ⅡπKcAnarorOBm BbXoDM: IOnCoEOHNHe15-tbpykOBm Mnn-pa3bEm D-SUB Ka6eBbVbDEocINHa K pa3bemy NnTbI BnDeoAanTepa B KomNtBepe (PncyHOK A.2).3aTaNHTe BCE BNHTb. ⅡπMac: POnCoEOHNHe aAnTepa Ka6eBn dN MaTIssync Macintosh (He BxoDHTB KOMNNEKT) K KomNtBepe, POnKnHOHTe Ka6eBb VbDEocINHa C 15-tbpybKObM Minn-pa3bEm O-D-SUB K aAnTepy Ka6eBn dN MultiSync Macintosh (PncyHOK A.3).3aTaNHTe BCE BNHTb.
PIMMEAHHE. INH HeKOTopbIX KOMNbIeTepOB Macintosh aanTep Ka6JIa Macintosh He Tpe6yETCR.
- Tc0bblycTahOBnBk pblkO tCkeKa pacnpdeHnna KaBneB, BblnonHnTe cneDyUoue JeCTBNn: Bctabte 3aueKKn kblkn OTEcKa pacnpdeHnna KaBneB 0 TBepCTnHa CTKe NOCTBAKN CDBNHyB KpblkYBn3, yCTahOBnTE ee Ha MeTO (Pcyhok A.4).
PIMMEAHNE. Y6eNTecb, TTO 3aueKn HaeXHo fKnCpyIOT KpbIky. - NOKHIOHTe BCE Ka6eN K COOTBETCTBYIOHM pa3bEMAM Ha 3aDHei NaHEI MOHITOPA (PcuyHK B.1) NOKHIOHTe HayuHNKn (HE BXOJAT B KOMNIKET) K COOTBETCTBYIOUeMy pa3bEMy HA 3aDHei NaHEI MOHITOPA (PcyHok C.1).
PucyHok C.1
PucyHok RL.1
Hea6pa3nBnaHnOBepxHOCTb
Pcyhok R.1
Pncyok R.2
PucyHok R.3
PucyHok TS.1
YCTaHOBNTe BnHTbHa MecTo
XapakTepeNtukn
4-BUNHTA (M4)
MAKCMAJIBHAR
Iy6HnHa
LCD175VXM+ - 7,0 MM
LCD195VXM+ -8.5MM
PnncnoB3OBAHm
Dpyrnx BnHTOB
npOBepBTe rnyOnHy
OTBepctnur.
Bec KKД монтopa b c6ope: 3,8 kR-LCD175VXM+ (MAX)
5,0 Kr-LCD195VXM+ (MAX)
- POKKIOHTE OIN KOHeu KaBEn NITAHN K MOHTOpy, a Dpyro - K pOeTKe 3IeKTPONITAHN. POMecTe BnDEOkaBEn, 3ByKOBoi KaBEn b KaBEn NITAHN IOD KpBlkY OTCKa pacnpedJeHn KaBEn (PcynHok B.1).
PnmuEAHNE.PacnpedenTeKaBENNoKpbIuKoYTO6bI npedOTbpaNTb NOBpeXdHne KaBene NIMMOHTopa.
PIMMEAHHE. PekomHdaunno npabInbHomy bibOpky Kabenr nTahnem.BpaDene "BHHMaHe" HactoIeTO pyKOBOCTBa
- BKJIOHHTe MOHITOP C NOMOUsbHO KHONK NITAHNA (PucyhoC.C.1) KOMIbOTep.
7ФyHKJHBeCKHOHTKHOHACTPOKNBbIOHNHErABTOMATNHeCKYO NOCTPOKY BNTMNAHbHSbNAPAMETPO MOHITOPa NPbEOHbAHLBOH HACTPOKE, BKIOHOAR 60bUNHCTBO NAPAMETPO CNXPOHN3aUMN.ДЯ DANBEHINIXHACTOEKNONON3yTE cnEDyOuNE npaMePbOSCM:
Auto Adjust Contrast (ABTOHAcToKa KOHTpactHOCTn)
AutoAdjust(ABToHaCTpoKa)
POnHoe onncaHne 3THN napameTPOB OSM cm. B pa3dene "OprahbI ynpabHeHn" 3TOrO pyKOBOCTBa NOB3OBaTeHn.
PIMMEUHNE. B cnuyae KAKOH-Ni6o HENONaDN 06paNTteCk pa3deny UcTpaHHe HeNCpRaBHOcte 3TOrO pykoBOCTBa NOn3OBATeN.
YcTaHOBka 3KpaHa MOHTopa B BepXHee H NIXKHee NOIOXKeHr
MOHITOP MOXHO NOHMATb H ONYCKATb. 4TO6bI NOHHTb INN ONCYTb 3KpAH, BO3MbITE MOHITOP C DBYX CTOPOH IN NOHMNTE INN ONCYTNE ERO HA HYHXHO BICOT (PcynHOK RL-1).
PIMMEAHNE. CoBIOJDAIte octopoXHOCTb npy UcTahOBKe 3KpaHa MOHITOPA B BepxHee H NIXHee NOIOKeHnA.
HaKJIOH
YCTAHOBITE Tpe6yembl HaKJIOH 3KpaHa MOHTopa,epKa eO pykamn C06eX CTOPOH (Pcyhok TS.1).
OTcoeDHHHeHne NOCTaBKN MOHITopa nepey yctAHOBKoi
YTO6bI NOITROBHTMOHITOP K yCTaHOBKe B DpyROM NONOJXEHN:
1.OTcoeHNHTe Bce Ka6eJIi.
2.ПОLOЖNTe MOHITOP 3KpaHOM BnI3 Ha Hea6pa3NbHyIO NOBepxHOCTb (PucyHOK R.1).
- OTBEPHNTE 4 BHTA, KPNJNAH MOnHTOP K NOCTABKE, N CHIMNTE NOCTABKY, KAK NOK3aHO HA PNCYHK (PNCYHK R.2).
Tenebp MOHITOP roTOB K yctaHOBKe dpym cnoocobom
DOWN/UP (BHN3/BBEPX (ToIbKO aHaJIorOBbI BxO)) KoHTpONb BEPTNkAaHbHoro nnonKeHHn H306paKeHHn Ha 3KpaHe KKn

H. SIZE (Γ. PA3MEP (TOnbko aHaNoRoBbI BxOd))
PerynpobkA ropu3oHTaIbHoro pa3mepa nyTeM yBENueHn nnYMeHbSeHHN 3HaueHHN 3TO rnapamtpa.

FINE (YETKOCTb) (Tonko ahanorobov bXoJ) Yunyuene HFOyCNPOBc, YOTKoTHaYTOHNBOCTH 3n0bpaexEH nyTEm yueuHEnH Nm yEmHoBuHn 3HaueHn 3TOro napametra.

COLOUR CONTROL SYSTEMS (CINCTEMbI PEYUNIPOBKN LBETA)
YeTbe 3aDabAeMbIX BapMaHTa yCTaHOBKn LBETA (9300/7500/SRGB/USER/NATIVE) dNn BbOpa HeoXoDMIOH NactpOnKu LBETA.
AniPbI cBeTOB sRGB u NATIVE RaHNOCTCA TaHApTbHM IN HEN3MHeMbIM.

COLOUR RED (KPACHB)
YBUNHENHE INN YMBHSEHNE KPACHORO ζβETA. N3MeHENHE
6DyET OT6PaxatbCR HAKPAHE.

COLOUR GREEN (3EJEHbI) YBENHNE INN yMbHbENHE 3eNEHO rBETA.N3MeHeHNE 6byetOTo6paxatbCRa HkPAhe.

COLOUR BLUE (CINHIN) YBENHENI INN yMbHNEHNE CINHERO cBETA. N3MeHNHE 6bETOTOBpaXATcB HA kPAne.


- MultiSync LCD175VXM+
- MultiSync LCD195VXM+
- NEC
- TCO'03
- TcODevelopment
- Congratulations!
- Ergonomics
- Energy
- Emissions
- Ecology
- Manufacturer's Recycling and Energy Information
- Disposing of your old NEC product
- Energy Saving
- WEEE Mark (European Directive 2002/96/EC)
- Within the European Union
- Outside the European Union
- 4
- WARNING
- !
- CAUTION
- Declaration of the Manufacturer
- Contents
- Quick Start
- Specifications
- Raise and Lower Monitor Screen
- Tilt
- Remove Monitor Stand for Mounting
- Connecting a Flexible Arm
- Controls
- OSM structure
- AUDIO
- BRIGHTNESS
- CONTRAST
- AUTO AUTO CONTRAST (Analog Input only)
- AUTO \3 → \1\ AUTO ADJUST (Analog Input only)
- LEFT/RIGHT (Analog Input only)
- DOWN/UP (Analog Input only)
- SIZE (Analog Input only)
- FINE (Analog Input only)
- COLOUR CONTROL SYSTEMS
- COLOUR RED
- G COLOUR GREEN
- B COLOUR BLUE
- TOOL
- FACTORY PRESET
- EXIT
- LANGUAGE
- OSMTURNOFF
- OSM LOCK OUT
- RESOLUTION NOTIFIER
- DDC/CI
- MONITOR INFO
- OSM Warning
- VORSICHT
- Kurzanleitung
- Contenido
- Sommaire
- Démarrage rapide
- 3aBHeHne n3roTOBnTeJIa
- Copepkmoe
- Kpatkoe pykoBoDCTBO no haay pa60TbI
- XapakTepeNtukn
- YcTaHOBka 3KpaHa MOHTopa B BepXHee H NIXKHee NOIOXKeHr
- HaKJIOH
- OTcoeDHHHeHne NOCTaBKN MOHITopa nepey yctAHOBKoi
- SIZE (Γ. PA3MEP (TOnbko aHaNoRoBbI BxOd))
Brand : NEC
Model : MultiSync LCD195VXM+
Category : Monitor