
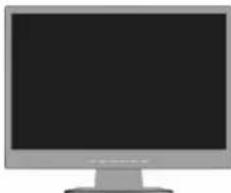
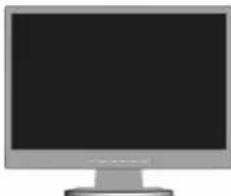
MultiSync LCD22WV - Monitor NEC - Free user manual and instructions
Find the device manual for free MultiSync LCD22WV NEC in PDF.
| Product type | LCD Monitor |
| Brand | NEC |
| Model | MultiSync LCD22WV |
| Screen size | 22 inches (diagonal) |
| Native resolution | 1680 x 1050 |
| Aspect ratio | 16:10 |
| Technology | LCD TFT |
| Net weight (with stand) | 5.0 kg |
| Power supply | 100-240 V AC, 50/60 Hz |
| Connectivity | VGA (D-Sub 15-pin) |
| VESA mounting | Yes, 100 x 100 mm (M4 screws) |
| Tilt | Yes, manually adjustable |
| OSD functions | Brightness, Contrast, Position, Clock, Phase, Color temperature (Warm, Cool, sRGB, User), Auto adjust, Language |
| sRGB mode | Yes |
| OSD lock | Yes |
| Auto adjustment | Yes (AUTO button) |
| Compliance | CE, EN 60950-1, EN55022, EN61000-3-2/3/4, EN55024 |
| Package contents | Monitor, power cord, video cable, CD-ROM, user manual, stand base, cable holder |
| Maintenance | Clean with a soft, dry cloth. Do not use abrasive products. |
| Intended use | Office, professional use |
Frequently Asked Questions - MultiSync LCD22WV NEC
User questions about MultiSync LCD22WV NEC
0 question about this device. Answer the ones you know or ask your own.
Ask a new question about this device
Download the instructions for your Monitor in PDF format for free! Find your manual MultiSync LCD22WV - NEC and take your electronic device back in hand. On this page are published all the documents necessary for the use of your device. MultiSync LCD22WV by NEC.
USER MANUAL MultiSync LCD22WV NEC
Manufacturer's Recycling Information
WEEE Mark (European Directive 2002/96/EC)

Within the European Union
EU-wide legislation, as implemented in each Member State, requires that waste electrical and electronic products carrying the mark (left) must be disposed of separately from normal household waste. This includes monitors and electrical accessories, such as signal cables or power cords. When you need to dispose of your NEC display products, please follow the guidance of your local authority, or ask the shop where you purchased the product, or if applicable, follow any agreements made between yourself and NEC.
The mark on electrical and electronic products only applies to the current European Union Member States.
Outside the European Union
If you wish to dispose of used electrical and electronic products outside the European Union, please contact your local authority so as to comply with the correct disposal method.
Chinese RoHS-information relevant for Chinese market
TO PREVENT FIRE OR SHOCK HAZARDS, DO NOT EXPOSE THIS UNIT TO RAIN OR MOISTURE. ALSO, DO NOT USE THIS UNIT'S POLARIZED PLUG WITH AN EXTENSION CORD RECEPTACLE OR OTHER OUTLETS UNLESS THE PRONGS CAN BE FULLY INSERTED. REFRAIN FROM OPENING THE CABINET AS THERE ARE HIGH VOLTAGE COMPONENTS INSIDE. REFER SERVICING TO QUALIFIED SERVICE PERSONNEL.

CAUTION

RISK OF ELECTRIC SHOCK·DO NOT OPEN
CAUTION: TO REDUCE THE RISK OF ELECTRIC SHOCK, DO NOT REMOVE COVER (OR BACK). NO USER SERVICEABLE PARTS INSIDE. REFER SERVICING TO QUALIFIED SERVICE PERSONNEL.

This symbol warns user that uninsulated voltage within the unit may have sufficient magnitude to cause electric shock. Therefore, it is dangerous to make any kind of contact with any part inside this unit.

This symbol alerts the user that important literature concerning the operation and maintenance of this unit has been included. Therefore, it should be read carefully in order to avoid any problems.
Declaration of the Manufacturer
We hereby certify that the colour monitor LCD19WV (TFT19W80PS)/LCD22WV (TFT22W90PS) are in compliance with
Council Directive 73/23/EEC: EN 60950-1
and marked with

Council Directive 89/336/EEC:
-EN55022
-EN61000-3-2
-EN61000-3-3
-EN55024
NEC Display Solutions, Ltd.
4-13-23, Shibaura,
Minato-Ku
Tokyo 108-0023, Japan
Contents
User's Manual

CD-ROM

Cable Holder
Power Cord
Video Signal Cable
LCD monitor
(Stand not connected)
Your new NEC LCD monitor box* should contain the following:
LCD monitor with tilt base
Power Cord
V ideo Signal Cable
- User's Manual
CD-ROM
- Base Stand
Cable Holder
- Remember to save your original box and packing material to transport or ship the monitor.
Quick Start
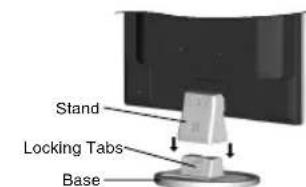
Figure S.1

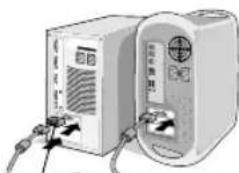
Figure A.1 Figure A.2
Macintosh Cable Adapter (not included)
Figure B.1
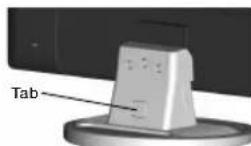
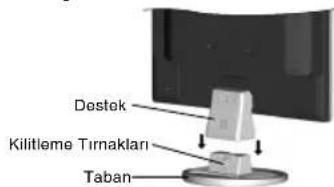
To attach the Base to the LCD Stand:
- Insert the front of the LCD stand into the holes in the front of the Base (Figure S.1).
- Attach the Base to the Stand. The locking tab on the Base should fit into the hole on the back of the Stand (Figure S.1).
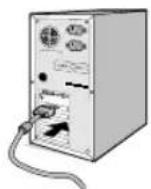
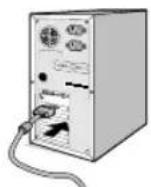
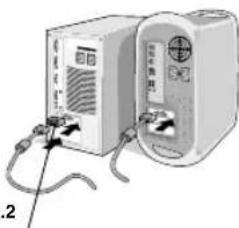
To attach the LCD monitor to your system, follow these instructions:
- Turn off the power to your computer.
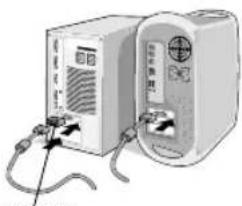
- For the PC with Analog output: Connect the 15-pin mini D-SUB signal cable connected with the monitor to the connector of the display card in your system (Figure A.1). Tighten all screws. For the Mac: Connect the MultiSync Macintosh cable adapter (not included) to the computer. Attach the 15-pin mini D-SUB signal cable to the MultiSync Macintosh cable adapter (Figure A.2). Tighten all screws.
NOTE: Some Macintosh systems do not require a Macintosh cable adapter.
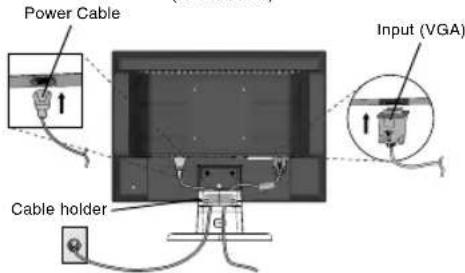
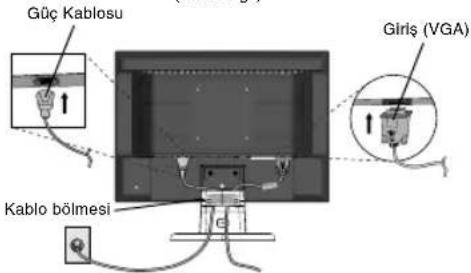
- Connect one end of the power cord to the monitor and the other end to the power outlet. Use the Cable holder to keep the Video Signal Cable and power cord together (Figure B.1).
- To attach the Cable Holder: Attach the Cable Holder on to the Base. Insert the hooks on the Cable Holder into the holes at the back of the Stand and slide the Cable Holder downward into place (Figure B.1).
NOTE: Please confirm that the tabs are completely secure.
NOTE: Adjust position of cable that place under the Cable holder to avoid damage for cable or monitor.
NOTE: Please refer to Caution section of this manual for proper selection of power cord.
uui6u
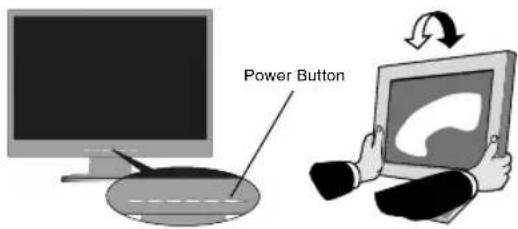
Figure C.1
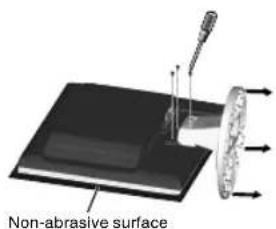
Figure R.1
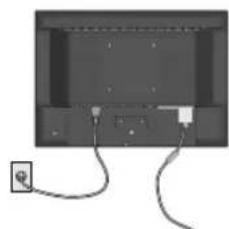
Figure R.2
Specifications
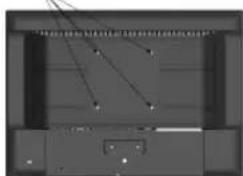
4-SCREWS (M4
(MAX depth: 8.5 mm)

Weight of LCD assembly: 4.2 kg (MAX) - (LCD19WV)
5.0 kg (MAX) - (LCD22WV)
-
Turn on the monitor with the front power button and the computer (Figure C.1).
-
No-touch Auto Adjust automatically adjusts the monitor to optimal settings upon initial setup for most timings.
For further adjustments, use the following OSD controls:
- Image Setup
- Image Position
Refer to the Controls section of this User's Manual for a full description of these OSD controls.
NOTE: If you have any problem, please refer to the Troubleshooting section (CD-ROM).
Tilt
Grasp both sides of the monitor screen with your hands and adjust the tilt as desired (Figure TS.1).
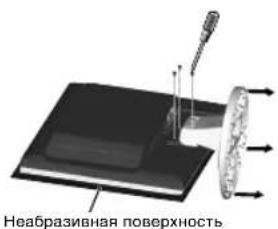
Remove Monitor Stand for Mounting
To prepare the monitor for alternative mounting purposes:
-
Disconnect all cables.
-
Place monitor face down on a non-abrasive surface (Figure R.1).
-
Remove the 3 screws connecting the monitor to the stand and remove the stand as indicated (Figure R.1). The monitor is now ready for mounting in an alternative manner.
-
Connect the AC cord to the back of the monitor (Figure R.2).
-
Reverse this process to re-attach stand.
NOTE: Use only VESA-compatible alternative mounting method.
NOTE: Handle with care when removing monitor stand.
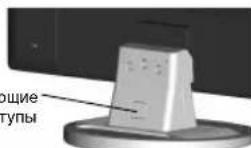
Removing the Base
NOTE: Always remove the Base when shipping the LCD.
- Place monitor face down on a non-abrasive surface (Figure R.1).
- While using your thumbs, press the bottom tabs upward to unlock.
- Press the top tabs down to unlock and pull off the stand.
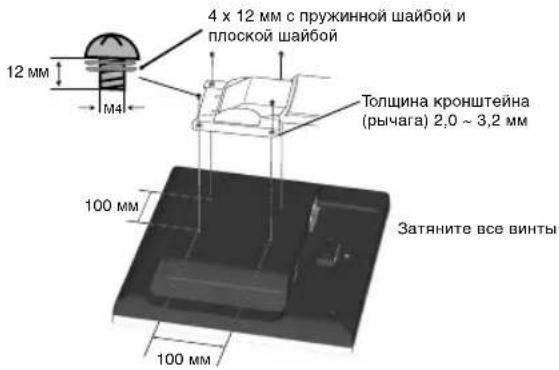
Connecting a Flexible Arm
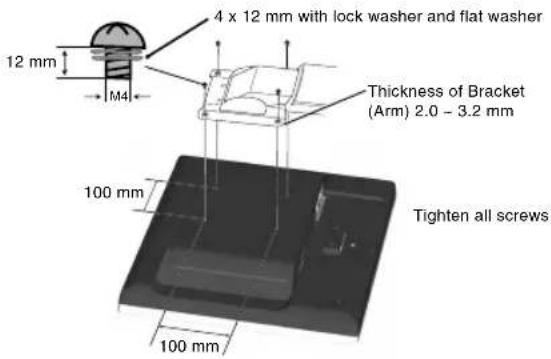
This LCD monitor is designed for use with a flexible arm.
Please use the attached screws (4pcs) as shown in the picture when installing. To meet the safety requirements, the monitor must be mounted to an arm which guarantees the necessary stability under consideration of the weight of the monitor.
The LCD monitor shall only be used with an approved arm (e.g. GS mark).
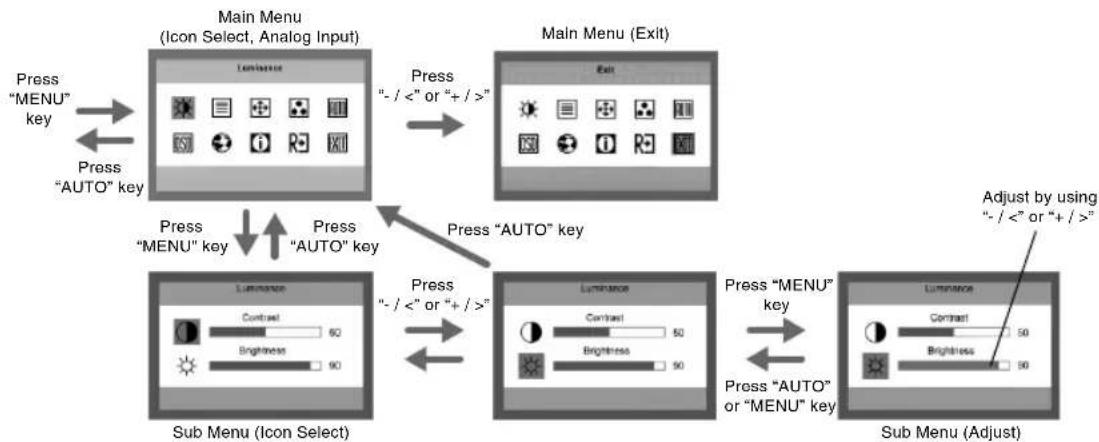
Controls
OSD (On-Screen Display) control buttons on the front of the monitor function as follows:
- Basic Key function
| Button | RESET (LCD22WV Only) | AUTO | -1</+1> | MENU | |
| OSD Off Shortcut to | Message displayed “Reset Yes/No” | Active Auto Adjustment function (press over 2 seconds). | Shortcut to Luminance (Brightness) window. | (Contrast) window. | OSD displayed. |
| OSD ON (Icon selection stage) | Message displayed “Reset Yes/No” | Act Exit-key. Cursor moves left. Cursor moves right. | Go to Adjustment stage. | ||
| OSD ON (Adjustment stage) | Message displayed “Reset Yes/No” | Act Exit-key. Adjust value decrease or Cursor for adjust moves left. | Adjust value increase or Cursor for adjust moves right. | Go to Icon selection stage. | |
| OSD Lock Active Active | Message displayed “Reset Yes/No” | function (press over 2 seconds). | Shortcut to Luminance (Brightness) window. | Shortcut to Luminance (Contrast) window. | Message displayed “OSD Loked”. |
2. OSD Lock function
To lock the OSD, press and hold the MENU button while the monitor is off and then press power button to turn the monitor on. To un-lock the OSD press and hold the MENU button while the monitor is off and then press power button to turn the monitor on.
3. OSD structure
Luminance
Contrast
Contrast from Digital-register.
Brightness
Backlight Adjustment.
Image Setup
Focus
Adjusts Picture Phase to reduce Horizontal-Line noise.
Clock
Adjusts picture Clock to reduce Vertical-Line noise.
Image Position
H. Position
Adjusts the horizontal position of the picture.
V. Position
Adjusts the vertical position of the picture.
Color Temp.
Warm
Recalls Warm Color Temperature from EEPROM.
Cool
Recalls Cool Color Temperature from EEPROM.
sRGB
Recalls sRGB Color Temperature from EEPROM.
R User/Red
Red Gain from Digital-register.
G User/Green
Green Gain Digital-register.
B User/Blue
Blue Gain from Digital-register.
Auto Config
Yes
Auto Adjusts the H/V Position, Focus and Clock of picture.
No
Does not execute Auto Config, returns to main menu.
OSD Setup
H. Position
Adjusts the horizontal position of the OSD.
V. Position
Adjusts the vertical position of the OSD.
OSD Timeout
Adjusts the OSD timeout.
Language
Language
Sets OSD language.
Information
Information
Shows the resolution, H/V frequency, serial number and input port of current input timing.
Reset
Yes
Clear each old status of Auto-configuration.
No
Do not execute reset, return to main menu.
Exit
Exits OSD.
OSD Message:
Auto Config Please Wait
If User Press Hot-Key "Auto", will show this message, and the monitor do the auto configuration function.
This message location is at the position setting in "OSD Setup" item.
Input Not Supported
When the H sync Frequency, V sync Frequency or Resolution is out of the monitor support range, will show this message. This message will be flying.
Cable Not Connected
When the video cable is not connected, will show this message. This message will be flying. After 5 seconds, the monitor will enter power saving.
No Signal
When the video cable is connected, but there is no active signal input, will show this message, after 5 seconds the monitor will enter power saving. This message location is at the position setting in "OSD Setup" item.
OSD Locked
When the OSD is unlocked, keep holding down "Menu" key and press "Power" key once to turn on the monitor, the OSD will be locked and show this message. When the OSD is locked, only Power key function is still working, if user presses any other key it will also show this message. When the OSD is locked, Keep holding down "Menu" key and press "power" key once to turn on the monitor, the OSD will be unlocked and will not show any messages. This message location is at the position setting in "OSD Setup" item.
When DDCCI is enable, press "Auto" key, after 5s the monitor will show "DDCCI Disable" message.
When DDCCI is disable, press "Auto" key, after 5s the monitor will show "DDCCI Enable" message.
This message location is at the position setting in "OSD Setup" item.

WARNING

NEC Display Solutions, Ltd.
4-13-23, Shibaura, Minato-Ku
Tokyo 108-0023, Japan
Directiva 89/336/CEE:
-EN60950-1
-EN55022
EN61000-3-2
-EN61000-3-3
-EN55024
y lleva la marca

NEC Display Solutions, Ltd.
4-13-23, Shibaura,
Minato-Ku
Tokyo 108-0023, Japon
Contenido

Manual del
username

CD-ROM

Pasacables
Baja Recalls Cool Color Temperature from EEPROM.
sRGB Recupera la temperatura de color sRGB de EEPROM.
NEC Display Solutions, Ltd.
4-13-23, Shibaura,
Minato-Ku
Tokyo 108-0023, Japan
Sommaire
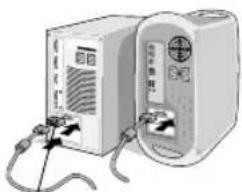
Figure A.1 Figure A.2
NEC Display Solutions, Ltd.
4-13-23, Shibaura,
Minato-Ku
3aBHeHne n3rOToBnTeJIa
HactoIIM NOITBepKdaem, YTO UeHTbIe XK-MOHITOpbl LCD19WV (TFT19W80PS)/LCD22WV (TFT22W90PS) COOTBETCTBYOT
DupekeTnBe CoBeta 73/23/EEC:
-EN60950-1
DinpeKTHBe CoBETA 89/336/EEC:
-EN55022
-EN61000-3-2
-EN61000-3-3
-EN55024

NEC Display Solutions, Ltd.
4-13-23, Shibaura,
Minato-Ku
Tokyo 108-0023, Japan

BZ02
Copepkmoe
YKOBOACTBO nonb0b0aBene

Kabenb
NITAHM


CD-ROM

DepxataeB
Kabeng


Ka6eBb
BnDeocnHana
KK-MOHHTOP
(noctabKa He npKpennHe)
ByaKOBouHOn KOPO6Ke* HOBO MOHToPa NEC LCD dONXHO 6bITb cnedyouee:
- MoHITop LCD c wapHnHpHOn onopo
KaebnbntaHn
Ka6enb BndeocnHana
PykoBoCTBO noIb3ObaTeMa - DCCK CD-ROM
- ΠΟ ΔCTaBka OCHOBaHnA
-Дерхатents Kabena
ObaTeBbNo CoaPahIe KOp6KBy uNyaKoBcHMy MaTePnAn dna TPAHOnOpTHPOBKn HJN HepeB03 MoHHTota.
Kpatkoe pykoBOcTBo no haay pa60tbI

Pncyok S.1
PncyHOK A.1 PncyHOK A.2
AaanTepKa6eBnIyMaCintosh (BEXoTNB KOMNNEKT)

Pcyhok B.1
YTo6bI NOcOeHNHTb OCHOBAHNE K NoCTaBKe KKJ:
1.BCTABBte nepeHIOO YACTb NOCTABKN KKII B OTBepCTN B nepeHne Yactn OCHOBHn (PncyHok S.1).
2.3akpennte noctabky Ha ochobAHm. 3aueKHa Ha ochOBAHn DOJNKA BOITN B COOTBETCTBYOUIEe OTBepTHe Ha 3aDneI CTOPHOE NOCTABKN (PucyHok S.1).
T06bI noKJIOHTB KKMD MOHITOP LCD K CNTeMe, BblONHInTe CNEyIOUme IHCTpyKUnn:
1.OTKIOHHTe NITAHNE KOMNbIOTepa.
2.ДЯнПКcaHAnorOBbIM BbIXOdOM:NOKIIIOHTe 15-KoTHaTbHbMnH-pa3bEM D-SUB BuJeocINHaBHorO Ka6Enr, INyUeroOT MOHITOPa,Kpa3bemy BuJeONlaTb HA KOMNbIbOTpe(PucyhoK A.1).3aTHNTE BCE BNTb.
M: PooeHnHTe aanTep kaen dna MultiSync Macintosh (He BxOINT B KOMNNEKT) K Komblotepy. IokLNHOHTe kaebnbueocmHana c 15-UTbpbKOBbIM MNH-paBemOM D-SUB K aadnTep Kaen dna MultiSync Macintosh (PncyhoK A.2).3aTHnTE BCE BNHTbl.
PIMMEAHHE. INa HeKOTOpbIX KOMNbIeTepOB Macintosh aanTeP Ka6ena Macintosh He Tpe6yTeC.
3.ПОДКИСНЕ OДИN KOHEU Ka6eJI NITAHIN K MOHNTOPY, a pyroI - K POSETKe 3EKNPTOnIHANu. YTObI ZAKPENITb BMEcTe Ka6eJI BIVDEOCINHANA n Ka6eJI NITAHIN, INONB3yIte DEKxATEJIb (PcHyOK B.1).
4. YTO6bI yCTaHOBnTb DePkaTeNb Ka6eH3 3aKpENITe DePkaTeNb Ka6eH3 Ha OCHOBaHH. BCTaBBte DePkaTeNb Ka6eH3 BOBTpcTHA Ha 3aDHeN CTOpOHe NOCTaBAH N, CDBNHyB DePkaTeNb BHn3, YCTaHOBnE rO H MaCtO (PcYHOK B.1).
INPMEYAHNE. Y6eNTecb, yTO 3aueKn Haedxho fHKpIOT depkataeb.
IPMUEAHHE. Otperynpyte nonoKeHne Ka6en naD ĀpKaTeHem Ka6eNe, YTObI nePdTbPaTb nobpeXdHeHne Ka6eNn MOHTopa.

Pucyok C.1
PucyHK.1

PucyhoK R.2
XapakTepncTnKu
4-BNHTA (M4)
(MAKCIMAMbHAH rny6nHa8,5 MM)

Bec XXKД MOHITOPA B c6ope: 4,2 KI (MAX) - (LCD19WV) 5,0 KI (MAX) - (LCD22WV)
IPNMEUHNE.PeKoMeHaaunNo npabnBHOmy Bb6Opy Ka6enr nTtAHm Cm.B pa3dene "BHHMaHne" HactoIero pyKOBOCTBa.
- BkIIOHTe MOHITOP c NMOUbHO KHOKN NITAHNA (PcCyHOK C.1) IN KOMNbHOTep.
6.ФУнкИЯ BECKOHtAKTHOH HAcTPOKN BbINOINHReT ABToMaTnueCkyo NOCTPOKy ONITMAhBbIX npaMeTpOB MOHTOP npN nepBOHaJIbHOH HAcTPOKE, BKIOUay BoBbIINcHTO npaMeTpOB CmHXpONH3aUN.ДЯн дын HeuHx HAcTPOE KcnoJbEyTe cNeDyOuNE napametpy OSD: - Image Setup (Hactpoika n306paekhenra)
Image Position (Пложбные Исторов OSD с Пложhoe опсаиме Энх napametpoв OSD с "Ораны ураларень") STORO руковоства
PIMMEAHHE. B cnyuae KaKnx-Ni6o Henoiaok o6paTntecb K pa3aeny UcTaPAHHe HEnCnPaBHOcte (Ha KOMNaKT-DiCKe).
HaKJIOH
YCTAHOBHTe Tpe6yemb HAKHOH 3KpaHa MOHITopa,epkaero pykamc0eexctopoH (PucyhoT S.1).
OToCoeHHeHne NODCTaBKn MOHTopa nepeyctahOBkO
YTObI NOrTOBnTb MOHITOp K yCTaHOBKe B dpyrom noLOXeHN: 1.OTcoEHHTE BCE kaEBN.
2.ПОJOKHTE MOHITOP 3KpaHOM BnH3 Ha Hea6pa3NBHyIO NOBepxHOCTb (PcCyHOK R.1).
3. OTBEPHNTE 3 BHNTA, KPNRNIUE MOHNTOP K NOCTABKE, IN CHMNTE NOCTABKY, KAK NOKA3aHO HA pCNYKHe (PcCyHK R.1). TENEBMOHNTOP TOB0 K yCTAHOBKe DpyrIM cnoC6oM.
4.Плкночite Ka6eIb nITaHnK pa3bemy Ha 3aHHe nHaHEn MOHTopoA (PncyHOK R.2).
5. Nobtopne npouecB 6opathom nopRKe, YTO6bI CHOba NOcOeDnHt b NOCTaBky.
PIMMEAHHE. DpyrHnCNOJb3yEmbl MeTObI yCTaHOBKn DOJXHHyIOBnetBOpA TbpeOBaHNM VESA.
PIMMEAHNE. Co6nOdaIte octopoxhoctb npCHTIN NOCTABKN MOHITOPA.
CHATME OCHOBAHNA
PnTpaHcnpOpBKe MOHTopa KKDCERa CHMaTe OCHOBaHne.
1.ПОДONКТЕ MOHITOP 3КРанOM BHN3 Ha Hea6pa3nHBYIO NOBepxHOCTb (PucyhoR.1).
2.60bHMMn naBcAMn HAXMNTHe HNXMH He BbCTynb HAnpaBHeHN BBePx nPa 3a6NoKpO8Kn
3. CHMMTE OCHOBAHNE C NOCTABKN.
IopcoeHHeHne NOdBHXHOro KpOHTeHa
TOTKKMOHHTOPnpEHa3HaueHINrNcNoB3OBAHnC NOBHXHBIMKPOHHTHOM.
Pn yctaHOBke nCNOB3yTe BnHTb4 (4 wT.)KAK NOKa3aHO Ha pncyHke. BcenxcoBNoJeNnaPabnn BezOnaHcOtn MOHITOP cNeyET yCTaHABnBaTa H KaPOHwTeHe, oBeceNeHBIOeM e Heo6xOAMyO YoCToHNBOCTb C yYetOM BeCa MOHTOpA.
KKMOnHToP CneJeT HcNoJIb3OaTb ToJIbKO c npEHa3HaueHHbIM dIra Hero KPOHHTeHOM (HanpIMep, MapKg GS).
OprAhblynpaBHeH
KhONkynpabHnnaKpaHHbIM MeHO Ha nepeHne naHeN MoHHTopa BbINOHNHOT CNeDyUOune yHKn:
1.OCHOBHnA FyHKnA KHONK
Image Setup (HactpoKa n3o6paKeHHa)
Focus (Фokусювka)
HactroPikaФЗ3IIO6OpaKeHnRAДСнИХЕнHaJMyBVDIJIPOR3IOJALbHbIXIINJIH.
Clock (CnHxpoHn3aun)
Hactpoika CnHPOHuaaIIMoBpaJHeN CHINJEH YA Ma B WBe DE PtIKKALbHbX LInHH.
Image Position (Положении ззбрахени)
H. Position (NoJoxeHne no rOpn3oHTaI)
PerynnpobKa nOxKeHnN 306paXeHnN no rOpN3oHTaII.
V. Position (NoJoxeHne no BepTnKaJI)
PerynnpobKa noNoXeHn n3o6paXeHn No BepTuKaN.
Color Temp. (Lbetobar TemnepaTypa)
Warm (Tenlbu mbet)
BoctaHOBJIeHne cTaHdApTHoT eTIOI ueTOBOI TEMpePaTybl.
Cool (XoJIoAnbIy cBeT)
BocctaHObENHe CTaHdAPTHo XNoDHOu CBETOBO TMepaIpyb.
sRGB
BocTaHOBHeHne CTAHdApTHoN cBeTobOTo TEMpePaTyb sRGB.
R User/Red (NoIb3ObaTeIbckn/KpacHbI)
BocTahOBHeNIE 3IuPDPoR0pePnTa Ko3ΦΦnHEnHa yCnHnK PkACHOrO UEBa.
G User/Green (NoB3oBaTeJbckn/3eNeHbI)
BocTahOBENHEI3UHPOBOrO pernctpa K03ΦmNHeHTA vceHNEJIeHOUBTeA.
BUser/Blue (NoIb3oBaTeJbckn/cHnn)
BocTahOBJIeHNe i3 cIIOPOBO rpeNCTpa Ko3ΦΦnIeHTa cnIyIeHc mIHO eZeta.
Auto Config (ABTomatnuecka Hactpoika)
Yes (a)
AbTomatuecka hactpoika napameTPOB n3o6paXeHn "IonoXeHne no Bepr./ropn3.," Pokyc n TaKT. hactota".
No (Her)
OTMeHA BInOpHENH ABTOMaTHeCKOH HAcTPOKNB03BpATB IraIbHOE MEHO.
OSD Setup (HactpoKa 3KpaHHoro MeHIO)
H. Position (Положенno ro np3oTann)
PerynnpOBka noJoxeHHN 3KpaHHO MeHIO no ropuHTaJI.
V. Position (NoJoxeHne no BepTuKaJIu)
PerynipoBka nOIOXeHnE 3KpaHHoro MeHIO NO BepTKaJI.
OSD Timeout (Bpemr oKuHaHn 3KpaHHoro MeHIO)
BbIXoI N3 3KpaHHoro MeHIO.
Coo6eHHe 3KpaHHoro MeHIO.
Auto Config Please Wait (BbInonHReTcABTOMaTHueckan hactpOka, noXaIyIcTa, noOxJdTe)
ECnn non3b0aBateNBnKHXIMaET KNONy Auto (ABTO),OTOBpaKaTcra 3TO COO6ueHHe N BblONHReTC aBOMATuHecKa HACTPOka MOHTOPa.
3To 0o6uIeHMe pacOnonaraeTcB HactpoiKax NIOJOKeHHA 3KpaHHOro MEHO.
Input Not Supported(BxOAnH cUrHan He noOpEpxuBaetc)
Ecnn 3naueHn yacToTb CnHxpoHn3aunn no BepTKan n nn npn3oHTan nn npa3eHn HbIXoAR 3a npdebl noDepKnaBaEMOro MOHITOpm Dnana3OHa, OTO6paXaETc RaanHoe coooBSeHne. CoooSeHne nepeMeuaetc no 3kPaNy.
Cable Not Connected (Ka6enb He nodknioueh)
Korda BndeOka6bEn He noDKnIOHEn, OTO6paKaeTc3 T0 COo6uHHe. Coo6uHHe nepemEuaTeCa TPO 3KpAny. Ype35cekyHd MoHITop nepeXoDMB PekmN 3KOHOMM 3HEprn.
No Signal (Hcturnhana)
Korda BndeokabeNb noKJHoeyH, Ho HET akTMBHO CmHaNA, OTO6Paxaetc3 To COo6UHeNE, Ype35 CMOTOP nepeXODITB PEXM3 KOHOMN3HEPRIM. 3To COo6UHeNE pacNONaraeTCB HACtpoKAX NIOJOKeEHN3 KpAHHO MeHIO.
OSD Locked (3KpaHHoe MeHIO 3a6JOKupoBaHO)
Ecnn 3kpahHOe MeHO He 3abNOKpObaHO, yapedXnBaTe KhoNkY
Menu (MeHO) n ONDOBpeMeHO HAXMNTe KHOKNy BKNIOHHe
NITAHNA, YTO6bI BKIOHOTb MOHOTp. 3KpaHHO MeHO 6yDET
3a6NOKpOBOAHO n OTo6P3ATcT 3TO COO6UHe. Korda 3KpaHHOe
MeHO 3a6NOKpOBAHO, pAOtaET TObKO KHONKa NITAHNA, npi
Hakatni NIO60dpyrO KOHNk KNo6PxAeTcRA DHHOOe CoO6UHe.
Ecnn 3kpAHHOe MeHO 3a6NOKpOBAHO, yepXKBaTe KHOKNy HMQNY Menu
(MEHIO) n ONDOBpeMeHO HAXMNTe KHOKNy BKNIOHHe NITAHNA,
TO6bI BKIOHOTb MOHOTp, 6NoKpOBOA 3KPAHORO MeHO 6yDET
CHRTa n DAAHOe COO6UHe He OTo6P3ATcT. 3TO COO6UHe
pacNoJARATAcB H aCTPOKxK PNOJOEHNs 3KPAHORO MeHO.
DDCCI Disable/Enable (BblK./BKJ.DDCCI)
KordaФунки DDCCI BKIOHHeHa,HAKMITE KhoNky AUTO (ATo),Yepe35 cek. Na MOHHTope NOBNTCR COoBSeHne "OTKIOHHe DDCCl"
KordaФинкцИ DDCCl OTKIQUHeHa,нakmITE KhONky AUTO (ATo), Yepe3 5 cek. ha moHnTope nOaBnTc coo6eHne "BknIOueHne DDCCl".
3To coo6ueHHe paonanaeTcB HacTpOaKax noIOKeHH 3KpaHHOr MOHIO.
4
DIKKAT
A
YANGIN VE SOK TEHLIKELERINI ONLEMEK I CIN CIHAZ YAGMUR YA DA NEME MARUZ KALMAMALIDIR. AYRICA BU CIHAZIN POLARIZE FISINI UCLAR TAM OTURMADIGI SURECE BIR UZATMA KABLOSU YA DA BASKA PRIZLERDE KULLANMAYIN. ICERISINDE YUKSEK VOLTAJI BILESENLER BULUNDUGU I CIN KASAYI AGMKTAN KAÇININ SERVIS I CIN YETKILI SERVIS PERSONELINE BASVURUN.

UYARI
ELEKTRIK SOKU RISKI -ACMAYIN

UYARI: ELEKTRIK SOKU RISKINI AZALTMAK IGIN, KAPAGI AÇMAYIN (VEYA ARKASINI). IÇ KISIMDA KULLANICINN ILGILENEBILECEGE HERHANGI BIR PARCA BULUNMAMAKTADIR. SERVIS IGIN YETKILI SERVIS PERSONELINE BASVURUN.

NEC Display Solutions, Ltd. 4-13-23, Shibaura, Minato-Ku
Tokyo 108-0023, Japonya
icindekiler

CD-ROM

Kablo Tutucu
Kullanica Kilavuzu
Guc Kablosu Video Sinyal Kablosu

LCD monitor
(Destek baglanmamistr)
LCD monitor ve monitor ayagi
Guc Kablosu
V ideo Sinyal Kablosu
Kullanicilavuzu
CD-ROM
T aban Destegi
Kablo Tutucu
Monitorāt tagmak va bīyā rē yō gōdermek içn ārjonal kutusunu ve ambajat mazemesisini sakakmiya unutmayn.
Hizli Başlama
Seik 5.1
Sekil A.1 Sekil A.2
Macintosh Kablo Adaptoru (dahil degil)
Sekil B.1
Tabani LCD Destege takmak ici:
LCD tertibatin agirlig: 4.2 kg (MAKS.) - (LCD19WV)
5.0 kg (MAKS.) - (LCD22WV)
Cable Not Connected (Kablo Bagli Degil)
No Signal (Sinyal Yok)
OSD Locked (OSD Kilitli)
Printed on recycled paper
Printed in China
Part Number:


- Manufacturer's Recycling Information
- WEEE Mark (European Directive 2002/96/EC)
- Within the European Union
- Outside the European Union
- Chinese RoHS-information relevant for Chinese market
- CAUTION
- Declaration of the Manufacturer
- Contents
- Quick Start
- uui6u
- Specifications
- Tilt
- Remove Monitor Stand for Mounting
- Removing the Base
- Connecting a Flexible Arm
- Controls
- OSD Lock function
- OSD structure
- Luminance
- Color Temp.
- OSD Message:
- Auto Config Please Wait
- Input Not Supported
- Cable Not Connected
- No Signal
- OSD Locked
- WARNING
- Contenido
- Sommaire
- 3aBHeHne n3rOToBnTeJIa
- Copepkmoe
- Kpatkoe pykoBOcTBo no haay pa60tbI
- XapakTepncTnKu
- HaKJIOH
- OToCoeHHeHne NODCTaBKn MOHTopa nepeyctahOBkO
- CHATME OCHOBAHNA
- IopcoeHHeHne NOdBHXHOro KpOHTeHa
- OprAhblynpaBHeH
- Image Setup (HactpoKa n3o6paKeHHa)
- Focus (Фokусювka)
- Clock (CnHxpoHn3aun)
- Image Position (Положении ззбрахени)
- Position (NoJoxeHne no rOpn3oHTaI)
- Position (NoJoxeHne no BepTnKaJI)
- Color Temp. (Lbetobar TemnepaTypa)
- Warm (Tenlbu mbet)
- Cool (XoJIoAnbIy cBeT)
- sRGB
- R User/Red (NoIb3ObaTeIbckn/KpacHbI)
- G User/Green (NoB3oBaTeJbckn/3eNeHbI)
- BUser/Blue (NoIb3oBaTeJbckn/cHnn)
- Auto Config (ABTomatnuecka Hactpoika)
- Yes (a)
- No (Her)
- OSD Setup (HactpoKa 3KpaHHoro MeHIO)
- Coo6eHHe 3KpaHHoro MeHIO.
- Auto Config Please Wait (BbInonHReTcABTOMaTHueckan hactpOka, noXaIyIcTa, noOxJdTe)
- Input Not Supported(BxOAnH cUrHan He noOpEpxuBaetc)
- Cable Not Connected (Ka6enb He nodknioueh)
- No Signal (Hcturnhana)
- OSD Locked (3KpaHHoe MeHIO 3a6JOKupoBaHO)
- DDCCI Disable/Enable (BblK./BKJ.DDCCI)
- 4
- DIKKAT
- A
- UYARI
- icindekiler
- Hizli Başlama
- Cable Not Connected (Kablo Bagli Degil)
- No Signal (Sinyal Yok)
- OSD Locked (OSD Kilitli)
Brand : NEC
Model : MultiSync LCD22WV
Category : Monitor