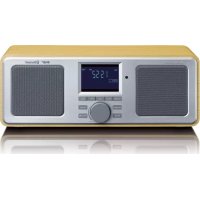
DAR015 - Radio LENCO - Free user manual and instructions
Find the device manual for free DAR015 LENCO in PDF.



| Product type | FM DAB+ stereo radio with Bluetooth |
| Brand | Lenco |
| Model | DAR015 |
| Category | Radio |
| Power supply | AC power adapter 100-240 V, 50/60 Hz, DC output 9 V / 2 A |
| FM frequency range | 87.5 – 108 MHz |
| DAB+ frequency range | 174 – 240 MHz |
| Headphone connector | 3.5 mm jack socket |
| Antenna | Integrated telescopic antenna |
| Output power | 2 x 5 W |
| Bluetooth | Yes, range approx. 10 m |
| Preset memory | 10 stations in DAB+ and 10 in FM |
| Functions | DAB+ radio, FM, Bluetooth, alarm (x2), snooze, sleep timer, LCD display |
| Display | LCD screen with station information |
| Cleaning | Soft dry cloth; do not use solvents |
| Safety | Do not expose to water, do not open the casing, maintain ventilation distances |
| Warranty | Compliant with European legislation, warranty by the retailer |
| After-sales service | Contact the retailer; repairs by authorized personnel only |
Frequently Asked Questions - DAR015 LENCO
User questions about DAR015 LENCO
0 question about this device. Answer the ones you know or ask your own.
Ask a new question about this device
Download the instructions for your Radio in PDF format for free! Find your manual DAR015 - LENCO and take your electronic device back in hand. On this page are published all the documents necessary for the use of your device. DAR015 by LENCO.
USER MANUAL DAR015 LENCO
Stereo DAB+, FM radio with bluetooth
English. Error! Bookmark not dened.
Nederlands 133
Deutsch 24
Francais 35
Espanol 46
CAUTION:
Usage of controls or adjustments or performance of procedures other than those specied herein may result in hazardous radiaon exposure.
This unit should not be adjusted or repaired by anyone except qualified service personnel.
KEEP THESE INSTRUCTIONS IN MIND:
- Do not use this device near water.
- Clean only with a slightly damp cloth.
- Do not cover or block any venlaon openings. When placing the device on a shelf, leave 5 cm (2^ ) free space around the whole device.
- Install in accordance with the supplied user manual.
- Don't step on or pinch the power adaptor. Be very careful, particularly near the plugs and the cable's exit point. Do not place heavy items on the power adaptor, which may damage it. Keep the enre device out of children's reach! When playing with the power cable, they can seriously injure themselves.
- Unplug this device during lightning storms or when unused for a long period.
- Keep the device away from heat sources such as radiators, heaters, stoves, candles and other heat-generang products.
- Avoid using the device near strong magne cels.
- Electrostac discharge can disturb normal usage of this device. If so, simply reset and restart the device following the instrucon manual. During le transmission, please handle with care and operate in a stac-free environment.
- Warning! Never insert an object into the product through the vents or openings. High voltage ows through the product and inserting an object can cause electric shock and/or short circuit internal parts. For the same reason, do not spill water or liquid on the product.
- Do not use in wet or moist areas such as bathrooms, steamy kitchens or near swimming pools.
- Do not use this device when condensaon may occur.
- Although this device is manufactured with the utmost care and checked several mes before leaving the factory, it is sill possible that problems may occur, as with all electrical appliances. If you nose smoke, an excessive build-up of heat or any other unexpected phenomena, you should disconnect the plug from the main power socket immediately.
- This device must be well ventilated at all me!
- This device must operate on a power source as specied on the specicaon label. If you are not sure of the type of power supply used in your home, consult your dealer or local power company.
- The socket outlet must be installed near the equipment and must be easily accessible.
- Do not overload ac outlets or extension cords. Overloading can cause re or electric shock.
- Devices with class 1 construcon should be connected to a main socket outlet with a protecve earthed connecn.
- Devices with class 2 construcon do not require a earthed connecn.
- Keep away from rodents. Rodents enjoy bing on power cords.
-
Always hold the plug when pulling it out of the main supply socket. Do not pull the power cord. This can cause a short circuit.
-
Avoid placing the device on any surfaces that may be subject to vibraons or shocks.
- To protect the device during a thunderstorm, unplug the ac power adaptor.
- When the device is not in use for long periods, unplug the ac power adaptor for safety reasons.
- To clean the device, use a so dry cloth. Do not use solvents or petrol based uids. To remove severe stains, you may use a damp cloth with dilute detergent.
- The supplier is not responsible for damage or lost data caused by malfuncon, misuse, modicaon of the device or baery replacement.
- Do not interrupt the conneccon when the device is formang or transferring les. Otherwise, data may be corrupted or lost.
- The usb memory sck should be plugged into the unit directly. Don't use an usb extension cable because it can cause interference resulting in failing of data.
- The apparatus shall not be exposed to dripping or splashing and make sure that no objects lled with liquids, such as vases, are placed on or near the apparatus.
- To completely disconnect the power input, the mains plug of the apparatus shall be disconnected from the mains, as the disconnect device is the mains plug of apparatus.
- The mains plug of the apparatus should not be obstructed or should be easily accessed during intended use.
- Baery shall not be exposed to excessive heat such as sunshine, re or the like.
- Minimum distance of 10cm around the apparatus is needed for sucient venlaons.
- The venlaon should not be impeded by covering the venlaon openings with items such as newspapers, table-cloths, curtains etc.
- No naked ame sources such as lighted candles should be placed on the apparatus.
- Aenon should be drawn to the environmental aspects of baery disposal.
- The apparatus can only be used in moderate extremely cold or climates warm environments should be avoided.
- The rang label has been marked on the boom panel of the apparatus.
- This device is not intended for use by people (including children) with physical, sensory or mental disabilities, or a lack of experience and knowledge, unless they're under supervision or have received instrucons about the correct use of the device by the person who is responsible for their safety.
- This product is intended for household use only and not for commercial or industrial use.
- Make sure the unit is adjusted to a stable posion. Damage caused by using this product in an unstable posion or by failure to follow any other warning or precaution contained within this user manual will not be covered by warranty.
- Never remove the casing of this apparatus.
- Never place this apparatus on other electrical equipment.
- Do not use or store this product in a place where it is subject to direct sunlight, heat, excessive dust or vibraon.
- Do not clean this product with water or other liquids.
- Do not block or cover the slots and holes in the product.
- Do not push foreign objects into the slots or holes in the product.
-
Do not allow children access to plasc bags.
-
Please check that the voltage on the type plate of your appliance corresponds with your house electricity supply (type plate is located on the back of the unit).
- Protect the power cord from being walked on or pinched, particularly at plugs, convenience receptacles, and the point where they exit from the apparatus.
- Only use aachments/accessories specied by the manufacturer.
- Refer all servicing to qualified service personnel. Servicing is required when the apparatus has been damaged in any way, such as the power supply cord or the plug, when liquid has been spilled or objects have fallen into the apparatus, when the apparatus has been exposed to rain or moisture, does not operate normally, or has been dropped.
- Do not use a damaged power cord or plug or a loose outlet. Doing so may result in re or electric shock.
Warning: prolonged exposure to loud sounds from personal music players may lead to temporary or permanent hearing loss.
INSTALLATION
- Unpack all parts and remove protecve material.
- Do not connect the unit to the mains before checking the mains voltage and before all other connecns have been made.
- Do not cover any vents and make sure that there is a space of several cenmeters around the unit for venlaon.
Product Overview
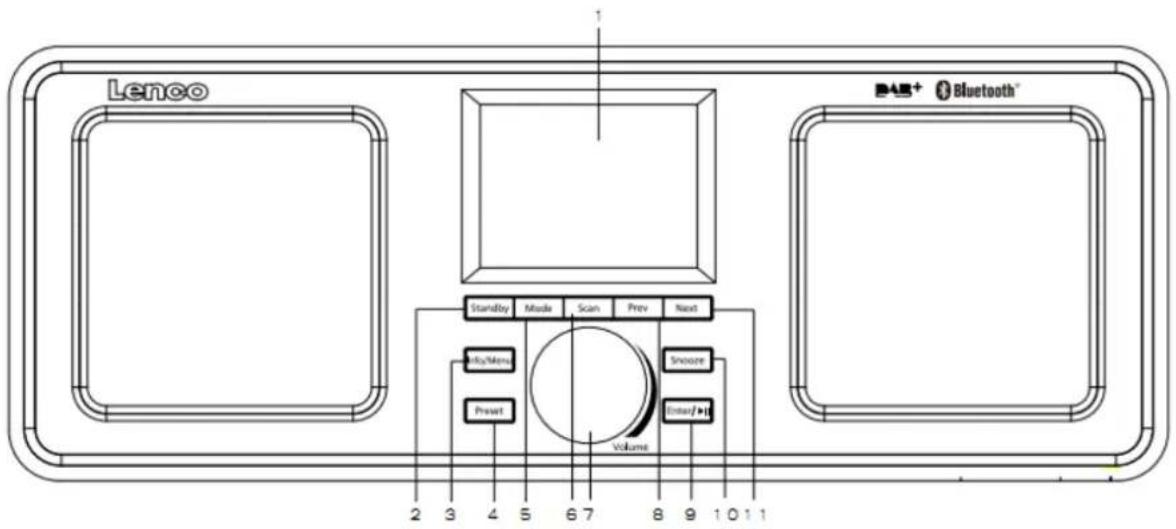
- LCD Display
- Standby Buon
- Info/Menu Buon
- Preset Buon
- Mode Buon
- Scan Buon
- Vol+/Vol-Knob
- Previous Buon
- Enter/Play/Pause Buon
- Snooze Buon
- Next Buon
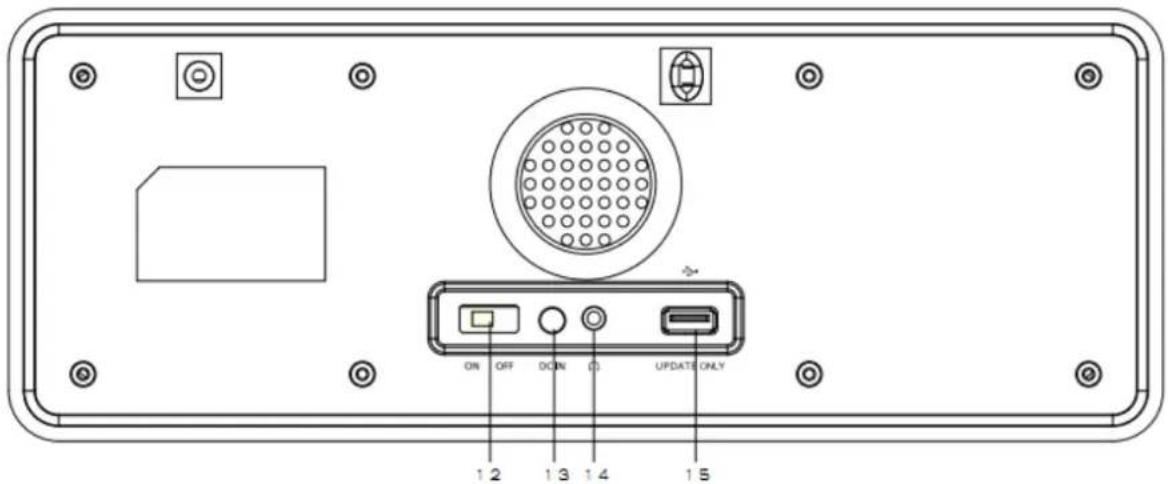
- ON/OFF Switch
- DC IN Socket
- Earphone Socket
- SW Update Socket
Remote Control
Switch on your radio for the rst me
Connect the radio with Power Adaptor provided.
Plug the other end into power socket.
Switch the ON/OFF switch to ON posion, the unit will display "Welcome to digital Radio".
Press the Standby buon to turn on.
Selecng the modes
When the radio is turned on, press the Mode buon repeatedly to switch between DAB+ and FM modes.
DAB+ operaoon
When you rst select DAB+ radio, press Scan buon it will search for and store all available DAB+ staons. Once Auto search is completed, your radio will select the rst staon tuned.
Selecng between staons. With your radio on:
Press the Mode buon to select DAB+ mode.
Press the Prev or Next buoy to navigate through the list of staons.
Press Enter buon to tune to the staon currently shown on the display.
You may adjust volume by turning Volume to le or right.
FM operao
With your radio on, press the Mode buon to select FM mode.
Press the Prev or Next buon to manually tune to specic frequencies by 0.05MHz per step.
The radio also includes the scan feature of FM, allowing you to automatically tune to FM staons.
Press the Scan buoy to automatically search for the next available radio staon. When a staon is found it will be automatically played.
You can search for staons in the opposite direcon by pressing and holding the Scan buon.
Storing staons as presets
Radio can store 10 staons as presets in both DAB+ and FM mode. To store a preset:
Tune to the staon you like, press and hold the Preset buon, then using the Prev or Next buon to select desired preset number. Then, press and hold the preset buon for 2 seconds, display indicate Preset Store< xx: (Empty)>, now select with Prev or Next buon the desired preset for store.
Press the Enter button to store the stacon. The message "Preset xx stored" will appear on the display.
Playing staons saved as presets
To play a preset staon:
Select the band (DAB+ or FM) of the staon by pressing the Mode buon.
Press the Preset buon to recall the preset staon, then using the Prev or Next buon to browse through your presets and press the Enter buon to conrm.
Seng the me automatically
When you rst turn on the radio it will automatically synchronize to the local me while searching for DAB+ staons. If the me hasn't set itself try to change the locaon of the device for a beer signal.
System Sengs
With the unit on, press and hold the Info/Menu buon. This will open the "Set Menu".
Press the Prev or Next buon to select your desired Sub-opon.
Seng the Time/Date
Press and hold Info/Menu buon, the
The hours will ash. Press the Prev or Next buon to set the hour. Press the Enter buon to conrm.
Repeat the last two steps to set the minutes, year, month and date.
System Version
You can check the soware version number by pressing and holding the Info/Menu buon. Press the Prev or Next buon unl
Reseng the radio
Reseng the radio will delete all the tuned DAB+ staons and all the preset memory staons in FM and DAB+ modes. To reset the radio:
Press and hold the Info/Menu buon.
Press the Prev or Next buon unl
Press the Enter buon and radio will be reset.
Sleep seng
Press and hold the Info/Menu buon.
Press the Prev or Next buon unl < Sleep Set> is shown on screen, press the Enter buon.
Press the Prev or Next buon to select either OFF-120-90-60-45-30-15-5 minutes.
Press the Enter buon to conrm.
Using the alarm
Alarm Seng
With radio on, press and hold the Info/Menu buon.
Then press the Prev or Next buon to choose Alarm 1 to ON posion, press Enter buon to conrm.
The hours will ash, use the Prev or Next buon to select hour. Press Enter buon to conrm.
The mins will ash, use the Prev or Next buon to select the minutes. Press Enter buon to conrm.
The Volume digit will ash, use the Prev or Next buon select the Volume. Press Enter buon to conrm.
The mode of Alarm will ash, use the Prev or Next buon select the Alarm source: Alarm/DAB/FM. Press Enter buon to conrm.
With radio on, press and hold the Info/Menu buon.
Then press the Prev or Next buon to choose Alarm 2 to ON posion, press Enter buon to conrm.
The seng procedure is the same as the "ALARM1".
Deacvate the alarm
Press and hold the Info/Menu buon, then select the alarm you wish to turn o using the Prev or Next buon to choose the Alarm to OFF posion.
Press Enter buon. The alarm will be deactivated.
Turning o the alarm
Press the Standby buon to turn o the alarm when the alarm is sounding.
NOTE: The alarm will keep ringing for 60 minutes if you do not turn it o when it is sounding.
Snoopze Funcon
When the alarm is sounding, press the Snooze buon to turn o the alarm temporarily. The alarm will be delayed for 9 mins and then come on again.
Staon informaon on DAB mode
Every me you press the Info/Menu buon in the DAB mode, the display will cycle through the following display modes:
Dynamic Label Segment (DLS): Displays scrolling text informaon supplied by the broadcaster.
Signal Strength: Displays a signal bar with the current staon strength.
Bit Error Rate (BER): Provides details of the signal error rate.
Channel Frequency: Displays the staon's transmission channel number and frequency.
Program Type (PTY): Shows the type and descripion of the program provided by the DAB staon.
Time&Date: Displays the me and date informaon provided by the broadcaster.
Bit Rate: The date rate of which the signal is being transmitted.
Staon informaon on FM mode
Every me you press the Info/Menu buon in the FM mode, the display will cycle through the following display modes:
Program type: Displays descripion of the program provided by the radio staon.
Signal Strength: Displays a signal bar with the current staon strength.
Time and Date: Displays the me and date informaon provided by the broadcaster.
Frequency: Displays the stoon's transmission frequency.
Audio Type: Displays the audio type of the current staon (Stereo or Mono).
Radio Text: Displays scrolling test informaon supplied by the broadcaster.
Note: To switch between mono and stereo by pressing the Enter buon repeatedly.
Retuning your DAB+/FM Radio
You can retune your radio staons to store new staons or tune to a new region. Your preset staons will remain stored when you perform a full scan retune. In DAB mode:
Press the Scan buon to perform a full scan.
Progress will be indicated on the display.
When tuning is complete, the radio will play the rst listed staon or return to the last staon played.
Using the Headphones
You can listen to your DAB/FM radio using headphones, just plug the 3.5mm jack into the back of your device in the headphone jack. Control the volume by using the Volume knob.
Bluetooth
To choose your mode, press through your choices using the 'Mode' buon. The choices will be displayed on the front screen.
Turn on Bluetooth on your phone and 'Lenco DAR-015' will appear. Click on this to connect. When the unit makes a short sound, it has successfully connected.
To choose music you will need to choose the album or playlist from your phone, but once selected you can then use the Prev or Next buoy to select previous or next tracks.
To pause the music playback, please press play/pause buon; to resume music playback, press play/pause buon again.
The operational range between the unit and a Bluetooth device is approximately 10 meters, without any objects in the way.
FAQs
| Problem | Soluon |
| No Power | Check that the system is connected to a working mains outlet. Check that the DC power adaptor is properly connected to the DC in on the radio. |
| No sound | Check that the volume control is not at minimum seng. |
| Poor reception | Adjust the locacon of the antenna for best signal reception. |
| Funcon disturbed | If none of the above soluon work, try switching o and unplugging your Radio. |
Specicaons
| Power supply | AC 100-240V |
| Frequency Ranges | FM 87.5-108MHz DAB 174-240MHz |
| Output connector | 3.5mm earphone socket |
| Aerial | Telescopic antenna |
| Output power | 2 x 5W |
| Max. Power consumpon | 18W |
| Power supply adaptor(For EU only) | |
| Adaptor Manufacturer | Dongguan Yuan Shuai Electronic Co., Ltd |
| Input | AC 100-240V~50/60Hz, 0.65A Max |
| Output | DC 9V/2A |
| Adaptor Model Number | YeS04S-0900200VH |
| Use only original AC adaptor | |
| Use only the power supply listed on the user instrucons |
Guarantee
Lenco oers service and warranty in accordance with the European law, which means that in case of repairs (both during and aer the warranty period) you should contact your local dealer.
Important note: It is not possible to send products that need repairs to Lenco directly.
Important note: If this unit is opened or accessed by a non-ocial service center in any way, the warranty expires.
This device is not suitable for professional use. In case of professional use, all warranty obligaons of the manufacturer will be voided.
Disclaimer
Updates to Firmware and/or hardware components are made regularly. Therefore some of the instrucon, specicaons and pictures in this documentaon may differ slightly from your parcular situacon. All items described in this guide for illustraon purposes only and may not apply to parcular situacon. No legal right or entitlements may be obtained from the descripon made in this manual.
Disposal of the Old Device
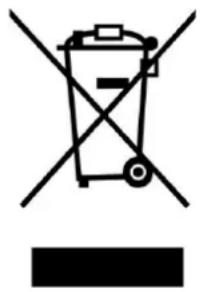
This symbol indicates that the relevant electrical product or baery should not be disposed of as general household waste in Europe. To ensure the correct waste treatment of the product and baery, please dispose them in accordance to any applicable local laws of requirement for disposal of electrical equipment or baeries. In so doing, you will help to conserve natural resources and improve standards of environmental protecon in treatment and disposal of electrical waste (Waste Electrical and Electronic Equipment Direcve).
Service
For more informaon and helpdesk support, please visit www.lenco.com
Lenco Benelux BV, Thermiekstraat 1a, 6361 HB, Nuth, The Netherlands.
Nederlandss
DAR-015
LET OP!
Lenco Benelux BV, Thermiekstraat 1a, 6361 HB Nuth, The Netherlands.
Français
DAR-015
ATTENTION!

- CAUTION:
- KEEP THESE INSTRUCTIONS IN MIND:
- INSTALLATION
- Product Overview
- Remote Control
- Selecng the modes
- DAB+ operaoon
- Selecng between staons. With your radio on:
- FM operao
- Storing staons as presets
- Playing staons saved as presets
- Seng the me automatically
- System Sengs
- Seng the Time/Date
- System Version
- Reseng the radio
- Sleep seng
- Using the alarm
- Alarm Seng
- With radio on, press and hold the Info/Menu buon.
- Turning o the alarm
- Snoopze Funcon
- Staon informaon on DAB mode
- Staon informaon on FM mode
- Retuning your DAB+/FM Radio
- Using the Headphones
- Bluetooth
- FAQs
- Specicaons
- Guarantee
- Disclaimer
- Disposal of the Old Device
- Service
- Nederlandss
- DAR-015
- LET OP!
- Français
- ATTENTION!
Brand : LENCO
Model : DAR015
Category : Radio