AP140 PRO - Air purifier IDEAL - Free user manual and instructions
Find the device manual for free AP140 PRO IDEAL in PDF.

| Product type | Air purifier |
| Brand | IDEAL |
| Model | AP140 PRO |
| Dimensions (L x W x H) | 633 × 562 × 725 mm |
| Weight | 51 kg |
| Power supply | 200-240V ~50/60Hz / 100-120V~50/60Hz, 175W |
| Max. air flow | 1500 m³/h |
| Ventilation levels | 5 (including Turbo) |
| Operating modes | Automatic, Silent, Programmable (delayed start/stop) |
| Air quality indicator | 3 colors (green, yellow, red) |
| Filtration | Pre-filter + HEPA 360° filter, optional activated carbon filter |
| Filter lifespan | Approximately 1 year (depending on use) |
| Remote control | Yes (CR2025 battery included), with magnetic attachment |
| Connectivity | WiFi, smartphone app (IDEALAIRPRO) |
| Sensors | Air quality, dust, brightness, IR receiver |
| Max. noise level | 60 dB(A) (Turbo) |
| Min. noise level | 17.5 dB(A) (Silent) |
| Recommended area | 120 to 160 m² |
| Maintenance | Clean housing with damp cloth, vacuum sensors and pre-filter |
| Safety | Automatic shutdown, child lock, overheat protection |
| Spare parts | Filter cartridge (Ref. 7320 099), Activated carbon insert (Ref. 7320 095) |
| Warranty | According to country conditions, wear parts excluded |
| Certifications | GS, CE (2014/35/EU, 2014/30/EU, 2011/65/EU) |
Frequently Asked Questions - AP140 PRO IDEAL
User questions about AP140 PRO IDEAL
0 question about this device. Answer the ones you know or ask your own.
Ask a new question about this device
Download the instructions for your Air purifier in PDF format for free! Find your manual AP140 PRO - IDEAL and take your electronic device back in hand. On this page are published all the documents necessary for the use of your device. AP140 PRO by IDEAL.
USER MANUAL AP140 PRO IDEAL
EN Operating Instructions
FR Mode d'emploi
natural_image
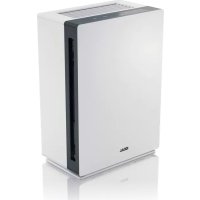
White industrial air purifier unit with ventilation grilles and cooling panel (no visible text or symbols)EN Operating Instructions (25 – 47)
natural_image
Simple line icon of an open book with an information symbol (no text or numbers present)Vorwort
Sicherheitshinweise
Sicherheitshinweise
natural_image
Warning symbol of a lightning bolt inside a triangular frame (no text)Achtung
Achtung
natural_image
Warning symbol of a flame inside a diamond shape (no text or numbers)Achtung
natural_image
Line drawing of a white industrial cabinet with ventilation grille and control panel (no text or symbols)Luftreiniger (inkl. Filterpatrone)

natural_image
Technical line drawing of a mechanical component with no visible text or symbolsnatural_image
Line drawing of a mobile phone with keypad and buttons (no text or symbols)natural_image
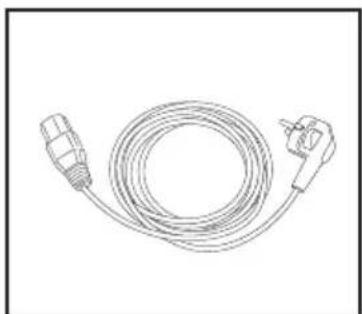
Line drawing of a coiled electrical plug with two connectors (no text or symbols)Netzkabel Gedruckte

Betriebsanleitung
natural_image
Isometric line drawing of a mechanical assembly with a base and top plate (no text or symbols)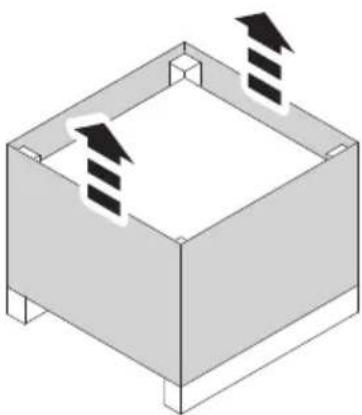
natural_image
Isometric diagram of a square container with three upward-pointing arrows indicating flow or movement (no text or symbols)natural_image
Diagram of a device inside a vehicle frame with an upward arrow indicating motion (no text or symbols)
natural_image
Line drawing of an open box containing a grid of cables and connectors, with no visible text or symbols.natural_image
Technical illustration of a mechanical component with a directional arrow indicating motion (no text or symbols)natural_image
Technical line drawing of a mechanical device with two views: top shows internal components, bottom shows exterior fan assembly (no text or symbols)natural_image
Diagram of a fan installation with directional arrows and grid layout (no text or symbols)natural_image
Diagram showing a door opening and connected electrical outlets with arrows indicating airflow or power flow (no text or symbols)natural_image
Illustration of a cabinet with an open door and fan (no text or symbols)

natural_image
Technical line drawing of an industrial fan assembly with a mesh fan and fan blade (no text or symbols)
natural_image
Diagram of a wall electrical plug installation with three arrows indicating flow direction (no text or symbols present)natural_image
Technical illustration of a mechanical component with three views: top, side, and cutaway view (no text or symbols)• www.krug-priester.com
• service@krug-priester.com
IDEAL AP140 PRO:
natural_image
Simple line drawing of a trash bin with crossed lines indicating no waste or restriction (no text or symbols)
D-72336 Balingen (Germany)
EN Operating Instructions (25 – 47)
| Intended use | 26 | ||
| Safety instructions | 26 | ||
| Product features | 28 | ||
| Included in the box 28 | |||
| Unpacking and setting up 29 | |||
| Control panel | 32 | ||
| Fan speeds | 33 | ||
| Timer function | 33 | ||
| Quiet function | 34 | ||
| Air quality indicator | 34 | ||
| Filter replacement indicator 34 | |||
| Daylight sensor | 34 | ||
| IR receiver | 34 | ||
| Air quality sensor | |||
| Remote control (when using for the first time) 35 | |||
| Remote control (replacing the battery) 36 | |||
| Remote control (function) | 37 | ||
| Changing the filter 38 | |||
| App Control / WLAN 39 | |||
| Cleaning and maintenance / Accessories 40 | |||
| Troubleshooting 41 | |||
| Technical data | 44 | ||

natural_image
Simple line icon of an open book with an information symbol (no text or numbers present)Introduction
Thank you for choosing a device from IDEAL.
Intended use
- The device is used exclusively for cleaning the ambient air indoors.
- Please read these operating instructions before starting to use the device and please follow the safety instructions.
The operating instructions must be kept available with the device at all times.

Safety instructions
- Keep packing material, such as plastic wrapping, away from children! (Risk of suffocation)
- Please follow the safety instructions to prevent fire or electric shock. Only use the device indoors.
- Only use a wall socket that supplies the correct voltage (see rating plate).
- Do not modify or repair the device.
- Do not use the device if the power cable or mains plug is damaged or if the connection at the wall socket is not stable.
- Make sure that the power cable does not get crushed while you are using the device and that it cannot be damaged in any other way. Place the cable so that no one will trip over it. Do not place the power cable under strain.
- Disconnect the plug from the wall socket for cleaning purposes and whenever the device is not in use for a significant period of time.
- Do not touch the plug or the device if you have wet hands.
- Do not spray any insect repellent.
- Do not use in rooms where the device may come into contact with fuel vapour or metal dust.
- Do not use any volatile liquids, petroleum, kerosene, paint thinner or polishing paste to clean the device. Such liquids may damage the surface of the device.
- Do not expose the device to rain, water, moisture or high humidity, and do not set it up in a bathroom or kitchen next to a sink.
- Make sure that no foreign objects get into the outlet grilles.
• Do not use near an open fire or sparks. - The device is not suitable for removing harmful gases (carbon monoxide, e.g. from heating appliances).
- The appliance is not to be used by persons (including children) with reduced physical, sensory or mental capabilities, or lack of experience and knowledge, unless they have been given supervision or instruction.
• Children being supervised not to play with the appliance.
Safety instructions

Safety instructions
- Do not block the air intake and outlet.
- Keep this air purifier away from direct sunlight, naked flames or heat.
- Only use the air purifier in closed interiors and within the specified technical parameters. Improper usage may pose a threat to life and health.
- Do not use the unit near a fire alarm. If the outlet air is blowing towards a fire alarm, the alarm may respond late or not at all.
natural_image
Warning symbol of a lightning bolt inside a triangle (no text or numbers)Caution
Risk of injury due to electric shock.
Always disconnect the mains plug prior to:
- Carrying out maintenance work or cleaning
- Moving the device
- Changing the filter

Danger
- Do not use any spray cans with flammable content near to the Air Purifier!

natural_image
Warning symbol of a flame inside a diamond shape (no text or numbers)Danger
- Do not use any flammable cleaning agents.
Product features
- Filter replacement indicator:
An illuminated red replacement indicator on the air purifier indicates that the filter cartridge needs to be replaced.
• Air purification in 5 speed settings
• 2-stage air purification system:
Pre-filter, HEPA filter
• 360° filter (Pre-filter, HEPA)
Easy maintenance and replacement of the filter cartridge.
Included in the box
natural_image
Line drawing of a white industrial machine with ventilation grille and control panel (no text or symbols)Air Purifier (including filter cartridge)
natural_image
Technical line drawing of a mechanical component with no visible text or symbolsFilter cartridge Remote control

natural_image
Line drawing of a mobile phone with keypad and buttons (no text or symbols)- Withself-adhesive magnetic film
- With 3V lithium battery
natural_image
Line drawing of a coiled electrical plug with two connectors (no text or symbols)Power cable Printed operating

instructions
Installation guidelines for optimum performance:
- Place the device at least 10 cm away from the wall.
- Keep the device away from areas subjected to draft (wind).
- Make sure that furniture, fabrics or other objects do not come in contact with the air intake/outlet or block them.
- Place the device on a stable, even surface and make sure there is sufficient air circulation.
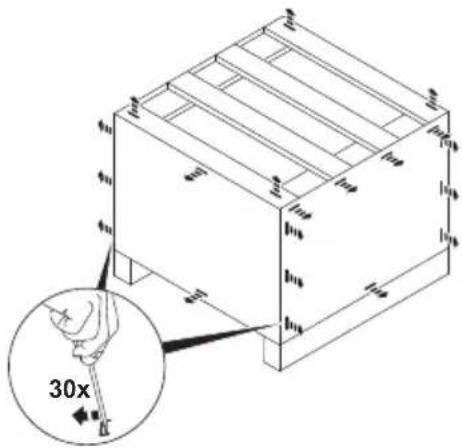
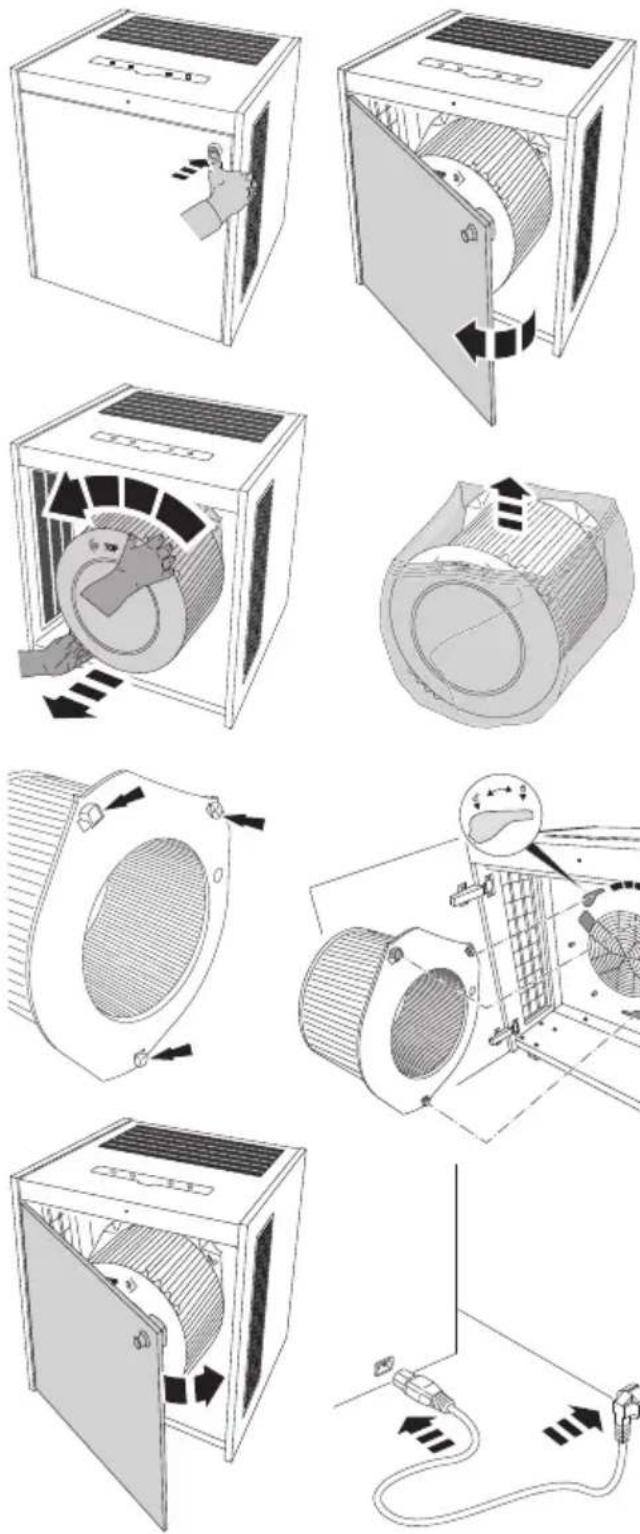
Remove all clips.
natural_image
Two technical diagrams showing a 3D box assembly with internal structure and directional arrows indicating flow or movement (no text or symbols present)First, remove the pallet cover and then remove the cardboard ring.
natural_image
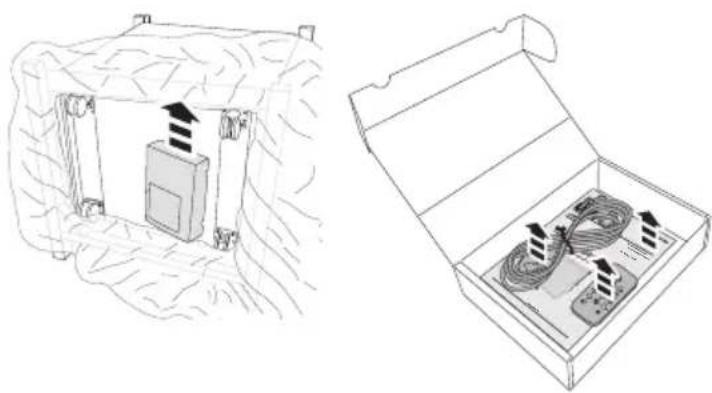
Technical line drawing showing a device inside a box and its open casing with cables (no text or symbols)Open the protective film and expose the castors completely. Remove the box of accessories. Take out the power cable, the remote control (with magnetic foil) and the operating instructions.
Unpacking and setting up
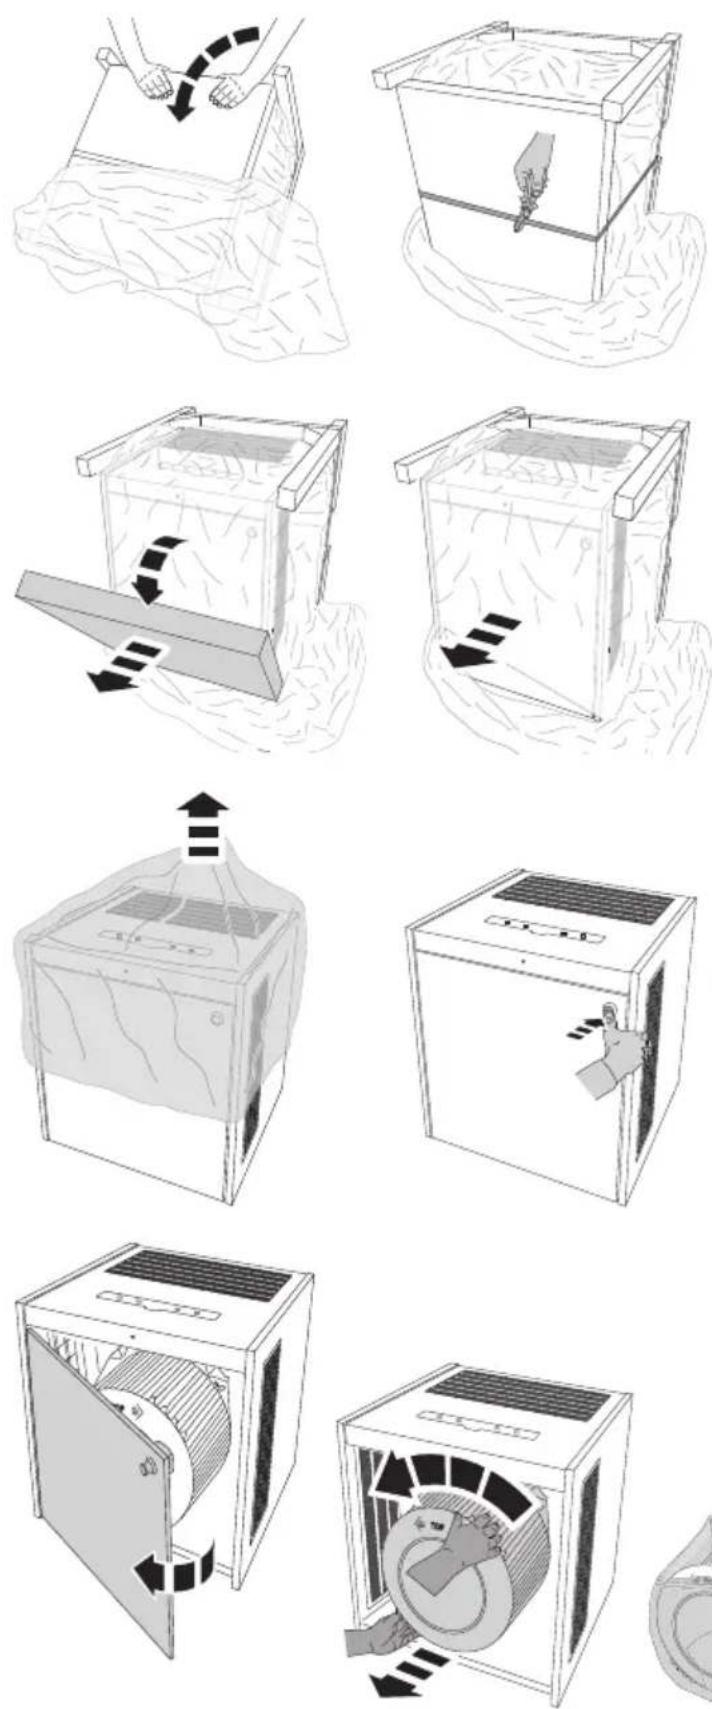
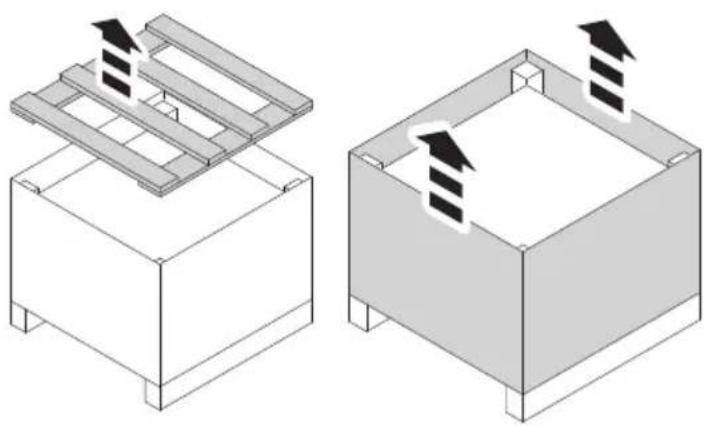
Place the air purifier incl. packaging carefully on the castors (tilt the wooden crate by 90°). Cut the plastic belt.
Remove the cardboard cover. Carefully pull the machine forwards out of the wooden crate.
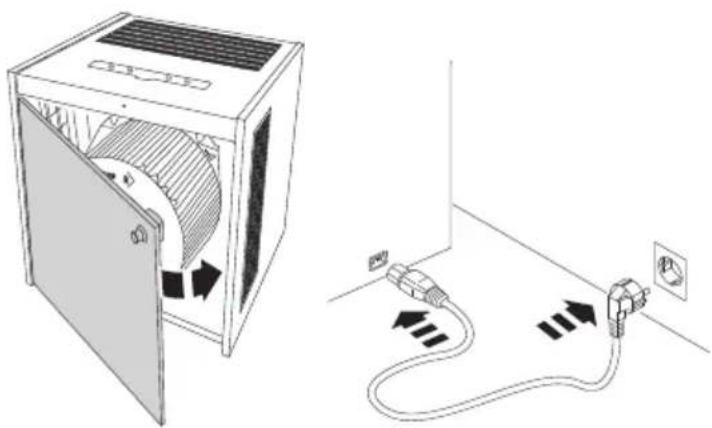
Remove the protective foil. Unlock the door by pressing the push lock, the door knob appears.
natural_image
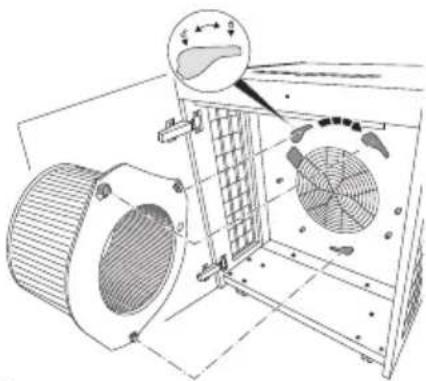
Technical illustration of a mechanical component with a directional arrow indicating motion (no text or symbols)Open the door by means of the door knob. Hold the filter cartridge with both hands using the recessed grips provided and turn it anti-clockwise ▼. Take out the filter cartridge and remove the protective film.
Unpacking and setting up
natural_image
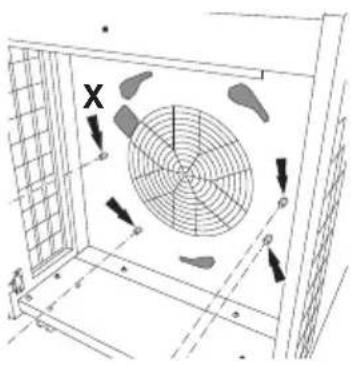
Technical line drawing of a mechanical device with two views: top shows internal components, bottom shows exterior fan assembly (no text or symbols)Insert the filter cartridge with the three tabs in the notches provided and lock in position by turning clockwise □.
natural_image
Diagram of a fan or vent system inside a room with a grid and directional arrows, no text or symbols present.Tip: For this, the filter cartridge can be placed on the assembly pins (X).
natural_image
Diagram showing a door opening and connected electrical outlets with arrows indicating airflow or power flow (no text or symbols)Close the door and lock it by pressing the push lock. Connect the power cable to the device first, then to the socket.
natural_image
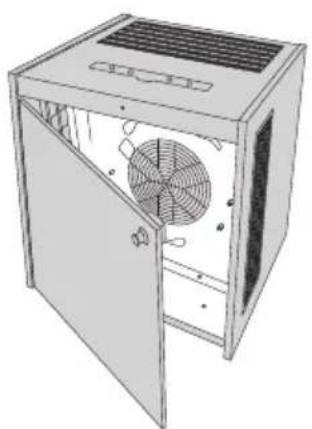
Illustration of a cabinet with an open door and fan inside, showing internal structure (no text or symbols)⚠️ Safety information
Operating the air purifier without panels and protective covers (motor protection grille, ventilation outlet grille, door, etc.) fully and securely attached is not permitted.
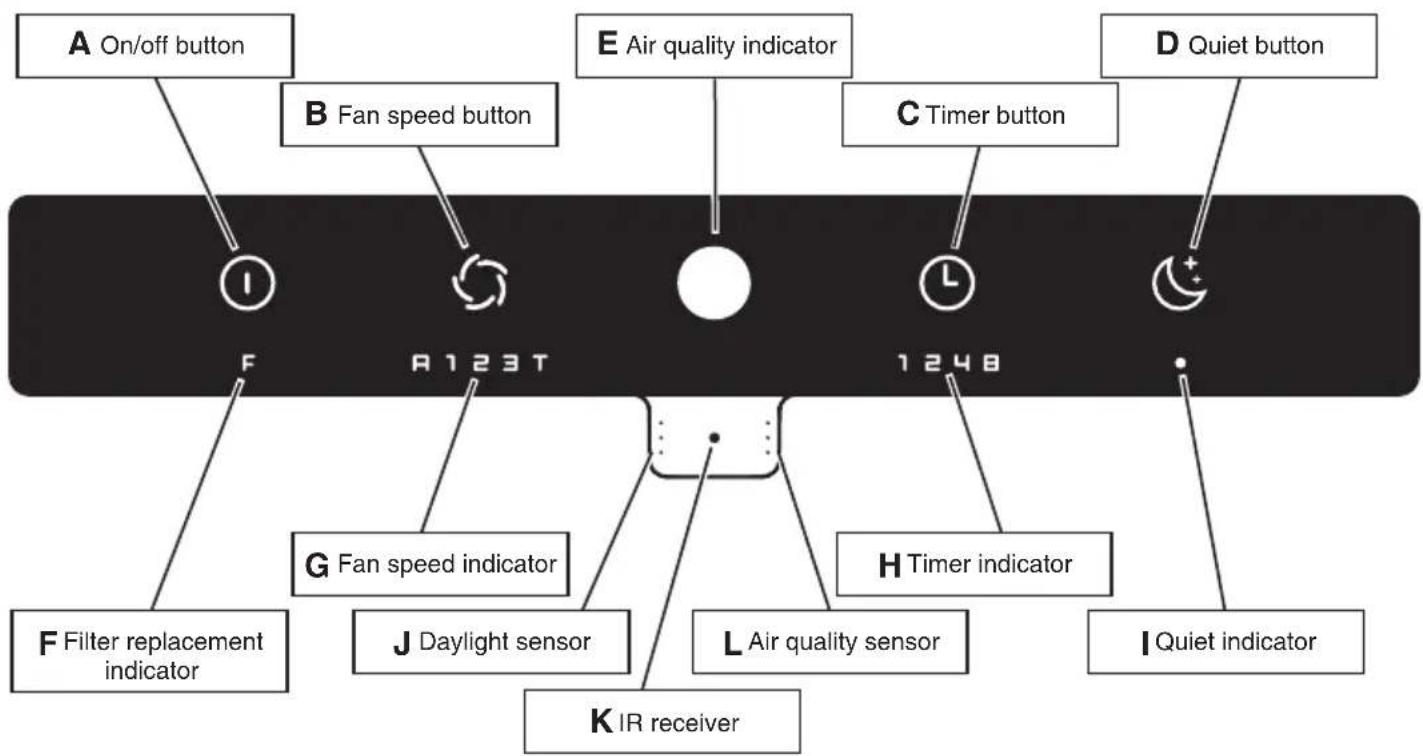
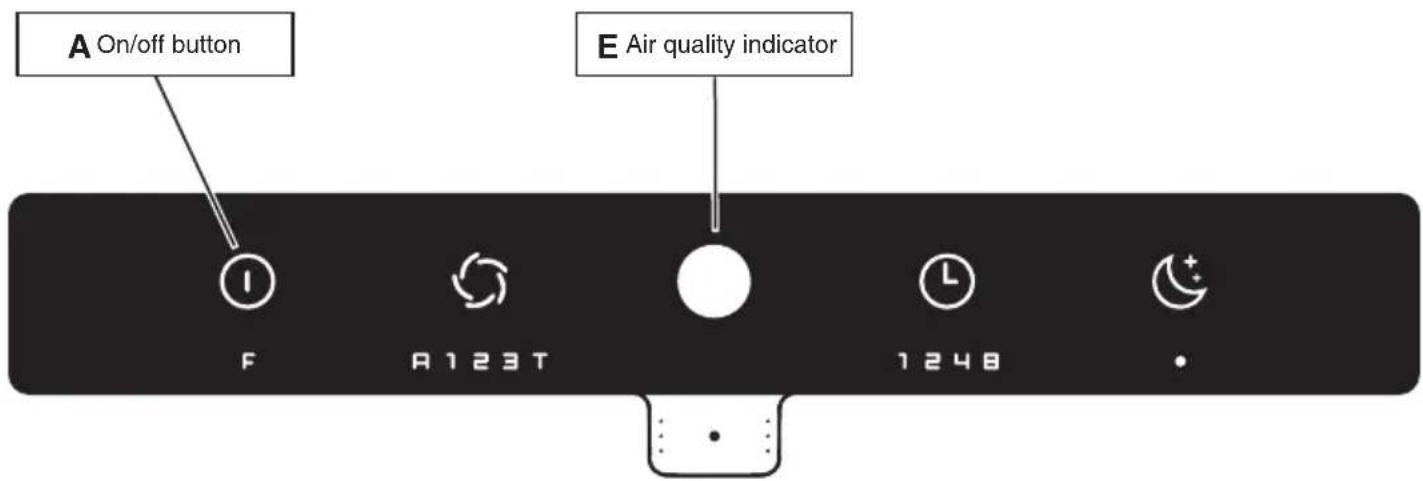
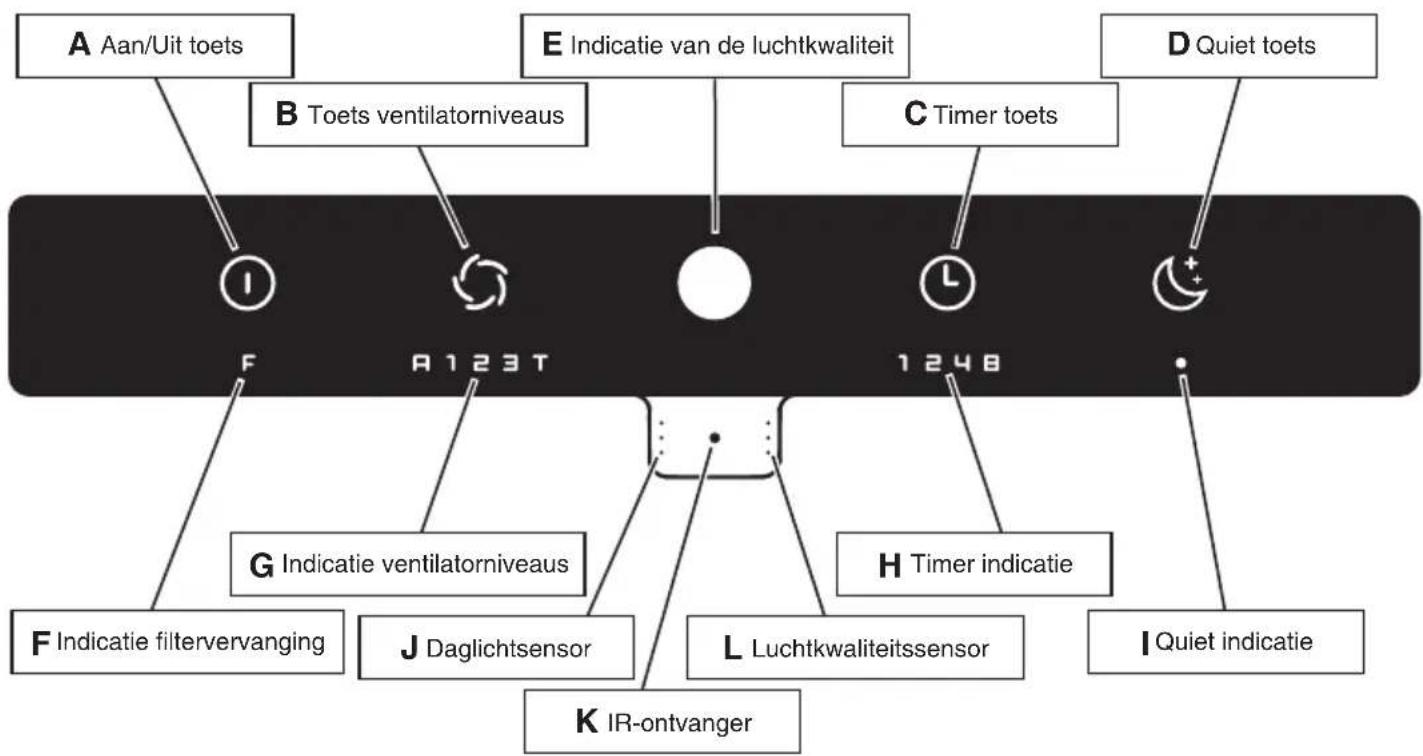
Control panel
flowchart
graph TD
    A["On/off button"] --> B["F"]
    C["F"] --> D["G"]
    E["Air quality indicator"] --> F["J Daylight sensor"]
    G["Air quality indicator"] --> H["L Air quality sensor"]
    I["D Quiet button"] --> J["I Quiet indicator"]
    K["C Timer button"] --> L["H Timer indicator"]
    M["C Timer button"] --> N["I Quiet indicator"]
    O["B Fan speed button"] --> P["F"]
    Q["B Fan speed button"] --> R["G"]
    S["B Fan speed button"] --> T["J"]
    U["B Fan speed button"] --> V["L"]
    W["B Fan speed button"] --> X["H"]
    Y["B Fan speed button"] --> Z["I"]
    AA["B Fan speed button"] --> AB["F"]
    AC["B Fan speed button"] --> AD["G"]
    AE["B Fan speed button"] --> AF["L"]
    AG["B Fan speed button"] --> AH["H"]
    AI["B Fan speed button"] --> AJ["I"]
    AK["B Fan speed button"] --> AL["F"]
Note:
The air quality sensor (L) is recalibrated the first time you switch it on (A) and after being disconnected from the mains power supply. Once the air quality sensor has been calibrated, the air purifier always starts in automatic mode. If the filter cartridge is missing, the filter replacement (F) and air quality indicators (E) flash red alternately.
Control panel
flowchart
graph TD
    A["On/off button"] --> B["F"]
    C["F"] --> D["A 1 2 3 T"]
    E["Air quality indicator"] --> F["1 2 4 8"]
    G["Fan speed indicator"] --> H["G"]
    I["Daylight sensor"] --> J["J"]
    K["IR receiver"] --> L["L"]
    M["Timer button"] --> N["H"]
    O["Quiet button"] --> P["I"]
    Q["On/off button"] --> R["B Fan speed button"]
    S["E Air quality indicator"] --> T["C"]
    U["D Quiet button"] --> V["C"]
    W["F Filter replacement indicator"] --> X["G"]
    Y["H Timer indicator"] --> Z["H"]
    AA["I Quiet indicator"] --> AB["I"]
Fan speeds
- Press the on/off button (A) to switch the air purifier on or off.
- The air purifier runs in automatic mode. In automatic mode, the fan speed (G) automatically adapts to the measured air quality. The worse the air quality, the higher the fan speed.
- Press the fan speed button (B) to exit automatic mode. The air purifier now runs at fan speed 1. Press again to increase the fan speed to 2
Press again to increase the fan speed to ☐, or to the turbofan speed ☐
- The turbo speed setting for fast purification of the ambient air requires the air purifier to run at maximum capacity. This can only be selected manually.
Timer functions
Pressing the timer while the air purifier is switched on activates the "switch-off timer" after the set time, the air purifier switches off:
- Switch the air purifier on (on/off button A).
- Press the timer button (C) to activate the timer. Press repeatedly to increase the timer time: 1 (h) → 2 → 4 → 8. Each number lights up in turn. Press the timer button again (no number lights up) to disable the timer function.
- The timer indicator counts the respective time with (→ Countdown). The remaining time is displayed.
Pressing the timer button while the air purifier is switched off activates the "switch-on timer" → after the set time, the air purifier switches on.
Control panel
flowchart
graph TD
    A["On/off button"] --> B["F"]
    C["F"] --> D["G"]
    E["Air quality indicator"] --> F["J Daylight sensor"]
    G["Air quality indicator"] --> H["L Air quality sensor"]
    I["D Quiet button"] --> J["I Quiet indicator"]
    K["B Fan speed button"] --> L["F"]
    M["C Timer button"] --> N["L"]
    O["C Timer button"] --> P["I"]
    Q["..."] --> R["K IR receiver"]
    S["H Timer indicator"] --> T["L"]
    U["G Fan speed indicator"] --> V["J Daylight sensor"]
    W["F Filter replacement indicator"] --> X["F"]
    Y["123T"] --> Z["1248"]
Quiet function
The Quiet button (D) is provided for particularly low-noise, unobtrusive operation (e.g. bedrooms). Press the Quiet button (D) to switch the fan speed (G) to its lowest capacity and switch off all indicators. Only the Quiet indicator (I) is dimly lit.
Air quality indicator (E)
The air quality is displayed in 3 colours:
Green: good air quality
Yellow: average air quality
Red: poor air quality
Filter replacement indicator (F)
An illuminated red " F " on the control panel indicates that the filter needs replacing.
- The life expectancy of the filter is approx. 1 year (depending on operation and purification activities).
- Only use original IDEAL filter cartridge. The device will only function with an original IDEAL filter cartridge.
Daylight sensor (J)
The display brightness is automatically adjusted to the ambient light.
IR receiver (K)
Receives the signals from the remote control.
Air quality sensor (L)
Battery usage
• Always use 3V lithium batteries CR2025 for the remote control.
- Incorrect battery usage may result in leakage of battery fluid and/or damage.
- If the remote control is not going to be used for a long time, please remove the battery.
Unsuitable location
- Make sure that no objects or furnishings are situated between the remote control and the air purifier.
- The air purifier should not be placed in direct sunlight. This could impair the infrared sensor.
- Locations where fluorescent tubes are flickering because they are defective or old.
- Do not store the remote control in direct sunlight and/or close to radiators/heaters.
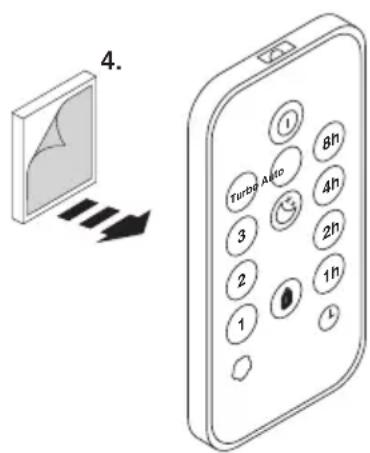
- When using for the first time
The remote control has a pre battery CR2025. Remove the protective flap to activate the remote control battery.
How to use correctly
- Point the remote control at the air purifier (IR receiver K).


Replacing the battery
- Open the battery compartment by pressing (1.) and pulling out (2.) at the same time. Take out the flat battery.
- Insert a new battery into the battery compartment, making sure the polarity is correct (+ / -).
• Always use 3V lithium batteries CR2025. - Slide the battery compartment back into its seating (3.).
The remote control comes with a self-adhesive magnetic film (4.). If required, this can be stuck on the back of the remote control. With the magnetic film stuck on it, the remote control can easily be attached to any ferromagnetic surface (e.g. on the back of the air purifier).
Important information about the batteries and how to dispose of them
Batteries must NOT be disposed of with household waste. As the user, you are legally obligated to return used batteries for proper disposal. You can hand in your batteries at public collection points in your community or wherever the same type of batteries are sold.
- It is very important that you make sure that the polarity of the batteries is correct.
Wrongly inserted batteries could destroy the device – a fire hazard. - Do not try to open or damage batteries and do not throw batteries into a fire.
- Batteries that are leaking fluid are dangerous. Only touch these with suitable gloves.
- Keep batteries out of the reach of children.
- Take the batteries out of the device if you are not going to be using it for a significant period of time.
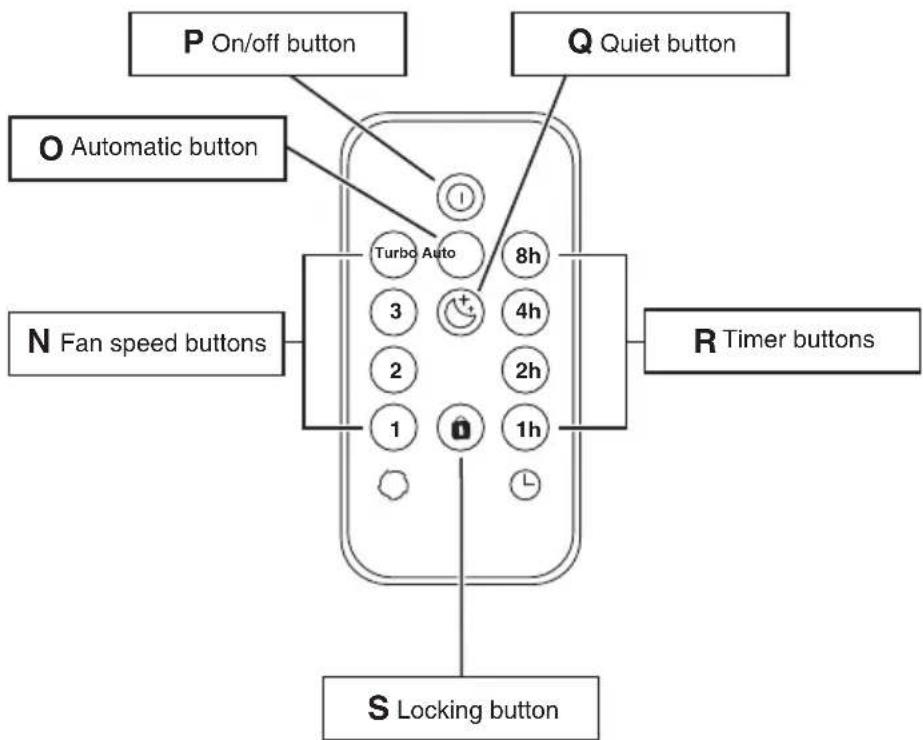
Function
N: Select the required fan speed ○.
O: Switches the air purifier to automatic mode A.
P: Switches the air purifier on/off ⏻.
Q: Switches the air purifier to Quiet mode.
R: Select the required timer time Ⓛ.
S: Press the locking button Ⓞ to lock the buttons on the control panel (air purifier). Press the locking button again to unlock.
The lock can also be removed by disconnecting the air purifier from the mains or by pressing and holding down the on/off button (A) on the device.
Note:
When you operate the remote control, the air quality indicator (E) lights up for approx. 1 second in acknowledgement. If you operate a button on the control panel (air purifier) while the locking function is activated, the air quality indicator (E) lights up briefly in red.
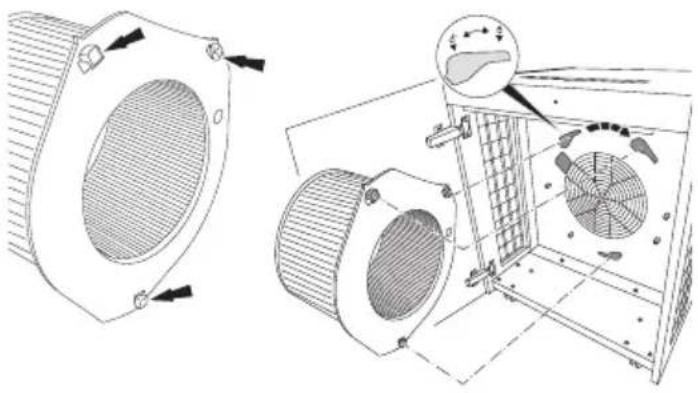
Filter replacement (e.g. in accordance with the filter replacement indicator F, see page 34) Note:
Only original IDEAL filter cartridges (order from www.ideal.de) may be used. No tools are required to replace the filter cartridge.
natural_image
Technical line drawing of an air duct system with fan blades and ventilation ducts (no text or symbols)
natural_image
Diagram of a wall electrical plug installation with three arrows indicating flow direction (no text or symbols present)CAUTION: Disconnect the mains plug!
Unlock the door by pressing the push lock, the door knob appears. Open the door by means of the door knob.
Hold the spent filter cartridge with both hands using the recessed grips provided and turn it anti-clockwise.
Remove the filter cartridge.
Insert the new filter cartridge (remove the protective foil beforehand) with the three snap-fit tabs into the recesses provided for this purpose and lock it by turning it clockwise.
For this, the filter cartridge can be placed on the assembly pins (X see page 31).
Close the door and lock it by pressing the push lock. Connect the power cable to the device first, then to the socket.
Note:
The air purifier automatically detects that a new IDEAL filter cartridge has been inserted and automatically resets the filter replacement indicator.
IDEAL filter cartridge Order no. 7320 099
App Control
Your purifier can additionally be controlled by the "IDEALAIRPRO" App via your smartphone / tablet (iOS /Android).


Enabling/disabling WLAN
The air purifier is connected to the power supply and switched off.
Press and hold down the Quiet button (D) until the air quality indicator (E) flashes
→ The WLAN is enabled
when the air quality indicator (E) flashes blue
→ The WLAN is disabled
when the air quality indicator (E) flashes white.
Resetting the WLAN
The air purifier is disconnected from the power supply.
Press and hold down the Quiet button (D), plug in the power cable and continue to hold down the Quiet button (D) until the air quality indicator (E) flashes pink
→ The WLAN is reset to factory settings.
Note:
To ensure a stable WLAN connection, a minimum distance of 1 m between air purifier and smartphone/tablet should be maintained during setup (connection setup).
Cleaning and maintenance

CAUTION: Disconnect the mains plug prior to any cleaning or maintenance work!
- Replace the filter cartridge as soon as the filter replacement indicator (F, page 34) lights up. The average life expectancy of the filter is approx. 1 year (depending on operation and purification activities).
- Clean the air purifier housing with a lint-free cloth moistened with soapy water.
- Clean the control panel with a dry, lint-free cloth.
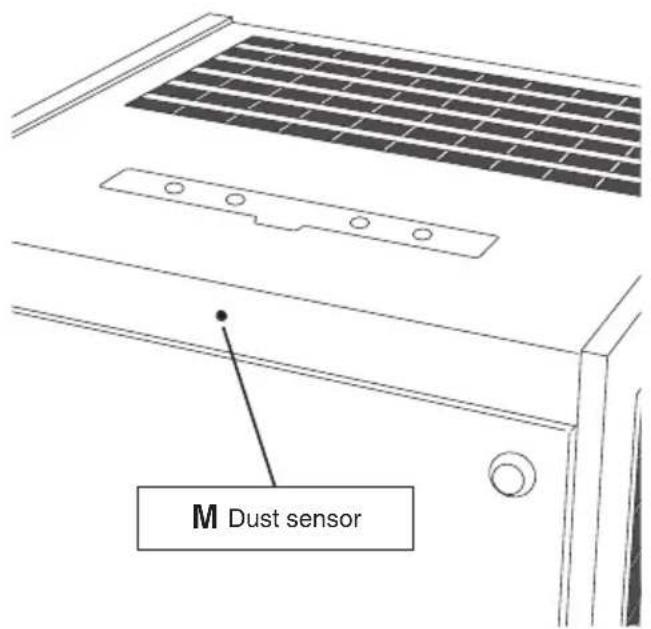
- Clean the openings for the air quality sensor (L) and the dust sensor (M page 32) with a vacuum cleaner.
- Clean the air intake ducts and the interior of the air purifier with a vacuum cleaner.
- Clean the filter cartridge's pre-filter with a vacuum cleaner. To do this, remove the filter cartridge ("Changing the filter" page 38).
- Do not use any solvents. These could damage the housing surface, the control panel and the air quality sensor.
- Protect the air purifier from water.
- Do not use any substances containing silicone, since this could destroy the air quality sensor.
- Do not test the effectiveness of the air quality sensor with high quantities of gas, or alcohol, since this could destroy the air quality sensor.
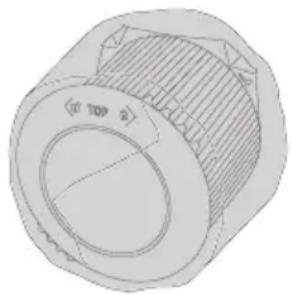
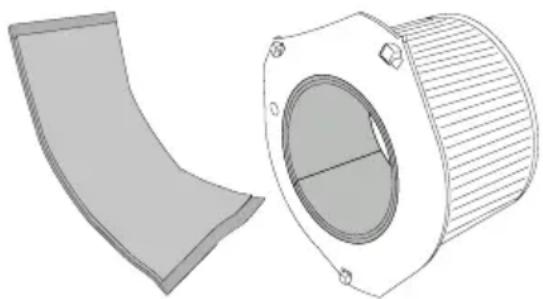
Accessories
You can source accessories via your dealer or at www.ideal.de.
natural_image
Technical line drawing of a mechanical component with no visible text or symbolsIDEAL filter cartridge Order no. 7320 099

natural_image
Technical illustration of a mechanical component with a curved surface and a cylindrical housing (no text or symbols)Activated carbon inlay* Order no. 7320 095
*not included in delivery
| The air purifier won't switch on. Is the power | cable securely connected to the back of the device?→ Make sure that the power cable is not damaged in any way.→ Check both ends of the power cable. Make sure that these are plugged in and that the purifier is connected to the power supply (page 31).Has a filter cartridge been inserted? Is the filter cartridge inserted correctly?→ Make sure that an original IDEAL filter cartridge is inserted.→ Make sure that the filter cartridge is clicked in place with all 3 tabs and is fully locked (padlock icon, page 31). |
| The buttons on the air purifier do not work. | Has the locking function been activated?→ Disable the locking function on the remote control (function S, page 37).→ Unplug the power cable and then plug it back in. |
| The buttons on the remote control do not work. | Is the battery in the remote control? Or is it flat?→ Check the battery (3V lithium CR2025).Is the IR receiver dirty?→ Clean the IR receiver with a dry, lint-free cloth.Are you using it correctly?→ Point the remote control at the air purifier (page 35).→ Having joined the power cord or exchanged the filter, the function of the remote control is blocked for about 10 seconds |
| The indicators on the control panel do not light up at all. | Is the air purifier switched on?→ Switch the air purifier on by pressing the on/off button (A, page 32).Has the Quiet function been activated?→ Disable the Quiet function by pressing the Quiet button (D, page 34). |
| Automatic mode is not working properly. The air purifier calibrates the air quality sensor. This happens when you first switch it on and after disconnecting it from the mains.→ Wait until the calibration process has been completed (this may take a few minutes)The air quality sensor is dirty.→ Clean the openings for the air quality sensor L, dust sensor M (page 32), the air intake ducts and the interior of the air purifier (where the filter cartridge is located) with a vacuum cleaner.The air quality sensor is not detecting the air quality reliably→ Calibrate the air quality sensor by briefly disconnecting it from the mains again! | |
Troubleshooting
| The air purifier is making loud noises. Is the | filter cartridge really dirty?→ Clean the pre-filter with a vacuum cleaner.Is the air purifier located on an even surface?→ Place the device on an even surface.Is the air purifier running at a high fan speed?→ Use the fan speed button (B, page 33) to set a lower fan speed (G, page 33). |
| In bright environments, the indicators on the air purifier control panel are too dark. | Is the daylight sensor dirty?→ Clean the relevant section on the control panel (J, page 32)!The display intensity automatically adapts to its surroundings. |

Did none of the specified solutions help you with your problem?
→ Contact: Service
• www.krug-priester.com
• service@krug-priester.com
IDEAL AP140 PRO:
| Power supply 200-240V | ~50/60Hz / 100-120V~50/60Hz |
| Power consumption 175W (200-240V) / 175W | (100-120V) |
| Suitable for rooms 120 to 160 m2* | |
| Air flow rate (max.) 1500 m3/h | |
| Dimensions (L × W × H) 633 × 562 × 725 mm | |
| Weight 51 kg | |
| Volume at turbofan speed T (max.) | 60 dB(A) |
| Volume in Quiet mode C (min.) | 17,5 dB(A) |
Subject to technical changes.
* For a room height of 2.50 m
Terms of warranty
IDEAL provides a warranty for this device from the date of purchase.
The terms of warranty are defined by our local representative.
- If a material or design defect occurs during the warranty period, IDEAL shall repair or replace the device, or repay the purchase price, at its discretion.
- The warranty will only be honoured if sufficient evidence is submitted, e.g. sales receipt, and the claim under warranty is made within the warranty period.
- The warranty does not cover wearing parts or parts that need to be replaced regularly.
- The warranty shall be void if the device is not set up, adjusted and cleaned/maintained correctly (in accordance with the operating instructions).
- The warranty shall be void if the device is connected to a power supply that does not comply with the rating plate data.
Storage
We recommend storing the air purifier in its original packaging in a cool, dry place.
Spare parts and accessories
You can source spare parts via your dealer or at www.ideal.de.
Only use the manufacturer's original parts.
Repairs
Repairs must only be carried out by qualified experts or the customer service department. This also applies if you have a defective power cable. Any attempt by untrained persons to perform repairs may pose considerable risk to the user and invalidate the warranty.
Disposal
This device must not be disposed of with household waste! Please hand this device in at the collection points provided! Collecting and recycling electrical and electronic waste conserves valuable resources!
The packaging material can be recycled.
Dispose of the packaging in an environmentally friendly manner and take it to the recyclable waste collection.
Thanks!

natural_image
Simple line drawing of a trash bin with two crossed lines indicating no waste or restriction (no text or symbols)
The company Krug + Priester has the following certifications:
• Quality management system according to DIN EN ISO 9001:2015
• Environmental management system according to DIN EN ISO 14001:2015
• Energy management system according to DIN EN ISO 50001:2011

This machine is GS-tested and conforms to the following EC guidelines:
• 2014/35/EU for electrical safety
• 2014/30/EU for electromagnetic compatibility.
• 2011/65/EU, 2015/863/EU RoHS.
For specific technical data, please refer to the information on the identification plate of the machine.
To file a warranty claim, the device must still bear its original identification plate.
Subject to technical changes.
EC-declaration of conformity
- Herewith we declare that
GS-IDENT. No. UL-IDENT. No. IDEAL AP140 PRO Made in Germany 11732001 10732001
- complies with the following provisions applying to it
2014/35/EU
Low voltage directive
2011/65/EU, 2015/863/EU
RoHS directive
2014/30/EG
EMV Electromagnetic compatibility directive
- Applied harmonised standards in particular
IEC 61000-3-2; IEC 61000-3-3; EN 61000-3-2; EN 61000-3-3;
EN 60335-2-65; EN 60335-1;
EN ISO 13857; EN 55014-1; EN 55014-2
02.04.2020
Datum
- Geschäftsführer -
Authorized representative for technical documentation:
D-72336 Balingen (Germany)
natural_image
Simple line icon of an open book with an information symbol (no text or numbers present)Préface
natural_image
Warning symbol of a lightning bolt inside a triangle (no text or numbers)Attention
Attention
natural_image
Warning symbol of a flame inside a diamond shape (no text or numbers)Attention
natural_image
Line drawing of a white industrial cabinet with ventilation grille and control panel (no text or symbols)natural_image
Technical line drawing of a mechanical component with no visible text or symbolsnatural_image
Line drawing of a mobile phone with keypad and buttons (no text or symbols)natural_image
Line drawing of a coiled electrical plug with two connectors (no text or symbols)natural_image
Isometric line drawing of a mechanical assembly with a base and top plate (no text or symbols)
natural_image
Isometric diagram of a square container with three upward-pointing arrows indicating flow or movement (no text or symbols)natural_image
Diagram of a device inside a vehicle frame with an upward arrow indicating motion (no text or symbols)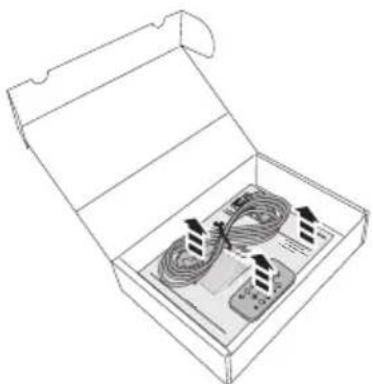
natural_image
Line drawing of an open box containing a grid of cables and electronic components (no text or symbols)natural_image
Technical illustration of a mechanical component with a directional arrow indicating motion (no text or symbols)natural_image
Technical line drawing of a mechanical component with internal parts and directional arrows (no text or symbols)natural_image
Diagram of a ventilation system with fan, blades, and airflow indicators (no text or labels)Conseil :
natural_image
Diagram showing a door opening with airflow arrows and connected electrical outlets (no text or symbols)natural_image
Illustration of a cabinet with an open door and fan (no text or symbols)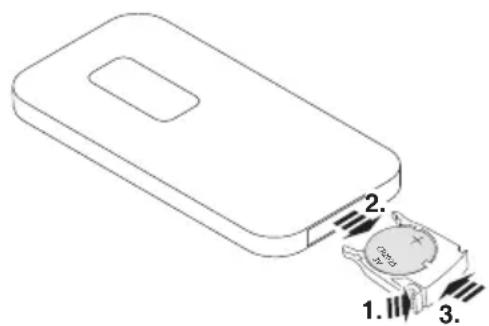
natural_image
Technical line drawing of a mechanical fan assembly with two fans and a mesh fan (no text or symbols)
natural_image
Diagram showing two connected electrical plugs in a corner with directional arrows indicating current flow (no text or symbols)natural_image
Technical line drawing of a mechanical component with no visible text or symbolsnatural_image
Technical illustration of a mechanical component with a curved surface and a cylindrical housing (no text or symbols)→ Contact : Service
• www.krug-priester.com
• service@krug-priester.com
IDEAL AP140 PRO:
natural_image
Symbol of a trash bin crossed with two opposing diagonal lines, no text or labels present
IDEAL AP140 PRO Made in Germany
GS-IDENT. No. UL-IDENT. No.
11732001
10732001
D-72336 Balingen (Germany)
natural_image
Simple line icon of an open book with an information symbol (no text or numbers present)Prólogo
natural_image
Warning symbol of a lightning bolt inside a triangle (no text or numbers)Atención
Atención
natural_image
Warning symbol of a flame inside a diamond shape (no text or numbers)Atención
natural_image
Line drawing of a white industrial machine with ventilation grille and control panel (no text or symbols)natural_image
Technical line drawing of a mechanical component with no visible text or symbolsnatural_image
Line drawing of a mobile phone with keypad and buttons (no text or symbols)natural_image
Line drawing of a coiled electrical plug with two connectors (no text or symbols)natural_image
Isometric line drawing of a mechanical assembly with a base and top plate (no text or symbols)
natural_image
Isometric diagram of a square container with three upward-pointing arrows indicating flow or movement (no text or symbols)natural_image
Diagram of a device inside a vehicle frame with a directional arrow indicating motion (no text or symbols)
natural_image
Line drawing of an open box containing a grid of cables and connectors, with no visible text or symbols.natural_image
Technical illustration of a mechanical component with a directional arrow indicating motion (no text or symbols)natural_image
Technical line drawing of a fan assembly with two views (top: front view, side: top-right), no text or symbols present.natural_image
Diagram of an air duct system with fan and directional arrows indicating airflow or movement (no text or symbols)natural_image
Diagram showing a door opening with airflow and plug connections, no text or symbols presentnatural_image
Illustration of a cabinet with an open door and fan (no text or symbols)
natural_image
Technical line drawing of an air duct system with fan blades and ventilation ducts (no text or symbols)
natural_image
Diagram of a wall electrical socket connected to a wall-mounted plug, showing wiring and grounding (no text or symbols)¡ATENCIÓN!
natural_image
Technical line drawing of a mechanical knob or dial component (no text or symbols)natural_image
Technical illustration of a mechanical component with a curved blade and a cylindrical housing (no text or symbols)→ Contacto: Servicio
• www.krug-priester.com
• service@krug-priester.com
IDEAL AP140 PRO:
natural_image
Simple line drawing of a trash bin with two crossed arms and a circular wheel, no text or symbols present.
GS-IDENT. No. UL-IDENT. No.
IDEAL AP140 PRO Made in Germany
11732001
10732001
D-72336 Balingen (Germany)
natural_image
Simple line icon of an open book with an information symbol (no text or numbers present)Prefazione
natural_image
Warning symbol of a lightning bolt inside a triangle (no text or numbers)Attenzione
Attenzione
natural_image
Black and white symbolic icon of a flame inside a diamond shape (no text or numbers)Attenzione
natural_image
Line drawing of a white industrial machine with ventilation grille and control panel (no text or symbols)natural_image
Technical line drawing of a mechanical component with no visible text or symbolsnatural_image
Line drawing of a mobile phone with keypad and buttons (no text or symbols)natural_image
Line drawing of a coiled electrical plug with two connectors (no text or symbols)natural_image
Two technical diagrams showing structural components with arrows indicating direction, no text or symbols present.natural_image
Technical line drawing of a device box with internal components and wiring, shown from two views (no text or symbols)natural_image
Technical illustration of a mechanical component with a directional arrow indicating motion (no text or symbols)natural_image
Technical line drawing of a fan assembly with internal components and directional arrows (no text or symbols)natural_image
Diagram of a fan or vent system with directional arrows and grid layout, no readable text or symbolsSuggerimento:
natural_image
Diagram showing a door opening with airflow arrows and a plug inserted into a wall socket (no text or symbols)natural_image
Illustration of a closed industrial fan or vent with ventilation grilles and fan blades (no text or symbols)
natural_image
Technical line drawing of an industrial fan assembly with a mesh fan and fan blade (no text or symbols)
natural_image
Diagram of a wall electrical plug installation with three arrows indicating flow direction (no text or symbols)ATTENZIONE!
natural_image
Technical drawing of a mechanical component with no visible text or symbolsCartuccia del filtro IDEAL N. ord. 7320 099
natural_image
Technical illustration of a mechanical component with a curved blade and a cylindrical housing (no text or symbols)natural_image
Simple line drawing of a trash bin with two crossed arms and a circular wheel, no text or symbols present.
IDEAL AP140 PRO Made in Germany
GS-IDENT. No. UL-IDENT. No.
11732001
10732001
D-72336 Balingen (Germany)
natural_image
Simple line icon of an open book with an information symbol (no text or numbers present)Voorwoord
natural_image
Warning symbol of a lightning bolt inside a triangle (no text or numbers)Opgelet
Opgelet
natural_image
Warning symbol of a flame inside a diamond shape (no text or numbers)Opgelet
natural_image
Line drawing of a white industrial machine with ventilation grille and control panel (no text or symbols)Luchtreiniger (incl. filterpatroon)

natural_image
Technical line drawing of a mechanical component with no visible text or symbolsFilterpatroon Afstandsbediening
natural_image
Line drawing of a mobile phone with keypad and buttons (no text or symbols)natural_image
Line drawing of a coiled electrical plug with two connectors (no text or symbols)Netsnoer Gedrukte
gebruiksaanwijzing
natural_image
Isometric line drawing of a mechanical assembly with a bracket and mounting base (no text or symbols)
natural_image
Isometric diagram of a square container with three upward-pointing arrows indicating flow or movement (no text or symbols)natural_image
Diagram of a device inside a vehicle frame with a directional arrow indicating motion (no text or symbols)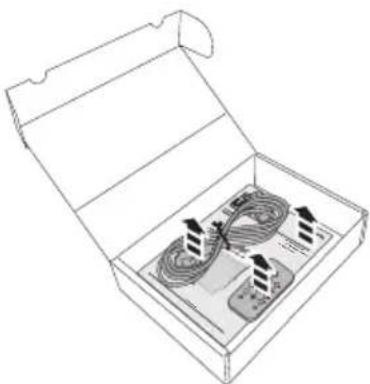
natural_image
Line drawing of an open box containing a grid of cables and connectors, with no visible text or symbols.natural_image
Technical illustration of a mechanical component with a directional arrow indicating motion (no text or symbols)natural_image
Technical line drawing of a mechanical component with internal parts and directional arrows (no text or symbols)natural_image
Diagram of a fan or vent system inside a room with a grid and directional arrows, no text or symbols present.natural_image
Diagram showing a door opening with airflow arrows and connected electrical outlets (no text or symbols)natural_image
Illustration of a cabinet with an open door and fan (no text or symbols)Bedieningsveld
flowchart
graph TD
    A["Aan/Uit toets"] --> B["Toets ventilatorniveaus"]
    B --> C["1"]
    D["D Quiet toets"] --> E["Timer toets"]
    E --> F["2"]
    G["G Indicatie ventilatorniveaus"] --> H["Indicatie filtervervanging"]
    I["H Timer indicatie"] --> J["J Daglichtsensor"]
    K["I Quiet indicatie"] --> L["L Luchtkwaliteitssensor"]
    M["K IR-ontvanger"] --> N["K"]
    O["E Indicatie van de luchtkwaliteit"] --> P["1"]
    Q["F Indicatie filtervervanging"] --> R["F"]
    S["F 1 2 3 T"] --> T["A"]
    U["1 2 4 8"] --> V["A"]
    W["B Toets ventilatorniveaus"] --> X["1"]
    Y["C Timer toets"] --> Z["2"]
    AA["D Quiet toets"] --> AB["2"]
Ventilatorniveaus

Batterij vervangen
natural_image
Technical line drawing of a mechanical fan assembly with two fans and a magnified inset showing internal components (no text or symbols)
natural_image
Diagram of a wall electrical plug installation with three arrows indicating flow direction (no text or symbols present)OPGELET!
WLAN activeren/deactiveren
→ WLAN is teruggezet op fabrieksinstelling.
Aanwijzing:
natural_image
Technical line drawing of a mechanical component with no visible text or symbolsIDEAL- lterpatroon Best. nr. 7320 099

natural_image
Technical illustration of a mechanical component with a curved cutaway view (no text or symbols)→ Contact: Service
• www.krug-priester.com
• service@krug-priester.com
IDEAL AP140 PRO:
| Netspanning 200-240V | ~50/60Hz / 100-120V~50/60Hz |
| Vermogensopname 175W (200-240V) / 175W | (100-120V) |
| Geschikt voor ruimtes 120 bis 160 m2 * | |
| Luchtdebiet (max.) 1500 m3/h | |
| Afmetingen (L × B × H) 633 × 562 × 725 mm | |
| Gewicht 51 kg | |
| Volume turboventilatorniveau T (max.) | 60 dB(A) |
| Volume Quiet modus ⚙ (min.) | 17,5 dB(A) |
natural_image
Simple line drawing of a trash bin with two crossed lines indicating no waste or restriction (no text or symbols)
IDEAL AP140 PRO Made in Germany
11732001
10732001
D-72336 Balingen (Germany)
Notizen:
Remarks:
Notes :
Notas:
Notizia:
Notities:
Immer frische Luft.
For more health, vitality and quality of life. Perceptible. With every breath you take.
D-72336 Balingen (Germany)
www.krug-priester.com