
1221FL - Coffee machine Flama - Free user manual and instructions
Find the device manual for free 1221FL Flama in PDF.

| Product type | Espresso coffee machine |
| Brand | Flama |
| Model | 1221FL |
| Use | Domestic and similar applications (staff kitchens, country houses, hotels, etc.) |
| Cup capacity | 1 or 2 espressos |
| Pre-infusion | Automatic (soaking of ground coffee before extraction) |
| Steam function | Yes, for milk froth |
| Cup warmer | Built-in |
| Water tank | Removable, with Min and Max marks |
| Brewing system | Portafilter with 1-cup or 2-cup filter |
| Safety – Automatic shut-off | Shut-off after 45 seconds of continuous dispensing |
| Safety – Standby mode | Enters standby mode after turning the selector to "0" |
| Cleaning – Removable parts | Wash with warm water and dish soap (portafilter not dishwasher safe) |
| Descaling | Recommended every 6 weeks, built-in automatic cycle |
| Warranty | 36 months (upon proof of purchase) |
| Included accessories | 1 and 2 cup filters, portafilter, tamper/doser, steam wand |
Frequently Asked Questions - 1221FL Flama
User questions about 1221FL Flama
0 question about this device. Answer the ones you know or ask your own.
Ask a new question about this device
Download the instructions for your Coffee machine in PDF format for free! Find your manual 1221FL - Flama and take your electronic device back in hand. On this page are published all the documents necessary for the use of your device. 1221FL by Flama.
USER MANUAL 1221FL Flama
natural_image
Black and white photo of a Flama coffee maker with control panel and side arm (no visible text or symbols on device body)1221FL
PT MÁQUINA DE CAFÉ EXPRESSO 1
ES CAFETERA EXPRESS 8
EN EXPRESS COFFEE MACHINE 15
FR MACHINE À CAFÉ EXPRESS 21
MÁQUINA DE CAFÉ EXPRESSO
INSTRUÇÕES DE SEGURANÇA
natural_image
Symbol of a trash bin with crossed lines indicating no waste, and a solid black rectangle below (no text or labels)natural_image
Symbol of a trash bin with crossed lines indicating no waste or discharge (no text or labels)Please read these instructions carefully before using the appliance for the first time and keep them for future reference.
FLAMA shall not be liable for any use that is not in accordance with the instructions.
Please check that the supply voltage of your electrical system corresponds to the voltage on the appliance's rating plate.
Please follow these safety instructions carefully when using the appliance. Improper use of the appliance can cause injuries.
Place the appliance on a dry, stable, flat, heat- and water-resistant surface away from water splashes and any other heat sources.
This appliance is intended for households and similar uses, such as:
- Staff kitchen areas in stores, workshops and other working environments;
- Cottages;
- Guests of hotels, motels and other residential environments;
- Inn-type environments.
Do not submerge the cord, plug, or any other electrical part of the appliance in water or any other liquid, or expose them to water. Make sure that your hands are completely dry before touching the plug or switching on the appliance.
Do not use the appliance if the cord, plug, or housing are damaged, or if it does not work properly, has been dropped or damaged.
Do not use any accessory that has not been recommended by FLAMA, as it may cause damage.
The temperature of accessible surfaces may be high when the appliance is being used and may cause burns.
Always connect the appliance to an earthed socket.
Do not run the appliance without water in it.
Do not move or switch off the appliance when it is working.
This appliance may be used by children aged 8 and over if they are supervised or have received instructions concerning the safe use of the appliance and understand the risks involved.
Cleaning and maintenance must not be carried out by children unless they are over 8 years old and supervised.
Keep the appliance and its power cord out of the reach of children under the age of 8.
This appliance may be used by persons with limited physical, sensory or mental abilities or lack of experience and knowledge, if they are supervised or have received instructions concerning the safe use of the appliance and understand the risks involved.
Children should be supervised to ensure they do not play with the appliance.
NOTE: this appliance was subject to a quality control prior to its placement on the market to ensure it is working properly.
After the control, the appliance is thoroughly cleaned, so there may be some water left inside.
Do not use the appliance if it is not working properly.
Please disconnect the appliance from the power supply by removing the plug from the power socket after each use and when cleaning. Please allow it to cool down before carrying out with any cleaning or storage operations.
If the power cord is damaged, have it replaced at an Authorized Flama Technical Assistance Service in order to avoid a hazard.
Any intervention other than cleaning must be carried out only by authorized FLAMA agents.
This product complies with the Low-Voltage and Electromagnetic Compatibility Directives.
This instruction manual is also available in PDF format at www.flama.pt.
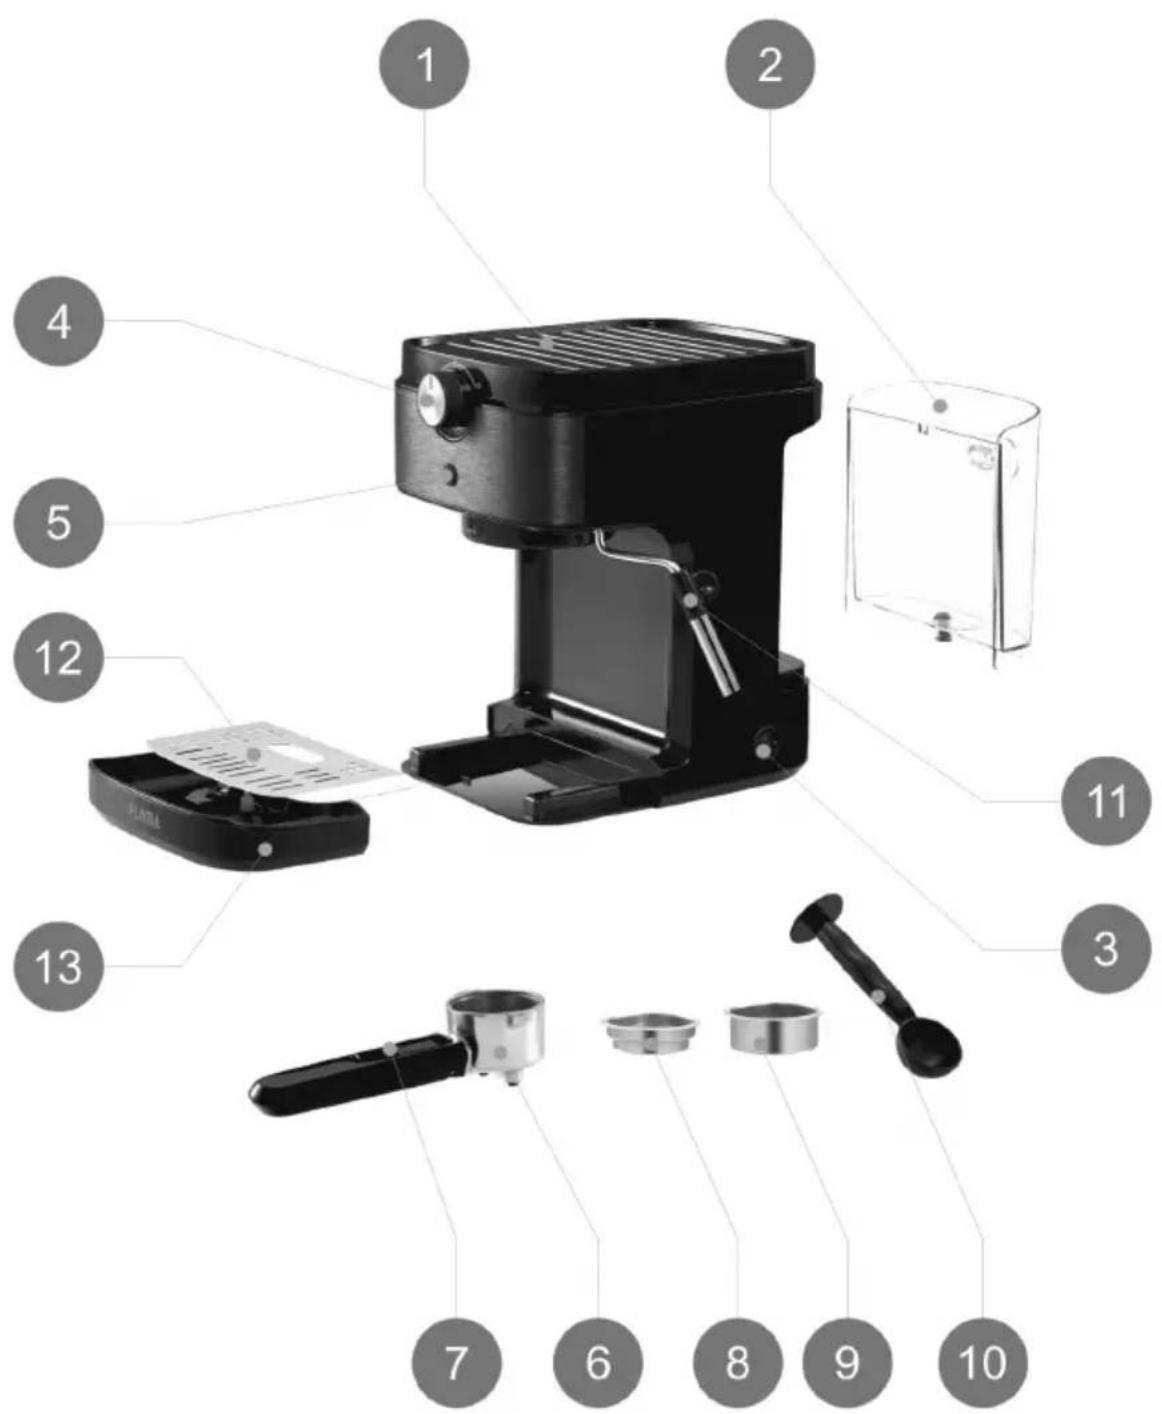
DESCRIPTION
- Cup heating surface
- Water tank
- ON/OFF switch
- Coffee/steam selector
- START button
- Filter holder
- Locking lever
- 1 coffee Filter
- 2 coffees Filter
- Measure spoon/presser
- Steam tube
- Grid
- Drip tray
BEFORE FIRST USE
Remove all packaging material, stickers and labels from the device, except the appliance's rating plate.
Make sure that all components are included. If any parts are missing or are not in good condition, please contact the Technical Assistance Service.
WARNING: Any dirt inside the filter holder may compromise the quality of the coffee, as well as cause the coffee to come out unevenly through the filter holder's spouts.
Do not put any substance inside the filter holder. If you detect coffee powder or any substance inside the filter holder, rinse it thoroughly under running water.
Remove the water tank and wash it. Follow the instructions in the chapter "Filling the water tank".
Filling the water tank
The water tank must be filled before starting the machine.
To remove the water tank, hold the water tank handle and pull it back slightly.
Fill the tank with water. Make sure the water is between the Min and Max mark.
Replace the tank, making sure it fits snugly into the back of the machine.
OPERATION
Priming the circuit
Fill the water tank. Do not exceed the MAX mark.
Connect the appliance to the power outlet. Switch on the ON/OFF button (I); the START button blinks.
Keep the Coffee/steam selector in coffee position. Do not rotate it. Put a container right under the coffee outlet.
NOTE: DO NOT INSERT THE FILTER HOLDER IN THIS OPERATION.
Press the START button, the machine will start pumping a small amount of water that will come out from the coffee shower. Repeat it 2-3 times if no water comes out in the first time.
Wait until the water stops pouring, then the machine will enter preheating mode. Rotate the Coffee/steam selector from coffee position to middle position.
As soon as the START button stops blinking, the machine will complete the circuit priming and finish the preheating automatically.
Carefully remove the container and pour out the dispensed water.
Now the machine is ready for use.
NOTES: Above simple operation ensures optimum dispensing and must be carried out:
-When first starting
-When the machine has been out of use for a long time (1-2 weeks).
-When the tank has run out of water.
Usage
IMPORTANT - Make sure that the water tank has water.
Switch the ON/OFF button; the START button blinks.
Turn the switch to the '0' position to start preheating. The START button blinks a blue light during preheating; it remains lit when preheating is finished.
Note: when the machine finishes dispensing coffee or steaming, it will dispense an amount of water into the drip tray and turn the switch to the '0' position. This is normal.
Coffee Mode
Select the desired filter (1 coffee or 2 coffees)
Place the filter in the filter holder.
Use the measure spoon to measure the amount of ground coffee powder for the desired filter. Press evenly the coffee powder onto the filter with the flat end of the measure spoon/presser.
Insert the filter holder into the machine.
Insert the filter holder into the machine from left to right until it locks.
Place the cup on the grid below the coffee spout.
Note: After dispensing the coffee, turn the switch to the '0' position before removing the filter holder.
Pre-infusion
Pre-infusion is the process of soaking, for a few seconds, the ground coffee in a small amount of water, before proceeding with the total extraction of the coffee. The aim is to ensure that the water passes evenly throughout the ground coffee, resulting in a more efficient extraction.
For 1 espresso:
Turn the switch to the coffee position. Press the START button shortly. The blue light of the START button starts blinking, the machine starts the pre-infusion for a few seconds, and then dispenses coffee. Dispensing stops automatically, however you can press the START button again to stop dispensing once you reach the desired amount of coffee. The blue START button light turns on.
Turn the switch back to the '0' position to enter standby mode, remove the filter holder by turning from right to left, clean the filter holder, and dry it after use.
For 2 espressos:
Turn the switch to the coffee position. Press the START button for 3 seconds. The START button starts blinking a purple light, the machine starts the pre-infusion for a few seconds, and then dispenses coffee. Dispensing stops automatically, however you can press the START button again to stop dispensing once you reach the desired amount of coffee. The blue START button light turns on.
Turn the switch back to the '0' position
to enter standby mode, remove the filter holder clockwise to detach it, clean the filter holder, and dry it after use.
Note: In order to avoid overflowing the drip tray, the machine will automatically stop when the coffee dispensing time exceeds the maximum dispensing time (45 seconds).
Steam/milk foam function
Note: when the machine finishes dispensing coffee or steaming, it will dispense an amount of water into the drip tray and turn the switch to the '0' position. This is normal.
Pour the desired amount of milk into a heat-resistant container.
IMPORTANT: The milk must be cold.
Place the container under the steam pipe. Dip the tube into the container.
Turn the switch to the steam position.
Press the START button. The button blinks a blue light. The machine starts making steam with the steam tube and nozzle. Move the container with slow movements from bottom to top. When the desired foam is reached, turn the switch back to the '0' position.
Remove the container. Use a damp cloth to remove milk residue from the steam pipe.
IMPORTANT - the tube is detachable.
- Always clean the entire steam pipe after each use to remove milk residue.
- The steam pipe may be hot. Take care when removing and cleaning.
CLEANING AND MAINTENANCE Cleaning
Disconnect the coffee machine from the power outlet and allow it to cool down completely before cleaning.
Do not use abrasive cleaners or sponges, as they may damage the surface of the appliance.
Do not submerge the main body of the coffee machine in water or any other liquid.
Remove the filter holder from the coffee machine and empty the coffee residue from the filters. Then, clean the filter holder with water and a cloth. If you detect coffee powder or any substance inside the filter holder, clean the interior of the filter holder thoroughly under running water.
Attention -The filter holder is not suitable for dishwashers.
Regularly wash the tank, drip tray, grid, and filters with warm water and dishwashing detergent. Rinse thoroughly to leave no detergent residue and dry with a cloth.
After using the steam function, clean the steam pipe immediately with a cloth.
Activate the steam function to avoid clogging the inside of the tube.
If the steam pipe clogs, use a needle to unclog it.
Use a soft, damp cloth to clean the outside of the coffee machine.
Descaling
Note: it is recommended that you descale the machine no more than every 6 weeks.
The frequency depends on the type of water used and the frequency of use.
Fill the water tank with descaling solution up to the maximum mark.
Select any filter to place in the filter holder. Position the filter holder in the machine.
Place a container underneath the coffee spout and steam pipe.
Turn the switch to the steam position and press the START button for 5 seconds. The machine will start descaling the steam system for about 5 minutes. During descaling, the red and blue lights of the START button blink alternately. When the cycle ends, the blue START button light blinks.
Turn the switch to the coffee position. The machine will start descaling the dispensing system for about 5 minutes. When the cycle ends, the blue START button light illuminates.
Pour the remaining solution from the water tank. Rinse the tank and add clean water up to the maximum mark; put the tank back in the machine.
Press the START button to start cleaning the dispensing system for 1 minute. During cleaning, the red and blue lights blink twice, alternately. When the cycle ends, the blue light blinks.
Turn the switch to the steam position and press the START button to start cleaning the steam system for 1 minute. When the cycle is complete, the machine will return to standby mode and is ready for use.
ANOMALIES AND REPAIR
In case of malfunction, please take the appliance to an authorized Technical Assistance Service. Do not attempt to disassemble or repair the appliance, as this may be dangerous.
PROTECTING THE ENVIRONMENT
natural_image
Symbol of a trash bin with crossed lines indicating no waste or discharge, and a solid black rectangle below (no text or labels)This symbol indicates the separate collection of electrical and electronic equipment.
The main objective of the separate collection of this waste is to reduce the quantity to be disposed of, promote re-
use, recycling and other forms of recovery in order to reduce its negative effects on the environment.
When it is no longer in use, this appliance must not be disposed of together with other unsorted municipal waste.
The user is responsible for delivering it free of charge to the selective collection facilities available for that purpose.
Pieces of equipment that are no longer in use can also be taken back at points of sale, by purchasing new pieces of equipment that are equivalent and have the same functions.
For more detailed information on collection points, please contact your City Council or a point of sale for this equipment.
MACHINE À CAFÉ EXPRESS
CONSIGNES DE SÉCURITÉ
DYSFONCTIONNEMENTS ET RÉPARATIONS
natural_image
Symbol of a trash bin with crossed lines indicating no waste, and a solid black rectangle below (no text or labels)- Keep the proof of purchase (receipt) for this product carefully. When a repair is made under these conditions, the technician will require proof of purchase. This assistance can only be provided once you have proven, with the proof of purchase, that your appliance is within the warranty period.
- The warranty period for this appliance is defined by the respective EU Directive in force on the date of purchase/delivery.
- Within the guarantee period, we will repair or replace, free of charge, any parts which, during the normal use of the appliance, have deteriorated as a result of a proven material or manufacturing defect.
- This warranty does not cover consumable items, light bulbs, easily breakable parts made of glass or plastic, or any other defects that do not impair its proper functioning.
- We accept no liability for damage caused by incorrect or careless use of the appliance, by its connection to an electrical current other than that indicated on the appliance's rating plate, by faulty electrical installation, or by atmospheric, chemical or electrochemical causes. Other claims or demands for compensation relating to objects which are not an integral part of the appliance will be denied.
- The provision of assistance under warranty does not extend the warranty period. Only within this period will assistance be provided under warranty. The right to assistance is only granted to the first purchaser of the device and cannot be transferred to a third party.
- The warranty expires when unauthorized persons have attempted to repair, modify or replace parts of the appliance.
- All expenses and risks of transportation to our factory or vice versa will always be borne by the buyer.
WARRANTY CONDITIONS
To benefit from the Technical Assistance service during the 36-month warranty period after the date of purchase, you will need to:
Present the Invoice/Proof of Purchase, stating the model and the manufacturing number of the product (whenever possible).
Note: Failure to present the aforementioned documents will be grounds for not providing services under warranty.
CONDITIONS DE GARANTIE
CONDITIONS DE GARANTIE

- MÁQUINA DE CAFÉ EXPRESSO
- INSTRUÇÕES DE SEGURANÇA
- DESCRIPTION
- BEFORE FIRST USE
- Filling the water tank
- OPERATION
- Priming the circuit
- Usage
- Coffee Mode
- Pre-infusion
- For 1 espresso:
- For 2 espressos:
- Steam/milk foam function
- CLEANING AND MAINTENANCE Cleaning
- Descaling
- ANOMALIES AND REPAIR
- PROTECTING THE ENVIRONMENT
- MACHINE À CAFÉ EXPRESS
- CONSIGNES DE SÉCURITÉ
- DYSFONCTIONNEMENTS ET RÉPARATIONS
- WARRANTY CONDITIONS
- CONDITIONS DE GARANTIE
Brand : Flama
Model : 1221FL
Category : Coffee machine