
1293FL - Coffee machine Flama - Free user manual and instructions
Find the device manual for free 1293FL Flama in PDF.
| Product type | Automatic coffee machine with built-in grinder |
| Brand | Flama |
| Model | 1293FL |
| Power supply | 220-240 V ~ 50/60 Hz |
| Power | Approximately 1400 W |
| Water tank capacity | Approximately 1.8 L |
| Bean hopper capacity | Approximately 250 g |
| Pump pressure | 15 bar |
| Weight | Approximately 9 kg |
| Dimensions (L x D x H) | Approximately 28 x 40 x 36 cm |
| Main functions | Espresso, Long, American, MyCoffee, hot water |
| Grind adjustment | Yes, by rotary control in the bean hopper |
| Operating modes | Preset, ECO, Quick |
| Automatic shut-off | Yes, adjustable (10, 20 or 30 min depending on mode) |
| Cleaning | Automatic (descaling) and manual |
| Descaling | Automatic program with supplied product (3 sachets included) |
| Vacuum system | Yes, for protection during prolonged non-use |
| Safety | Grounded plug, overheat protection, automatic shut-off |
| Included accessories | 3 descaler sachets, microfiber cloth, cleaning brush |
| Warranty | 36 months |
Frequently Asked Questions - 1293FL Flama
User questions about 1293FL Flama
0 question about this device. Answer the ones you know or ask your own.
Ask a new question about this device
Download the instructions for your Coffee machine in PDF format for free! Find your manual 1293FL - Flama and take your electronic device back in hand. On this page are published all the documents necessary for the use of your device. 1293FL by Flama.
USER MANUAL 1293FL Flama
natural_image
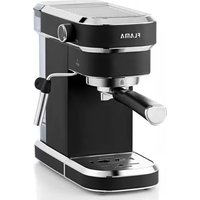
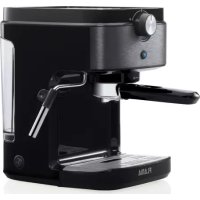
Black FLAMA digital water heater device with control panel and side-mounted buttons (no visible text or symbols on body)1293FL
PT MÁQUINA DE CAFÉ AUTOMÁTICA 1
ES CAFETERA AUTOMÁTICA 14
EN AUTOMATIC COFFEE MACHINE 27
FR MACHINE À CAFÉ AUTOMATIQUE 40
MÁQUINA DE CAFÉ AUTOMÁTICA
INSTRUÇÕES DE SEGURANÇA
natural_image
Symbol of a trash bin with crossed lines indicating no waste or discharge (no text or labels)natural_image
Symbol of a trash bin with crossed lines indicating no waste or discharge, and a solid black rectangle below (no text or labels)Please read these instructions carefully before using the appliance for the first time and keep them for future reference.
FLAMA shall not be liable for any use that is not in accordance with the instructions.
Please check that the supply voltage of your electrical system corresponds to the voltage on the appliance's rating plate.
Please follow these safety instructions carefully when using the appliance. Improper use of the appliance can cause injuries.
Place the appliance on a dry, stable, flat, heat- and water-resistant surface away from water splashes and any other heat sources.
This appliance is intended for households and similar uses, such as:
- Staff kitchen areas in stores, workshops and other working environments;
- Cottages;
- Guests of hotels, motels and other residential environments;
- Inn-type environments.
Do not submerge the cord, plug, or any other electrical part of the appliance in water or any other liquid, or expose them to water. Make sure that your hands are completely dry before touching the plug or switching on the appliance.
Do not use the appliance if the cord, plug, or housing are damaged, or if it does not work properly, has been dropped or damaged.
Do not use any accessory that has not been recommended by FLAMA, as it may cause damage.
The temperature of accessible surfaces may be high when the appliance is being used and may cause burns.
Always connect the appliance to an earthed socket.
Do not run the appliance without water in it.
Do not move or switch off the appliance when it is working.
This appliance may be used by children aged 8 and over if they are supervised or have received instructions concerning the safe use of the appliance and understand the risks involved.
Cleaning and maintenance must not be carried out by children unless they are over 8 years old and supervised.
Keep the appliance and its power cord out of the reach of children under the age of 8.
This appliance may be used by persons with limited physical, sensory or mental abilities or lack of experience and knowledge, if they are supervised or have received instructions concerning the safe use of the appliance and understand the risks involved.
Children should be supervised to ensure they do not play with the appliance.
NOTE: this appliance was subject to a quality control prior to its placement on the market to ensure it is working properly.
After the control, the appliance is thoroughly cleaned, so there may be some water left inside.
Do not use the appliance if it is not working properly.
Please disconnect the appliance from the power supply by removing the plug from the power socket after each use and when cleaning. Please allow it to cool down before carrying out with any cleaning or storage operations.
If the power cord is damaged, have it replaced at an Authorized Flama Technical Assistance Service in order to avoid a hazard.
Any intervention other than cleaning must be carried out only by authorized FLAMA agents.
This product complies with the Low-Voltage and Electromagnetic Compatibility Directives.
This instruction manual is also available in PDF format at www.flama.pt.
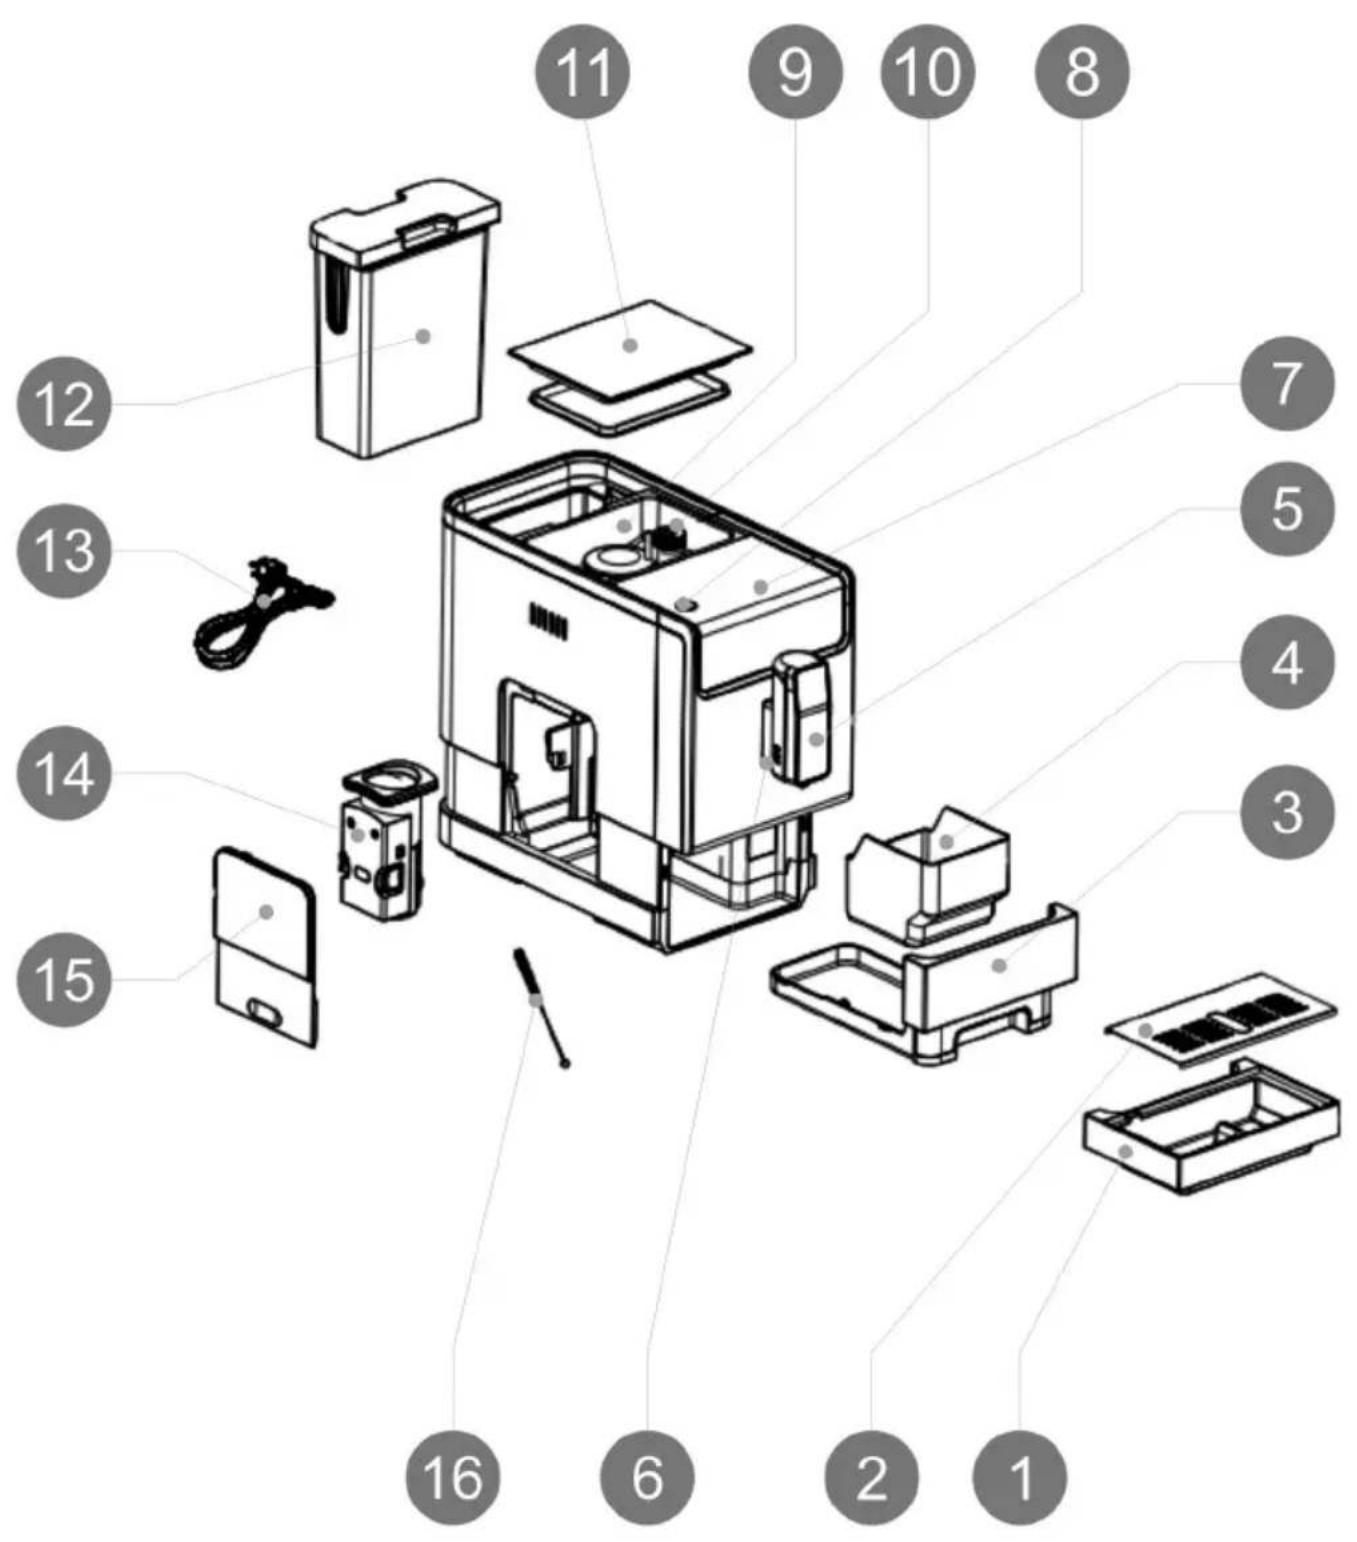
DESCRIPTION
- External drip tray
- External drip tray screen
- Internal drip tray
- Coffee grounds container
- Adjustable coffee spout
- Mug illumination light
- Control panel
- ON/OFF button
- Coffee bean container
- Grinder adjustment knob
- Coffee bean container lid
- Water tank
- Power cord
- Brewing group
- Service door
- Cleaning brush
ACCESSORIES
The product package includes:
- 3 packets of descaling agent for the descaling process.
- Cloth for cleaning the control panel.
- Cleaning brush.
USE AND CARE
- WARNING - Only use roasted coffee beans. Do not use caramelized/torrefacto coffee, ground coffee, instant coffee, or any other type of coffee as it may damage the machine.
- Do not use the appliance if the accessories are not correctly installed.
- Do not run the appliance without water.
- Do not use the appliance if the ON/OFF switch does not work.
- Do not move the appliance while in operation.
- Respect the MAX levels.
- Unplug the appliance from the wall outlet when not in use and before starting any cleaning process.
- Unplug the appliance from the wall outlet before filling the water tank.
- Do not store the appliance while still hot.
- Only use the appliance with water.
- Using bottled mineral water suitable for human consumption is recommended.
- Never leave the appliance plugged in while unattended. This will also help save energy and extend the life of the appliance.
CONTROLS AND ALERTS
 | ON/OFF button. |
| [CTAW] | ESPRESSO coffee button. |
 | LONG coffee button. |
| [WH0H] | AMERICANO coffee button. |
| [W9K4] | Favorite setting button - MyCoffee |
 | Hot water button. |
 | Low water level indicator symbol.Flashing light: low water level/water tank missing. |
 | Low coffee bean level indicator.Steady light: lack of coffee beans in the container. |
 | Coffee grounds indicator symbol.Steady light: the coffee grounds container is full.Flashing light: The internal drip tray/coffee grounds container is missing. |
 | In use indicator |
 | Brewing group indicator symbol.Steady light: The brewing group is incorrectly positioned/missing.Flashing light: the service door is open/incorrectly positioned. |
 | Descaling indicator symbol.Steady light: descaling needed.Flashing light: descaling in process. |
 | Vacuum indicator symbol.Vacuum system function in process. |
MACHINE INSTALLATION
- Remove the protective film, tape (the control panel protection, etc.) and any other packing material.
- Choose a safe and stable surface with an easily-accessible power supply and at least 15 cm (6 in) of open space around the machine.
- Insert the external drip tray; it has magnets to facilitate installation. Ensure that it is correctly positioned.
- Fill the water tank.
- Fill the coffee bean container.
- Unwind and extend the power cord and plug it into the socket at the back of the machine. Insert the plug at the other end of the power cord into a wall outlet with suitable voltage.
OPERATING INSTRUCTIONS
Operation
- Turn on the appliance by pressing the ON/OFF button.
The machine cleans the water circuit when it is turned on for the first time and after having been turned off for a while.
Place an empty container underneath the adjustable coffee spout before turning the machine on or off.
Warning: If water circulation is difficult for any reason, press and hold the hot water button until a continuous flow of water comes out of the coffee outlet.
Option to deactivate automatic cleaning:
You may choose to do manual cleaning (see MANUAL CLEANING). If you find the automatic cleaning option to be bothersome, you may deactivate this function as follows:
- Open and remove the service door.
- Press and hold the ON/OFF button for a few seconds until you hear 2 beeps. This indicates that the automatic cleaning function has been deactivated.
To reactivate it, repeat the procedure until you hear 2 beeps.
The appliance will enter STANDBY mode.
- Place a mug under the coffee spout and adjust the height of the spout so that the mug fits. Depending on the size of the mug (too high or too wide), you may remove the external drip tray.
- Press the desired coffee button. The pressed coffee button will light up and remain lit to indicate that the machine is preparing the cup of coffee.
While the coffee is being prepared, the mug illumination light turns on. - When the appliance returns to STANDBY mode, the coffee is ready to be served.
NOTE - The coffee buttons can be adjusted (see the “OTHER SETTINGS” section - adjusting the volume of coffee/hot water).
Press the hot water button (see the “Hot water” section below) to clean the interior of the coffee machine before first use.
Filling the water tank
When the low water level icon flashes, it means that the water tank is low on water and needs to be filled.
- Lift up the water tank using the lid as a handle.
- Rinse the water tank with clean water, fill it to the maximum fill line and return it to place in the machine. Ensure that it is well placed.
Note: to prevent water overflow from the water tank, do not add water directly to the tank while placed in the machine.
WARNING: Never fill the water tank with warm water, hot water, sparkling water or any other type of liquid that could damage the tank and the machine.
Filling the coffee bean container
When the coffee bean indicator symbol flashes, the machine needs to be refilled with coffee beans.
- Remove the lid of the coffee bean container.
- Slowly pour in coffee beans.
- Replace the lid on the container.
WARNING - Only use roasted coffee beans. Do not use caramelized/torrefacto coffee, ground coffee, instant coffee, or any other type of coffee as it may damage the machine.
Hot water
- Place the mug/recipient under the coffee spout.
- Press the hot water button.
The hot water button and the mug illumination will light up to indicate that the appliance is heating the water and dispensing it.
This process may be interrupted at any time by pressing the hot water button.
Favorite setting function - MyCoffee
The favorite setting function - MyCoffee may be used to memorize an additional selection of how much coffee (espresso, long and americano) to dispense, but for just one of these selections.
Adjusting the favorite setting function - MyCoffee
- Press and hold the favorite setting button for 2 seconds; the coffee buttons will start flashing.
- Press either button to memorize the desired volume. When a coffee button is pressed, the light of the selected button will become steady and the selection will begin dispensing. Immediately press and hold the button to continue dispensation. Dispensation will stop when the button is released, and the amount will be memorized.
ATTENTION: In case the symbol lights up, never remove the coffee grounds container to empty it while the machine is in operation. This can happen if the water runs out while coffee is being dispensed.
- Refill the water tank to automatically complete the cycle.
Never force the removal of the internal drip tray and the coffee grounds container, as this can damage the machine. The machine will not work because it will not detect the internal drip tray.
MANUAL CLEANING
You may also complete a manual cleaning cycle to clean the coffee spout after use. We suggest performing a manual cleaning if the machine has not been used for a long period of time. How to do it:
- In STANDBY mode, simultaneously press and hold the ON/OFF button and the hot water button; an alert will sound.
The hot watter button will flash until the rinse process is complete.
Danger: the water leaving the hot water spout is hot and is collected in the external drip tray below. Avoid contact with stray water droplets.
After this manual cleaning, the appliance returns to STANDBY mode.
AUTOMATIC SHUT OFF
The machine comes equipped with an automatic shut-off function. Depending on the mode selected, the machine takes different lengths of time to shut off automatically. (See the “OTHER SETTINGS – Mode selection” section).
DAILY CLEANING
The timely cleaning and maintenance of the machine are very important to extending its working life.
Do not begin any cleaning or maintenance procedure with the machine switched on.
- If the machine is turned on, turn it off by pressing the ON/OFF button for a few seconds.
- Remove the external drip tray.
- Empty the water in the tray into the sink and wash it with cold water. Dry it immediately.
- Remove the internal drip tray and the coffee grounds container.
- Empty the coffee grounds container. Wash the internal drip tray and the coffee grounds container with cold water. Dry them immediately.
- Place the coffee grounds container in the internal drip tray, immediately returning them to their original position.
Cleaning the brewing group
- Push the service door from the bottom.
- Remove the service door.
- Press the (orange) buttons to eject the brewing group.
- Remove the brewing group.
- Wash the brewing group in running water. Immediately dry it very well.
- Clean the brewing group compartment.
- Return the brewing group to its original position, followed by the service door.
Notes:
When the brewing group symbol light is:
- Steady, the brewing group is missing or incorrectly positioned.
- Flashing, the service door is missing or incorrectly positioned.
When the coffee grounds container symbol is flashing, the coffee grounds container is missing.
- Place the coffee grounds container in the internal drip tray, immediately returning them to their original position.
OTHER SETTINGS
Adjusting the volume of coffee/hot water (espresso, long, americano and hot water buttons)
The machine can memorize the desired volume of coffee, as well as hot water, between 25 mL (0.85 oz.) to 250 mL (8.5 oz.).
When preparing the coffee/water, press, release, and immediately press and hold the corresponding button. The machine will continue filling the mug.
- When the volume reaches the desired level, release the button. Two beeps will sound, indicating that the amount has been memorized.
Adjusting the grinder
The grinder can be adjusted to suit the roast of your coffee by turning the grinder adjustment knob, located on the coffee bean container.
- To adjust the grind, turn the knob ONLY when the grinder is grinding coffee. The dots on the adjustment knob indicate in which direction to rotate for a finer or coarser grind.
ATTENTION: Never adjust the grinder when not in operation. This can damage the grinder.
Mode selection
In addition to its default settings, the machine has two different settings: ECO mode and quick mode. In ECO mode, the machine helps conserve energy. In quick mode, the user can make their coffee more quickly than when using the default settings. The table below shows which functions are active for each mode.
| Default mode | ECO mode | Quick mode | |
| Coffee spout illumination | Yes | No | Yes |
| Pre-brewing* | Yes | Yes | No |
| Automatic shut off | 20 minutes | 10 minutes | 30 minutes |
| Memorized volume per mug | Yes | Yes | Yes |
\* What is pre-brewing?
When the pump begins working, there is a short pause. During that pause, the ground coffee in the brewing group is moistened with a small amount of water before complete extraction. This process expands the ground coffee inside the brewing group, which increases water retention and pressure to help extract all of the oils and flavor from the ground beans.
Mode selection - indicative table
| Espresso button Long button Hot water button | |||
| Default Flashing light Steady light Flashing light | |||
| ECO mode Flashing light Flashing light Steady light | |||
| Quick mode Steady light Flashing light Flashing light | |||
To select a mode:
- With the machine in STANDBY mode, press the ON/OFF button for 5 seconds until the button begins flashing.
- Release the ON/OFF button.
- The ON/OFF button will remain flashing and the espresso, long and hot water buttons will give a series of indications, according to the table above.
- To change the mode, press the hot water button for ECO mode, the espresso button for quick mode and the long button for the default settings. You will hear 2 beeps, indicating that the mode has been selected.
- If you wish to keep the current settings and not make changes, press the ON/OFF button again or wait 5 seconds until the machine returns to STANDBY mode.
CLEANING AND MAINTENANCE
Automatic cleaning/descaling
When the descaling indicator symbol is lit, this means that automatic cleaning should be performed. The machine will remain in top condition if this function is performed at least once per month, or more frequently, depending on the hardness of the water used.
IMPORTANT: The complete descaling process will take approximately 30 minutes. For your safety, do not turn off the machine during the process. If the descaling process is interrupted, it should be restarted from the beginning.
- Completely fill the water tank.
- Add the contents of the descaling packet included in the box to the water tank.
IMPORTANT: Do not use vinegar or any other cleaning agent to perform automatic cleaning of this appliance. Cleaning agents
may damage the machine.
- If the machine is not in STANDBY mode, turn it on using the ON/OFF button.
- Place a sufficiently large recipient under the coffee spout.
- Simultaneously press and hold the ON/OFF button and the espresso coffee button for 5 seconds. You will hear a beep; the espresso coffee button and the descaling indicator symbol will flash.
- Press the espresso coffee button to confirm the start of the cleaning process.
- The descaling indicator symbol will continue flashing, indicating that the appliance is performing the automatic cleaning process.
Attention: keep your body/skin away from the hot water.
- When all the water in the tank has been used, the low water level indicator symbol and the espresso coffee button will flash.
- Carefully discard any remaining solution from the water tank, wash it and fill it with clean water until the MAX fill line. After the water tank is filled and returned to place, the low water level indicator symbol will turn off. The low water level indicator symbol and the espresso coffee button will stop flashing.
The machine will continue with the descaling process; it will first use half of the water in the tank, then, after a pause of around 1 minute, the process will continue until the rest of the water from the tank has been used.
- When the automatic cleaning process has finished, the appliance will automatically shut off.
Note: to make sure that the descaling process is complete, be patient during the
process and check that the appliance turns off automatically.
Cleaning the ground coffee outlet
After prolonged periods of use, some ground coffee may accumulate in the passage from the grinding compartment to the brewing group. We suggest cleaning the outlet of this passage to ensure that the ground coffee reaches the machine.
- Push the service door from the bottom.
- Remove the service door.
- Press the (orange) buttons to eject the brewing group.
- Remove the brewing group.
- Use the cleaning brush to clean the grinder compartment outlet.
Cleaning the appliance
Unplug the appliance from the wall outlet.
Empty the internal drip tray and the coffee grounds container.
Use a damp cloth or non-abrasive cleaning agent to clean the water stains from the appliance.
IMPORTANT: Never use abrasive cleaning agents, vinegar or descaling solutions not included in the appliance's cleaning kit.
We recommend using the vacuum system function before long periods of not using the appliance to protect against low temperatures, as well as before contacting technical assistance services.
- In STANDBY mode, simultaneously press the ON/OFF button and the espresso button for 5 seconds; there will be an alert sound
and the vacuum system symbol will flash.
- Remove the water tank from the machine. The vacuum system symbol will stop flashing, indicating that the vacuum system process is underway.
When the vacuum system function is finished, the machine will automatically shut off.
- Press the ON/OFF button before removing the water tank to return to STANDBY mode.
IMPORTANT: after running the vacuum system function, before using the machine again, turn it on and press the hot water button until water exits the coffee spout.
TROUBLESHOOTING
| Problem Cause Solution | ||
| The appliance does not work. | The appliance is not plugged into the wall outlet. | Plug in the power cord and press the ON/OFF button.Check the power cord and plug. |
| Buttons on the control panel are non-responsive or require multiple presses. | The appliance is under electromagnetic interference. The control panel is dirty. | Unplug the appliance, wait 2 minutes and plug it back in.Clean the control panel with the provided cloth. |
| The coffee is not hot enough. | The mugs have not been pre-heated. The brewing group is too cold. | Heat the mugs. Perform manual cleaning of the appliance at least 2 times before preparing the coffee. |
| No coffee comes out. | The vacuum system function was previously used. | Press the hot water button until water comes out of the coffee spout. |
| The first cup of coffee is not good quality. | The first grind of the grinder may not deliver enough coffee to the brewing group. | Discard the coffee. The next coffees will be of good quality. |
| The coffee does not have crema. | The coffee beans are not fresh. | Substitute or use a suitable brand of coffee beans. |
| The touch buttons are not sensitive. | You did not press the touch button in the most central area. | Press the button in the most central area. |
| The machine takes too long to heat up. | Scale has built up. Descale the machine. | |
| Problem Cause Solution | ||
| When removing the water tank, the water level is very low, but the alert indicator did not activate. | The area surrounding the water tank connections is damp. | Clean the water surrounding the water tank connections. |
| The external drip tray collects too much water. The coffee comes out too slowly or drop by drop. | The coffee grind was too fine and blocked the water outlet. | Adjust to a coarser grind while the grinder is operating. |
| The low coffee bean level indicator light turns on, but there are coffee beans in the coffee bean container. | The internal coffee grounds outlet is blocked. | Follow the steps in the “CLEANING THE GROUND COFFEE OUTLET” section. |
| The internal drip tray and coffee grounds container cannot be placed in position. The machine does not work (control panel is deactivated). | The internal drip tray and the coffee grounds container were removed during the brewing process. | Place the internal drip tray and the coffee grounds container in the machine so that it can detect them and continue with the interrupted cycle.Afterwards, remove and correctly replace the internal drip tray and coffee grounds container into position. |
ANOMALIES AND REPAIR
In case of malfunction, please take the appliance to an authorized Technical Assistance Service. Do not attempt to disassemble or repair the appliance, as this may be dangerous.
PROTECTING THE ENVIRONMENT
natural_image
Symbol of a trash bin crossed out by two crossed lines, with no text or numbers present.This symbol indicates the separate collection of electrical and electronic equipment.
The main objective of the separate collection of this waste is to reduce the
quantity to be disposed of, promote re-use, recycling and other forms of recovery in order to reduce its negative effects on the environment.
When it is no longer in use, this appliance must not be disposed of together with other unsorted municipal waste.
The user is responsible for delivering it free of charge to the selective collection facilities available for that purpose.
Pieces of equipment that are no longer in use can also be taken back at points of sale, by purchasing new pieces of equipment that are equivalent and have the same functions.
For more detailed information on collection points, please contact your City Council or a point of sale for this equipment.
MACHINE À CAFÉ AUTOMATIQUE
CONSIGNES DE SÉCURITÉ
DYSFONCTIONNEMENTS ET RÉPARATIONS
natural_image
Symbol of a trash bin with crossed lines indicating no waste or discharge (no text or labels)- Keep the proof of purchase (receipt) for this product carefully. When a repair is made under these conditions, the technician will require proof of purchase. This assistance can only be provided once you have proven, with the proof of purchase, that your appliance is within the warranty period.
- The warranty period for this appliance is defined by the respective EU Directive in force on the date of purchase/delivery.
- Within the guarantee period, we will repair or replace, free of charge, any parts which, during the normal use of the appliance, have deteriorated as a result of a proven material or manufacturing defect.
- This warranty does not cover consumable items, light bulbs, easily breakable parts made of glass or plastic, or any other defects that do not impair its proper functioning.
- We accept no liability for damage caused by incorrect or careless use of the appliance, by its connection to an electrical current other than that indicated on the appliance's rating plate, by faulty electrical installation, or by atmospheric, chemical or electrochemical causes. Other claims or demands for compensation relating to objects which are not an integral part of the appliance will be denied.
- The provision of assistance under warranty does not extend the warranty period. Only within this period will assistance be provided under warranty. The right to assistance is only granted to the first purchaser of the device and cannot be transferred to a third party.
- The warranty expires when unauthorized persons have attempted to repair, modify or replace parts of the appliance.
- All expenses and risks of transportation to our factory or vice versa will always be borne by the buyer.
WARRANTY CONDITIONS
To benefit from the Technical Assistance service during the 36-month warranty period after the date of purchase, you will need to:
Present the Invoice/Proof of Purchase, stating the model and the manufacturing number of the product (whenever possible).
Note: Failure to present the aforementioned documents will be grounds for not providing services under warranty.
CONDITIONS DE GARANTIE
CONDITIONS DE GARANTIE

- MÁQUINA DE CAFÉ AUTOMÁTICA
- INSTRUÇÕES DE SEGURANÇA
- DESCRIPTION
- ACCESSORIES
- USE AND CARE
- CONTROLS AND ALERTS
- MACHINE INSTALLATION
- OPERATING INSTRUCTIONS
- Operation
- Option to deactivate automatic cleaning:
- Filling the water tank
- Filling the coffee bean container
- Hot water
- Favorite setting function - MyCoffee
- Adjusting the favorite setting function - MyCoffee
- MANUAL CLEANING
- AUTOMATIC SHUT OFF
- DAILY CLEANING
- Cleaning the brewing group
- Notes:
- OTHER SETTINGS
- Adjusting the volume of coffee/hot water (espresso, long, americano and hot water buttons)
- Adjusting the grinder
- Mode selection
- \* What is pre-brewing?
- To select a mode:
- CLEANING AND MAINTENANCE
- Automatic cleaning/descaling
- may damage the machine.
- Attention: keep your body/skin away from the hot water.
- process and check that the appliance turns off automatically.
- Cleaning the ground coffee outlet
- Cleaning the appliance
- ANOMALIES AND REPAIR
- PROTECTING THE ENVIRONMENT
- MACHINE À CAFÉ AUTOMATIQUE
- CONSIGNES DE SÉCURITÉ
- DYSFONCTIONNEMENTS ET RÉPARATIONS
- WARRANTY CONDITIONS
- CONDITIONS DE GARANTIE
Brand : Flama
Model : 1293FL
Category : Coffee machine