
AR321 - Alarm Clock LIVOO - Free user manual and instructions
Find the device manual for free AR321 LIVOO in PDF.
| Product Type | Radio alarm clock with dawn simulator |
| Brand | Livoo |
| Model | AR321 |
| Power supply | 5V 1A via USB cable (power adapter not included) or 2 x AAA batteries (not included) |
| Dimensions (approx.) | 18 x 10 x 6 cm |
| Weight (approx.) | 0.35 kg |
| Display | LED, adjustable brightness (low/high), 12H/24H format |
| FM Radio | Automatic station scanning and storage, manual tuning, adjustable volume (1-15) |
| Nature sounds | 6 selectable nature sounds + radio as alarm ringtone |
| Alarm | Programmable alarm with snooze (5 min), duration 2 minutes, sunrise simulation 30 min before |
| Light | Integrated bedside lamp, 7 colors (green, red, blue, purple, gold, pink, indigo), adjustable brightness (1-15), sunset mode |
| Sunset function | Timer with gradual light dimming over 30 minutes |
| Battery operation | Limited display (5 sec), alarm and snooze available, no light or radio |
| Maintenance | Clean with a dry cloth, do not use chemicals |
| Safety instructions | Do not expose to water, heat >40°C, or flames; use only a 5V/1A adapter; do not open or repair yourself |
| Certifications | Compliant with RED 2014/53/EU and EMC 2014/30/EU directives |
| Included accessories | USB cable, user manual |
Frequently Asked Questions - AR321 LIVOO
User questions about AR321 LIVOO
0 question about this device. Answer the ones you know or ask your own.
Ask a new question about this device
Download the instructions for your Alarm Clock in PDF format for free! Find your manual AR321 - LIVOO and take your electronic device back in hand. On this page are published all the documents necessary for the use of your device. AR321 by LIVOO.
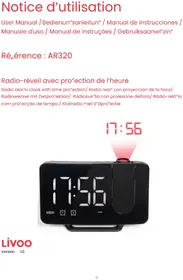
USER MANUAL AR321 LIVOO
natural_image
Digital clock display showing 07:00 with buttons and a 'FM' label, no readable text or symbols beyond the display.ichémas / órawings / Esquemas / íchemas / íchemi / Esquemas / Regelingen
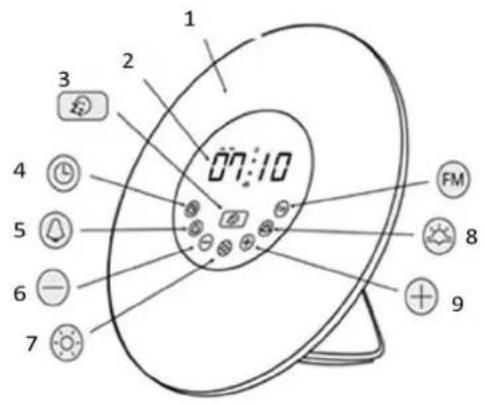
Fig. 1
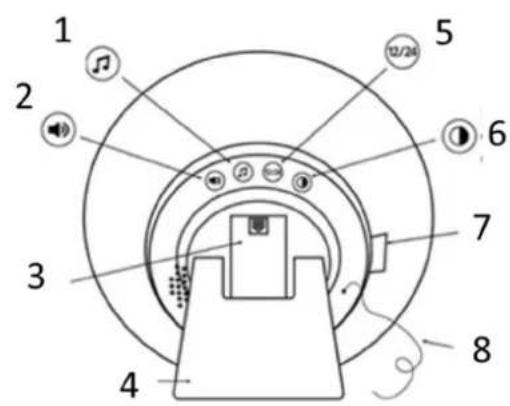
Fig. 2
D,,vid Bousquet, CEO
Sign„ture :
Thank you for choosing a Livoo device!
Your "lender, your ",r"ecue, ,nd your he,dphones ,re not just o'jects, they ,re extensions of yourself, ,llowing you to get closer to your friends ,nd f,mily, to "ring them together, to l,ugh ,nd to sh,re experiences. Livoo's ,im is to help you live your life to the fullest, wh,tever wishes you h,ve throughout the ye,r. Winter r,clette, summer ",r"ecue. Or the other w,y ,round. It's up to you. T,ke ,dv,nt,ge of this freedom for feel good moments every d,y.
Th„t's why we're const„ntly innov„ting „nd cre„ting clever devices full of zest, "ut most of „ll, „ccessi"le.
Find our entire collection on our we"site www.livoo.en.
Livoo, your daily companion till social networks

@Livoo

@livoo_officiel

@Livoo
íafety Instructions
Ple„seäét„keétëmeétoére„òéwellétäeëenstruûtëonésäeeté“eùoreétäeèürstéuseé„nòékeepétäeméùoré„éùuture«Aémësuseéouétäeé„pplë„nûeêû„néò„m„Èeëëtéoréäurtétäeéuser.éAssureétä„téyouéuseétäeé„pplë„nûeèúorétäeé„ùoréwääüäëëtéeséosëÈneò.éóeéruùuseé„nyéresponsë“ëlëtéesé„séùorétäeéo„m„Èesé“yé„néënûorreûtéuseéoré„m„nëpul„tëon.é
Batteriesè 2 * AAA (ã3 not included)
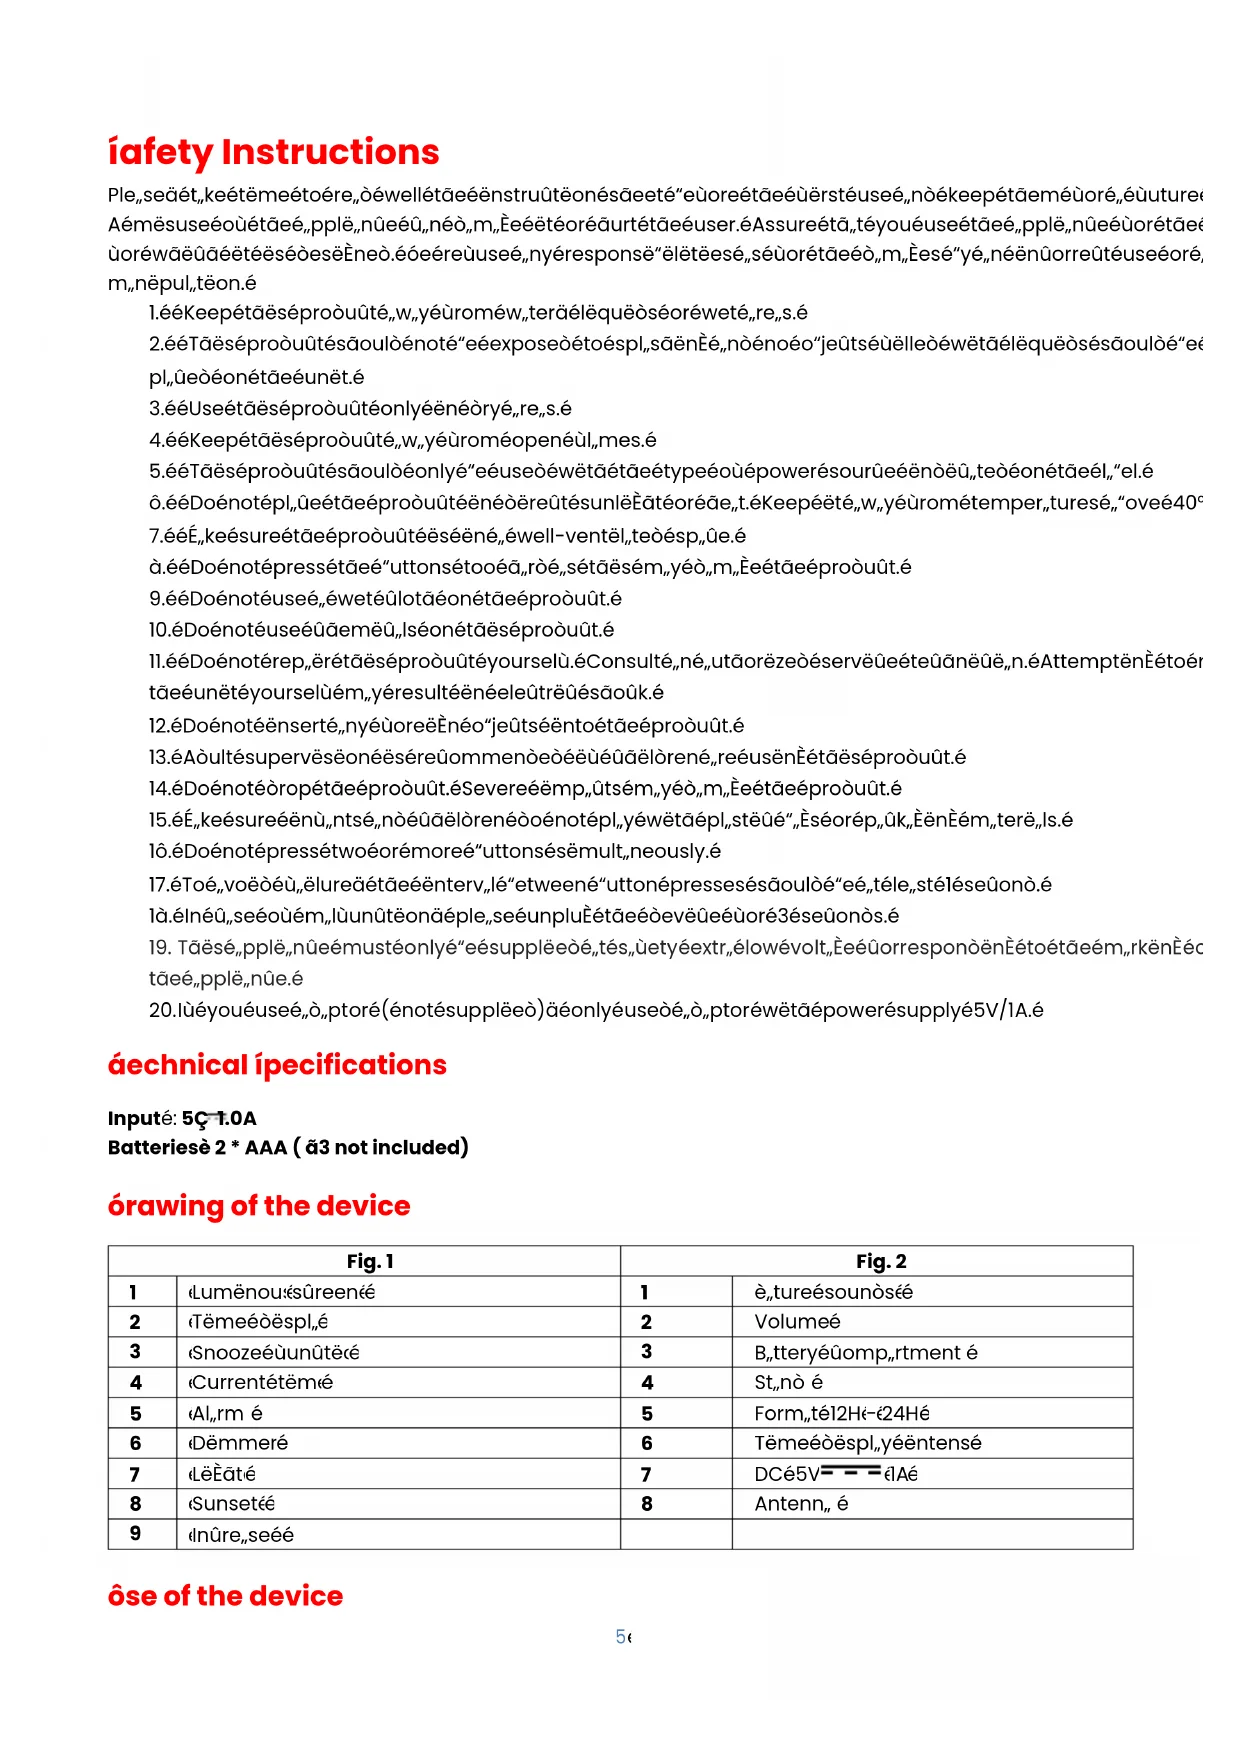
órawing of the device
| Fig. 1 | Fig. 2 | ||
| 1 | «Lumênou:ésûreenéé | 1 | è,,tureésounòsée |
| 2 | «Tëmeéòëspl,é | 2 | Volumeé |
| 3 | «Snoozeéùunûtëcé | 3 | B,,tteryéûomp,,rtment é |
| 4 | «Currentétêmíé | 4 | St,,nò é |
| 5 | «Al,,rm é | 5 | Form,,tél2Hé-é24Hé |
| 6 | «Dëmmeré | 6 | Tëmeéòëspl,,yéëntensé |
| 7 | «LëÈâté | 7 | DCé5V— — — élAé |
| 8 | «Sunsetéé | 8 | Antenn,, é |
| 9 | «Inûre,,seéé | ||
ôse of the device
zhanging the current time
Pressétäekeyééééééé:étäeétëmeéënòëû„tëonéwëlléül„sä.é
Useétãékeysééétoésetétãééáoursé„nòémènutesé„nòéûonùërméwëtãétãékeyéééééé.élùétãééënòëü„tëonéá stoppeòäépressétãeés„meékeyé„È„ën.é
áime display intensity
zleaning and maintenance
zorrect óisposal of this product
(Ãaste Ólectrical & Ólectronic Óquipment)
(Applicable in the Óuropean ônion and other Óuropean countries with separate collection systems)
The Europe„n Direûtive 2012/19/EU on W„ste F„ûilities Eleûtriû„l „nd Eleûtroniû (WEEE)
This m,,rking shown on the produût or its liter,,ture, indiû,,tes th,,t it should not "e disposed with other household w,,stes ,t the end où its working liüe.
To prevent possi"le h,rm to the environment or hum,n he,lth ùrom unûontrolled w,ste
dispos, I, ple, se sep, r, te this ürom other types où w, stes, nd reûyûle it responsi"ly to promote the sust, in, "le reuse où m, teri, I resourûes.
Household users should ûont„ût either the ret„iler where they purûh„sed this produût or their lou„I „uthority oùùiûe, ùor det„ils où where „nd how they û„n t„ke this item ùor environment„lly s„ûe reûyûling.
D,,vid Bousquet, CEO
Sign„ture:
D,,vid Bousquet, CEO

natural_image
Symbol of a trash bin with crossed lines indicating no waste or restriction, and a solid black rectangle below (no text or labels)D,,vid Bousquet, CEO
natural_image
Symbol of a trash bin crossed with no visible text or labelsnatural_image
Symbol of a trash bin crossed with a diagonal line, no text or labels present
Brand : LIVOO
Model : AR321
Category : Alarm Clock