KOV6270NE - Above-ground pool GRE - Free user manual and instructions
Find the device manual for free KOV6270NE GRE in PDF.
| Product type | Above-ground pool |
| Brand | Gre |
| Model | KOV6270NE |
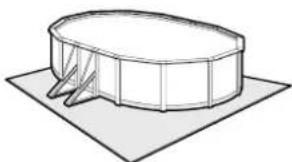
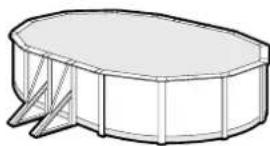
| Dimensions (overall) | 7.00 m x 4.30 m (oval shape) |
| Depth | Approx. 1.20 m (estimated) |
| Maximum water volume | Approx. 36 m³ (calculated) |
| Structure material | Galvanized steel + reinforced PVC liner |
| Liner type | Flexible thermoplastic PVC, standard thickness |
| Liner thickness | 0.6 mm (estimated) |
| Filtration type | Sand or cartridge filtration (depending on kit) |
| Recommended filtration flow rate | Adapted to the pool volume (minimum 8 h/day) |
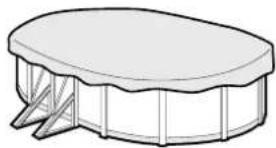
| Included accessories | Skimmer, return nozzle, ladder, cover (depending on version) |
| Ideal installation temperature | Between 15 °C and 25 °C |
| Ground preparation | Flat, firm, level ground, with recommended concrete slab |
| Warranty | 2 years legal + 2 years commercial on metal parts |
| Safety standards | Barrier, alarm, rescue equipment recommended |
| Maintenance | Liner cleaning, pH/chlorine control, winterization with cover |
| Repairability | Patches for liner, spare parts available from customer service |
| After-sales service | www.grepool.com/fr/apres-vente |
Frequently Asked Questions - KOV6270NE GRE
User questions about KOV6270NE GRE
0 question about this device. Answer the ones you know or ask your own.
Ask a new question about this device
Download the instructions for your Above-ground pool in PDF format for free! Find your manual KOV6270NE - GRE and take your electronic device back in hand. On this page are published all the documents necessary for the use of your device. KOV6270NE by GRE.
USER MANUAL KOV6270NE GRE
BEFORE STARTING ASSEMBLY, READ CAREFULLY THE INSTRUCTION MANUALS OF EVERY COMPONENTS OF THE KIT. KEEP THIS INSTRUCTIONS FOR FUTURE REFERENCE
ES PISCINA DE PARED DE ACERO KOV4870NE/KOV6270NE
natural_image
Aerial view of a modern swimming pool surrounded by lawn and a small house, with no visible text or symbols.
text_image
UEJE STANDARD EUROPE SWIMMINGPOOLS 2015-2017
text_image
PRODUCT ACCORDING TO THE NORM EN 1658 2-12015
text_image
PRODUCT ACCORDING TO THE NORM EN 1658 2-32015
text_image
PRODUCT ACCORDING TO THE NORM EN 1671 3-12015INSTRUCTIONS
1
p.3
SAFETY PRECAUTIONS
natural_image
Black-and-white photo of an adult and child embracing in a waterway, with a small boat visible in the background (no text or symbols)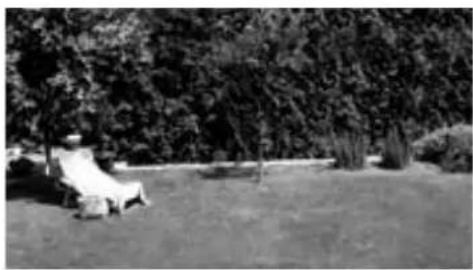
natural_image
Black-and-white photo of a person relaxing on a lawn with shrubs and trees in the background (no text or symbols visible)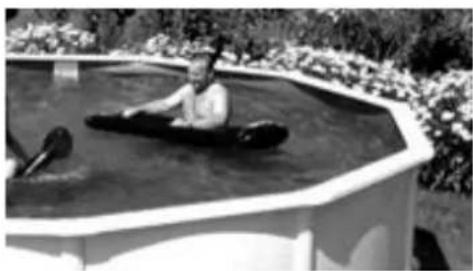
natural_image
Person in a small boat navigating a circular pool surrounded by plants and trees (no visible text or symbols)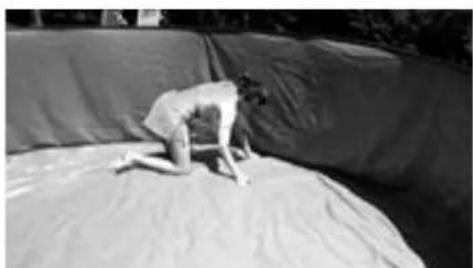
natural_image
Person performing a crouching exercise on a large bed, no visible text or symbols
natural_image
Black-and-white photo of a woman rowing a small boat outdoors, surrounded by foliage (no visible text or symbols)
natural_image
Exterior view of a two-story building with balconies and trees in the background (no signage or text visible)
natural_image
Exterior view of a boat railing with visible water and partial structure (no text or symbols)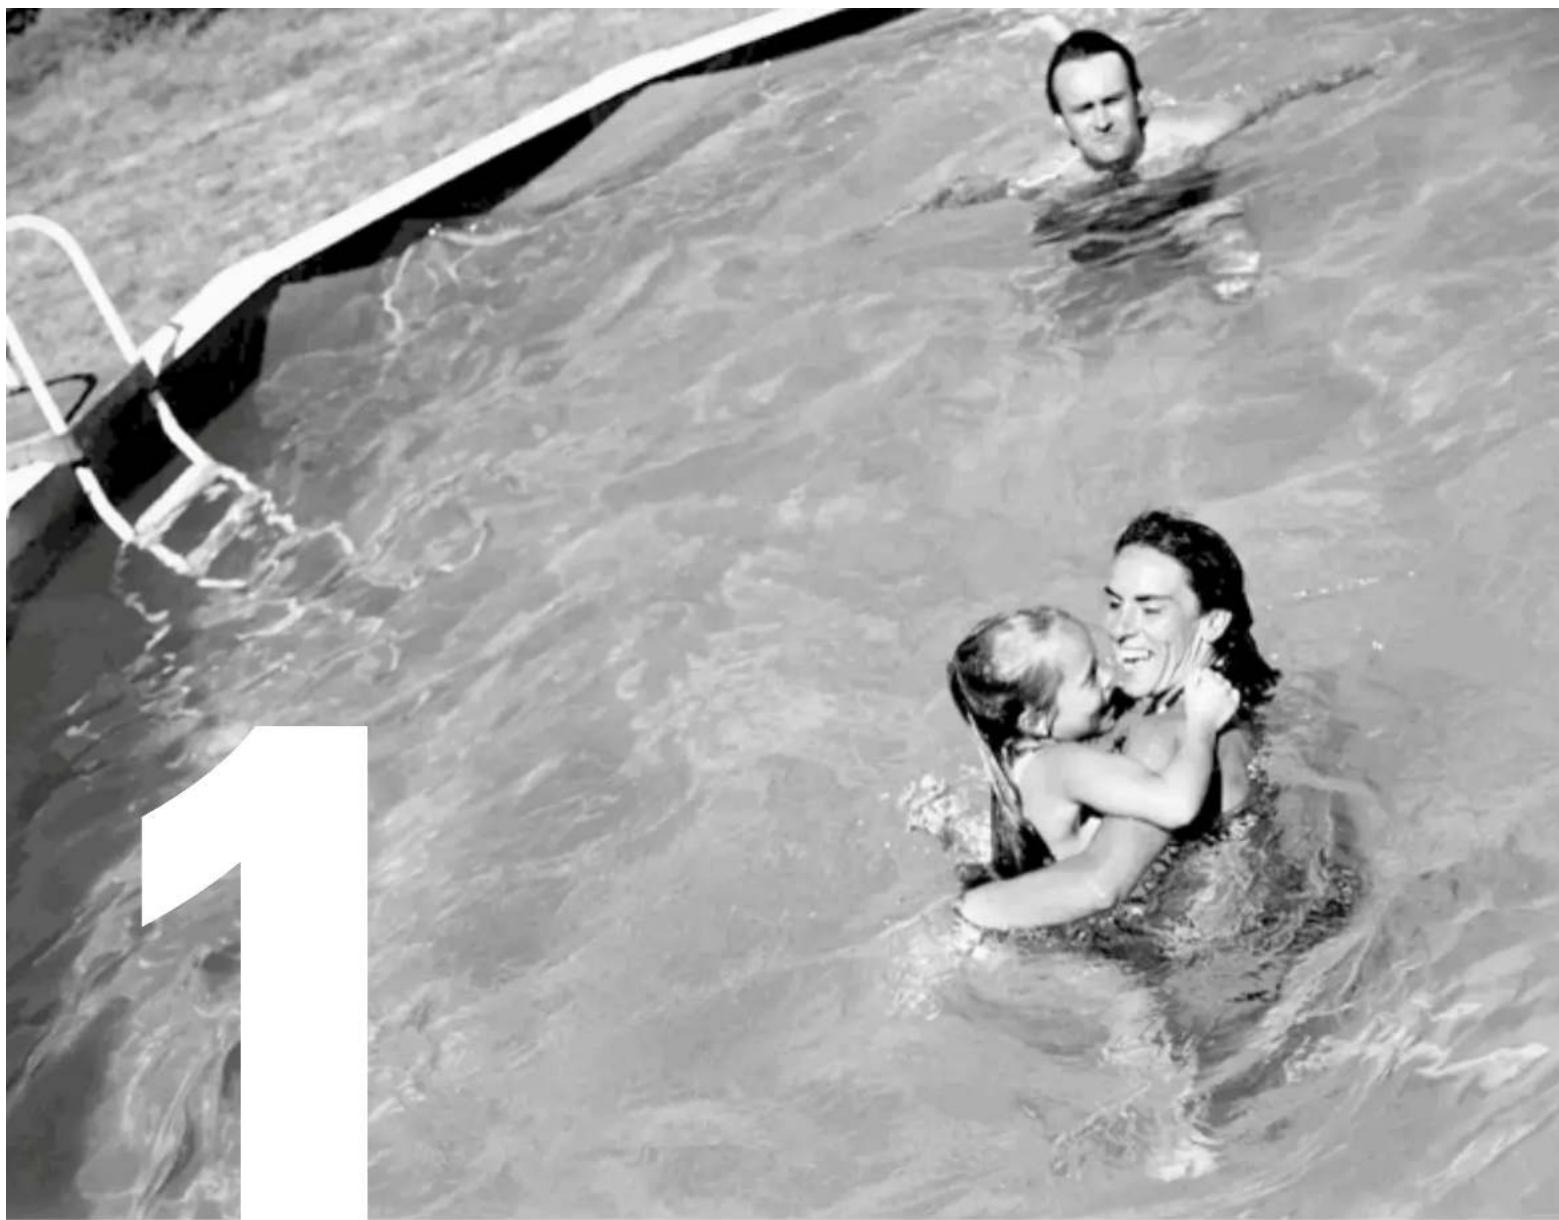
natural_image
Black-and-white photo of a woman and a child embracing in a pool, with a ladder extending into the water (no text or symbols visible)EN SAFETY PRECAUTIONS
ES CONSEJOS DE SEGURIDAD
FR CONSEILS DE SECURITE
DE SICHERHEITSHINWEIS
IT CONSIGLI DI SICUREZZA
NL RAADGEVINGEN VOOR DE VEILIGHEID
PT CONSELHOS DE SEGURANÇA
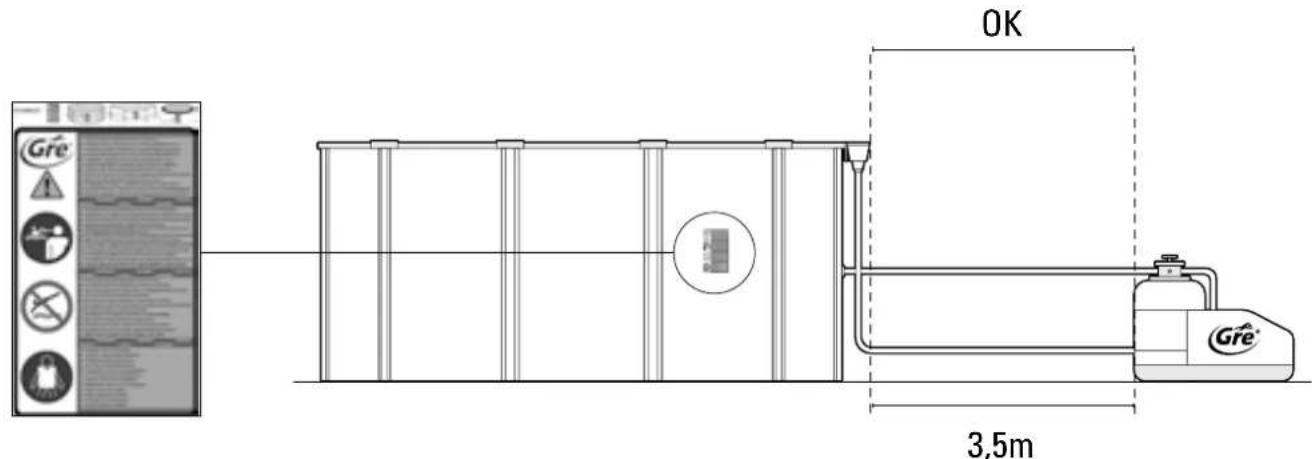
text_image
OK 3,5mEN SAFETY ADVICES
Carefully read, understand, and follow all information in this user manual before installing and using the swimming pool.
These warnings, instructions, and safety guidelines address some common risks of water recreation, but they cannot cover all risks and dangers in all cases. Always use caution, common sense, and good judgment when enjoying any water activity. Retain this information for future use.
Non Swimmers safety
Continuous, active, and vigilant supervision of weak swimmers and non-swimmers by a competent adult is required at all times (remembering that children under five are at the highest risk of drowning).
- Designate a competent adult to supervise the pool each time it is being used.
- Weak swimmers or non-swimmers should wear personal protection equipment when using the pool.
- When the pool is not in use, or unsupervised, remove all toys from the swimming pool and its surrounding to avoid attracting children to the pool.
Safety devices
- It is recommended to install a barrier (and secure all doors and windows, where applicable) to prevent unauthorized access to the swimming pool.
- Barriers, pool covers, pool alarms, or similar safety devices are helpful aids, but they are not substitutes for continuous and competent adult supervision.
Safety equipment
- It is recommended to keep rescue equipment (e.g. a ring buoy) by the pool.
- Keep a working phone and a list of emergency phone numbers near the pool.
Safe use of the pool
- Encourage all users especially children to learn how to swim
- Learn Basic Life Support (Cardiopulmonary Resuscitation - CPR) and refresh this knowledge regularly.
This can make a life-saving difference in the event of an emergency.
- Instruct all pool users, including children, what to do in case of an emergency
-Never dive into any shallow body of water. This can lead to serious injury or death.
- Do not use the swimming pool when using alcohol or medication that may impair your ability to safely use the pool.
- When pool covers are used, remove them completely from the water surface before entering the pool.
- Protect pool occupants from water related illnesses by keeping the pool water treated and practicing good
hygiene. Consult the water treatment guidelines in the user's manual.
- Store chemicals (e.g. water treatment, cleaning or disinfection products) out of the reach of children.
- Signage is to be displayed in a prominent position within 2 m of the pool.
- Removable ladders shall be placed on a horizontal surface.
WARNING:
Every electrical appliance fed in 220 V, has to be located at least at 3.50 m from the edge of the pool. The equipment should be connected to a voltage, with earth connection, protected by a residual current device (RCD) having a rated residual operating current not exceeding 30 mA.
Read the instructions carefully and keep for future reference.
IF YOU HAVE ANY PROBLEM, ..; CONTACT US! www.grepool.com/en/after-sales
text_image
Warning symbols and icons including warning, human, no smoking, brain, monitoring devices, and a 'inundation' iconwww.grepool.com/it/post-vendita
VEILIGHEIDSINFORMATIE
service@aqua-fun.info
www.grepool.com
natural_image
Five architectural line drawings showing different building layouts or structures, each with a vertical panel and horizontal beam (no text or symbols)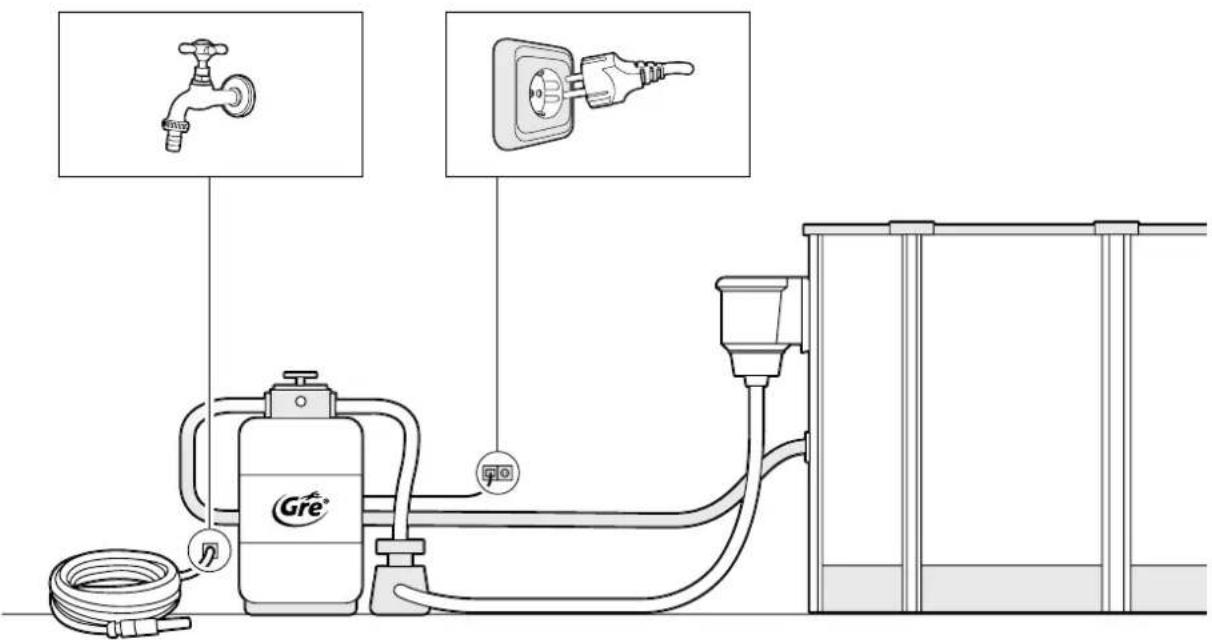
text_image
Diagram of a water pump system with labeled components including a faucet, plug, and hose connectionFN Installation place: Our pools are designed to be erected above ground and for an outdoor family use. The ground has to be firm, flat and perfectly horizontal. Remember: 1000 Its of water = 1 m3 = 1000 kgs.
Advices to choose the best location for your pool:
Select a place where you'll have to realize the least excavation to levelled the ground. Non easily inundated area in case of rain. Where there is not any underground convection (water, gaz, electricity...) Do not install it underneath electric line. Protected from wind and without any trees because the pollen and the leaves make the pool dirty. Sunny area, where the most sun is during the morning. Close to a water and power supply and drainage system. UNACCEPTABLE LOCATION: Sloping, uneven ground. Sandy, rock or soggy ground.
natural_image
Line drawings of various household cleaning and tools including gloves, tools, and a wheel (no text or labels)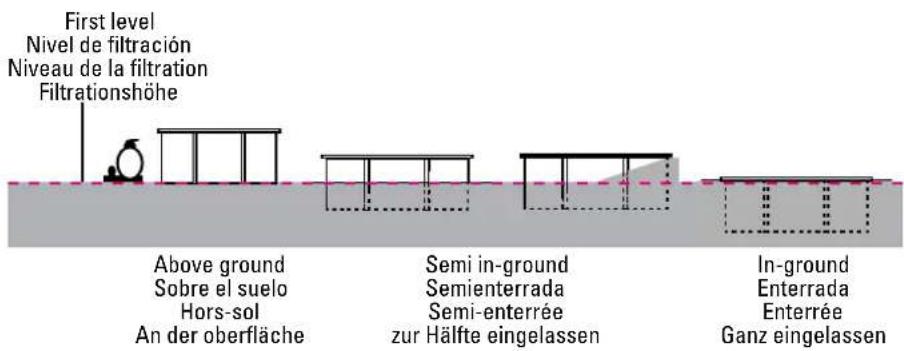
text_image
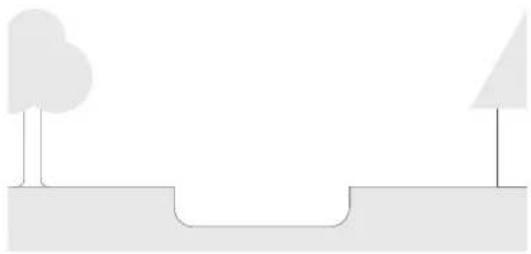
First level Nivel de filtración Niveau de la filtration Filtrationshöhe Above ground Sobre el suelo Hors-sol An der oberfläche Semi in-ground Semienterrada Semi-enterrée zur Hälfte eingelassen In-ground Enterrada Enterrée Ganz eingelassenEN This is a determining stage in the construction of your pool. Certain works performed in situ, like the preparation of the land, the concrete slab, the draining... can need the intervention of professionals that will propose the most adequate solutions.
Select the ideal location, in the sunniest spot possible, taking into account the local regulations (distance from the paths, public rights of way, networks...) and the landscaping after installing the pool. Decide the location by marking the ground, check the «Ground layout» section.
Your pool can be installed in these three ways:
Try to not install your pool on recently filled land or unstable land. Whatever type of installation you choose, you should excavate and prepare the land for levelling.
Attention: in the case that the land is sloping, you need to excavate it for levelling. Do not add soil to level it.
There are two options to assemble this pool: A- Install the pool directly on the ground B- Partial or completely in-ground installation. The installation of your pool requires preparing a concrete foundation slab reinforced with fibres or with welded lath.
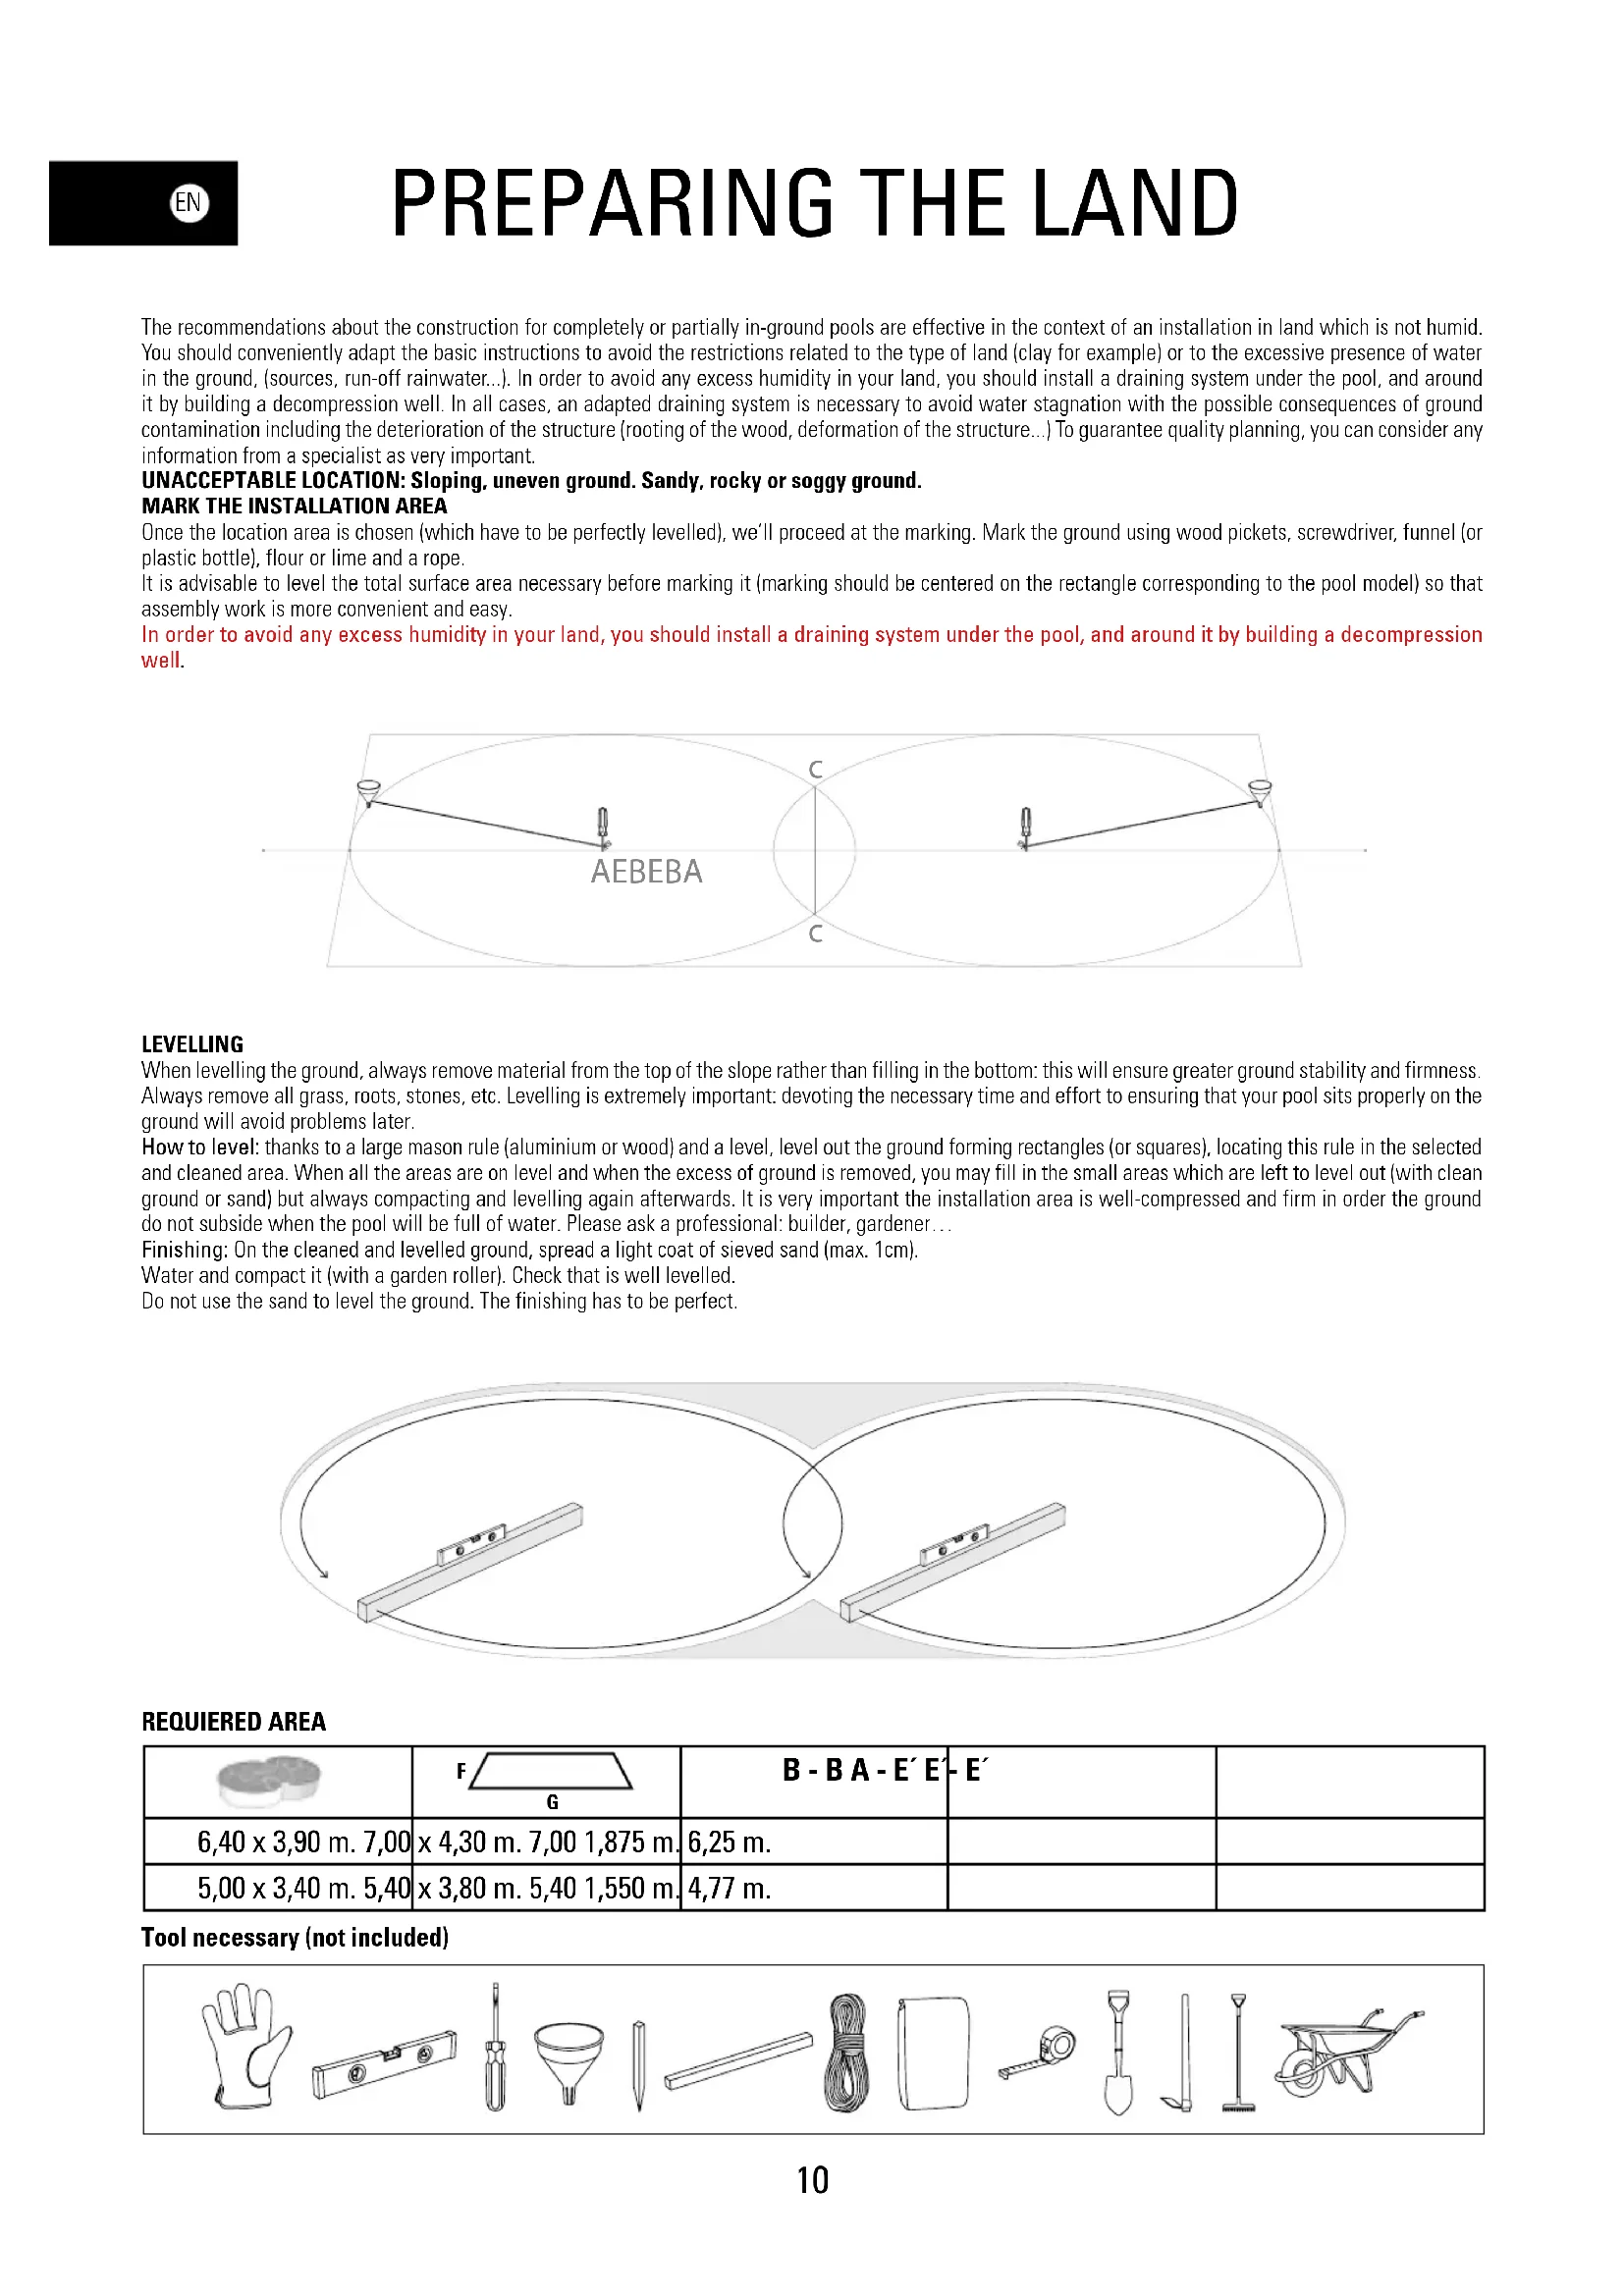
The recommendations about the construction for completely or partially in-ground pools are effective in the context of an installation in land which is not humid. You should conveniently adapt the basic instructions to avoid the restrictions related to the type of land (clay for example) or to the excessive presence of water in the ground, (sources, run-off rainwater...). In order to avoid any excess humidity in your land, you should install a draining system under the pool, and around it by building a decompression well. In all cases, an adapted draining system is necessary to avoid water stagnation with the possible consequences of ground contamination including the deterioration of the structure (rooting of the wood, deformation of the structure...) To guarantee quality planning, you can consider any information from a specialist as very important.
UNACCEPTABLE LOCATION: Sloping, uneven ground. Sandy, rocky or soggy ground.
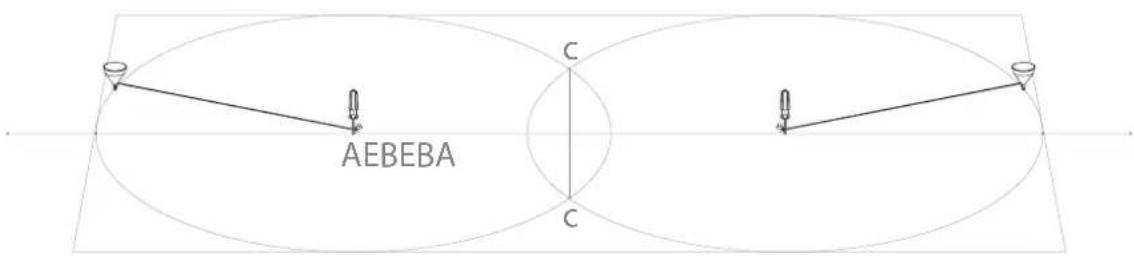
MARK THE INSTALLATION AREA
Once the location area is chosen (which have to be perfectly levelled), we'll proceed at the marking. Mark the ground using wood pickets, screwdriver, funnel (or plastic bottle), flour or lime and a rope.
It is advisable to level the total surface area necessary before marking it (marking should be centered on the rectangle corresponding to the pool model) so that assembly work is more convenient and easy.
In order to avoid any excess humidity in your land, you should install a draining system under the pool, and around it by building a decompression well.
text_image
AEBEBA C CLEVELLING
When levelling the ground, always remove material from the top of the slope rather than filling in the bottom: this will ensure greater ground stability and firmness. Always remove all grass, roots, stones, etc. Levelling is extremely important: devoting the necessary time and effort to ensuring that your pool sits properly on the ground will avoid problems later.
How to level: thanks to a large mason rule (aluminium or wood) and a level, level out the ground forming rectangles (or squares), locating this rule in the selected and cleaned area. When all the areas are on level and when the excess of ground is removed, you may fill in the small areas which are left to level out (with clean ground or sand) but always compacting and levelling again afterwards. It is very important the installation area is well-compressed and firm in order the ground do not subside when the pool will be full of water. Please ask a professional: builder, gardener...
Finishing: On the cleaned and levelled ground, spread a light coat of sieved sand (max. 1cm).
Water and compact it (with a garden roller). Check that is well levelled.
Do not use the sand to level the ground. The finishing has to be perfect.
natural_image
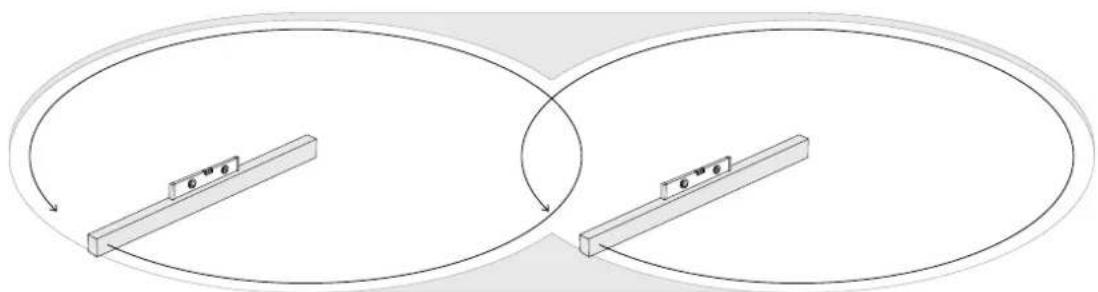
Diagram showing two parallel rotating frames with labeled 'e' and 'w' on each bar, no text or symbols present.REQUIRED AREA
We recommend you assemble the pool between two or three persons and on a wind-free day. The use of gloves for the installation is recommended for safety. THE ENTIRE PROCESS SHOULD BE CARRIED OUT ON FIRM AND LEVEL GROUND, BEFORE EXCAVATING THE FOUNDATION EXCAVATION OF THE FOUNDATION (Z) FOR THE COLUMNS (C): Dimension of the foundation:
Z = 430 × 15 × 15 ~cm Z = 380 × 15 × 15 ~cm
IMPORTANT: When excavating the foundation, the rectangular space reserved for situating the AP that should be buried 5 cm and transversally fixed with their respective PG should be excavated(*). All the structural system should be perfectly levelled (columns and internal structure, beams).
natural_image
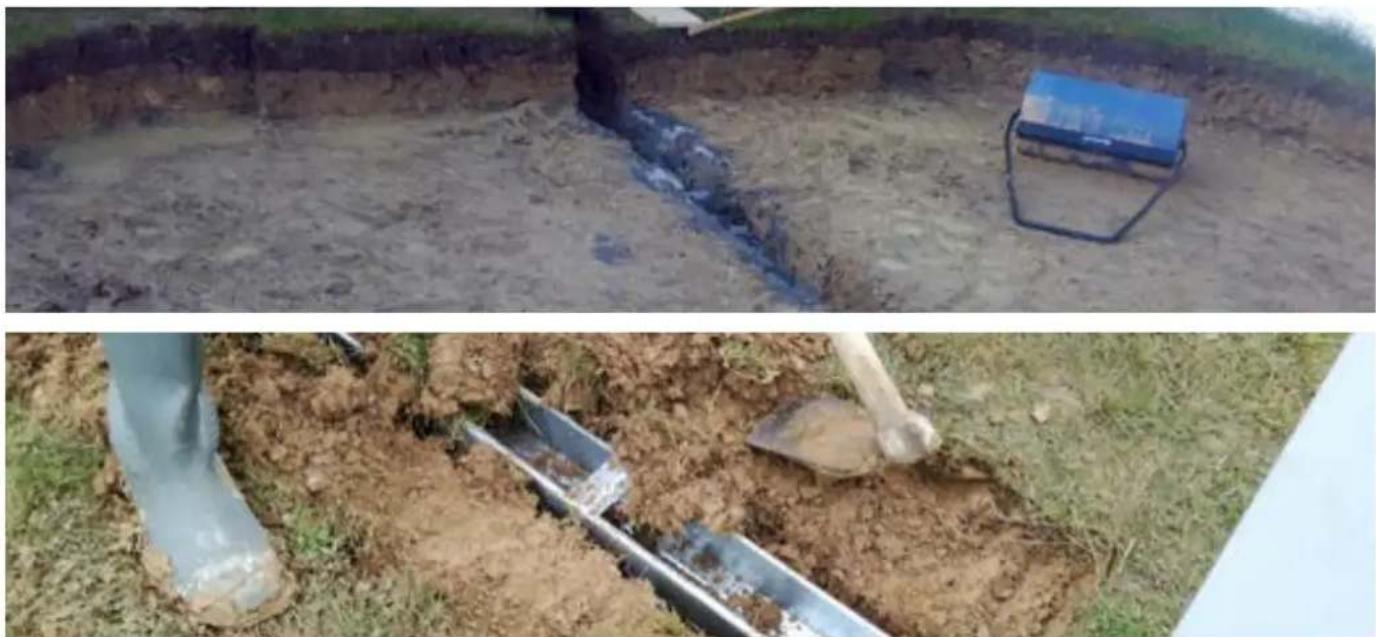
Two outdoor scenes: top shows a muddy trench with a blue container and a small container; bottom shows a metal tool inserted into soil with a shovel, no visible text or symbols.PARTIAL OR COMPLETELY IN-GROUND INSTALLATION
Bedding: (S) (Concrete):
When the excavation is level, lay the concrete bedding for the pool.

We recommend to ask a professional to prepare the foundation slab.
The concrete slab is not included.
Dosing 350 kg/m³(standardized type C125 430)
L: 7,00 x W: 4,30 x H: 0,15 m - 4,51 m3 concrete.
L: 5,40 x W: 3,80 x H: 0,15 m - 3,07 m3 concrete.
CAUTION:
Check that the surface is perfectly level and smooth. Any imperfection in the bedding will be visible when the pool is filled with water.
Before pouring the concrete, the structural system (columns and internal structure, beams) should be perfectly levelled)
After building the structure, the framework can be placed over it.
Make sure that the structure is well fixed to avoid its movement when pouring the concrete. The base of the structure should be completely covered, with 2 cm of concrete over the PEAO base.
If you are going to use a concrete slab, the flanges should not be installed (AP).
natural_image
Simple line drawing of a landscape with trees and a path (no text or symbols)
natural_image
Simple line drawing of a landscape with trees, a bridge, and a small structure (no text or symbols)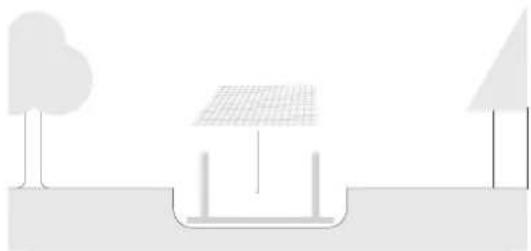
natural_image
Simple line drawing of a solar panel installation with trees and a ground support (no text or symbols)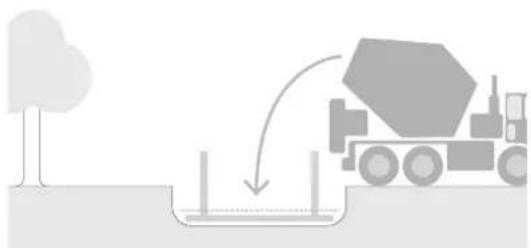
natural_image
Illustration of a construction scene with a crane lifting a concrete block, no text or symbols presentnatural_image
Diagram showing two parallel rotating rods with labeled 'θ' and directional arrows, no text or symbols present.AREA NECESARIA
natural_image
Exterior view of a construction site with exposed concrete and a blue equipment box (no signage or text visible)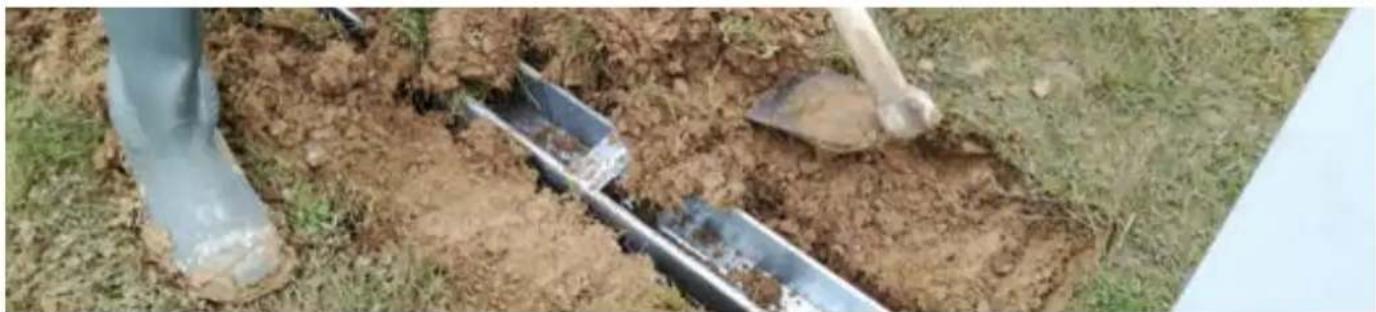
natural_image
Person digging with a metal tool in a muddy field, no visible text or symbolsnatural_image
Simple line drawing of a landscape with trees and a bridge (no text or symbols)
natural_image
Simple line drawing of a landscape with trees, a bridge, and a small structure (no text or symbols)
natural_image
Simple line drawing of a solar panel installation with trees and a bridge (no text or symbols)
natural_image
Illustration of a construction scene with a concrete mixer truck and tree (no text or symbols)TERRASSEMENT
natural_image
Diagram showing two parallel rotating frames with a central rectangular block, no text or symbols presentSURFACE NECESSAIRE
natural_image
Line drawings of various household tools including gloves, tools, and wheelwheels (no text or labels)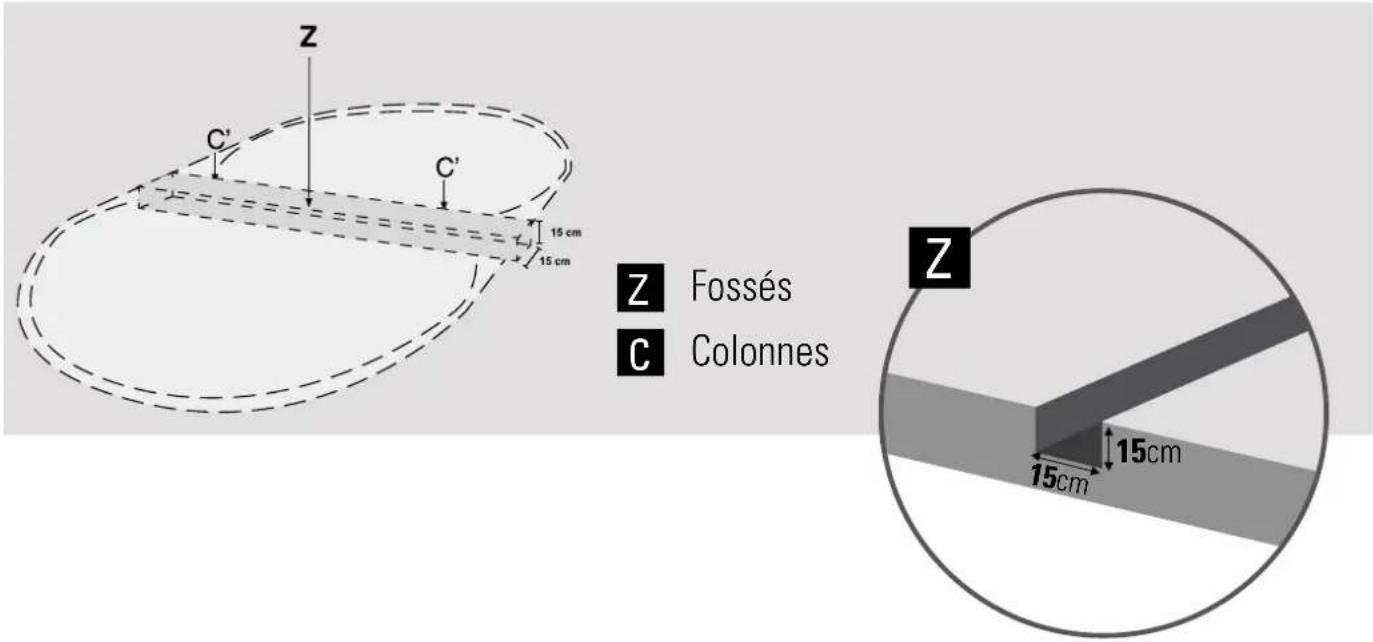
text_image
Z C' C' 15 cm 15 cm Z Fossés C Colonnes Z 15cm 15cmINSTALLER LA PISCINE DIRECTEMENT SUR LE TERRAIN
natural_image
Two outdoor scenes: top shows a pipe with wet ground and a blue container; bottom shows a metal tool inserted into soil with visible dust.INSTALLATION SEMI A TOTALEMENT ENTERREE
Base: (S) (Béton):
natural_image
Simple line drawing of a landscape with trees and a bridge (no text or symbols)
natural_image
Simple line drawing of a landscape with trees, a bridge, and a small structure (no text or symbols)
natural_image
Simple line drawing of a solar panel installation with trees and a bridge (no text or symbols)
natural_image
Illustration of a construction scene with a concrete mixer truck and tree (no text or symbols)GELÄNDEVORBEREITUNG
DE
natural_image
Diagram showing two identical rectangular blocks with circular arrows indicating rotation or interaction (no text or symbols)natural_image
Two outdoor scenes: top shows a muddy trench with a container and tool, bottom shows a metal tool inserted into soil with shovels (no visible text or symbols)natural_image
Simple line drawing of a landscape with trees and a valley (no text or symbols)
natural_image
Simple line drawing of a landscape with trees, a bridge, and a small structure (no text or symbols)
natural_image
Simple line drawing of a solar panel installation with trees and a curved structure (no text or symbols)
natural_image
Illustration of a construction scene with a concrete mixer truck and tree (no text or symbols)natural_image
Diagram showing two parallel rotating frames with a central rectangular block, no text or symbols presentSUPERFICIE RICHIESTA
natural_image
Line drawings of various household tools including gloves, tools, and wheelwheels (no text or labels)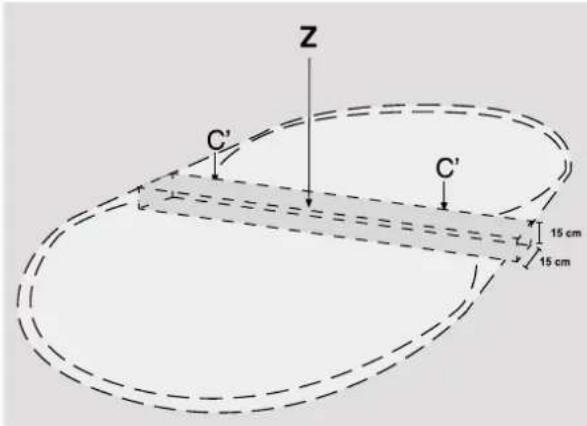
text_image
Z C' C' 15 cm 15 cmZ
Scanalature
C
Colonne

natural_image
Exterior view of a construction site with excavator and equipment (no signage or text visible)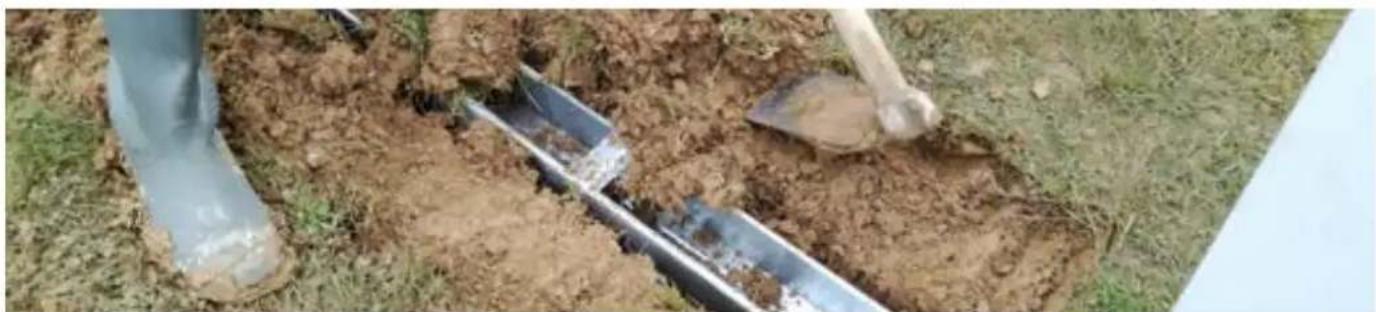
natural_image
Person digging with a shovel and metal tool in a muddy field (no visible text or symbols)INSTALLAZIONE PARZIALMENTE O COMPLETAMENTE INTERRATA
natural_image
Simple line drawing of a landscape with trees and a bridge (no text or symbols)
natural_image
Simple line drawing of a landscape with trees, a bridge, and a small structure (no text or symbols)
natural_image
Simple line drawing of a solar panel installation with trees and a fence (no text or symbols)
natural_image
Illustration of a construction scene with a concrete mixer truck and tree (no text or symbols)VOORBEREIDING VAN HET TERREIN
NL
natural_image
Diagram showing two parallel rotating frames with labeled control points (no text or symbols present)VEREISTE OPPERVLAKTE
natural_image
Exterior view of a construction site with concrete ground, a blue tool box, and a person operating equipment (no visible text or symbols)
natural_image
Person digging with a shovel and metal tool in a muddy field (no visible text or symbols)GEDEELTELIJKE OF GEHEEL VERZONKEN INSTALLATIE
natural_image
Simple line drawing of a landscape with trees and a path (no text or symbols)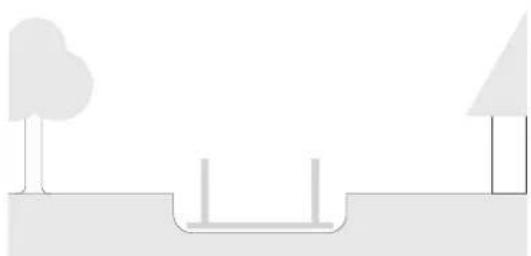
natural_image
Simple line drawing of a landscape with trees, a bridge, and a building (no text or symbols)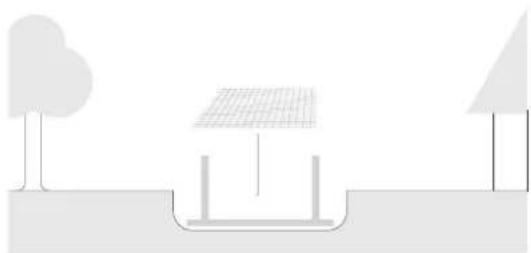
natural_image
Simple line drawing of a solar panel installation with trees and a ground support (no text or symbols)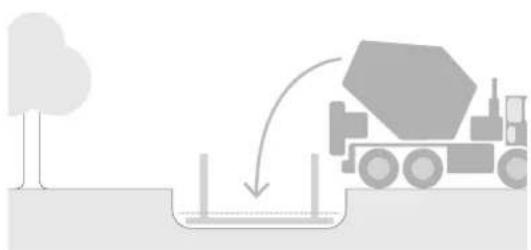
natural_image
Illustration of a construction scene with a concrete mixer truck and tree (no text or symbols)natural_image
Line drawings of various household tools including gloves, tools, and wheelwheels (no text or labels)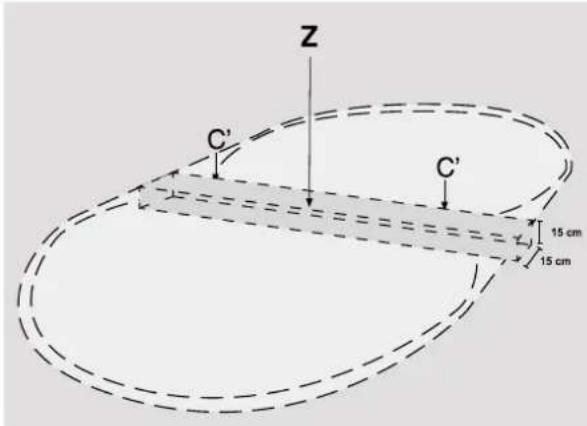
text_image
Z C' C' 15 cm 15 cmZ Escavaçao das valas
C Colunas

natural_image
Exterior view of a construction site with exposed concrete, a blue equipment box, and a person operating equipment (no signage or text visible)
natural_image
Person digging with a shovel and metal tool in a muddy field (no visible text or symbols)natural_image
Simple line drawing of a landscape with trees and a bridge (no text or symbols)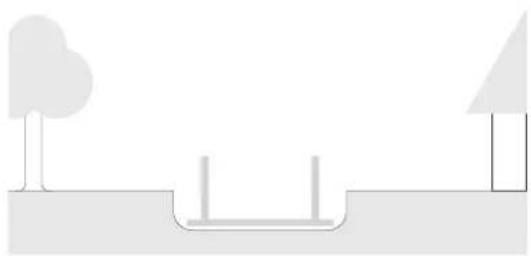
natural_image
Simple line drawing of a landscape with trees, a bridge, and a small structure (no text or symbols)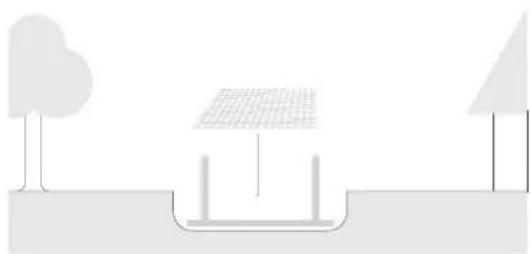
natural_image
Simple line drawing of a solar panel installation with trees and a bridge (no text or symbols)
natural_image
Illustration of a construction scene with a concrete mixer truck and tree (no text or symbols)
natural_image
Black-and-white exterior view of a modern building with outdoor seating and a swimming pool, featuring a metal staircase and potted plant (no visible text or symbols)3
 | 6,40 x 3,90 m. 5,00 x 3,40 m. | ||
 | 6,25 x 3,75 m. 5,00 x 3,10 m. | ||
| 1,05 m. 1,05 m. | |||
| m3 20,65 13,69 | |||
 | 2-3 2-3 | ||
 | 8h 7h | ||
COMPONENTS: Draw and classify all components included before assembly. It's time to assemble the ladder and the pump, follow the respective instructions. Kits with missing parts will be covered by the warranty only if reported to the after-sales service within 15 days as from the date of purchase of the swimming pool. In order to avoid any possible injury all swimming pool walking entrance must be regularly checked.
COMPONENTES: Saque y clasifique los componentes de la piscina antes de iniciar el montaje. Además es el momento de montar la escalera y la depuradora (vea sus respectivas instrucciones de montaje). La falta de piezas en el kit debe de ser informada al servicio postventa en un plazo máximo de 15 días desde la fecha de compra de la piscina, en caso contrario no estará cubierto por la garantía. Sin tener en cuenta los materiales usados para la construcción de la piscina, las superficies accesibles tienen que ser revisadas regularmente para evitar lesiones.
ELEMENTS: Avant de commencer le montage prenez et séparez les différents éléments qui constituent votre piscine. De même procedez au montage de l'échelle et de l'épuration (suivre leurs instructions d'installation et d'utilisation). Il faut signaler au service après-vente si le kit est incomplet (pièces manquantes), et ce, dans un délai maximum de 15 jours à partir de la date d'achat de la piscine. Si cette condition n'est pas respectée, la garantie ne sera pas valide. Quels que soient les matériaux utilisés pour la construction de la piscine, les superficies accessibles doivent être régulièrement contrôlees afin d'éviter les blessures.
BESTANDTEILE: Bestandteile vor dem Aufbau des Schwimmbeckens überprüfen und einordnen. Wenn Sie einen KIT erworben haben, bauen sie jetzt die Leiter und Filteranlage ein. ( Beachten Sie die Montageanweisungen ). Spätestens 15 Tage nach dem Pool-Kaufdatum ist der Mangel an Kit-Bestandteilen dem Kundendienst mitgeteilt zu werden. Andernfalls wird die Garantie unwirksam. Ungeachtet der Materialien, die beim Bau von Pools eingesetzt werden, müssen zugängliche Oberflächen regelmäßig überprüft werden, um Verletzungen zu vermeiden.
COMPONENTI: Estrarre e classificare i componenti della piscina prima di provvedere al montaggio della stessa. Allora è il momento di montare la scala e il depuratore (vedere le relative istruzioni per il montaggio). La mancanza dei pezzi nel kit deve essere informata al servizio post-vendita entro un massimo di 15 giorni dalla data dell'acquisto della piscina; in altro caso la garanzia non coprirà la mancanza. Indipendentemente dai materiali utilizzati per la costruzione della piscina, le superfici accessibili devono essere sottoposte a controllo periodico per evitare il rischio di lesioni.
NL ONDERDELEN: Pak eerst de onderdelen van het zwembad uit en sorteer deze al vorens met de montage te beginnen. Is dit het moment om de trap en de zuiveringsinstallatie te monteren (zie de respectievelijke instructies voor de montage daarvan). Het gebrek aan onderdelen in de kit moet maximaal binnen 15 dagen vanaf de datum van aankoop van het zwembad worden medegedeeld aan de service na aankoop; in het tegenovergestelde geval zal het gemis niet door de garantie worden gedekt. Ongeacht welke materialen er worden gebruikt voor de aanleg van het zwembad, moeten de toegankelijke oppervlakten regelmatig worden geïnspecteerd om eventueel letsel te voorkomen.
COMPONENTES: Tirar os componentes da piscina e classificá-los antes de começar a montagem. Monte durante esse tempo a escada e o equipamento de depuração (ver instruções de montagem respectivas). A falta de peças no kit deve ser informada ao serviço após venda num prazo máximo de 15 dias desde a data de compra da piscina, caso contrário não estará coberto pela garantia. Sem ter em conta os materiais utilizados para a construção da piscina, as superfícies acessíveis devem ser inspecionadas regularmente a fim de evitar lesões.
CH PV1235KIT - V PV1235KIT - V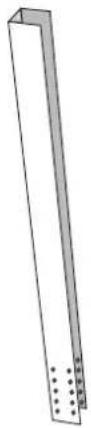 PGKIT - GE[IMAGE]APKITALETA PGKIT - GE[IMAGE]APKITALETA 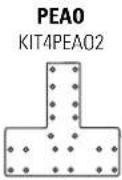 PEBP08KITNV PEBP08KITNV | LINER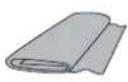 BG BG 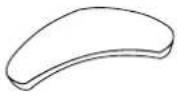 PU PU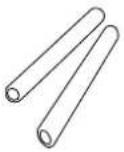 PIG PIG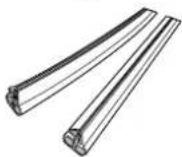 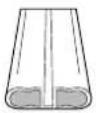 PGT PGT | TM6  TM640KITENV TM640KITENV 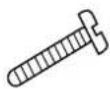 B2PIOGP B2PIOGP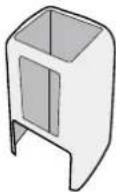 TVKITENV TVKITENV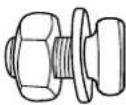 TPVCKITENV TPVCKITENV TCKITENV TCKITENV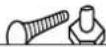 | 640 x 390 cm | 500 x 340 cm | |
| CH | 1 | 1 | |||
| PV1235 | 2 | 2 | |||
| PG | 2 | 2 | |||
| E | 2 | 1 | |||
| A | 1 | - | |||
| AP | 4 | 4 | |||
| PEAO | 8 | 8 | |||
| PEBP08 | 2 | 2 | |||
| LINER | 1 | 1 | |||
| BG | 2 | 2 | |||
| PU | 26 26 | ||||
KITOMEGASPEUKITENV[IMAGE] PIU PIU | PIG | 1 | 1 | ||
| PEUKITOMEGA | 8 | 4 | |||
| PEU2KITOMEGA | 4 | 4 | |||
| TM6 | 4 | 4 | |||
| TM640 | 4 | 4 | |||
| B2 | 2 | 2 | |||
| TV | 120 104 | ||||
| TPVC | 1 | 1 | |||
| TC | 32 32 | ||||
| PGT | 12 12 | ||||
| PIU | 12 12 | ||||
text_image
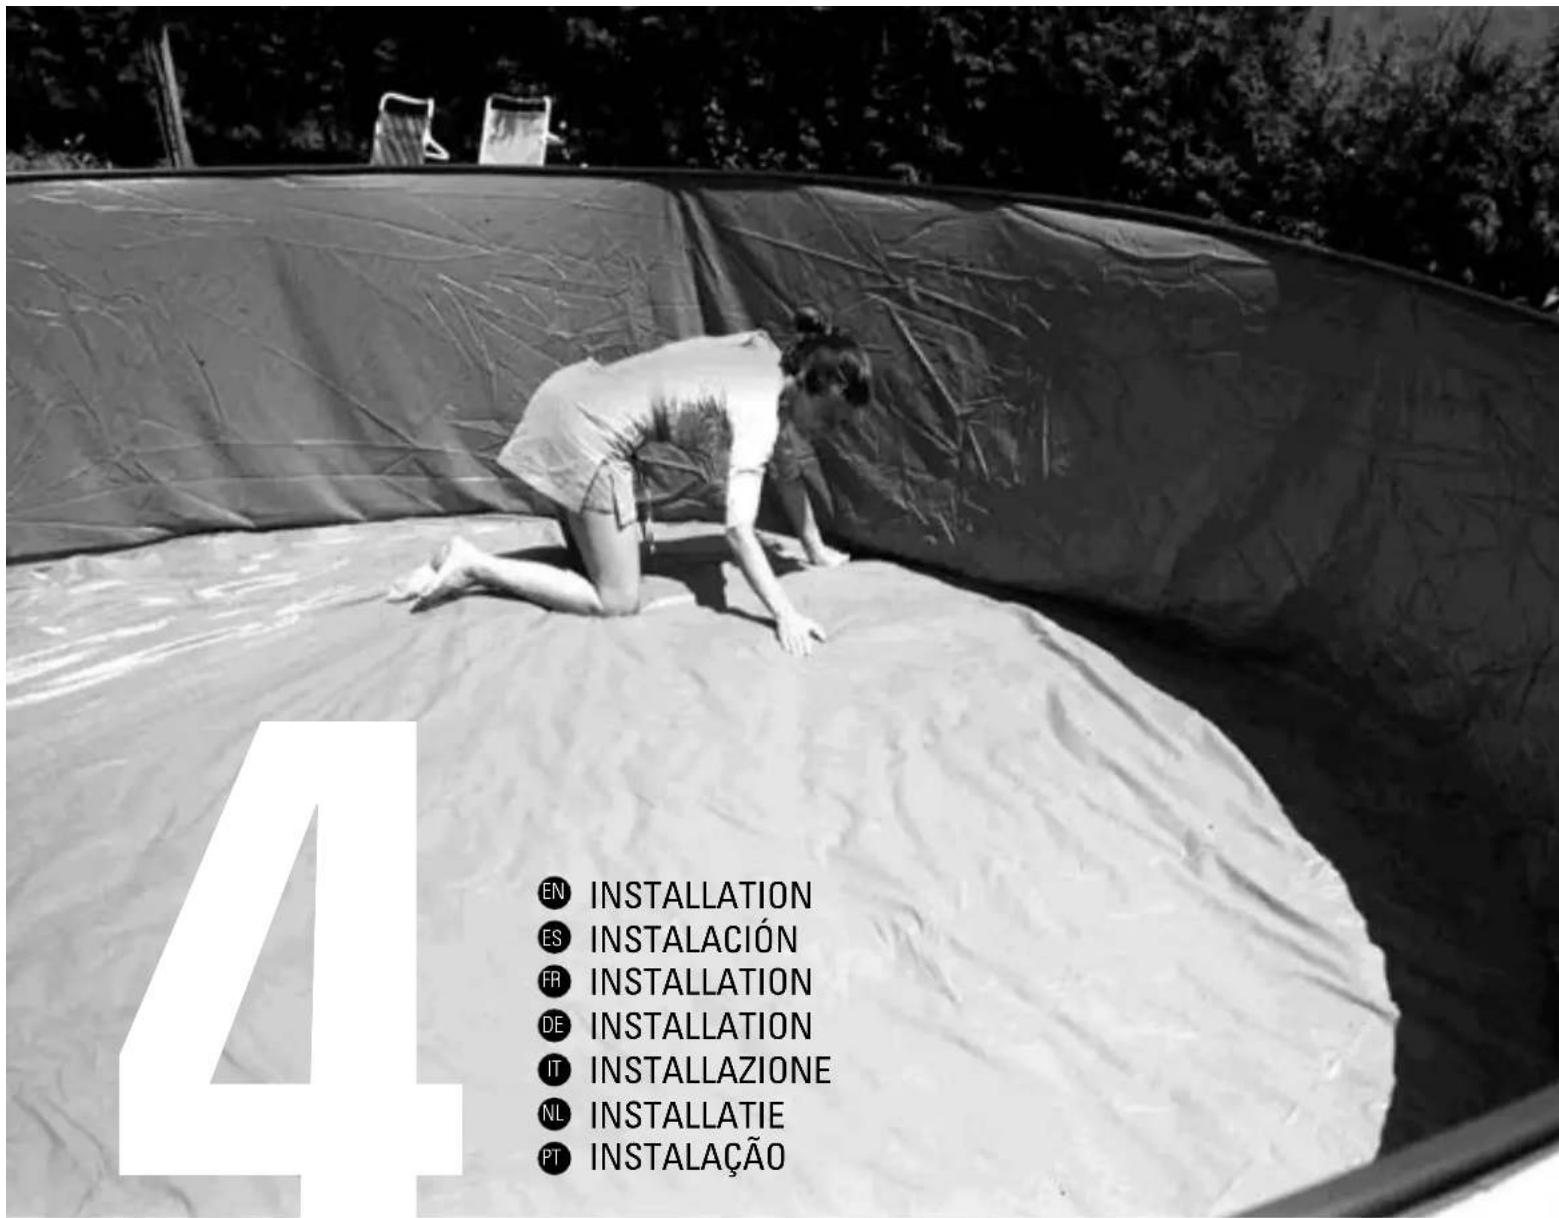
4 EN INSTALLATION ES INSTALACIÓN FR INSTALLATION DE INSTALLATION IT INSTALLAZIONE NL INSTALLATIE PT INSTALAÇÃOEN Important: The liner used in the manufacture of all our pools has been designed for exposure to heat and ultraviolet rays for a considerable period of time. However, under certain climatic conditions and use, the qualities of the liner may vary slightly. The inner liner of the pool is made from flexible PVC (thermoplastic). The characteristics of this material allow optimal conditions for installation when the outside temperature is between 15 and 25 °C.
Note: Temperature too low: hard and rigid liner; meaning, too small. Temperature too high: flexible and elastic liner; meaning too large.
EN It is essential to follow these three steps to achieve a correct assembly:
When closing the pool plate (CH) using the screws (TC), make sure the screw heads are facing inwards and the washer and the blind nut outwards (page 42). Tighten the screws without distorting the plate.
INSTALLATION OF THE SWIMMINGPOOL: WE RECOMMEND THAT THIS IS DONE BY TWO OR MORE ADULTS AND ON A DAY WITHOUT WIND. FOR YOUR SAFETY, IT IS VERY IMPORTANT TO WEAR GLOVES WHILE ASSEMBLING THE POOL.
EN ASSEMBLING THE STRUCTURE FOR FIGURE-OF-EIGHT SWIMMING POOLS
ALL OF THESE STEPS MUST BE CARRIED OUT ON FIRM, LEVEL GROUND BEFORE DIGGING THE CORRESPONDING TRENCHES. ALL OF THESE STEPS MUST BE CARRIED OUT ON FIRM, LEVEL GROUND BEFORE DIGGING THE CORRESPONDING TRENCHES.
Assemble the two uprights using the following parts: 1PV1235 + 1PG + 4PEA0 + 2 PEU2 and using TV screws. 1.- Fit the PEU2 piece so that the four holes on each lateral of the sides coincide with the second and third row of holes of the PG (see drawing 1b) and that each side with two holes remain on the top part. Do not screw the TV screws until fitting the PEA0 pieces.
2.- Fit the 2 pieces next to the PEAO on each side and on the outside of the PG bottom rail and screw them (with TV screws and N° 13 spanner). 3.- Fit the PV1235 piece. Insert another PEU2 piece from the top part until the lower part of the PV1235 upright, makes a barrier with the PG piece, and screw them with 4 TV screws on each side of the PEAO pieces.
ES MONTAJE DE LAS VIGAS PARA PISCINAS CON FORMA DE OCHO
REALICE TODOS ESTOS PASOS SOBRE UN SUELO FIRME Y NIVELADO ANTES DE HACER LAS RESPECTIVAS ZANJAS.
text_image
5 PG E A E TV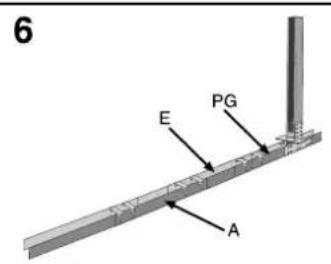
text_image
6 E PG AEN ASSEMBLING THE STRUCTURE FOR FIGUERE-OF-EIGHT SWIMMING POOLS
CROSS PIECES AND COLUMNS (C) ASSEMBLING: 2°.- Attach bottom rails E and A to the two uprights (depending on the model of the swimming pool).
4.- Take the type E bottom rail (according to swimming pool model) and hold in place the PG bottom rail with the PEU pieces and TV screws.
5.- Then take the type A bottom rail (according to swimming pool model) and hold in place with the bottom rail already placed (piece E) to the PEU pieces and TV screws. Do the same with the following type E bottom rail, which corresponds to the swimming pool.
6.- Finally, fit the other PG bottom rail with the PV1235 upright which has been previously assembled.
NOTE ref. 5,00 x 3,40 m: Between the PG bottom rails there is only one bottom rail (piece E) but the procedure is the same.
ATTENTION: The 2 small holes in the centre of bottom rail PG are to attach plate AP to the PEU pieces using 2 type TM640 screws.
ES MONTAJE DE LAS VIGAS PARA PISCINAS CON FORMA DE OCHO
EN - Put and install in the trenches (one or several), the cross pieces (one or several) according to the pool model. Control the levels.
- Fill up, pack and control the column levels in order they are well levelled.
- Place the pressure blades (AP) on the cross pieces using the screws (TM640). Size of the trenches: 2Z = 51 x 101.5 x 1.5 cm
IT IS IMPORTANT THE THE STRUCTURE IS LEVELLED WITH THE GROUND.
The pressure blade (AP) top must be flushed to the ground and perfectly horizontal. (under the ground)
NB: If the level controls of the columns (C) and pressure blade (AP) are not respected, the pool will not be mounted properly. Then, you will have to repeat the installation process.
Before fitting the plate, insert part B2 into the top of part PV1235. Repeat these steps for all PV1235 parts. FITTING THE WALL PLATING: To execute this operation, you must choose a day without wind. You must be at least 2 persons wearing gloves. We recommend to assemble the access ladder to the pool first, in order you can go in and out of the pool. Identify the skimmer and refulling pipe cuttings and place them face to dominating winds.
Fit the wall plating CH vertically on a piece of cardboard (to avoid damaging the area prepared for the installation (checking that the cut-out for the skimmer is at the top of the wall). DO NOT FULLY UNFOLD THE WALL PLATING as this may complicate assembly. Fit the end into place so that the skimmer cut-out is at the middle of one of the curved parts. Fit the wall plating all around the pool and screw the ends together, ensuring that the screw heads face inwards and the waschers and blind nuts outwards (Tighten the screws without distorting the material).
ES IMPORTANTE! ANTES DEL MONTAJE, DESBARBAR, CON AYUDA DE LIMA Y PAPEL DE LIJA EL BORDE DE LA CHAPA (CH).
Strip to the top nut and bend it in to the pool so that it covers the screw heads.
The Ground Cover or floor tapestry – Caution: Clean all dirt from the pool wall and bottom with a vacuum cleaner before placing the ground cover or floor tapestry in position. Fit the protective ground cover or floor tapestry in the interior of the pool and smooth out all the creases, adjusting and cutting away excess from the total surface area. Cut so that the bottom section pieces and the metal parts are covered. This way the liner will be protected when you install it.
ES TIRA DE PVC PROTECTORA:
NL BESCHERMSTROOK VAN PVC:
EN PVC LINER ASSEMBLY: Extend the liner (L) in the shade at least 2 hours prior to fitting so that it can recover its proper texture. Ideal temperature: in order to handle the liner more easily, ensure that it is fitted at an ambient temperature of between 15^ - 25^ . If the liner wall is over large at any point, distribute the excess evenly all around the pool to prevent wrinkles. If it seems too small, stretch it evenly around the pool perimeter. Place the liner (L) in the centre of the pool, and start by unfolding the bottom, following the main axi of the pool and pushing the side up against the wall plating. The seam between the bottom and the side must be butted against the base of the wall plating all around the pool bottom, to prevent folds. It is most important that the PVC liner be fully extended. THE LINER IS OVAL IN SHAPE, TO MATCH THE SHAPE OF THE POOL WALLS. IT CAN THEREFORE ONLY BE FITTED IN ONE POSITION. PROPER LINER PLACEMENT IS ESSENTIAL TO PREVENT FOLDS AND WRINKLES.
SERIAL NO: Locate it on the bottom or wall of the liner and write the serial No. in the box on the instruction sheet for possible claims.
natural_image
Illustration of a hand holding a tool or blade, showing internal structure and shading (no text or symbols)
natural_image
Technical line drawing of a mechanical component with layered structure (no text or symbols)EN A- After having positioned the liner, the next step is to position the rigid profiles (PIG) in the entire perimeter of the pool. We will start from the two columns.
B- Take 4 profiles and position two in each column. There is no need to screw them to the sheet panels. Only the liner must be fixed.
natural_image
Diagram of a mechanical or structural component with a curved top and flanged base, showing internal vertical lines (no text or symbols)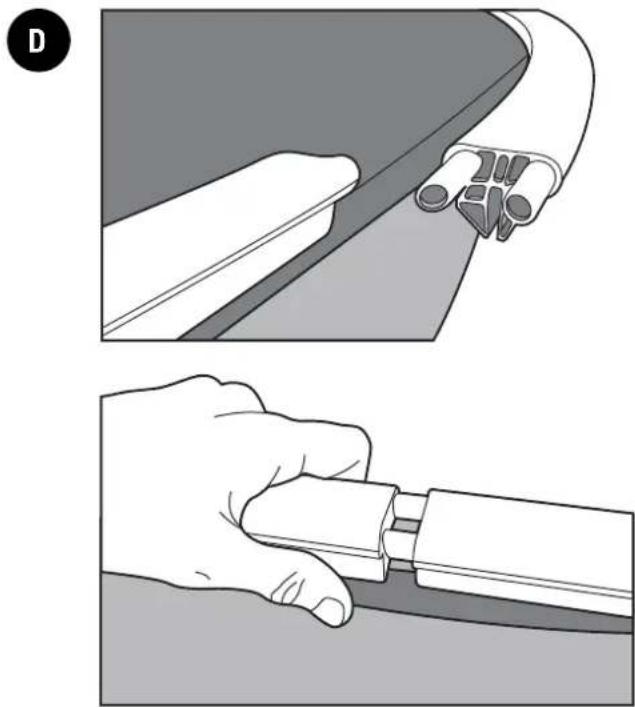
natural_image
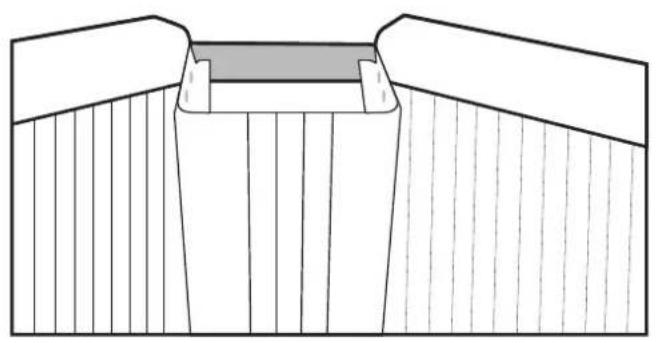
Illustration showing two-step procedure: adding a component to a device, then adjusting a tool (no text or symbols present)FN C- Position the trim or cover (BG) as shown in photograph C. it must be inserted into the column and close to the profiles (PIG) until they touch the trim at the lower part. If the pool is well assembled, it will fit perfectly. If you have problems to introduce the cover into the column, we suggest you use a file to achieve it.
D- Then, you must position the rest of profiles around the entire perimeter of the pool. They just be joined together with the PU pieces as shown in the image. You may need to cut off the PIG profile excess using a saw.
C- Coloque el embellecedor o tapa (BG) como se muestra en la foto C. Hay que insertarlo dentro de la columna y acercar los perfiles (PIG) hasta que toquen el embellecedor por la parte inferior. Si la piscina está bien montada encajará perfectamente. Si tiene problemas para introducir la tapa en la columna, le aconsejamos que utilice una lima para conseguirlo.
D- A continuación, tiene que colocar el resto de perfiles por todo el perímetro de la piscina. Debe unirlos entre sí con las piezas PU como se muestra en la imagen. Es posible que necesite cortar el exceso de perfil PIG con la ayuda de una sierra.
FR C- Placez la cache ou couvercle (BG) comme cela est indiqué sur la photo C. Il faut l'insérer dans la colonne et rapprocher les profilés (PIG) jusqu'à ce qu'ils touchent la cache par la partie inférieure. Si la piscine est correctement montée, l'emboîtement sera parfait. Si vous avez des problèmes pour introduire le couvercle dans la colonne, nous vous conseillons d'utiliser une lime pour y parvenir.
D- Ensuite, vous devez placer les autres profilés sur tout le périmètre de la piscine. Reliez-les entre eux avec les pièces PU, comme cela est indiqué sur l'image. Il peut être nécessaire de couper l'excès de profilé PIG avec une scie.
CE C- Platzieren Sie die Verkleidung oder Abdeckung (BG) wie in der Abbildung C gezeigt. Setzen Sie sie in die Säule ein und bringen Sie die Profile (PIG) näher heran, bis sie die Verkleidung unten berühren. Wenn der Pool richtig montiert ist, sitzt er perfekt. Wenn Sie Probleme haben, die Abdeckung in die Säule einzufügen, empfehlen wir Ihnen, dazu eine Feile zu verwenden.
D- Platzieren Sie als nächstes die restlichen Profile um den Umfang des Schwimmbeckens herum. Sie müssen mit den PU-Stücken wie auf dem Bild gezeigt zusammengefügt werden. Möglicherweise müssen Sie das überschüssige PIG-Profil mit Hilfe einer Säge zuschneiden.
C- Posizionare il bordo o la copertura (BG) come mostrato nella foto C. Deve essere inserito nella colonna fino e avvicinato ai profili (PIG) fino a toccare il rivestimento dalla parte inferiore. Se la piscina è ben assemblata, si adatterà perfettamente. Se si verificano problemi ad inserire la copertura nella colonna, le consigliamo di utilizzare una lima.
D- Successivamente occorre posizionare i restanti profili attorno al perimetro della piscina. È necessario unirli insieme alle parti in PU come mostrato nell'immagine. Potrebbe essere necessario tagliare il profilo PIG in eccesso con l'aiuto di una sega.
NL C- Bevestig de sierstrip of afdekking (BG) zoals te zien is op foto C. Je moet de sierstrip in de kolom steken en de profielen (PIG) naar elkaar toe brengen totdat ze aan de onderkant tegen de sierstrip komen. Als het zwembad goed in elkaar is gezet, zal alles perfect aansluiten. Als het in de kolom plaatsen van de afdekking moeizaam gaat, kun je het beste een vijl gebruiken.
D- Vervolgens moet je de rest van de profielen rondom de rest van het zwembadomtrek plaatsen. Deze moeten worden samengevoegd met de PU-delen zoals te zien is op de afbeelding. Het kan nodig zijn dat u het overtollige PIG-profiel moet inkorten met behulp van een zaag.
C- Coloque o embelezador ou tampa (BG) como mostrado na fotografia C. Deve ser inserido dentro da coluna e aproximar os perfis (PIG) até tocarem no embelezador na parte inferior. Se a piscina estiver bem montada, encaixará perfeitamente. Se tiver problemas para introduzir a tampa na coluna, aconselhamos que utiliza uma lima para consegui-lo.
D- Em seguida, deve colocar o resto dos perfis por todo o perímetro da piscina. Deve uni-los entre si com as peças PU, como mostrado na imagem. É possível que deva cortar o excesso de perfil PIG com a ajuda de uma serra.
natural_image
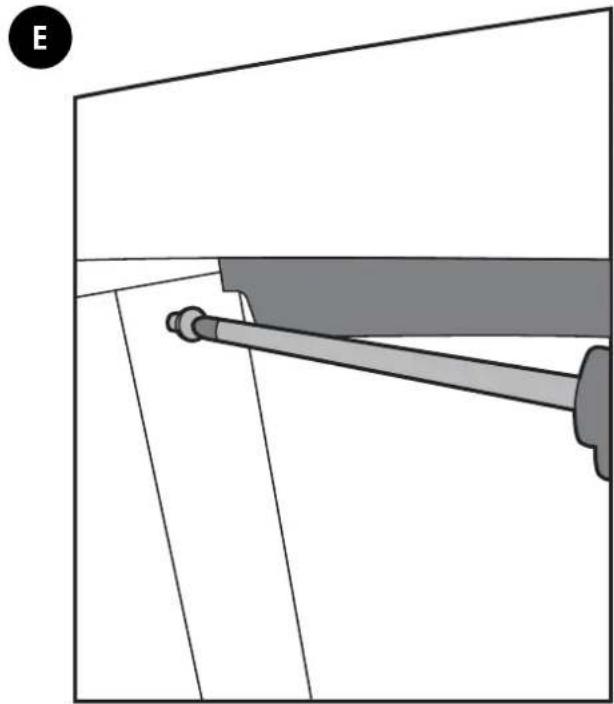
Diagram of a mechanical lever with a fulcrum and pivot, shown in perspective view (no text or symbols)E- In this last step we will definitely fix the cover. Find the T1 screws and put one at each side using a screwdriver.
E- En este último paso vamos a fijar la tapa de manera definitiva. Localice los tornillos T1 y coloque uno a cada lado con la ayuda de un destornillador.
E- Dans cette dernière étape, nous allons fixer le couvercle définitivement. Placez une vis T1 de chaque côté avec un tournevis.
E- Bei diesem letzten Schritt muss die Abdeckung endgültig befestigt werden. Setzen Sie die T1-Schrauben mit Hilfe eines Schraubendrehers auf jeder Seite ein.
E- In questo ultimo passaggio verrà fissata la copertura in modo permanente. Individuare le viti T1 e posizionarne una su ciascun lato con l'aiuto di un cacciavite.
NL E- In deze laatste stap wordt de afdekking definitief vastgezet. Zoek de T1-schroeven en plaats er aan elke kant één met behulp van een schroevendraaier
E- Neste último passo, devemos fixar a tampa de maneira definitiva. Localize os parafusos T1 e coloque um a cada lado, com a ajuda de uma chave de fendas
text_image
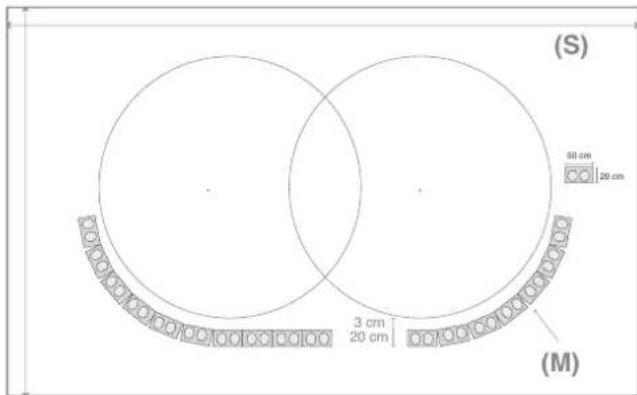
(S) 50 cm 20 cm 3 cm 20 cm (M)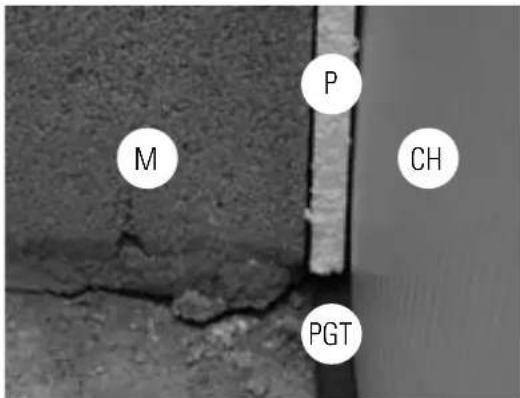
text_image
M P CH PGTEN PARTIAL OR COMPLETELY IN-GROUND INSTALLATION
Once pools are full of water, start to build the wall and install the 3 cm thick expanded polyester (P). The polyester is located between the extrusion profile where the panel and the wall are located. To install it use double faced adhesive tape All the holes of the panel should remain accessible and not be covered by the walls.
Important: Do not use the handrail (PM) to fix the panel to the wall, only for oval pools.
When the wall is finished, at least a week should pass for the concrete to dry.
Follow the instructions for your filter system.
This valve is located at the bottom of the pool wall, and water is returned to the pool through it after treatment in the treatment unit. Start pouring water into the pool through a garden hose, and stop 4 cm below the bottom of the valve hole (check the liner is clean before filling the pool). Mark the position of the hole on the liner with a felt pen and make a cross-shaped cut in the centre of the mark with a stanley knife or similar. Do not cut beyond the edge of the hole. Place inside the pool through the cut, with a seal (J) and a friction ring (F). Cut the protruding part of the liner. Fit the other seal (J) and the other friction ring (F) and tighten firmly with the nut (T). Insert the return hose (M) which goes from the outlet of the tratment unit to the return valve (V), and secure it with the clamp (A).
text_image
IN 4 cm S C A L X JEN ATTACHING THE SKIMMER BODY (S) TO THE OUTSIDE OF THE POOL:
Fill the pool with water until the level is 4 cm from the bottom of the perforation for the skimmer. Using a Stanley knife, cut the liner (L) inside the pool opposite the perforation. Locate the double seal (J) so that the wall plate and liner are within the groove (X) made for this purpose and fit the two shorter screws into the larger centre holes from the inside of the pool through the double seal and the liner. Screw them into the center holes on the skimmer (S). Cover the connecting bushing (C) and the water treatment unit inlet with Teflon. Screw the connecting bushing (C) tightly to the skimmer, connect one end of the hose to the skimmer connecting bushing (C) using a clamp (A), and fit the other end to the treatment unit inlet. Clamp this end also. NB.- Fit Teflon on all water hose connection threads to ensure leak-tightness.
Ensure that all holes are lined up properly (seal to wall plate perforation to skimmer). Screw 10 remaining screws loosely trough the frame to check that the fit is correct. Then tighten the screws a little more one by one in the order indicated. Finally tighten them fully in the same order. FINAL DETAILS: Clip the trim cover over the skimmer frame (Z). Put the gate (K) into the skimmer mouth and clip it in place by pressing the two ends. Fit the basket (O) inside the skimmer and finally fit the skimmer body cover (TS). FINISH FILLING THE
ES POOL TO HALF WAY UP THE SKIMMER MOUTH TO ENSURE THAT THE WATER ENTERS THE SKIMMERS.
natural_image
Illustration of a gas collection or storage apparatus with pipes and a container (no text or symbols visible)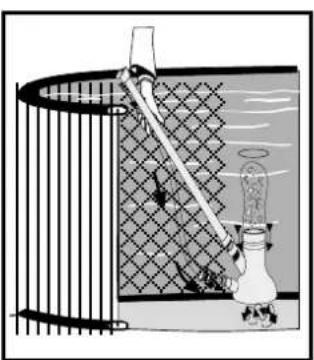
natural_image
Diagram of a water filtration or distillation setup with a vertical pipe and mesh chamber (no text or symbols)
text_image
D OK WATER Warning Warning Warning WATEREN RESPECT THE ENVIRONMENT
DO NOT TAKE APART THE POOL UNLESS IT IS STRICTLY NECESSARY. IF YOU DO SO, PLEASE REUSE THE WATER. WATER IS A SCARCE GOOD.
When your pool reaches the end of its useful life, it should be disassembled; the different materials (plastic and steel) should be separated and taken to the disposal point indicated by local
authorities.
MAINTENANCE AND USE:
- Switch on the filter system once a day in to insure a complete water volume renewal and never do it when somebody is in the pool (see filter manual).
- Check the filter's level of clogging regularly in summer when the pool kit is in use.
- Check screws, nuts and washers (for rust).
- The pool water level has always to be hold in a minimum of 15 cm from the pool superior edge.
- Never empty the pool completely. Low water levels may cause serious damage to the pool.
- Failure to comply with the maintenance instructions may lead to serious health risks, especially for children.
- The use of a swimming costume entails respect for the safety regulations set out in the maintenance and user guide.
- Never leave a pool kit empty on the ground, outdoors.
- Clean regularly the P.V.C liner and the water level mark with non-abrasive products. Regularly clean the fold joining the bottom to the side of the liner, as it is an area where dirt accumulates. If you do by accident a small hole in the liner, you can repair it thanks to our rubber patches AR202 or V12.
- The isothermic covers (for the summer) protect your pool from in sects, dust, leaves,... and avoid to loose the water temperature. Do always set it in order the bubbles are in contact with the water.
WINTER-SEASON:
A) IF YOU CHOOSE NOT TO DISMOUNT THE POOL:
1- Clean the liner bottom and sides with a non-abrasive product.
2- Treat the water with a chemical product for wintering. We recommend using LIQUID WINTERISER instead of floats with solid product to avoid discolouring the liner.
3- Leave the pool full of water considering:
a) For pools with skimmer and refulling pipe, reduce the water level 5 cm underneath the skimmer and close the refulling pipe with the screw tap which is included with the filter.
b) For pools with exhaustion and refulling pipes, reduce the water level 20 cm from the superior edge of the pool and close the pipes using the screw system incorporated.
4- Disconnect the pipes. Do not dismount the skimmer and the refulling and exhaustion pipes.
5- Protect the pool with a winter cover, and put a floating element between the cover and the water, in order to protect it from frost.
6- Filter: disconnect it from the pool. Clean it, empty the sand or remove the cartridge, dry it and keep it in a covered and sheltered from dampness place.
7- Accessories: remove every accessories (ladder, alarm, spotlight, pole...), rinse them with soft water and tidy them away.
TO RUN THE POOL AGAIN: Remove the winter cover, install the filter, change at least 1/3 of water and realize a chlorine treatment. Switch on the filter for at least 8 hours in an uninterrupted way, respecting the continuous working period indicated in the filter manuals.
B) IF YOU CHOOSE TO DISMOUNT THE POOL:
1- Empty the pool. Measures: Filter, Automatic pump for handling clean water or communicating vessels system. Communicating vessels system: Use the hose from your filter with the smallest cross-section. Fix a weight to one of its end and plunge it into the swimming pool. After this, sink the whole hose, until there is no air inside. With one hand, and under the water stop up hermetically the end of the hose and take it to the emptying point. Remove hand, and water will start running. Do not use this water for watering the plants, because it contains chemical products.
2- Clean every pool constituents with a sponge and a soap product with a neutral pH. Dry them and tidy them away in a dry and clean place.
That's normal that after having installed and dismounted the pool several times, the P.V.C liner dilate and loose its elasticity.
TO RUN THE POOL AGAIN: Read another time this manual instructions from the beginning.
CHIMICAL MEASURES:
Please read carefully the chemical product manufacturer instructions. WARNING: Keep chemical products in a clean, dry and out of children place. Important: Every products used have to be compatible with the P.V.C liner.
- First filling: Analyse the water pH and chlorine (Cl) and adjust them to the optimal levels: pH: 7,2 - 7,6; Chlorine: 0.5 - 2 ppm. - Chlorine treatments: Consist in increasing the chlorine level until approximatively 20 ppm to eliminate germs and seaweeds. This process has to be done only when the pool water comes from rivers or ponds, ... or if it stayed a long time without any treatments.
- Checking: Check at least once a week the chlorine levels (use a chlorine and pH analyser). In the same way, we advise to add an algicid to prevent seaweeds appearance. Never have a swim before the chlorine level stabilization. Do always use a floating dispenser for the chemical product (tablets) dissolution. The chemical product measuring out has to be done in accordance with: Your pool water volume, the bathe frequency, the climatic conditions, the water temperature and the location. Do always move the water and wait for the chemical product dissolution before adding another one. Wait approximatively 12 hours between any pH, chlorine or algicid adjustment using the filter system.
MECHANICAL MEASURES:
Check the filter, the skimmer, the valves and the pipes are well connected to the pool. Do consider high water temperature will involve more time for the filtering. Theoretic filtering time = Water volume / Filter system discharge (generally 8h/day with water temperature of 21°C), (Ideal: 2h in the morning – 4h around midday – 2h in the afternoon). PLEASE RESPECT THE CONTINUOUS WORKING PERIOD INDICATED IN THE FILTER MANUALS.
VACUUM CLEANER (MANUAL OR AUTOMATIC):
Only for pools with skimmer. Connect an hose extremity to the brush head and immerse it into the water to make it fill in. Connect the other pipe extremity to the exhaustion adapter (TA) and place it above the skimmer basket. Switch on the filter in the FILTER position and begin to clean the bottom. Pay special attention to areas with folds where dirt accumulates.
BOTTOM CLEANER VENTURY STYLE:
Connect a garden hose to the bottom cleaner join and introduce it into the pool. Open the tap until a normal pressure to make the water flow out against the bottom of the pool, producing in that way an ascendant stream which leave the dirt into the filter (bag) which is adjust on the bottom cleaner.
| PROBLEM CAUSE SOLUTION | ||
| Muddy water Bad filtration. | High PH. Organic residues in excess. | Perform a return was of the filter. Add PURIFIER in tablets using a dispenser. Perform a shock chlorinating. |
| Green water Seaweed or mud formation. | Gently clean the bottom and walls of the pool. Analyse the pH and adjust it to between 7.2 - 7.6. Add algicide and liquid purifier. | |
| Brown water Presence of iron or manganese. | Analyse the pH and adjust it to between 7.2 - 7.6. Perform a shock chlorinating. Add liquid purifier. | |
| Incrustations Presence of Calcareous in the water. | Analyse the pH and adjust it to between 7.2 - 7.6. Add anti-calcareous once a week. | |
| Eyes and skin irritations. Bad smell. | Misadjusted PH. Organic residues in excess. | Analyse the pH and adjust it to between 7.2 - 7.6. Perform a shock chlorinating. |

text_image
EMPTYING - COMMUNICATING VESSELS SYSTEM
text_image
D AGUA OK ! ! ! ! ?text_image
E DAU OK A A D N XFR RECOMMANDATION POUR L'ENVIRONNEMENT :
«NE DÉMONTEZ PAS LA PISCINE SI CELA N'EST PAS ABSOLUMENT NÉCESSAIRE. EN CAS DE DÉMONTAGE, NOUS VOUS PRIONS DE RÉUTILISER L'EAU. IL N'Y A PAS D'EAU EN TROP».
text_image
OK D WATERnatural_image
Line drawing of a portable vacuum cleaner with handle and control panel (no text or symbols)CLEANERS LIMPIAFONDOS ASPIRATEURS BODENREINIGER PLUSCI-FUNDOS BODEMREINIGERS LIMPA-FUNDOS
natural_image
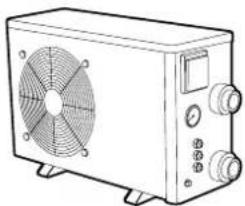
Line drawing of a portable electronic device with fan and control knobs (no text or symbols)HEAT PUMPS BOMBAS DE CALOR POMPES À CHALEUR WÄRMEPUMPE POMPAS DE CALORE WARMTEPOMPEN BOMBAS DE CALOR
natural_image
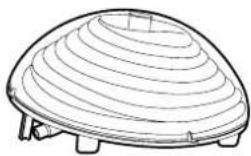
Line drawing of a dome-shaped object with concentric ridges and base legs (no text or symbols)HEATING SYSTEMS CALEFACCIÓN CHAUFFAGE HEIZUNG RISCALDAMENTO VERWARMING AQUECIMENTO
WATER TREATMENT
TRATAMIENTO DE AGUA
TRAITEMENT D'EAU
WASSERAUFBEREITUNG
TRATTAMENTO ACQUA
WATERBEHANDELING
TRATAMENTO DE ÁGUA
natural_image
3D diagram of a cylindrical tank with internal blades, placed on a flat base (no text or symbols)FLOOR TAPESTRY TAPICES DE SUELO TAPIS DE SOL BODENSCHUTZMATTE TELO DI PROTEZIONE BODEMBEKLEDING TAPETE DE SOLO
natural_image
3D diagram of a cylindrical container with internal structural framework (no text or symbols)ISOTHERMIC COVERS CUBIERTAS ISOTÉRMICAS COUVERTURES ISOTHERMES ISOTHERMISCHE ABDECKUNGEN COPERTURE ISOTERMICI ISOTHERMISCHE OVERTREKKEN COBERTAS ISOTERMICAS
natural_image
3D diagram of a cylindrical container with a flanged top and internal structure (no text or symbols)WINTER COVERS CUBIERTAS DE INVIERNO COUVERTURES POUR L'HIVER WINTERABDECKPLANEN COPERTURE INVERNALI WINTER-OVERTREKKEN COBERTAS DE INVERNO
natural_image
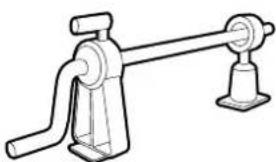
Line drawing of a mechanical lever mechanism (no text or symbols)COVER ROLLER FOR ABOVE ENROLLADOR CUBIERTAS ENROULEUR DE BACHE AUFROLLER FÜR ABDECKPLANE BOBINA TELONE AFDEKZEIL ROLLER VOOR ZWEMBADEN ENROLADOR DE COBERTURAS

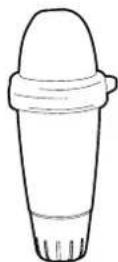
SOLAR SHOWERS
DUCHAS
DOUCHES
SOLARDUSCHE
DOCCIA SOLARE
DOUCHES
CHUVEIRO SOLAR


Guarantee card
Keep your manual with the purchase justification (payment receipt) for any type of reclamation.
Any reclamation against guarantee should be made by an online declaration, via the www.service-gre.com website, together with receipt of purchase. You may be asked for photographs to justify the claim. No returns of material will be accepted without previous agreement. The client will support all costs of all returns of goods. (packaging and transport).
AFTER VERIFICATION AND CONFIRMATION OF A MANUFACTURING DEFECT
The products that eectively show defects will be repaired or will be replaced free of transport costs.
The guarantee is limited to the repair or replacement of the defective part. It does not include, under any circumstance, the payment of compensation for harm and damages.
THE GUARANTEE IS NOT APPLICABLE IN THE FOLLOWING SITUATIONS:
- Use of materials that do not comply to our instructions.
- Damages caused by mishandling or an installation not complying with the instructions.
• The maintenance instructions were not followed. - Inappropriate or wrong use of the chemical product.
DURATION OF THE GUARANTEE:
IMPORTANT:
Manufacturas Gré interchanges components in exchange for others to be verified. If, after the verification no anomaly or dysfunction is detected, Manufacturas Gré reserves the right to invoice the client for the cost for transport and other diverse expenses.
Gre pools are subject to the legal 2- years guarantee established by the General Consumers and Users Defence Act counting from the date of purchase and according to the terms of the same. We remind you that for the guarantee to be applicable the purchase receipt should be presented and/or the return of the product. Manufacturers Gre also grant an additional 2-year commercial guarantee for this pool model, that is to say making a total of 4 years, exclusively regarding the metallic parts of the pool structure. This additional commercial guarantee will not act the rights of the consumer according to the legal guarantee.
The following is excluded from both guarantees:
• The PVC Liner, in the case of disassembly and re-assembly of the pool
• Stains or decolouring that can appear in the liner due to its use
- Damages to the pool derived from poor ground preparation where the pool is located
• Damage to the pool derived from burial of the same
- Any damage to the pool derived from misuse of the same, according to the instruction manual
Likewise, all plastic parts are excluded from the additional commercial guarantee, that is to say:
• Theliner
- Any decorative part
To be able to benet from the guarantee, your pool should include this document. Guarantee valid for pools sold after 1 January 2016.
- Liner: 2 years for the seams and water tightness in normal conditions of use. The guarantee does not include: Ripping, tears, breakages, stains (caused by pouring treatment products directly into the water), stains linked to the growth of algae, stains related to the decomposition of foreign bodies in contact with the liner, stains and decolouring resulting from the action of oxidising products, colour maintenance and wear due to friction of the material over diverse surfaces. Deformation of the liner that has been left without water for 24 hours (never completely empty the pool). You should keep the label with the serial number of the liner that is on the product and on its packaging. This number and a sample of the liner will be required for any eventual reclamation against the guarantee.
- Filter group: The pump has 2 years guarantee (electrical problem), in normal conditions of use. The guarantee does not cover breakage of parts (pump base/sand deposit, pre-Iter cover, multi-directional trap...), wear due to a poor connection, use of the pump without water, wear due to abrasion or corrosion (the Iter group should be located in a cool and dry position, kept protected from water splashing).
• Other components: 2 years.
THE FOLLOWING IS NOT INCLUDED IN THE GUARANTEE:
- Cuts in the liner
• The assembly and Iter connection - Theassembly
• The lling with water
• Installation of the edges - Thewintering
- Maintenance
AFTER SALES SERVICE WITHOUT GUARANTEE:
The guarantee is valid in all the UE countries, UK and Switzerland. GRE oers the buyer -in addition to the rights of guarantee from the seller that correspond by law and without limiting them- an additional right according to the conditions of the following obligations guaranteed for new products.
• In the case of problems, contact us: www.grepool.com/en/after-sales