
B32 - Blender JIMMY - Free user manual and instructions
Find the device manual for free B32 JIMMY in PDF.
| Product type | Blender |
| Brand | JIMMY |
| Model | B32 |
| Rated voltage | 220 V - 240 V ~, 50 Hz |
| Rated power | 700 W |
| Bowl capacity | 900 mL (max) |
| Noise level | < 88 dB(A) |
| Power cord length | 1.2 m |
| Bowl material | Glass |
| Number of speeds | 2 (level 1 and 2) + Pulse |
| Main functions | Mix, grind, crush ice, puree |
| Safety | Start-up protection if the bowl is not properly installed |
| Cleaning and maintenance | Removable blades for cleaning; bowl and accessories hand-washable; wipe the motor unit with a damp cloth |
| Included accessories | Mixing bowl (glass), outer lid, inner cap, measuring cup, instruction manual |
| Warranty | 2 years for the main unit, 1 year for accessories |
| Country of origin | China |
| Use | Household use only |
Frequently Asked Questions - B32 JIMMY
User questions about B32 JIMMY
0 question about this device. Answer the ones you know or ask your own.
Ask a new question about this device
Download the instructions for your Blender in PDF format for free! Find your manual B32 - JIMMY and take your electronic device back in hand. On this page are published all the documents necessary for the use of your device. B32 by JIMMY.
USER MANUAL B32 JIMMY
natural_image
Line drawing of a Jimmy blender with control knob (no text or symbols on the device itself)B32
Open the package, take out the foam pad, all accessories and machine from the package, take off the plastic bag and save them for the purpose of future maintenance and repair.
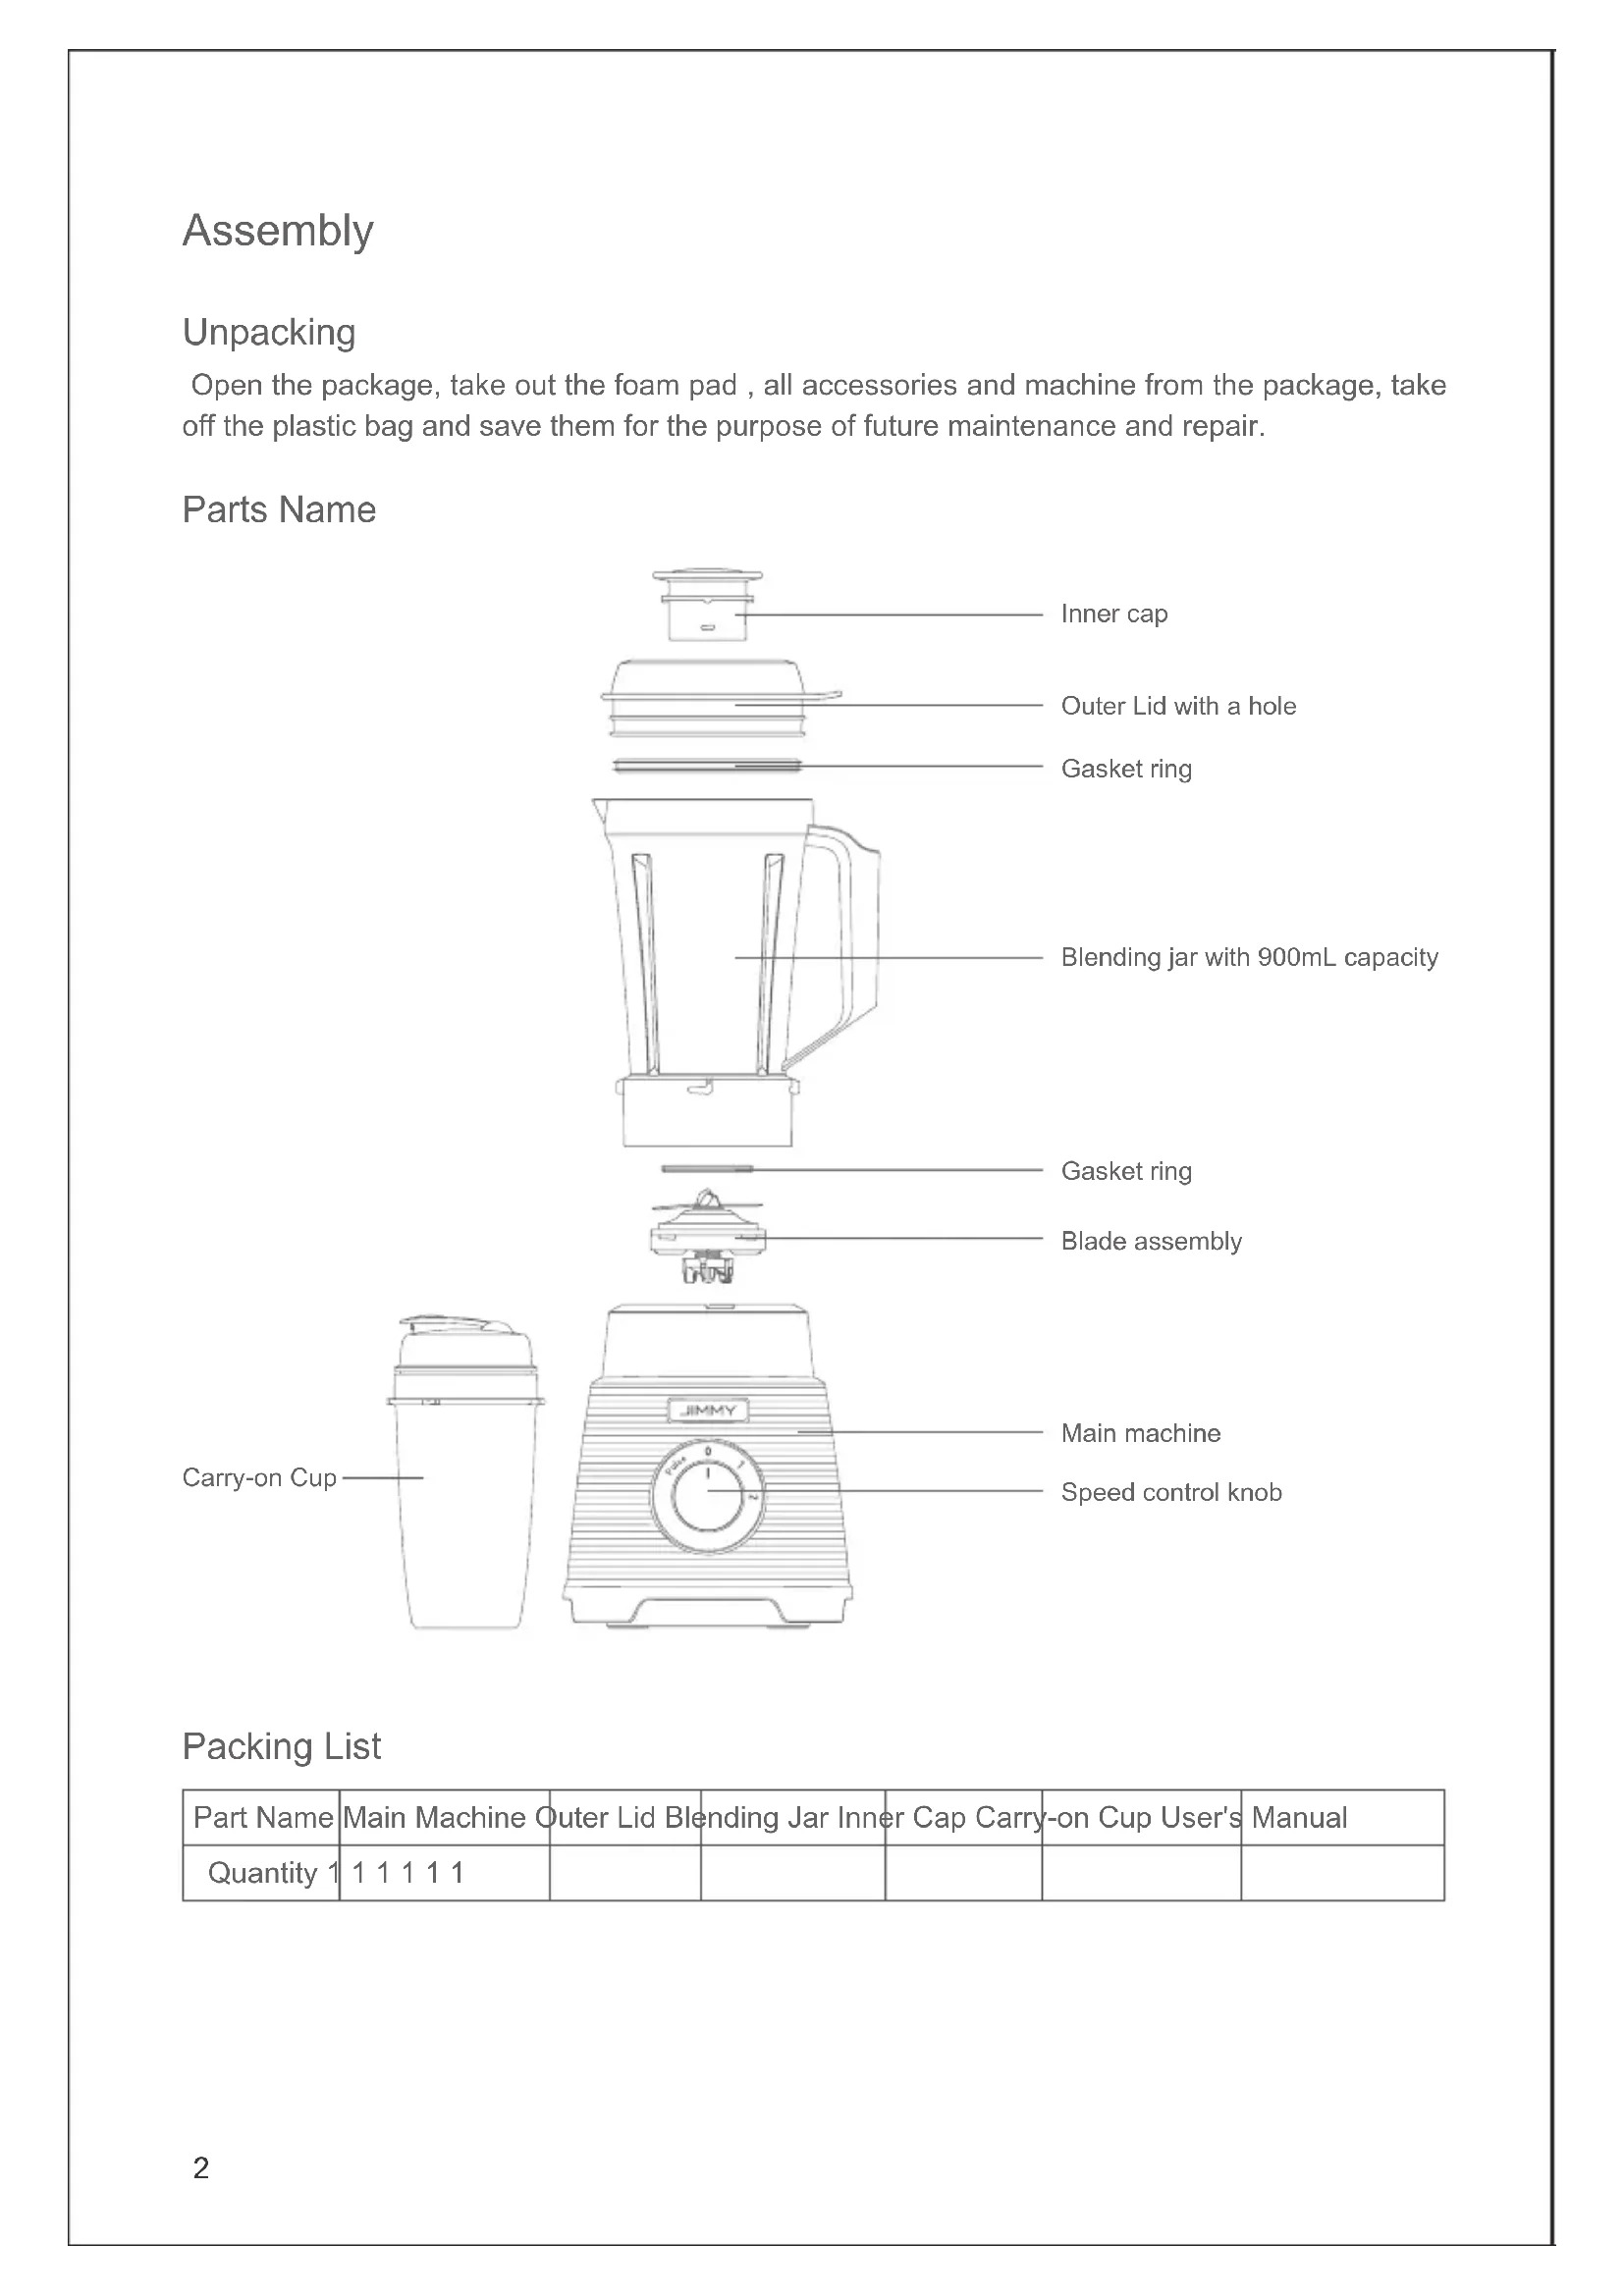
Parts Name
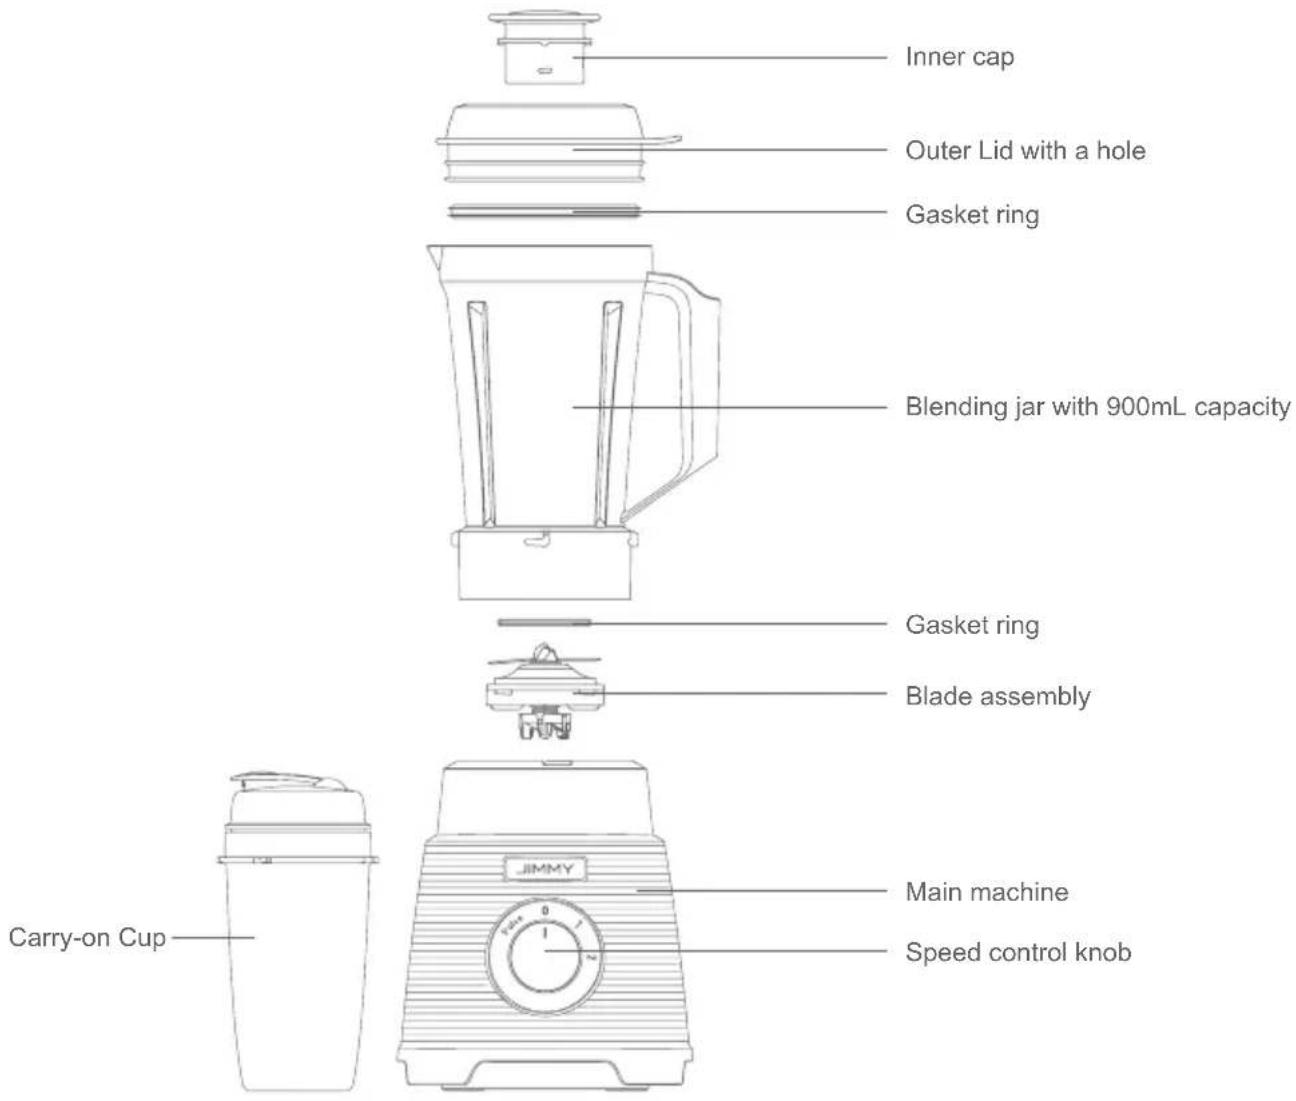
Packing List
| Part Name | Main Machine | Outer Lid Blending Jar Inner Cap Carry-on Cup User's Manual | |||
| Quantity 1 | 1 1 1 1 1 | ||||
Use of Product
Control Panel Instruction

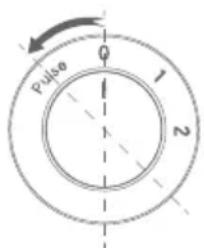
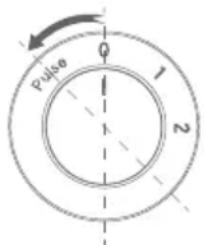
Speed Control Knob
After the power is connected, the user can use the "speed control knob" to adjust the speed by themselves according to different food materials, so as to process the food materials to the best effect.
Level "0": It's used to turn off the machine.
Level "1": Low rotation speed, used for stirring some soft fruits, such as tomatoes, watermelon, oranges, also used for crushing the boiled grains and beans.
Level "2": High rotation speed, used for crushing some hard fruits (such as carrots), grinding nuts, dried grains, dried beans, and crushing hard crystals (such as rock candies, ice cubes).
"Pulse": Used for pulse blending or cleaning the blending jar.
Operation Steps
Only when all parts of this product are installed correctly can they be used normally.
-
Place the blender on a stable table. To ensure safety, please check whether the speed control knob stays "0" before the power cord is plugged in. (Figure 1)
-
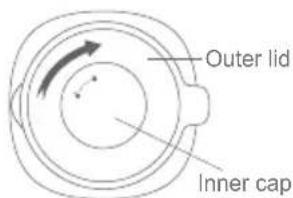
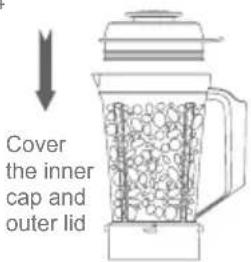
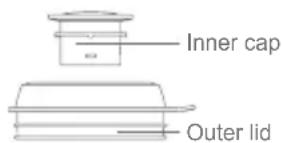
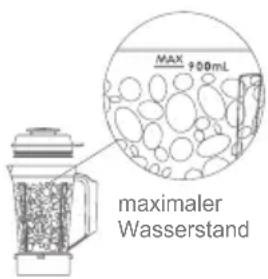
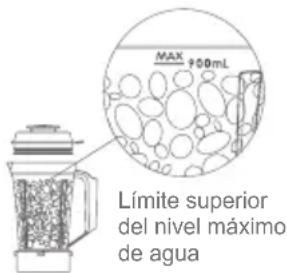
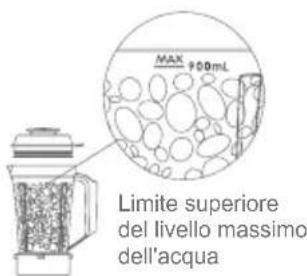
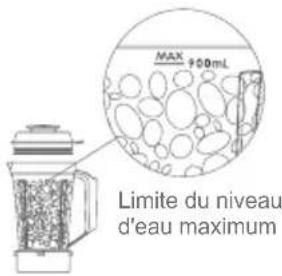
Put fruits, vegetables or other food material into the blending jar. The solid food material should be cut into 1\~2cm cubes, and be added appropriate amount of liquid (not less than 200mL). Cover the blending jar with the outer lid and the inner cap. (Figure 2, 3 & 4)
Notes: Liquid shall not exceed the upper limit of the maximum water level by 900mL.
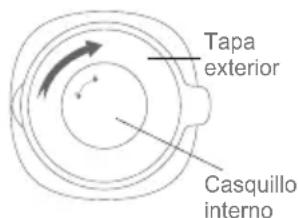
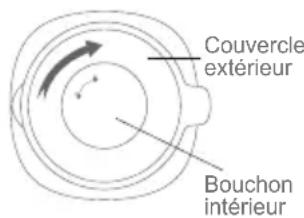
3.Aim the blending jar's bayonet at the main machine's bayonet, and place it vertically on the main machine, rotate it clockwise and finish the installation when a "click" sound is heard. (Figure 5)
1

natural_image
Line drawing of a blender with a power outlet and a small meter (no text or symbols)2

3
4
5
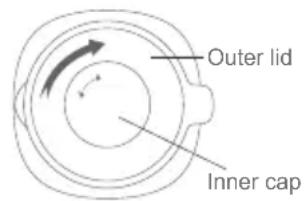
Rotate
clockwise
natural_image
Line drawing of a portable blender with a hand holding the lid and handle (no text or symbols)6

- Rotate the speed control knob the machine will start. You can adjust the rotation speed by switching between level "1" and level "2". (Figure 6)
Notes: Do not open the outer lid of the blending jar during stirring. Be sure to cover the inner cap tightly.
- After the food material processing is completed, rotate the speed control knob to level "0" to stop the operation.
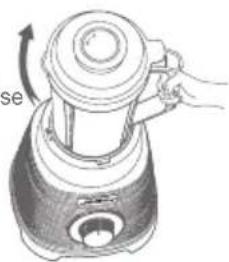
Notes: Please wait until the blade stops completely before removing the blending jar or lid from the machine (you can gently push the protruding edge of the lid above the blending jar mouth to open the lid).
- Unplug the machine when it stops running.
Notes:
- If the smoothie is to be made separately and there is no liquid in the jar, put no more than 10 ice cubes into the jar (the ice cube's size is about 2.5cm × 2.5cm × 2.5cm ). You can switch between "level 0" and "level 1" several times for better effect.
- The continuous working time of the machine is not allowed to exceed 90 seconds. If the food material is still not stirred well after 90 seconds, please turn off the power and continue to use after a rest of 3 minutes.
- Do not add more than 900mL of food material in the jar, as overload will affect the lifetime of the machine.
- During the operation of the product, do not open the lid or rotate to remove the jar. If you need to add fruits, vegetables or other food, please turn off the power and add ingredients after the blade stops completely.
- Do not add more than 200g of dry ingredients for grinding, otherwise the machine will be damaged.
Cleaning and Maintenance
Cleaning of Blending Jar
For your safety and health, please follow the following steps when using the machine for the first time.
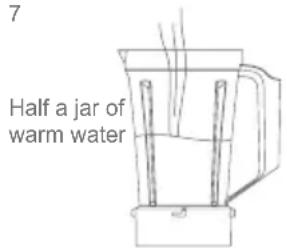
- Fill the jar with half the water and add a few drops of detergent. (Figure 7)
- Lock the outer lid and the inner cap tightly. (Figure 8)
-
Rotate the speed control knob to "Pulse" (Figure 9) and the cleaning starts.
-
Turn off the machine until it stops spinning and pour the liquid out of the jar.
Notes: When cleaning, do not touch the blade directly with your hands, in case the blade cuts your fingers.
You can also use tools to assist in cleaning.
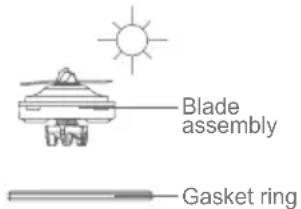
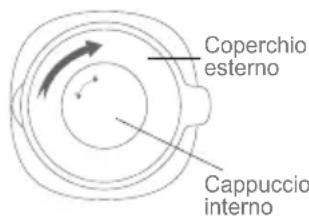
Cleaning of Inner Cap, Outer Lid, Blade Assembly and Gasket Ring
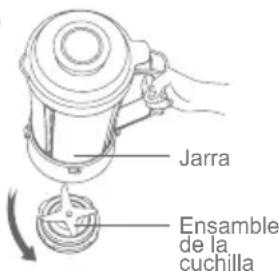
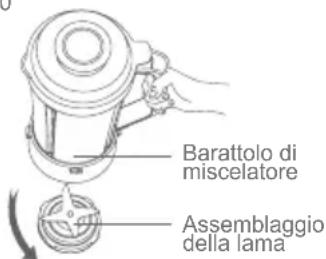
Notes: The blending jar and the blade assembly can be disassembled. First hold the jar body with one hand, and then rotate the blade assembly counterclockwise to open it for further cleaning.(Figure 10)
Separate the inner cap, outer lid, blade assembly and gasket ring. Wash them with
7
8
9

10

detergent in warm water, and then rinse them with flowing water and dry them (Figure 11). Please reinstall before using.
Cleaning of Main Machine
- Unplug before cleaning.
- Soak a piece of soft cloth or sponge with the mixture of detergent and warm water, then clean the outer surface of the main machine with the soft cloth or sponge. Do not put the main machine directly in water to wash or rinse directly with water. (Figure 12)
- Thoroughly clean the panel, speed control knob to ensure its flexible operation. If any liquid or sticky substance sticks to the surface of the main machine during operation, please remove it immediately.
Notes: Use soft cloth to wipe, so as not to scratch the appearance of the host. Do not use corrosive detergent or liquid to clean, and wait for the main machine to dry thoroughly before storage.
11
12

natural_image
Line drawing of a hand holding a kitchen blender with a control knob (no text or symbols)Recipe
| Name of Beverage Food Material Operation Steps | ||
| Orange Juice | Orange 330g, honey 2 tablespoons, 5-6 ice cubes, cold water 180mL | 1. Peel the orange and divide it into four halves.2. Put ingredients into blending jar, add honey and ice cubes, and pour 180mL of cold water (adjust as needed).3. Close the lid, plug in the power, and select level "2" for about 40s before turning off the machine. |
| Carrot Cranberry Juice | Carrot 110g, pineapple 250g, cranberry 1 tablespoon (about 10g), 5-6 ice cubes, cold water 180mL | 1. Wash and peel carrot and pineapple and cut into pieces.2. Put ingredients into blending jar, add dried cranberries and ice cubes, and pour 180mL cold water (adjust as needed).3. Close the lid, plug in the power supply, select level "2" running about 60s then close the machine. |
| Celery energy soup | Pea seedling 10g, celery 60g, apple 1 (about 170g), pineapple 100g, mixed nuts 1 tablespoon, cold water 500mL | 1. Wash celery, apple and pineapple, peel and cut into pieces.2. Put ingredients into blending jar, add nuts, and pour 500mL cold boiled water (adjust as needed).3. Close the lid, plug in the power supply, select level "2" running about 60s then close the machine. |
| Papaya milk | Papaya 250g, fresh milk 360mL, 5-6 ice cubes | 1. Place ingredients in blending jar and add ice.2. Close the lid, plug in the power supply, select level "2" operation and turn off the machine after 60s |
| Red bean milk smoothie | Honey red bean (about 200g), 90mL of milk, 8-10 ice cubes | 1. Place ingredients in blending jar and add ice.2. Close the lid, plug in the power supply, and use level "1" to run for 4s, then turn to level "0" and then turn to level "1". After running for a total of 10 cycles, turn off the machine. |
| Peanut Butter | Cooked peanut 200g, small particles (less than 1cm^3 ) rock sugar or yellow granulated sugar 1 and a half tablespoons, olive oil 100mL | 1. Put the ingredients into blending jar and add the olive oil.2. Close the lid, plug in the power, select level "2" to run 10s, and then use level "1" to run about 60s before turning off the machine. |
| Banana milkshake | 240g peeled banana, 500g yogurt (refrigerated) | 1. Peel and cut bananas into slices. Place in blending jar. Add yogurt.2. Close the lid, plug in the power supply, and choose level "2" to run for about 30 seconds before turning off the machine. |
Notes
Please read this manual carefully before use and keep it for future reference. This product is only for general household use.
Before connecting the product to the power supply, please confirm whether the voltage marked at the bottom of the main machine is consistent with the local power supply voltage.
Please stop using the product when the power cord, plug or other parts are damaged.
Do not allow children or people without independent capacity or relevant experience to use this product alone.
If the power cord is damaged, it must be replaced and repaired by a professional from the manufacturer's maintenance department or similar department to avoid danger.
Do not use this product on the surface with water or uneven surface. Do not allow the jar body, host or power cord to touch the hot surface.
Do not exceed the maximum volume marked on the jar body when using.
Please operate when the outer lid and inner cap are in place. Only remove the cap when adding the ingredients. Turn off the machine until the blade stops running completely, then remove the jar from the main machine. Do not touch moving parts.
Do not leave foreign objects (such as spoons, chopsticks, forks, etc.) in the blending jar. If there is any foreign objects in the jar when starting the machine, it will damage the machine and may cause personal injury.
Do not use accessories or components from other manufacturers or from non-recommended manufacturers.
Before each use of the machine, check the jar body and the blade. If you find any cracks in the jar body, loose blade or damage, please do not use this product again and contact the nearest service center.
Take extra care of the blade when emptying or cleaning the jar to avoid injury.
Do not put your hands or other objects into the jar during stirring to avoid personal danger or machine damage. Before removing the jar body for cleaning, the jar body can only be removed from the machine until the blade stops rotating completely.
Be sure to unplug the product after use.
Do not immerse the main machine in water or other liquids, and do not flush the body to prevent electric shock.
When preparing oily foods or grinding dry ingredients, the mixture should be continuously stirred in the jar for no more than 60 seconds. Stirring too long may damage the jar or cause the motor to overheat.
Trouble Shooting
Please check the following issues before sending to designated repair offices.
| Symptoms Possible Causes Solutions | ||
| The blender doesn't work | Not connected to the power supply | Plug the power into a suitable socket |
| The blender is equipped with protection function. If the jar is not properly installed on the main machine, the blender will not work | Installed the blending jar into position | |
| Ingredients cannot be stirred or the rotation is not stable | Food dices are too big | Cut the food materials into even small pieces |
| Not adding liquid before processing or not adding enough liquid | At least 200mL of liquid should be adde | |
| Too much solid food | Reduce the proportion of solid foods | |
| Smells weird | It runs too long time | Don't let the machine run too long time |
| Too many ingredients in t the blending jar | Pay attention to the appropriate proportion of feeding | |
| Crushing effect is not good | Too little liquid or water is added | At least 200mL of liquid should be added |
| Too much solid food is added | Reduce the proportion of solid food | |
| Too much food to be stirred | Stir food no more than 900mL | |
| There is an outflow of fluid during the operation | Blade assembly is not tightened | Install the blade assembly into position |
| The balde"s gasket ring is not installed in position | Install the gasket ring into position | |
| There's liquid outside the jar | Dry the outside of the blending jar | |
| The lid's gasket ring is not installed in position | Install the gasket ring into position | |
If any other failures occurred, which need professional tools, in order to avoid danger, the machine must be repaired or replaced by manufacturer, other maintenance offices or professionals from similar offices.
Product Specification
Technical Parameter
| Model No. | B32 |
| Rated Voltage 220V-240V~ | |
| Rated Frequency 50Hz | |
| Rated Power 700W | |
| Capacity 900mL | |
| Noise Level <88dB(A) | |
| Power Cord Length 1.2m |
Manufacturer Information
| Manufacturer Kingclean Electric Co., Ltd | |
| Address | No.1 Xiangyang Road, Suzhou New District, Jiangsu Province 215009, China |
Disposal
The machine, accessories and packaging should be sorted for environmental-friendly recycling.

Do not dispose of the machine into household waste!
Subject to change without notice.
Warranty Information
This product enjoys two-year warranty for the main machine and one-year warranty for the accessories. Service starts from the date of purchase.
Excluded from the guarantee is normal wear, commercial use, alterations to the appliance as purchased, consequences of improper use or damage by the purchaser or a third person, damage, that can be attributed to external circumstances.
Baugruppe
Auspacken
natural_image
Line drawing of a blender with a power outlet and a small paper label (no text or symbols on the device itself)2
3

natural_image
Illustration of a hand pressing down on a kettle with an arrow indicating rotation (no text or symbols)6

natural_image
Line drawing of a hand operating a JIMY blender with a control knob (no text or symbols on the device itself)Kochrezept
natural_image
Line drawing of a blender with a power outlet and a small paper label (no text or symbols on the device itself)2
natural_image
Illustration of a portable blender with a hand adjusting its lid (no text or symbols visible)6

natural_image
Line drawing of a blender with liquid and two handles (no text or symbols)8
9
10
natural_image
Line drawing of a blender with a power cord and a small battery (no text or symbols)2
natural_image
Line drawing of a hand operating a portable kitchen blender with a scroll wheel (no text or symbols)6

natural_image
Line drawing of a blender with liquid and two handles (no text or symbols)8
9
10
natural_image
Line drawing of a hand operating a kitchen blender with a control knob (no text or symbols)Separare capsula interna, coperchio esterno,
natural_image
Line drawing of a blender with a power outlet and a small paper label (no text or symbols on the device itself)2
natural_image
Illustration of a hand holding a portable kettle with a handle, showing internal components and a scroll (no text or symbols)6

natural_image
Line drawing of a blender with liquid and two handles (no text or symbols)8
natural_image
Line drawing of a hand holding a kitchen blender with a control knob (no text or symbols)natural_image
Line drawing of a blender with a power cord and a small screen labeled A and B (no text or symbols on the device itself)2

7

natural_image
Line drawing of a hand holding a small object over a washing machine (no text or symbols)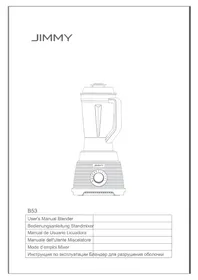

- Use of Product
- Control Panel Instruction
- Speed Control Knob
- Operation Steps
- Notes:
- Cleaning and Maintenance
- Cleaning of Blending Jar
- Cleaning of Inner Cap, Outer Lid, Blade Assembly and Gasket Ring
- Cleaning of Main Machine
- Notes
- Trouble Shooting
- Product Specification
- Disposal
- Warranty Information
- Baugruppe
- Auspacken
Brand : JIMMY
Model : B32
Category : Blender