622 - Measuring equipment Testo - Free user manual and instructions
Find the device manual for free 622 Testo in PDF.
| Product type | Laboratory condition display |
| Brand | Testo |
| Model | 622 |
| Measured parameters | Temperature, relative humidity, absolute pressure |
| Temperature measuring range | -10 to +60 °C |
| Humidity measuring range | 0 to 100 % RH (non-condensing) |
| Pressure measuring range | 300 to 1200 hPa |
| Temperature accuracy | ±0.4 °C + 1 digit |
| Humidity accuracy | ±2 % RH + 1 digit (10-90 % RH at 25 °C), ±3 % RH remainder |
| Pressure accuracy | ±3 hPa + 1 digit |
| Resolution | Temperature 0.1 °C, humidity 0.1 % RH, pressure 0.1 hPa |
| Measurement interval | 10 seconds |
| Power supply | 4 AA batteries (alkaline or rechargeable) |
| Battery life | At least 12 months |
| Dimensions (W x H x D) | 185 x 105 x 36 mm (without clip), 185 x 112 x 47 mm (with clip unfolded) |
| Weight | Approx. 240 g (without batteries) |
| Housing material | ABS |
| Protection type | IP30 |
| Mounting | Wall or table mount (integrated clip) |
| Display | Temperature, humidity, pressure, date, time, max/min values |
| Alarm functions | High/low limits for temperature and humidity, LED indicator |
| Calibration reminder | Yes, programmable |
| Maintenance and cleaning | Clean with a damp cloth; do not use solvents or compressed air |
| Optional accessories | Calibration software with USB cable (ref. 0554 6230), calibration certificates |
| Warranty | 24 months (conditions at www.testo.com/warranty) |
Frequently Asked Questions - 622 Testo
User questions about 622 Testo
0 question about this device. Answer the ones you know or ask your own.
Ask a new question about this device
Download the instructions for your Measuring equipment in PDF format for free! Find your manual 622 - Testo and take your electronic device back in hand. On this page are published all the documents necessary for the use of your device. 622 by Testo.
USER MANUAL 622 Testo
testo 622 · Scientific Ambient Monitor
Bedienungsanleitung
testo 622 · Scientific Ambient Monitor
Instruction manual
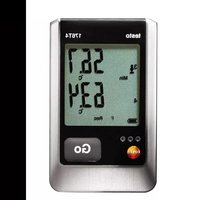
text_image
Labeled diagram of a device rear panel with numbered components and warning label1 Contents....23
2 Safety and the environment....24
2.1. About this document....24
2.2. Ensure safety....25
2.3. Protecting the environment....25
3 Specifications 25
3.1. Use 25
3.2. Scope of delivery 26
3.3. Technical data 26
4 Product description....27
4.1. Overview....27
4.2. Basic properties....29
5 First steps 29
6 Using the product....30
6.1. Commissioning....30
6.2. Setting the limits ......31
6.3. Performing settings....31
6.4. Flowchart....32
6.5. Measuring....36
7 Maintaining the product....37
8 Tips and assistance....38
8.1. Accessories and spare parts 38
8.2. Questions and answers....38
2 Safety and the environment
2.1. About this document
Use
Please read this documentation through carefully and familiarize yourself with the product before putting it to use. Pay particular attention to the safety instructions and warning advice in order to prevent injuries and damage to the products.
Keep this document to hand so that you can refer to it when necessary.
Hand this documentation on to any subsequent users of the product.
Symbols and writing standards
| Representation | Explanation |
| Warning advice, risk level according to the signal word:Warning! Serious physical injury may occur.Caution! Slight physical injury or damage to the equipment may occur.> Implement the specified precautionary measures. | |
| i | Note: Basic or further information. |
| 1. ...2. ... | Action: more steps, the sequence must be followed. |
| > ... Action: a step or an optional step. | |
| - ... Result of an action. | |
| Menu | Element of the instrument or instrument display. |
| [Set] | Control keys of the instrument. |
| ... | ... Functions/paths within a menu. | |
| “...” | Example entries |
2.2. Ensure safety
Do not store the product together with solvents. Do not use any desiccants.
Only use the device in closed, dry rooms and protect it from rain and moisture.
Only operate the product properly, for its intended purpose and within the parameters specified in the technical data. Do not use any force.
2.3. Protecting the environment
Dispose of faulty rechargeable batteries/spent batteries in accordance with the valid legal specifications.
At the end of its useful life, send the product to the separate collection for electric and electronic devices (observe local regulations) or return the product to Testo for disposal.
3 Specifications
3.1. Use
The instrument is a display instrument that was developed for monitoring ambient conditions in laboratories during test setups and calibrations.
The parameters of temperature, humidity and pressure can be viewed at a glance on the display.
The instrument can be mounted on the wall or placed on the workbench.
3.2. Scope of delivery
The delivery of the testo 622 includes:
• Measuring instrument testo 622 (art. no. 0560 6220)
- Instruction manual
- Calibration report
- Mounting material
- Guarantee card
- 4 batteries (AA)
3.3. Technical data
| Characteristic Values | |
| Parameters | Temperature / Humidity / Absolute pressure |
| Units °C/°F | % RH, td, wbhPa, mbar, kPa, in Hg, in H2O, psi |
| Resolution Temperature: 0.1 °CHumidity: 0.1 %RHAbsolute pressure: 0.1 hPa | |
| Measuring range Temperature: -10 to +60 °CHumidity: 0 to 100 % RH (non-dewing)Absolute pressure: 300 to 1200 hPa | |
| Accuracy | Temperature:± 0.4 K + 1 digitHumidity:±2 %RH + 1 digit at 25 °C (10 to 90 %), ±3 % RH rest of rangeAbsolute pressure:±3 hPa + 1 digit |
| Measuring rate 10 s | |
| Operating temperature | -10 to +60 °C |
| Storage temperature | -20 to +60 °C |
| Battery type 4 x AA | |
| Battery life at least 12 months | |
| Housing material ABS | |
| Protection class IP 30 | |
| Weight approx. 240 g (without batteries) | |
| Dimensions(LxWxH in mm) | 185x105x36185x112x47 (mounting clip folded out) |
| Warranty | 24 months, warranty conditions: see website www.testo.com/warranty |
| EC Directive 2004/108/EC | |
4 Product description
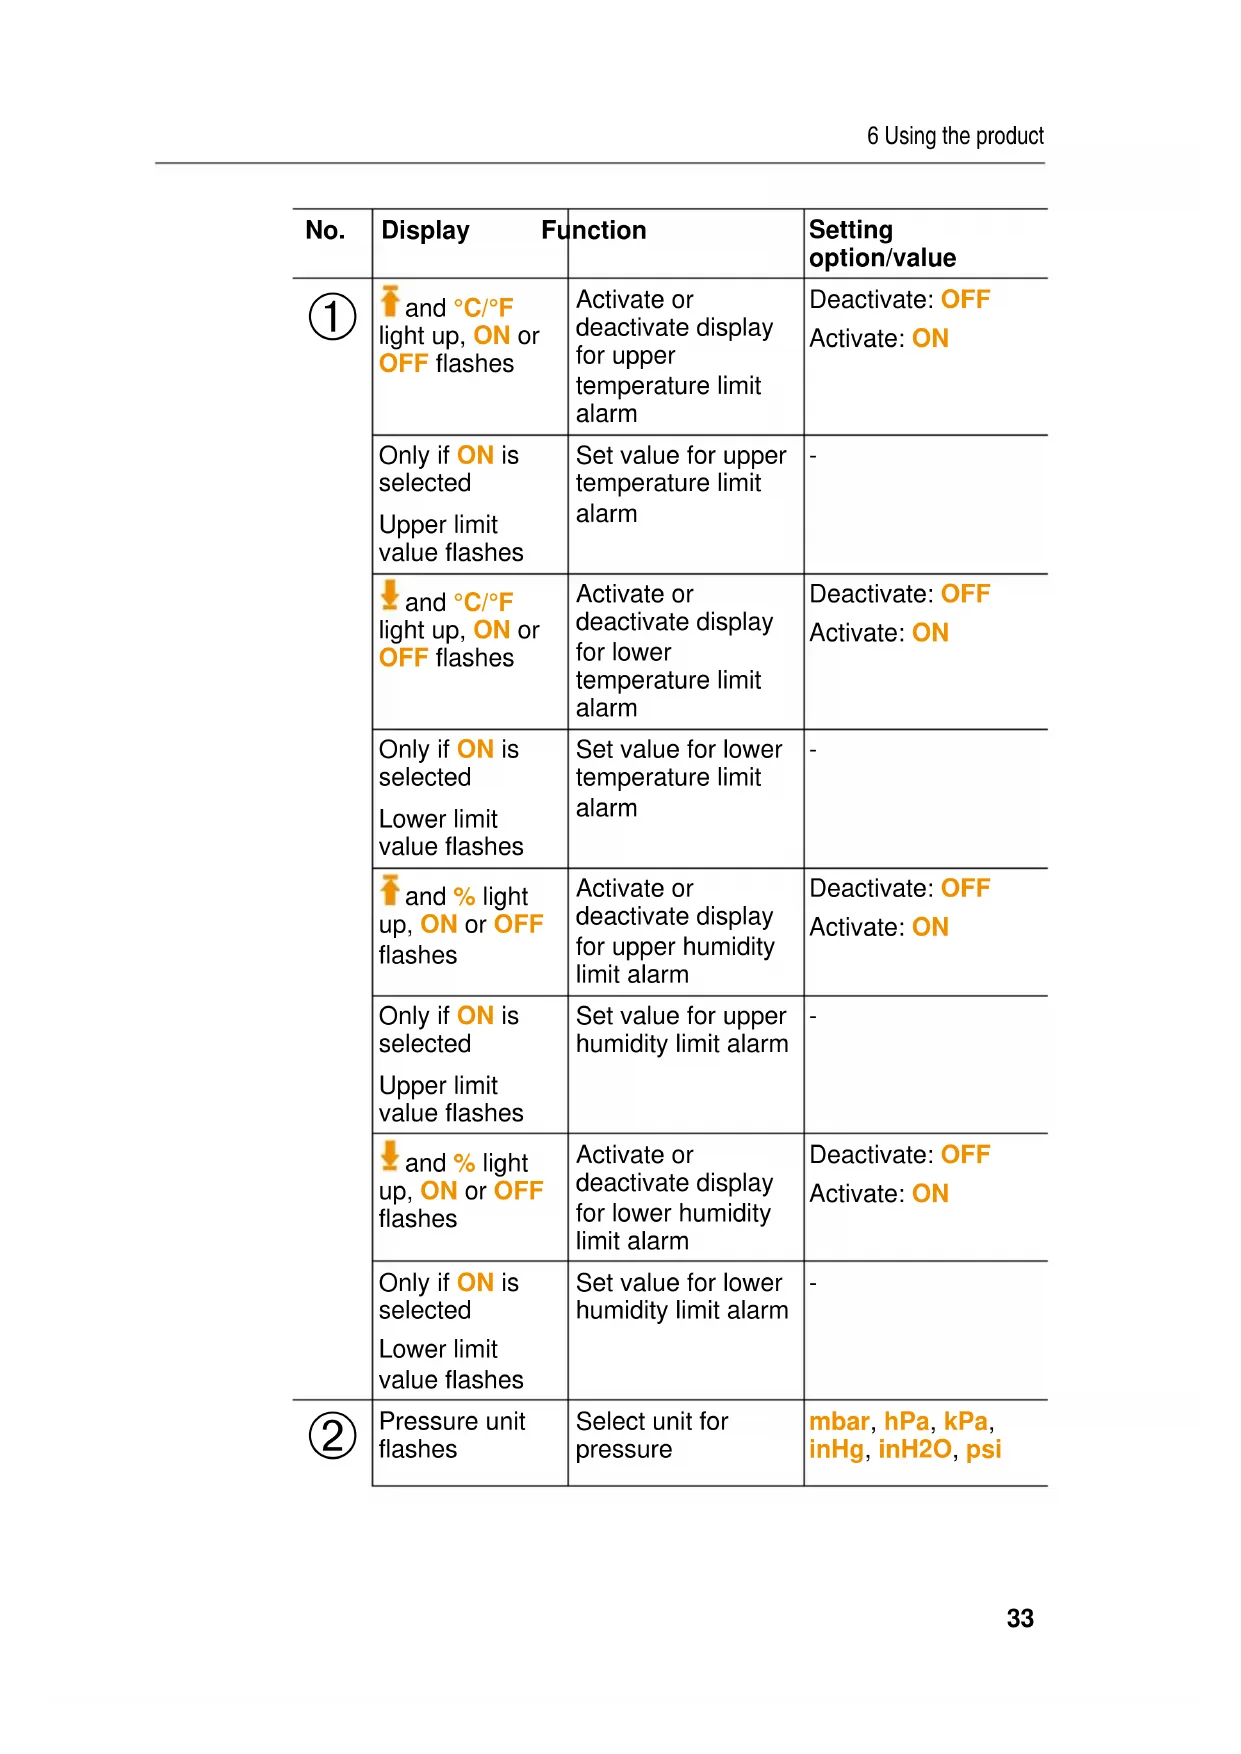
4.1. Overview
text_image
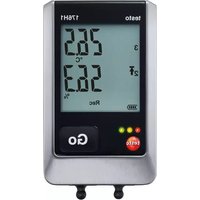
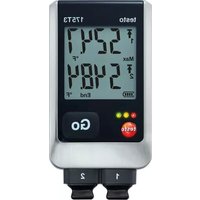
23.4°C 1023.6 hPa 70.01 54.6% 11:54:45 AM 35.01 24.12.2009 testo 622 Calibration! Max Min %RH hPa Set Esc > Alarm * ① ②① Keypad
| Key Function | |
| Max | Display max. value |
| Min | Display min. value |
| %rH | Set unit for humidity |
| hPa | Display pressure settings |
| Change settings | |
| Change settings | |
| Set | Confirm settings |
| Esc | Cancel input |
| ■Alarm■ | Acknowledging an alarm |
② Sensors
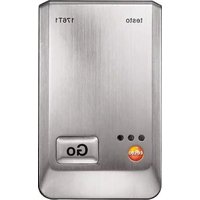
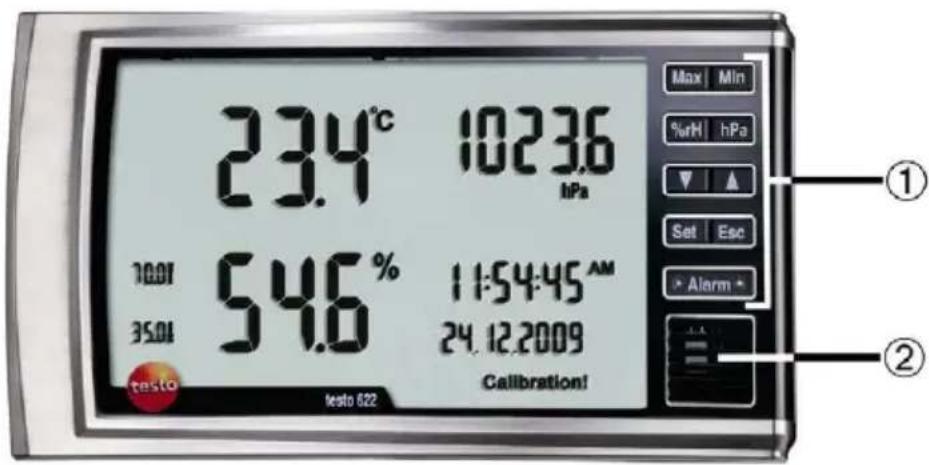
text_image
Labeled diagram of a device showing internal components and safety warning label③ Attachment device
④ Battery compartment and instrument interface
⑤ Mounting clip and wall fixture (integrated into housing)
4.2. Basic properties
Power supply
The instrument is powered optionally by:
- 4 batteries / rechargeable batteries, type AA
Wall mounting
The distance between the upper and lower drill hole is 63 mm.
5 First steps
Removing the protective film
Remove the protective film from the display
Inserting batteries/rechargeable batteries
- Open the battery compartment on the rear of the instrument.
- Insert batteries/rechargeable batteries (observe the polarity!)
- Close the battery compartment.
6 Using the product
6.1. Commissioning
The date and time must be set on commissioning.
- Select the required function with [Set].
If no button is pressed > 30 sec, the testo 622 changes to Measuring Mode. To perform additional settings, press and hold [Set] for 2 sec.
The adjustable parameter flashes.
- Set values with [▲] or [▼] and confirm entry with [Set] (for settings, see following table).
To scroll rapidly forward and back in the relevant menu, press and hold [▲ or ▼].
Press [Esc] to cancel settings without saving them.
Hold [Set] down for 2 s to save previously set values and leave the menu.
- Instrument returns to the display.
| Display | Function | Setting |
| DD.MM.YYYY flashes or MM.DD.YYYY flashes | Set date format | DD.MM.YYYY = day, month, yearMM.DD.YYYY = month, day, year |
| Year flashes | Set year | 2009 - 2099 |
| Month flashes Set month | 01 - 12 | |
| Day flashes | Set day | 01 - 31 |
| 24H or 12H (AM/PM) flash | Set time format 24h/12h | |
| Hour flashes | Set hour value | 00 - 23 or 01 - 12 |
| Minute flashes | Set minute value | 00 - 59 |
| Second flashes | Set second value | 00 - 59 |
| °C flashes | Set unit for temperature | °C/°F |
6.2. Setting the limits
Temperature
When changing the temperature unit from ^ C to ^ F, the set limit values are converted
Humidity
When changing the humidity unit (%, td, wb), the set limit values are not converted. The limit values must be reset via the Setup menu.
Pressure
It is not possible to set the limit values.
6.3. Performing settings
- Press and hold [Set] for 2 s.
Display flashes.
- Select the required function with [Set].
The adjustable parameter flashes.
3 Set values with [▲] or [▼] and confirm entry with [Set] (for settings, see following table). - Instrument changes to the next display function
i
To scroll rapidly forward and back in the relevant menu, press and hold [▲ or ▼].
Press [Esc] to cancel settings without saving them.
Hold [Set] down for 2 s to save previously set values and leave the menu.
If the entire Setup menu is run through, the settings made are automatically stored.
If no key is pressed within 30 s, the screen reverts to the current reading display automatically. No settings are saved.
- Instrument changes to the next display function
6.4. Flowchart
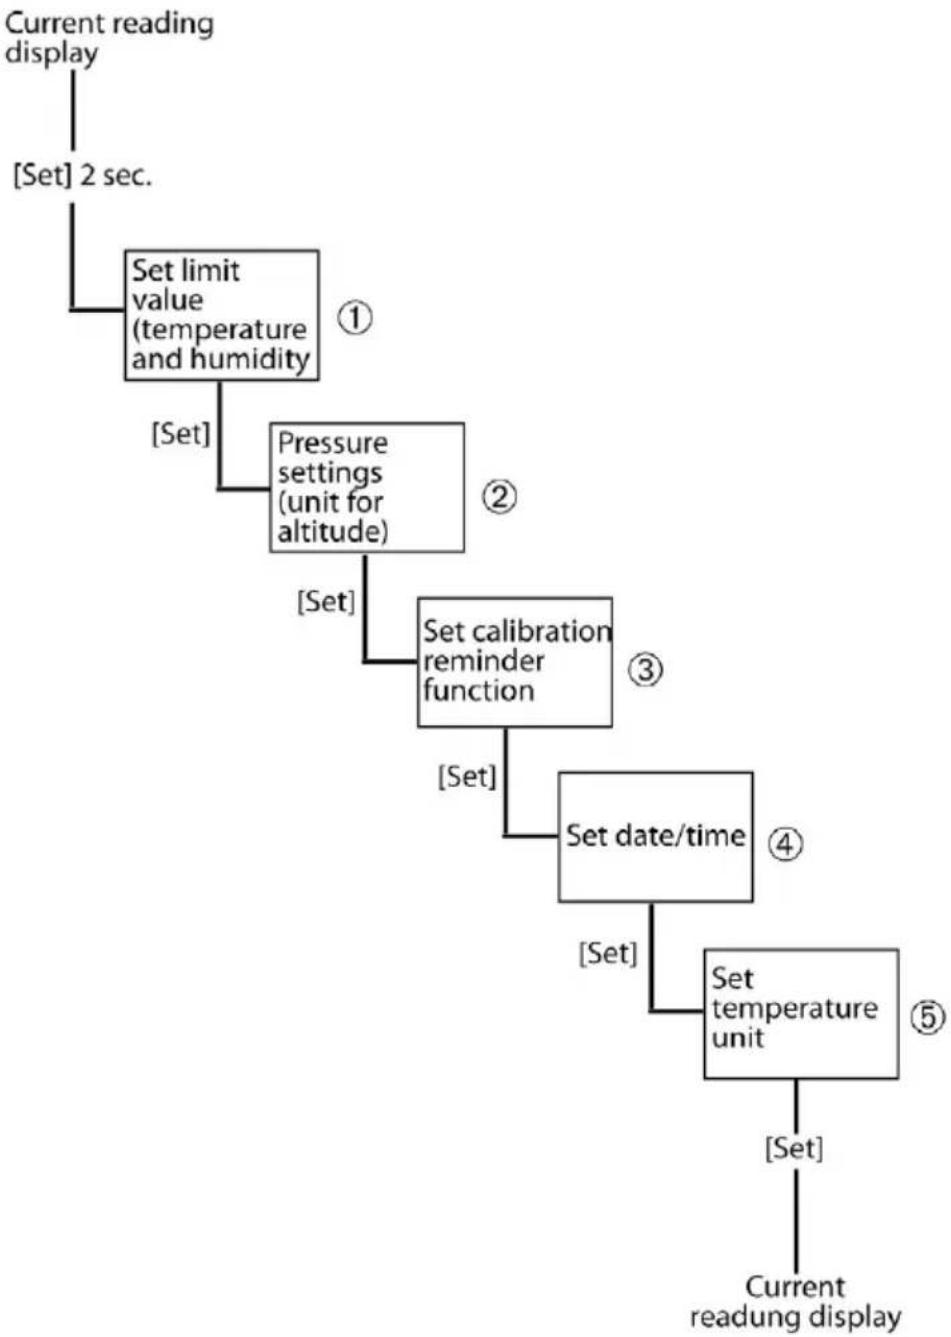
flowchart
graph TD
    A["Current reading display"] --> B["[Set"] 2 sec.]
    B --> C["Set limit value (temperature and humidity)"]
    C --> D["[Set"]]
    D --> E["Pressure settings (unit for altitude)"]
    E --> F["[Set"]]
    F --> G["Set calibration reminder function"]
    G --> H["[Set"]]
    H --> I["Set date/time"]
    I --> J["[Set"]]
    J --> K["Set temperature unit"]
    K --> L["[Set"]]
    L --> M["Current reading display"]
A detailed description of the points ①, ②, ③, ④, ⑤ can be found on the following pages.
| No. | Display Function | Setting option/value | |
| 1 | and °C/°F light up,ON or OFF flashes | Activate or deactivate display for upper temperature limit alarm | Deactivate:OFF Activate:ON |
| Only ifONis selectedUpper limit value flashes | Set value for upper temperature limit alarm | - | |
| and °C/°Flight up,ONor OFF flashes | Activate or deactivate display for lower temperature limit alarm | Deactivate:OFF Activate:ON | |
| Only ifONis selectedLower limit value flashes | Set value for lower temperature limit alarm | - | |
| and % light up,ONor OFF flashes | Activate or deactivate display for upper humidity limit alarm | Deactivate:OFF Activate:ON | |
| Only ifONis selectedUpper limit value flashes | Set value for upper humidity limit alarm | - | |
| and % light up,ONor OFF flashes | Activate or deactivate display for lower humidity limit alarm | Deactivate:OFF Activate:ON | |
| Only ifONis selectedLower limit value flashes | Set value for lower humidity limit alarm | - | |
| 2 | Pressure unit flashes | Select unit for pressure | mbar, hPa, kPa, inHg, inH2O, psi |
| Altitude lights up, height unit flashes | Select unit for height above sea level | m, ft | |
| 2 flashes | Set value for height above sea level | For unit in m:0 to 9000 mFor unit in ft:0 to 29,527 ft | |
| 3 | Calibration!lights up,ON or OFFflashes | Activate or deactivate calibration reminder function | Deactivate: OFFActivate: ON |
| Only if ON is selectedCalibration!lights up,Year flashes | Set year 2009 - 2099 | ||
| Only if ON is selectedCalibration!lights up,Month flashes | Set month 01 - 12 | ||
| 4 | Update date & time? lights up,No flashes | Set date and time No change | Select YesSelect No |
| Only if Yes is selectedDD.MM.YYYYflashesorMM.DD.YYYYflashes | Set date format | DD.MM.YYYY = day, month, yearMM.DD.YYYY = month, day, year | |
| Only if Yes is selectedYear flashes | Set year | 2009 - 2099 | |
| Only if Yes is selectedMonth flashes | Set month | 01 - 12 | |
| Only if Yes is selectedDay flashes | Set day | 01 - 31 | |
| Only if Yes is selected24H or 12H (AM/PM) flash | Set time format | 24h/12h | |
| Only if Yes is selectedHour flashes | Set hour value | 00 - 23 or 01 - 12 | |
| Only if Yes is selectedMinute flashes | Set minute value | 00 - 59 | |
| Only if Yes is selectedSecond flashes | Set second value | 00 - 59 | |
| 5 | °C flashes Set unit for temperature | °C/°F | |
| i | If the power supply is interrupted the settings are being saved for at least 3 min. | ||
6.5. Measuring

With max./min., the time that it occurred and the corresponding value (°C/% RH) is shown.
Displaying max. values
Press [Max].
To reset the max. value:
- Select the max. temperature value or max. humidity value.
- Press and hold [Max] for 2 s.
- The max. temperature value or max. humidity value is reset.

If the [Max] key is not pressed for >30 s, the screen reverts to the current display automatically
Displaying min. values
Press [Min].
To reset the min. value:
- Select the min. temperature value or min. humidity value.
- Press and hold [Min] for 2 s.
- The min. temperature value or min. humidity value is reset.

If the [Min] key is not pressed for >30 s, the screen reverts to the current display automatically
Displaying humidity values
To change the display between \% relative humidity, dewpoint and wet bulb:
Press [%RH].

If the limit values for \% relative humidity are activated, no limit values for dewpoint and wet bulb will be shown when the [% RH] key is pressed.
If the limit values for dewpoint or wet bulb are activated, no limit values for % relative humidity will be shown when the [% RH] key is pressed.
Displaying pressure values and set height above sea level
To change the display between absolute pressure, barometric pressure and set height above sea level:
Press [hPa].
Acknowledging an alarm
Alarm was triggered:
- LED flashes
- The alarm value that was exceeded or undershot flashes
To clear an alarm:
Press [Alarm].
- Alarm is cleared

With the alarm activated and a change to the setup menu, the current alarm is acknowledged.
7 Maintaining the product
Changing batteries/rechargeable batteries
CAUTION
Incorrectly inserted batteries / rechargeable batteries can damage the instrument!
Observe the polarity when inserting the batteries / rechargeable batteries.
- Open the battery compartment on the rear of the instrument.
- Remove spent batteries / rechargeable batteries from the battery compartment and insert new batteries / rechargeable batteries (type AA)
- Instrument turns on automatically.
- Close the battery compartment.

If the power supply is interrupted the settings are being saved for at least 3 min.

If the instrument is not used over a longer period, the batteries/rechargeable batteries should be removed from the instrument to prevent damage to the instrument and the batteries/rechargeable batteries.
Cleaning the instrument
If the housing of the instrument is dirty, clean it with a damp cloth.
Do not use any aggressive cleaning agents or solvents! Weak household cleaning agents or soap suds can be used.

Do not clean the instrument with compressed air, otherwise the sensor may be damaged.
8 Tips and assistance
8.1. Accessories and spare parts
| Description Article no. | |
| Calibration and adjustment software incl. USB cable | 0554 6230 |
| DKD humidity calibration certificate, electronic hygrometer; calibration points 11.3 % RH and 75.3 % RH at 25 °C | 0520 0206 |
| ISO humidity calibration certificate, calibration points 11.3 % RH and 75.3 % RH at 25 °C | 0520 0006 |
8.2. Questions and answers
| Question Possible causes | |
| Instrument displays LO | Below -20 °C |
| Instrument displays HI | Above +70 °C |
If we could not answer your question, please contact your dealer or Testo Customer Service. For contact details see the rear side of this document or the web page www.testo.com/service-contact