616 - Measuring equipment Testo - Free user manual and instructions
Find the device manual for free 616 Testo in PDF.
User questions about 616 Testo
0 question about this device. Answer the ones you know or ask your own.
Ask a new question about this device
Download the instructions for your Measuring equipment in PDF format for free! Find your manual 616 - Testo and take your electronic device back in hand. On this page are published all the documents necessary for the use of your device. 616 by Testo.
USER MANUAL 616 Testo
Material moisture measuring instrument
natural_image
Close-up of a handheld electronic device with a digital display and control buttons (no visible text or symbols)General notes ......18
- Safety instructions....19
- Intended purpose .....20
- Product description....21
3.1 Display and control elements .....21
3.2 Voltage supply 22
3.3 Humidity measurement procedure 22
-
Commissioning 23
-
Operation ......23
5.1 Switching the instrument on/off 23
5.2 Switching the display light on/off 24
5.3 Performing settings .....24
- Measuring 25
- Care and maintenance .....27
- Questions and answers.....28
- Technical data .....28
- Tips and assistance....29
- Accessories/spare parts .....29
en
General notes
This chapter provides important advice on using this documentation.
This documentation contains information that must be applied if the product is to be used safely and efficiently.
Please read this documentation through carefully and familiarize yourself with the operation of the product before putting it to use. Keep this document to hand so that you can refer to it when necessary.
Identification
| Representation Meaning Comments | ||
 | Warning advice: Warning! | Read warning advice carefully and take the precautionary measures indicated!Serious physical injury could occur if you do not take the precautionary measures indicated. |
 | Warning advice: Caution! | Read warning advice carefully and take the precautionary measures indicated!Slight physical injury or damage to equipment could occur if you do not take the precautionary measures indicated. |
| i | Note Offers helpful tips and information. | |
| ➢, 1, 2 Objective Denotes the objective that is to be achieved via the steps described. Where steps are numbered, you must always follow the order given! | ||
| ✓ Condition A condition that must be met if an action is to be carried out as described. | ||
| ➢, 1, 2, ... Step Carry out steps. Where steps are numbered, you must always follow the order given! | ||
| Text | Display text | Text appears on the instrument display. |
| Taste | Control key | Press the key. |
| - | Result | Denotes the result of a previous step. |
| → | Cross-reference | Refers to more extensive or detailed information. |
Note Offers helpful tips and information.
1. Safety instructions
This chapter gives general rules which must be followed and observed if the product is to be handled safely.
enfr
Avoiding personal injury/damage to equipment
Do not use the measuring instrument and sensors to measure on or near live parts.
Never store the measuring instrument/probe together with solvents and do not use any desiccants.
Product safety/preserving warranty claims
Operate the measuring instrument only within the parameters specified in the Technical data.
Always use the measuring instrument properly and for its intended purpose. Do not use force.
Do not expose handles and feed lines to temperatures in excess of 70 °C unless they are expressly permitted for higher temperatures. Temperatures given on probes/sensors relate only to the measuring range of the sensors.
Open the instrument only when this is expressly described in the documentation for maintenance and repair purposes.
Carry out only the maintenance and repair work that is described in the documentation. Follow the prescribed steps when doing so. For safety reasons, use only original spare parts from testo.
Ensure correct disposal
Take faulty rechargeable batteries/spent batteries to the collection points provided for them.
Send the product back to testo at the end of its useful life. We will ensure that it is disposed of in an environmentally friendly manner.
2. Intended purpose
This chapter gives the areas of application for which the product is intended.
Use the product only for those applications for which it was designed. Ask testo if you are in any doubt.
The product was designed for the following tasks/applications:
- Fast and non-destructive evaluation of material moisture courses in woods and building materials.
Does not replace reference methods such as CM method or Darr-Wäge (dry-and-weigh) method.
i The instrument is not calibratable.
The product must not be used in the following areas:
- Areas at risk of explosion.

Materials subject to electrical voltage.
Electric sshock!
▶ If in doubt, check whether the materials are energized before the measurement (e.g. in the event of water damage in walls)
3. Product description
This chapter provides an overview of the components of the product and their functions.
en
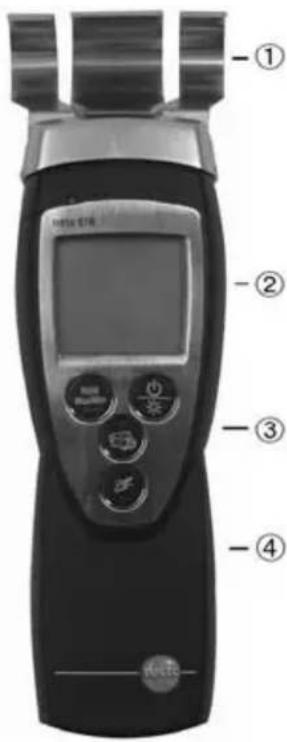
3.1 Display and control elements
Overview
text_image
-① -② -③ -④① Contact plates
② Display
③ Control keys
④ Battery compartment (rear)
Key functions
| Key Functions | |
| Switch instrument on;switch instrument off (press and hold)Switch display light on/off | |
| Keep reading, displaymaximum/minimum valueOpen/leave configuration mode (press and hold);In configuration mode:Confirm input | |
| In configuration mode:Increase value, select option | |
| In configuration mode:Decrease value, select option | |
Important displays
Display Meaning
| Battery capacity (bottom right in display): · 4 segments in the battery symbol are lit: Instrument battery is fully charged · No segments in the battery symbol are lit: Battery is almost spent |
3.2 Voltage supply
Voltage is supplied by means of a 9 V monobloc battery (included in delivery) or rechargeable battery. It is not possible to run the instrument from the mains supply or charge a rechargeable battery in the instrument.
3.3 Humidity measurement procedure
The non-destructive stray field measurement uses the ability of water molecules to dampen and thus change electromagnetic fields. The electric field penetrates the material via the contact plates and creates a measuring field with a depth of approx. 5 cm (2").
The following factors can influence the measurement result:
| Factors Ideal condition | |
| Measurement depth | Material thickness > 5 cm (> 2"). Caution: The upper layers of the material influence the measurement result more than the deeper layers. |
| Material surface As level as possible as contact plates should lay flat against it. | |
| Material properties As homogeneous as possible with no air pockets. | |
| Moisture distribution As even as possible. | |
| Metals and electric fields None, if possible. | |
4. Commissioning
This chapter describes the steps required to commission the product.
➢ Removing the protective film on the display:
Pull the protective film off carefully.
➢ Inserting a battery/rechargeable battery:
1 To open the battery compartment on the rear of the instrument, push the lid of the battery compartment in the direction of the arrow and remove it.
2 Insert a battery/rechargeable battery (9 V monobloc). Observe the polarity!
3 To close the battery compartment, replace the lid of the battery compartment in position and push it against the direction of the arrow.
5. Operation
This chapter describes the steps that have to be executed frequently when using the product.
5.1 Switching the instrument on/off
▶ Switching the instrument on:
Press. - The current reading is shown
▶ Switching the instrument off:
Press and hold (for approx. 2 s) until the display goes out.
5.2 Switching the display light on/off
▶ Switching the display light on/off:
√ The instrument is switched on.
Press
5.3 Performing settings
1 To open configuration mode:
√ The instrument is switched on and is in measurement view. Hold, Max or Min are not activated.
Press and hold (for approx. 2 s) until the display changes.
- The instrument is now in configuration mode.
You can change to the next function with

You can leave configuration mode at any time. To do so, press and hold (for approx. 2 s) until the instrument has changed to measurement view. Any changes that have already been made in configuration mode will be saved.
2 To set Auto Off:
√ Configuration mode is opened, AutoOff is flashing.
Select the desired option with ⚠️ and confirm with 📋:
- on: The measuring instrument switches off automatically if no key is pressed for 10 min.
Exception: A recorded reading is shown on the display (Hold or Auto Hold is lit).
- oFF: The measuring instrument does not switch itself off automatically.
3 To reset:
√ Configuration mode is opened, RESET is lit.
Select the desired option with ⚠️ and confirm with ⏚️:
· no: Instrument is not reset.
- Yes: Instrument is reset. The instrument is reset to the factory settings.
- The instrument returns to measurement view.
en
6. Measuring
This chapter describes the steps that are required to perform measurements with the product.
Setting the material characteristic curve:
1 Switch between the display of wood moisture (F) and building moisture (M): or press.
2 Select the desired option with or and confirm with ⏚:
| Display Category | Example | |
| F 1 | Softwood lumber | Spruce, larch, cherry, pine, poplar, meranti |
| F 2 | Hardwood lumber | Beech, oak, maple, ash, Douglas-fir, walnut, birch |
| F 3 | Chipboard | |
| M 1 | Cement screed | |
| M 2 | Anhydrite screed | |
| M 3 | Concrete | |
| M 4 | Solid brick | |
| M 5 | High-insulating brick | |
| M 6 | Limestone | |
| M7 | Gas concrete | |
| CAL | Testing characteristic | Not for on-site measurements! |
6. Measuring26
▶ Taking a measurement:
√ The instrument is switched on and is in measurement view.
Hold instrument horizontal to contact surface. Slowly increase contact pressure to 1 to 3 kg until a stable value is shown
In order to be able to evaluate a moisture course, several measurements at different positions or at different times are necessary.
In drying processes, the displayed measurement values can in individual cases also be negative. This occurs as a result of the material composition and the different moisture gradients. When negative measurement values are displayed, the drying process is nearly finished, i.e., the more negative the values, the drier the material.
For better assessment of the contact pressure, the instrument can initially be pressed against a scale.
Keep reading, display maximum/minimum value:
The current reading can be recorded. The maximum and minimum values (since the instrument was last switched on) can be displayed.
Press several times until the desired value is displayed.
- The following are displayed in turn:
· Hold: The recorded reading
• Max: Maximum value
- Min: Minimum value
- Current reading
➢ Resetting the maximum/minimum values:
Switching the instrument off and on again resets the maximum and minimum values.
7. Care and maintenance
This chapter describes the steps that help to maintain the functionality of the product and extend its operating life.
enfr
▶ Cleaning the housing:
Clean the housing with a moist cloth (soap suds) if it is dirty. Do not use aggressive cleaning agents or solvents!
➢ Changing the battery/rechargeable battery:
√ The instrument is switched off.
1 To open the battery compartment on the rear of the instrument, push the lid of the battery compartment in the direction of the arrow and remove it.
2 Remove the spent battery/rechargeable battery and insert a new battery/rechargeable battery (9 V monobloc). Observe the polarity!
3 To close the battery compartment, replace the lid of the battery compartment in position and push it against the direction of the arrow.
8. Questions and answers
This chapter gives answers to frequently asked questions.
| Question Possible causes Possible solution | ||
| is lit (bottom right · Instrument battery is · Replace instrument in display). almost spent. battery. | ||
| Instrument switches · itself off. is switched on. | Auto Off function · Switch function off · Residual capacity · Replace battery of battery is too low. | |
| Display reacts · Ambient temperature · Increase ambient sluggishly | is very low. | temperature. |
| Display: uuuu · Permitted measuring range · Keep to permitted was undershot. | measuring range. | |
| Display: 0000· | · Permitted measuring range · was exceeded. | Keep to permitted measuring range. |
If we could not answer your question, please contact your dealer or testo Customer Service. Contact details can be found on the guarantee card or on the Internet under www.testo.com.
9. Technical data
| Characteristic | Values |
| Parameters | Water content in weight percent of dry mass |
| Measuring ranges | Woods: < 50 %Building materials: < 20 % |
| Resolution | 0.1 % |
| Probe | Contact plate (integrated) |
| Measuring rate | 0.5 s |
| Operating temperature | 5 to 40°C (41 to 104°F) / 10 to 80 %RH |
| Storage temperature | -20 to 70°C (-4 to 158°F) |
| Voltage supply | 1 x 9 V monobloc battery/rech. battery |
| Life | 60 h |
| Protection class | IP30 |
| EC Directive | 2004/108/EC |
| Warranty | 2 years (excepting wearing parts) |
10. Tips and assistance
Typical values for equilibrium moisture (air dryness in building materials ^1 and woods).
| Material Material moisture |
| Softwood lumber 9 ± 3 % by weight |
| Hardwood limber 9 ± 3 % by weight |
| Chipboard < 8 % by weight |
| Cement screed < 3 % by weight |
| Anhydrite screed < 0,5 % by weight |
| Concrete < 2,2 % by weight |
| Solid brick < 1 % by weight |
| High insulating brick < 2,5 % by weight |
| Limestone < 1,3 % by weight |
| Gas concrete < 5 % by weight |
^1 In ambient conditions 20 °C and 65 %RH
11. Accessories/spare parts
Designation Article no.
Case 0516 0210
For a complete list of all accessories and spare parts, please refer to the product catalogues and brochures or look up our website at: www.testo.com
Notes30