
16582.B - Programmable switch Vimar - Free user manual and instructions
Find the device manual for free 16582.B Vimar in PDF.
| Product type | Programmable switch (daily/weekly electronic timer) |
| Brand | Vimar |
| Model | 16582.B |
| Dimensions (width) | 3 modules (52.5 mm) |
| Minimum embedding depth | 46 mm |
| Weight | Approximately 150 g |
| Power supply | 120-230 V~ 50-60 Hz, 1 VA |
| Output type | Changeover relay 8 A / 230 V~ |
| Switching capacity | Resistive loads 8 A, incandescent lamps 800 W, ferromagnetic transformers 800 W |
| Number of channels | 1 channel, 1 time channel |
| Programs | 4 programs: Reduced, Cyclic, Prog_1 (customizable), Prog_2 (customizable) |
| Maximum number of operations per day | 35 |
| Minimum interval between operations | 1 minute |
| Power reserve (clock) | Minimum 10 days with CR2032 battery |
| Buffer battery type | CR2032 (Lithium 3 V) |
| Password protection | 3-digit PIN, can be disabled |
| Display | Backlit LCD with timed auto-off |
| Available languages | Italian, English, French, Spanish, German |
| Protection rating | IP40 |
| Electrical class | Class II |
| Operating temperature | 0°C to +40°C |
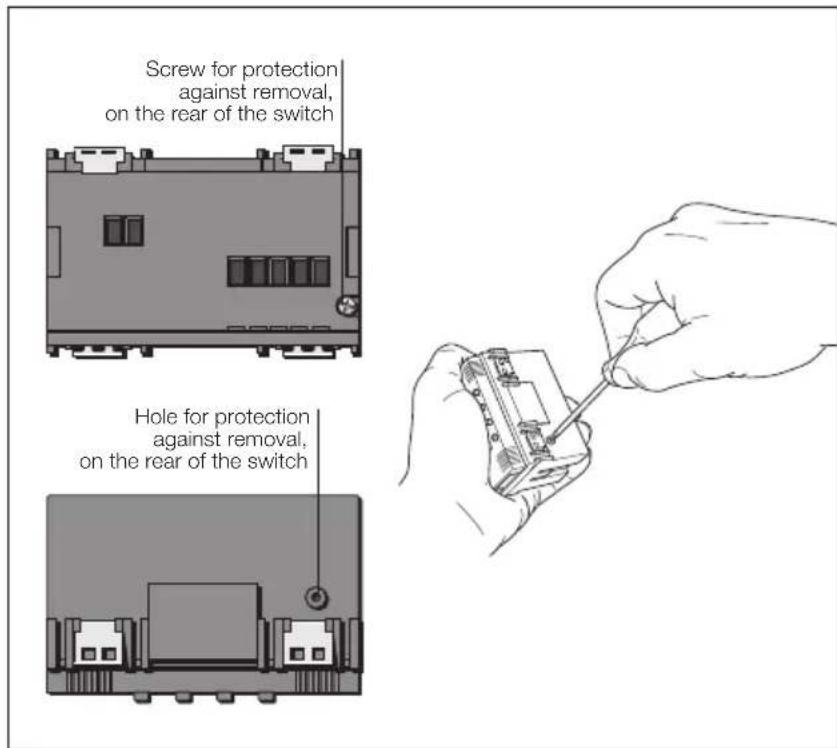
| Anti-pullout device | Yes (screws supplied) |
| Number of manual/automatic cycles | 3,000 manual cycles, 100,000 automatic cycles |
| Maintenance and cleaning | Clean with a soft, dry cloth; do not use solvents |
| Safety | Installation by a qualified professional in compliance with current standards |
| Spare parts and repairability | CR2032 battery replaceable; no other user-serviceable parts |
| General information | Compliant with WEEE directive; may contain traces of lead (REACH) |
Frequently Asked Questions - 16582.B Vimar
User questions about 16582.B Vimar
0 question about this device. Answer the ones you know or ask your own.
Ask a new question about this device
Download the instructions for your Programmable switch in PDF format for free! Find your manual 16582.B - Vimar and take your electronic device back in hand. On this page are published all the documents necessary for the use of your device. 16582.B by Vimar.
USER MANUAL 16582.B Vimar
Remove the protective film to activate the buffer battery only on delivery and activation of the system.
ATTENTION!
11. CONFORMITA NORMATIVA.
Space for noting the three-digit PIN number used as the lockout password.
(see "Password", page 13)
VIMAR
CONTENTS
1.Description. 10
2. Scope 10
3. Front view and view of controls 10
4. Connections 11
5. Protection against removal.. 11
6. Replacing the backup battery 12
7. Using the electronic programmable timer switch
7.1. Operation 13
7.2. Settings 13
7.3. Programming 14
- Reset procedure 14
- Characteristics 14
- Installation rules 15
- Conformity to standards 15

VIMAR
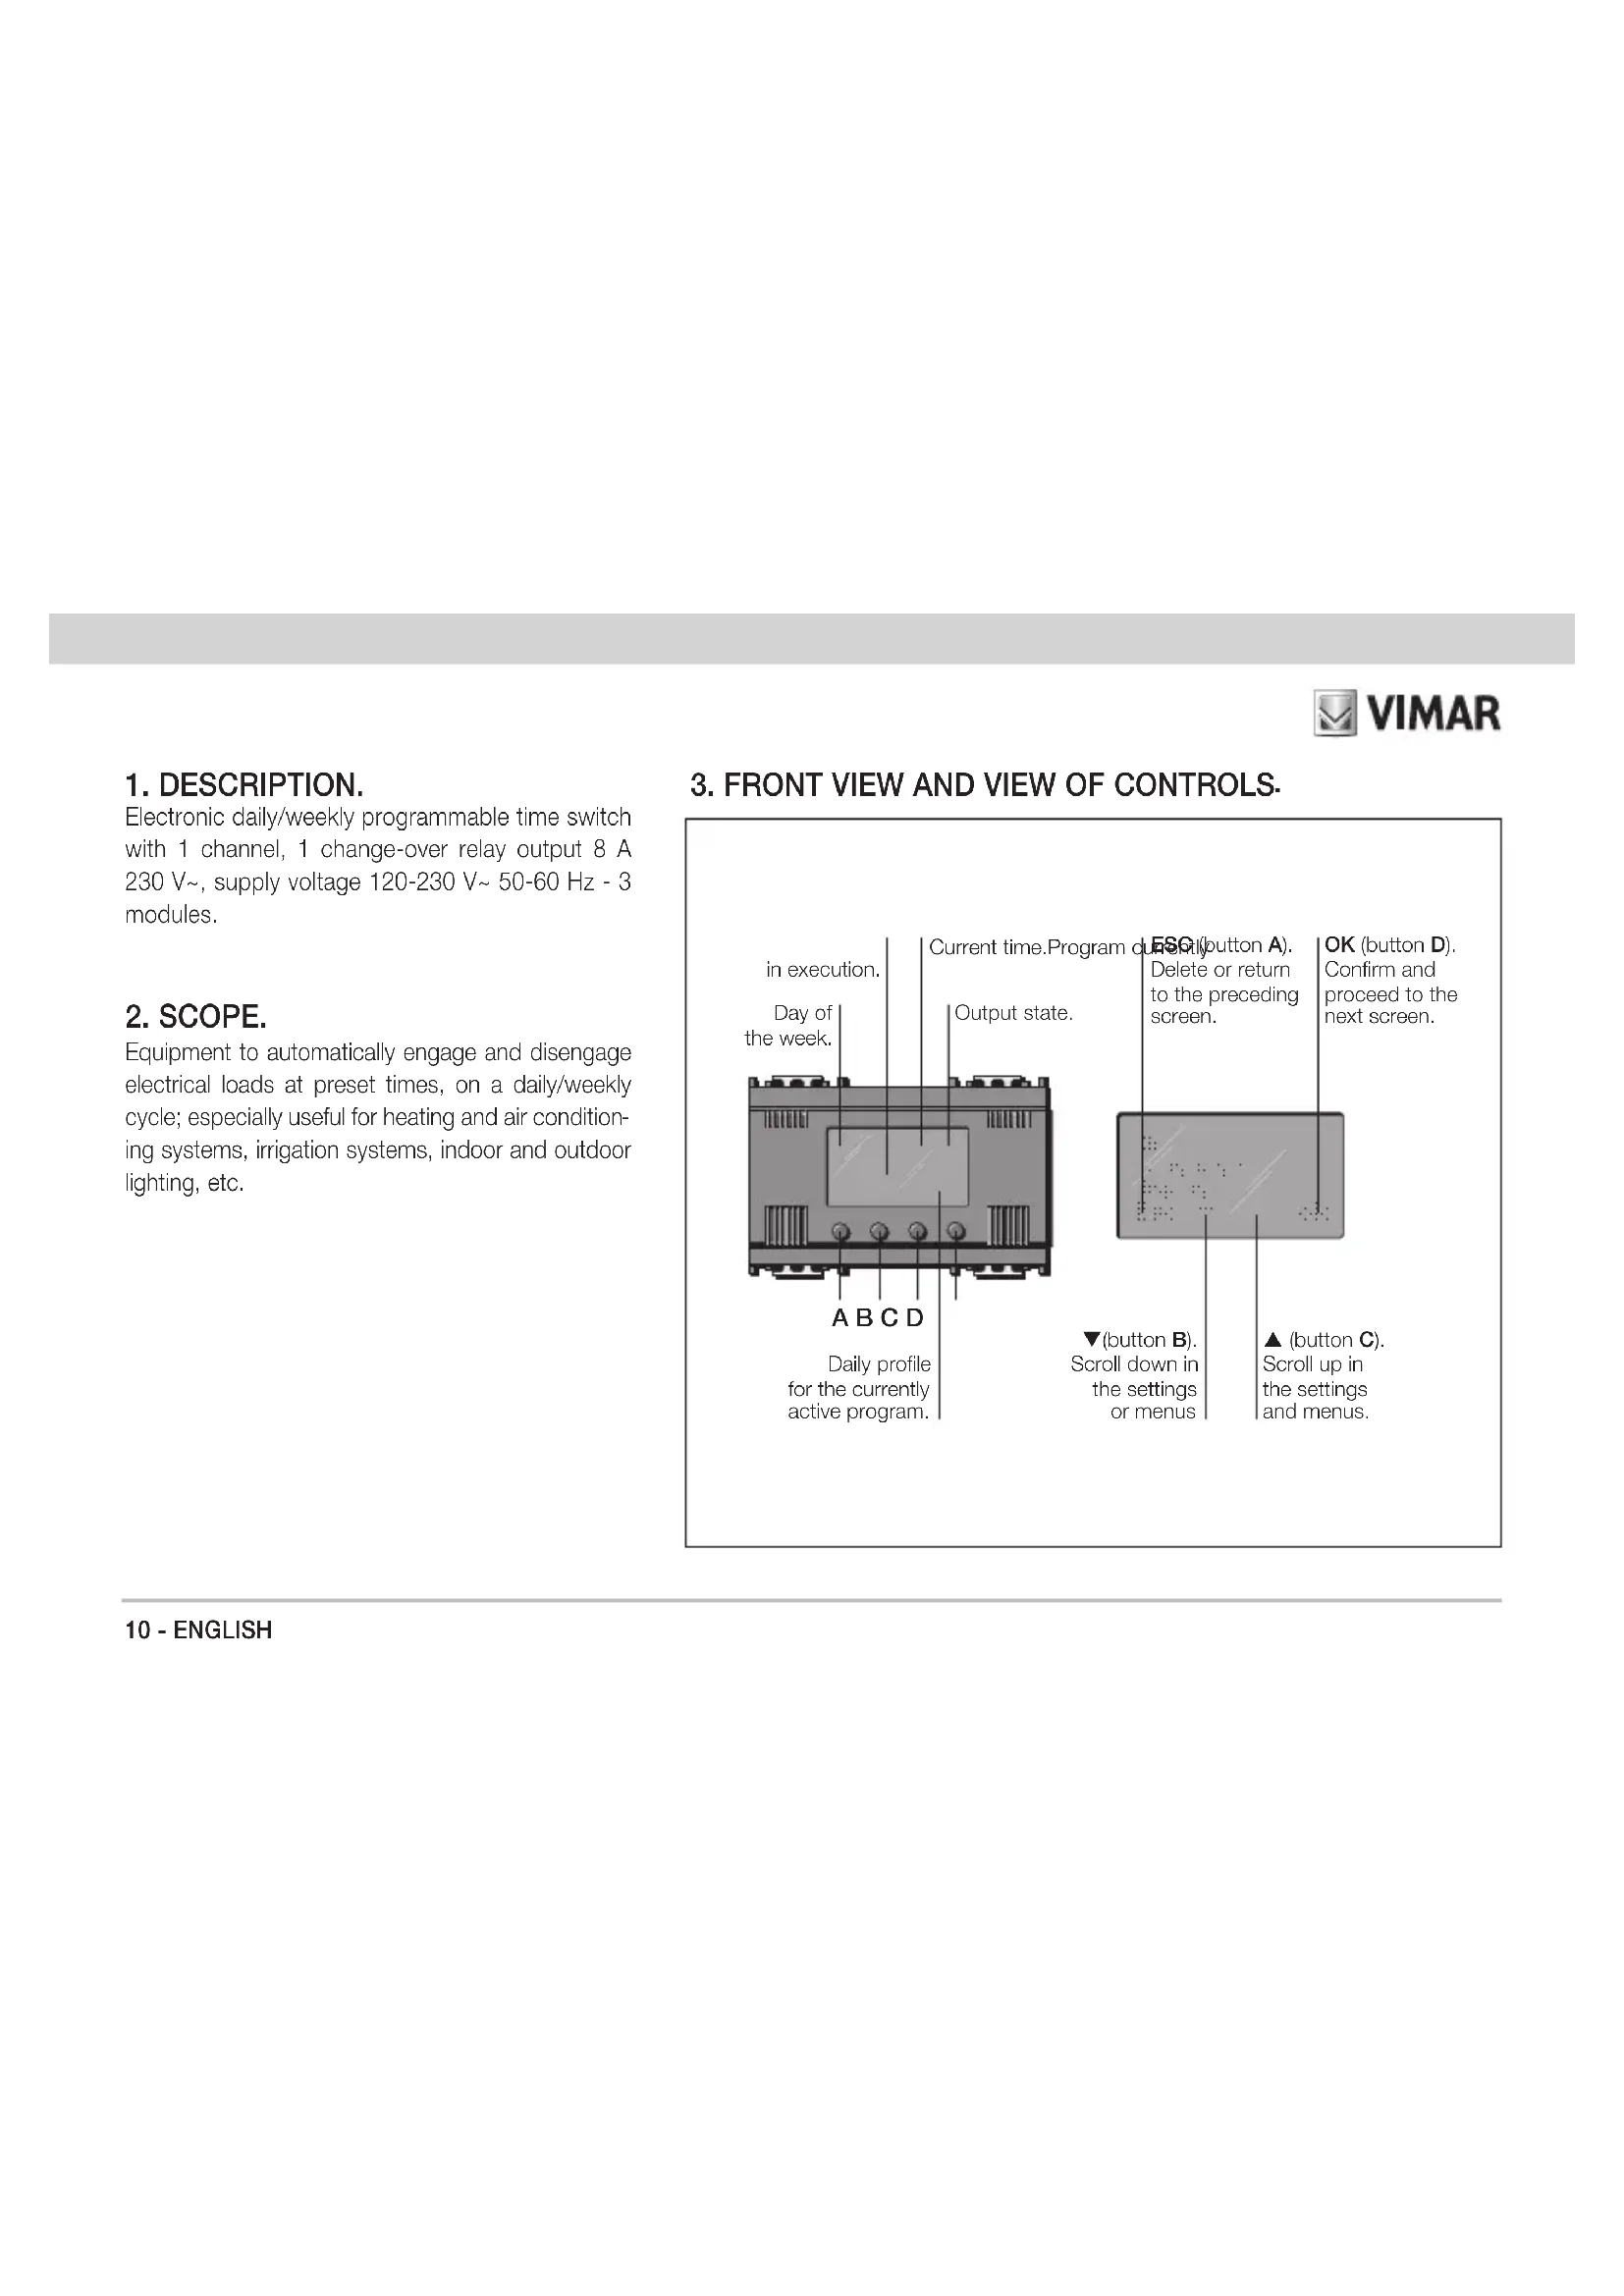
1.DESCRIPTION.
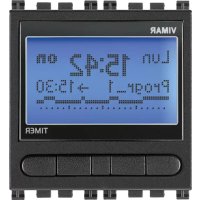
Electronic daily/weekly programmable time switch with 1 channel, 1 change-over relay output 8 A 230V supply voltage 120 - 230V 50 - 60Hz - 3 modules.
2. SCOPE.
Equipment to automatically engage and disengage electrical loads at preset times, on a daily/weekly cycle; especially useful for heating and air conditioning systems, irrigation systems, indoor and outdoor lighting, etc.
3. FRONT VIEW AND VIEW OF CONTROLS


VIMAR
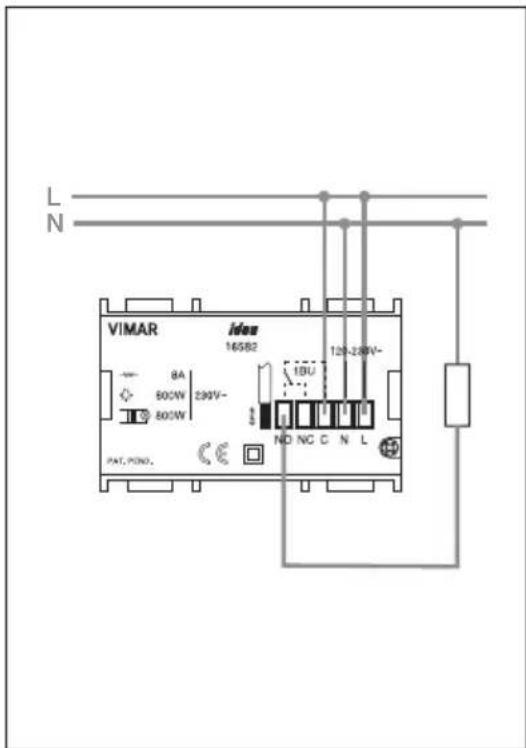
4. CONNECTIONS (example).
5. PROTECTION AGAINST REMOVAL.

VIMAR
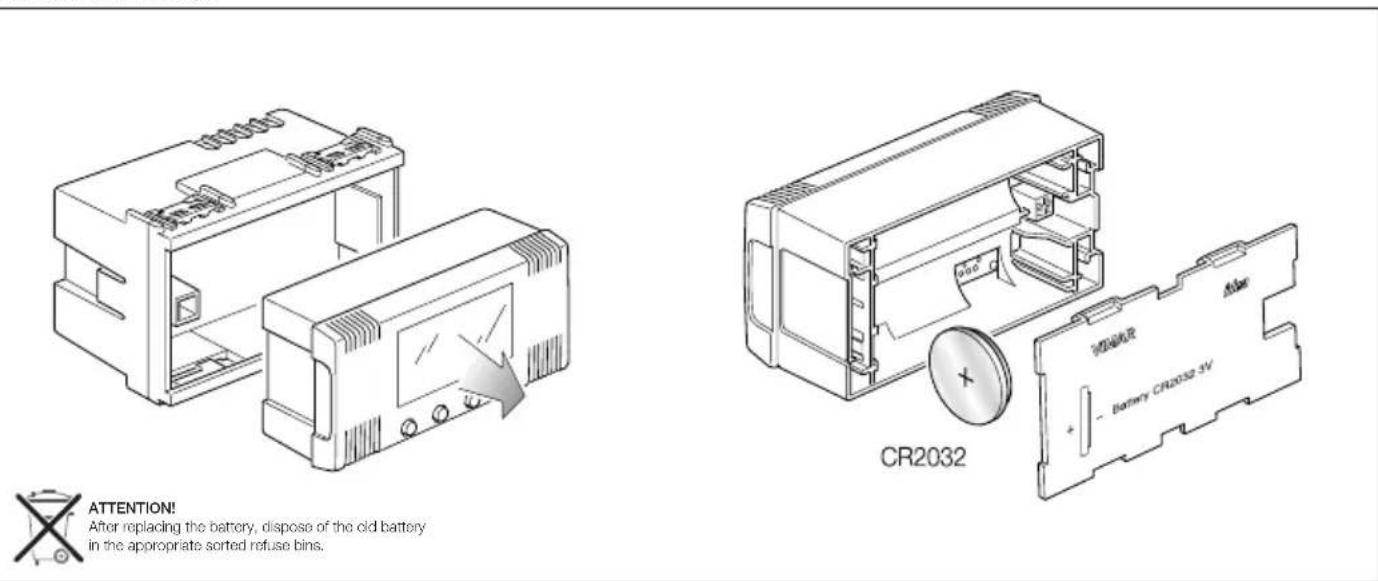
6. REPLACING THE BACKUP BATTERY.
The backup battery allows the electronic programmable time switch to be configured and programmed even when it is removed from its mounting box. It also assures continued operation of the display, with updating of the date and time, for a period of at least 10 days in the event of a power outage.
It does not, however, allow control of the relay output.
IMPORTANT!
The buffer battery is required in order for the equipment to function properly.
12-ENGLISH

VIMAR
7. USING THE ELECTRONIC PROGRAMMABLE TIME SWITCH.
To configure the time switch, from the starting screen of the display, press any one of the four front buttons.
The following icons appear:
- "Esc" (button A): cancels the selection.
- "▼" (button B): switches the controlled load on or off.
- “▲” (button C): switches the controlled load on or off.
- "Menu" (button D): used for accessing the "Operation" menu.
- Press "▼" (button B): the "Settings" and "Programming" menu items appear; use "▲" (button C) to scroll upward in the menu, or "Esc" (button A) to return to the previous menu.
- Press "Ok" (button D) to confirm.
7.1 OPERATION.
Selection of operating mode for the electronic programmable time switch, choosing between "Automatic" and "Manual".
AUTOMATIC.
Allows the user to configure the desired program type (see "Programming", page 14).
- MANUAL.
Allows the user to manually switch the controlled load on or off. This can also be done by pressing "▼" (button B) or "▲" (button C) from the main display screen.
7.2 SETTINGS.
Used for setting "Clock", "Language", "Display" and "Password".
CLOCK.
Used for setting the current date and time.
LANGUAGE.
Used for setting the language in which the instructions are displayed, choosing between Italiano, English, Frangais, Espanol and Deutsch.
- DISPLAY.
Used for choosing the type of icon that indicates the relay state and for adjusting the display contrast.
- PASSWORD.
Allows the user to configure, change or disable a 3-digit PIN password to prevent unauthorized access to the thermostat functions, settings and programs.
Attention!
Remember to make a note of the PIN number in the special space provided on pg. 8.

VIMAR
7.3 PROGRAMMING.
Configuration of 4 different programs: "Reduced", "Cyclic", "Progr_1" (personalised) e "Progr_2" (personalised).
- REDUCED.
For programming a single switch-on and a single switch-off event during the day.
CYCLIC.
For programming a switch-on and a switch-off period that are repeated cyclically. For example, entering "On hh mm 1.15" and "Off hh mm 1.30" the contact will continually repeat the sequence "contact ON for 1 hour and 15 minutes" - "contact OFF for 1 hour and 30 minutes"
PROGR_1 e PROGR_2.
Personalised programs. For setting up 2 different switch-on and switch-off programs for each individual day of the week, for a maximum of 35 switch events a day.
Confirm "ok" (button D) = scrolling menu with a choice of "Modify", "Copy" and "Rename".
- Modify.
Allows the user to set up or edit the switch-on and switch-off program, if desired by copying a program from one of the other days.
- Copy.
For copying a program that has already been configured by the user into one of the programs that is still to be configured.
- Rename.
For assigning a name to or renaming the chosen program.
8. RESET PROCEDURE.
- Simultaneously press the four buttons (button A, button B, button C, button D)
- Confirm with "Yes" (button D).
Restores the original first power-up conditions; all parameters are reset to their default values.
9. CHARACTERISTICS.
Supply voltage: 120-230 V~50-60 Hz
Average absorption: 1 VA
- Front controls: "Esc", "▲" "▼", "Set"/"ok"
- Clock backup battery duration: about 10 days, with type CR2032 battery
Output: 8 A 230V - change-over relay output
controllable loads:
- purely resistive loads : 8 A

VIMAR
- incandescent lamps : 800 W
- magnetic core transformers for very low voltage incandescent lamps (for example, halogen lamps) 800 W
- Not suitable for directly controlling fluorescent lamps
- Timed back-lit display, activated by pressing one of the four push buttons.
- instructions in 5 languages (Italian, English, French, Spanish, German)
device reset
Clock accuracy: ≤ ± 1 s a day - Number of switch events: max 35 a day (for a max of 245 switch events a week)
- Minimum duration of each switch event: 1 minute
- Programs:
- 2 programs fully configurable by the user (daily/weekly)
- 1 simple program (1 switch event a day) and 1 cyclic program (one "on" period and one "off" period, continually repeated)
- button lockout function with 3-digit PIN number to prevent unauthorized access to all the thermostat functions and programs (for example, when installed in a public place).
Number of manual cycles: 3.000
Number of automatic cycles: 100.000 - Type of contact opening: micro disconnect
- Type of action: 1BU
-
Tracking index: PTI175
-
Can be installed in a box with minimum depth of 46 mm
Pollution status: normal
Protection degree: IP40
Class II equipment: - Operating temperature: 0^ + 40^
- Ambient temperature range during transport: -25 °C +60 °C
- Possibility of protection against removal using the screw provided.
10. INSTALLATION RULES.
Installation should be carried out by qualified personnel in compliance with the current regulations regarding the installation of electrical equipment in the country where the products are installed.
11. CONFORMITY TO STANDARDS.
LV Directive. EMC Directive. Standards EN 60730-1, EN 60730-2-7.
REACH (EU) Regulation no. 1907/2006 - Art.33. The product may contain traces of lead.

11. CONFORMITA NORMATIVA.
Directive BT. Directive EMC. Normes EN 60730-1, EN 60730-2-7.
If the crossed-out bin symbol appears on the equipment or packaging, this means the product must not be included with other general waste at the end of its working life. The user must take the worn product to a sorted waste center, or return it to the retailer when purchasing a new one. Products for disposal can be consigned free of charge (without any new purchase obligation) to retailers with a sales area of at least 400m^2 if they measure less than 25cm . An efficient sorted waste collection for the environmentally friendly disposal of the used device, or its subsequent recycling, helps avoid the potential negative effects on the environment and people's health, and encourages the re-use and/or recycling of the construction materials.
- ATTENTION!
- CONFORMITA NORMATIVA.
- VIMAR
- CONTENTS
- 1.DESCRIPTION.
- SCOPE.
- FRONT VIEW AND VIEW OF CONTROLS
- CONNECTIONS (example).
- PROTECTION AGAINST REMOVAL.
- REPLACING THE BACKUP BATTERY.
- IMPORTANT!
- USING THE ELECTRONIC PROGRAMMABLE TIME SWITCH.
- OPERATION.
- SETTINGS.
- PROGRAMMING.
- - REDUCED.
- CYCLIC.
- PROGR_1 e PROGR_2.
- - Modify.
- - Copy.
- - Rename.
- RESET PROCEDURE.
- CHARACTERISTICS.
- INSTALLATION RULES.
- CONFORMITY TO STANDARDS.
Brand : Vimar
Model : 16582.B
Category : Programmable switch