PondoSolar 1600 - Pump Pontec - Free user manual and instructions
Find the device manual for free PondoSolar 1600 Pontec in PDF.


User questions about PondoSolar 1600 Pontec
0 question about this device. Answer the ones you know or ask your own.
Ask a new question about this device
Download the instructions for your Pump in PDF format for free! Find your manual PondoSolar 1600 - Pontec and take your electronic device back in hand. On this page are published all the documents necessary for the use of your device. PondoSolar 1600 by Pontec.
USER MANUAL PondoSolar 1600 Pontec
EN Operating instructions
FR Notice d'emploi
natural_image
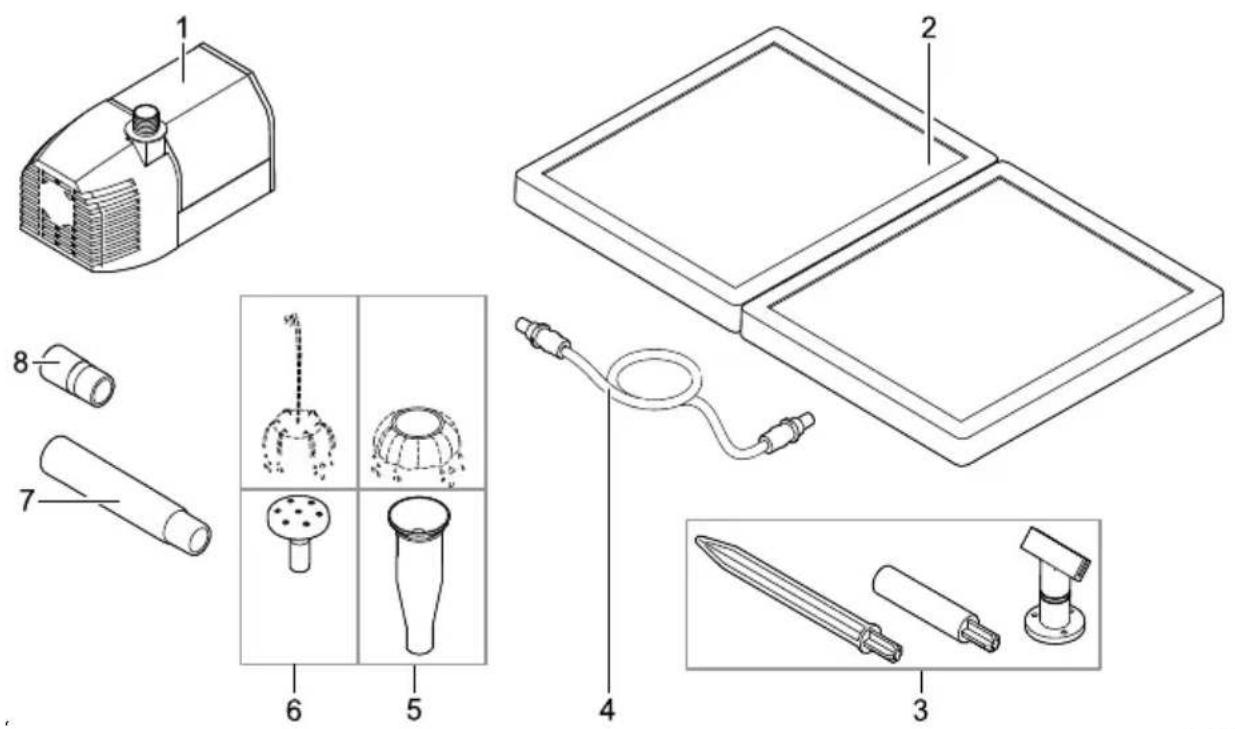
Technical line drawing of mechanical components including a pump, tool holder, and clamps (no text or labels)A
text_image
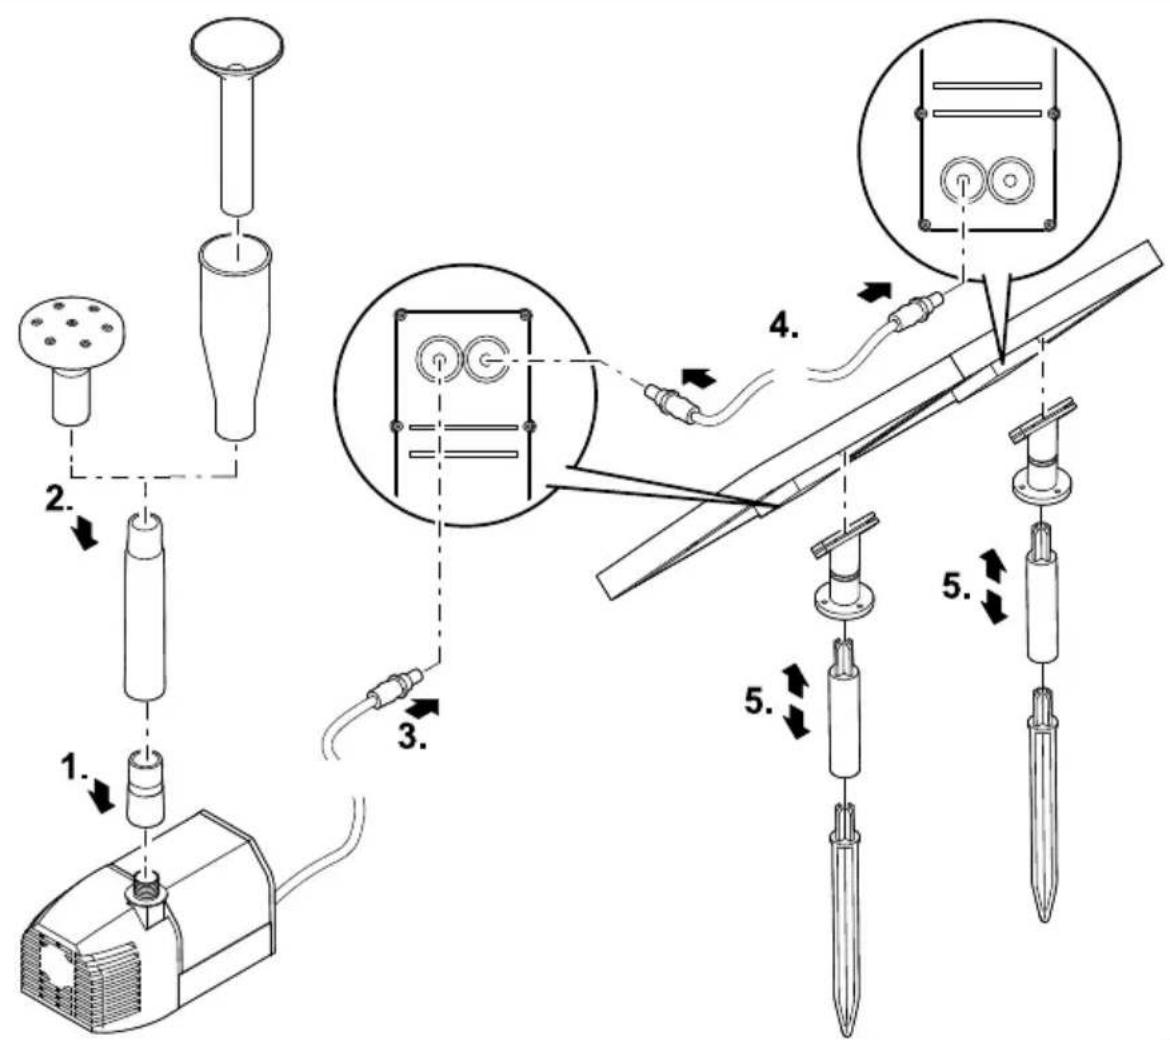
Technical diagram showing exploded view of a device with labeled parts including a device case, tray, and accessories.PSO0050
B
text_image
Technical diagram illustrating the assembly steps of a medical or laboratory device with labeled components and directional arrows.PSO0051
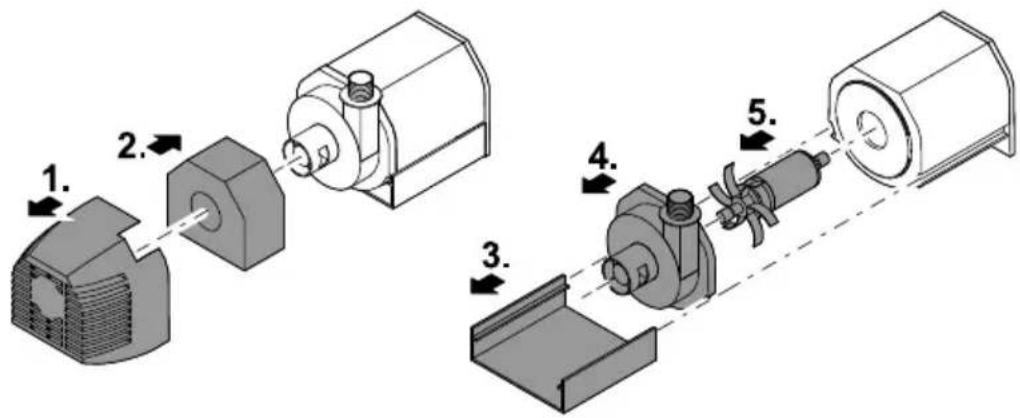
C
text_image
Technical diagram showing five sequential steps of a mechanical assembly with labeled componentsPSO0052
Translation of the original Operating Instructions
Information about these operating instructions
You made a good choice with the purchase of this product PondoSolar 1600.
Prior to commissioning the unit, please read the instructions of use carefully and fully familiarise yourself with the unit.
Ensure that all work on and with this unit is only carried out in accordance with these instructions.
Adhere to the safety information for the correct and safe use of the unit.
Keep these instructions in a safe place! Please also hand over the instructions when passing the unit on to a new owner.
Symbols used in these instructions
☐ A Reference to one or more figures. In this example: Reference to Fig. A.
→ Reference to another section.
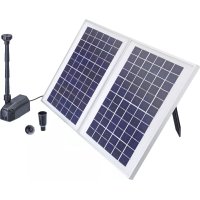
Scope of delivery
| ☐ A | Quantity | Description |
| 1 1 Pump with 5 m connection cable | ||
| 2 | 2 | Solar module |
| 3 2 Ground stake set | ||
| 4 1 Connecting cable for solar module | ||
| 5 | 1 | Nozzle holder |
| 6 | 2 | Nozzle attachment |
| 8 | 3 | Nozzle extension |
| 7 | 1 | Transition piece |
Intended use
PondoSolar 1600, referred to in the following as "unit", may only be used as specified in the following:
- For creating a water fountain in a pond.
- For operation with clean water.
• Operation under observance of the technical data.
The following restrictions apply to the unit:
- Never use the unit to convey fluids other than water.
- Never run the unit without water.
- Do not use in conjunction with chemicals, foodstuff, easily flammable or explosive substances.
Safety information
This unit can be used by children from the age of 8 and by persons with physical, sensory or mental impairments or lack of experience and knowledge, as long as they are supervised or instructed on how to use the unit safely and are able to understand the potential hazards. Do not allow children to play with the unit. Do not allow children to clean or maintain the unit without close supervision.
- EN -
Safe operation
- Do not carry or pull the unit by its electrical cable.
- Route cables/hoses such that they are protected from damage and do not present a tripping hazard.
- Only use original spare parts and accessories for the unit.
- In the case of electrical units and installations with a rated voltage of U > 12 V AC or U >30 V DC located in the water: Isolate the units and installations (switch off and disconnect from the power supply) before reaching into the water.
- Only operate the pump together with the supplied solar module.
- Do not allow the pump to run dry.
- Protect the unit from knocks or vibration.
- Clean the unit at least twice a year.
- Keep the connection plugs dry.
Installation and connection
How to proceed:
□ B
- Screw the transition piece onto the pump outlet.
- Assemble the nozzle unit and fit it onto the transition piece.
-
Adapt the number of nozzle extensions used to the depth of the pond.
-
Connect the connection cable to solar module 1.
- Push the plug completely into the socket (up to the stop) to ensure that the connection is watertight.
- Switching on: Connect the pump to the solar module.
- Switching off: Disconnect the solar module from the pump.
- Connect both solar modules together using the connecting cable.
- Push the plug into the socket as far as possible to ensure that the connection is watertight.
- Assemble the ground stake set and attach it to the solar module.
- Ensure that the connection cable is routed downwards.
- Install the solar module so that it is exposed to direct sunlight.
- Recommendation: Align the solar module to the sun to ensure maximum energy yield.
- Fix the pump underwater to a smooth, clean surface using the suction cups.
Remedy of faults
| Malfunction | Cause | Remedy | |
| Pump does not start. No connection to | the solar modules or the solar modules are not connected to each other. | - Check the connection to the solar module.- Connect the pump to the solar module.- Push the plug into the socket as far as possible. | |
| The solar module is soiled. Clean | |||
| The impeller unit is blocked. Clean | |||
| The battery capacity is exhausted. Charge the battery for at least 4 hours. | |||
| The rechargeable battery is defective. Disposing of the unit | |||
| Insufficient sunlight — | |||
| Insufficient or no pump delivery The filter is clogged. Remove the filter housing, remove and clean | the filter. | ||
Maintenance and cleaning
The unit has to be taken out of the water for cleaning or maintenance.
Cleaning the unit
- Never use aggressive cleaning agents or chemical solutions. These could attack the housing surface or impair the function.
- Recommended cleaning agent for removing stubborn limescale deposits:
– Vinegar- and chlorine-free household cleaning agent.
How to proceed:
- Disassemble the unit.
- Clean the filter housing and impeller unit. (→ Replacing the impeller unit)
- Pull the nozzle unit apart.
- Clean all parts.
– Use a soft brush as an aid.
– Rinse parts in clean water.
- Clean the solar module with a damp cloth and wipe dry.
- Reassemble the unit in the reverse order.
Replacing the impeller unit
How to proceed:
□ C
- Pull the filter housing from the pump.
- Remove the foam filter from the filter housing and rinse it out.
- Pull out and remove the base plate.
- Remove the cover from the impeller unit (bayonet closure, turn counter-clockwise).
- Pull out the impeller unit and clean or replace.
- Reassemble the unit in the reverse order.
Wear parts
The following components are wear parts and are excluded from the warranty:
- Impeller unit
- Foam filter
Storage/Over-wintering
Observe the permissible operating temperature range. (→ Technical data)
- If the limit values are exceeded or gone below, it is necessary to remove the unit. Clean the unit thoroughly and check it for damage.
- Store the pump submerged and in a frost-free environment.
Disposal

This unit contains electronic components - do not dispose of this unit with domestic waste! For disposal purposes, please use the return system provided. Render the unit unusable beforehand by cutting the cables.
Guarantee conditions
PfG grants a 2 year guarantee from the date of sale on proven material and manufacturing faults. Prerequisite for our guarantee is the presentation of the purchase receipt. Our guarantee will become null and void if the unit is misused, electrically or mechanically damaged by inappropriate use and improper repair by non-authorised workshops. Repairs are reserved for workshops authorised by PfG or by PfG itself. In the case of warranty claims, please return the defective unit or part freight paid to PfG together with a description of the fault and the purchase receipt. PfG reserves the right to invoice repair costs. PfG is not liable for transport damage. Any damage must be claimed against the carrier. Further claims of whatever type, especially consequential damage, are excluded. This guarantee does not affect the final customer's claims against the dealer.
text_image
Technical diagram showing assembly steps of a device with labeled components and component callouts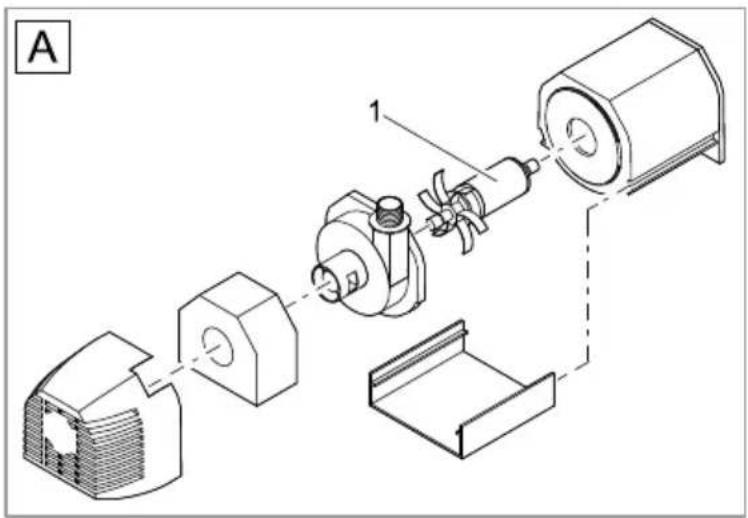
text_image
A 1PSO0058

text_image
pontecPfG GmbH
Tecklenburger Straße 161
D - 48469 Hörstel
Germany
www.pontec.com
CE