PE244CER - Cooker BERTAZZONI - Free user manual and instructions
Find the device manual for free PE244CER BERTAZZONI in PDF.
Download the instructions for your Cooker in PDF format for free! Find your manual PE244CER - BERTAZZONI and take your electronic device back in hand. On this page are published all the documents necessary for the use of your device. PE244CER by BERTAZZONI.
USER MANUAL PE244CER BERTAZZONI
CERAMIC GLASS COOKTOP
- Use and maintenance instructions
TABLE VETROCERAMIQUE
Please kindly register on our web site www.bertazzoni.com to validate your new product warranty and help us to assist you better in case of any inconvenience.
TWO YEAR LIMITED WARRANTY
The warranties provided by Bertazzoni Spa in this statement apply exclusively to Bertazzoni appliances and accessories sold as new products to the original owner by a Bertazzoni authorized distributor, retailer, dealer or service center and installed in the United States and Canada. The warranties provided in this statement are not transferable and have validity from the date of installation.
COVERAGE INFORMATION
Bertazzoni SpA will repair or replace any component part which fails or proves defective due to materials and/or workmanship within 2 years from the date of installation and under conditions of normal residential use.
Repair or replacement will be free of charge, including labor at standard rates
and shipping expenses. Repair service must be performed by a Bertazzoni Authorized Service
Center during normal working hours.
COSMETIC WARRANTY
Bertazzoni will cover parts showing cosmetic defects in material and workmanship for a period of thirty (30) days from date of installation of the unit. This coverage will include scratches, stains, surface imperfections on stainless steel, paint and porcelain, with the exclusion of slight differences in color due to materials and painting/enameling technologies.
Exclusions are labor costs, B stock items, out - of - box appliances and display units.
HOW TO OBTAIN SERVICE
To obtain service please contact Bertazzoni Customer Service at the numbers below and make sure to have model number, serial number, and date of purchase ready. This information will be requested by our team and is crucial to speeding up resolution.
UNITED STATES https://us.bertazzoni.com/more/support
Phone: 866-905-0010
CANADA https://ca.bertazzoni.com/more/support
Phone:800-361-0799
Save proof of original purchase original installation to establish warranty period. Copy of the product serial tag is affixed to the back cover of the instruction manual.
WHAT IS NOT COVERED
1.The product used in any commercial/business application
2.Repair service provided by other than a Bertazzoni authorized service agent.
3. Damage or repair service to correct service provided by an unauthorized agency or the use of unauthorized parts.
4.Installation not in accordance with local electrical codes or plumbing codes.
5.Defects or damage due to improper storage of the product.
6.Defects or damage or missing parts on products sold out of the original factory packaging or from displays.
7. Service calls or repairs to correct the installation of the product and/or related accessories.
8. Service calls to connect, convert or otherwise repair the electrical wiring / gas line / water line to properly use the product.
9. Service calls to provide instructions on the use of a Bertazzoni product.
10. Repair service due to product usage in manner other than what is normal and customary for home use.
11. Replacement of wear and tear parts
12. Replacement of glasses and light bulbs if they are claimed to have failed later than 30 days after installation and in no case later than 4 months after date of purchase
13. Defects and damages arising from accident, alteration, misuse, abuse, improper installation.
14. Defects and damages arising from transportation of the product to the home of the owner.
15. Defects and damage arising from external forces beyond the control of Bertazzoni SpA such as fire, flood, earthquakes and other acts of God.
In case the product will be installed in a remote area, where certified trained technicians are not reasonably available, the customer will be responsible for the transportation costs for the delivery of the product to the nearest authorized service center or for the displacement costs of a certified trained technician.
Bertazzoni does not assume any responsibility for incidental or consequential damages.
Some states do not allow the exclusion or limitation of incidental or consequential damages, so the above limitation or exclusion may not apply to you. This warranty gives you specific legal rights and you may also have other rights which may vary from state to state or province to province.
CALIFORNIA PROPOSITION 65
WARNING: Cancer and Reproductive
Harm -
www.P65Warnings.ca.gov.
3071108
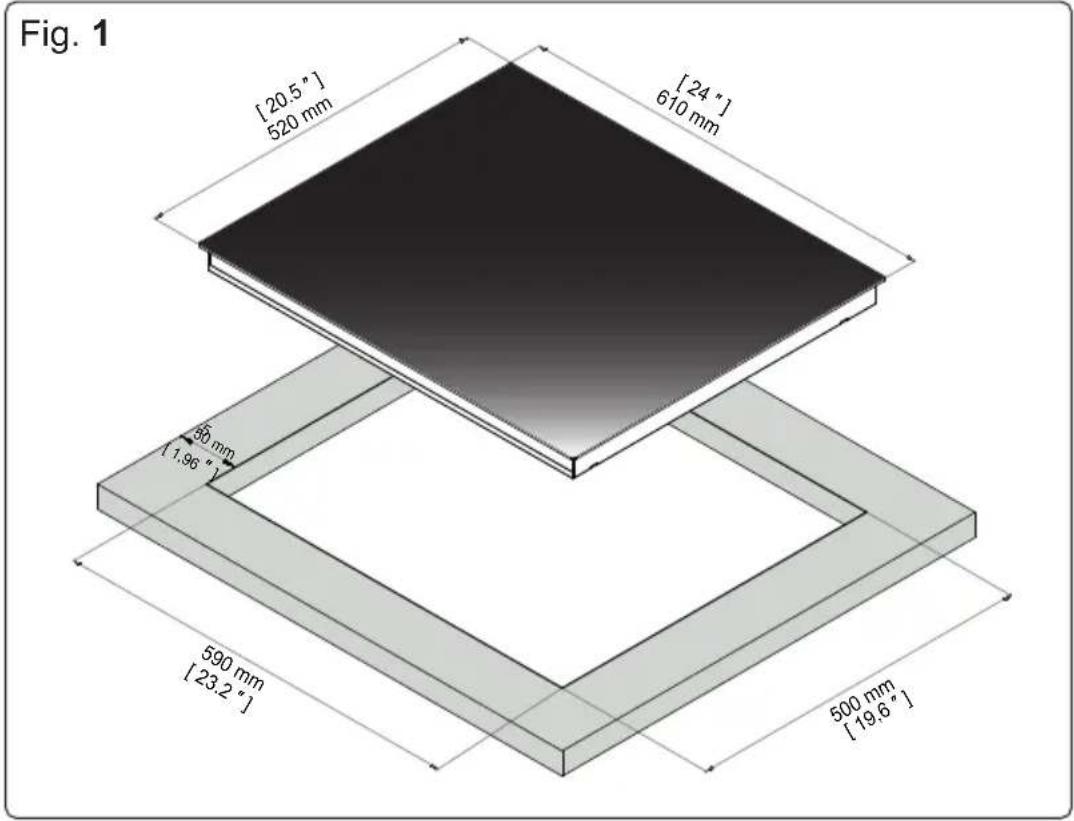
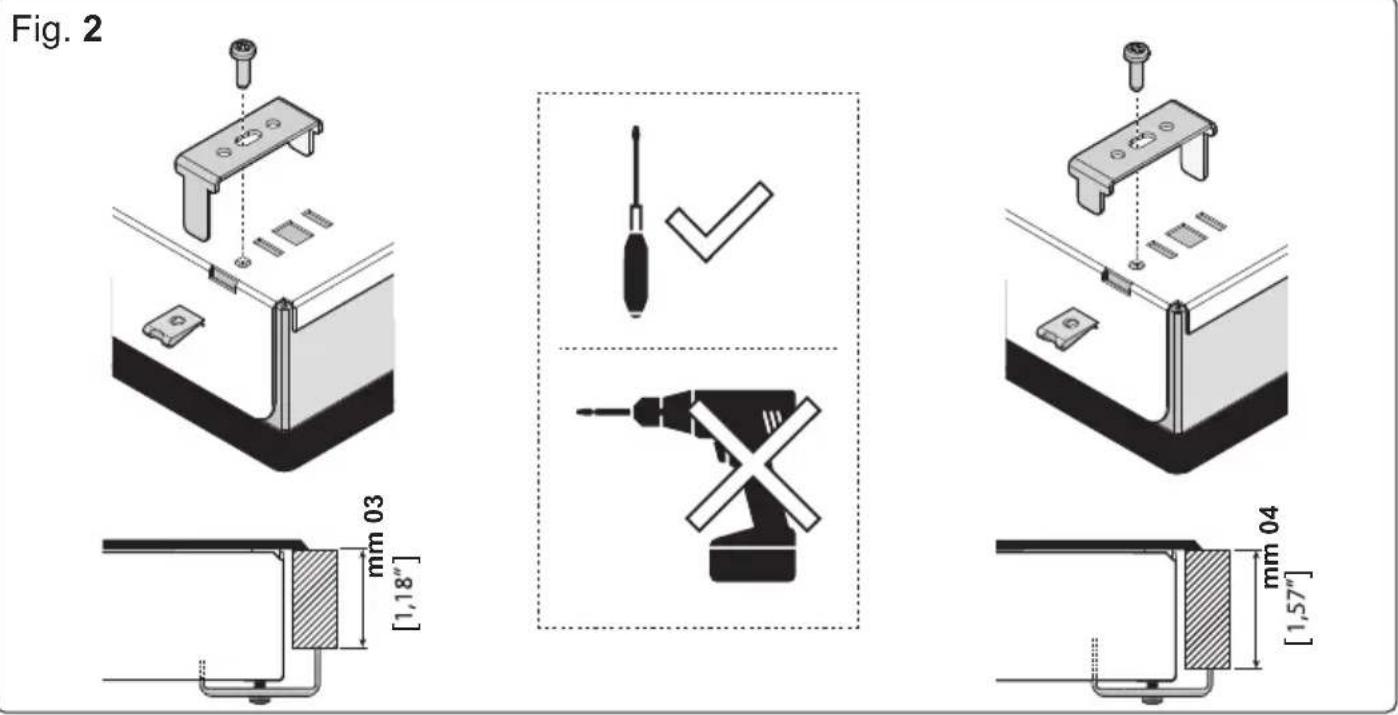
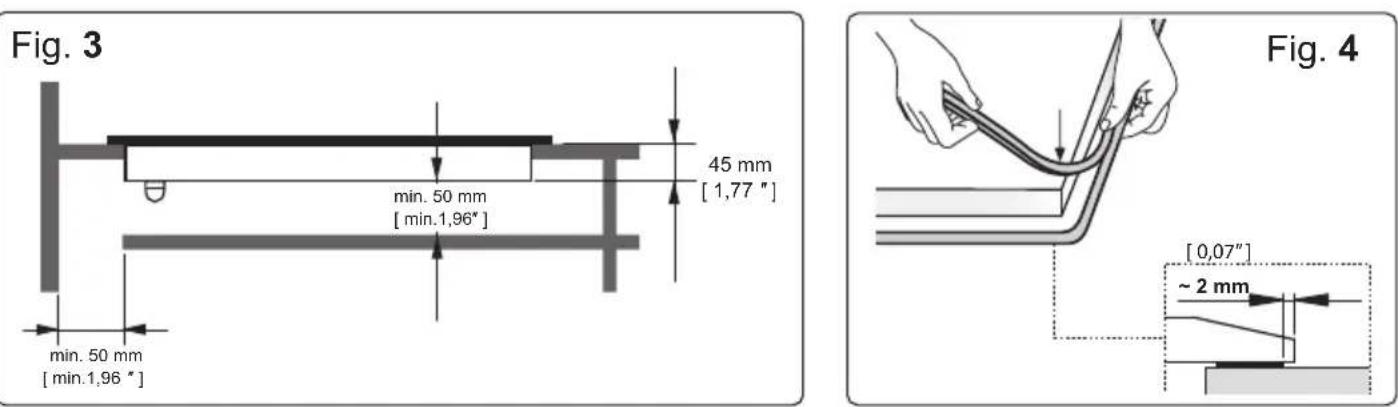
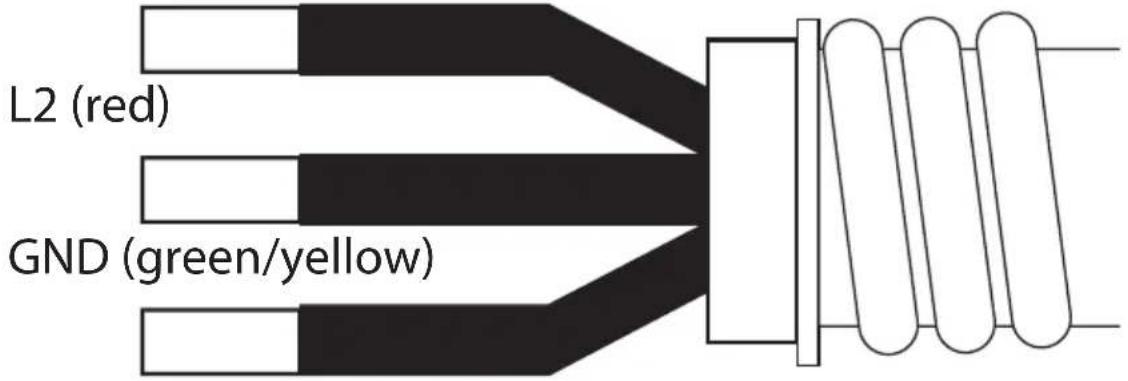
Fig. 5
L1 (black)
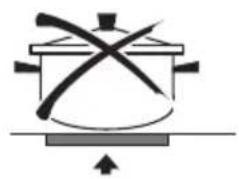
Fig. 6
Carefully read the contents of this instruction manual since it provides important instruction manual regarding safety of installation, use and maintenance. Keep the Instruction manual for possible future consultation. All the operations relating to installation (electrical connections) must be carried out by specialised personnel in accordance with current regulations and code.
SAFETYWARNINGS
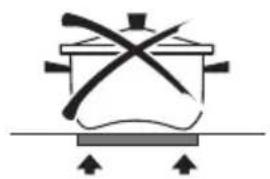
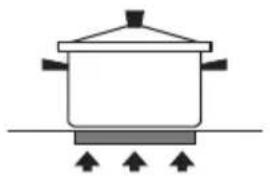
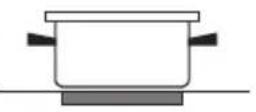
It is recommended to use flat-bottom pans with a diameter equal to or slightly larger than that of the heated area (Fig.6). Do not use pans with a rough base in order to prevent scratching the heat surface of the cooking hob. This appliance is not suitable for use by children or persons requiring supervision.
IMPORTANT
- Avoid spilling liquid, therefore to boil or heat liquids, reduce the power of the cooking zone.
- Please ensure when the appliance is turned on, that there are no empty pots left on top.
- After cooking, make sure to switch off the heating element used.
WARNING!!
If the surface of the hob is cracked, turn off the appliance and disconnect from the electrical main in order to avoid any possible electric shocks.
INSTALLATION INSTRUCTIONS
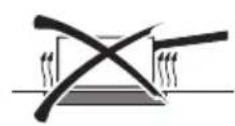
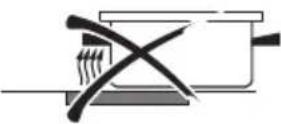
These instructions are for a specialized installer and are a guide for the installation process, regulations and maintenance in accordance with the law and current standards. If the built-in oven or any other appliances that produce heat, need to be installed directly underneath the cooking hobs in ceramic glass, IT IS NECESSARY THAT THE APPLIANCE (oven) AND THE COOKING HOBS IN CERAMIC GLASS ARE ADEQUATELY ISOLATED (fig.3). Failure to follow this precaution, could cause a malfunction in the TOUCH
CONTROL system.
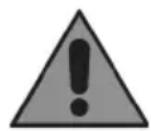
POSITIONING
The domestic appliance was built in order to be built into a work surface, the way it is illustrated in Fig 1. Place sealing gasket along the whole perimeter Fig.4 (the dimensions of the cut Fig.1). This sealing gasket is included in the product packaging, if this is lost you can request it again. This operation is necessary to avoid any liquids penetrating the worktop.Lock the domestic appliance into place with 4 supporters, keeping in mind the width of the surface (Fig.2). If the lower part of the appliance after installation, is accessible via the lower part of the furniture, it is necessary to mount a separating panel keeping in mind the distances indicated (Fig.3). It is possible to mount the hob in Flush mode. Following the measurements in fig. 10, i.e. with a distance from the hob to the hob of 7mm [0,27].
ELECTRICAL CONNECTIONS
(Fig.5)
Electrical safety instructions
- All electrical work should be carried out by a suitably qualified and competent person, in strict accordance with current local and national safety regulations. Installation, repairs and other work by unqualified persons could be dangerous. The manufacturer cannot be held liable for unauthorised interventions.
- A damaged cable must be replaced by a suitably qualified electrician with a special connection cable of the same type of the one originally provided with the cooktop.
- Ensure power is not supplied to the appliance until after installation or repair work has been carried out. The appliance must only be operated when built-in. This is to ensure that all electrical parts are shielded. Live parts must not be exposed.
- Do not connect the appliance to the mains electricity supply by an extension cord. These do not guarantee the required safety of the appliance.
- Connection should be made via a suitable isolator which complies with national and local safety regulations, and the On/Off switch should be easily accessible after the appliance has been built in.
If the switch is not accessible after installation (depending on the country) an additional means of disconnection must be provided for all poles.
- For extra safety it is advisable to protect the appliance with a residual current device (RCD). Please contact a qualified electrician for advice.
When switched off there must be an all-pole contact gap of at least 3mm (0,11") in the isolator switch (including switch, fuses and relays).
WARNING! THIS APPLIANCE MUST BE GROUNDED
The electrical safety of this appliance can only be guaranteed when continuity is complete between it and an effective earthing system, which complies with current local and national safety regulations.
It is most important that this basic safety requirement is present and regularly tested and, where there is any doubt, the electrical wiring in the home should be inspected by a qualified electrician. The manufacturer cannot be held liable for the consequences of an inadequate earthing system such as an electric shock.
The manufacturer cannot be held liable for damage which is the direct or indirect result of incorrect installation or connection.
WARNING!

Electrical Shock Hazard
Disconnect power before servicing.
Use 10 gauge copper wire.
Electrically ground cooktop.
Failure to follow these instructions can result in death, fire, or electrical shock.
Electrical Connection
The cooktop is equipped with a flexible metal conduit encasing 3 wires ready for connection to a grounded power supply.
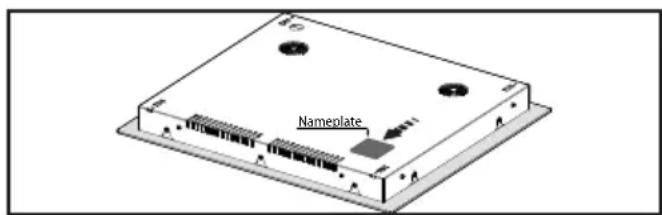
Please note the nameplate label located below the cooktop
- Disconnect power.
- Remove junction box cover if it is present.
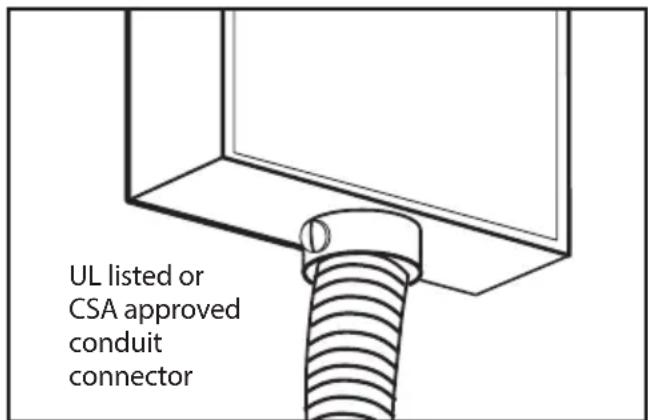
- Connect the flexible cable conduit from the cooktop to the junction box using a UL listed or CSA approved conduit connector.
4.Tighten screws on conduit connector if present. - See next page to complete installation for your type of electrical connection.
Please see Fig. 5:
208/240 V, 60 Hz, from 50 A fuse rating to 30A
Black wire: connect to L1 (hot)
Red wire: connect to L2 (hot)
Green/Yellow wire: connect to GND (ground)
A dedicated line and junction box should be used to connect the cooktop to a 30 A circuit.
Installation
4-Wire Cable from Home Power Supply
IMPORTANT: Use the 4-wire cable from home power supply in the U.S.A. where local codes do not allow grounding through neutral, New Branch circuit installations (1996 NEC), mobile homes and recreational vehicles, new construction, and in Canada.
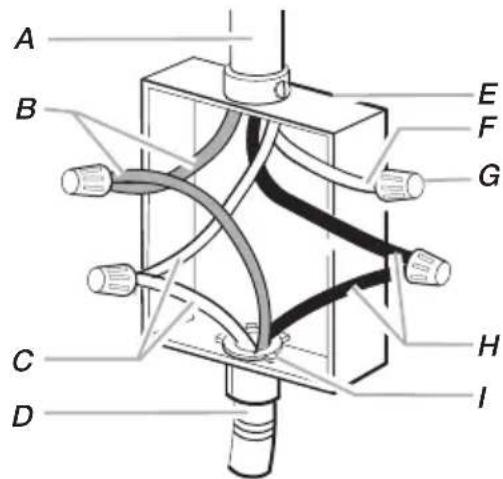
A. Cable from home power supply
B. Red wires
C. Green (or bare) ground wire
D. 3-wire cable (from cooktop)
E. Junction box
3-Wire Cable from Home Power Supply - U.S.A. Only
IMPORTANT: Use the 3-wire cable from home power supply where local codes permit a 3-wire connection.
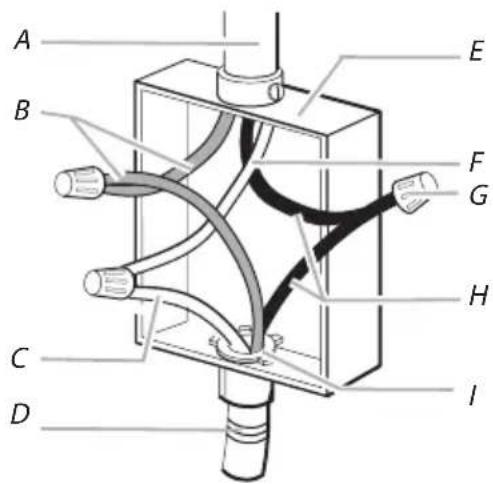
F. White wire (from home power supply)
G. UL listed wire connector
H. Black wires
I. UL listed or CSA approved conduit connector with wire bushing
- Connect the 2 red wires (B) together using a UL listed wire connector.
- Connect the green (or bare) ground wire (C) from the cooktop cable to the green (or bare) ground wire (in the junction box) using a UL listed wire connector.
- Put a UL listed wire connector on the end of the white wire (F).
NOTE: Do not connect the green (or bare) ground wire to the neutral (white) wire in the junction box.
- Connect the 2 black wires (H) together using a UL listed wire connector.
-
Install junction box cover.
-
Connect the 2 red wires (B) together using a UL listed wire connector.
- Connect the green (or bare) cooktop cable wire (C) to the white (neutral) wire (F) in the junction box using a UL listed wire connector.
- Connect the 2 black wires (H) together using a UL listed wire connector.
- Install junction box cover.
USE AND MAINTENANCE
MAINTENANCE
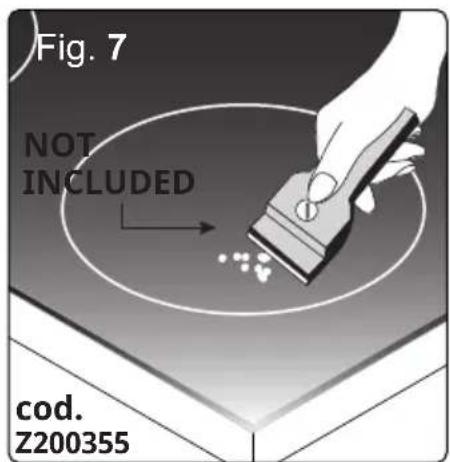
Remove any residues of food and drops of grease from the cooking surface by using the special scraper supplied on request (Fig.7- cod. Z200355). Clean the heated area as thoroughly as possible using suitable products, and a cloth/paper towel, then rinse with water and dry with a clean cloth.
Using the special scraper (optional) immediately remove any fragments of aluminium and plastic material that have unintentionally melted on the heated cooking area, or residues of sugar or food with a high sugar content (Fig.7). In this way, any damage to the cooktop surface can be prevented.
Under no circumstances should abrasive sponges, or corrosive chemical detergents, such as oven sprays or stain removers, be used.
USE
Use the touch control system in the corresponding position according to individual cooking needs.
Keep in mind that the higher the number, the more heat is produced.
TOUCH CONTROL (see Fig.8)
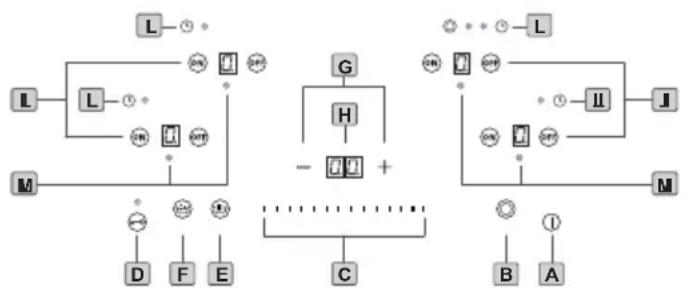
A. ON/OFF button > switch the appliance ON and OFF
B. Double cooking zone > activate the second circuit of the extendable cooking zone
C. Cooking Zone / Slider bar > increase or reduce power level of the cooking zone
E. Low Temperature key > allow to keep a fixed value of temperature
F. Fast Boil key > increase power at maximum level faster
G. Lock key /Child lock > activate control panel lock
H. Display timer
I. Minute minder time Keys (-1+)> increase or decrease timer value
L. ON/OFF keys for each cooking zone > switch the cooking zone ON and OFF
M. Clock indicator for each cooking zone
N. Double cooking zone indicator
SWITCHING ON THE HOB①
When manufactured, the appliance will be in the safety position, i.e. control lock is active and the 1key is illuminated. In order to use the appliance the safety function must be deactivated by pressing the 1key until the indicator light switches off. Press 1 key (A zone) for 1 sec to switch the top on. A beep sounds and all the cooking zone displays (M zone) show 0. The control unit remains active for 10 seconds. If within this time no cooking zone is selected, the electronic device returns automatically to the OFF position and the above described operation must be repeated to switch the cooking top on again.
SWITCHING ON THE COOKING ZONES
To switch on a cooking zone it is necessary to select the desired cooking zone key (I zone). A beep sounds and the cooking zone on led blinks. The ON key will be locked if the key lock is activated, or if there is any cooking zone error.
SELECTING A POWER LEVEL FOR A COOKING ZONE
Once the cooking zone is selected, the power level can be selected by touching the Slider Bar (C zone). The selected power level is showed in the cooking zone display (M zone). The Slider Bar key will be locked if the key lock is activated. Once this operation has been completed you can adjust the temperature with the Slider Bar (C zone). The power of the single cooking zone can be adjusted in 9 different positions and will be shown on luminous display (M zone) with a number from "1 to 9". When the power level is accepted, a beep sounds, the cooking zone on led stops blinking.
EXTENDABLE DOUBLE COOKING ZONE
The cooktop has extendable cooking zones that can increase the cooking area. In this way, the user can utilize pans with different diameters.
Press the key to activate the second circuit of the cooking zone.
Then, use the Slider Bar (C zone) to adjust the power level.
To disable this function: touch the Double cooking zone key (B zone) again.
RESIDUAL HEAT
If the temperature of the cooking zone is still high after it has been switched off, the relative indicator will be on (residual heat).
The signal will only switch off when the surface temperature has fallen to a safe level.
TIMER
This function allows establishing the time (from 1 to 99 minutes), and can be modified at any time.
The minute minder is switched on by touching the Timer or key (G zone). If the key is touched, a beep sounds and the timer display (H zone) shows "45". The timer indicator of the timer display blinks to indicate the time selection status. If key is touched, a beep sounds and the timer displays show "00", and the timer indicator display blinks to indicate the time selection status.
To disable the operation of the timer, select a timer value of "00", using the
key, or switch off the timer by touching the Timer and Keys simultaneously.
Select a Cooking zone minute minder:
To select a minute minder associated to a cooking zone:
-
Select the desired cooking zone
-
Touch the Timer or keys (G zone) to switch on the Timer; the cooking zone timed led blinks when a cooking zone minder is selected. If the cooking zone is switched off, the corresponding cooking zone minute minder is switched off.
Select a independent minute minder: If no cooking zone is selected, press the timer or keys (G zone) to select the independent minute minder.
The independent minute minder can be selected even if the cooktop is off: touching the timer or key to switch on the timer. The timer on led blinks when the independent minute minder is selected. If the cooktop is off, the independet minute minder is not switched off.
Minute Minder Time Visualization:
If more than one minute minder is selected, then the timer displays show the count down of the timer whose remaining time is the lowest. The active minute minder led blinks. If no cooking zone is selected, touch the timer or key to change the independent minute minder time. The timer display (H zone) shows the selected time, and the timer led blinks. If a timed cooking zone is selected, the timer display shows the selected timer time, and the timed cooking zone led blinks (L zone).
Selecting/changing the time:
If the or keys associated with the timer are held down, the value increases/decreases automatically. After 10 increase/ decrease increment/decrement increases in speed. This makes possible to reach the desired timer setting more quickly. The led light timer blinks indicating that the time selection status. The selection time is confirmed 5 seconds after the last touch over the timer or
keys. When the selection time finishes, a beep sounds to indicate that the countdown has initiated.
Starting the timer countdown:
If no key is touched in 5 seconds after thelastoperationoverthetimeror
key, the timer selection will switch off. In this 5 sec, if any cooking zone is selected the timer selection will switched on and the timer will be switched on.
Timer elapsed:
When timer elapses, a "Cycle Finish tone" will be sound. When the time set on the timer has run out, a "Cycle Finish tone"sounds for 1 minute, and the timer display (H zone) blinks the indication "00" until any of the user interface keys is touched.
CONTROL PANEL LOCK
It is possible to block the controls to prevent the risk of unintentional modification of the settings (children, cleaning etc.). By touching the key (G key) for 2 seconds. If the key lock indicator is on, the keyboard is locked. This function can be activated when the cooking zones are ON or when the cooktop is OFF. If the cooktop is on, this Lock function locks all the keys except the cooking zone OFF keys, the ON/OFF key (of the entire cooktop) and the key lock indicator. Otherwise, when the cooktop is off, the key lock function locks all the keys, including the general ON/OFF key.
The key-lock is always activated at the start up of the control. Then from the second start this will no longer happen. To disable this function is necessary touching the key (G key) for 2 seconds.
LOW TEMPERATURE FUNCTION
The "LOW TEMP" function allows us to keep the temperature at a fixed value. It is used to keep food warm. Therefore the cooking zone works with one low power.
The temperature values are for:
- Melting (Dissolving)
- Warming (keep warm) keep at temperature constant food
- Simmering (Simmer) cook just below the point of boiling.
To activate this function: after a cooking zone has been selected, touch the Low Temperature key (E key). A beep sounds and the cooking zone display shows the selected power level and an "L" alternating.
To disable this function: after a cooking zone has been selected, touch the Low Temperature key (E key). A beep sounds and the cooking zone display shows the selected power level and
an "L" alternating. This function can be enabled/disabled before or after selecting the power level and when the heater is on or off.
FAST BOIL FUNCTION
This activity makes it possible to use the hob's maximum power (for example to bring water to the boil very quickly).
To activate this function: after a cooking zone has been selected, touch the Fast Boil key (F key). A beep sounds and the cooking zone display shows the selected power level and a "P" flashing. The cooking zone will work at maximum power level for 10 minutes. After these minutes the cooking zone will return to the selected power level.
To disable this function: after a cooking zone has been selected, touch the Fast Boil key (F key). A beep sounds and the cooking zone display shows the selected power level and a "P" flashing.
SWITCHING OFF THE COOKING ZONES
To switch a cooking zone off, touch key of the relative zone. A beep sounds, the cooking zone display shows and the cooking zone led is switched off (if there is no residual heat).
The cooking zone selection will finish 10 second after the last key is touched (Slider, Fast Boil, Low Temp, etc...).
SWITCHING OFF THE HOB ①
To turn off the appliance entirely hold down the ① key.
OVERFLOW SECURITY
In case of liquid spills on the cooking hob (for example water or other liquids) that might prevent the command from working properly, the cooking zones will automatically shut down. In all the hob displays an "FC" error message will show together with a beep sound. To return to the normal operation, you will have to clean up the cooking hob, by removing the spilled liquid, shut the appliance down and then reactivate it.
SAFETY SWITCH
The appliance has a safety switch that automatically switches off the cooking zones when they have been operating for a certain amount of time at a given power level.
| POWER LEVEL | Max. time on (hours) |
| 1 | 10 |
| 2 10 | |
| 3 | 10 |
| 4 | 10 |
| 5 | 10 |
| 6 | 10 |
| 7 | 10 |
| 8 | 10 |
| 9 | 3 |
DISPOSAL OF OLD ELECTRICAL APPLIANCES
The European Directive 2002/96/ EC on Waste Electrical and Electronic Equipment (WEEE), requires that old household electrical appliances must not be
disposed of in the normal unsorted municipal waste stream. Old appliances must be collected separately in order to optimise the recovery and recycling of the materials they contain and reduce the impact on human health and the environment. The crossed-out dustbin symbol on the product reminds you of your obligation regarding separated waste collection. Consumers should contact their local public service or their local dealer for more information on the correct disposal of exhausted household appliances.
THE MANUFACTURER DECLINES ALL RESPONSIBILITY FOR EVENTUAL DAMAGES CAUSED BY NOT COMPLYING WITH THE ABOVE WARNINGS.
THE WARRANTY IS NOT VALID IN THE CASE OF DAMAGE CAUSED BY FAILURE TO COMPLY WITH THE ABOVE-MENTIONED WARNING.
| Information for household electric hobs In acc. with regulation (EU) No. 66/2014 | |||||
| Model name / identifier | |||||
| Type of hob | built-in | ||||
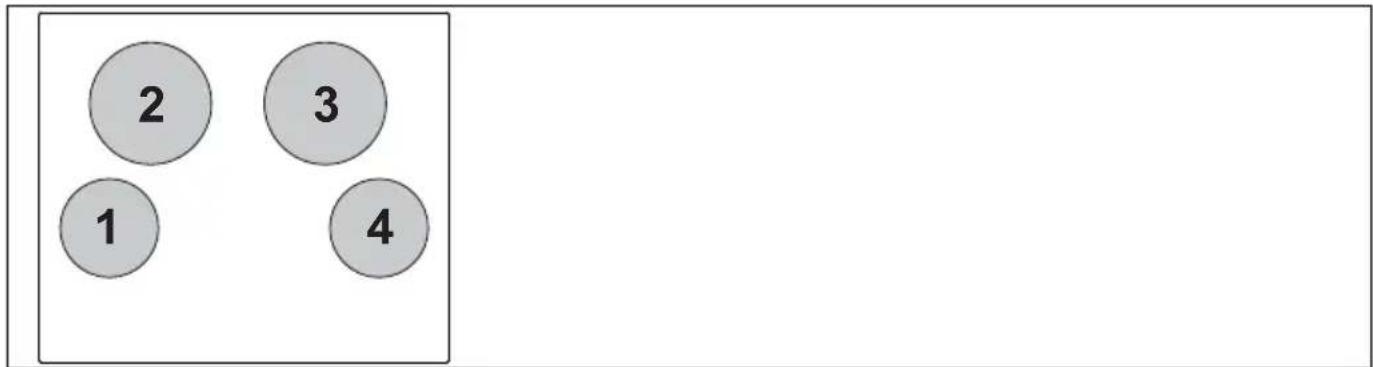
| Number of cooking zones and/or areas | 4 | ||||
| Heating technology Cooking zones and cooking areas, radiant cooking zones, | 1. = Hi-light 2. = Hi-light 3. = Hi-light 4. = Hi-light | ||||
| For circular cooking zones: diameter of useful surface area cooking zone For non-circular cooking zones or areas: length and width of useful surface area per electric cooking zone or area | 1. = Ø 146 mm 2. = Ø 181 mm 3. = Ø 181 mm 4. = Ø 146 mm | 1. = Ø 5.74" 2. = Ø 7.12" 3. = Ø 7.12" 4. = Ø 5.74" | |||
| Energy consumption per cooking zone or area Wh/kg calculated per kg (EC electric cookbag) | 1. = 186 2. = 185.8 3. = 190.2 4. = 186 | ||||
| Energy consumption for the hob calculated per kg (EC electric hob) Wh/kg | 187 | ||||
ERRORS
| Event(Visualization Priority Order) | Description | Action End | Heater Display | All heater Display | |
| FalloKeyOnOffEmitter Security Key Error App Off (*) ............ FA | |||||
| FalloKeyOnOffReceiver Security Key Error App Off (*) ............ FC | |||||
| FalloNtcShort Touch NTc Error App Off (*) ............ FE | |||||
| FalloNtcOpen Touch NTc Error App Off (*) ............ Ft | |||||
| FalloOverTemp Touch NTc > 105°C App Off (*) T < 95°C Fc | |||||
| FalloRelay Touch Relay Failure | App Off (*) ............ Fr | ||||
| FalloEepromChecksum | App Off (*) ............ FH | ||||
| FalloAdc Security Key Error App Off (*) ............ FJ | |||||
| FalloSw Software Error | F0 | ||||
| FalloAmbientLight | Keyboard Error | App Off (*) | Light condition | ||
| FalloDivisor | Security Key Error App Off (*) ............ FU | ||||
| FalloTestLedOnOff | OnOff Led Error App Off (*) ............ Fd | ||||
| FalloTetGroupSelection | Keyboard Error | App Off (*) | ...... | ||
| FalloComunicaciones | Communication Error | I.H. Off(****) | Comm. OK F5 | ||
| FalloFanNoRun | Fan Error | I.H. Off(****) | Serial Comm. | ||
| FP | |||||
(^*) All cooking zones switched Off and locked
CANADA https://ca.bertazzoni.com/more/support
Phone:800-361-0799