
Super Cooler Cryo - Air Conditioning Thermex - Free user manual and instructions
Find the device manual for free Super Cooler Cryo Thermex in PDF.

| Product type | Mobile monobloc air conditioner |
| Brand | Thermex |
| Model | Super Cooler Cryo |
| Dimensions (W x H x D) | 414 x 783 x 425 mm |
| Net weight | 31 kg |
| Power supply | 220-240 V ~ 50 Hz |
| Cooling capacity | 3.2 kW (10,918 BTU/h) |
| Rated power (cooling) | 1050 W |
| Refrigerant | R290 (flammable) |
| Refrigerant charge | 0.28 kg |
| Operating modes | Auto, Cooling, Fan, Dehumidification |
| Fan speeds | 3 (High, Medium, Low) |
| Programmable timer | 1 to 24 hours |
| Night mode | Yes (gradual temperature adjustment) |
| Efficiency Boost function | Yes (add water up to 2.5 L to improve efficiency) |
| Moisture removal capacity | 28 L/day |
| Operating temperature (cooling) | 18 °C to 35 °C |
| Compressor type | Rotary |
| Activated carbon filter | Included |
| Remote control | Yes (AAA batteries not included) |
| Hot air exhaust hose | Ø150 x 1500 mm (flexible) |
| Continuous drainage | Possible with supplied hose |
| Minimum room area | 13.4 m² |
| Included accessories | Exhaust hose, connectors, window panels, carbon filter, remote control |
Frequently Asked Questions - Super Cooler Cryo Thermex
User questions about Super Cooler Cryo Thermex
0 question about this device. Answer the ones you know or ask your own.
Ask a new question about this device
Download the instructions for your Air Conditioning in PDF format for free! Find your manual Super Cooler Cryo - Thermex and take your electronic device back in hand. On this page are published all the documents necessary for the use of your device. Super Cooler Cryo by Thermex.
USER MANUAL Super Cooler Cryo Thermex
Read the instructions contained in this booklet carefully before using the appliance.
Vortice cannot assume any responsibility for damage to property or personal injury resulting from failure to abide by the instructions given in this booklet.
Following these instructions will ensure a long service life and overall electrical and mechanical reliability.
Keep this instruction booklet in a safe place.
Index EN
Technical data 18
Description 19
Safety 19
Informations and safety R290 21
Informations about disposal. 22
Supplied accessories 23
Installation 23
Functioning 26
Maintenance and cleaning 31
- Measuring condition for above is as per EN 14511:
Cooling - DB= 35^ , WB= 24^
DB= temperature of dry bulb = room temperature.
WB= temperature of wet bulb = relative himidity. - Test condition for data in our rating label is as per safety regulation: EN60335-2-40
- Current & Fuse : F10AL250V or T10AL250V
ENGLISH
Description
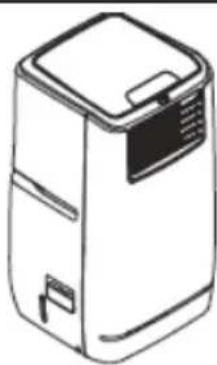
VORT KRYO-POLAR 11, 11 HP, 13, 13 HP are "all in one" local air conditioner, that contain in one unit, everything they need for their functioning. In particular the VORT KRYO-POLAR 13 HP & 11 HP models contains also an heating pump.
Read carefully this instructions manual before install, operate or repair the unit.
The appliance is filled with Propane gas R290.
- Before use the appliance, read the owner's manual first.

- Before installing the appliance, read the installation manual first.
- Before repairing the appliance, read the service manual first.
Safety:
- Table of minimal dimensions of the ventilated room, for use, store or install.
| Product name Min. room dimensions m2 |
| VORT KRYO-POLAR EVO 11 13,4 |
| VORT KRYO-POLAR EVO 11 HP 13,4 |
| VORT KRYO-POLAR EVO 13 14.4 |
| VORT KRYO-POLAR EVO 13 HP 14.43 |
- Do not use the appliance in cabinet, closet, boats, caravans or similar locations.
- Do not use the appliance in swimming pools, washrooms or similar wet areas.
- Leave the unit in a standing position for 12 hours before connecting it to the main supply, after transport or when it's been tilted (ex. During cleaning)
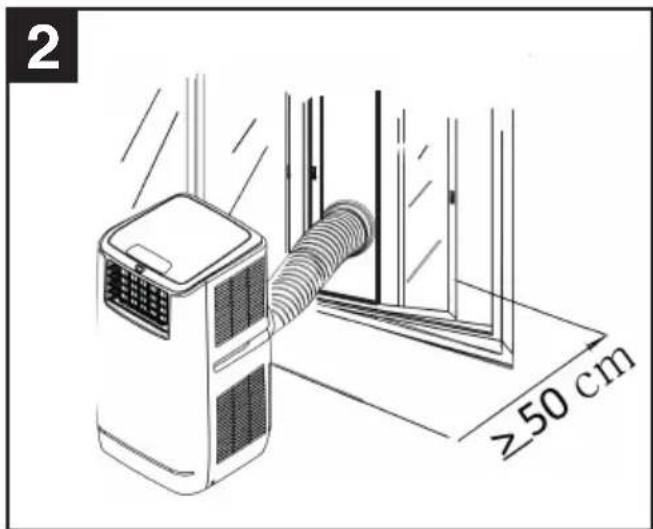
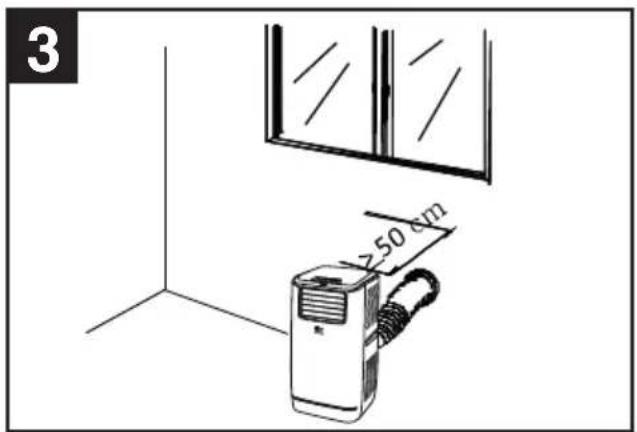
- Only use the unit in an upright position and on a flat level surface (even during transport), keep at least 50 cm in all directions from any objects.
ENGLISH
- Do not use the appliance in the proximity of flammable or explosive substances, fuels. Never use paint, cleaning sprays, insect spars or any other similar product nera the unit; this could deform the plastics or cause electrical damage.
- Make sure that there is at least 50~cm between the sides of the appliance and any flammable, heating materials.
- Do not place objects on the unit or restrict air inlet/outlet.
- Avoid splashes to the unit.
-
Closely supervise any children or pets when the unit is in use.
-
This appliance can be used by children aged from 8 years and above and persons with reduced physical, sensory or mental capabilities or lack of experience and knowledge if they have been given supervision or instruction concerning use of the appliance in a safe way and understand the hazards involved. Children shall not play with the appliance. Cleaning and user maintenance shall not be made by children without supervision.
-
These appliances are designed for use in residential and commercial properties.
- The appliance must be installed by a professionally qualified electrician.
- The electrical system to which the product is connected must be in compliance with applicable regulations.
- An omnipolar switch with a contact opening distance of 3mm or higher should be provided for installation, enabling complete disconnection under overvoltage category III conditions.
Children shall not play with the appliance. - Cleaning and user maintenance shall not be made by children without supervision.
- Make sure to switch off and unplug the unit when it's not in use.
- Never leave the unit functioning while not supervised.
- Do not pull the unit along by the cord.
- Avoid over-twisting, -coiling, -pulling the power cord. Never use nylon or iron wire to tide the power cord.
- Make sure that the plug and socket remain visible and accessible at all the time.
- Do not use extension cords.
- Never reach the unit if water has fallen on it. In such case, immediately unplug the machine and have it checked before using it again.
- If the supply cord is damaged, it must be replaced by an electrician or similarly qualified person, to avoid hazard.
- The main supply must conform to the specification shown on the rating plate at the back of the unit.
- Do not exceed the recommended room size for max. efficiency.
- Close all doors and windows while operating the appliance.
- Keep curtains or blinds closed during the sunniest hours of the day.
Always remember to keep the filters clean. - Once room has reached the desired conditions, reduce the setting of temperature and ventilation.
- Do not turn on the appliance if you have discovered damage to the appliance, cord, plug or if the appliance is malfunctioning or if there are signs of any other defect. Please return the complete product to the
vendor or to a certified electrician for inspection and/or repair. Always ask for original parts. The appliance (including cord and plug) may only be opened and/or repaired by properly authorised and qualified persons.
- It is suggested to send the unit for professional maintenance periodically.
- Only a licensed professional is allowed to dismantle or modify the appliance.
- The machine must be used only for its prescribed purpose.
Any other use is deemed to be a case of misuse. The user/operator, not the manufacturer will be liable for any damage or injuries of any kind caused as a result of this.
ENGLISH
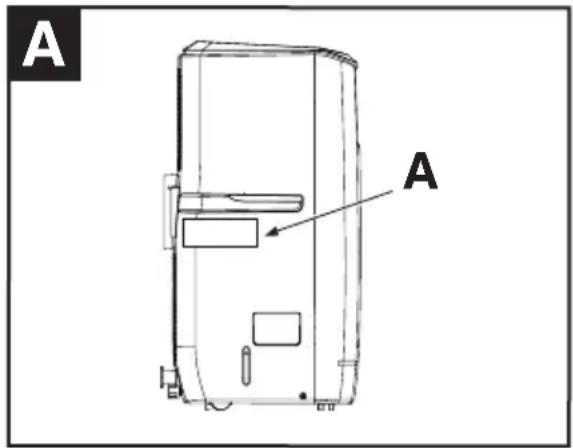
- It is important that the rating label and the Marks on the unit are always visible and readable. Marks that are not anymore visible or readable, must be corrected.
Informations and safety relating refrigerant R290
- Read these warnings carefully.
- This appliance contains the refrigerant R290. R290 is a refrigerant that complies with the relevant European Directives. Never perforate the refrigerant circuit. R290 is flammable (GWP 3) (Max. refrigerant charge: 0,28 Kg - VORT KRYO-POLAR 11,11 HP, 0,30 Kg - VORT KRYO-POLAR 13 / 13 HP)
- Do not use means to accelerate the defrosting process or to clean, other than those recommended by the manufacturer.
- The appliance shall be stored in a room without continuously operating ignition sources (for example: Open flames, an operating gas appliance or an operating electric heater)
- Do not pierce or burn any of the components of the cooling circuit of the unit. Do not set light to the unit.
- The appliance shall be stored as so to prevent mechanical damage from occurring.
- The appliance should be installed, operated or stored in a well ventilated room and with a floor area larger than 13,4m^2 for model 11, 11HP and 14,4m^2 for models 13, 13 HP, also it shall be constructed that should any refrigerant leak, it will not stagnata so as to create a fire or explosion hazard.
- Be aware that the refrigerant may not have any odour, meaning it's harder to recognize leaks.
- Compliance with national gas regulations shall be observed.
- Keep ventilations openings clear of obstruction.
- Any person who is involved with working on or breaking into a refrigerant circuit should hold a current valid certificate from an industry-accredited assessment authority, which authorises their competence to handle refrigerants safely in accordance with an industry recognised assessment specification.
- Before decommissioning the unit, make sure that the unit has been labeled and signed stating that it has been de-commissioned and emptied of refrigerant, also make sure that there are still labels on
ENGLISH
the appliance stating the equipment contains flammable refrigerant. Under no circumstances shall potential sources of ignition be used in the searching for detection of refrigerant leaks. A halide torch (or any other detector using a naked flame) shall not be used.
| Code | Product name GAS KG GWP | |||
| 65001 | VORT KRYO-POLAR 11 R290C,283 | |||
| 65066 | VORT KRYO-POLAR 11 HP R290C,283 | |||
| 65002V | VORT KRYO-POLAR 13 R290C,303 | |||
| 65003V | VORT KRYO-POLAR 13 HP R290C,303 |
EN Contains fluorinated greenhouse gases.
EN Hermetically sealed system.
EN The name plate in your local language can be found in the product pack; apply the relevant name plate over the one already present on the unit, taking care not to cover the serial number.
Compliance with the following regulations :
- Regulation (UE) 2017/1369
- Directive 2009/125/CE
- Delegated Regulation (UE) n. 626/2011
- Delegated Regulation (UE) n. 206/2012 - Eco - design
- EN 14511:2013
- EN ISO 3741:2010
- EN 12102:2013
ENGLISH
IMPORTANT INFORMATIONS FOR DISPOSAL
IN CERTAIN EUROPEAN UNION COUNTRIES THIS PRODUCT DOES NOT FALL WITHIN THE REQUIREMENTS OF THE NATIONAL LAWS IMPLEMENTING THE WEEE DIRECTIVE, AND IN THESE COUNTRIES THE PRODUCT IS NOT SUBJECT TO SEPARATE DISPOSAL OPERATIONS AT THE END OF ITS WORKING LIFE.
Important
This product conforms to EU Directive EU 2012/19/EC.
This appliance bears the symbol of the barred waste bin. This indicates that, at the end of its useful life, it must not be disposed of as domestic waste, but must be taken to a collection centre for waste electrical and electronic equipment, or returned to a retailer on purchase of a replacement.
It is the user's responsibility to dispose of this appliance through the appropriate channels at the end of its useful life. Failure to do so may incur the penalties established by laws governing waste disposal.
Proper differential collection, and the subsequent recycling, processing and environmentally compatible disposal of waste equipment avoids unnecessary damage to the environment and possible related health risks, and also promotes recycling of the materials used in the appliance.
For further information on waste collection and disposal, contact your local waste disposal service, or the shop from which you purchased the appliance.
Manufacturers and importers fulfil their responsibilities for recycling, processing and environmentally compatible disposal either directly or by participating in collective systems.
ENGLISH
Supplied accessories
Supplied accessories with the appliance (Fig. 1)
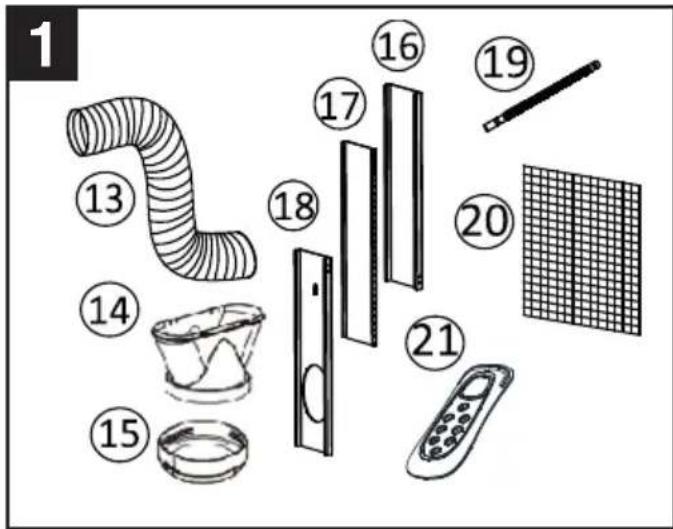
13 - Exhaust hose;
14 - Adaptor - for insertion over hose and into window spacer (or into a hole in the wall/window)
15 - Cover for adaptor n°14
16 - Window spacer - for filling the open window space.
17 - Window spacer - for filling the open window space.
18 - Window spacer - for filling the open window space and with hole for connection to exhaust hose.
19 - Drain tube for continuous drainage
20 - Active carbon filter
21 - Remote control
Installation
Installation of the exhaust hose
- Installation with panels (fig.2, 2A)
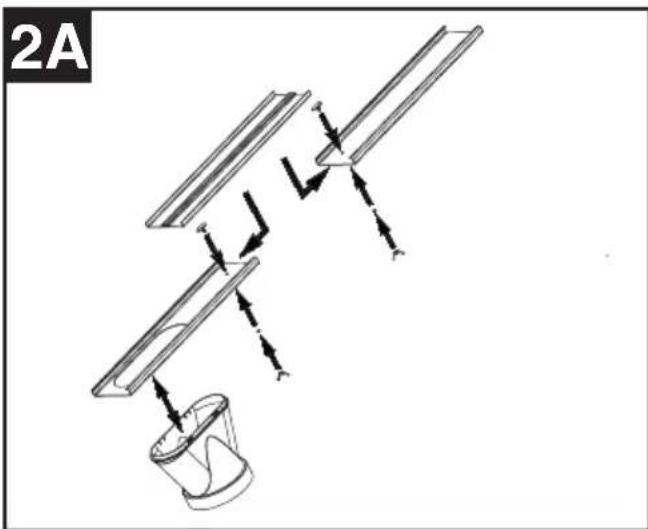
- Insert the end of the hose into the hole in the panel;
- Fit from the outside the rounded connector to the end of the hose;
- If the panel is too big, cut it to fit the window;
ENGLISH
2 Exhaust the hot air through the window or wall (Fig.3)
- make a hole (of more than 152mm diameter) in the window or wall;
- insert the end of the hose into the hole;
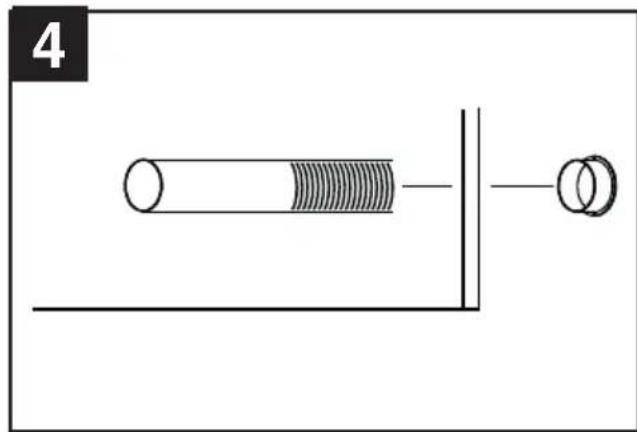
- fit the rounded connector (fig 4) from the outside to the end of the extraction hose.
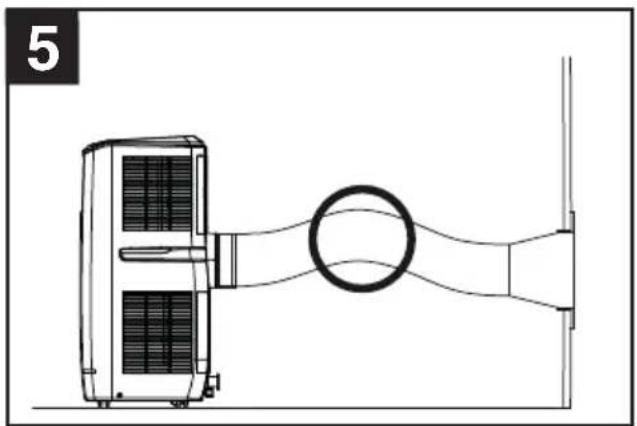
- the hot air extraction hose supplied with the appliance can be extended by 300 to 1500mm (Fig 4,5); It is best to use the smallest possible extension;
- when the appliance is disconnected from the window or wall, use the blanking cap to cover the hole;
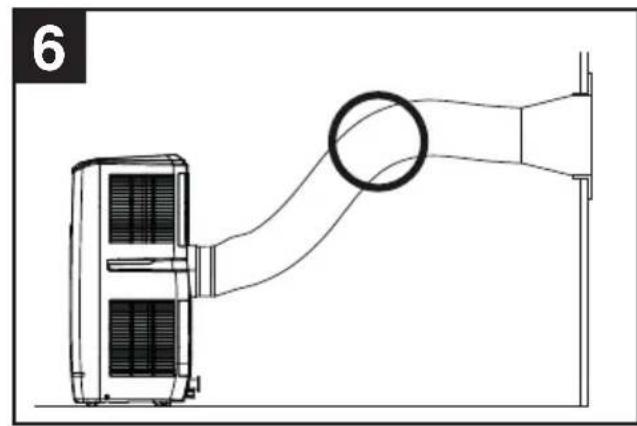
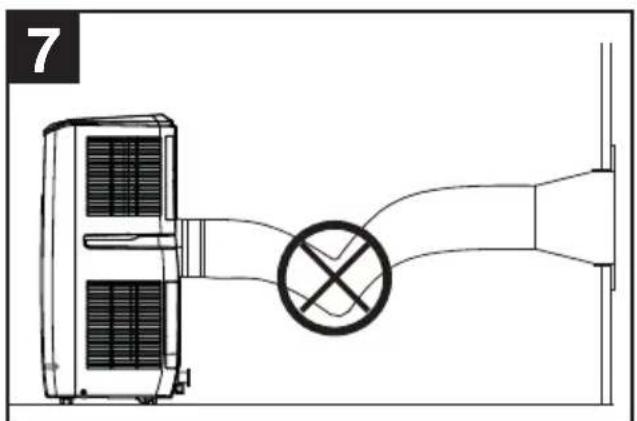
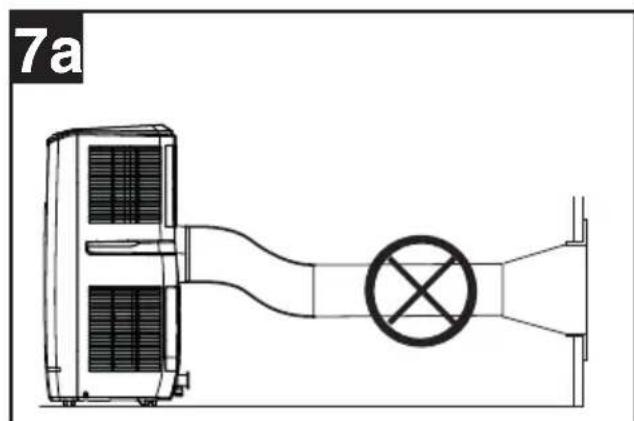
- take care not to form kinks in the hose, where hot air could be trapped and then on escaping set off the automatic thermal cut-out system (fig.7)
- the lenght of the hose has been carefully calculated to match the specifications of the appliance. You are advised not to replace the hose or extension as this may lead to a fault developing (fig.7a).
ENGLISH
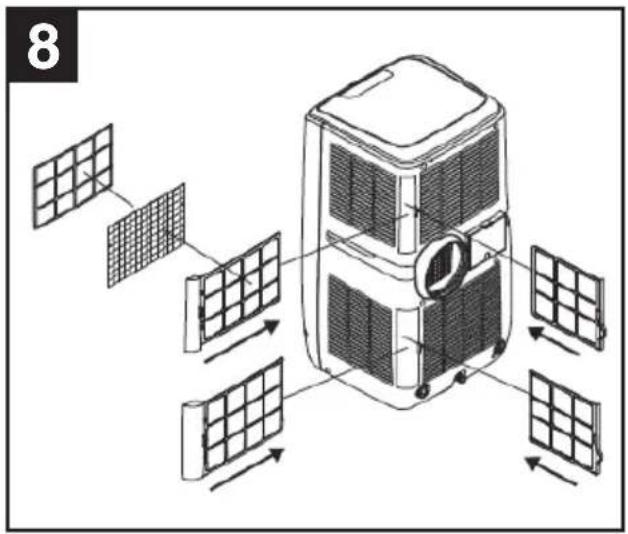
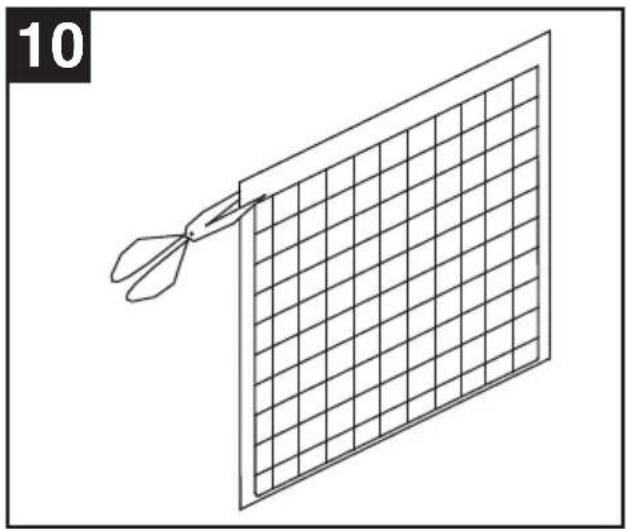
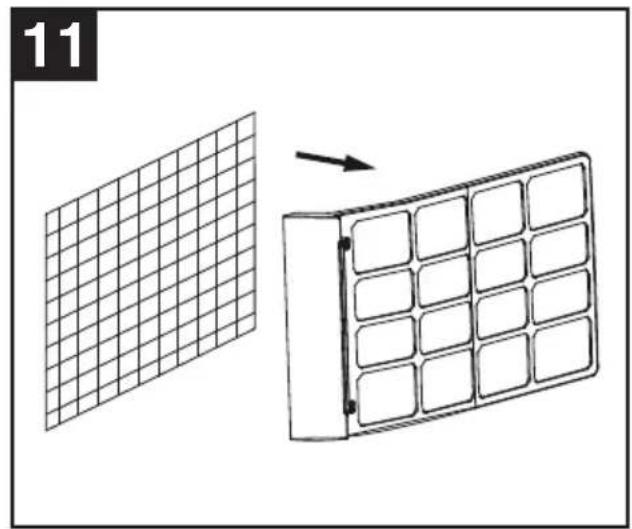
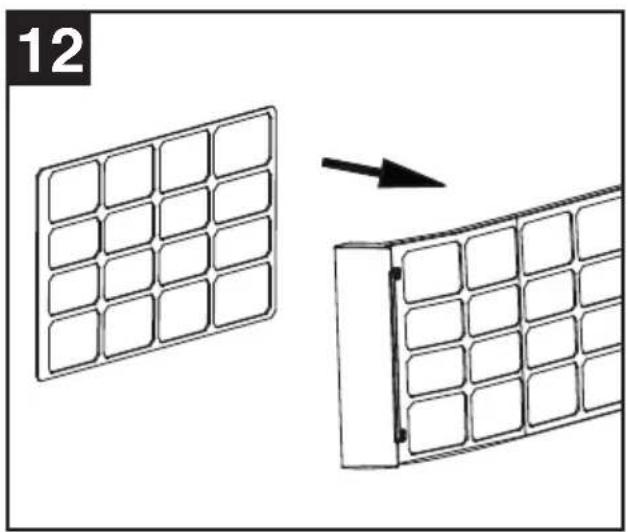
Active carbon filters installation
Remove the filter holderfram from the appliance (Fig. 8)
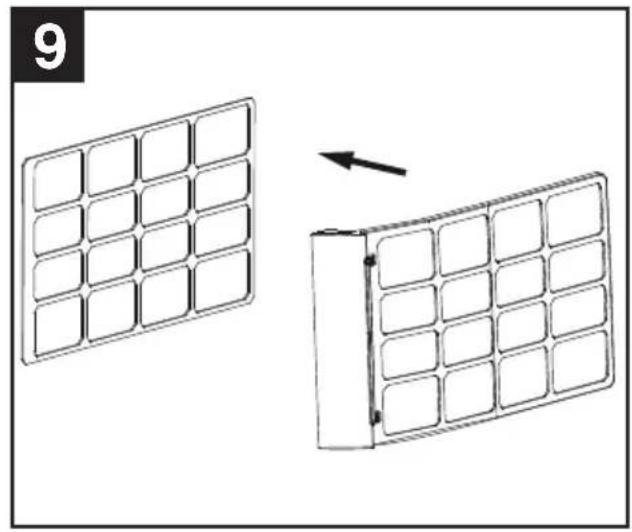
Remove the filter fastening device from the frame (Fig. 9)
Remove the active carbon filter from its packaging (Fig. 10)
Insert the filter into the frame (Fig. 11)
Fit the filter and reassemble the fastening device (Fig. 12)
ENGLISH
Functioning
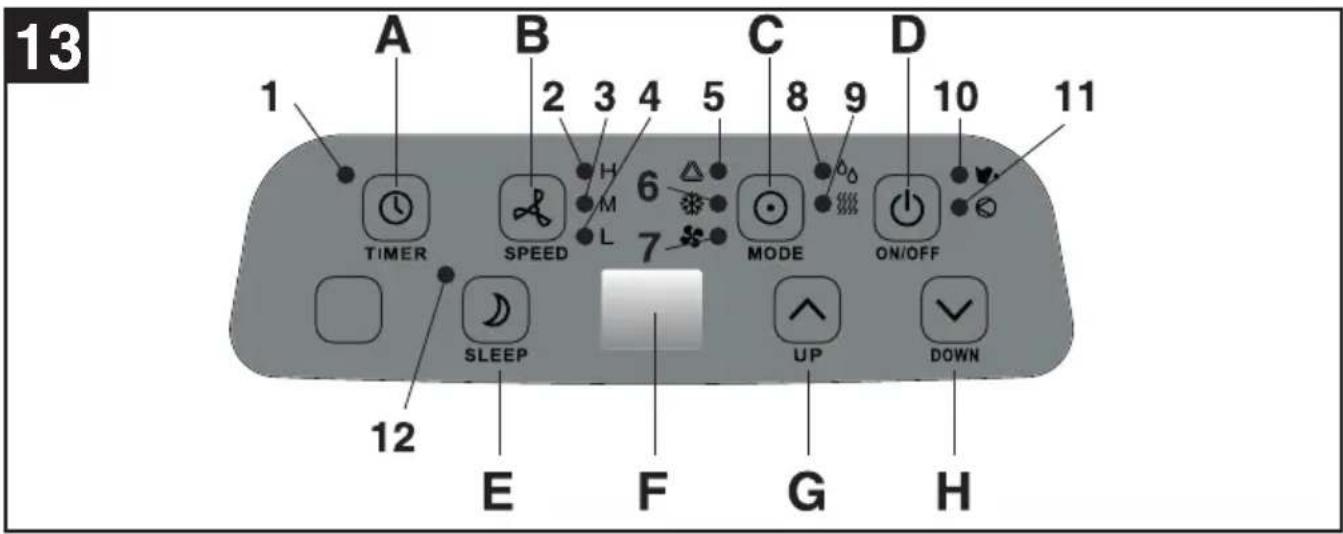
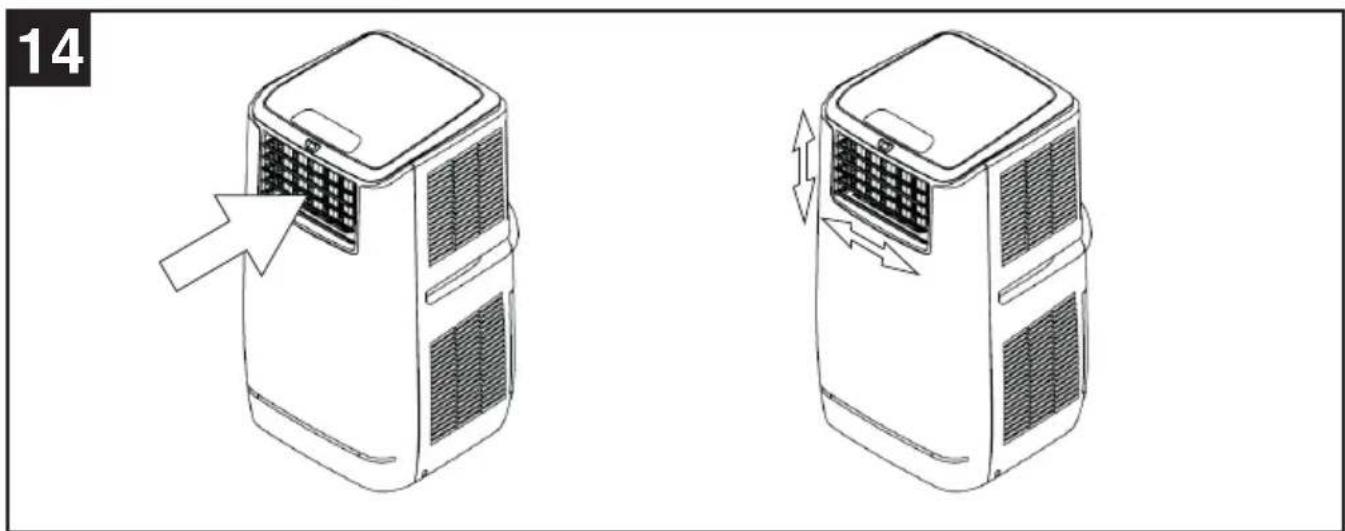
Control panel (Fig. 13)
NOTE: Before using the unit, please do open the horizontal louver. Adjust the louvers to your desired direction (Fig. 14)
Buttons:
A. Timer
B. Speed (ventilation) button
C.Mode button
D. ON/OFF (power) button
E. Sleep button
F. Display window
G. Temperature up button
H. Temperature down button
Indicators:
- Timer indicator
- High fan speed indicator
- Medium fan speed indicator
- Low fan speed indicator.
5 Auto mode indicator. - Cool mode indicator
- Fan mode indicator
- Dehumidify (dry) mode indicator
- Heating mode indicator (only for 11 HP, 13 HP models)
- Water full indicator
- Compressor operation indicator
- Sleep mode indicator
ENGLISH
Turning ON/OFF
Press ON/OFF button, the unit will start in automatic mode (Auto: green led on).
The unit start in Cool, Fan, or Heat (Only 11 HP, 13 HP models), depending on the room temperature:
room temperature >24^ the unit will work in cooling mode
20^ < room temperature < 24^ the unit will work in fan mode
room temperature < 20^ C : the unit will work in heating mode
Setting mode/function
Press MODE button to select required working mode: Auto, cooling, fan, dehumidify (dry) or heating (only for models 11 HP, 13HP) signs of your selected mode comes on.
Setting temperature
- Press 'Temperature up' or 'Temperature down' button to regulate the temperature you desired.
- The display window will show the temperature you set as you press 'Temperature up' or 'Temperature down' button. Otherwise, it will always show the ambient temperature.
- The pre-setting temperature of this machine is: 24^ for cooling.
ENGLISH
Setting ventilation speed
Press SPEED button to choose the ventilation speed you need, high, medium or low. The sign of high or low ventilation will light on at the same time.
Setting timer
- Press TIMER button to set the operating hours you desired (1 to 24 hours, the sign of timer will light on). When the set time has been reached, the machine will turn off automatically. The display window will show the hour(s) you set as you press TIMER button. If the timer button is not pressed, the unit will work continuously.
- By pressing the timer but without turning on the other functions, you can PRE-SET the time for the machine to work. For example, if you press the timer to '2', the unit will work automatically after 2 hours.
SLEEP function
- In cooling mode, by pressing the SLEEP button, the set temperature will increase 1^ at the 1st hour, another 1^ at the second hour, then keeps at that temperature.
- In heat mode(only in 11HP, 13HP models), by pressing the SLEEP button, the set temperature will descend 1^ at the 1st hour, another 1^ at the second hour, then keeps at that temperature.
- In sleep mode, the ventilation will keep at low speed. Re-press the SLEEP button, the setting temperature and ventilation speed will return to the pre-selected one.
- The unit will shut down automatically after the SLEEP function running for 12 hours.
NOTA: Please note, the sleep function is not available while the machine is working in ventilation, dehumidification or auto mode. Only available in Cooling or Heating mode.(11HP, 13 HP). When the machine is in Sleep function, the Fan Speed would turn to be LOW speed.
Dehumidify (DRY) mode
In dehumidify (DRY) mode, the temperature cannot be adjusted, the ventilation will fix at low speed. When the unit is operating in Dehumidify (DRY) mode, humidity extracted from the air is collected in an internal tank. If the tank reaches full, the compressor and motor cut out automatically. At the same time, the "Water Full" indicator comes on. An alarm will also sound. When the tank is full, drain the water as shown in the page concerning "DRAINAGE". You may also use the unit without having to empty the tank so often by using "continuous drainage", please also refer to the page about "DRAINAGE".
Heating function (11 HP, 13 HP models)
Thanks to the presence of the heat pump the air in the room can be heated.
The Exhaust Pipe must be still fitted to allow the cold air to be removed in this mode & used in the usual way. Also please fix the drainage to be continuous drainage (i.e. drain the water by water tube), because the condensed water will be collected quickly. Under this system, the machine can run at HIGH, MEDIUM or LOW speed.
ENGLISH
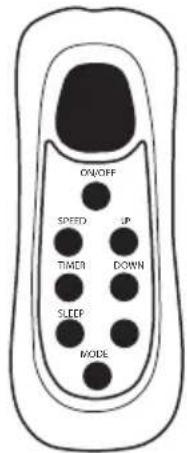
Remote control
(Fig. 15)
All the above functions can also be performed with the supplied remote control.
This remote control requires 2 pcs AAA batteries to operate (battery is not supplied along with the unit).
15
Self-diagnosis
This machine is equipped with self-diagnosis function. If something is wrong in the machine, the LED will show the word "E1" or "E2".
- E1 means the sensor wire for room temperature does not connect well (this wire is located in the center of the evaporator).
- E2 means the sensor wire for anti-frost does not connect well (this wire is located at the side of evaporator). As this time, please call your service centre. Please DO NOT dismantle the machine by yourselves in any case.
"Efficiency boost" mode
The unit has a "Efficiency boost" function: you have to fill the lateral tank with 2,5 l max of water: the energy efficiency will increase.
To ensure that the appliance works properly in "Efficiency boost" mode, make sure that the tank is filled. The procedure is as follows. (Fig.16)
16
1- Open the water tank.
2- Fill the water (max. 2.5L) please pay attention on the water level of the seethrough window beneath the water tank.
3- Place the water tank back into space.
ENGLISH
NOTE: This "Efficiency boost" feature by adding water is proposed to do after one hour operation and the water should NOT be over 2.5L, otherwise, the "water full" indicator will light in red and the unit will stop working. This action should only be performed while the power is on, in order for the "water full" alarm to work, also please pay attention on the water level of the see-through window beneath the water gate. In case the "water full" indicator is in red, please drain the water from the drain point at the back side of the unit until the red light goes out. The unit should work again now.
IMPORTANT
- To prolong the compressor's life, after switch-off of the unit, please wait for 3 minutes (at least) before reswitch..
- The cooling system will switch off if the ambient temperature is lower than the set one. The ventilation, however, keeps working on the set level. If the ambient temperature rises above the selected level, the cooling will return to work.
- On the contrary, the heating will switch off if the ambient temperature is higher than the set one (still, the ventilation keeps working on the set level). As the ambient temperature drops below the selected level, the heating will return to work.
- This machine is equipped with ANTI-FROST function. While using the heating function during low temperature, sometimes the heating will stop for a while in order to melt the frost. As this occurs, just wait for the heating returns to work.
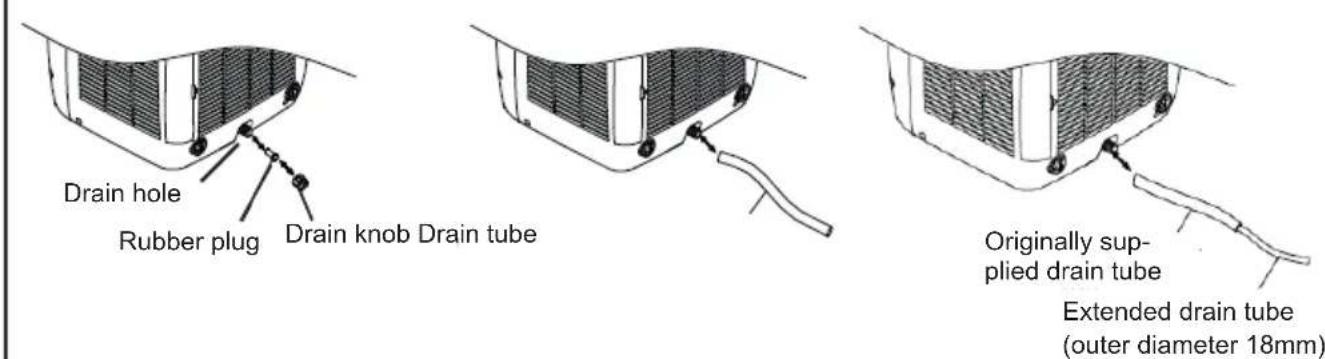
Drainage
When the unit is operating in Cooling or Dehumidify ( DRY) mode, humidity extracted from the air is collected in an internal tank. If the tank reaches full, the compressor and motor cut out automatically. At the same time, the "Water Full" indicator comes on. An alarm will also sound. When the tank is full, carry out the following instructions:
- Turn off the air conditioner and avoid moving it when full.
- Position a container (a water tray for example) underneath the drain hole.
- Remove the drain knob & rubber plug from the drain hole and allow the water to drain out.
- When the container is almost full, replace the rubber plug in the drain hole and empty the water tray.
- Repeat until the unit is emptied.
- Replace the rubber plug and tighten the drain knob firmly.
- Switch on the unit - the full water or compressor operating indicator should not be flashing.
Should you prefer to use the appliance without having to empty the tank often, proceed as follows :
- Remove the drain knob and rubber plug and retain for future use.
- Connect the drain tube supplied to the water outlet as shown and locate the other end into a drain.
- The drain tube may be extended by adding an extension tube and using a suitable connector.
17
ENGLISH
Special caution for heating function. (Only for models 11HP, 13 HP)
- Install the exhaust pipe well, in order to exhaust the cool air to outdoor. (Please refer to the instruction manual for installation method.)
- Fix the drainage to be continuous drainage (i.e. drain the water by water tube).
- Working range for heating function is 7 to 25C.
Special caution for cooling function
Woking range for cooling function is 18 to 32^
For temperature outside this range, the unit may not work properly.
PROBLEMS CHECK LIST
The air conditioner does not run - Is the air conditioner plugged in?
- Is there a power failure?
- Is the "full water" indicator flashing?
- Is the room temperature below the set temperature?
The machine seems to do little - Is there direct sunshine? (please avoid direct sunshine in the room or on the appliance)
- Are there windows or doors open?
- Are there too many people in the room?
- Is there something in the room producing lots of heat?
Too noisy - Is the machine positioned unevenly so as to create vibration?
- Is the floor underneath the machine uneven?
The compressor doesn't run - Is so, it is possible to overheat protection of the compressor is on.
just wait for the temperature to drop.
Maintenance and Cleaning
Always unplug the air conditioner form the mains supply before cleaning and/or repairing.
To maximize the efficiency of the air conditioner, clean the unit regularly.
Extraordinary maintenance operations or repairs must be done by professional qualified staff. Call a Vortice Service Center.
Before doing maintenance operations, please check the followings :
- The capacitor must be discharged : this hall be done in a safe manner to avoid possibility of sparking;
- That no live electrical components and wiring are xposed while charging, recovering or purging the system;
- that there is continuity of earth bonding.
When breaking into the refrigerant circuit containing flammable refrigerants to make repairs, it is important to follow the procedure listed below:
- Remove refrigerant;
- Purge the circuit with inert gas;
Evacuate; - Purge the circuit with inert gas;
- Open the circuit by cutting or brazing.
Cleaning the housing
Use a soft, damp cloth to wipe the body clean.
Never use aggressive chemicals, gasoline, detergents, chemically treated cloths, or other cleansing solutions.
These all could possibly hurt the cabinet.
ENGLISH
Cleaning the filter
Use a vacuum cleaner or tap the filter lightly to remove loose dust and dirt from the filters and then rinse thoroughly under running water (no hotter than 40^ ).
Dry thoroughly before replacing.
NOTE: Never operate the unit without the filters.
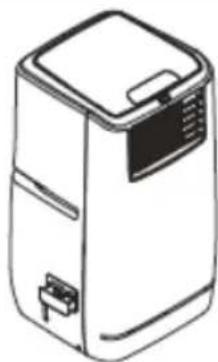
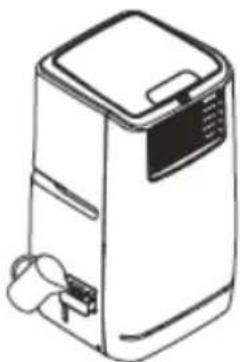
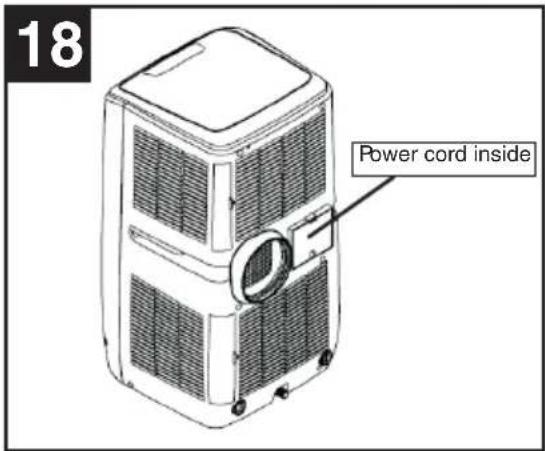
End of season storage
- Drain any water in the unit before completely operating the unit on ventilation only mode for a few hours, to thoroughly dry the inside.
- Clean or change the filter
- Unplug the power cord and store it as shown in Fig.18
- Replace in the original carton or cover for storage.
Decommissioning
Is important that before decommissioning the unit, it has been emptied from refrigerant. Before carrying out this procedure, it is essential that the technician is completely familiar with the equipment and all its detail.
- Become familiar with the appliance and its operation.
- Isolate the system electrically.
- Before attempting the procedure, ensure that:
- Mechanical handling equipment is available, if required, for handling refrigerant cylinders;
- All personal protective equipment is available and being used correctly;
- The recovery process is supervised at all times by a competent person;
-
Recovery equipment and cylinders conform to the appropriate standards.
-
Pump down refrigerant system, if possible.
- If a vacuum is not possible, make a manifold so that refrigerant can be removed from various parts of the system.
- Make sure that cylinder is situated on the scales before recovery takes place.
- Start the recovery machine and operate in accordance with instructions.
- Do not overfill cylinders ( no more than 80% vlume liquid charge).
- Do not exceed the maximum working pressure of the cylinder, even temporarily.
- When the cylinders have been filled correctly and the process completed, make sure that the cylinders and the equipment are removed from site promptly aand all isolation valves on the equipment are closed off.
- Recovered refrigerant shall not be charged into another refrigerant system unless it has been cleaned and checked.
FRANCAIS
Données techniques
Proper differential collection, and the subsequent recycling, processing and environmentally compatible disposal of waste equipment avoids unnecessary damage to the environment and possible related health risks, and also promotes recycling of the materials used in the appliance.
Vortice Elettrosociali S.p.A. reserves the right to make improvements to products at any time and without prior notice.
Tel. +39 02-90.69.91
ITALIA
vortice.com
postvendita@vortice-italy.com
VORTICE LATAM S.A.
3er Piso, O ficina 9-B, Edic
Meridiano
Guchipelin, Escazu, San Jose
PO Box 10-1251
Tel +506 2201 6242;
COSTA RICA
vortice-latam.com
info@vortice-latam.com
VORTICE LIMITED
Beeches House - Eastern Avenue
Burton on Trent
DE13 OBB
Tel. +44 1283-492949
UNITED KINGDOM
vortice.ltd.uk
sales@vortice.ltd.uk
VORTICE VENTILATION SYSTEM (CHANGZHOU) CO., LTD
Building 19, No.388 West Huanghe Road, Xinbei District,
Changzhou, Jiangsu Province CAF:213000
CHIN
vortice-china.com
vortice@vortice-china.com

TAGLIANDO INTERVENTO IN GARANZIA CERTIFICATE OF WORK PERFORMED UNDER GUARANTEE COUPON INTERVENTION SOUS GARANTIE
DATA INTERVENTO DATE OF WORK - DATE INTERVENTION
TIMBRO CENTRO ASSISTENZA STAMP OF TECHNICAL ASSISTANCE CENTRE - CACHET SERVICE APRES-VENTE

TAGLIANDO INTERVENTO IN GARANZIA CERTIFICATE OF WORK PERFORMED UNDER GUARANTEE COUPON INTERVENTION SOUS GARANTIE
DATA INTERVENTO DATE OF WORK - DATE INTERVENTION
TIMBRO CENTRO ASSISTENZA STAMP OF TECHNICAL ASSISTANCE CENTRE - CACHET SERVICE APRES-VENTE

TAGLIANDO INTERVENTO IN GARANZIA CERTIFICATE OF WORK PERFORMED UNDER GUARANTEE COUPON INTERVENTION SOUS GARANTIE
DATA INTERVENTO DATE OF WORK -DATE INTERVENTION
TIMBRO CENTRO ASSISTENZA STAMP OF TECHNICAL ASSISTANCE CENTRE - CACHET SERVICE APRES-VENTE

TAGLIANDO INTERVENTO IN GARANZIA CERTIFICATE OF WORK PERFORMED UNDER GUARANTEE COUPON INTERVENTION SOUS GARANTIE
DATA INTERVENTO DATE OF WORK - DATE INTERVENTION
TIMBRO CENTRO ASSISTENZA STAMP OF TECHNICAL ASSISTANCE CENTRE - CACHET SERVICE APRES-VENTE

This guarantee is offered as an extra benefit and does not affect your legal rights. All electrical appliances produced by
VORTICE ELETTROSOCIALI SPA are guaranteed by the Company for 2 years against faulty material or workmanship. If any part is found to be defective in this way within the first twenty-four months from the date of purchase or hire purchase agreement, we, or our authorised service agents, will replace or at our option repair that part without any charge for materials or labour or transportation, provided that the appliance has been used only in accordance with the instructions provided with each appliance and has been not connected to an unsuitable electricity supply, or subjected to misuse, neglect or damage or modified or repaired by any person not authorised by us. The correct electricity supply voltage is shown on the rating plate attached to the appliance. This guarantee is normally available only to the original purchaser of the appliance, but the Company will consider written applications for transfer. Should any defect arise in any Vortice product and a claim under guarantee become necessary, the appliance should be carefully packed and returned to your approved Vortice stockist. This portion of the guarantee should be attached to the appliance.
ITALIA
Send the guarantee in sealed envelope to:
Vortice Limited
Beeches House
Eastern Avenue
Burton on Trent
DE13 0BB United Kingdom
OTHER COUNTRIES
Please send the guarantee to the retailer's address in the country where the appliance has been purchased.

to include my personal details within their database, which they use, via a third party for the despatch of advertising material, at any time, in accordance with the regulations in force within my country. I can have access to my details and can request changes, or prohibit the usage of my details. This will be done by addressing my request directly to:
Vortice Limited
Beeches House
Eastern Avenue
Burton on Trent
DE13 0BB United
Kingdom.
I do not authorize (please tick if required)

I authorize VORTICE ELETTROSOCIALI SPA
and its local distributors to include my personal details within their database and they can use it through a third party for the despatch of advertising material. At any time, in accordance with the regulations in force within my country. I can have access to details and can ask to make changes, or prohibit the usage of my details. This will be done by addressing my request directly to the headquarters of the local distributor where the appliance has been bought.

I do not authorize (please tick if required)

I do not authorize (please tick if required)
1 GARANZIA - GUARANTEE - GARANTIE
DA CONSERVARE
TO BE RETAINED A CONSERVER
This warranty must be attached to the appliance should it need to be returned for servicing. N.B.Guarantee is only valid if all details are completed correctly.
I have read and understood the terms and conditions of this guarantee and I authorize the processing of my personal details (see overleaf).