
Winemex Blue 5 - Wine cellar Thermex - Free user manual and instructions
Find the device manual for free Winemex Blue 5 Thermex in PDF.


| Product Type | Wine Cellar |
| Brand | Thermex |
| Model | Winemex Blue 5 |
| Capacity | Approximately 5 standard wine bottles |
| Climate Class | N |
| Energy Efficiency Class | F |
| Annual Energy Consumption | ~85 kWh |
| Noise Level | ≤ 42 dB(A) |
| Temperature Range | 8–18°C |
| Cooling System | Compressor |
| Number of Shelves | 2 wooden shelves |
| Door Hinge | Right, reversible |
| Lock | Yes, with key |
| Interior Light | LED |
| Dimensions (HxWxD) | 50 x 40 x 50 cm |
| Weight | 15 kg |
| Power Supply | 220–240 V, 50 Hz |
| Rated Power | 90 W |
| Refrigerant | R600a |
| Built-in | Freestanding |
Frequently Asked Questions - Winemex Blue 5 Thermex
User questions about Winemex Blue 5 Thermex
0 question about this device. Answer the ones you know or ask your own.
Ask a new question about this device
Download the instructions for your Wine cellar in PDF format for free! Find your manual Winemex Blue 5 - Thermex and take your electronic device back in hand. On this page are published all the documents necessary for the use of your device. Winemex Blue 5 by Thermex.
USER MANUAL Winemex Blue 5 Thermex
EN - Cleaning and maintenance 47
ES - Servicio 50
ENGLISH - CONTENTS
EN -Warnings 11
EN - Installation 22
Quick guide 24
EN - Control 40
EN - Cleaning and maintenance 47
EN - Service 50
DK - GENEREL ADVARSEL
VIGTIGE SIKKERHEDSFORANSTALTNINGER
- Bed and breakfast-miljøer;
When using an electrical appliance, basic precautions should always be followed to reduce the risk of fire, electric shock, and injury, including the following:
FOR YOUR SAFETY
Read all instructions carefully, even if you are familiar with the appliance.
- This appliance is intended for the storage of wine. Use only as described in this manual. Other uses may cause fire, electric shock, or injury.
- In compliance with EN standards: This appliance can be used by children aged 8 years and above and persons with reduced physical, sensory, or mental capabilities or lack of experience if they have been given supervision or instruction on safe use and understand the hazards involved. Children shall not play with the appliance. Cleaning and maintenance shall not be done by children without supervision.
- In compliance with IEC standards: This appliance is not intended for use by persons (including children) with reduced physical, sensory, or mental capabilities, or lack of experience, unless supervised or instructed on safe use by a person responsible for their safety. Children should be supervised to ensure they do not play with the appliance.
- Electrical devices are not toys. Keep the device and mains cord out of the reach of children. Do not let the cord hang over the edge of the table or worktop.
- Children aged 3 to 8 years may load and unload refrigerating appliances.
- To protect against electric shock, DO NOT IMMERSE the unit, cord, or plug in water or spray any liquid.
- Unplug the appliance when not in use, when moving it, and before cleaning.
- To disconnect, grip the plug and pull from the wall outlet. Never pull by the cord.
- WARNING: Keep the appliance away from substances that can cause ignition. Do not operate in the presence of explosive or flammable fumes.
- Do not place the appliance or any part near an open flame or heating appliance.
- Do not operate with a damaged cord or plug, or if malfunctioning, dropped, or damaged. If the supply cord is damaged, it must be replaced by the manufacturer, an authorized service center, or qualified persons to avoid a hazard.
- The use of unauthorized attachments may be hazardous.
- Place the unit on a dry, level surface.
- A loose fit between the AC outlet and plug may cause overheating. Contact a qualified electrician to replace loose or worn outlets.
- Locate away from direct sunlight and sources of heat (stove, heater, radiator, etc.).
- WARNING: This appliance is CFC- and HFC-free and contains Isobutane (R600a), which is environmentally friendly but flammable. Care must be taken during transportation and setup to ensure no parts of the cooling system are damaged. Leaking coolant can ignite and may damage the eyes. In the event of damage:
- Avoid open flames and sparks,
- Disconnect from the mains,
- Air the room for several minutes, and
- Contact the Service Department for advice.
- The more coolant in the appliance, the larger the room it should be installed in. For every 8 g of coolant, at least 1 cubic meter of space is required. The amount of coolant is stated on the data plate inside the appliance. Only an Authorized Service Person should service or repair this appliance. In Queensland, Australia, the authorized person must hold a Gas Work Authorization for hydrocarbon refrigerants before servicing or repairing.
- WARNING: Keep ventilation openings clear of obstruction. No liability for damage due to misuse or unqualified repairs.
- WARNING: Do not use mechanical devices or other means to accelerate defrosting other than those recommended by the manufacturer.
- WARNING: Do not damage the refrigerant circuit.
- WARNING: Do not use electrical appliances inside the food storage compartment unless recommended by the manufacturer.
- WARNING: To avoid instability, fix the appliance according to the instructions.
- CAUTION: Keep products away from fire before disposal.
- WARNING: Do not store explosive substances such as aerosol cans with a flammable propellant in this appliance.
- WARNING: Ensure the supply cord is not trapped or damaged when positioning the appliance.
- WARNING: Do not locate multiple portable socket outlets or portable power supplies at the rear of the appliance.
- WARNING: Danger of injury from LED lamp. If the cover is defective, do not look directly into the illumination with optical lenses from close proximity.
- WARNING: To avoid food contamination, follow these instructions:
- Do not open the door for long periods to avoid significant temperature increase.
- Clean surfaces that come into contact with food and accessible drainage systems regularly.
- Clean water tanks if unused for 48 hours; flush the water system if water has not been drawn for 5 days.
- Store raw meat and fish in suitable containers in the refrigerator to prevent contact with or dripping onto other food.
- Two-star frozen food compartments are suitable for storing pre-frozen food, making ice cream, and ice cubes.
- One, two, and three-star compartments are not suitable for freezing fresh food.
- If the refrigerating appliance is empty for long periods, switch off, defrost, clean, dry, and leave the door open to prevent mold.
- For information on appliance use, refer to the manual.
- For replacing illuminating lamps (if user-replaceable), refer to the manual.
- This appliance is intended for household and similar applications such as:
- Staff kitchen areas in shops, offices, and other work environments:
- Farmhouses, hotels, motels, and other residential environments;
- Bed and breakfast environments;
- Catering and similar non-retail applications.
- Do not attempt to repair or replace any part of your appliance unless recommended in the manual. Refer all other servicing to a qualified technician.
- Replace all panels after service before operating.
- WARNING: Glass breakage. If installed above 1500m, the glass in the door may break due to air pressure changes. Handle shards with care to avoid injury.
- Use two or more people to move and install the appliance to prevent back or other injuries.
- Never clean appliance parts with flammable fluids. Do not store or use gasoline or other flammable vapors and liquids near this or any appliance to avoid fire or explosion.
- Do not connect or disconnect the electric plug with wet hands.
- A separate circuit serving only your appliance is recommended. Use receptacles that cannot be turned off by a switch or pull chain.
- If the appliance is lockable, do not keep the key near the appliance or within reach of children.
- If you have lost the instruction manual, contact the local agent or email us for an electronic version.
DK - INSTALLATION
F∅R DU BRUGER DIT APPARAT
INSTALLATION AF DIT APPARAT
natural_image
Architectural floor plan showing room layout with walls, doors, and fixtures (no text or labels)SE-MONTERING
natural_image
Architectural floor plan showing room layout with walls, doors, and central furniture (no text or labels)NO - INSTALLASJON
F∅R DU BRUKER APPARATET
DETTE APPARATET MÅ JORDES.
natural_image
Technical line drawing of a mechanical assembly with no visible text or symbolsFI - ASENNUS
ENNEN LAITTEEN KÄYTTÖÄ
natural_image
Technical line drawing of a mechanical assembly with no visible text or symbolsES - MONTAJE
ANTES DE UTILIZAR SU APARATO
natural_image
Technical line drawing of a mechanical assembly with no visible text or symbols20 THERMEX Winemex 5 M 910211013219072024
EN - INSTALLATION
• BEFORE USING YOUR APPLIANCE
Remove all exterior and interior packing. Clean the interior surface with lukewarm water using a soft cloth. The unit may have residual odors at first; they will disappear as the unit cools.
Before connecting the appliance to the power source, let it stand upright for at least 24 hours. This will reduce the possibility of a malfunction in the cooling system caused by handling during transportation and ensure that the oil flows back into the compressor. During this time, we recommend that you leave the door open to clear any residual odors.
• INSTALLATION OF YOUR APPLIANCE
The appliances are designed to be built-in, recessed, or freestanding, depending on your model. For freestanding installation-only models, it is not intended to be used as a built-in appliance.
WARNING: Do not store or install the appliance outdoors. The unit is for indoor use only.
WARNING: Do not install the appliance in the laundry room. Avoid locating the unit in damp areas.
Place your appliance on a floor/surface that is strong enough to support it when it is fully loaded. Check that the base the drawer will sit on is clean and level (use a spirit level). This is important for the appliance to function correctly.
Push the drawer into the housing unit and make sure it is correctly aligned in the unit.
Open the drawer, and use the 4 screws supplied to secure it to the side walls of the housing unit.
For freestanding installation, 100mm of space between the back and sides of the unit is suggested to allow proper air circulation to cool the compressor and condenser for energy saving. Even with built-in installation, it is essential to keep 5mm of space on each side and at the top to ensure proper service access and ventilation. Make sure the air vent around the appliance is never covered or blocked in any way.
Locate the unit away from direct sunlight and sources of heat (stove, heater, radiator, etc.). Direct sunlight may affect the acrylic coating, and heat sources may increase electrical consumption. Extreme cold ambient temperatures may also cause the unit to not perform properly.
Plug the unit into an exclusive, easily accessible socket. Any questions concerning power and/or grounding should be directed to a qualified electrician or an authorized product service center.
The appliance must be installed to all electrical, plumbing, water, and drain connections in accordance with state and local codes.
IMPORTANT: HIGH HUMIDITY CLIMATE. During periods of high humidity, some condensation may appear on the outside surface of the glass door. This condensation will disappear when humidity levels drop. To prevent this, it is advisable to install the appliance with sufficient ventilation in a dry and/or air-conditioned space.
- FULLY INTEGRATED BUILT-IN COLUMN INSTRUCTIONS
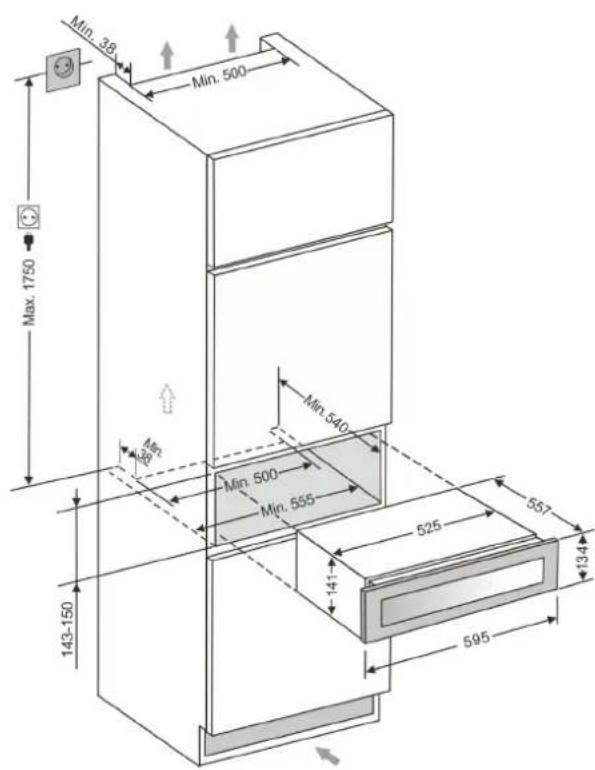
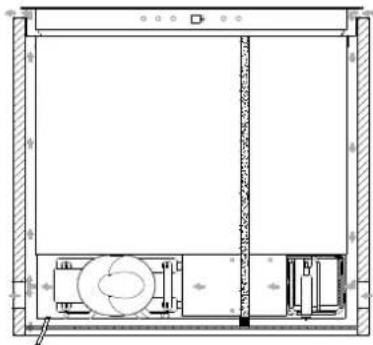
The unit door seals the installed unit almost completely, so an air vent must be provided in the base of the housing. Warmed air must be conducted via the ventilation shaft to the rear wall of the housing and then expelled upwards.
The ventilation channels should measure at least 200 square centimeters in cross-section. After installation, make sure that the appliance door opens and closes properly.
The unit depth is 575mm for the integrated model with an 18mm panel installed. WARNING: To ensure the proper functioning of the appliance, air vents should never be blocked or covered.
• BUILT-IN DRAWER INSTRUCTIONS
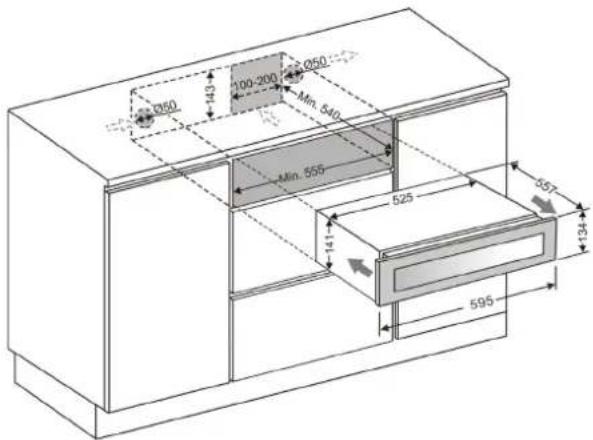
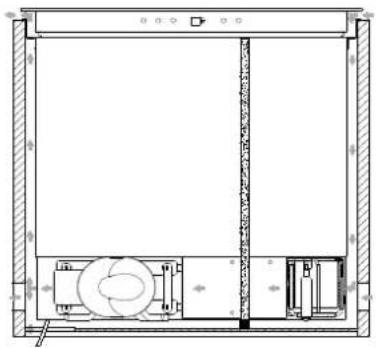
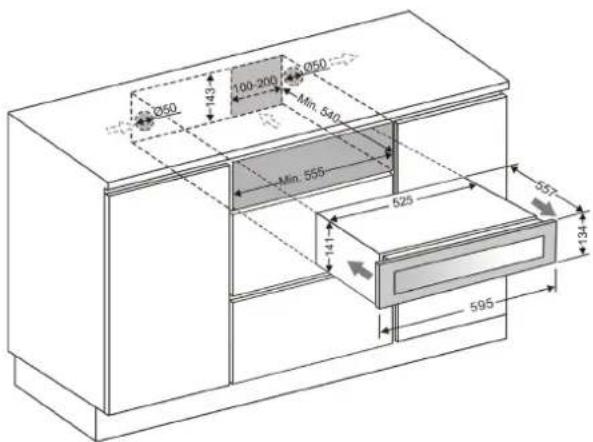
Air at the back of the unit gets warm. The unit is equipped with an integrated ventilation system to disperse the warm air automatically. Air intake is provided at the left side of the drawer door and housing, and the air escapes at the back and right side of the housing and at the right of the door. A cut-out measuring 100-200 x 140 mm at the right back of the housing and two circular cut-outs with a diameter of 50 mm on both sides of the housing are necessary for ventilation and power supply cord passage. The air inlet and outlet must not be covered or blocked in any way. They must also be regularly cleaned of dust. After installation, make sure that the appliance door opens and closes properly.
After installation, make sure that the appliance door opens and closes properly.
The unit depth is 575mm for the integrated model with an 18mm panel installed.
- If there is any gap at the top of the unit or between the rear wall of the unit and the housing rear plate, use the provided sponge to seal as shown in the figure below to create the ventilation channel.
WARNING: If the specified ventilation gaps are not observed, the compressor will run more frequently and for longer periods. This will result in increased energy consumption and a higher operating temperature for the compressor, which may cause damage to the compressor. It is essential to observe the specified ventilation gaps.
• ELECTRICAL CONNECTION
WARNING: Improper use of the grounded plug can result in the risk of electrical shock. If the power cord is damaged, have it replaced by a qualified electrician or an authorized service center.
All electrical work should be carried out by a suitably qualified and competent person in accordance with local and national safety regulations.
Check that the voltage marked on the product corresponds with your supply voltage.
Connect this appliance to a separate circuit of at least 13A. Connection should be made via a suitable switched socket that is easily accessible. For extra safety, it is advisable to install a residual current device (RCD) with a trip current of 30mA.
Have the receptacle and the circuit checked by a qualified electrician to ensure that the socket is grounded correctly.
Note: In locations where there is frequent lightning, it is advisable to use surge protectors.
Do not connect the appliance to the mains electricity supply by an extension lead. Extension leads do not guarantee the required safety of the appliance (e.g., danger of overheating).
The appliance must not be connected to an inverter and must not be used with a plug adapter as these can cause damage to the appliance's electronic unit. The cord must rest securely behind the appliance and not be allowed to lie or hang unprotected.
WARNING:
THIS APPLIANCE MUST BE EARTHED.
natural_image
Architectural floor plan showing room layout with walls, doors, and furniture (no text or labels)QUICK GUIDE
DK - BETJENING
TEMPERATURMINNESFUNKTION
TEMPERATURMINNEFUNKSJON
Setting the Temperature
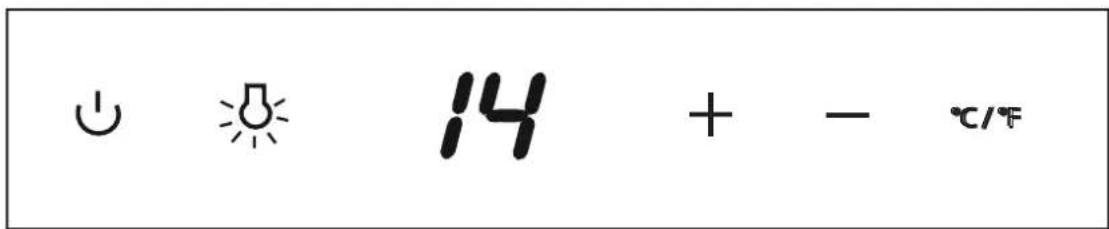
The unit has a single adjustable temperature zone. The temperature can be set between 5^ C and 20^ C ( 41^ F and 68^ F). It can be used as a wine maturing cabinet or a wine serving cabinet. The recommended temperature setting range for maturing wine is between 11^ C and 14^ C ( 52^ F and 57^ F). The recommended temperature setting range for serving white wine is between 5^ C and 10^ C ( 41^ F and 50^ F), and the recommended temperature setting range for serving red wine is between 15^ C and 20^ C ( 58^ F and 68^ F).
When the unit is plugged in for the first time, it will power up automatically to the preset defaults. The temperature preset at the factory is 12^ C ( 54^ F) (ideal maturing temperature).
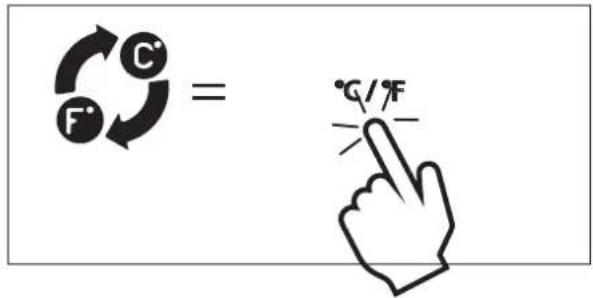
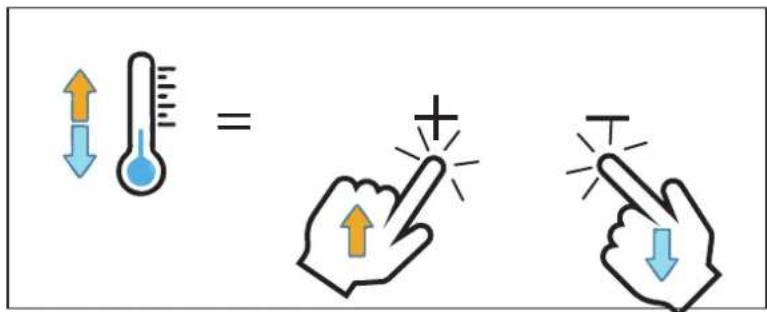
You can set the temperature as required by touching the UP or DOWN key. When you touch either key for the first time, the display will show the last temperature set. The temperature will increase by 1^ C/ 1^ F if you touch the UP key once, or decrease by 1^ C/ 1^ F if you touch the DOWN key once. The display flashes while you make the setting.
After the temperature has been set, the display shows the current inner temperature.
To view the set temperature at any time, touch the UP or DOWN key, and the set temperature will temporarily flash on the display for 5 seconds. Then the display will show the current inner temperature again.
TEMPERATURE DISPLAY
During normal operation, the temperature display on the control panel shows the temperature inside the appliance. The temperature display will flash if:
A different temperature is being set.
The temperature in the zone deviates by more than 5^ C ( 9^ F) from the set temperature.
The flashing temperature display ensures that temperature changes do not go unnoticed, which could impair the wine.
TEMPERATURE MEMORY FUNCTION
In the event of a power interruption (power surge, breaker switch, etc.), the unit remembers the previous temperature settings. When the power is restored, the cabinet temperature will return to the same setting as before the power interruption.
TEMPERATURE ALARM
An audible alarm will sound if the temperature rises or falls outside the set temperature range. The temperature display will flash simultaneously.
The temperature the appliance is set to determine the temperature the appliance recognizes as being too warm or too cool. The audible alarm will sound and the temperature display will flash in the following situations:
When you switch the appliance on, if the temperature inside the appliance is very different from the set temperature.
When there has been a lengthy interruption to the power supply.
When too many items have been put into the unit at one time, or too much ambient air flowed in when rearranging and removing storage items.
When the door has not been closed tightly.
If the appliance is faulty.
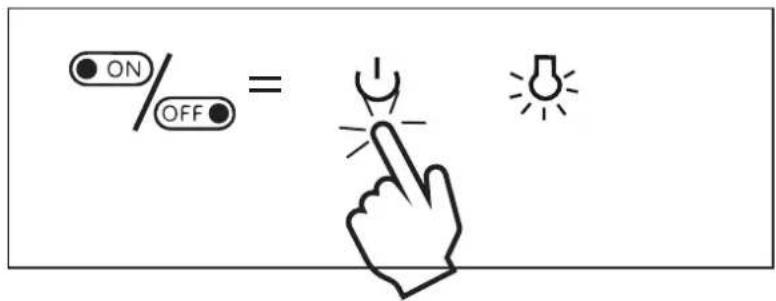
The audible alarm will automatically silence, and the temperature display will stop flashing when the set temperature is reached again. However, if the noise disturbs you, you can switch the audible alarm off before this by touching the POWER key once. The alarm will stop. The relevant temperature display will continue to flash until the set temperature has been reached. The display will then light up constantly, and the alarm system will be fully active again.
DOOR ALARM
If the door has been left open for more than 60 seconds, the audible alarm will sound. Closing the door or touching the POWER key once can switch off the audible alarm.
INTERIOR LIGHT
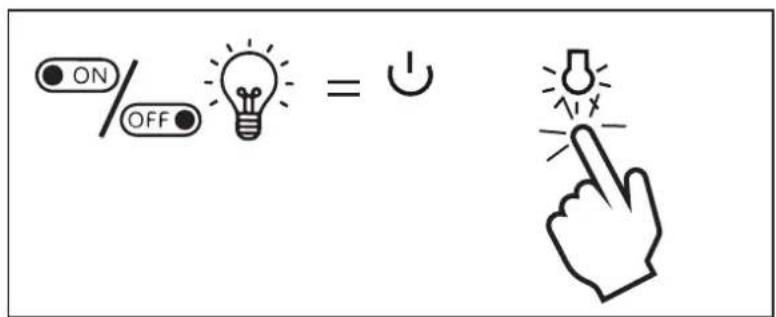
The interior lighting makes it easy to view your wine labels and enhances the display of your collection. Touching the LIGHT key toggles between two modes of operation for the interior lights: functional (default) mode and showcase mode. In functional (default) mode, the lights will turn on only when the door is open. The interior light will go out approximately 5 seconds after the door is closed. In showcase mode, the lights will be on whether the door is open or closed.
The unit is equipped with LED lights designed for an extremely long life. Thanks to the LED lighting, the wine will not be adversely affected by heat or UV light. However, they are not user-serviceable. To change them, please contact the service department.
NOTE: Please use only the original LED light fittings provided by the manufacturer.
DYNACLIMA / SILENT MODES
The appliance has two different running modes: DynaClima and Silent modes.
The DYNACLIMA (Dynamic Climate) mode enables the relative humidity inside the unit and the temperature to be distributed evenly around the interior, allowing you to store all your wine under exactly the same excellent conditions. If you plan to store wine long-term, the DYNACLIMA mode is essential. This mode creates a continuous climate in the cabinet that imitates that of a wine cellar.
In DYNACLIMA mode, the interior fan circulates the air evenly even when the set temperature is reached. To switch to DYNACLIMA mode, touch and hold the DOWN key for approximately five seconds. The wine cellar will beep five times to confirm DYNACLIMA mode is on. To switch to SILENT mode (also known as energy-saving mode), touch and hold the UP key for approximately five seconds. The wine cellar will beep three times to confirm SILENT (default) mode is on.
DK - OPBEVARING AF VIN
All wines mature at the same temperature, which is a constant temperature set between 12^ C and 14^ C. That the chart below is a guide temperature chart to indicate the best temperature for drinking purposes.
- Champagne NV, Sparkling, Spumante 6°C
- Dry white semillon, Sauvignon Blanc 8°C
- Champagne Vintage 10^ C
- Dry white Chardonnay 10°C
• Dry white Gewürztraminer, Riesling, Pinot grigio 10°C
- Sweet white Sauternes, Barsac, Montbazillac, Ice wine 10^
- Beaujolais 10°C 13°
13°C Sweet White Vintage: Sauternes... 14°C
• White vintage Chardonnay 14°C
• Red Pinot Noir 16°C
• Red Grenache, Syrah 16°C
• Red vintage Pinot Noir 18°C
• Cabernet & Merlot: French, Australian, New Zealand, 20°C
- Chilean, Italian, Spanish, Californian, Argentinian... 20° Vintage Bordeaux ... Room temperature not above 20°C
In other words, as long as the temperature of your wine cooler is constant (between 12^ C to 14^ C), wines will be stored in perfect conditions. Not all wines will improve with age. Some should be consumed at an early stage (2 to 3 years) while others have tremendous aging potential (50 and over). All wines have a peak in maturity. Check with your wine merchant for the relevant information.
Winemex 30 can store bottles of max. 315 mm on the shelves. At the bottom, you can store max. 320 mm bottles.
DK - RENG∅RING OG VEDLIGEHOLD
RENG∅RING AF WINEMEx
RENGÖRING AV WINEMEx
KOPPLA ALLTID BORT STRÖMMEN FÖRE RENGÖRING.
NO - VEDLIKEHOLD OG RENGJ∅RING
RENGJ∅RING AV WINEMEX
KOBLE ALLTID FRA STRÖMMEN F∅R RENGJ∅RING.
natural_image
Technical line drawing of a mechanical device with two views (1 and 2), showing internal components and mounting features without any text or symbols.FI - HUOLTO JA PUHDISTUS
WINEMEXIN PUHDISTUS
IRROTA AINA VIRTA ENNEN PUHDISTAMISTA.
natural_image
Technical line drawing of a mechanical device with two views (1 and 2), showing internal components and mounting features without any text or symbols.ES - MANTENIMIENTO Y LIMPIEZA
LIMPIEZA WINEMEX
natural_image
Technical line drawing of a mechanical assembly with two views (1 and 2), showing internal components and alignment indicators (no text or symbols)EN - CLEANING AND MAINTENANCE
CLEANING THE WINEMEX
ALWAYS DISCONNECT THE POWER BEFORE CLEANING.
- The unit must be cleaned regularly to ensure optimal operation and longevity.
- The unit should be cleaned both externally and internally regularly
- Never use oily or greasy cleaners on the unit's rubber strips. There is a risk that the moldings will dry out and crack.
- Never use oily or greasy cleaners on the interior wooden strips. It can cause discolouration.
- Never use steam cleaners or similar hot cleaning devices on the device.
- Never use sharp or pointed tools to clean the device. These tools can damage the unit's cooling elements.
• Lacquered surfaces are cleaned with a damp cloth with washing-up liquid. NEVER use abrasives.
It is recommended to use a special cleaning agent to clean the glass plate and the control panel.
REMOVING DRAWER
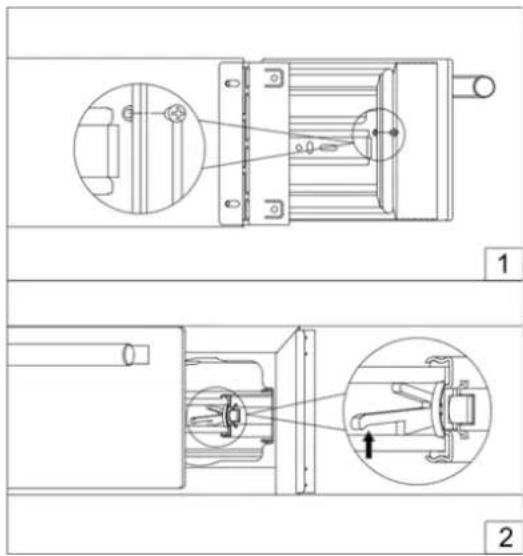
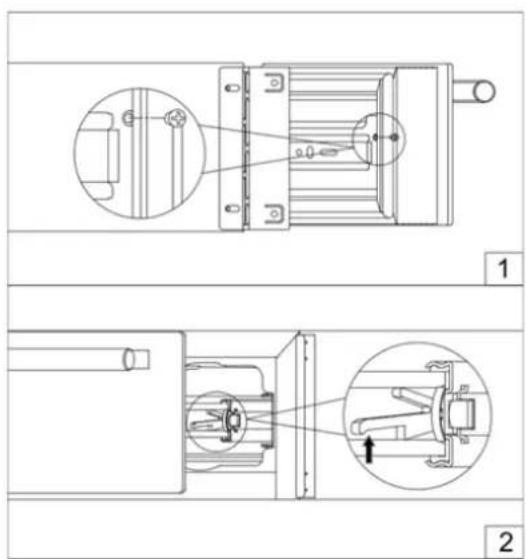
To remove the drawer, extend it out of the rail compartment until it stops and remove all bottles from the drawer. Remove the screw fixing the cable cover to the drawer on the left side as shown in Figure 1, and then remove the cable cover. Disconnect the cable from the drawer. Press the left slide release lever down and at the same time lift the corresponding right slide lever up, then pull the drawer out until it is free of the tracks and the cabinet, as shown in Figure 2.
To replace the shelf, repeat this procedure in reverse.
natural_image
Technical line drawing of an electrical switchgear assembly (no text or symbols)DK - SERVICE
Before you report your Thermex product for service, it is important that you have thoroughly read the installation and/or user manual. This ensures that Thermex can provide you with the best possible assistance.
The service department at Thermex can be contacted for:
- Technical support for assembly and installation of your product.
- Clarification of functionalities in your product.
• Service request under the right of complaint on your product.
Always try to disconnect the power supply to the product for approx. 5 minutes. Then reconnect the power to see if the problem is resolved.
If the error is not resolved, disconnect the power supply to the product for one hour. If the product still does not work properly and the points in the troubleshooting guide have been reviewed, contact the service department.
NOTE: In the event of inquiries within the right of complaint, you will be asked for documentation of your purchase in the form of a purchase receipt. Therefore, always save your purchase receipt.
Before contacting us regarding service requests within the right of complaint, it is important to have all the necessary information ready:
Information and documentation for purchases - purchase receipt
- Error description
• Model and seriesnumber - Proof of purchase
Service requests under the right of complaint can be made by filling in the service form at www.thermex.dk/service, where the service conditions can also be read.
Inquiries regarding technical support or clarification of functionalities can be made by sending an inquiry to service@thermex.dk or on tel. +45 9892 6233.
MILJ∅HENSYN
EMBALLAGE
SKROTNING AF PRODUKTET
The packaging must be disposed of in accordance with local regulations on waste management.
SCRAPPING OF THE PRODUCT
The symbol 📋 on the product or accompanying documentation indicates that this product may not be disposed of as household waste but must be delivered to the nearest collection center for the recycling of electrical and electronic equipment.
MILIEUOVERWEGINGEN
VERPAKKING
- ENGLISH - CONTENTS
- DK - GENEREL ADVARSEL
- FOR YOUR SAFETY
- DK - INSTALLATION
- F∅R DU BRUGER DIT APPARAT
- INSTALLATION AF DIT APPARAT
- SE-MONTERING
- NO - INSTALLASJON
- FI - ASENNUS
- ES - MONTAJE
- ANTES DE UTILIZAR SU APARATO
- THERMEX Winemex 5 M 910211013219072024
- EN - INSTALLATION
- • BEFORE USING YOUR APPLIANCE
- • INSTALLATION OF YOUR APPLIANCE
- - FULLY INTEGRATED BUILT-IN COLUMN INSTRUCTIONS
- • BUILT-IN DRAWER INSTRUCTIONS
- • ELECTRICAL CONNECTION
- QUICK GUIDE
- DK - BETJENING
- TEMPERATURMINNESFUNKTION
- TEMPERATURMINNEFUNKSJON
- Setting the Temperature
- TEMPERATURE DISPLAY
- TEMPERATURE MEMORY FUNCTION
- TEMPERATURE ALARM
- DOOR ALARM
- INTERIOR LIGHT
- DYNACLIMA / SILENT MODES
- DK - OPBEVARING AF VIN
- DK - RENG∅RING OG VEDLIGEHOLD
- RENG∅RING AF WINEMEx
- RENGÖRING AV WINEMEx
- NO - VEDLIKEHOLD OG RENGJ∅RING
- RENGJ∅RING AV WINEMEX
- FI - HUOLTO JA PUHDISTUS
- ES - MANTENIMIENTO Y LIMPIEZA
- EN - CLEANING AND MAINTENANCE
- DK - SERVICE
- MILJ∅HENSYN
- EMBALLAGE
- SKROTNING AF PRODUKTET
- MILIEUOVERWEGINGEN
- VERPAKKING
Brand : Thermex
Model : Winemex Blue 5
Category : Wine cellar