— Radio — Mode d'emploi PDF")
P66024 (MD 44100) - Radio MEDION - Free user manual and instructions
Find the device manual for free P66024 (MD 44100) MEDION in PDF.
| Product type | Internet Radio, DAB+, FM, CD player, Bluetooth, audio streaming |
| Dimensions | 44 x 14.7 x 26 cm (W x H x D) |
| Weight | 5.15 kg |
| Power supply | AC 230 V ~ 50 Hz, standby consumption < 1 W |
| Output power | 2 x 20 + 40 W RMS |
| Radio bands | FM 87.5-108 MHz, DAB III 174.928-239.200 MHz |
| Station presets | 40 presets for FM/DAB, 500 Internet favorites |
| CD player | CD-R, CD-RW, CD Audio, MP3 CD (laser class 1) |
| Bluetooth | Version 5.0, profiles A2DP/AVRCP, range 10 m |
| Wi-Fi | 802.11 a/b/g/n, 2.4/5 GHz, encryption WEP/WPA/WPA2 |
| Ports | AUX (3.5 mm jack), LINE IN (RCA), headphone (3.5 mm jack), USB 2.0 (32 GB max), LAN RJ45, wire antenna |
| Streaming services | Spotify Connect, Amazon Music |
| Control app | MEDION LifeStream 2 (iOS/Android) |
| Display | Adjustable brightness, dimmable standby |
| Clock functions | Dual alarm, wake by radio/buzzer, sleep timer |
| Equalizer | Presets (Normal, Rock, Jazz...) + custom |
| Supported audio formats | MP3, WMA, WAV, FLAC, AAC (USB/network) |
| Remote control | Infrared, 2 x AAA batteries (included) |
| Care and cleaning | Unplug before cleaning, use a soft dry cloth, no solvents |
| Safety | Protection class II, indoor use only, do not open the housing |
| Repairability | Entrust repairs to authorized service; no spare parts supplied |
| General information | Brand MEDION, model P66024 (MD 44100), CE certification, WEEE recycling |
Frequently Asked Questions - P66024 (MD 44100) MEDION
User questions about P66024 (MD 44100) MEDION
0 question about this device. Answer the ones you know or ask your own.
Ask a new question about this device
Download the instructions for your Radio in PDF format for free! Find your manual P66024 (MD 44100) - MEDION and take your electronic device back in hand. On this page are published all the documents necessary for the use of your device. P66024 (MD 44100) by MEDION.
USER MANUAL P66024 (MD 44100) MEDION
natural_image
Black metal electronic device with a digital display and control buttons (no visible text or symbols on the device body)All-In-One Audio System
All-In-One Audio System
MEDION® P66024 (MD 44100)
Inhaltsverzeichnis
DE
8. Anschlüsse.... 21
natural_image
Two cylindrical batteries with positive and negative charges, no text or symbols visible
The Spotify Software is subject to third party licenses found here:
https://www.spotify.com/connect/third-party-licenses
natural_image
Lifestream II app icon with musical note and Wi-Fi signal symbol (no text or symbols beyond the icon itself)text_image
QR code image containing encoded data, no visible human-readable textnatural_image
Two cylindrical batteries with positive and negative charges, no text or symbols visible
AVERTISSEMENT !
Risque d'explosion!
https://www.spotify.com/connect/third-party-licenses
natural_image
Lifestream II app icon with musical note and Wi-Fi signal symbol (no text or symbols beyond the icon itself)text_image
QR code image containing encoded data, no visible human-readable text25.2. Installation via Google Play ou l'App Store d'Apple
natural_image
Two cylindrical batteries with positive and negative charges, no text or symbols visible
WAARSCHUWING!
Explosiegevaar!
Log in met uw Amazon-account.
natural_image
Lifestream II app icon with musical note and Wi-Fi signal symbol (no text or symbols beyond the icon itself)Met de LifeStream 2-app op uw smartphone of tablet kunt u uw internetradio bedienen.
text_image
QR code image containing encoded data, no visible human-readable text25.2. Installatie via Google Play of de Apple App Store
natural_image
Two cylindrical batteries with positive and negative charges, no text or symbols visible
iADVERTENCIA!
https://www.medion.com/power_consumption/
23.5. Ajuste de la hora
natural_image
Lifestream II app icon with musical note and Wi-Fi signal symbol (no text or symbols beyond the icon itself)text_image
QR code image containing encoded data, no visible human-readable text25.2. Instalación mediante Google Play o Apple App Store
natural_image
Symbol of a trash bin crossed out by two crossed lines, with no text or labels present.APARATO
natural_image
Two cylindrical batteries with positive and negative charges, shown in side view (no text or symbols)
AVVERTENZA!
natural_image
Lifestream II app icon with musical note and Wi-Fi signal symbol (no text or symbols beyond the icon itself)text_image
QR code image containing encoded data, no visible human-readable text1. Information about this user manual 277
1.1. Explanation of symbols 277
FR
2. Proper use
3. Safety information
3.1. Operating safety 280
ES
3.2. Installation location
IT
3.3. Repairs....281
EN
3.4. Environmental conditions
3.5. Power supply 282
3.6. CD player....283
4. Batteries 28
4.1. Handling batteries 28
5. System requirements
6. Package contents
7. Device overview
7.1. Front....287
7.2. Back....288
7.3. Remote control 289
8. Connections 29
8.1. Inserting batteries in the remote control 292
9. Navigation within menus 293
10. Configuration for the internet radio 293
10.1. Network requirements....293
11. Network configuration....294
11.1. Accessing the web interface on the internet radio .....294
12. Connecting to a power supply.... 294
13. Using the device for the first time.... 294
13.1. Setting the time/date 295
13.2. Maintaining the network connection....295
13.3. Selecting a WLAN region....295
13.4. Establishing a connection to a network 296
13.5. WLAN connection via WPS 296
13.6. Entering a network key 297
13.7. Using the WLAN radio as a media client....298
13.8. Connecting the internet radio with a media server 298
14. Listening to internet radio 298
14.1. Selecting radio services 298
14.2. Connecting to an internet radio station/podcast 299
15. Listening to DAB radio 300
15.1. Setting radio stations....300
15.2. Storing radio stations 301
15.3. Main menu in DAB radio mode 301
16. Listening to FM radio.... 302
16.1. Setting radio stations 302
16.2. Storing radio stations 302
16.3. Main menu in FM radio mode 302
17. Playing back CDs 303
17.1. Track information (ID3) 303
17.2. Inserting/removing a disc 303
17.3. Starting/pausing playback....303
17.4. Track selection, fast rewind/fast forward ....304
17.5. Folder selection 304
17.6. Programming the track playing order 304
17.7. Repeat/random playback 304
18. Bluetooth mode 304
18.1. Connecting Bluetooth devices 305
18.2. Control via remote control (Bluetooth range) 305
19. Listening to audio files via a computer/USB 305
19.1.Main menu in music playback mode 306
19.2. Playback display 307
20. Streaming services 307
20.1. Using streaming services 307
20.2. Spotify Connect 308
20.3. Listening to Amazon Music 308
21. Playback on the AUX IN connection.... 309
22. Playback on the LINE IN connection 309
23. System settings 309
23.1. Setting the switch-off time 309
23.2. Equaliser 310
23.3. Audiostream quality 310
23.4. Network settings 310
23.5. Setting the time....312
23.6. Setting the alarm....312
23.7. Setting the language 313
23.8. Resetting the device to factory settings 313
23.9. Updating the software 313
23.10. Starting the set-up wizard 314
23.11. Viewing software information.... 314
23.12. Data protection....314
23.13. Configuring the display lighting....314
24. Settings in the main menu 315
- Control using the MEDION LifeStream 2 app .... 315
25.1. Installation via direct link 315
25.2. Installation via Google Play or the Apple App Store 315
25.3. Using the app 315
- Troubleshooting 317
- Cleaning 31
- Disposal 320
- Technical specifications 32
- EU – Declaration of Conformity 323
- Licence agreements for end users 324
31.1. Audio products for use with the internet radio 324
31.2. Information on trademarks and licences 325
- Legal notice 32
- Privacy statement 32
1. Information about this user manual

Thank you for choosing our product. We hope you enjoy using this device.
Please read the safety instructions and the user manual carefully before using this product for the first time. Note the warnings on the device
and in the user manual.
Always keep the user manual close to hand. If you sell the device or give it away, please ensure that you also pass on this user manual. It is an essential component of the product.
1.1. Explanation of symbols
If a block of text is marked with one of the warning symbols listed below, the hazard described in that text must be avoided to prevent the potential consequences described there from occurring.

DANGER!
Warning: risk of fatal injury!

WARNING!
Warning: risk of possible fatal injury and/or serious irreversible injuries!

CAUTION!
Warning: risk of minor and/or moderate injuries!

NOTICE!
Follow these instructions to prevent damage to the device!

More detailed information about using the device!

Follow the instructions in the user manual!

Due to the 5 GHz frequency range of the wireless LAN solution used, the device may only be used inside buildings in the EU.

WARNING!
Warning: risk of electric shock!
WARNING!
Warning: danger due to loud volume!

CE labelling
Products that feature this symbol meet the requirements of the EU directives (see chapter entitled "Declaration of conformity").

Protection class II
Electrical devices in protection class II are devices that have double and/or reinforced insulation throughout, and do not have an option for connecting a protective earth. The housing of an electrical device in protection class II, with surrounding insulating material, might either form all of the additional or reinforced insulation, or part of it.

Indoor use
Devices with this symbol are intended solely for indoor use.

Symbol for direct current (DC)
- Bullet point/information on steps during operation
▶ Instruction to be carried out
■ Safety instructions to be performed
2. Proper use
This device is used for playing audio streamed over the internet or a network. Furthermore, you can also use the device to play back audio files on USB data media and CDs, via Bluetooth® and FM/DAB radio signals.
- The device is only intended for private use and not for industrial/commercial use.
Please note that we shall not be liable in cases of improper use:
- Do not modify the device without our consent and do not use any auxiliary equipment that we have not approved or supplied.
- Only use replacement parts or accessories that we have supplied or approved.
- Comply with all the information in this user manual, especially the safety information. Any other use is considered improper and can cause personal injury or property damage.
- Do not use the device in potentially explosive atmospheres. This includes petrol stations, fuel storage areas and areas where solvents are processed. This device must also not be used in areas with particle-laden air (for example flour or wood dust).
- Do not use the device outdoors.
- Do not expose the device to extreme conditions. Avoid:
– high humidity or wet conditions
– extremely high or low temperatures
- direct sunlight
- naked flames.
3. Safety information
3.1. Operating safety
This device may be used by children over the age of 8 and by persons with limited physical, sensory or mental abilities or by those without experience and knowledge, if they are supervised or have been instructed in the safe use of the device and have understood the dangers that result from it.
- Children should be supervised to ensure they do not play with this device.
- Cleaning and user maintenance may not be carried out by children unless they are supervised.
- Keep the device and accessories out of reach of children.

DANGER!
Risk of choking and suffocation!
Packaging film can be swallowed or used improperly, creating a risk of choking and suffocation.
- Keep packaging material such as plastic film or plastic bags away from children.
3.2.Installationlocation
- Keep your device and all connected components away from moisture and avoid dust, heat, direct sunlight and naked flames (such as candles, for instance). Non-compliance with these instructions can lead to faults or damage to the display.
-
Do not use the device outdoors as it could be damaged by weather such as rain, snow etc.
-
Avoid exposing the device and the power pack to water droplets or spray and do not place any liquid-filled containers (vases or similar) on or next to the device or the power pack. Liquids penetrating the device may impair the electrical safety of the product.
- The slots and openings on the device are for ventilation purposes. Do not cover these openings (risk of overheating, fire hazard)!
- Position the cables so that no one can tread on them or trip over them.
- Make sure that there is enough clearance between the device and any surrounding furniture or walls. Ensure a minimum clearance of 10 cm around the device for sufficient ventilation.
- Place and operate all the components on a stable, level and vibration-free surface in order to prevent the device from falling.
3.3. Repairs
- Contact customer services if:
– the mains cable is burnt or damaged
– liquid has penetrated the device
– the device is not operating correctly
– the device has fallen or the housing is damaged.
- Repairs to your device should only be carried out by qualified specialists.
- If a repair must be carried out, please contact only our authorised service partners.
3.4. Environmental conditions
- The device may only be used and stored in accordance with the environmental conditions specified in the technical data.

DANGER!
Risk of electric shock!
Major changes in temperature or fluctuations in humidity can cause moisture to build up within the device due to condensation – this can cause an electrical short circuit.
■ After transporting the device, wait until it has reached ambient temperature before switching it on.
3.5. Power supply

DANGER!
Risk of electric shock!
Even when the mains switch is off, some components of the device are live.
In order to disconnect the power to your device or to completely isolate the device from voltage sources, remove the mains plug from the socket.
- Operate the device only from a 230 V\~, 50 Hz earthed power outlet that is close by and easy to access.
- To disconnect the power supply from your device, pull the plug from the socket.

DANGER!
Risk of electric shock!
The device contains live parts. They pose a risk of electric shock or fire if an unintentional short circuit occurs.
■ Never open the housing and never insert any objects through the slots and openings into the device!
- Do not place any objects on the cables as they may be damaged.
- Keep the device at a distance of at least one metre from sources of high-frequency or magnetic interference (televisions, speakers, mobile telephones etc.) to avoid malfunctions and data loss.
3.6. CD player

text_image
LASER KLASSE 1 CLASS 1 LASER PRODUCT APPAREIL LASER DE CATEGORIE 1The CD player is a class 1 laser product. The device has a safety system that prevents dangerous laser beams from escaping during normal use. To avoid eye injuries, never tamper with or damage the device's safety system.
4. Batteries
4.1. Handling batteries
The remote control is battery-operated. Please note the following:
- Keep new and used batteries out of the reach of children. Do not swallow batteries as they can cause chemical burns.

WARNING!
Risk of chemical burns!
The remote control supplied with the device contains a battery. If this battery is swallowed, it can cause serious internal chemical burns within 2 hours, which may prove fatal.
- Seek medical help immediately if you think that batteries may have been swallowed or secreted in any part of the body.
- Stop using the remote control if you cannot close the battery compartment securely, and keep it well away from children.
- Before inserting the batteries, check that the contacts in the device and on the batteries are clean and, if necessary, clean them.
- Always use new batteries of the same type. Never use old and new batteries together.
- Pay attention to the polarity (+/−) when inserting the batteries.
- There is a risk of explosion if batteries are replaced incorrectly! Only replace batteries with those of the same or an equivalent type.
- Never try to recharge non-rechargeable batteries. Risk of explosion!
- Never expose the batteries to excessive heat (such as direct sunlight, fire or similar).
- Store batteries in a cool, dry place. Strong direct heat can
damage batteries. Do not expose the device to sources of intense heat.
- Never short-circuit batteries.
- Never throw batteries into a fire.
- Remove leaking batteries from the device immediately. Clean the contacts before inserting a new battery. Risk of chemical burns from battery acid!
• Always remove flat batteries from the device. - If the device is not going to be used for long periods, remove the batteries.
5. System requirements
Basic requirements for DLNA services or internet radio:
– Broadband internet connection (e.g. DSL)
- WLAN or wired router
Playback from the PC music archive:
- For example, Windows Media Player 11 or later
- Windows® 10, Windows® 8/Microsoft® Windows® 7 (UPnP-enabled)
Easily control the internet radio using a smartphone/tablet PC:
- Smartphone/tablet with WLAN 802.11 a/b/g/n
- Android™ platform 4 or higher
- iOS ^® 5.0 or higher
– Free MEDION® LifeStream 2 app installed
6. Package contents

DANGER!
Risk of choking and suffocation!
There is a risk of choking and suffocation due to swallowing or inhaling small parts or plastic wrap.
- Keep the plastic packaging out of the reach of children.
Remove the product from the packaging and remove all packaging material.
▶ Please check your purchase to ensure that all items are included. If anything is missing, please contact us within 14 days of purchase.
The following items are supplied with your product:
- 1 micro audio system
- 1 remote control
• 2 batteries, type 1.5 V R03/LR03/AAA - Mains cable
- Documentation
- Wire aerial
7. Device overview
7.1. Front
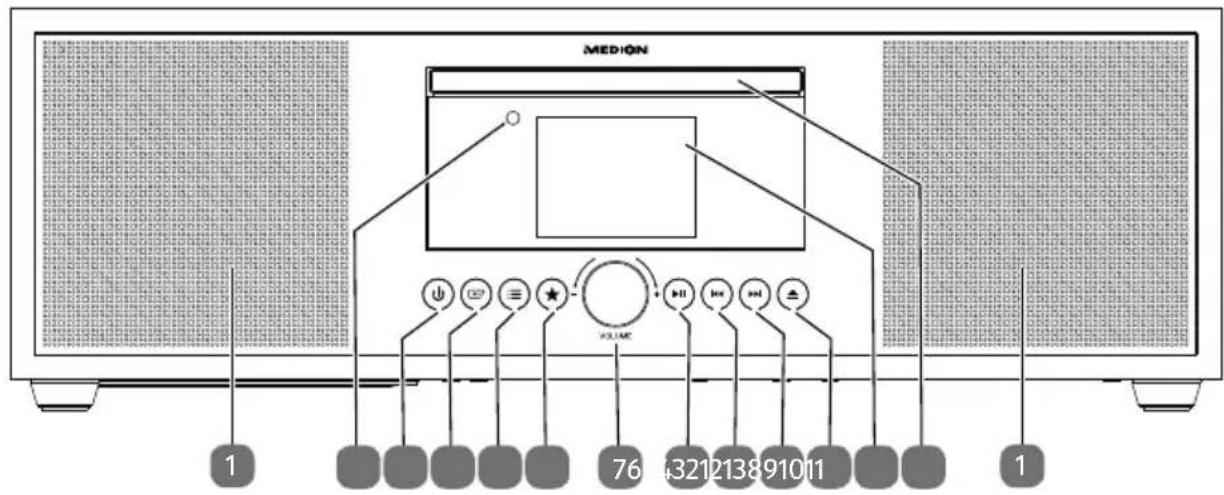
text_image
MEDION VOLUME 1 76 321213891011 11) Speaker
2) Infrared sensor for remote control
3) - Switch device on / switch to standby mode
4) - Select operating mode
5) :≡ – Short press for station or track information. Long press to open/close menu; return to previous menu level
6) - Store station; call up stored station
7) VOL-/+ - Adjust volume; when menu is open: turn to navigate through the menu, press to confirm menu selection
8) ▶ II – Start/pause playback
9) ◀◀ – Previous track
10) ▶▶ – Next track
11) - Eject CD
12) Display
13) CD compartment
7.2. Back
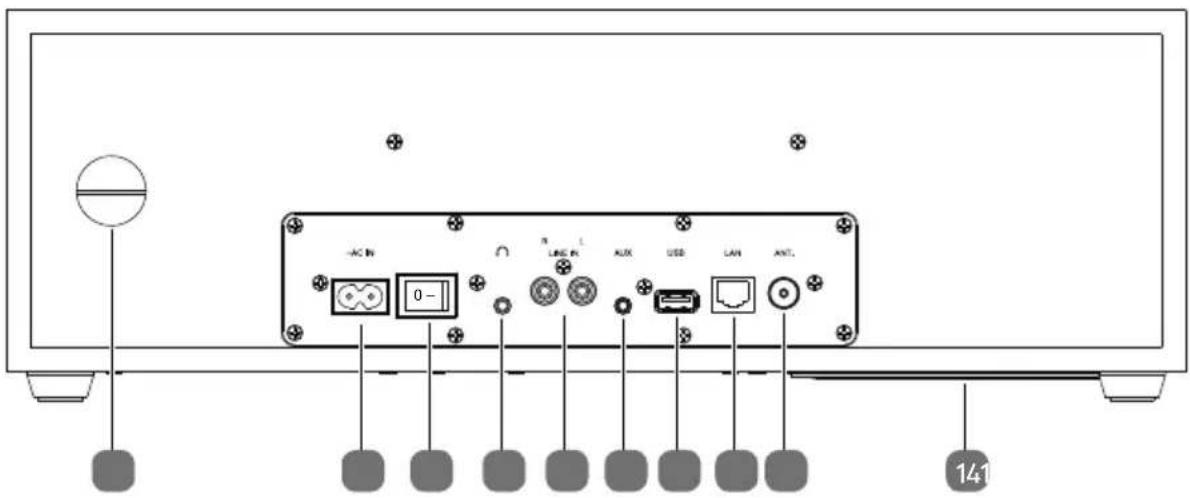
text_image
AC IN 0- LINE IN AUX USB LAN ANTL 14114) Bass reflex port
15) \~AC IN – Connection port for mains cable
16) 0/1 - Mains switch
17) - Headphone connection, 3.5 mm stereo jack
18) LINE IN L/R - Connection port for external device (cinch connection)
19) AUX – Connection port for external device (jack connection)
20) USB – Connection port for USB storage medium
21) LAN - RJ45 network socket
22) Connection for DAB/FM wire aerial
7.3. Remote control
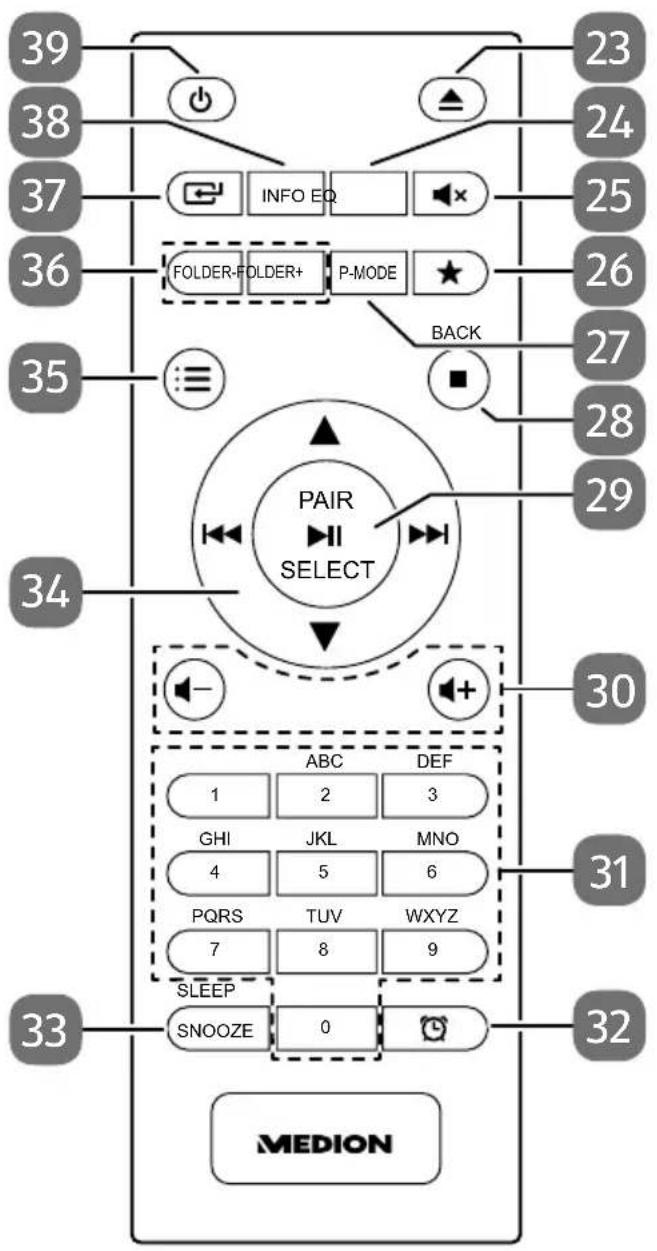
text_image
39 38 37 36 35 34 33 23 24 25 26 27 28 29 30 31 32 MEDION INFO EQ FOLDER-FOLDER+ P-MODE BACK PAIR SELECT ABC DEF 1 2 3 GHI JKL MNO 4 5 6 PQRS TUV WXYZ 7 8 9 SLEEP SNOOZE 023) - Eject CD
24) EQ – Select equaliser mode
25) x - Mute
26) ★ - Store station; call up stored station
27) P-MODE – Select playback mode
28) ■ – Stop playback
BACK – Return to previous menu
29) ▶ II – Start/pause playback
SELECT – Confirm selection in menu
PAIR – Start Bluetooth pairing mode
Automatically store stations
30) - /+ - Increase/decrease volume
31) 0-9 A-Z - Number/character buttons
32) - Display/set timer
33) SNOOZE – Snooze function
SLEEP – Call up sleep mode
34) ◀◀ – Fast rewind/play previous track / radio station button – ▶▶ – Fast forward/play next track / radio station button + ▲▼ – Navigate up/down through the menu
35) :≡ - Open/close menu
36) FOLDER-/+ - Select folder (CD, USB mode)
37) - Select operating mode
38) INFO – Display radio station information/track information
39) - Switch device on / switch to standby mode
8. Connections
Before making any connections, unplug the mains plug.
Operation in LAN mode: ▶ Connect an Ethernet cable to the RJ45 port.
Operating the FM radio: ▶ Adjust the wire aerial for reception.
Operating the FM/DAB ▶ Adjust the wire aerial for reception. radio:
Mains connection: ▶ Connect the connector plug to the \~AC IN port and plug the mains plug into a power socket.
AUX: ▶ Connect a 3.5 mm stereo jack to the AUX socket to transmit the stereo sound output from the device to other audio devices.
LINE IN: ▶ Connect RCA cable to the LINE IN socket to play back stereo sound output from other audio devices via the internet radio.
Headset connection: ▶ Connect the 3.5 mm stereo jack plug of the headphones to play back sound from the internet radio via the headphones.
USB port ▶ Connect a USB data medium here to play back audio files on the data medium.

All multimedia devices that can be connected to the corresponding connections of the device must comply with the requirements of the Low Voltage Directive.
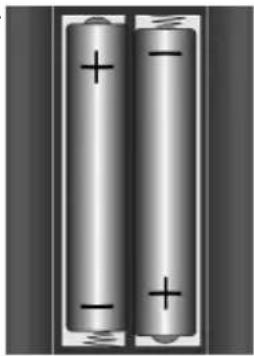
8.1. Inserting batteries in the remote control
Remove the battery compartment cover on the back of the remote control.
Insert two LR03/AAA/1.5 V batteries in the battery compartment of the remote control. Check the battery polarity (see label on the bottom of the battery compartment).
▶ Close the battery compartment.
natural_image
Two cylindrical batteries with positive and negative charges, no text or symbols visible
WARNING!
Risk of explosion!
There is a risk of explosion if the batteries are replaced incorrectly.
■ Replace batteries only with the same or equivalent type.
The remote control can be damaged by leaking batteries if not used for a long period of time!
Remove the batteries from the remote control if the device is not going to be used for a long period.
9. Navigation within menus
All functions can be operated using both the remote control and the buttons on the device.
▶ Press and hold the button to call up the main menu for the corresponding mode.
▶ Turn the -/+ dial on the device or use the navigation buttons ▲ ▼ ◀◀ ▶◀ on the remote control to navigate through the menus.
▶ Press the -/+ dial or the SELECT button on the remote control to confirm your menu selection.
▶ Press the :≡ button to return to a previous menu level.
10. Conf i guration for the internet radio
The radio is registered with an internet radio station service when it is connected to the internet. This enables you to receive over 15,000 radio stations worldwide. You can store up to 500 stations in your favourites list.
You can connect the radio to the internet via an access point to your PC:
- Wirelessly in WLAN mode: The radio's WiFi antenna receives the signal from your DSL router.
- Using a cable via the radio's RJ45 port in "LAN mode" if an Ethernet network is available.
The PC does not need to be switched on to receive the radio station.

The station list on your internet radio is provided and continually updated free of charge.
If a radio station is unavailable, this can be for various reasons on the part of the radio station operator. However, this does not mean that the device is faulty.
When connecting to internet radio stations, high numbers of requests may lead to temporary delays. Try to establish a connection with the internet service again at a later point in time.
10.1. Network requirements
The network must meet the following requirements for the device to work as a WLAN radio:
- The router used for the network must have a DHCP server function so it can automatically assign the device a network IP address.
- If you use a router that has already been configured in this way, you can connect the WLAN radio to the network by itself.
11. Network configuration
There are two possible network configurations for the internet radio: WLAN mode (wireless) or LAN mode (using an Ethernet cable).
- If the internet connection has been established using an Ethernet cable, select connection type KABEL in the set-up wizard. You can manually amend all settings under system settings at a later point in time.
- If you are on a wireless 802.11 a/b/g/n network, you can connect the internet radio to the internet via WLAN.
When using the device for the first time, you must select an Access Point (AP) and enter the network key, if applicable. Thereafter the radio will always connect to this AP automatically. If the AP can no longer be found, a message appears accordingly.
11.1. Accessing the web interface on the internet radio
When you enter the IP address of the internet radio in your browser, the web interface of the internet radio is displayed.
- You can find the current IP address under SYSTEMEINSTELLUNGEN/INTERNETEINST./EINSTELLUNGEN ANZEIGEN.
- Here, you can give your internet radio a friendly name (by default it is [MEDI-ON]+[MAC address]).
12. Connecting to a power supply
Connect the power supply plug on the supplied mains adapter to the \~AC IN socket on the device.
13. Using the device for the first time
When using the device for the first time, the language selection dialogue is displayed first.
▶ Select a language for the internet radio menu and press SELECT on the remote control to confirm your selection.
A data protection notice is then displayed.
▶ Press SELECT on the remote control to accept the data protection provisions.
After this, the set-up wizard starts.
▶ Confirm the prompt EINRICHTUNGSASS. JETZT AUSFÜHREN? by pressing JA to start the set-up wizard.
▶ Select the display language for the menus and press SELECT to confirm.
The set-up wizard is displayed (in the previously set language):

If you select NEIN you can select in the next window whether the wizard is to start the next time the device is switched on.
13.1. Setting the time/date
▶ Set whether to display the time in 12 or 24 hour format.
Configure whether the time is to be set automatically using the FM reception (UPDATE ÜBER FM), the DAB reception (UPDATE ÜBER DAB) or automatically via the network (UPDATE ÜBER NETZWERK).
▶ Set 12 h or 24 h mode for the time display format.
Then configure the automatic setting for summer/winter time to EIN or AUS.

If you have selected UPDATE ÜBER NETZWERK, configure your time zone in the next dialogue window.
▶ If you have selected the last option (KEIN UPDATE), proceed as follows to set the time manually:
The digit position for the day flashes.
▶ Set the day using ▲▼ and press SELECT to confirm.
The digit position for the month flashes.
▶ Set the month using ▲▼ and press SELECT to confirm.
The digit position for the year flashes.
▶ Set the year using ▲▼ and press SELECT to confirm.
The digit position for the hour flashes.
▶ Set the hour using ▲▼ and press SELECT to confirm.
The digit position for the minutes flashes.
▶ Set the minutes using ▲▼ and press SELECT to confirm.
13.2. Maintaining the network connection
If the network connection is to remain active even when in standby mode or in operating modes that do not use WLAN such as AUX IN or FM radio (increasing power consumption in standby mode), select JA. When you press JA to confirm this setting, the internet and network functions are available more quickly when the device is switched on.
When NEIN is set, the network connection is re-established when the internet radio is switched on.
13.3. Selecting a WLAN region
▶ Select the region in which you are using the internet radio.
The device then begins to search for available WLAN networks (Access Points).
13.4. Establishing a connection to a network
The names (SSID) of the networks found are shown in a list. WLAN Access Points that provide connections via WPA are indicated with [WPS].
Beneath this, you will see:
NEUER SUCHLAUF: start a new search
KABEL: search for networks via Ethernet
MANUELLE KONFIG: enter connection data manually
13.4.1. Connection via WLAN
▶ Select the WLAN Access Point for connection with the internet radio and press the dial to confirm.
In case of an unencrypted (open) WLAN Access Point, the internet radio establishes the connection automatically.
▶ To connect with an encrypted network, observe the following sections.
13.5. WLAN connection via WPS
Once a WLAN network providing the option to connect via WPS has been selected, the WPS menu appears. If you do not want to establish a connection via WPS, select WPS ÜBERSPRINGEN here.
13.5.1. WPS button
Select TASTE DRÜCKEN to enable the WPS function to be used via the router's WPS button.
Then press the WPS button on the router and press SELECT to confirm the connection with the internet radio.

You can also access the WPS function at any time ^1 by pressing and holding the INFO button.
To this end, please also note the information in your router's user manual.
- The device will now establish a connection with the network. Once the connection is successful, a corresponding notice is then displayed.
- The device can now play back media via the network and receive internet radio stations as long as there is an active internet connection via the network.
- The device stores the connection data so that it does not need to be re-entered to re-establish the connection.
13.5.2. Entering a PIN
If the router does not feature a WPS button, but does provide the option for a WPS connection by entering a PIN on the router's web interface, select PIN EINGE-BEN.
When prompted, enter the PIN shown on the internet radio display on the router's web interface and press SELECT to confirm your entry.

To this end, please also note the information in your router's user manual.
The device will now establish a connection with the network. Once the connection is successful, a corresponding notice appears.
▶ Press SELECT to confirm.
The device stores the connection data so that it does not need to be re-entered to re-establish the connection.
The device can now play back media via the network and receive internet radio stations as long as there is an active internet connection via the network.
13.6. Entering a network key
If you have skipped the WPS menu, you must enter the network key.
▶ Enter the network key for the WLAN access point using the number/character buttons on the remote control.
Alternatively
▶ You can enter the network key using the dial on the device:
▶ To do so, use the dial to select a character and press SELECT to confirm.
▶ To delete a character, select BKSP and press SELECT.
▶ If you want to discard the entry, select CANCEL and then press SELECT.
▶ Once you have entered the network key, select SELECT and then press SELECT to confirm.
The device stores this key so that it does not need to be re-entered to re-establish the connection.
The device will now establish a connection with the network. Once the connection is successful, a corresponding notice is then displayed.
▶ Press SELECT to confirm.
The device can now play back media via the network and receive internet radio stations as long as there is an active internet connection via the network.
13.7. Using the WLAN radio as a media client
Your WLAN radio supports the UPnP protocol, Universal Plug and Play. Audio files on your PC can be transmitted wirelessly to your WLAN radio when UPnP software is installed.
The internet radio supports integration as a Digital Media Renderer (DMR). This enables you to play back music files from your computer on the internet radio. You can also set the volume from the computer.
13.8. Connecting the internet radio with a media server
You can connect your internet radio to a media server.
▶ Open the MUSIKABSPIELER menu in the main menu (or press the ← button) and use the dial (7) to select MUSIKABSPIELER.
The radio starts to search for available media content on the network. After a few seconds, the name of the media server is shown, provided that it has been found, e.g.: My NAS server
If you want to connect the installed media server with the radio, press SELECT to confirm.
The folder and music files on the media server are displayed. You can now select and play back music files.

You may need to confirm and approve the connection on your PC.
14. Listening to internet radio
To listen to internet radio, select INTERNET RADIO from the main menu and then press SELECT or press the ⏻ button and use the dial (7) to select INTERNET RADIO.
In addition to the menu entries, there are two additional entries in the first display: ZULETZT ANGEHÖRT: retrieves the last radio station played
SENDERLISTE: calls up the available internet radio services from the internet server.
14.1. Selecting radio services
Select the Station list entry to select from the following services:
14.1.1. My favourites
You can call up stations stored as favourites under MEINE FAVORITEN.
14.1.2. Region
Under REGION, you can display all stations mapped to the region (in this case: DEUTSCHLAND) in which the internet radio has accessed the internet.
14.1.3. Stations
Select SENDER to select internet radio stations based on the following criteria.
▶ LÄNDER: select stations by country
▶ GENRE: select stations by genre
▶ SENDER SUCHEN: search for stations by name
▶ POPULÄRE SENDER: select stations from a list of popular stations
▶ NEUE SENDER: select stations from a list of the newest stations
▶ Select a station based on the search criteria above and press SELECT.
14.1.4. Podcasts
Select PODCASTS based on the following criteria:
MEINE FAVORITEN: you can call up podcasts stored as favourites here.
▶ COVID-19: You can find podcasts about coronavirus here.
▶ LÄNDER: select a region from a list here and press SELECT to confirm. Then select a podcast and press SELECT to confirm.
- GENRE: select a genre from a list here and press SELECT to confirm. Then select a podcast and press SELECT to confirm.
▶ SUCHEN PODCASTS: search for podcasts by name
14.2. Connecting to an internet radio station/podcast
Once you have selected a station/podcast as described above, the radio is connected to the internet radio server. The following information is shown on the display:
- Radio station name
- Time
• Additional information about the radio station - Buffer display
• Memory slot number - WLAN connected
Pressing the Info button on the remote control several times brings up additional information:
• Language and location
• Information about the bit rate, codec used and scanning rate
- Playback buffer
- Today's date
The radio has been successfully connected to the internet server and is receiving internet radio stations.

If an error message appears, it may be that the radio cannot find the internet server.
14.2.1. Storing internet radio stations

You can save internet radio stations to a memory slot. The internet radio has 40 memory slots.
Once a station has been saved to a memory slot, the station's memory slot is shown on the display during playback.
▶ Press and hold the button for longer until the list of memory slots is shown on the display.
Then select a memory slot from 1–40 and press SELECT to confirm. The radio station has been stored.
To call up the radio station again, press the ★ button and select the station from the list. Press SELECT to play the station.
15. Listening to DAB radio
To listen to DAB radio, select DAB RADIO from the main menu and then press SELECT to confirm or press the button and use the dial (7) to select DAB RADIO.
The following information is shown on the display:
• DAB reception
• DAB stereo reception
- Time
• WLAN reception strength
• DAB reception strength
- Station name
15.1. Setting radio stations
▶ Select a radio station from the list of stations by turning the dial (7).
▶ Press SELECT to play the radio station.
15.2. Storing radio stations

The DAB radio has 40 memory slots.
Once a station has been saved, the station's memory slot is shown on the display during playback.
▶ Press and hold the button for longer until the list of memory slots is shown on the display.
Then select a memory slot from 1–40 and press SELECT to confirm. The radio station has been stored.
To call up the radio station again, press the ★ button and select the station from the list. Press SELECT to play the station.
15.3. Main menu in DAB radio mode
▶ Press the :≡ button on the device for longer to call up the menu for DAB radio mode.
15.3.1. Station list
You can display the list of stations under SENDERLISTE
15.3.2. Search
▶ Select VOLLSTÄNDIGER SUCHLAUF to start a station search immediately. A progress bar indicates the search progress.
Once the search is complete, the list of stations is displayed.
15.3.3. Manual setting
Under MANUELL EINSTELLEN, channels 5A to 13F with the corresponding frequencies are shown on the display.
▶ Then select a channel and press SELECT to confirm.
15.3.4. Cleaning the list of stations
▶ Select BEREINIGUNG UNGÜLTIG and confirm the subsequent prompt by pressing JA to delete stations that are no longer available from the list of stations.
15.3.5. Dynamic Range Control
▶ Reduce the difference between quiet and loud sounds under DRC.
15.3.6. Station sort sequence
▶ Set the station sort sequence for the list under SENDERREIHENFOLGE:
• ALPHANUMERISCH
Stations are sorted in alphabetical and numerical order.
- ENSEMBLE
Stations are sorted by DAB ensemble.
• GÜLTIG
Stations are sorted by the broadcast signal strength.
16. Listening to FM radio
To listen to FM radio, select FM RADIO from the main menu and then press SELECT to confirm or press the ← button and use the dial (7) to select FM RADIO.
The FM radio display is shown:
• Station name (in case of RDS reception)/frequency display
- Time
- FM signal strength
- FM stereo reception
- RDS reception
• Frequency, PTY information, date, radio text (press the INFO button)
16.1. Setting radio stations
▶ Press the ◀◀◀ or ▶▶◀ button on the device or remote control several times to set the radio frequency.
▶ Press and hold the ◀◀◀ or ▶▶◀ button on the device or remote control to start an automatic station search. The automatic search starts either backwards or forwards, depending on which button was pressed.
16.2. Storing radio stations
▶ Press and hold the ★ button for longer until the list of memory slots is shown on the display.
Then select a memory slot from 1–40 and press SELECT to confirm. The radio station has been stored.
To call up the radio station again, press the ★ button and select the station from the list. Press SELECT to play the station.
16.3. Main menu in FM radio mode
▶ Press the :≡ button on the device for longer to call up the menu for FM radio mode.
16.3.1. Search settings
Under SUCHLAUF EINSTELLUNG confirm the following prompt NUR STARKE SENDER? by pressing
• JA for the radio to search only for stations with a strong signal;
• NEIN for the radio to also search for stations with a weak signal.
16.3.2. Audio setting
Under AUDIO EINSTELLUNG, confirm the following prompt NUR MONO ANHÖREN? by pressing
• JA to play radio stations in mono. Use this setting when there is weak reception.
• NEIN to play radio stations in stereo.
17. Playing back CDs
▶ Press the :≡ button or press ← and use the dial (7) to select CD.
17.1. Track information (ID3)
If the CD contains tracks with ID3 information, press INFO while a track is playing to display this information about the tracks one after the other. You will see the track, artist and album name on the display.
17.2. Inserting/removing a disc
Ensure there is approximately 15 cm of space in front of the device so that the CD can be ejected easily.
▶ Press the ▲ button on the device or on the remote control to open the CD tray.
OPEN will appear on the display.
▶ Always place the CD in the disc tray with the labelled side facing upwards.
▶ Press ▲ on the device again to close the CD tray. LADEVORGANG will appear on the display.
The total number of tracks on the CD and the total running time are displayed. The first track then starts playing automatically.
If no disc is inserted, or if the disc cannot be read, the display reads KEINE CD.
▶ Press the ▲ button to eject the CD again. OPEN will appear on the display.
17.3. Starting/pausing playback
▶ Use the SELECT/▶II button on the remote control or ▶||/■× on the device to start playing tracks. To pause playback, press the button again. Press the button again to resume playback.
17.4. Track selection, fast rewind/fast forward
Press the ◀ button to go back to the start of the track that is currently being played. Press the button again to skip to the previous track. Use the ▶ button to skip to the next track.
▶ Hold down the◀ button to fast rewind within a track or hold down the ▶ button to fast forward.
17.5. Folder selection
If you are playing MP3 files, you can store them in different folders to make it easier to keep an overview of the tracks.
▶ Press either the ▲ or ▼ button to change folder on an MP3 data medium.
17.6. Programming the track playing order
Use the programme function to create your own music playlist by selecting which specific tracks you want to play. You can specify the order in which the list is played yourself. Proceed as follows:
▶ Press ■ on the remote control to stop playback.
▶ Press the ★ button. Programme position P01 and track display T001 are shown on the display.
▶ Now press ◀◀ or ▶▶ to select a track.
▶ Press the ★ button to save more tracks in the same way.
▶ Press SELECT/▶II to start playing back the programmed playlist.
▶ To delete the programmed playback, press the ■ button on the remote control twice.
17.7. Repeat/random playback
▶ Press the P-MODE button to switch on random playback or to run through the repeat modes. The device has a number of different modes:
- Repeat individual track
- Repeat folder
- Repeat all
18. Bluetooth mode
You can use Bluetooth to play tracks wirelessly from external devices such as MP3 players or mobile phones with Bluetooth on this device.
▶ Press the button or press and use the dial (7) to select BLUETOOTH AUDIO.
18.1. Connecting Bluetooth devices
- Enable the Bluetooth function on your external device and then connect to it. Refer to the user manual for your device for more information. The audio system's name is "MD 44100".
If you are prompted to enter a password on the external device, enter "0000" as the password.
▶ You have now set up the connection and can use the external device with the audio system.
You can control how tracks are played, the volume and a range of special functions on your external device and on the audio system. What functions are available is dependent on your external device and the software that you use.
If you want to stop data transfer via Bluetooth, either switch off the Bluetooth function on the external device or select a different source on the audio system.
18.2. Control via remote control (Bluetooth range)
You have the following options for controlling the tracks using the audio system's remote control:
- Press the - or + button to increase or decrease the volume.
- Press SELECT/▶II on the remote control to start or pause playback.
- Press ◀◀ or ▶▶ to go back to the previous track or skip to the next track
Please note: not every function is available for every external device. Some functions may be displayed in the external device's display.
19. Listening to audio fi les via a computer/USB
To listen to audio files from the network, select MUSIKPLAYER from the main menu and then press SELECT to confirm or press the MODE button several times.

To play audio files from the network on the radio, you must use media server software in the network.

If the device switches off due to an electrical discharge while in USB mode (media player) or in the optional DLNA "Media library" mode, it will restart. The last operating mode cannot be restored independently. Start the respective media or applications again.
The last user settings entered may not be restored following a static discharge, because the folder structure is not stored in the memory.

NOTICE!
Possibility of damage to the device.
Improper handling of sensitive surfaces can damage the device.
■ To avoid damaging the device, do not use a USB extension cable, and do not connect the device directly to the USB port of a computer.
■ The USB connection is only designed to be used for USB memory sticks: other external storage media such as external hard disks cannot be operated via the USB port.
To play back audio files from a USB data medium, connect a USB data medium to the USB port.
When you connect a USB data medium, the device automatically switches to music playback mode and the dialogue USB DISK ANGESCHLOSSEN. ORDNER ÖFFNEN? appears.
▶ Confirm by pressing JA to open the content on the USB data medium directly. If no audio files are available, the main menu is displayed when music playback is called up:
19.1. Main menu in music playback mode
19.1.1. Selecting audio files from the network
Select GEMEINSAME MEDIEN to search for audio files in the network directly. If a media server has been found, a selection menu is displayed, including entries transmitted from the media server.
19.1.2. USB playback
Select USB-WIEDERGABE to search for audio files directly on the USB data medium.
19.1.3. Selecting a playlist from the network
Select PLAYLIST to search for playlists in the network.
19.1.4. Repeat track
In the menu, set ERNEUTE WIEDERGABE to EIN to automatically play back the selected track again.
19.1.5. Automatic playback
In the menu, set SHUFFLE to EIN to start automatic playback of the track.
19.1.6. Deleting playlists
Select MEINE PLAYLIST LEEREN to delete the playlist entries.
19.1.7. Waking the server
Under SERVER BEREINIGEN, confirm the dialogue GEMEINSAM VERWEN-DETE MEDIEN BEREINIGEN - LAN-SERVER WIEDER AKTIVIEREN by
pressing JA to display inactive media servers. You can then select and wake a media server (WOL, Wake on LAN function) to play media contents.
19.2. Playback display
The following information is shown on the playback display:
- Track name
- Time
• WLAN reception strength - Shuffle mode
- Repeat mode
- USB playback
• Media playback via a server
- ID3 tag display (press INFO to display additional information)

During playback, you can use the playback buttons like on a standard CD player.
Supported audio formats: *.mp3, *.wma, *.wav, *.flac., *.acc
20. Streaming services

Different streaming services are available depending on the region. The streaming services available, and how many of them are available, may change when firmware updates are carried out. The user shall not be entitled to any legal claims to the use of any specific streaming service via Internet radio.
20.1. Using streaming services
▶ Open the menu for SPOTIFY or AMAZON MUSIC, for example, in the main menu or press the Button and use the dial (7) to select one of the streaming services. Press SELECT to confirm your selection.

You must already be registered to use one of the streaming services above.
- Log in using your user information.
▶ Select the music track that you want to listen to and start playing it.
The music track is played.
The following playback functions are available: PLAY, STOP, previous/next track and automatic playback (shuffle).
20.2. Spotify Connect
Use your smartphone, tablet or computer as a remote control for Spotify. Learn more at spotify.com/connect.
The Spotify Software is subject to third party licenses found here:
https://www.spotify.com/connect/third-party-licenses

text_image
Spotify®20.3. Listening to Amazon Music
You can play back audio data from Amazon Music using the internet radio. The internet radio and the device must be registered with the app for the internet radio on the same network.
Activating Amazon Music in the internet radio app
▶ Open the app for the internet radio, see "20. Steuerung über die App" on page 43.
▶ Press QUELLE and then select AMAZON MUSIC.
▶ Press DURCHSUCHEN.
▶ Log in to your Amazon account.
Selecting and playing music tracks
▶ Open the menu for AMAZON MUSIC in the main menu or press the button and use the dial (7) to select AMAZON MUSIC. Press SELECT to confirm your selection.
▶ Select the music track that you want to listen to and start playing it.
The music track is played back on the internet radio speaker.

You can also search for the desired track using the app and start play-back on the internet radio.
21. Playback on the AUX IN connection
There is an AUX IN audio input on the back of the device.
Connect the AUX-IN socket to the audio output of an external device using the 3.5 mm audio cable to output the audio signal on the internet radio.
Then select the AUX IN menu. You can also press the button on the remote control and then use the arrow buttons to select the operating mode and confirm by pressing SELECT.
The audio signal from the external device is now output on the internet radio speakers.
22. Playback on the LINE IN connection
There is an LINE IN audio input on the back of the device.
Connect the LINE-IN socket to the audio output of an external device using a stereo cinch audio cable to output the audio signal on the internet radio.
Then select the LINE IN menu. You can also press the button on the remote control and then use the arrow buttons to select the operating mode and confirm by pressing SELECT.
The audio signal from the external device is now output on the internet radio speakers.
23. System settings
23.1. Setting the switch-off time
▶ Select the following automatic switch-off settings under SCHLUMMER: SLEEP MODE OFF - 15 MINUTES - 30 MINUTES - 45 MINUTES - 60 MINUTES.
When SCHLAFMODUS AUS is selected, no switch-off time is set.
You can also set the switch-off time by pressing the SLEEP button several times.
23.2. Equaliser
Under EQUALIZER, you can select a default sound format or configure your own. Select one of the following sound formats:
▶ NORMAL, FLAT, JAZZ, ROCK, SOUNDTRACK, KLASSIK, POP, NA-CHRICHTEN, MEIN EQ or MEINE EQ EINSTELLUNG and press SELECT to confirm. The setting will take effect immediately.

The sound format is preset to NORMAL. The best sound format for playing music is the setting ROCK.
When headphones are connected, the sound setting is automatically set to FLAT.
MY EQ
If you have selected a personalised sound format under the following entry, select MEIN EQ to take over the sound format directly.
MY EQ SETTINGS
Set your personalised sound format for MEIN EQ here.
▶ Set the bass, treble and volume by turning the dial on the device or by pressing the ▲▼ buttons on the remote control and press the SELECT button to store the entry.
▶ Press JA to confirm the subsequent prompt and to store the sound format.
23.3. Audiostream quality
You can configure the corresponding settings under the QUALITÄT AUDIOS-TREAM menu to improve the streaming quality.
▶ Select QUALITÄT AUDIOSTREAM and then press SELECT to confirm.
▶ Next, set your preferred streaming quality (GERINGE, NORMALE ODER HOHE QUALITÄT) using the volume control or the ▲▼ buttons on the remote control and press SELECT to confirm.

To avoid interruptions and failure during playback, only select HOHE QUALITÄT when there is a fast internet connection.
23.4. Network settings
Configure the network settings under NETZWERK.
23.4.1. Network wizard
▶ Select NETZWERKASSISTENT to start searching for networks.
Then enter the WEP/WPA key to connect the device with the wireless AP.
23.4.2. Establishing a WPS connection
You can establish a WPS connection under PBC WLAN SETUP:
▶ Activate the WPS connection on the device, which supports WPS and then confirm the connection on the internet radio and press SELECT to confirm.
23.4.3. Displaying settings
Information about the currently connected network and the device's MAC address is displayed under EINSTELLUNGEN ANZEIGEN.
23.4.4. Selecting a WLAN region
▶ Select the region, in which you are using the device under WLAN-REGION.
23.4.5. Manual settings
▶ Under MANUELLE EINSTELLUNGEN, select cable connection (Ethernet) or wireless connection (WLAN) and set the DHCP function to EIN or AUS.
23.4.6. Changing the NetRemote PIN
Under NETREMOTE PIN-SETUP, you can re-assign the four-digit number entered when establishing a connection with the Lifestream 2 app on a smartphone or tablet PC.
23.4.7. Deleting a network profile
The device stores the last 4 WLAN networks that have been connected.
▶ Under NETZWERKPROFIL, select a network and press SELECT to confirm. Press JA to confirm the subsequent prompt and delete the network from the list.

The currently connected network cannot be deleted.
23.4.8. Deleting network settings
▶ Select JA to delete all network settings.
23.4.9. Maintaining a network connection in standby mode
Select NETZWERKVERBINDUNG BEIBEHALTEN and set the function to JA if the internet radio is to remain connected to the network even when in standby mode or in an operating mode that does not use WLAN (AUX IN, FM radio, DAB radio). This enables other media players to access the internet radio and "wake it up".
If you do not want the network connection to be maintained, set the function to NEIN. When this setting is selected, the WLAN is also switched off for operating modes that do not use WLAN (e.g. AUX IN, FM radio, DAB radio). In this case, it is not possible to use the controls via the MEDION LifeStream 2 app.

Please note that when the network connection is maintained in standby mode (set to JA), the internet radio consumes more power than indicated for standby mode in the technical specifications. The values regarding the additional consumption can be found at: https://www.medion.com/power_consumption/
23.5. Setting the time
Under ZEIT/DATUM, set the date and time as described in the section on setting up the device for the first time.
23.6. Setting the alarm
You can set two alarm times on your internet radio under WECKER.

Before setting an alarm time, you must first set the time.
▶ Select an alarm and press SELECT to confirm.
▶ Select one of the following entries and press SELECT to adopt the settings.
23.6.1. Switching on the alarm
▶ Under AKTIVIERT, select AUS to deactivate the alarm.
▶ Select TÄGLICH, EINMALIG, WOCHENENDE or WOCHENTAGE to activate the alarm.
23.6.2. Setting the alarm time
▶ Set the time that the alarm is to go off under UHRZEIT.
23.6.3. Selecting an alarm signal
▶ Set the alarm tone for the alarm under MODUS:
• SUMMER: Wake to alarm tone
• INTERNET RADIO: Wake to internet radio
• DAB: Wake to DAB radio
• FM: Wake to FM radio
23.6.4. Selecting a radio programme for the alarm
▶ Under VOREINSTELLUNG, select a memory slot if you have previously chosen the option to wake to the internet radio or FM/DAB radio.
23.6.5. Setting the alarm volume
▶ Set the alarm volume under LAUTSTÄRKE.
23.6.6. Saving settings
To adopt the alarm settings, select SPEICHERN and press SELECT to confirm.
23.7. Setting the language
You can set the menu language under SPRACHE.
23.8. Resetting the device to factory settings
If the internet radio stops responding to inputs, or there are problems with the network connection, it may be necessary to reset the device to factory settings.
If your device stops responding, switch it off using the On/Off 0/1 switch on the back of the device and then restart it after a few seconds.
Then reset the menu settings to factory settings by calling up the menu SYSTEMEINSTELLUNGEN -> WERKSEINSTELLUNG and then press JA to confirm the subsequent prompt.
The installation process must then be carried out again.

Please note that all settings, such as the network key, are irretrievably lost when the device is reset and must be re-entered when the device is restarted.
23.9. Updating the software
You can search for and, if applicable, install software updates under SOFTWARE-UPDATE.
23.9.1. Performing automatic updates
Under EINSTELLUNG AUTOMATIKSUCHE, select JA to automatically search for software updates at regular intervals.
23.9.2. Searching for software updates
Select JETZT SUCHEN to start searching for software updates immediately.
23.10. Starting the set-up wizard
Select EINRICHTUNGSASSISTENT to start the set-up wizard as described in the section on using the device for the first time.
23.11. Viewing software information
The software version and radio identification number of the device are shown under INFO.
23.12. Data protection
A data protection notice is displayed under DATENSCHUTZBESTIMMUNGEN.
23.13. Configuring the display lighting
You can configure the display lighting under DISPLAYBELEUCHTUNG:
- Dim the display in standby mode or operating mode after a pre-determined time
- Display brightness
Setting the dim time during operation
Select ZEITÜBERSCHREITUNG and press SELECT to confirm. Select EIN, 10, 20, 30, 45, 60, 90, 120 or 180 seconds and press SELECT to confirm.
Display brightness during operation
▶ Select IN BETRIEB and press SELECT to confirm. Set your preferred brightness, HELL, MITTEL, DUNKEL, and press SELECT to confirm.
Display brightness in standby mode
▶ Select DIM-LEVEL and press SELECT to confirm. Set your preferred brightness, HELL, MITTEL, DUNKEL, and press SELECT to confirm.
24. Settings in the main menu
From the HAUPTMENÜ, you can use the ⏻ button to call up the operating modes:
• INTERNET RADIO
• AMAZON MUSIC
- SPOTIFY
• MUSIC PLAYER
• DAB
• FM
- BLUETOOTH
• CD
• AUX IN
• LINE IN
- SYSTEM SETTINGS
25. Control using the MEDION LifeStream 2 app
natural_image
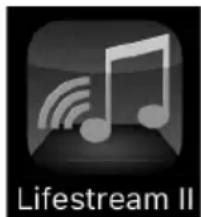
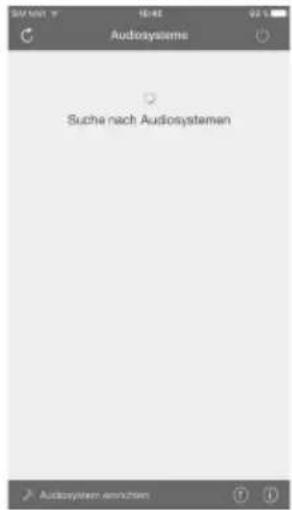
Lifestream II app icon with musical note and Wi-Fi signal symbol (no text or symbols beyond the icon itself)You can control your Internet radio using the MEDION LifeStream 2 application on your smartphone or tablet PC.
In addition to the established setting options such as start, stop, repeat or the creation of favourites lists and station searches, the MEDI-ON LifeStream 2 application makes it possible to individually customise the sound output.
25.1. Installation via direct link
Scan the QR code shown to download the MEDION LifeStream 2 app directly from the Google Play Store® or Apple® App Store:

text_image
QR code image containing encoded data, no visible human-readable text25.2. Installation via Google Play or the Apple App Store
Open the Google Play Store ^® or the Apple ^® App Store and search for MEDION LifeStream 2 ^2 .
▶ Install the MEDION LifeStream 2 app. Follow the installation instructions on the screen.

In order to be able to install the MEDION LifeStream 2 app, there must be an Internet connection.
25.3. Using the app
▶ Start the MEDION LifeStream 2 app.
Make sure that the smartphone/tablet PC and internet radio are logged in to the same WLAN network.
When started for the very first time, the app will list all compatible internet radios detected in the WLAN network by their friendly name.
▶ Select the correct internet radio.
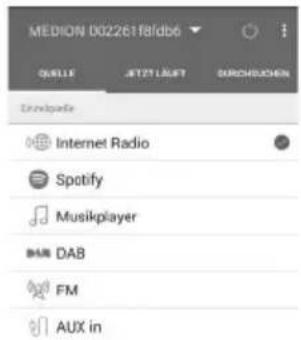
You can use all of the internet radio functions via the app.
- You can select the operating mode via QUELLE.
- The current playback is shown under JETZT LÄUFT.
- You can search for internet radio stations/podcasts under DURCHSUCHEN.
text_image
MEDION 0022618f8db6 QUILLE JETZY LAGY DURCHUCHEN Developer Internet Radio Spotify Musikplayer DAB FM AUX in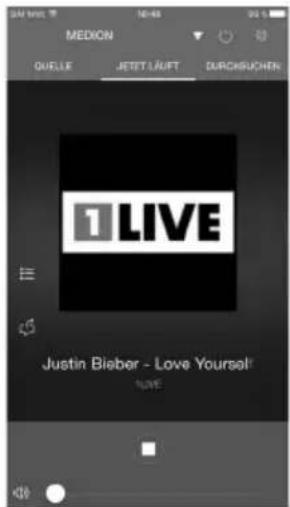
text_image
MEDION QUELLE JETT LAIFT DURCKUCHEN 1 LIVE Justin Bieber - Love Yourself LIVE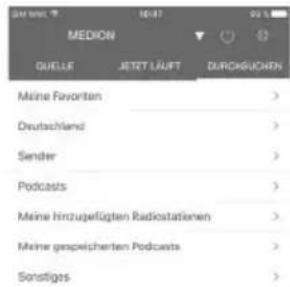
When WLAN is switched off for operating modes that do not use WLAN such as AUX-IN, FM-Radio and DAB-Radio, it is not possible to control the device using the MEDION LifeStream 2 app.
26. Troubleshooting
If the device stops working properly, please refer to the troubleshooting table shown below to see if you can resolve the problem yourself.
Never attempt to repair the device yourself. If a repair is necessary, please contact our Service Centre or a suitable authorised repair workshop.
| Fault Possible cause Corrective action | ||
| The remote control is not working. | Are the batteries inserted correctly? | Insert the batteries correctly. |
| Are you more than 7 m away from the radio? | Reduce the distance. | |
| Is the route from the remote control to the infrared sensor clear? | Remove obstacle. | |
| Is the remote control aligned with the sensor? | Align the remote control correctly. | |
| No sound | The current volume is set too low. | Increase the volume. |
| The mute setting is activated. | Switch off the mute setting. | |
| When the device is connected via AUX/LINE IN or Bluetooth: The volume of the external device is too low. | Increase the volume on the external device. | |
| Headphones are connected.The sound playback on the loudspeakers is interrupted if headphones are connected. | Unplug the headphone jack plug from the headphone socket. | |
| No or poor radio reception | The station signals are too weak. | Adjust the frequency of the stations.Move the radio to a different location or change the direction of the aerial to improve the reception, if necessary. |
| CD is not played. | Condensation has formed. | Pull the mains adapter out of the socket and wait until the device and the CD have adapted to the environmental conditions. |
| Incorrect CD format. | The device only supports the CD formats specified in the technical data. | |
| The CD is dirty or incorrectly inserted. | Clean the CD and insert it into the CD compartment with the label facing upwards. | |
| No function | The mains adapter is not inserted correctly. | Check if the mains adapter is inserted in the socket and the device correctly. |
| The device is disrupted by a thunderstorm, static charge or another external factor. | Pull the mains adapter out of the socket and then plug it in again. | |
| No access to the internet radio | No WLAN connection | Check the WLAN router and connections. |
| The alarm is not working Function not activated | Check the alarm settings. | |
| Fault Possible cause Corrective action | ||
| Problem with the router connection. | No DHCP server is activated. | Check the router settings. |
| An incorrect encryption algorithm has been entered for the network. | Re-enter the encryption algorithm for the network. | |
| The RJ45 port or WiFi module is defective. | Contact our Service Centre | |
| No IP address found | No response from DNS (Domain Name Server) | Check the DNS settings on your router. |
| The DNS used does not recognise the name of V-Tuner.com. | Use a different DNS server. | |
| The internet radio has booted normally but cannot receive IP addresses | No DHCP server is activated. | Check the router settings. |
| Incorrect WiFi encryption algorithm entered. | Re-enter the WiFi encryption algorithm. | |
| The network interfaces are not working properly. | Check the interfaces. | |
27. Cleaning
Before cleaning, pull the mains plug out of the mains socket.
▶ Use a soft, dry cloth to clean the device.
Do not use chemical solutions or cleaning agents because these may damage the device's surface or the labels on it.
28. Disposal

PACKAGING
Your device has been packaged to protect it from damage in transit. The packaging is made of materials that can be recycled in an environmentally friendly manner.

DEVICE
Old devices that carry the symbol illustrated may not be disposed of in ordinary household waste.
In accordance with Directive 2012/19/EU, these devices must be disposed of correctly at the end of their service life.
This involves separating the materials in the device for the purpose of recycling and minimising the environmental impact.
Take old devices to an electrical scrap collection point or a recycling centre. Before doing so, remove the batteries from the device and take them to a separate collection point for used batteries.
Contact your local waste disposal company or your local authority for more information on this subject.
29. Technical specifications
| Power supply | |
| Voltage AC 230 V~ 50 Hz | |
| Power consumption in standby mode < 1 W | |
| Output power 2 x 20 + 40 watt RMS | |
| Remote control batteries 2 x 1.5 V R03/LR03/AAA | |
| Radio | |
| FM band 87.5–108 MHz | |
| DAB band III 174.928–239.200 MHz | |
| RDS Yes | |
| Station memory 40 | |
| CD player | |
| Laser output Class 1 laser product | |
| Supported formats | CD-R, CD-RW, audio CD, MP3 CD |
| Bluetooth | |
| Version 5.0 | |
| Profile A2DP, AVRCP | |
| Range Up to 10 metres (without obstacles) | |
| Frequency range | 2402–2480 MHz |
| Maximum transmission power -1.39 dBm | |
| Connections for external functions | |
| FM antenna 75 Ohm connection, wire aerial | |
| AUX 3.5 mm jack | |
| Headphone socket 3.5 mm jack | |
| LINE-IN R/L Cinch connection | |
| USB input | Standard USB host (version 2.0) with up to 32 GB and MP3 decoding ^3 |
| USB output voltage DC 5 V max. 500 mA | --- |
| Environmental conditions | |
| Temperatures In operation: 0°C to +35°C | |
| Not in operation: 0°C to +35°C | |
| Humidity In operation: < 80% | |
| Not in operation: < 80% | |
| Dimensions/weight | |
| Device: Width x height x depth Approx. | 44 x 14.7 x 26 cm |
| Weight 5.15 kg | |
| WLAN | |
| Frequency range 2.4 GHz / 5 Ghz | |
| WLAN standard 802.11a/b/g/n | |
| Encryption WEP/WPA/WPA2 | |
| Range | Indoors approx. 35–100 m / outdoors approx. 100–300 m |
| Frequency range/MHz Channel | Max. transmitting power/dBm |
| 2402–2482 1–13 12.81 dBm | |
| 5180–5700 36–140 <20 dBm |
30. EU - Declaration of Conformity

MEDION AG hereby declares that this device complies with the fundamental requirements and the other relevant provisions of:
• Radio Equipment Directive 2014/53/EU
• Ecodesign Directive 2009/125/EC
• RoHS Directive 2011/65/EU
All multimedia devices that can be connected to the corresponding connections of the device must comply with the requirements of the Low Voltage Directive.
You can download the complete EU Declaration of Conformity at www.medion.com/conformity.
Due to the 5 GHz frequency range of the integrated wireless LAN solution, the device may only be used inside buildings in the EU (see table).
| ATBEBGCZDK | ||||
| EEFRDEISIE | ||||
| ITELESCYLV | ||||
| LILTLUHUMT | ||||
| NLNOPLPTRO | ||||
| SI | SKTR | FISE | ||
| CH | UKHR | |||
AT = Austria, BE = Belgium, CZ = Czech Republic, DK = Denmark, EE = Estonia, FR = France, DE = Germany, IS = Iceland, IE = Ireland, IT = Italy, EL = Greece, ES = Spain, CY = Cyprus, LV = Latvia, LT = Lithuania,
LU = Luxembourg, HU = Hungary, MT = Malta, NL = Netherlands, NO = Norway, PL = Poland, PT = Portugal, RO = Romania, SI = Slovenia, SK = Slovakia, TR = Turkey, FI = Finland, SE = Sweden, CH = Switzerland, UK = United Kingdom, HR = Croatia
31. Licence agreements for end users
31.1. Audio products for use with the internet radio
This document is the property of MEDION. It may not be copied or published without written approval from MEDION. All third parties given this document must sign a non-disclosure agreement.
This document replaces all previous versions. MEDION, provider of online content and portal services, reserves the right to make unannounced amendments to products, services and documentation in accordance with our principle of continuous improvement.
MEDION shall not be liable for losses that supposedly result from the use of the document or associated products.
Audio coding technology MPEG layer-3 licensed by Fraunhofer IIS and Thomson.
This product contains software. You have the simple, non-transferable right to use the software only in the form of the object code and only for operating the product.

Fraunhofer
Institut
The intellectual property rights regarding the software contained in this product remain with the providing contractual party (or the respective licensor). All rights reserved.
You are strictly prohibited from amending, translating, reverse engineering, decompiling, disassembling or otherwise determining the source code of the software contained in this product, or otherwise reproducing the functionality of the software contained in this product, unless such restriction is expressly prohibited by applicable laws.
We assume no liability for the function or performance of the software and neither we, nor our suppliers or licensors shall be liable for incidental, indirect, special or consequential damage (such as loss of earnings) that result from the use of the software included in this product, unless such an exclusion of liability is not permitted in the region in which you purchased this product.
These conditions are valid for all updates you carry out to the software.
This product is protected by specific intellectual property rights of Microsoft. Without a licence granted by Microsoft, use or distribution of this technology not with this product is prohibited.
Eric Young hereby becomes recognised as author of parts of the OpenSSL software library used in this tool.
UPnP ^™ is a registered trademark of UPnP Implementers Corporation.
31.2. Information on trademarks and licences
Google Play Store ^® and Android ^® are registered trademarks of Google Inc.
Apple ^® , AirPlay ^® , iPad ^® , iPhone, iPod ^® , iPod touch ^® and iTunes ^® are brands of Apple Inc., registered in the USA and in other countries. iPad Air ^® and iPad mini ^™ are brands of Apple Inc. App Store is a service brand of Apple Inc. iOS ^® is a registered trademark of Cisco in the USA and in other countries, and is used under licence.
All other products and company names referred to in this document are trademarks or registered trademarks of their respective owners.
32. Legal notice
Copyright © 2020
Date: 09.10.2020
All rights reserved.
This user manual is protected by copyright.
Mechanical, electronic and any other forms of reproduction are prohibited without the written permission of the manufacturer.
Copyright is owned by the company:
MEDION AG
Am Zehnthof 77
45307 Essen
Germany
Please note that you cannot use the above address for returns. Please always contact our customer service team first.
33. Privacy statement
Dear Customer,
We wish to inform you that we, MEDION AG, Am Zehnthof 77, 45307 Essen, Germany process your personal data as a data controller.
For matters regarding data protection, we are supported by our company data protection officer, who can be contacted at MEDION AG, Datenschutz, Am Zehnthof 77, D – 45307 Essen; datenschutz@medion.com. We process your data for the purpose of warranty processing and associated processes (e.g. repairs) and rely on the sales contract concluded with us when processing your data.
Your data will be provided to repair service providers contracted by us for the purpose of warranty processing and associated processes (e.g. repairs). We generally store your personal data for a period of three years in order to fulfil your legal warranty rights.
You have the right to be informed of the personal data concerned as well as the right to rectification, erasure, restriction of processing, the right to object to processing and the right to data portability.
In the case of the right to be informed and the right to erasure, restrictions apply according to paragraphs 34 and 35 of the BDSG (Federal Data Protection Act) (Art. 23 of the GDPR). In addition, there is a right of appeal to a competent data protection supervisory authority (Article 77 of the GDPR in conjunction with paragraph 19 of the BDSG). For MEDION AG, this is the state official for data protection and freedom of information North Rhine-Westphalia, PO box 200444, 40212 Düsseldorf, Germany, www.ldi.nrw.de.
The processing of your data is necessary for warranty processing: it is not possible to process the warranty without the provision of the required data.