YXL10P - Speaker YORKVILLE - Free user manual and instructions
Find the device manual for free YXL10P YORKVILLE in PDF.

User questions about YXL10P YORKVILLE
0 question about this device. Answer the ones you know or ask your own.
Ask a new question about this device
Download the instructions for your Speaker in PDF format for free! Find your manual YXL10P - YORKVILLE and take your electronic device back in hand. On this page are published all the documents necessary for the use of your device. YXL10P by YORKVILLE.
USER MANUAL YXL10P YORKVILLE
Warning: To reduce the risk or fire or electric shock, do not expose this apparatus to rain or moisture.
Do not use this apparatus near water!
Warning: When using electric products, basic precautions should always be followed, including the following:
Power Sources Your unit should be connected to a power source only of the voltage specified in the owners manual or as marked on the unit. This unit has a polarized plug. Do not use with an extension cord or receptacle unless the plug can be fully inserted. Precautions should be taken so that the grounding scheme on the unit is not defeated. An apparatus with CLASS I construction shall be connected to a Mains socket outlet with a protective earthing connection. Where the MAINS plug or an appliance coupler is used as the disconnect device, the disconnect device shall remain readily operable. Hazards Do not place this product on an unstable cart, stand, tripod, bracket or table. The product may fall, causing serious personal injury and serious damage to the product. Use only with cart, stand, tripod, bracket, or table recommended by the manufacturer or sold with the product. Follow the manufacturer’s instructions when installing the product and use mounting accessories recommended by the manufacturer. Only use attachments/accessories specified by the manufacturer Note: Prolonged use of headphones at a high volume may cause health damage on your ears. The apparatus should not be exposed to dripping or splashing water; no objects filled with liquids should be placed on the apparatus. Terminals marked with the “lightning bolt” are hazardous live; the external wiring connected to these terminals require installation by an instructed person or the use of ready made leads or cords. Ensure that proper ventilation is provided around the appliance. Do not install near any heat sources such as radiators, heat registers, stoves, or other apparatus (including amplifiers) that produce heat. No naked flame sources, such as lighted candles, should be placed on the apparatus. Power Cord Do not defeat the safety purpose of the polarized or grounding-type plug. A polarized plug has two blades with one wider than the other. A grounding type plug has two blades and a third grounding prong. The wide blade or the third prong are provided for your safety. If the provided plug does not fit into your outlet, consult an electrician for replacement of the obsolete outlet. The AC supply cord should be routed so that it is unlikely that it will be damaged. Protect the power cord from being walked on or pinched particularly at plugs. If the AC supply cord is damaged DO NOT OPERATE THE UNIT. To completely disconnect this apparatus from the AC Mains, disconnect the power supply cord plug from the AC receptacle. The mains plug of the power supply cord shall remain readily operable. Unplug this apparatus during lightning storms or when unused for long periods of time. Service The unit should be serviced only by qualified service personnel. Servicing is required when the apparatus has been damaged in any way, such as power-supply cord or plug is damaged, liquid has been spilled or objects have fallen into the apparatus, the apparatus has been exposed to rain or moisture, does not operate normally, or has been dropped. Disconnect power before servicing! Instructions relatives au risque de feu, choc électrique, ou blessures aux personnes Veuillez Lire le Manuel: Il contient des informations qui devraient êtres comprises avant l’opération de votre appareil. Conservez. Gardez S.V.P. ces instructions pour consultations ultérieures et observez tous les avertissements. Nettoyez seulement avec le tissu sec. Emballage: Conservez la boite au cas ou l’appareil devait être retourner pour réparation. Avertissement: Pour réduire le risque de feu ou la décharge électrique, n'exposez pas cet appareil à la pluie ou à l'humidité. N’utilisez pas cet appareil près de l’eau! Attention: Lors de l’utilisation de produits électrique, assurez-vous d’adhérer à des précautions de bases incluant celle qui suivent: Alimentation - L’ appareil ne doit être branché qu’à une source d’alimentation correspondant au voltage spécifié dans le manuel ou tel qu’indiqué sur l’appareil. Cet appareil est équipé d’une prise d’alimentation polarisée. Ne pas utiliser cet appareil avec un cordon de raccordement à moins qu’il soit possible d’insérer complètement les trois lames. Des précautions doivent êtres prises afin d’eviter que le système de mise à la terre de l’appareil ne soit désengagé. Un appareil construit selon les normes de CLASS I devrait être raccordé à une prise murale d’alimentation avec connexion intacte de mise à la masse. Lorsqu’une prise de branchement ou un coupleur d'appareils est utilisée comme dispositif de débranchement, ce dispositif de débranchement devra demeurer pleinement fonctionnel avec raccordement à la masse. Risque - Ne pas placer cet appareil sur un chariot, un support, un trépied ou une table instables. L’appareil pourrait tomber et blesser quelqu’un ou subir des dommages importants. Utiliser seulement un chariot, un support, un trépied ou une table recommandés par le fabricant ou vendus avec le produit. Suivre les instructions du fabricant pour installer l’appareil et utiliser les accessoires recommandés par le fabricant. Utilisez seulement les attachements/accessoires indiqués par le fabricant. Note: L'utilisation prolongée des écouteurs à un volume élevé peut avoir des conséquences néfastes sur la santé sur vos oreilles. Il convient de ne pas placer sur l’appareil de sources de flammes nues, telles que des bougies allumées.L’appeil ne doit pas être exposé à des égouttements d’eau ou des éclaboussures et qu’aucun objet rempli de liquide tel que des vases ne doit être placé sur l’appareil. Assurez que lappareil est fourni de la propre ventilation. Ne procédez pas à l’installation près de source de chaleur tels que radiateurs, registre de chaleur, fours ou autres appareils (incluant les amplificateurs) qui produisent de la chaleur. Les dispositifs marqués d’une symbole “d’éclair” sont des parties dangereuses au toucher et que les câblages extérieurs connectés à ces dispositifs de connection extérieure doivent être effectivés par un opérateur formé ou en utilisant des cordons déjà préparés. Cordon d’Alimentation - Ne pas enlever le dispositif de sécurité sur la prise polarisée ou la prise avec tige de mise à la masse du cordon d’alimentation. Une prise polarisée dispose de deux lames dont une plus large que l’autre. Une prise avec tige de mise à la masse dispose de deux lames en plus d’une troisième tige qui connecte à la masse. La lame plus large ou la tige de mise à la masse est prévu pour votre sécurité. La prise murale est désuète si elle n’est pas conçue pour accepter ce type de prise avec dispositif de sécurité. Dans ce cas, contactez un électricien pour faire remplacer la prise murale. Évitez d’endommager le cordon d’alimentation. Protégez le cordon d’alimentation. Assurez-vous qu’on ne marche pas dessus et qu’on ne le pince pas en particulier aux prises. N’UTILISEZ PAS L’ APPA REIL si le cordon d’alimentation est endommagé. Pour débrancher complètement cet appareil de l’alimentation CA principale, déconnectez le cordon d’alimentation de la prise d’alimentation murale. Le cordon d’alimentation du bloc d’alimentation de l’appareil doit demeurer pleinement fonctionnel. Débranchez cet appareil durant les orages ou si inutilisé pendant de longues périodes. Service - Consultez un technicien qualifié pour l’entretien de votre appareil. L'entretien est nécessaire quand l'appareil a été endommagé de quelque façon que se soit. Par exemple si le cordon d’alimentation ou la prise du cordon sont endommagés, si il y a eu du liquide qui a été renversé à l’intérieur ou des objets sont tombés dans l'appareil, si l'appareil a été exposé à la pluie ou à l'humidité, si il ne fonctionne pas normalement, ou a été échappé. Débrancher l’appareil avant d’enlever les couvercles!
The Lightning Flash with arrowhead symbol within an equilateral triangle, is intended to alert the user to the presence of uninsulated "dangerous voltage" within the product enclosure that may be of sufficient magnitude to constitute a risk of shock to persons The exclamation point within an equilateral triangle is intended to alert the user to the presence of important operating and maintenance (servicing) instructions in the literature accompanying the product
1. Read these instructions. 2. Keep these instructions. 3. Heed all warnings. 4. Follow all instructions. 5. Do not use this apparatus near water. 6. Clean only with dry cloth.
7. Do not block any ventilation openings. Install in accordance with the manufacturer’s instructions.
8. Do not install near any heat sources such as radiators, heat registers, stoves, or other apparatus (including amplifiers) that produce heat. 9. Do not defeat the safety purpose of the polarized or grounding-type plug. A polarized plug has two blades with one wider than the other. A grounding type plug has two blades and a third grounding prong. The wide blade or the third prongs are provided for your safety. If the provided plug does not fit into your outlet, consult an electrician for replacement of the obsolete outlet. 10. Protect the power cord from being walked on or pinched particularly at plugs, convenience receptacles, and the point where they exit from the apparatus.
11. Only use attachments/accessories specified by the manufacturer.
12. Use only with the cart, stand, tripod, bracket, or table specified by the manufacturer, or sold with the apparatus. When a cart is used, use caution when moving the cart/apparatus combination to avoid injury from tip-over.
13. Unplug this apparatus during lightning storms or when unused for long periods of time.
14. Refer all servicing to qualified service personnel. Servicing is required when the apparatus has been damaged in any way, such as power-supply cord or plug is damaged, liquid has been spilled or objects have fallen into the apparatus, the apparatus has been exposed to rain or moisture, does not operate normally, or has been dropped. WARNING:
- To reduce the risk of fire or electric shock, do not expose this apparatus to rain or moisture and objects filled with liquids, such as vases, should not be placed on this apparatus.
- To completely disconnect this apparatus from the ac mains, disconnect the power supply cord plug from the ac receptacle.
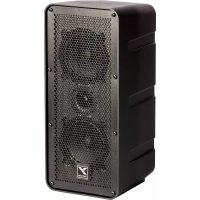
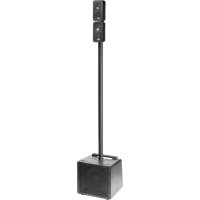
IEC 60417-50411 YXL SERIES YXL Series Powered Active Speakers The YXL Series oers our best ratio of power, performance and value for full-range active loudspeaker enclosures. Providing 500 watts (1000 watts peak) with ecient speaker components, the YXL Series is extremely loud for their sizes. There are several dierent input options for connecting audio sources including Bluetooth®, microphones, musical instruments and other audio sources. While the onboard audio mixer may has a minimum of controls, it's tremendously useful and provides great versatility. The YXL Series can be easily used in any situation, close to walls, oors, in arrays with multiple enclosures and as a stage monitor. With all these options, the YXL Series is the solution for all of your audio applications. Up to 16 YXL Series Powered speakers can be linked together with a maximum of three ‘mixers’ active at any one time. This means up to 6 mic sources and 6 instrument/line sources are available in an array of three or more enclosures. The Master level controls are used to adjust the levels of individual powered enclosures. This is invaluable in applications where large numbers of enclosures are used such as in clusters or in trade show applications (or when YXL Series powered speakers are used as repeater enclosures or side-ll). NOTE: Our Link system allows additional powered YXL Series powered speakers to be driven from a single source (up to a maximum of 16 YXL Series powered enclosures). A maximum of 3 mixers can be used when Linking YXL Series powered enclosures USER TIP: When a pair of YXL Series powered speakers are Linked you can use both mixers integrated on each cabinet. A 100 Hz high pass lter can be activated to make it easier to add subwoofers to the YXL- Series powered enclosures. This allows the speakers to be used more eciently with almost any active subwoofer. Features
- 1000 watts (peak) 500 watts (program)
- Superior DSP processing with component protection
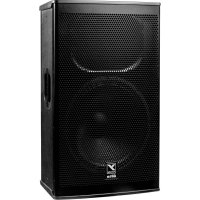
- 10, 12 or 15-inch woofers with 2-inch voice coils
- 1-inch HF compression drivers
- 90° x 60° HF dispersion Horns
- Dual purpose full-range and wedge monitor speaker
- Ultra-clear reproduction throughout the whole audio bandwidth
- Lightweight and high eciency bi-amped power module
- Low distortion and high power-handling 10, 12 and 15-inch woofers
- Recessed control panel
- Master Level control with Activity indicator (cabinet level adjustment)
- 3 Performance modes, Concert, Club and Monitor
- Defeatable 3 channel mixer with level controls and Clip indicators
- Bluetooth® input / streaming, not aected by Mixer Defeat
- 2 Microphone Inputs with level control and phantom power
- 1/4-inch TRS Instrument and Line Inputs
- 1/8-inch Aux Input for connecting mono or stereo audio sources
- An XLR Main In and Link output for easy connection and looping
- Selectable Sub lter (HPF) for connecting a subwoofer
- ABS / Polypropylene cabinet construction
- Tough, full length metal grille2 YXL SERIES
1. Power Switch and Mode LED
The AC power switch on the rear panel turns the power On or O. The Mode LED turns on to indicate power is supplied to the unit.
The Mode Selector applies specic EQ and tone settings for the YXL Series powered enclosure, eectively custom tailoring the speaker for any environment. Concert: Allows instruments and vocals to be equally and naturally reproduced which is best for live performance. Club: Boosted bass and enhanced highs make this mode ideal for music playback. Monitor: Optimized for use as a stage monitor and the human voice while minimizing feedback.
The Master control sets the level of ALL sound coming out of the YXL Series enclosure. If there are multiple YXL Series speakers in a system, the volume of each speaker is individually set by using each enclosure’s Master control.
This LED illuminates when audio signal is present from all sources being sent to the Master. NOTE: If the Master is turned to Min, the Activity LED will not illuminate.
The Yorkville YXL Series is capable of receiving streaming audio over Bluetooth® from devices such as smart phones, tablets and laptops. Pairing your device with the YXL Series is simple and gives you the freedom to play your music wirelessly.
6. Bluetooth® Pairing
To pair your Bluetooth® device, depress the Bluetooth® switch for approximately 4-seconds. The blue LED will ash to indicate the YXL speaker is ready to be paired.
7. Linking Multiple Cabinets Using Bluetooth®.
Bluetooth® can be used along with the Link feature only when the rst cabinet in the Link chain is paired and the mixer is enabled. Pair with the rst cabinet using Bluetooth® and leave the others unpaired. Then, use the appropriate XLR cables to Link between the multiple cabinets by wire through the Link/left channel connection. If Stereo Bluetooth® is desired, set the “paired” cabinet to Stereo Mode, the right channel will play on the paired cabinet and the Left signal will play on the cabinet connected to the L/Link jack.
8. Onboard Mixer and Mixer Enable Switch
The Mixer Enable switch turns the onboard mixer ‘on’ or ‘o.’ When the Mic or Line inputs are used, this switch must be set to the ‘on’ position. If these inputs are not being used, the mixer should be turned ‘o,’ this will help prevent the mixer from contributing noise to the system. The onboard mixer should not be used when a source other than another YXL Series powered speaker (or similar) is connected to the LINK jack. Remember, a maximum of 3 mixers, in a chain of enclosures, should be used! A much larger number of enclosures may be used with the mixers disabled on the additional enclosures. Clip Activity MASTER
Channel Level Controls & Clip LEDs The channel level controls adjust the input sensitivity and the level of the channel’s signal being sent to the Master. The clip LEDs illuminate 3 dB before clipping and are aected by both the source’s gain signals and each corresponding channel level control. USER TIP: When using the mixer, the Master control should be adjusted to control the suitable overall level of the YXL Series Powered Enclosure for the application. NOTE: Adjustments of the gain for the Bluetooth® source can be made on the source device. Channel 1 Mic / Instrument In Any standard dynamic, condenser or phantom powered microphone may be connected to the Mic input, phantom power is built-in. The 1/4-inch TRS Instrument input is optimized for instruments such as guitars, basses or keyboards. Do NOT use both XLR and 1/4-inch inputs simultaneously. NOTE: Some condenser microphones, that don’t use batteries, may require phantom power. TECH NOTE: The function of the xed 90 Hz high pass lter on Channel 1 is to minimize low frequency rumble when an acoustic instrument is used. It also helps remove the boominess when using the Microphone. Channel 2 Mic / Line In Any standard dynamic, condenser or phantom powered microphone may be connected to the Mic input, phantom power is built-in. The 1/4-inch TRS input can be used with any line source such as a CD player or an electronic instrument with a line output. It is always recommended to use balanced sources. This helps prevent the risk of hum or buzz associated with unbalanced connections, especially if the cable is long or the source is operated from a separate AC power connection. Do NOT use both XLR and 1/4-inch inputs simultaneously. Channel 3 Stereo Aux In The 1/8-inch Line input jack is a typical ‘stereo’ audio input which properly sums the left and right signals from stereo sources such as MP3 players. When the mixer is set in Stereo Mode the right output will appear at the Link Output allowing a pair of linked YXL cabinets to give you stereo playback. NOTE: Channel 3’s 1/8-inch TRS Line input and Bluetooth® can be used simultaneously.
For operation with a subwoofer, the Sub switch shuts o the low frequency boost and lters out signals below 100 Hz. This switch only aects the signals to the internal amplier and does not aect signals going out from the onboard mixer, or to signals passing through the Link connections.
The Main In and L/Link connectors allow additional powered enclosures to be driven from a single source. You can Link up to 16 YXL Series powered enclosures! The Main In jack is the correct input to use when driving the YXL Series Powered Speaker with an external mixer or from another YXL link output. TECH NOTE: The Main In and L/Link jacks operate at line level (+4 dBu) to achieve full power. When operating from signals that are not as strong, use the Line inputs of the rst cabinet in the chain. The Link jacks are high quality balanced inputs with very good common mode (hum) rejection. To ensure maximum hum rejection, the proper balanced cables must be used. NOTE: A maximum of 3 YXL Series Control Panel mixers can be used when Linking YXL Series Powered Enclosures.
Active Loudspeaker Active or Passive Active Pro
500 watts program (1000 watts peak) Max SPL
126dB continuous Fre
HF Horn Part of baffle LF Driver
120/180 Mixer Controls 3 recessed dial controls Level Controls Channels 1-3 and Master EQ Controls Pushbutton select, Concert, Club, Monitor Limiter Multiband excursion, RMS, rail Other Controls / Features 2 Mic Inputs. Instrument In, Line In, 3.5mm Aux in, Bluetooth streaming, Sub In/Out, Mixer In/Out, Stereo/Mono Out Feet Rubber Bar Handles 1 x Side / 1 x Back Pole Mount Ada
Hardware 2 (top), 1 (pullback) Enclosure Materials Polypropylene Cabinet, ABS baffle metal grille Grille Powder Coated Steel with Grille Cloth Other Details Rubber feet on bottom and side with the monitor Wedge Dimensions
YXL10P 28x33.5x52; YXL12P 34x35.5x 58.5; YXL15P
Weight (lbs/kg) YXL10P 31/14; YXL12P 37/16.8; YXL15P (TBD) Specifications subject to change without notice Specifications
YXL10P 28x33.5x52; YXL12P 34x35.5x 58.5; YXL15P
Many of the popular models in the Yorkville speaker cabinet line are now equipped with flying hardware for overhead suspension applications. Depending on the model, two or more internal braces have been provided for rigging purposes. Each brace contains two bolt holes and provides center-of-gravity fly-points for use with in-line or angular loads. Many of the models will support additional suspended cabinets according to their specified working load limits. IMPORTANT!! THE RIGGING OF LOUDSPEAKER SYSTEMS IS AN EXTREMELY SERIOUS MATTER. OVERHEAD RIGGING REQUIRES EXTENSIVE EXPERIENCE, INCLUDING (BUT NOT LIMITED TO) CALCULATING WORKING LOAD LIMITS, HARDWARE INSTALLATION, AND PERIODIC SAFETY INSPECTION OF ALL HARDWARE AND CABINETRY. IF YOU LACK THESE QUALIFICATIONS, DO NOT ATTEMPT THE INSTALLATION YOURSELF, BUT INSTEAD USE A PROFESSIONAL STRUCTURAL RIGGER. IMPROPER INSTALLATION CAN RESULT IN BODILY INJURY OR DEATH. CONSULT A STRUCTURAL ENGINEER TO CALCULATE ADDED LOADS FOR A BUILDING. STRUCTURAL REINFORCEMENT MAY BE NECESSARY TO INSURE A SAFE INSTALLATION.
4.5mm (7/32”) Hex Wrench Thread lock adhesive (Removable Type)
3. EYEBOLT INSTALLATION
a) Using a 4.5mm (7/32”) hex wrench, remove the flat head bolts from the top or bottom of the speaker enclosure to expose the tapped holes (on TX models, the flat head bolts are located within the track rails), as shown below. Be sure to keep these handy as they will be needed to seal the cabinet after the eyebolts are removed. IMPORTANT!! USE ONLY LOAD RATED FORGED EYEBOLTS. THESE MAY BE PURCHASED THROUGH YORKVILLE SOUND OR ATM FLY- WARE™. TO INSURE CABINET-BRACING STRENGTH, MAKE SURE ALL FLY-POINTS ARE SECURED WITH EITHER AN EYEBOLT OR FLAT HEAD HEX BOLT. b) Place a drop of thread-lock adhesive on the threads of the eyebolt and insert one into exposed hole. Tighten each eyebolt by hand until its fits snugly against the cabinet. Further tighten each eyebolt by rotating it another half turn. Be sure to insert eyebolts in the threaded hole directly in-line with the suspension cable. Always follow the eyebolt manufacturers installation and use instructions. c) Suspend each cabinet according to working load calculations and practices recommended by the rigging hardware manufacturer. IMPORTANT!! ON MODELS WITH ONLY TWO TOP SUSPENSION POINTS THE SUPPLIED PULL BACK AT THE REAR OF THE BOTTOM CENTER PANEL OF THE CABINET IS NOT TO BE USED AS A SUSPENSION POINT. THIS POINT TO BE USED FOR PULL BACK PURPOSES ONLY. IMPORTANT!! READ ALL ENCLOSED INSTRUCTIONS ABOUT PROPER USE OF HARDWARE. TO INSURE PROPER INSTALLATION, FOR TECHNICAL INFORMATION ON SUSPENSION TECHNIQUES AND EXTERIOR ACCESSORY INFORMATION WE SUGGEST CALLING ATM FLY- WARES TECHNICAL SERVICES IN THE UNITED STATES AT (310)639-8282 MONDAY THROUGH FRIDAY FROM 9 AM TO 6 PM (PST) OR FAX AT (310)639-8284. YORKVILLE SOUND MAKES NO CLAIMS AS TO THE SAFETY OF THE ENCLOSURES IF RECOMMENDED LOAD LIMITS AND HARDWARE ARE NOT STRICTLY ADHERED TO. NOR DOES IT MAKE ANY SAFETY CLAIMS TO THE RESULTANT INSTALLATION. IMPORTANT!! TRACK RAILINGS: UNITS THAT INCORPORATE THE TRACK RAILING SYSTEM HAVE THE SAME WORKING LOAD LIMITS AS THEY DO WHEN THEY ARE USED WITH EYEBOLTS. THESE RATINGS MAY BE LIMITED AND BASED ON THE RATINGS OF THE TRACK FITTINGS THEMSELVES. PLEASE ENSURE THAT THE RATING OF THE CERTIFIED TRACK FITTINGS EXCEEDS
Level HPF Ch 1 1/4-inch TRS XLR XLR XLR