USER MANUAL DESKJET 450 MOBILE HP
getting started guide
- Windows: Install the printer software first. Only connect the USB or parallel cable when prompted.
Mac OS: Connect the printer before installing the printer software.
© 2003 Copyright Hewlett-Packard Development
Company, L.P.
Reproduction, adaptation or translation without prior written permission is prohibited, except as allowed under the copyright laws.
The information contained herein is subject to change without notice.
The only warranties for HP products and services are set forth in the express warranty statements accompanying such products and services. Nothing herein should be construed as constituting an additional warranty. HP shall not be liable for technical or editorial errors or omissions contained herein.
1,9/2003
Trademark Credits
HP ZoomSmart Scaling Technology is a trademark of Hewlett-Packard Company.
Microsoft, MS-DOS, MS Windows, Windows, Windows NT, Windows CE, and Microsoft Pocket PC Software are either registered trademarks or trademarks of Microsoft Corporation in the United States and/or other countries/ regions.
Pentium is a U.S. registered trademark of Intel Corporation.
Mac, Macintosh, Mac OS, PowerBook, and Power
Macintosh are trademarks of Apple Computer, Inc., registered in the U.S. and other countries/regions.
TrueType is a U.S. trademark of Apple Computer, Inc.
Bluetooth and the Bluetooth logos are trademarks owned by Bluetooth SIG, Inc., U.S.A. and licensed to Hewlett-Packard.
© 2003 Copyright Hewlett-Packard Development
Company, L.P.
Always follow basic safety precautions when using this product to reduce risk of injury from fire or electric shock.
1 Read and understand all instructions in the documentation that comes with the printer.
2 Observe all warnings and instructions marked on the product.
3 Unplug this product from wall outlets before cleaning.
4 Do not install or use this product near water, or when you are wet.
5 Install the product securely on a stable surface.
6 Install the product in a protected location where no one can step on or trip over the line cord, and the line cord cannot be damaged.
7 If the product does not operate normally, see Troubleshooting in the onscreen user's guide on the Starter CD.
8 There are no user-serviceable parts inside. Refer servicing to qualified service personnel.
HP Deskjet 450 series printer.
This printer provides quick, professional mobile printing. You can print from notebooks; desktops; wireless devices such as personal digital assistants (PDAs) running Microsoft® Pocket PC software, Windows® CE, and Palm OS®; digital cameras via CompactFlash™ card; and mobile phones with Bluetooth and infrared connectivity.
For information about using PDAs and Bluetooth, see the Personal Digital Assistant Guide and the Bluetooth Printing Guide on the Starter CD.
Drucker HP Deskjet 450.
Step 1: Check the package contents.
1) HP Deskjet 450 series printer, 2) power adaptor,
3) power cord, 4) black and color print cartridges,
5) parallel cable, 6) printed documentation (setup poster, getting started guide, HP customer support guide),
7) Starter CD (software and electronic documentation), 8) battery (HP Deskjet 450CBi/450wbt), 9) HP Bluetooth printer card (HP Deskjet 450wbt).

Step 2: Remove the packing tape. Remove all packing tape from the printer.

Step 3: Identify printer parts (front).
1) Input tray extension, 2) input tray, 3) paper guide, 4) card slot, 5) alignment guide, 6) print cartridge latch, 7) print cartridge socket, 8) output slot, 9) front access cover, 10) infrared port.
1) Battery charge LED, 2) left print cartridge LED, 3) right print cartridge LED, 4) Cancel button, 5) Resume button, 6) Resume LED, 7) Power button, 8) Power LED, 9) Infrared LED. Note: See LED Reference to diagnose printing problems.

Identify printer parts (back).
1) Battery contacts, 2) battery contact cover,
3) battery slot, 4) power connector, 5) parallel port,
6) CompactFlash™ card slot, 7) universal serial bus (USB) port, 8) security lock slot, 9) battery,
10) battery release slider.
Identify printer parts (bottom).
1) Card holder, 2) cover of replaceable ink service module.

Step 4: Install the battery (HP Deskjet 450CBi/450wbt). 1) Slide the battery into the battery slot at an angle until the battery is flushed with the contacts. 2) Push the battery into the battery slot until the battery clicks into place.
Note: Use only the C8222A battery with the printer. Fully charge the battery before using (approximately 1 hour and 30 minutes). When the battery is charging, the battery charge LED is green. If the LED is red while charging, the battery might be faulty and need to be replaced.

Step 5: Install the HP Bluetooth printer card (HP Deskjet 450wbt).
Note: Make sure that your Bluetooth host device and operating system are supported by the printer. For more information, refer to http://wwwHp.com/support/dj450. 1) Insert the Bluetooth card with the LED facing up into the CompactFlash™ card slot.
Step 6: Connect the power cord.

1) Connect the power cord to the printer and an alternating current (AC) power receptacle. 2) Lift the input tray to its open position. Note: For Windows, only connect the printer to the computer when you have completed the software installation or when prompted to do so during installation.

Step 7: Turn on the printer and install the print cartridges.
1) Press the Power button to turn on the printer. 2) Open the front access cover. 3) Lift up the print cartridge latches.
4) Remove the print cartridge from its package, and then remove the protective tape from the print cartridge.
1) Slide up the input tray extension. 2) Insert up to 45 sheets of paper into the tray. 3) Slide the paper guide snugly against the edge of the paper.

9
Step 9: Install the software and connect the printer. 1) Insert the Starter CD into the CD-ROM drive, and then follow the appropriate procedure for your operating system and connection. For Bluetooth connection, select either USB or Parallel and click Skip when prompted to connect the printer. For infrared (IR) connection, ensure the IR port of your device is enabled (see Infrared Reference to enable the IR port). Select Other in the Select Port dialog and then choose the port assigned to the IR device in your host machine.
2) For USB or parallel connection, connect the USB or parallel cable. Note: Only connect the printer to the computer when you have completed the software installation or when prompted to do so during installation. If you have connected the printer to the computer before you install the software, refer to the Readme file in the Starter CD to complete the printer installation. 3) Follow the onscreen instructions to complete the printer installation.
Note: For a Bluetooth connection, make sure that your Bluetooth host device is supported by the printer and that Bluetooth printing is enabled in your device. See http://www.hp.com/support/dj450 for a list of supported Bluetooth devices and refer to the manufacturer's documentation for more instructions. 1) After installing the software in Step 9, perform printer discovery with your host device (see the Bluetooth Printing Guide). 2) Select the printer from the list of Bluetooth-enabled printers.
Schritt 10: Aktivieren von Bluetooth-Druck (HP Deskjet 450wbt - Windows).
3) Check that the Deskjet 450 printer icon is in the Printers or Printers and Faxes folder. (Click Start, point to Settings, and then click Printers in Windows NT 4.0, Windows 98, Windows Me, and Windows 2000 or click Start and click Printers and Faxes in Windows XP.) If you do not see the printer icon, double-click Add Printer and select the COM port assigned for your Bluetooth device. Click Next. Select HP and hp deskjet 450 series in the Add Printer Wizard. Follow the onscreen instructions to complete the printer installation.
4) Right-click the printer icon and click Ports (Windows 2000, Windows XP, Windows NT 4.0) or Details (Windows 98 and Windows Me). 5) Make sure that the printer is assigned to the COM port or virtual Bluetooth port created for your Bluetooth device.

Step 11: Test the software installation.
Print a document from an application you use frequently to test the software installation and printer connection.
Note: For Bluetooth configuration and printing information, see the Bluetooth Printing Guide on the Starter CD. For printing via infrared device, place the device's infrared lens within 3 feet (1 meter) from the printer and within a 30-degree total angle from the printer's infrared lens. The printer's infrared LED turns green when receiving an infrared transmission.
Step 12: Align the print cartridges (Windows). Whenever you install a print cartridge, align the print cartridges for the best possible print quality. 1) Click Start, point to Settings, and then click Printers (Windows NT 4.0, Windows 98, Windows Me, and Windows 2000) or click Start and click Printers and Faxes (Windows XP). 2) Right-click the printer icon and click Printing Preferences (Windows 2000 and Windows XP), Properties (Windows 98 and Windows Me), or Document Defaults (Windows NT 4.0).
3) Click the Services tab, and then click Align Print Cartridges. 4) Click Align in the dialog and follow the onscreen instructions to complete the alignment procedure. Note: You can also align the print cartridge from the Printer Services tab in the Toolbox.

13
Step 13: Align the print cartridges (Mac). Whenever you install a print cartridge, align the print cartridges for the best possible print quality. 1) Open the HP Inkjet Utility and click Calibrate Device. 2) Follow the onscreen instructions to complete the alignment procedure.

14
Step 14: Register the printer. Register the printer to receive important support and technical information. If you did not register your printer while installing the software, you can register later at http://www.registerer.hp.com.
Your printer is ready to use. For information about using the printer and troubleshooting, refer to the following resources:
the onscreen documentation on the Starter CD
HP Instant Support (For more information, see the onscreen user's guide.)
the product support site at http://www.hp.com/support/dj450
the HP customer support guide (in box).
The following tips will help you prepare for traveling with your printer:
- If you are bringing along an extra black or photo print cartridge, store it in the travel holder (part number C8233A) to prevent ink leakage.
- You can bring the printer along in a carrying case (part number C8232A). The carrying case has compartments for both your notebook and the printer. The compartments can also be detached if you want to carry the notebook and printer separately.
- Turn off the printer using the Power button. This ensures that the print cartridges are returned to the home position at the right side of the printer and locked in place.
- Disconnect the printer cable and power adapter from the printer. Slide down the input tray extension and close the input tray.
If you are traveling to another country/region, bring the necessary plug adapter with you.
- Use only the power adapter that is supplied with the printer. Do not use any other voltage transformer or converter. The power adapter can be used with AC power sources of 100 to 240 volts, 50 or 60Hz .
- Remove the battery if you will not be using the printer for more than a month.
Reisetips
You must enable the infrared port in your host machine before you can use it.
- Reboot your system and press F2 while your system is starting up.
- Select the System Devices menu and set Infrared Port to Enabled.
- Set Mode to FIR.
- If DMA channel conflicts with Parallel port DMA channel, change Parallel Port to EPP.
- Save and Exit to continue reboot.
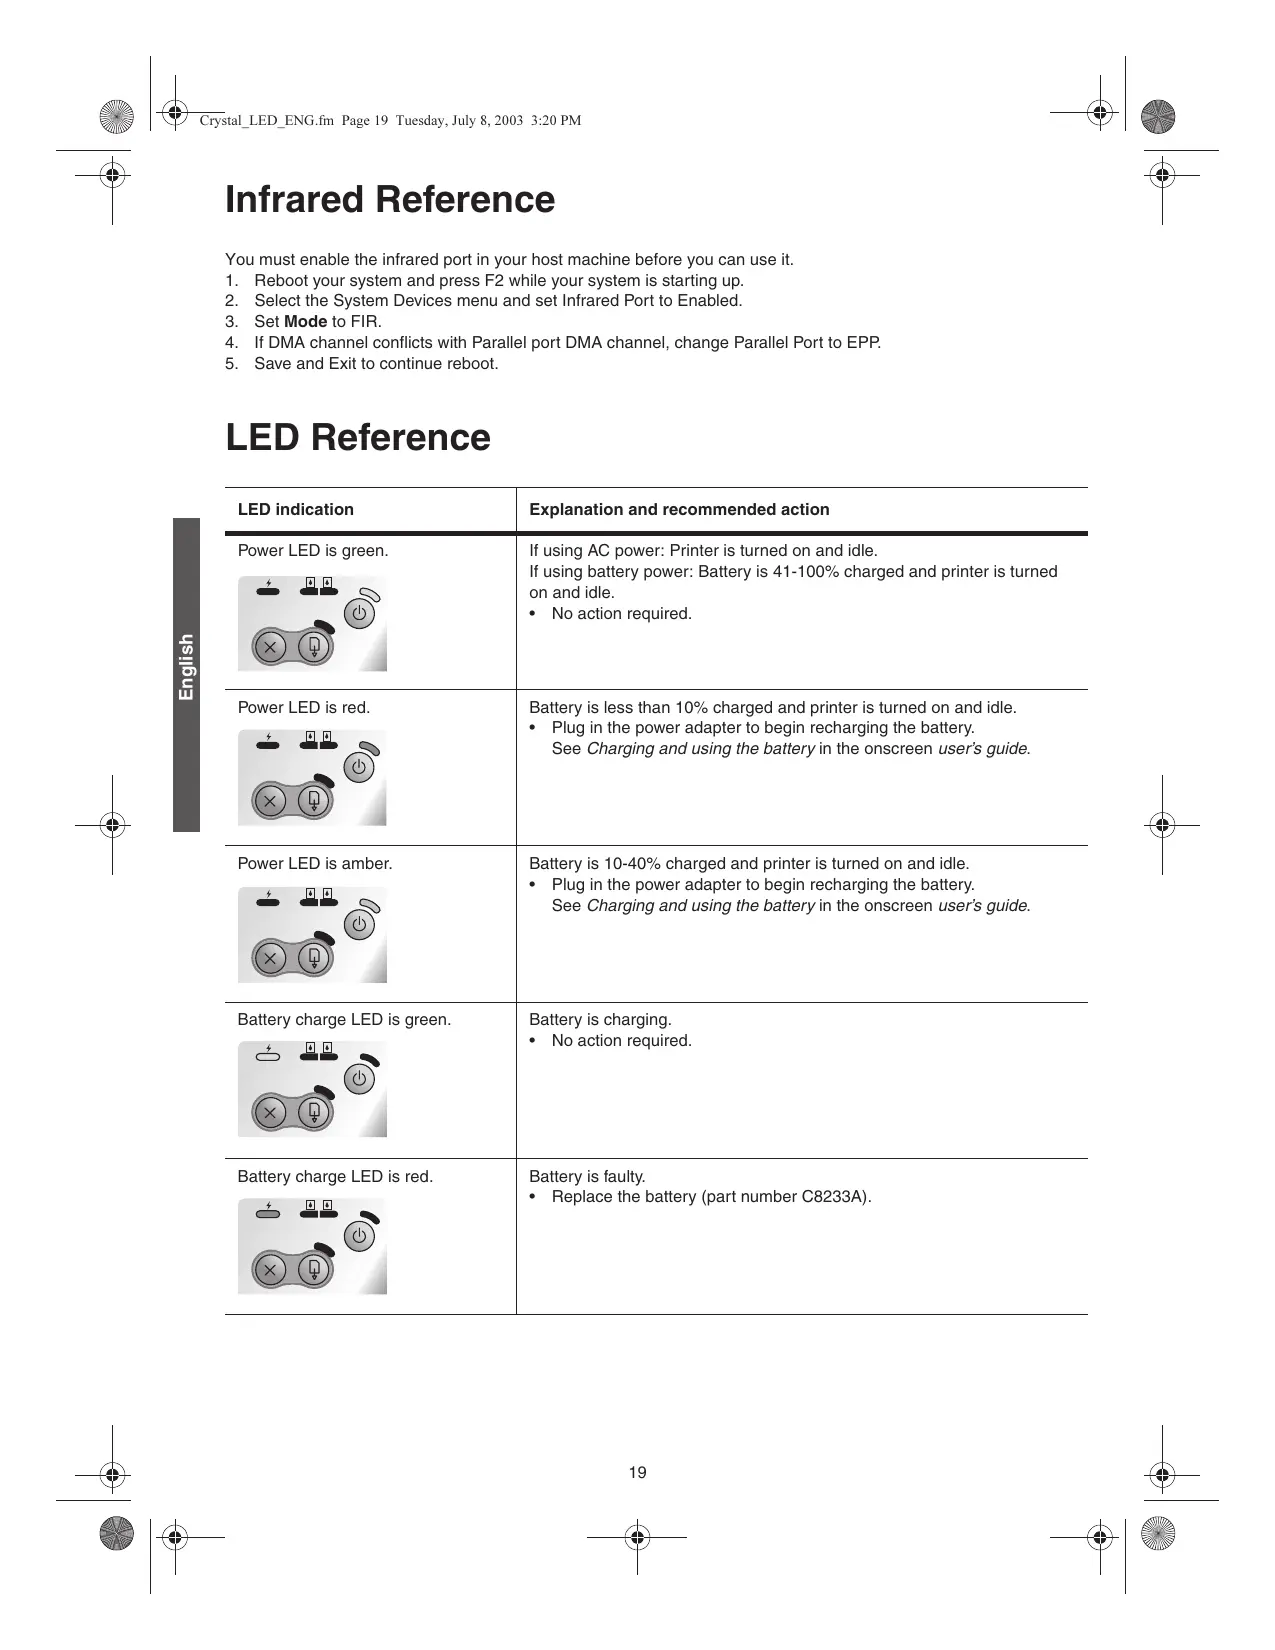
LED Reference
| LED indication | Explanation and recommended action |
| Power LED is green. | If using AC power: Printer is turned on and idle.
If using battery power: Battery is 41-100% charged and printer is turned on and idle.
• No action required. |
| Power LED is red. | Battery is less than 10% charged and printer is turned on and idle.
• Plug in the power adapter to begin recharging the battery.
See Charging and using the battery in the onscreen user's guide. |
| Power LED is amber. | Battery is 10-40% charged and printer is turned on and idle.
• Plug in the power adapter to begin recharging the battery.
See Charging and using the battery in the onscreen user's guide. |
| Battery charge LED is green. | Battery is charging.
• No action required. |
| Battery charge LED is red. | Battery is faulty.
• Replace the battery (part number C8233A). |
| Power LED blinks. | Printer is printing.
• No action required. |
| Power, Resume, Left and Right print cartridge LEDs cycle. | Printer is powering on.
• No action required. |
| Power LED is green and Resume LED blinks. | Printer is either stalled, waiting for special media to dry, out of paper, or processing Digital Print Order Format (DPOF) printing.
• If out of paper, load paper. Press the Resume button to continue the print job. |
| Left print cartridge LED blinks. | Tri-color print cartridge needs attention.
• Reinstall the print cartridge and try to print. If the error persists, replace the cartridge. See Replacing the print cartridges in the onscreen user's guide. |
| Right print cartridge LED blinks. | Black or photo print cartridge needs attention.
• Reinstall the print cartridge and try to print. If the error persists, replace the cartridge. See Replacing the print cartridges in the onscreen user's guide. |
| Right and Left print cartridge LEDs blink. | Tri-color and black or photo print cartridges need attention.
• Reinstall the print cartridges and try to print. If the error persists, replace the cartridges. See Replacing the print cartridges in the onscreen user's guide. |
| Left print cartridge LED on. | Tri-color print cartridge is low on ink.
• Replace the print cartridge. See Replacing the print cartridges in the onscreen user's guide. |
| Right print cartridge LED on. | Black or photo print cartridge is low on ink.
• Replace the print cartridge. See Replacing the print cartridges in the onscreen user's guide. |
| Right and Left print cartridge LEDs on. | Tri-color and black or photo print cartridges are low on ink.
• Replace the print cartridges. See Replacing the print cartridges in the onscreen user's guide. |
| Power LED off, Resume LED blinks. | Media jam or paper motor stall.
• Clear the jammed paper. See Print media is jammed in the onscreen user's guide. After clearing the jam, press the Resume button to continue the print job.
If no paper jam exists, press the Resume button. If this does not work, try turning the printer off and then on again, and resend the print job. |
| Power LED blinks, Resume LED blinks. | Media jam or carriage stall.
• Clear the jammed paper. See Print media is jammed in the onscreen user's guide. After clearing the jam, press the Resume button to continue the print job.
If no paper jam exists, press the Resume button. If this does not work, try turning the printer off and then on again, and resend the print job. |
| Power LED blinks, Resume LED blinks, Left and Right print cartridge LEDs on. | Media jam or service station stall.
• Clear the jammed paper. See Print media is jammed in the onscreen user's guide. After clearing the jam, press the Resume button to continue the print job.
If no paper jam exists, press the Resume button. If this does not work, try turning the printer off and then on again, and resend the print job. |
| Power LED turns on twice as long as off. | Print job is being canceled.
• No action required. |
| Power LED, Resume LED, Left and Right print cartridge LEDs on. | New firmware is being flashed to the printer.
• No action required. |
| Power LED on, Resume LED blinks, Right print cartridge LED turns on twice as long as off. | Ink service module almost full.
• If you have a replacement for the ink service module, replace it immediately by following the instructions that come with it.
• Otherwise, visit www.hp.com/support/dj450 or see Customer Support to get a replacement.
In the meantime, you can press the Resume button to continue printing, but this LED error state will remain until the ink service module is replaced. When the ink service module is full, the printer will stop printing. |
| Power LED on, Resume LED on, Right print cartridge LED turns on twice as long as off. | Ink service module full.
• If you have a replacement for the ink service module, replace it immediately by following the instructions that come with it.
• Otherwise, visit www.hp.com/support/dj450 or see Customer Support to get a replacement.
In the meantime, you can remove the black print cartridge and print using only the tri-color print cartridge. The color results and print speed may be affected. See Single-cartridge printing mode in the onscreen user's guide. |
| Infrared LED on. | Printer is receiving infrared transmission.
• No action required. |
| Power LED, Resume LED, Left and Right print cartridge LEDs cycle at fast rate. | Printer error.
• Press the Resume button to print the error code. Press the Power button to reset the printer. |
Infrarot-Referenz
HP Deskjet 450 series printer.
Impresora HP Deskjet 450 series.
Hewlett-Packard Limited Warranty Statement
HP product
Software
Accessories
Print cartridges
Printer peripheral hardware (see below for details)
Extent of Limited Warranty
1 Hewlett-Packard warrants to the end-user customer that the HP products specified above will be free from defects in materials and workmanship for the duration specified above, which duration begins on the date of purchase by the customer.
2 For software products, HP's limited warranty applies only to a failure to execute programming instructions. HP does not warrant that the operation of any product will be uninterrupted or error free.
3 HP's limited warranty covers only those defects that arise as a result of normal use of the product, and does not cover any other problems, including those that arise as a result of:
a Improper maintenance or modification;
b Software, media, parts, or supplies not provided or supported by HP;
c Operation outside the product's specifications;
d Unauthorized modification or misuse.
4 For HP printer products, the use of a non-HP print cartridge or a refilled print cartridge does not affect either the warranty to the customer or any HP support contract with the customer. However, if printer failure or damage is attributable to the use of a non-HP or refilled print cartridge, HP will charge its standard time and materials charges to service the printer for the particular failure or damage. This warranty does not extend to empty HP print cartridges, refilled HP print cartridges, or HP print cartridges which have been tampered with.
5 If HP receives, during the applicable warranty period, notice of a defect in any product which is covered by HP's warranty, HP shall either repair or replace the product, at HP's option.
6 If HP is unable to repair or replace, as applicable, a defective product which is covered by HP's warranty, HP shall, within a reasonable time after being notified of the defect, refund the purchase price for the product.
7 HP shall have no obligation to repair, replace, or refund until the customer returns the defective product to HP.
8 Any replacement product may be either new or like new, provided that it has functionality at least equal to that of the product being replaced.
9 HP products may contain remanufactured parts, components, or materials equivalent to new in performance.
10 HP's Limited Warranty Statement is valid in any country/region where the covered HP product is distributed by HP. Contracts for additional warranty services, such as on-site service, are available from any authorized HP service facility in countries/regions where the product is distributed by HP or by an authorized importer.
Duration of Limited Warranty
90 days
1 year if sold with printer; 90 days if purchased separately
Until the HP print cartridge has been depleted of HP ink, or until the "end of warranty" date printed on the HP print cartridge, whichever occurs first.
1 year
Limitations of Warranty
TO THE EXTENT ALLOWED BY LOCAL LAW, NEITHER HP NOR ITS THIRD PARTY SUPPLIERS MAKES ANY OTHER WARRANTY OR CONDITION OF ANY KIND, WHETHER EXPRESS OR IMPLIED WARRANTYES OR CONDITIONS OF MERCHANTABILITY, SATISFACTORY QUALITY, AND FITNESS FOR A PARTICULAR PURPOSE.
Limitations of Liability
1 To the extent allowed by local law, the remedies provided in this Warranty Statement are the customer's sole and exclusive remedies.
2 TO THE EXTENT ALLOWED BY LOCAL LAW, EXCEPT FOR THE OBLIGATIONS SPECIFICALLY SET FORTH IN THIS WARRANTY STATEMENT, IN NO EVENT SHALL HP OR ITS THIRD PARTY SUPPLIERS BE LIABLE FOR DIRECT, INDIRECT, SPECIAL, INCIDENTAL, OR CONSEQUENTIAL DAMAGES, WHETHER BASED ON CONTRACT, TORT, OR ANY OTHER LEGAL THEORY AND WHETHER ADVISED OF THE POSSIBILITY OF SUCH DAMAGES.
Local Law
1 This Warranty Statement gives the customer specific legal rights. The customer may also have other rights which vary from state to state in the United States, from province to province in Canada, and from country/region to country/region elsewhere in the world.
2 To the extent that this Warranty Statement is inconsistent with local law, this Warranty Statement shall be deemed modified to be consistent with such local law. Under such local law, certain disclaimers and limitations of this Warranty Statement may not apply to the customer. For example, some states in the United States, as well as some governments outside the United States (including provinces in Canada), may:
a Preclude the disclaimers and limitations in this Warranty Statement from limiting the statutory rights of a customer (e.g. the United Kingdom);
b Otherwise restrict the ability of a manufacturer to enforce such disclaimers or limitations; or
c Grant the customer additional warranty rights, specify the duration of implied warranties which the manufacturer cannot disclaim, or allow limitations on the duration of implied warranties.
3 FOR CONSUMER TRANSACTIONS IN AUSTRALIA AND NEW ZEALAND, THE TERMS IN THIS WARRANTY STATEMENT, EXCEPT TO THE EXTENT LAWFULLY PERMITTED, DO NOT EXCLUDE, RESTRICT, OR MODIFY, AND ARE IN ADDITION TO, THE MANDATORY STATUTORY RIGHTS APPLICABLE TO THE SALE OF THE HP PRODUCTS TO SUCH CUSTOMERS.
3 FOR CONSUMER TRANSACTIONS IN AUSTRALIA AND NEW ZEALAND, THE TERMS IN THIS WARRANTY STATEMENT, EXCEPT TO THE EXTENT LAWFULLY PERMITTED, DO NOT EXCLUDE, RESTRICT, OR MODIFY, AND ARE IN ADDITION TO, THE MANDATORY STATUTORY RIGHTS APPLICABLE TO THE SALE OF THE HP PRODUCTS TO SUCH CUSTOMERS.
Juslllal yaiyiaial lal gall jle aieyaiyaii
Jusuaaiai jusu aagjg jcl HP 1
aalil 100000000000000000000000000000000000000000
jag jg jia iia .jai lia liy jil HP alio jgi
2011 1111111111111111111111
glll lal HP i 5 j 5i 5i 5i 5i 5i 5i
J 100 HP L222
Jusill CD jaiuallle psslll Jus
gdpdsslll lalalal HP Instant Support
(20
http://www hp.com/support/dj450
()HP

C. ( r1^2 + r2^2 + r_3^2) = 1
olilll laljaiw y jaiy w jaiy w jaiy bpa Jlly jali cllall clogg o g jg jg jg jg jg jg jg jg jg jg jg jg jg jg jg jg jg jg jg jg jg jg jg jg jg jg jg jg jg jg jg jg jg jg jg jg jg jg jg jg jg jg jg jg jg jg jg jg jg jg j

sIe Ic biically p a s. aloua yooia ole le biically p ( 4
clalil lai p aol jy. sIe sIae Ic biiz ( t .elall yabj
li di kai: hao. slalall lac ac arjla Jauo iuii jaii allg od gall
gi zalll aoia yooia ole qyrb je celalll sbjda joi sIz Ioc
.

JlalllgIe IaIaIaIaIaIaIaIaIaIaIaIaIaIaIaIaIaIaIaIaIaIaIaIaIaIaIaIaIaIaIaIaIaIaIaIaIaIaIaIaIaIaIaIaIaIaIaIaIaIaIaII (Windows 2000, Windows XP, Windows NT 4.0) Js J (Windows Me, Windows 98) Js J (Windows Me, Windows 98) Js J (Windows Me, Windows 98) Js J (Windows Me, Windows 98) Js J (Windows Me, Windows 98) Js J (Windows Me, Windows 98) Js J (Windows Me, Windows 98) Js J (Windows Me, Windows 98) Js J (Windows Me, Windows 98) Js

.(Windows) aclall jolj 17 sglil
Jauil aclalb slalj paa cclalb slj baiy bai y loie
Ia Jia Lla pia jz le bia (1.2i00 aelab oay jai 98,Windows Me,Windows 2000) aLb i aLul
le bia jia jz le bia all y (Windows NT 4.0,Windows
Ls wLl Bia jz bia (Y.(Windows XP) pia aLsliy aLbl
2000) g f aLal lal .(Windows XP) (Windows
Me) , (Windows 98) .(Windows XP) , (Windows
.(Windows NT 4.0)

JLSI I USB JI JSLJ SJSJZJG JUSB JSLSJSJ (Y
TSSJIO JI 10000000000000000000000000000000000000000000000000000000000000000000000000000000000000000000000000000
aall aas yagolal 10000000000000000000000000000000000000000000000000000000000000000000000000000000000000000

j 400
150
150
150
150
150
150
150
150
150
150
.HP Deskjet 450 series printer
j 1 j 1 j 1 j 1 j 1 j 1 j 1 j 1 j 1 j 1 j 1 j 1 j 1 j 1 j 1 j 1 j 1 j 1 j 1 j 1 j 1 j 1 j 1 j 1 j 1 j 1 j 1 j 1 j 1 j 1 j 1 j 1 j 1 j 1 j
CE .Microsoft Pocket PC (PDAs) Software, Windows
ailll l 100000000000000000000000000000000000000000000000000000000000000000000000

(2jgckylll lallll golral) jililil (V
.(HP Deskjet 450CBi/,450wbt)
.(HP Deskjet 450wbt) 20. HP
aegall 1gjzoo jzjj
LdL (r, LgJg (HP Deskjet 450 series 1u (1)
(1) (1) (0, jgljg jg jg jg jg jg jg (2)
. (e) Lp HP jj j j j j j j j
. Intel 256,257,258,259,260,261,262,263,264 Pentium
Power Macintosh .PowerBook .Mac OS .Macintosh .Mac
Apple Computer, Inc 1111111111111111111111111111111111111111111
Apple
Apple
Lgblaiyblay Lxle y Bluetooth logos o jyblgBluetooth
z y, y, y, y, y, y, y, y, y, y, y, y, y, y, y, y, y, y, y, y, y, y, y, y, y, y, y, y, y, y, y, y, y, y, y, y, y, y, y, y, y, y, y, y, y, y, y, y, y, y, y
Copyright Hewlett-Packard Development Company, L.P. 一 · 一 ©
jI jUaal jUaJg jI Jauai Jauai Jauai Jauai Jauai Jauai
Jaa! jaa yaaill li aaySall aLogall
Jallll lili y aag HPGsH Looaoglllssyall llaalll
Loo Jol jiee y .Loalllgaiioll oayaaayall
jia jia jia jia jia jia jia jia jia jia jia jia jia jia jia jia jia jia jia jia jia jia jia jia jia jia jia jia jia jia jia jia jia
aill lallll lalee nnnn nn nnnn nnnn nnnn nnnn nnnn nnnn nnnn nnnn nnnn nnnn nnnn nnnn nnnn nnnn nnnn nnnn nnnn nnnn nnnn nnnn nnnn nnnn nnnn nnnn nnnn nnnn nnnn nnnn nnnn nnnn nnnn nnnn nnnn nnnn nnne e aee
jell
daii dao g jwll jy jia liu
a!gall aclb gabga lglal bghgbaa 1
J (C8233A jj)
j)]
Jgssd jgsaS no ksl aiaaa pLsI Jgssi (C8232A
jsssslll j 11111111111111111111111
ailllll lalpall jaljalal aljilla

i n v e n t
printed on cycled paper

Hewlett-Packard Development Company, L.P.
printed in Germany
http://www.hp.com/support/dj450

C8145-90004