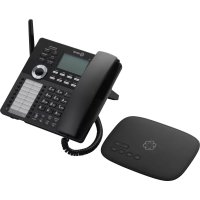
Telo Air 2 - Headphones Ooma - Free user manual and instructions
Find the device manual for free Telo Air 2 Ooma in PDF.

| Product Type | VoIP Phone Adapter (Voice over IP) |
| Brand | Ooma |
| Model | Telo Air 2 |
| Dimensions (L x W x H) | Approximately 12 x 12 x 3 cm |
| Weight | Approximately 200 g |
| Power Supply | AC power adapter (included) |
| Connectivity | Wi-Fi 802.11 b/g/n, Ethernet 10/100, RJ-11 phone port, USB port |
| Main Features | Phone calls via Internet, voicemail, call forwarding, telemarketer blocking, call waiting, virtual number, Ooma mobile app |
| Care and Cleaning | Clean with a soft, dry cloth. Avoid moisture and extreme temperatures. |
| Safety | Do not plug the PHONE port into a wall telephone jack connected to the telephone company network. Disconnect external wiring first. |
| Spare Parts and Repairability | Power adapter and Ethernet cable replaceable. No user-serviceable parts. |
| General Information | Compatible with Ooma HD2/HD3 handsets, Ooma Linx, and home security. Setup app available on iOS and Android. |
Frequently Asked Questions - Telo Air 2 Ooma
User questions about Telo Air 2 Ooma
0 question about this device. Answer the ones you know or ask your own.
Ask a new question about this device
Download the instructions for your Headphones in PDF format for free! Find your manual Telo Air 2 - Ooma and take your electronic device back in hand. On this page are published all the documents necessary for the use of your device. Telo Air 2 by Ooma.
USER MANUAL Telo Air 2 Ooma
For warranty, safety, and other legal information, visit www.com/legal
- ZOR Coms, Inc. All rights reserved. Reproduct on wholesale import and/or written permission to prepaid Coms, the Dom's logo, Dom's info, Dom's 1023 Handels, Coms Premier and all other Dom's company, product and service names and slogans are trademarks of Coms, Inc. All other products, service or brand names are the property of their respective owners. Patient meeting, PYS: YGD-29P-200
text_image
Quick Start GuideContents
Getting Started 4
Get the Ooma Setup App ....5
Activate Your Account....5
Connect your Ooma Telo Air to the Internet 6
Connect a Phone ....7
Congratulations, you're done!......8
What's next? 9
Doma Usage Guide 10
Ooma Premier 12
Quick Reference 14
Status Lights 15
Troubleshooting....16
Add-Ons for Ooma Telo....18
Alternative Wi-Fi Setup 20
Connecting Your Telo Using Ethernet 21
Alternative Ethernet Setup Options 22
Fax and Home Wiring Setup Options 24
Getting Started
Installing Ooma Telo Air is easy! In fact, most users are up and calling in less than 15 minutes. This guide will walk you through the basics of setting up your Ooma Telo Air. It will also introduce you to the basics of using your Ooma service.
Package Contents
Ooma Telo Air
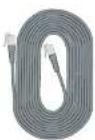
Ethernet Cable
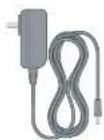
AC Adapter
Doma Telo Air AC AdapterEthernet Cable
A
Have a question or need assistance?
Here is where you can look for help:
Knowledge base: www.ooma.com/support
User manuals: support.ooma.com/userguide
Community forum: www.ooma.com/forums
Live Customer Care: 1-888-711-6662 (US)
1-866-929-6662(CA)
STEP 1
Get the Ooma Setup App
The easiest way to set up your Telo is with your iPhone or Android smartphone. Visit the app store on your phone and search for the "Ooma Setup" app. Install the app and follow the instructions.
If you don't have a smartphone or cannot install the app, you can visit ooma.com/activate on your computer. Follow the alternate instructions on that site to activate your account and set up your Telo.

Download on the App Store

ANDROIDS APP ON Google play
STEP 2
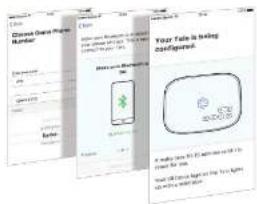
Activate Your Account
The Ooma Setup app will guide you through the necessary steps to activate your account. You will need to provide your 911 address and select a phone number.
Again, if you don't have a smartphone or cannot install the app, go to ooma.com/activate on your computer and follow the alternate instructions to activate your account and set up your Telo.
text_image
Close-up Google Phone Number Your Safe is being Configured. Home access to the 2000s version of the Google Phone. You can't have a phone to use this device for your connection to the Google Phone. Please note that you can't have a phone to use this device for your connection to the Google Phone.STEP 3 STE
Connect your Ooma Telo Air to the Internet
The Ooma Setup app contains instructions that will guide you through connecting to the Internet. You can connect it to the Internet in two different ways:
Wi-Fi connection
OR
Ethernet connection

text_image
Diagram showing three connected devices with signal waves, likely representing wireless or network connections.If you need additional assistance, you can find alternate instructions for Wi-Fi setup on page 20 of this booklet. Instructions for Ethernet setup can be found on pages 22 and 23.
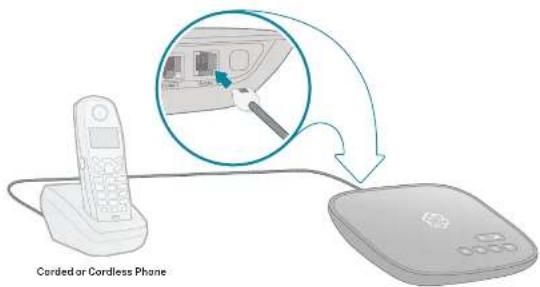
Connect a Phone
Using an existing corded or cordless phone, plug the other end of the cord into the PHONE port.
text_image
Corded or Cordless Phane
If you have purchased on Ooma HD2 or HD3 handset bundle, see the separate guide for instructions to set it up.
Congratulations, you're done!
Your Ooma Telo is ready to be used once the light on top of the device is blue. Pick up the phone and listen for the Ooma dialtone to confirm that your setup is complete. If you connected a computer to complete your Wi-Fi setup, you disconnect it now.
Place your first phone call
Pick up the phone you connected to the Ooma Telo and dial just like you always do. Call a friend or family member and experience firsthand the quality of Ooma PureVoice™ technology.
Set up your voicemail
Pick up the phone connected to the Ooma Telo and press the key on the Telo.
The system will walk you through configuring your account and recording a personal greeting.
If your Telo needs a software upgrade, the light on top of the device will blink purple while it is downloading the newest version. This may take 5-10 minutes. Do not unplug the Telo while it is upgrading. It will automatically reboot after the upgrade is done.
Check out My Ooma
Access your online control panel at my.ooma.com. Here you'll unlock the capabilities of your system:
Check voicemail and call logs
- Configure preferences and set up advanced features
Update your 911 address
Purchase additional services and add-ons
And much more!
The first time you log in, our Setup Wizard will help configure our most popular features.
What's next?

Transfer your phone number
In most areas, you can port your existing number to Ooma for a one-time fee. You must maintain your current phone service until the porting process is completed, which usually takes about 1-3 weeks. To check availability, to learn more, or to get started, please visit: my.ooma.com/port

Explore Ooma Premier™
Ooma Premier is a bundle of enhanced calling features that will get your home phone service firing on all cylinders.
See the Ooma Premier section for an overview of our most popular features. To learn more about all the features and benefits included in Ooma Premier, go to: my.ooma.com/premier
Ooma Usage Guide
Basic Operation
Making and receiving calls
To place a call, pick up a phone connected to your Ooma Telo and dial a phone number.
To answer a call, pick up the phone when it rings as you normally would.
Call-waiting
Switch to a second incoming call by pressing the Flash key on your telephone handset. The current call will automatically be put on hold. To switch back, press the Flash key again.
Blocking caller-ID
Disable your caller-ID on outgoing calls by dialing 67 before you dial out. To disable caller-ID for all calls, visit: my.ooma.com/privacy
911 emergency calling
In case of an emergency, dial 9 1 1 to reach first responders. For your safety, always keep your address up-to-date at: my.ooma.com/address
Setting up 911 notifications
Gain some peace of mind by setting up your Ooma system to send email or text message alerts whenever someone dials 911 from home. To set this up, go to: my.ooma.com/911
International and other calling services
A calling plan or prepaid balance is required to call outside the country. Visit my.cama.com/prepaid to get started. Then dial 0 1 1 followed by the country code and phone number. Your remaining time will be announced before the call completes.
NOTE: A prepaid balance is required for 411 calls.
Voicemail
Setting up
Pick up your phone and press the key on the Ooma Telo. The system will walk you through setting up your PIN and recording a personal greeting.
Playing messages at home
When you have new messages, the Key will blink. Press the Key to listen to your voicemail through the speaker. You can also listen to messages through your phone. Simply dial your own phone number and follow the voice prompts. Checking voicemail remotely
There are three ways to check voicemail remotely:
- Phone: Dial your Ooma number. When the call rolls to
voicemail, press the * key and enter your PIN. - Online: Listen to and manage your voicemail on the web at my.ooma.com/index
- Email: Forward your voicemail as an MP3 file to your email or mobile phone (requires Coma Premier). Set up forwarding at: my.ooma.com/voicemail
Changing voicemail settings
Pick up the phone connected to your Ooma Telo and press the |key.
From the main menu, select option 2: "Change your settings," then follow the instructions.

Ooma Premier
Your Ooma Telo comes with a free trial of Ooma Premier, a bundle of over 25 premium calling features. Check out some of our most popular features below!
Making two calls at once
Press the Flash key on your handset, and you'll get a new Ooma disltone.
Forwarding your voicemail
Forward your voicemail to email so you can listen to messages from your smartphone or computer. To set this up, go to: my.ooma.com/voicemail
Staying connected on the go
Afraid to miss a call? Set up your Ooma Telo to forward calls to your cell phone. Choose to forward all calls, only when your Internet is down, or to ring your home phone and cell phone at the same time. Set this up any time at: my.ooma.com/calling
Blocking telemarketers
Personal and community blacklists have been designed to help you filter out telemarketers and other unwanted callers. To start blocking callers, visit:my.ooms.com/blacklists
Choosing a virtual number
Select a number from almost any calling area for a home office or to make it easy for friends and family in another state to reach you. Get started at: my.ooms.com/numbers
Identifying callers
Don't recognize the number? Enhanced Caller-ID will look up the caller's name from a national database so you'll have more than just the number to go by.
Monitoring your calls
Listen in as your callers leave their voicemail. The message will be played through the speaker in your Telo. Only answer the phone if you decide you want to take the call.
Using Ooma on your smartphone
Use your Apple or Android smartphone to make phone calls over any Wi-Fi or 3G/4G data connection with the Ooma Mobile app. To get started, go to: my.ooma.com/mobile
Turning off the ringer
Need some peace and quiet? Just press and hold the >> button or dial ▪ 7 8 on your phone and all your calls will roll straight to voicemail. To deactivate Do Not Disturb, press and hold >> again or dial ▪ 7 9.
And much, much more
Explore all the features and benefits of Ooma Premier: my.ooma.com/premier
Quick Reference

text_image
POWER USB HOME INTERNET PHONE Page Key System Status Volume @ csi Delete @05 Play Rewind Fast ForwardStatus Lights
Play Key Press to hear your voicemail messages.
Press again to stop playback. Key will blink when there are new messages.
901 Fast Forward Key During voicemail playback, press to skip to the next message. Press and hold to toggle Do Not Picture
REIND Key During voicemail playback, press once to replay the current message, and twice to skip to the previous message.
Press to adjust brightness of the status light.
Delete Key During voicemail playback, press to delete the current message.
Volume Adjustment Key Press to adjust the volume level.
Page Key (on rear of Base Station) Press to locate your Ooma handsets.
Press-and-hold for three seconds to register a new cordless Ooma device such as an HD2 Handset or Linx.
Solid Blue System Status Indicates that your Ooma service is working. You will hear the Ooma dial tone and all services are operational.
Solid Purple System Status Indicates that your Ooma service is working and Do Not Disturb is enabled. All incoming calls will be directed to voicemail.
Blinking Purple System Status Indicates that your Ooma Base Station is downloading a software upgrade. All services are unavailable. Do not unplug your Ooma Base Station when it is in this state.
Blinking Red System Status Indicates that your Ooma service is not working. All services are unavailable. You will not hear any dial tone and will not be able to make or receive calls.
White System Status Indicates that your Ooma Base Station is not powered on or that brightness is turned all the way down.
Troubleshooting
The light is blinking red. A blinking red light indicates that your Ooma Telo is not operational. It is normal for the light to blink red for a couple of minutes during boot up. Otherwise, check the following to make sure everything is set up correctly:
- Verify that you have activated your device as described in STEP 1. If you plugged in your device before going through the activation process, try rebooting it now.
For Ethernet installations: Check that your network cables are plugged in securely. Verify that the INTERNET port is connected to your router (or modem). The LED at the bottom right of the connector will be lit green if the cable is connected properly.
For Wi-Fi installations: Try moving the Tele Ebsor to your Wi-Fi router and repeating the directions on Page 5 to refresh your wireless setup. If you are unable to connect over Wi-Fi, follow the directions on Page 22 to connect your Tele to your router using Ethernet instead.
- Check that your Internet connection is working. Try connecting a computer to the HOME port and browse to my.ooma.com. You should see the login screen for My Ooma. If not, troubleshoot your Internet connection. - Try rebooting your Tolo, modem, and router by pulling out the power and plugging them back in.
The light does not light up Check that the AC adapter is plugged in and power is being supplied to the device.
You don't hear the Ooma dialtone. If the light is blue but you don't hear a dialtone, check that your phone is correctly plugged into the PHONE port.
Incoming calls do not ring your home phone When it is turned on, the light will light up purple and all incoming calls will go directly to voicemail without ringing your phones. To turn off the feature, press and hold the >> button or dial ▶7□7 from your phone.
You are unable to hear your messages. Check that the speaker hasn't been turned off. Increase the volume level by pressing. The device will say what volume it has been set to.
Voice constantly breaks up Voice quality is dependent on the speed and quality of your Internet connection. For best results, Ooma recommends that you hardwire your Telo between the modem and router as shown on Page 22. This configuration allows phone calls to be intelligently prioritized over other network traffic. You can optimize how Ooma allocates bandwidth by connecting a computer to the HOME port, browsing to setup.ooma.com, then clicking on the Advanced tab.
Add-Ons for Ooma Telo
Ooma HD2 and HD3 Handset
The Ooma HD2 and HD3 handsets sync wirelessly with the Ooma Telo to give you the freedom to set them up anywhere in your home. The handset supports many advanced features, including contact list syncing, Facebook picture caller-ID, custom musical ringtones, access to the Instant Second Line, and much more.

Ooma Smart Home Security
Add Ooma Smart Security to your current Ooma home phone service and check the status of your home 24/7. Call 911 remotely from your home phone number even when you are not at home. Receive notifications when doors open or close. Monitor movement from anywhere. Detect water before it causes damage.

Doma Linx
Sometimes you want a telephone in a room that doesn't have the wiring to set one up. The Ooma Linx device is a remote phone jack that syncs wirelessly with the Ooma Telo to support a telephone anywhere there is an available electrical outlet. With Premier service you can assign a separate number to the Ooma Linx for a perfect home office solution.
Ooma mobile app
Available for both iOS and Android devices, the free Coma mobile app allows you to make and receive phone calls through your Wi-Fi or 3G/4G data connection without using cell phone minutes. The app also offers a convenient interface to listen to voicemails and to manage your Coma account.
To learn more about these accessories for the Ooma Telo, visit: my.ooma.com/products
Alternative Wi-Fi Setup
We recommend using the Ooma Telo setup app for Wi-Fi setup. If you cannot use the mobile app, follow the instructions below:
Connect a Computer to your Ooma Telo
Power on your Telo Air using the included AC cord. It is normal for the lights on the Telo to blink for a couple of minutes while it boots up.
When the device has booted up, use the included Ethernet cable to connect a computer to the HOME port of the Tela.
Configure Wireless Settings
Open a browser on the computer connected to the Telo and navigate to setup.ooms.com, a special site embedded in your Telo.
Click the Wireless tab on the left side of your screen. Follow the onscreen instructions to connect the Tolo to your Wi-Fi network using your network name and password.
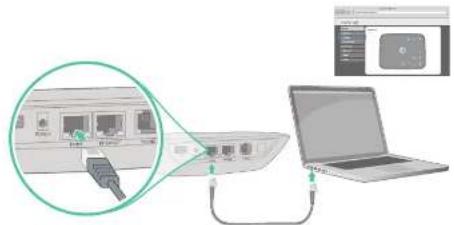
natural_image
Illustration of a computer setup with an attached network and a laptop connected via cable (no text or symbols visible)IMPORTANT: If the computer has Wi-Fi, it must be disabled. The computer must have a wired connection to the Telo.
Connecting Your Telo Using Ethernet
If you do not wish to connect your Telo to your Wi-Fi network, you can use a hardwired connection instead. Insert one end of the Ethernet cable into the INTERNET port on the back of the Telo. Connect the other end of the cable to an open port on your router.
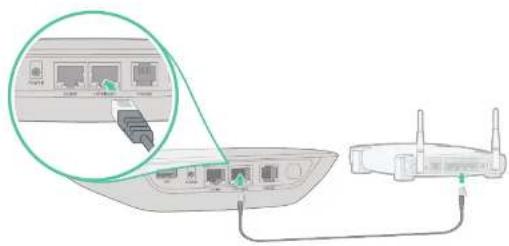
natural_image
Diagram showing connection between a router and a device via cable, with an inset view of ports (no text or symbols present)Plug the included AC adapter into the POWER port. The Ooma logo will blink red for a few minutes. When it turns blue, the Telo is ready.
Alternative Ethernet Setup Options
The Ooma Telo is flexible enough to work in almost any home network and with a variety of devices. Review the following options to see if any of them apply to you.
OPT.A Install Telo between modem and router (best voice quality)
This setup allows Ooma to prioritize your phone calls over other network traffic.
-
Find the Ethernet cable that connects your modem to your router.
-
Unplug the modem end and plug into the HOME port of the Telo.
- Use the Included Ethernet cable and connect the INTERNET port of the Telo to your modern.
- Reboot your modem and router
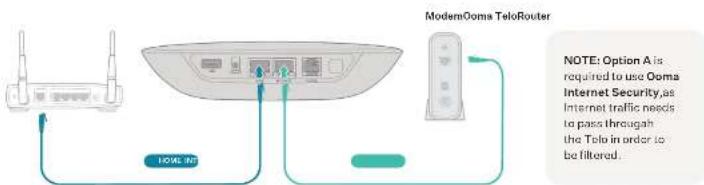
text_image
ModernOoma TeloRouter NOTE: Option A is required to use Ooma Internet Security,as Internet traffic needs to pass through the Telo in order to be filtered. 100% SDOPT.B Install Telo between modem and PC
If you only have one computer and it is connected to your modem, use this option.
1. Find the Ethernet cable that connects your modem to your computer.
2. Unplug the modem end and plug it into the HOME port of the Telo.
3. Use the included Ethernet cable and connect the INTERNET port of the Talo to your modem.
4. Reboot your modem and computer.
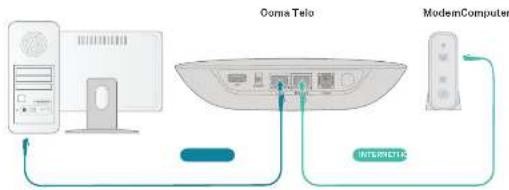
text_image
Ooma Telo ModemComputer INTERNETICSFax and Home Wiring Setup Options
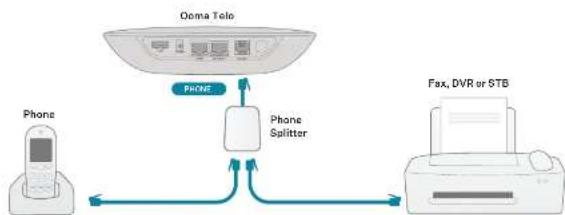
Connecting your Fax
A standard phone splitter can be used to connect more than one device to the PHONE port.
To learn more, visit: www.ooma.com/fax
flowchart
graph TD
    A["Qoma Tele"] -->|PHONE| B["Phone Splitter"]
    B --> C["Fax, DVR or STB"]
    D["Phone"] -->|PHONE| B
    B --> E["Printer"]
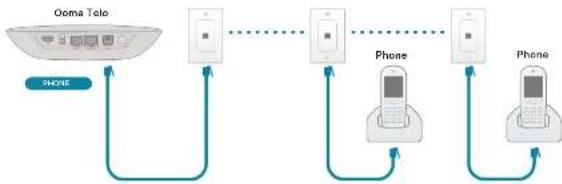
Connecting Your Phone Jacks
You can link the Ooma Telo to the phone jacks in your home, allowing you to connect phones in multiple rooms.
flowchart
graph LR
    A["Ooma Tolo"] -->|SPONE| B["Phone"]
    B --> C["Phone"]
    C --> D["Phone"]
    D --> E["Phone"]
    E --> F["Phone"]
    F --> G["Phone"]
    G --> H["Phone"]
    H --> I["Phone"]
    I --> J["Phone"]
    J --> K["Phone"]
    K --> L["Phone"]
    L --> M["Phone"]
    M --> N["Phone"]
    N --> O["Phone"]
    O --> P["Phone"]
    P --> Q["Phone"]
    Q --> R["Phone"]
    R --> S["Phone"]
    S --> T["Phone"]
    T --> U["Phone"]
    U --> V["Phone"]
    V --> W["Phone"]
    W --> X["Phone"]
    X --> Y["Phone"]
    Y --> Z["Phone"]
    Z --> A

IMPORTANT: The PHONE port on the back of your Ooma Telo is not designed or filed for connecting to your phone company's wiring, whether through the phone is in your home or otherwise. To avoid the risk of fire and/or electrical shock, you first completely disconnect the phone company's wiring outside of your house at the phone wiring inside of your house. Do not plug your Ooma Telo into your home jacks before doing this. Please visit ooma.com/homedistribution before you need with connecting your Telo in this manner.
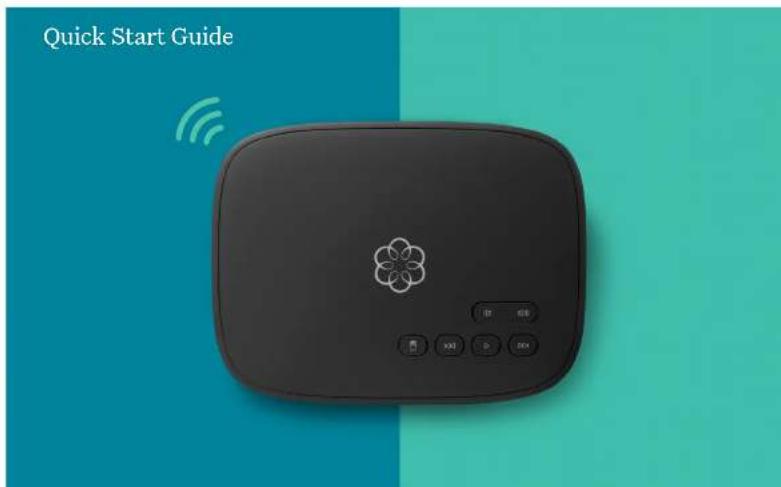
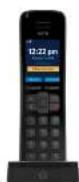
Ooma Telo Air 2
natural_image
Black rectangular device with a flower-shaped icon and control buttons (no readable text or symbols)Table des matières
Pour commencer....30
Obtenez l'application de configuration Ooma....31
Download on the App Store

ASSETS-APP ON Google play