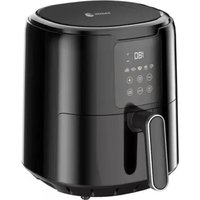
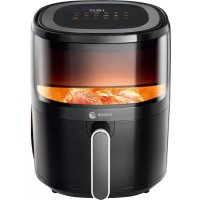
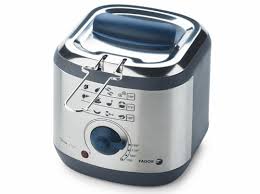
USER MANUAL FG403 FAGOR
MANUEL D'INSTRUCTIONS
CONSERVEZ CES INSTRUCTIONS
SAVE THESE INSTRUCTIONS
For Household Indoor Use Only
IMPORTANT!
- Always place the deep fryer on a stable surface and keep all flammable materials away.
- Make sure that the deep fryer is not near or on a switched plate.
- Make sure that the voltage indicated on the rating plate is followed before connecting the unit to the mains supply
- Before you use the deep fryer it must be filled with the required amount of oil or fat.
- Never use the deep fryer without oil or fat because this could damage the unit.
- Never move the deep fryer during use. The oil becomes very and you can get burned. Wait to move the deep fryer until has cooled off.
- Never immerse the control and heating element in water and don't clean these parts under running water.
- Never switch on the deep fryer if it is not filled with oil or
- Only use oil or fat that does not foam and is suitable for fr
- Do not put oversized food into the deep fryer.
- Please see the Frying Tips for information on the quantities c each food items to be fried.
- Hot steam is released during frying. Keep a safe distance away from the steam to avoid burns and other injuries.
- Disconnect the mains plug and allow the oil or fat to cool down
- Do not move the deep fryer until it and its contents have cooled down
- Do not use attachments not included in the appliance.
- Keep the appliance away from children.
- Do not place the appliance near a gas stove or electric burn
in a heated oven.
-
Do not use outdoors or for commercial purpose
-
Never overheat the oil/fat otherwise it catches fire. Never use water to extinguish a cooking oil fire.
-
Never leave the deep fryer unattended while in use. Always ensure the safety of children if they are near the deep fryer
-
If the deep fryer and/or cord are damaged, they must be rep by a professional service department.
-
Do not try to repair the unit by yourself, neither to replace a damaged cord. This requires special tools.
-
Be sure not to damage the heating element. (Do not bend o dent.)
-
The electrical component is equipped with a safety cut off, wl ensures that the heating element can only function when the element is correctly placed on the fryer.
-
If the supply cord is damaged, it must be replaced by the manufacturer, its service agent or similarly qualified persons in order to avoid a hazard.
-
The appliance is not intended to be operated by means of a external timer or a separate remote-control system.
-
The appliance must not be immersed in water.
-
This appliance shall not be used by children from 0 year to years. This appliance can be used by children aged from 8 and above if they are continuously supervised. This appliance can be used by people with reduced physical, sensory or me capabilities or lack of experience and knowledge if they have been given supervision or instruction concerning use of the appliance in a safe way and understand the hazards involved. Keep the appliance and its cord out of reach of children age than 8 years. Cleaning and user maintenance shall not be m by children.
-
Cooking appliances should be positioned in a stable situation with the handles (if any) positioned to avoid spillage of the liquids.
-
This appliance is intended to be used in household and similar applications such as:
-
staff kitchen areas in shops, offices and other working environments;
- farm houses;
- by clients in hotels, motels and other residential type environments;
-
bed and breakfast type environments.
-
For details on how to clean surfaces that come into contact foodstuffs or oil, refer to the "Cleaning and maintenance" sec below.

SURFACES ARE LIABLE TO GET HOT DURING USE.
BEFORE USE
First read carefully all instructions before use and retain for later reference.
Before first use, remove the packing materials; tear down the protection films on the lid, outer case (Pls. pay attention to environment protection!). Then, wash the accessories and the inn pan in warm water. Dry well before use. Make sure that the e parts remain dry. The deep fat fryer is equipped with a multi-fu display screen and indicator lamps. The "open" frying system ensures excellent professional results and easy cleaning.
Plug this appliance into an earthed socket only.
This instruction also can get from our after sales service.
This type of fryer may only be used with oil or liquid not suitable for use with solid fat. Solid fat may contain which can cause hot fat to be sprayed out when heated
- Never switch on the deep fryer without oil or fat, as this cd damage the machine. Also, do not place any other liquids such water or other substances in the pan.
- Place the deep fryer on a dry, stable surface.
- Since the deep fryer becomes hot during use, make sure that not too close to other objects.
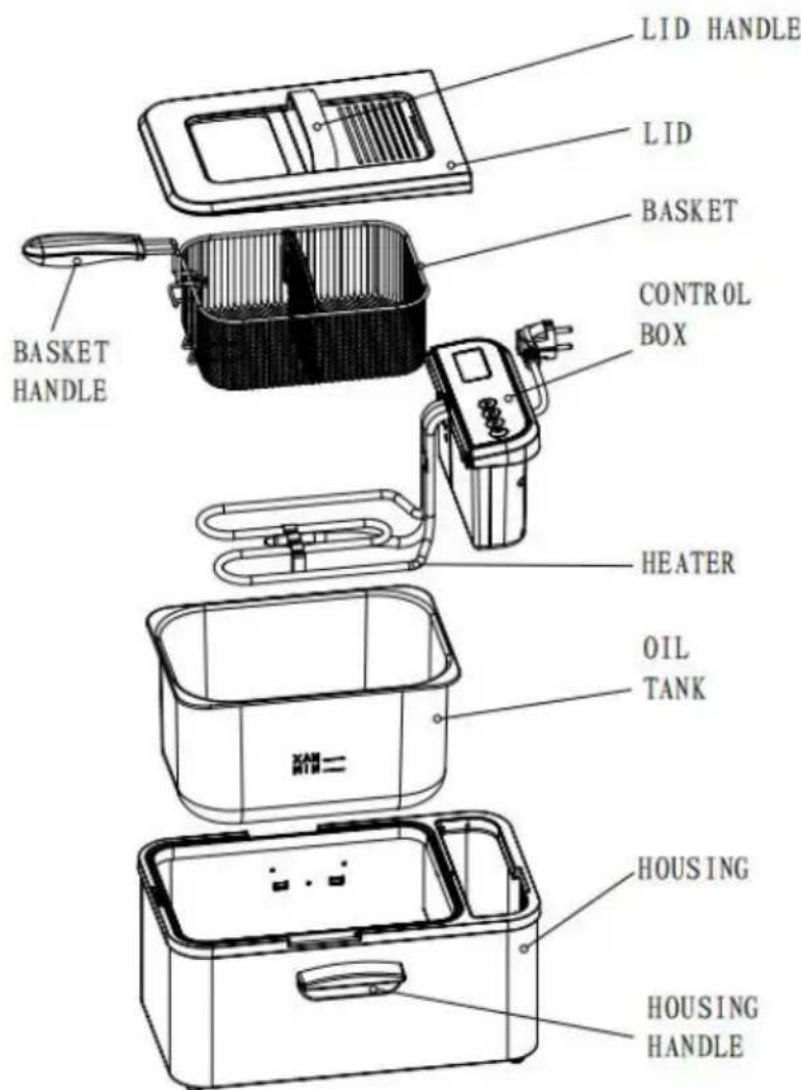
- Remove the lid from the deep fryer and take out the access
- Fill the deep fryer with the desired amount of oil or fat. Ma that it is filled not less than minimum level and not higher than maximum level as indicated on the inside of the appliance. For results, we recommend that you do not mix different kinds of o together.
- Choose the temperature, which is suitable for what you are Consult the temperature table.
- Use the handle to place the basket in the deep fryer.
- Place the food to be deep fired into the basket.
- For best results, put dry food into the basket.
- Lower the basket into the oil slowly to prevent excessive bubbling.
- Raise the basket again when the frying time has elapsed.
- Remove the plug from the outlet.
- Rinse the handle and the basket after use, and dry thorough
- Once the deep fryer has completely cooled off, you can report the basket in the appliance and store it. Store the deep fryer, lid close, in a dark, dry place. In this way, you can leave the the basket in the deep fryer when storing.
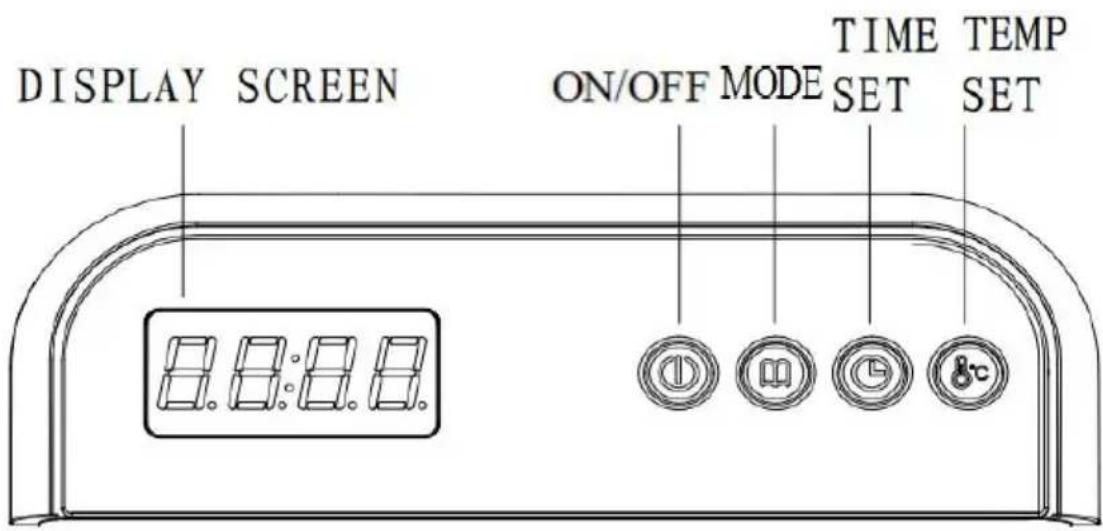
Operation Instruction
Blue light keep on : the function is in use.
On / Off button: power on, switch on and off, confirm your
selection.
Mode button: Program setting (5 to choose).
Timer button: setting the time.
Temperature button: setting the temperature.
Display screen: display of operations in progress.
2. Operation:
2.1 Standby Mode:
The deep fryer will emit a single "beep" for 1s. Here the ON/OFF light will flash and the display will show "P001". The Mode light will also flash.
2.2 Selecting Modes:
2.2.1 Press the “Mode” button in standby mode to make a mode selection. The blue Mode light will flash. The display will show “P001-P005”. Press it again and the display will show “P001”.
Note: Each mode has a matching preset time and temperature, please check the section "Pre planned Recipe".
2.2.2 Press the "Temp" button in standby mode. The display will show the preset temperature and the corresponding blue temp indicator light will turn on. Press the "Temp" button once to increase the temperature by 5^ . Use the "Temp" button to adjust the temperature from 110^ to 190^ . When the temperature selection reaches 190^ , press the "Temp" button again and the temperature will revert back to 110^ .
2.2.3 Press the "Time" button in standby mode and the display will show the preset time and the corresponding blue time indicator light will turn on. Press the "Time" button once to increase the time by 1min. Use the "Time" button to adjust the time from 1(mini min) to 99(max min). When the time selection reaches 99min, press the button again and it will revert back to 1min.
Throughout the whole process, The digital screen will show 0.5s flash in both the start and stop operation
2.3 Starting: preheating phase
2.3.1 After selecting your chosen mode, press the ON/OFF button and the display will show the current oil temperature. Here the power light and the heating indicator light will turn on. The deep fryer now begin heating process.
2.3.2 During the heating process, press the "Mode" button. Notice that there is no change on the display or the setting. Press the "Time" and the display will show the preset time. Press the "Temp" button show the preset temperature.
2.4 Waiting Mode:
Once the oil reaches the preset temperature then the deep fryer will "beep" (beep 0.3s, stop 0.3s). The display will now show the current temperature. Should the deep fryer be left without any selection for then it will automatically switch to standby mode.
2.5 Frying Mode:
2.5.1 After entering waiting mode, press the ON/OFF button. The deep fryer will stop "beeping". The display will show the preset time and down. Time precision requirements ± 3% .
2.5.2 During the frying process, press the "Time" button and the display will show the preset time. Here the time light will glow. Pres "Temp" button and the display will show the preset temperature. Sho the deep fryer be left without any selection for 5s then it will automatically switch to the countdown timer.
2.5.4 Once the deep fryer has reached the end of its preset time, it emit ten "beeps"(beep 2s, stop 1s). It will stop heating up. The disp will show the last set state and switch to setting mode.
2.5.5 Press the ON/OFF button when the fryer is working and the defryer will stop the heating process. The display will show the default code and switch to setting mode.
(Pleaseserefertothedetailed recipeat theendofthismanu
Mode 1: 190 °C temps 2 min Tempura of vegetables
Mode 2:180 ^ C temps 3 min Donut
Mode 3 : 170 °C temps 4 min Fish and Chips
Mode 5: 150 °C temps 10 min Fresh french tank n°1 (tank modes 2)
| MODEL | TEMP (°C) | TIME (min) |
| 1 | 190 | 2 |
| 2 | 180 | 3 |
| 3 | 170 | 4 |
| 4 | 160 | 9 |
| 5 | 150 | 10 |
FRYING TIPS
- Use a maximum of 250 grams of French fries per liter of oil
- With deepfreeze products, use a maximum of 100 grams because they quickly cool off. Shake deepfreeze products about the sink to remove excess ice.
- When using fries made from fresh potatoes: dry the fries after
washing so that no water will go into the oil.
FRYING TABLE
| Type of food | Frying temperature°d) |
| Pre-fry chips | 180 |
| Final fry chips | 190 |
| Fondue parmesan | 170 |
| Cheese croquettes | 170 |
| Meat/fish/potato croquettes | 190 |
| Fish | 170 |
| Fish sticks | 180 |
| Cheese fritters | 180 |
| Donuts | 180 |
| Meat croquettes | 190 |
| Chicken | 160 |
| Scampi fritters | 180 |
TO REPLACE THE OIL
Make sure that the deep fryer and the oil have totally cooled (before replacing the oil (remove the plug from the socket!). Rep the oil regularly. This is definitely necessary if the oil becomes or takes on a different odor. In any case, replace the oil once every 10 times' usage. Replace the oil all at once; do no mix new oil. Discarded oil is a burden to the environment. Do not the normal rubbish bin, but follow the guidelines of the municipal waste collector in your area.
CLEANING AND MAINTENANCE
- Clean the deep fryer on both the inside and outside regularly
- Clean the outside of the deep fryer with a damp cloth and on a soft, clean cloth.
- Never use abrasive cleaners or sponges.
- The basket and the handle can be cleaned in warm, soapy \ Dry well before using again.
- When replacing the oil you can also clean the inside of the fryer. Empty the deep fryer and first clean the inside with a towel and then with a cloth dipped in soapy water. Then wip a damp cloth and allow drying thoroughly.
- All components, with the exception of the electrical parts, may cleaned in warm soapy water. Dry thoroughly before use.
- Dishwasher cleaning is not recommended.
TECHNICAL DATA
Operating voltage
| Model | Volume | Power |
| FG403 | 4.2L | 230V~50/60Hz,3000W |
PRE-PLANNED RECIPES
- PROGRAM P1
TEMPURA OF VEGETABLES
Program: P1 - 190 ° C - 2 min
Ingredients:
Zucchini: 8 pieces
Flour with tempura: 150 g
Water: 6 cl
- Pepper mill: 5 laps
- Fine salt: 6 pinches
- Cooking oil: 2 cl
- STEP 1: Wash all vegetables and peel them. Cut zucchini and carrots small sticks.
- STEP 2: Mix the water and flour with tempura. Heat the fryer to 190
- STEP 3: Dip the vegetables in the tempura dough, drain them to remove excess dough and fry for 2 minutes. Once the vegetables are colored, put them on an absorbent paper, salt and pepper them immediately.
PROGRAM P2
DONUT
Program: P2 - 180 ° C - 3 min
Ingredients:
Wheat flour: 700 g
Baker's yeast: 20 g
- Egg: 2 pieces
Butter: 80 g
- Sugar powder: 40 g
- Ice sugar (for fine dusting)
1/2 skimmed milk: 15 cl
Water: 14 cl
- Fine salt: 1 pinch
- Cooking oil: 1 l
-
STEP 1: Put the butter to melt. In a large salad bowl, combine the fl and sugar. Dig a well in the center and pour in milk, water and crumbled yeast and eggs (the yeast can also be diluted with water lukewarm milk). Mix everything with a spatula until a ball of homogeneous dough is formed. Knead for a few minutes to make dough soft and elastic. Then cover with a clean cloth and leave t at room temperature for 1 h 30.
-
STEP 2: Lay the dough on a lightly floured work surface, flatten it with palm of your hand and then gently spread it with the rolling pin in thickness of about 1cm . Then cut out discs with a punch of 4~t in diameter. Cover with a clean, slightly damp cloth and allow to 30 minutes to 1 hour.
-
STEP 3: Heat the oil: a small piece of dough immersed in it must rise immediately without browning too quickly. Fry then the donuts by 2 in each side of the basket (basket divided into 2). As soon as the browned on one side, turn them over to cook the other side. The them on sheets of absorbent paper.
-
STEP 4: Before serving, sprinkle with powdered sugar or icing sugar.
PROGRAM P3
FISH AND CHIPS
Program: P3 - 170 ° C - 4 min
Ingredients:
Cod fillets (or haddock): 150 g x 5
- Egg: 2 pieces
-
Blond beer: 20 cl
Sunflower oil / frying: 4.5 I
Flour: 200 g
Salt
Pepper
-
STEP 1: Pour the flour into a salad bowl, add the eggs, salt and pep Whisk and pour the beer gradually to obtain a smooth paste. Boom min.
- STEP 2: Salt and pepper the fish fillets and lightly flour them.
- STEP 3: Immerse the pieces of fish in the batter.
- STEP 4: Then dip 2 to 2 (1 in each tray) into the fryer.
Serve with fries.
PROGRAM P4
CHICKEN DIPS
Program: P4 - 160 ° C - 9 min
Ingredients:
Aiguillettes / pieces of chicken breasts: 10
- Egg: 1 piece
Flour: 100 g
A bit of milk
Frying oil: 4.5 I
- Paprika powder: 1 tbsp.
Dried onion: 1 tbsp.
Dried garlic: 1 tbsp.
Dried oregano: 1 tbsp.
Pepper
Salt
- STEP 1: Make the spicy breadcrumbs in a dish by mixing flour, salt and pepper, garlic, onion and dried oregano and paprika powder. In a deep pour the milk and break the whole egg. Beat the mixture.
- STEP 2: To have a crispy breading, pass the chicken in the flour, the egg / milk mixture and again in the flour.
- STEP 3: For cooking, heat frying oil to 160^ C. Dip the chicken pes minutes (P4).
- STEP 4: Once the drumsticks are golden brown, remove them from the and place them in a dish on a few sheets of absorbent paper to remove oil. Serve hot.
- PROGRAMS P5 AND P2
FRESH FRENCH
Programs:
P5 - 150 ° C - 10 min
P2 - 180 ° C - 3 min
Ingredients:
Potatoes: 1 kg
Sunflower oil / frying: 4.5 I
Salt
- STEP 1: Wash and peel the potatoes.
- STEP 2: Cut them into quarters.
STEP 3: Immerse them in the 1st oil bath: 10 min at 150^ C
- STEP 4: Take out the basket, wring out, reserve 30 min.
STEP 5: Immerse them in the 2nd oil bath: 3 min at 180^ C
REMOVAL OF APPLIANCES USED

Directive 2012/19/EU on waste electrical and electronic Equipment (WEEE) requires that the appliance uses are not disposed of using the normal municipal waste Old appliances must be collected separately in order optimize the recovery and recycling of materials they
contain and reduce the impact on human health and the environment.
The symbol of the dustbin is used on all products to remind the obligations for separate collection. Consumers should contact their local authorities or dealer regarding the steps to follow for the removal of their old appliance. If you proceed with the scrapping old equipment, be sure to render useless what could be dangerous disconnect the power cable flush with the device.
Danger:
Never attempt to use your appliance, if it shows signs of damage the power cord or plug is damaged. If the power cord is defective important to have it replaced with the after sales service to eliminate any danger.
Only qualified and authorized persons are authorized to carry out repairs to your appliance. Any repairs not in accordance with standards could significantly increase the level of risk for the us Defect resulting from improper handling, degradation or attempted repairs by third parties voids the warranty on the product. This applies in case of normal wear and accessories from the applia
Important!
We recommend that you keep the packaging of your device at
for the duration of the warranty. The guarantee does not apply without the original packaging.
Warranty:
Your device has two years warranty. The warranty does not cover wear and breakage following a wrong use of the product. The customer is responsible for all returns. You remain responsible for the costs and risks associated with the product shipment; it is therefore recommended to ship the product with an acknowledgement of receipt and transport insurance in case of significant value of the product.
KEEP OUT OF REACH OF CHILDREN
Children should be supervised to ensure that they do not play the appliance.
FAGOR

EUROMENAGE
20/22Ruedelafermesaintladre
95470SAINTWITZFRANCE
C E