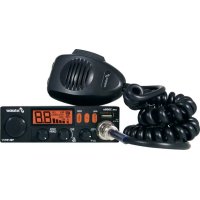
xm 3004e VOX 1224 - Radio STABO - Free user manual and instructions
Find the device manual for free xm 3004e VOX 1224 STABO in PDF.

User questions about xm 3004e VOX 1224 STABO
0 question about this device. Answer the ones you know or ask your own.
Ask a new question about this device
Download the instructions for your Radio in PDF format for free! Find your manual xm 3004e VOX 1224 - STABO and take your electronic device back in hand. On this page are published all the documents necessary for the use of your device. xm 3004e VOX 1224 by STABO.
USER MANUAL xm 3004e VOX 1224 STABO
Please read this booklet carefully to make yourself familiar with the various functions of your radio set.
C Charlie J Juliett Q Quebec X X-ray
D Delta K Kilo R Romeo Y Yankee
E Echo L Lima S Sierra Z Zulu
F Foxtrot M Mike T Tango
G Golf N November U Uniform
QRA: Mein Stationsname ist...
1 ON/OFF - Volume (volume control with On/Off switch)
2 SQUELCH (squelch)/ASC(Automatic Squelch Control)
3 Channel selection rotary switch (or UP/DOWN keys on microphone)
4 Display screen
5 Press once mode select modulation type AM/FM Press and hold ANL automatic noise limiter
6 F key
7 Microphone socket (6-pin)
8 Emergency key can be freely assigned
Press once first press EMG1
second press EMG2
Press and hold Change configuration
9 VOXkey VOX Switch on/off
10 PTT key
11 UP/DOWN keys Press once channel selection on microphone Press and hold SCAN channel search
A Power supply (12/24 V)
B Antenna connection (SO-239)
C Connection for external speaker (2 W, ∅ 3.5 mm)
D Connection for optional VOX microphone (∅ 2.5 mm)
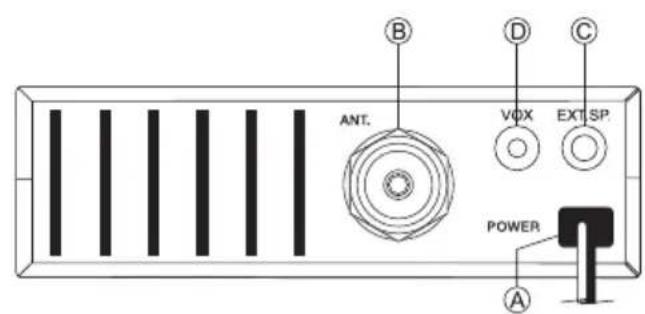
text_image
ANT. VDX EXT SP. POWER A B C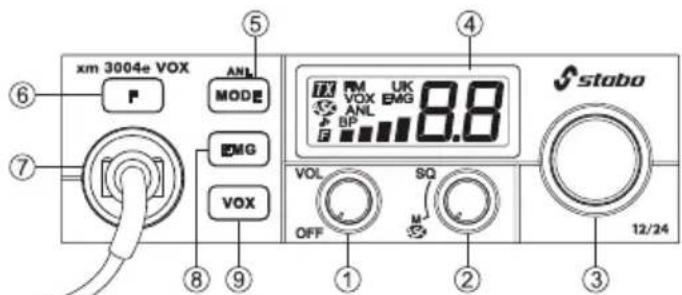
text_image
xm 3004e VOX ANL MODE EMG VOX VOL OFF SQ M 12/24 4 ④ ⑤ ⑥ ⑦ ⑧ ⑨ ⑩ staboDisplay (when activated)

Transmitting
FM
AM mode
FM
FM mode
UK MPT 1382 mode
VOX VOX function
EMG Direct access to channel 19 or 9

Automatic Squelch Control
ANL ANL Noise limiter

ROGER BEEP function
BP KEY BEEP function

MENU mode

Adjusted channel

In mode RU carrier offset -5 KHz (T0)

Strength of transmitter/receiver
Welcome to the fascinating world of CB radio and congratulations on your new stabo xm 3004e VOX 12/24 CB radio. You have opted for a user-friendly top device with numerous additional functions which can be used both in the car and as a fixed station at home. It is also characterised by simple operation and a robust construction.
Please read the operating instructions carefully and in full so that you can get the most out of all of the options of your stabo xm 3004e VOX 12/24. Pay particular attention to the instructions for connection and installation. We hope you have a lot of fun with your stabo xm 3004e VOX 12/24 and many pleasant radio calls.
Product description / Proper use
The stabo xm 3004e VOX 12/24 is a mobile CB radio device for installation in motor vehicles. Using a suitable power unit, the device can also be used as a fixed station. You have opted for a user-friendly top device with numerous functions:
Functions
Vox function switchable (5 levels)
Energy-efficient 12/24 V operation without switching (no converter required)
Multifunctional LC display (able to select from 7 background colours)
EU Multinorm 40 channels AM/FM
6 switchable frequency tables
ASC automatic squelch control (patented by PRESIDENT)
ANL (Automatic Noise Limiter) (AM), switchable
F function key
AM/FM key mode
EMG key, 2x freely assignable memory
Roger Beep, switchable
Acoustic key acknowledgement (Beep Function)

Important information
Safety notes
- We urgently recommend that wearers of pacemakers first consult a doctor to check whether there are any fundamental concerns with regard to the use of radio equipment and whether any special rules of conduct must be observed.
- Do not under any circumstances touch the antenna when transmitting!
- Before you use the device in a vehicle, it is imperative that you familiarise yourself with the functions and operation! Do not under any circumstances allow yourself to be distracted from the traffic by the use of the device or by radio calls!
● Never transmit without a connected antenna! - Never open the housing of a radio device or the accessories and do not make any modifications. Have repairs carried out by qualified persons only. Modifications or interventions on the radio device automatically render the approval for use and the warranty null and void!
● Prevent children from playing with the radio device, accessories and the packaging material. - Do not use the device if you discover damage to the housing or the antenna: contact a specialist workshop.
- Protect your radio device and the accessories from moisture, heat, dust and strong vibrations. Avoid operating temperatures below -10°C and above +50°C.
Legal regulations
Operating CB radio devices:
In Germany this device is not subject to compulsory registration or fees.
However, in other countries other regulations apply: before using the device abroad, obtain information on the current valid national regulations. Adhere to the respective regulations and register the device as necessary – otherwise you risk incurring heavy fines or even the confiscation of your radio device!
Installing a radio device in a motor vehicle:
For almost all motor vehicles the manufacturer provides installation guidelines for radio devices and antennas: therefore, contact your car dealer for the respective manufacturer guidelines for your vehicle model. When installing, it is imperative that you adhere to these guidelines as the approval for use for your vehicle can otherwise be rendered null and void!
Use of voice radio in the vehicle:
Whereas the driver of a motor vehicle is only permitted to use mobile phones with hands-free equipment or with the vehicle motor shut off, the German "StVO" (highway code) includes an explicit exception for radio devices up until 30 June 2020 (before travelling abroad, obtain information on any different regulations which may apply!). With activated hands-free equipment (VOX), the radio device will fulfil the regulations from 1 July 2020. However, only use your device if the traffic conditions allow it (see also safety notes)!
In the box
CB radio device
Electret microphone with up/down function
Mounting bracket and fastening screws
Microphone mount
Operating instructions
Installation
Installation in the car
a) Adhere to the instructions provided by your motor vehicle manufacturer.
b) Make sure that all cables and connection lines are routed through the vehicle without any problems. Do not route cables in the vicinity of the heater!
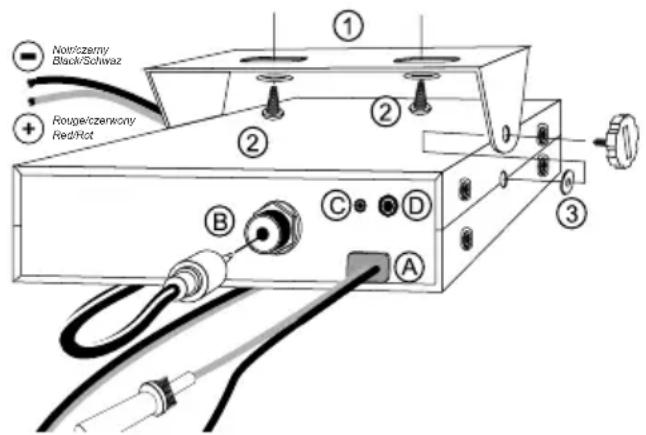
c) Fasten the mounting bracket (1) (see fig.) in a suitable position using the self-taping screws (2) (diameter of the drilled hole: 3.2 mm). Make sure beforehand that the fastening will not damage any lines inside the car! The mounting bracket should be fitted in a suitable position which allows the radio device to be fastened firmly and securely with as little vibration as possible.
d) Select a place for the microphone mount in which the microphone is close to hand at all times and does not get in the way of its connection cable to the radio device.

Note: If there is so little space available for installation of the radio device that the sound emitted from the speaker (on the base of the radio device) is obstructed, you should install an external mobile speaker, as available in the stabo range of accessories. It is connected to the EXT.SP socket (C) at the rear of the radio device, shutting off the internal speaker automatically in the process.
text_image
Noticzerny Black/Schwaz Rouge/czenwory Red/Rot ① ② ③ B C D AConnecting the antenna
Selecting the antenna:
In CB radio the following applies: the better the antenna the greater the range of the station. Make your choice based on the following recommendations.
Mobile antenna:
Tuned and tunable antennas are available.
Tuned antennas should only be mounted on a large metal surface, for example on the car roof or on the boot lid.
In the process, make sure that there is a short connection to ground.
If you drill a hole in the bodywork for the antenna, the sheet metal must be sanded down flat to do so in order for the fastening screw and the seal to rest properly in place.
Route the coaxial cable so that it is not kinked and does not rest on sharp edges (otherwise: risk of short circuit!)
Fasten the antenna cable to the connection (B).
Fixed station antenna:
With a fixed station antenna you achieve the maximum range for your radio device. For outdoor antennas it is imperative that you adhere to the valid VDE regulations (lightning protection!), structural analysis and building legislation! Ideally, in this case you should have the antenna system installed by a specialist.
The stabo range of accessories includes the ideal fixed station antenna.

Tuning the antenna
Do not under any circumstances transmit without the antenna as this will destroy the device.
Tuning the antenna means that your antenna is adjusted to the output impedance of the transmitter, i.e. 50 .
The actual wave impedance of the antenna does not only depend on its length but also on the environment in which it is installed. Therefore, the manufacturer can only supply a roughly tuned antenna. In general it is constructed so that there is always enough margin for calibration to the existing conditions. In practice this means that a new antenna is usually too long.
To tune, loop in a VSWR testing bridge (e.g. President TOS-1, art. no. 50004) between the stabo xm 3004e VOX 12/24 and the antenna and shorten or extend the antenna in accordance with the manufacturer's specifications so that the VSWR is as low as possible on your favourite channel or one of the middle channels. To do so, set FM modulation in order to work with a constant transmission power when measuring.
You should in any case achieve a value of ≤ 1:2.0. However, it is not of any use to aim to set a value of 1:1 for mobile operation as other environments, changes in the cable etc. can change this value again anyway. We do though recommend that you check the tuning regularly because a poor value is an indication of problems with plug connectors and cables.
Power supply
Your radio device is supplied with a maximum of 26.4 volts DC voltage. It is equipped with reverse polarity protection.
Nevertheless, you should make sure that the polarity is correct! Reversing the polarity will destroy your CB radio device.
The supply voltage must not under any circumstances exceed 30 V.
The negative pole is connected to ground (= chassis), like on practically all modern cars.
Before connecting, check the polarity and the voltage: on older cars the positive pole may be connected to ground. In case of any doubt consult a specialist workshop.
Once you have made sure that the voltage and polarity are correct, proceed as follows:
a) You radio device is supplied with a cable for the power supply (A) with a 5 A fuse in the circuit. Connect the free ends of the power supply cable directly to the respective terminals on the battery:
Red = positive pole, black = negative pole (ground).
b) Connect the cable directly to the vehicle battery. If connected, e.g. to the cigarette lighter, the radio device would no longer be supplied with the necessary buffer voltage once the ignition is switched off.
c) Route the power supply cable in the car so that it can absorb as little interference from the ignition system as possible.
CAUTION: If the fuse in the power supply cable blows: a) locate and eradicate the cause, b) replace it with another 5 A fuse.
Always switch off the device before you exit the vehicle so that you do not find an empty battery next time.

text_image
To the engine starter To the chassis
External speaker
The stabo xm 3004e VOX 12/24 is equipped with a connection (C) for an external speaker with an impedance of 8 .
You can connect a speaker with a 3.5 mm mono jack plug to improve reproduction. Install the speaker so that it cannot injure you or your passengers in case of an accident.
Microphone connection
Connect the supplied microphone to the microphone connection at the front left of the device. Make sure that the recess on the plug connector points down.
Country programming (6)
The stabo xm 3004e VOX 12/24 has six different channel configurations.
In Germany this device is not subject to compulsory registration or fees.
Before you use your radio device abroad, familiarise yourself with the regulations in the respective countries and register the device as necessary.
The frequency band and transmission power of your device must match the national regulations in the country in which it is being used.
EU 40 FM (4 W), 40 AM (4 W) ^1)
P_L 40 FM (4 W), 40 AM (4 W) ^2) With a carrier offset of -5 KHz
d 80 FM (4 W), 40 AM (4 W) ^3)
EC 40 FM (4 W) ^4)
U 40 FM/AM (4 W) CEPT 40 FM (4 W) MPT 1382 ^5)
rU 40 FM (4 W), 40 AM (4 W) ^6) With a carrier offset of 0/-5 KHz, switchable
1) Not subject to compulsory registration or fees in BE, CH, CY, DE, DK, EE, IS, LT, LU, NO, PT, SE
Subject to compulsory registration or fees in ES, IT
2) Only permitted in PL
3) Not subject to compulsory registration or fees in DE, CZ, SK
4) Use approved in all CEPT states, subject to compulsory registration in individual countries
5) Only permitted in GB
6) Permitted in Russia
In order to switch the configuration, proceed as follows:
- Switch off the radio device.
- Press and hold the F key while you switch on the device.
- The previously used channel configuration then flashes on the display screen.
- Now select one of the six configurations using channel switch 3.
- Press and hold the F key for approximately 1 second until the display stops flashing.
- Switch the device off and back on again.
The device is then ready for operation with the new channel configuration.
Operation
Operation of the stabo xm 3004e VOX 12/24 is practically self-explanatory. After establishing all connections, switch your CB radio device on using the left control knob 1 (OFF/VOL) which also regulates the volume. The display should now light up. If the display screen remains dark, check the power supply and the fuse. You must be able to hear noise from the speaker. If this is not the case, check whether the microphone is connected and turn the middle control knob 2 (SQ) anti-clockwise until you hear noise.
KEY BEEP Acoustic key acknowledgement (11)
Key Beep is activated by switching on the device while pressing the DN key 11. BP is shown on the display screen to indicate that the Key Beep function is switched on, and all operating inputs on the device are confirmed by a short beep sound.
ROGER BEEP (11)
Roger Beep is activated by switching on the device while pressing the UP key 11. A ♪ is shown on the display screen to indicate that the Roger Beep function is switched on. A short beep sound is made when you release the PTT key. This signals to the conversation partner that he/she can now transmit.
Reception
Channel selection (3)
You can set the desired channel that you want to listen to using the right large rotary switch (channel switch) 3.
Squelch (2)
The stabo xm 3004e VOX 12/24 has a circuit for noise suppression (squelch) which suppresses the reproduction if the signal is missing or too weak. The signal level at which the circuit takes effect is set using the SQ control 2. Turn to the left to reduce this level. Turn to the right to increase it.
In case of variable reception conditions, such as in mobile operation, it may be necessary to readjust regularly.
ASC (Automatic Squelch Control) (2)
ASC is a circuit patented by Groupe President Electronics SA, France. This circuit analyses what is referred to as the signal-to-noise ratio (ratio of the desired signal to the interference signal). The desired signal is only connected to the speaker if it is worthy of reception, i.e. largely noise-free. Constant readjustment, as is often necessary with the field strength-based squelch circuit, is therefore no longer necessary, which is beneficial for road safety. ASC can be used with AM and FM. This is activated and shown on the display when the squelch control is in the leftmost stop position.
VOX (9)
VOX is an automatic, voice-controlled transmit/receive switcher.
When VOX is switched on, you can transmit hands-free. You do not need to press the microphone transmit key in VOX mode.
Position the microphone at a max. distance of 40 to 50 cm and avoid loud ambient noises in order to prevent unintentional transmission.
VOX is switched on and off by pressing the VOX key 9 once. VOX is shown on the display screen to indicate that VOX is activated.
The response sensitivity of the VOX can be adjusted in five steps.
Changing the sensitivity:
Switch on VOX by pressing the VOX key once. VOX flashes.
Now press the F key once, F and VOX will flash.
Press the VOX key again once and the level set will be displayed.
Select the desired level (L1 (high sensitivity = low threshold) to L5 (low sensitivity = high threshold) using the channel switch or the UP/DN keys.
Save the setting by pressing the PTT key until you hear a beep.
The sensitivity setting depends on the volume of your voice, the positioning of the microphone and the ambient noises.
In order for VOX to work you must set squelch correctly or switch on ASC.
Open squelch or ASC blocks VOX while a signal is being received and the VOX display flashes.
VOX is reactivated after approximately one second once squelch or ASC has been closed.
This prevents unintentional transmissions caused by the reception signal.
The activated VOX function can only transmit if squelch or ASC is activated.
MODE Modulation types AM/FM (5)
In program positions 40/40 and 80/40 you can operate in both FM and AM. Your preferred modulation type of the two depends on your conversation partners and your own requirements. However, bear in mind that there is compulsory registration for AM operation in many countries!
In general, frequency-modulated signals (FM) are less sensitive to interferences from ignition sparks etc. than amplitude modulated signals (AM). If you hear an unintelligible, distorted sounding signal in the speaker, it is advisable to try to receive using another modulation type.
To change the modulation type, press the MODE key 5 once. The modulation type is shown on the display screen as AM or FM. Switch between AM, FM and FM UK in frequency band U.
ANL (Automatic Noise Limiter) (5)
The device is equipped with an automatic noise limiter.
Press and hold the MODE key 5 to switch the ANL on/off. ANL is shown on the display screen when it is activated.
Note: The ANL only works in AM mode.
EMG (8)
To change the EMG configuration, press the EMG key once, then the EMG is shown in the display.
Then press and hold the EMG key, EMG flashes and F is also displayed.
Now select the desired channel with the channel switch or the UP/DN keys and select the desired modulation type by pressing the MODE key.
Press the PTT button once to save the setting. The acoustic signal confirms this.
To change the second EMG configuration, proceed in exactly the same way.
Setting the -5 KHz carrier offset in RU mode
In RU ( U ) mode, T0 ( E.O ) is the standard setting.
To enter the carrier offset setting, press and hold the F key until T5 ( E ) appears, then release. To return to the standard setting, press the F key again until T0 ( E ) appears, then release.

Signal level
The bar display to the left of the channel display indicates the signal level in S levels when receiving. S-values of 3, 5, 7 and 9 are displayed.
Transmitting
To transmit, press the PTT key (push-to-talk key) (10) on the left-hand side of the microphone and speak into the microphone at a normal volume while you hold the key. Do not speak too loud. This way your voice will sound natural on the outstation. It is advisable to try it once and receive a modulation report. Please do not forget that you should not transmit without a connected and tuned antenna as your radio device will otherwise become damaged.
Wait for a moment before you begin transmitting in order to hear whether the channel is free so that you do not "double-up" with another station. Also bear in mind that the transmitter takes a certain amount of time to start up. Therefore, do not start talking immediately but rather wait for a second.
TOT (timeout timer)
If the PTT key remains pressed for longer than 3 minutes, the transmission ends automatically and the channel display flashes.
Power display
When you press the PTT key, the bar display indicates the relative output power of the transmitter instead of the S-value. In AM mode more or fewer bars are displayed depending on the modulation.
Colour of the background lighting
This function allows you to select the colour of the display background lighting.
- Switch on the device while pressing the MODE key 5 at the same time. The letters associated with the current colour flash.
- Turn the rotary switch 3 or press the UP/DN keys 11 on the microphone to select the colour. The 7 colours available are displayed one after the other:
- Press the transmitter/PTT key 10 to confirm and exit. If the key acknowledgement tone is activated, a long acoustic signal confirms that the operation was successful (see section key acknowledgement tone on page 21).
orange green blue cyan yellow violet light blue Or Gr bl C E PU CL y y
- If a key hasn't been pressed for 5 seconds, the device exits the colour setting automatically without saving the setting.
The default colour is: Or (orange).
Reset
Switch on the device while pressing the EMG key. -5 flashes in the display.
Press the F key until a beep sounds. -5 stops flashing.
Now release the F key and the device restarts automatically with the factory setting.
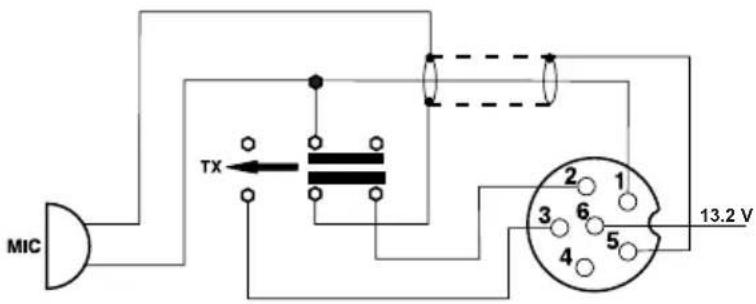
Configuration of the microphone plug connector (six-pin)
1 Modulation
2 -
3 TX
4 -
5 Ground
6 Power supply
Technical data
text_image
MIC TX 13.2 VGeneral
Channels: 40 (80)
Operating modes: AM/FM
Frequency range: 26.565 MHz to 27.99125 MHz
Antenna impedance: 50 ohms
Supply voltage: 13.2 / 26.4 V DC voltage
Dimensions (WxHxD): 115 x 35 x 165 mm
Weight: approx. 0.6 kg
In the box: CB Radio device,
hand-held electret microphone with mount, mounting bracket, mounting material
Transmitter
Frequency stability: +/- 600 Hz
Transmission power: 4 W AM / 4 W FM
FM deviation: ≤ 2 KHz
Modulation depth: ≥ 85%
Spurious emissions: Under 4 nW (- 54 dBm)
Frequency response: 300 Hz - 3 KHz in AM/FM
Adjacent channel power: Under 20 μW
Microphone sensitivity: < 3 mV
Power consumption: 2 A max.
Receiver
Sensitivity (20 dB SINAD): ≤ -107 dBm
Frequency response: 300 Hz - 3 KHz
Adjacent channel selection: 60 dB
LF output power: 2 W
Squelch sensitivity: minimum < 1 V
Image frequency suppression: 70 dB
Power consumption: 300 mA nominal /750 mA max.
In case of problems
You cannot transmit or can only transmit in poor quality:
Check the standing wave ratio of your antenna and the supply line for any breaks or loose contacts.
Check whether the microphone is connected properly and that the connection does not have any loose contacts.
When you press the transmit key on the microphone, TX must be displayed and your transmitter must transmit. When you release the key, this display must disappear again and your radio device must switch to receiver again.
You do not receive a response to your transmission or the reception is poor:
Set the SQUELCH controller correctly!
Set the VOLUME controller to a suitable reproduction volume.
Check whether the microphone is connected properly and that the connection does not have any loose contacts.
Check the standing wave ratio of your antenna and the supply line for any breaks or loose contacts.
Make sure that you are using the same operating mode (AM or FM) as your conversation partner!
The displays do not light up:
Check your power unit: is it switched on?
Have you reversed the connections for positive (= RED) and negative (= black)? If this is the case, swap the connections around.
Tips for radio communication:
In order to enjoy uninterrupted radio communication, you should take the following six rules of CB radio to heart:
-
After switching on the device, always listen first to determine whether the channel is free.
-
To do so, open the squelch so that you do not miss stations transmitting with a weaker signal.
-
Only start your own call if the channel is completely free.
-
Only ever transmit brief calls.
-
Listen carefully after every call to hear whether a station responds. Do not repeat the call until you have done so.
-
Always wait a few seconds after each transmission from the outstation before speaking yourself so that other stations can also respond ("switchover pause").
Call channels
We recommend the following call channels:
Channel 1 (FM) as call channel in FM,
Channel 4 (AM) as call channel in AM,
Channel 9 (AM) as emergency channel and trucker channel
Channel 19 (FM) as long distance driver channel abroad
It is of course possible to deviate from this.
In case of poor connections or heavy interference it is often problematic to properly transmit words which are difficult to understand, such as proper names and place names.
The international spelling alphabet, as used in air traffic (ICAO) and by NATO, helps in this case:
International Phonetic Alphabet
A Alfa H Hotel O Oscar V Victor
B Bravo I India P Papa W Whiskey
C Charlie J Juliet Q Quebec X X-ray
D Delta K Kilo R Romeo Y Yankee
E Echo L Lima S Sierra Z Zulu
F Foxtrot M Mike T Tango
G Golf N November U Uniform
Assessing reception quality
In order to be able to tell the respective conversation partner how loud and clear you are receiving him/her, the numbers of the R/S code are used. The R value ("Radio") stands for readability and the S value ("Santiago") stands for the reception and volume of the outstation.
The letters R and S are abbreviations for the terms "readability" and "signal strength".
R/S code
R = readability
1 Unreadable, unintelligible
2 Barely readable, occasional words distinguishable
3 Readable with considerable difficulty
4 Readable with practically no difficulty
5 Perfectly readable
S = signal level
1 Faint – signals barely perceptible
2 Very weak signals
3 Weak signals
4 Fair signals
5 Fairly good signals
6 Good signals
7 Moderately strong signals
8 Strong signals
9 Extremely strong signals
Abbreviations
CB radio also has its own "specialist language" which features numerous specialist terms which are derived from amateur radio and professional radio communication, for instance.
They are mostly used for relaying messages quickly and clearly, even in cases in which transmission is difficult or subject to interference. The following is a list of common abbreviations and their meanings, as they are usually used in CB radio:
Break: Please wait a moment, I would like to join the conversation
Cheerio: Goodbye
CL: End of radio communication, station being switched off
CQ: General call
DX: Long-distance radio connection
Fading: Signal is fluctuating
Handle: Radio nickname
HI: I'm laughing
Mike: Microphone
Negative: No, I did not understand
OK: Understood, correct, okay
QRM/QRN: Interferences
Roger: I understood, everything perfectly received
Standby: Remain in receive mode
Stereo: Two stations transmitting simultaneously
TVI: Television interference
Q groups
Abbreviations are often used for CB radio communication. Many of them have been adopted from the internationally binding Q code, which is also used in maritime radio or in amateur radio. These three-letter codes are used to relay information quickly. Given that particularly "CB newbies" are not familiar with these abbreviations, we have put together a list of those most commonly used and their meanings in CB radio:
QRA: My station name is...
QRG: Frequency, operating channel
QRL: Occupation, workplace
QRM: Interference from other stations
QRN: Atmospheric interference
QRP: Operating with low power
QRT: End of radio communication
QRU: There are no more messages
QRV: Ready to transmit and receive
QRX: Interruption in radio communication, pause, please wait
QRZ: You are being called, call from a certain station
QSB: Fluctuations in the field strength, losses, fading
QSL: Reception confirmation
QSO: Radio connection, radio conversation
QSP: Relaying by two stations for a third
QST: Message to all users
QSY: Frequency change, channel change
QTH: Location
Dimensions (I x H x P): 115 x 35 x 165 mm
Poids : 0,6 kg env.
C Charlie J Juliett Q Quebec X X-ray
D Delta K Kilo R Romeo Y Yankee
E Echo L Lima S Sierra Z Zulu
F Foxtrot M Mike T Tango
G Golf N November U Uniform
Moc nadawania: 4 W AM / 4 W FM
C Charlie J Juliett Q Quebec X X-ray
D Delta K Kilo R Romeo Y Yankee
E Echo L Lima S Sierra Z Zulu
F Foxtrot M Mike T Tango
G Golf N November U Uniform
6-pin microphone plug
Prise micro 6 broches
The frequenzy band and the transmission power of your transceiver must correspond with the configuration authorized in the country where it is used.
SIMPLIFIED EU DECLARATION OF CONFORMITY
Hereby, stabo Elektronik GmbH declares that the radio equipment type
stabo xm 3004e VOX 12/24
is in compliance with Directive 2014/53/EU.
The full text of the EU declaration of conformity is available at the following internet address:
https://stabo.de/fileadmin/DoC/DoC_RED_xm3004e_VOX.pdf
DECLARATION UE DE CONFORMITE SIMPLIFIEE
Errors and technical modifications reserved.