USER MANUAL Omniblade Face HG2000 REMINGTON
natural_image
Black and white Remington 11 electric toothbrush with no visible text or symbols on the body
Omniblade Face
HG2000
text_image
Technical diagram of a hairbrush with labeled parts including tip, base, and handle
text_image
Technical diagram of a hairbrush with labeled parts including tip, base, and handle
A
natural_image
Illustration of a person applying a medical or cosmetic device to their face, with no visible text or symbols.
B
natural_image
Diagram showing two mechanical components with directional arrows indicating motion or movement (no text or symbols)
C

natural_image
Illustration of a hairpin with a downward arrow indicating compression or disassembly (no text or symbols present)
D
text_image
CLICK!
Thank you for buying your new Remington® product. Please read these instructions carefully and keep them safe. Remove all packaging before use.
IMPORTANT SAFEGUARDS
- This appliance can be used by children aged from 8 years and above and persons with reduced physical, sensory or mental capabilities or lack of experience and knowledge if they have been supervised/instructed and understand the hazards involved. Children shall not play with the appliance. Cleaning and user maintenance shall not be done by children unless they are older than 8 and supervised. Keep the appliance and cable out of reach of children under 8 years.

Suitable for use in a bath or shower.
- Do not use the product with a damaged cord.
- The battery in this device is not replaceable.
- Do not use the appliance if it is damaged or malfunctions.
- Do not use attachments other than those we supply.
- This appliance should never be left unattended when plugged into a power outlet, except when charging.
- Keep the power plug and cord away from heated surfaces.
- Do not plug or unplug the appliance with wet hands.
- Do not twist or kink the cable, or wrap it round the appliance.
- This appliance is not intended for commercial or salon use.
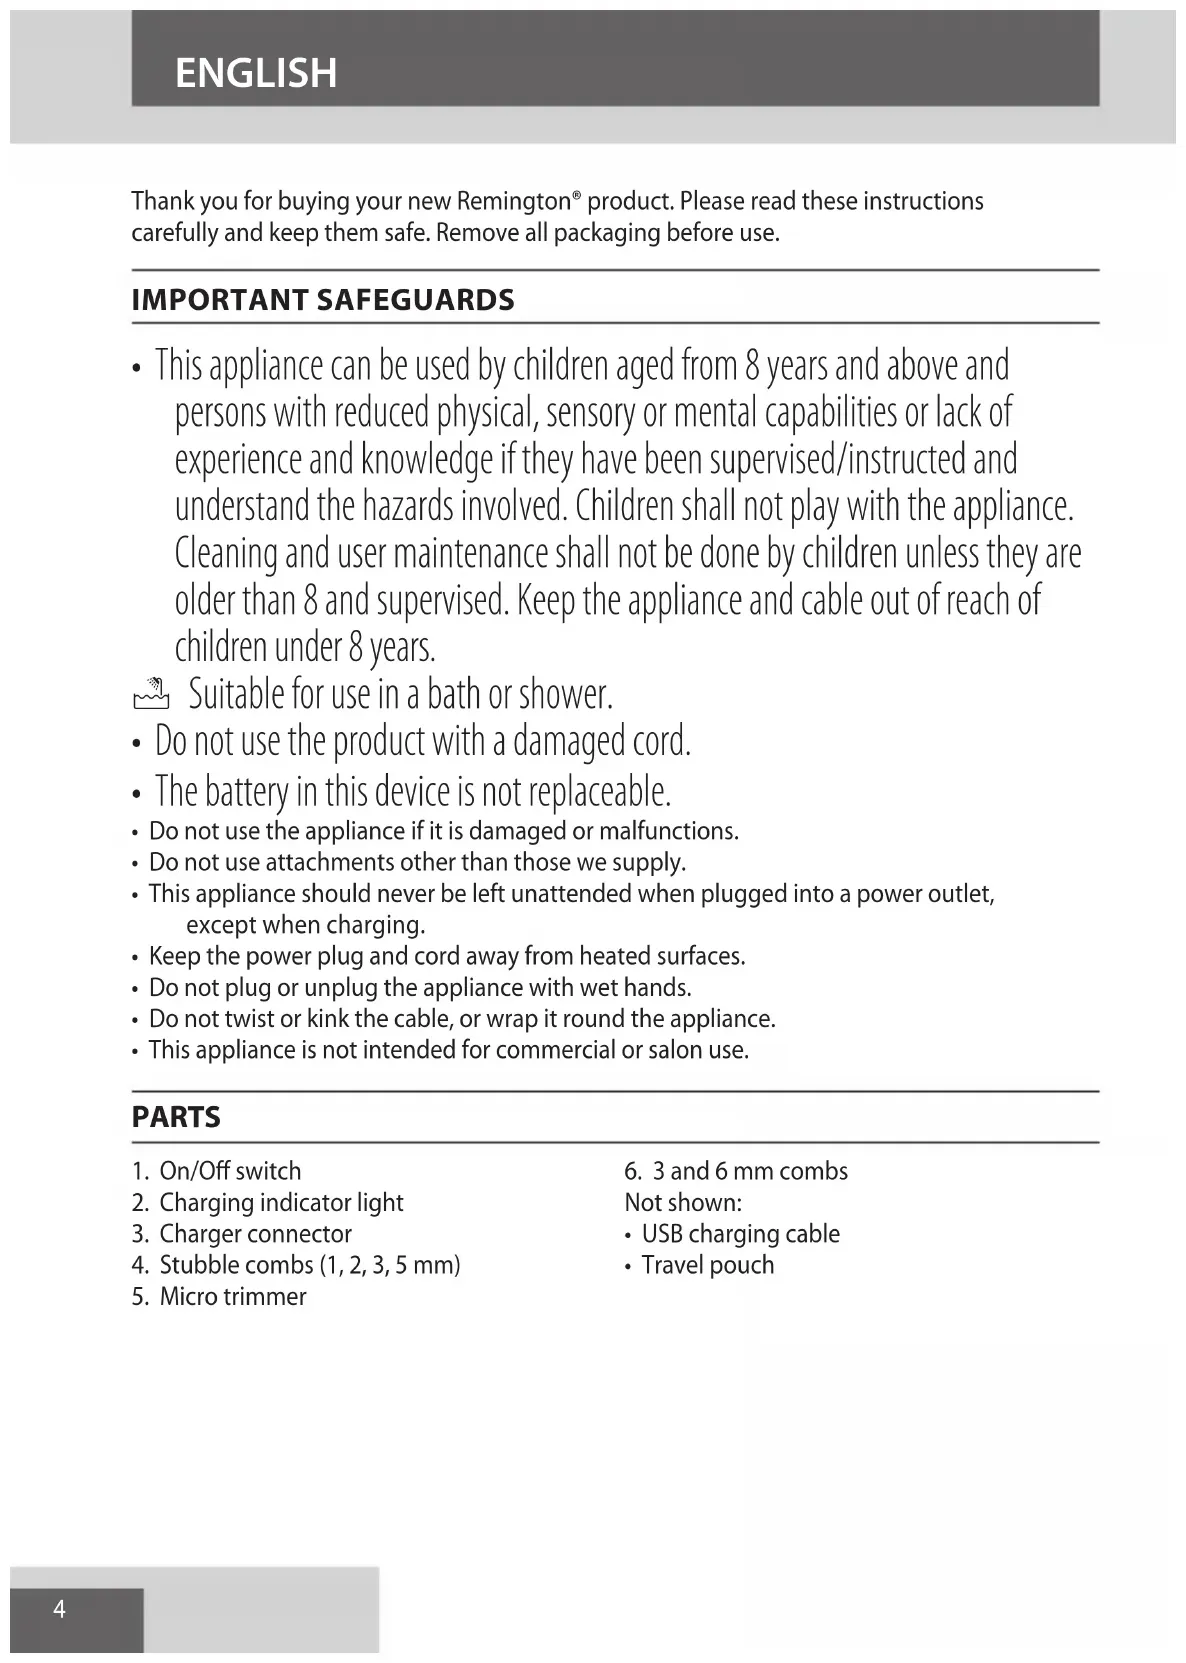
PARTS
- On/Off switch
- Charging indicator light
- Charger connector
- Stubble combs (1, 2, 3, 5 mm)
-
Micro trimmer
-
3 and 6 mm combs
Not shown:
- USB charging cable
- Travel pouch
CHARGING YOUR APPLIANCE

It is recommended to fully charge your appliance before using it for the first time.
- Ensure the product is switched off.
- Connect the product to the USB cable and then to the USB end of the cable to a powered USB port.
CHARGING INDICATOR LIGHT
| Charging Fully charged Battery Low | |
| The light will come on | The light will stay on for 5 minutes then go out | The light will flash for 5 seconds when there are 5 minutes or ledss of run time left |
- Your trimmer cannot be overcharged. However, if it is not going to be used for an extended period of time (2-3 months), unplug it from the mains supply and store.
- To preserve the life of your batteries, let them run out every 6 months then recharge for 4 hours.
- Run time from fully charged is up to 40 mins.
ATTACHMENTS
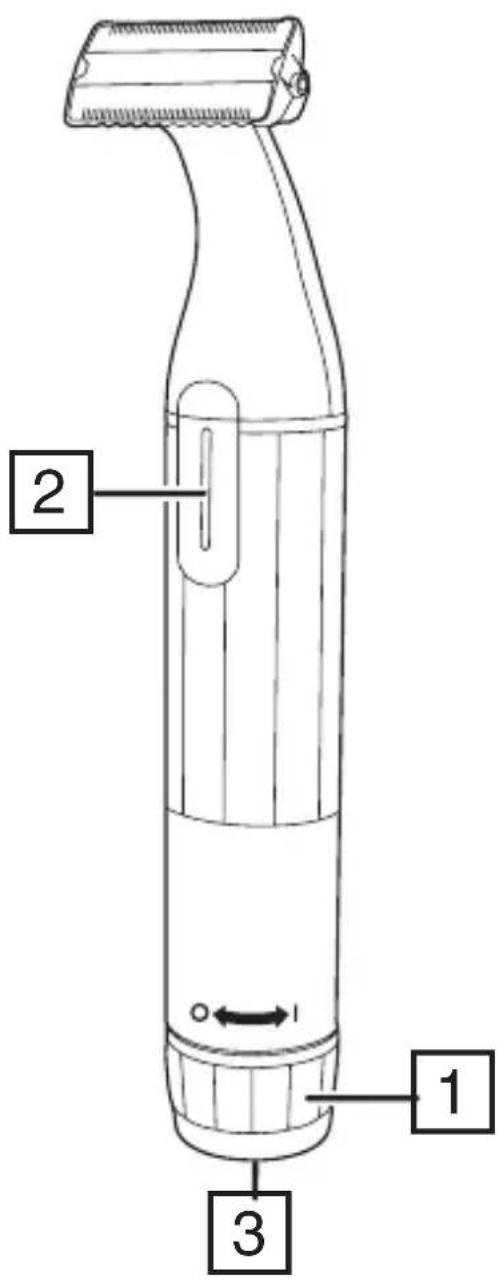
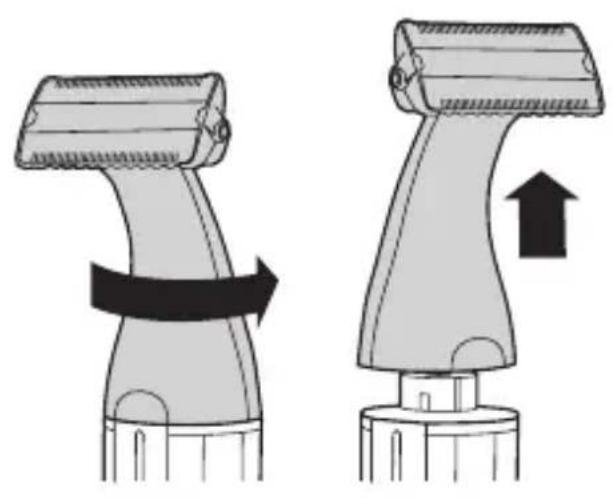
TO FIT AND REMOVE ATTACHMENTS (FIG. B)
Ensure that the device is switched off before fitting or removing attachments.
- To remove, rotate the attachment anti-clockwise until it unlocks and then lift it off.
- To fit, place the desired attachment on top of the device and rotate the attachment clockwise to lock it into place.
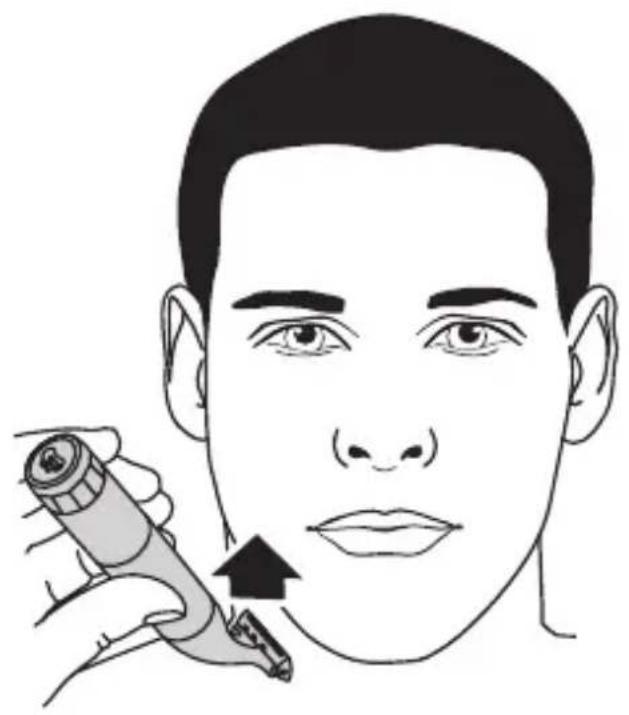
FITTING AND REMOVING STUBBLE GUIDE COMBS (FIG. C)
To Fit
- Hook the front of the comb over the blade.
- Press the back of the comb down until it clicks into place.
To Remove
- Lift the tab on the back of the comb upwards until it comes free from the blade.
INSTRUCTIONS FOR USE
Switch the product on by rotating the on-off switch to the I mark.
Always comb your beard or moustache with a fine comb before you start trimming.
TO TRIM THE BEARD
- Select your desired trimming length comb. If you are trimming for the first time start with the maximum trimming length setting.
- Turn the unit on.
- Place the flat top of the fixed comb against the skin.
- Slowly slide through the hair. Repeat from different directions as necessary.
- If hair builds up in the trimmer comb during the trimming process, switch the unit off, pull off the comb and brush the hair off.
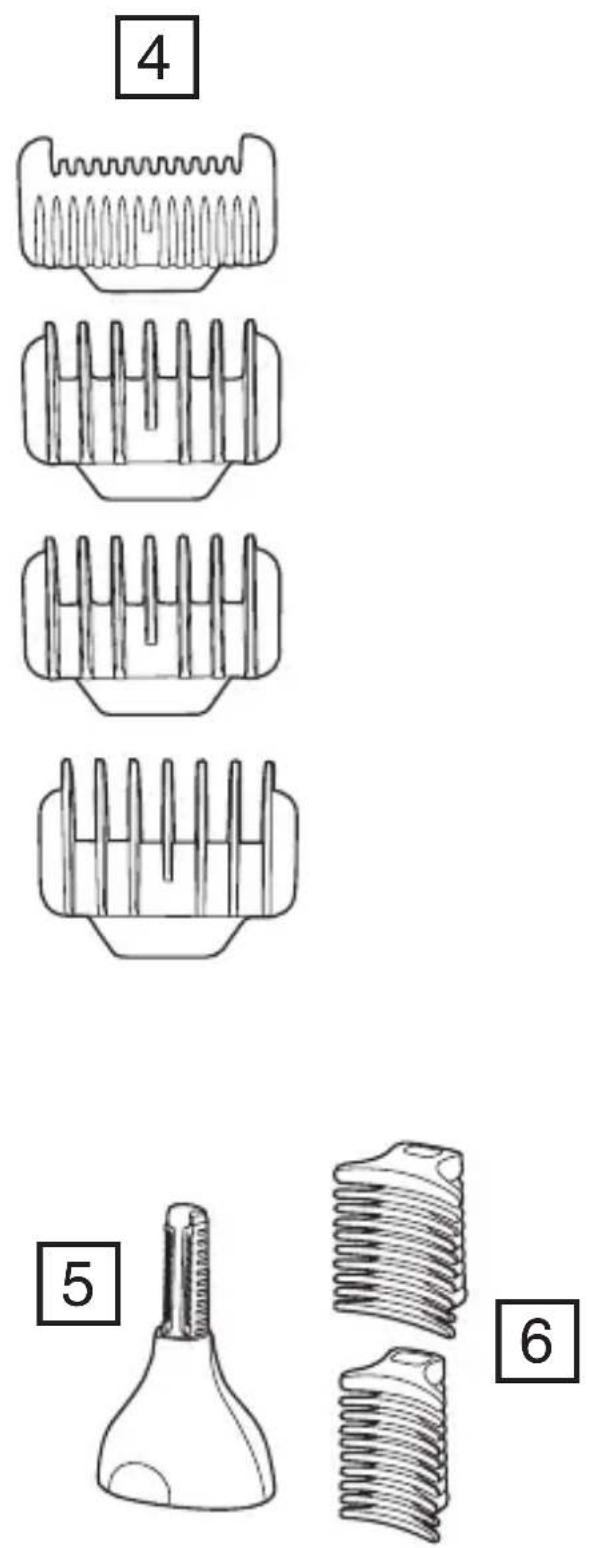
TO GET A SHAVEN LOOK
To trim any length of beard or stubble hair for a clean, shaven look then follow the above steps without a comb attached to the blade head.
Place the flat top of the blade against the skin and slowly slide through the hair against the direction of growth.
Shave in an upwards direction when shaving under the chin (Fig. A).
TRIMMING AND EDGING
- Hold the device with the back side of the blade facing you with no combs attached.
- Start with the blades resting lightly against your skin, use motions towards edge of beard line to trim to desired locations in facial area.
- Shape as desired.
TRIMMING WITH SHAVING GEL
Follow the same instructions as dry shaving if using shaving gel.
Caution: After use with shaving gel, please rinse the blade under warm water to clean away any excess gel and debris.
DETAILED NOSE, EYEBROW AND EAR HAIR TRIMMING
Attachments
Micro trimmer
Nose and ear:
- Fit the micro trimmer.
- Insert the attachment gently into the nostril or ear.
- Gently move the attachment in and out while rotating the body of the groomer at the same time.
- Don't insert the attachment more than 6 mm.
- Wash the attachment after each use.
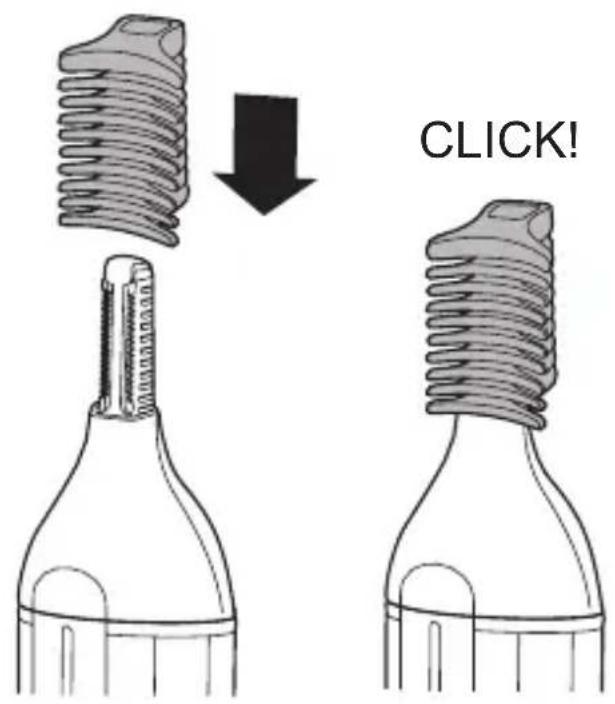
Eyebrow:
- Slide the desired eyebrow comb attachment (3 or 6 mm) over the trimmer head (Fig. D).
- Carefully guide the attachment to remove any stray or longer hairs from the eyebrow.
- To completely remove hairs, let the attachment touch the skin then move over the desired area.
Care for your product to ensure a long lasting performance. We recommend that you clean your groomer after each use.
AFTER EACH USE
- Brush any accumulated hairs from the groomer and attachment heads.
- The easiest and most hygienic way to clean the groomer is by detaching the head from the groomer body and rinsing the head with warm water.
- Place one or two drops of cutter oil or sewing machine oil on the blades.
- Turn the device on to distribute the oil evenly, wipe off any excess oil.
BATTERY REMOVAL
We strongly recommend that a professional removes the rechargeable battery. Parts of the shaver case, and tools have sharp edges and may cause injury if not handled correctly.
- The rechargeable battery must be removed from the appliance before it is scrapped.
- Ensure the trimmer is discharged of all power. To do this, operate the device until it stops.
- Remove any attachments.
- Pry off the switch button/switch cover.
- Unscrew the 2 screws under the cover then remove the lower housing.
- Slide out the battery assembly.
- Unscrew the 2 screws from the cover then remove the battery.
- The battery is to be disposed of safely.
- Do not attempt to operate the device once you have opened it.
RECYCLING
To avoid environmental and health problems due to hazardous substances, appliances and rechargeable and non-rechargeable batteries marked with one of these symbols must not be disposed of with unsorted municipal waste. Always dispose of electrical and electronic products and, where applicable, rechargeable and non-rechargeable batteries, at an appropriate official recycling/collection point.
UW APPARAAT VERZORGEN
FÖR ATT FÄSTA OCH AVLÄGSNA TILLBEHÖR (FIG. B)
FÄSTA OCH AVLÄGSNA STUBBKAMMAR (FIG. C)
Att fästa
FÖR ATT TRIMMA SKÄGGET
natural_image
Two identical diagrams of a trash bin with cross-bracing, no text or symbols present
DETALJNO TRIMOVANJE DLAKA U NOSU, UŠIMA I NA OBRVAMA
Prilozi
Mikro trimer
Nos i uvo:
- Namestite mikro trimer.
- Lagano umetnite nastavak u nosnicu ili uho.
- Nežno pomerajte nastavak unutar i van nozdrve i istovremeno okrećite trimer.
- Nastavak nemojte uvući više od 6 mm.
- Nakon svake upotrebe operite nastavak.
Obrve:
natural_image
Solid gray rectangular shape with no text, symbols, or discernible features
Ref. No. HG2000
Type No. HG02A
Remington ^® is a Registered Trade Mark of Spectrum Brands, Inc., or one of its subsidiaries
Russell Hobbs Deutschland GmbH, Am Unisyspark 1, 65843 Sulzbach, Germany
remington-europe.com