NE118AU - Beard trimmer REMINGTON - Free user manual and instructions
Find the device manual for free NE118AU REMINGTON in PDF.

User questions about NE118AU REMINGTON
0 question about this device. Answer the ones you know or ask your own.
Ask a new question about this device
Download the instructions for your Beard trimmer in PDF format for free! Find your manual NE118AU - REMINGTON and take your electronic device back in hand. On this page are published all the documents necessary for the use of your device. NE118AU by REMINGTON.
USER MANUAL NE118AU REMINGTON
natural_image
Black Remington 3D-printed hairbrush with a pair of teeth, no visible text or symbols on the brush itself.To register your product go to www.remington-products.com.au www.remington.co.nz
2 YEAR WARRANTY NE118AU
IMPORTANT SAFETY INSTRUCTIONS
When using appliances, especially when children are present, basic safety precautions should always be followed, including the following:
- To prevent accidents keep the appliance away from your eyelashes as well as clothes, brushes and wire.
- Always remember to turn on the trimmer before you insert it into your nose or ear to avoid painfully snagging hairs.
- Never insert the trimmer more than 6mm (1/4") into your nose or ear. Foreign objects should not come into contact with your ear drum.
- This appliance should not be used by persons (including children) with reduced physical, sensory or mental capabilities or lack of experience and knowledge, unless they have been given supervision or instruction concerning use of the appliance by a person responsible for their safety.
- Keep the appliance and the power cord away from the edge of table or countertops and out of reach of children and persons with reduced physical, sensory or mental capabilities.
• Children shall not play with the appliance. - Cleaning and user maintenance shall not be made by children without supervision.
- Use this appliance only for its intended use as described in this manual. Do not use attachments not recommended by Remington.
- Do not use on people who are asleep.
- Never drop or insert any object into any opening of this appliance.
- Do not use the trimmers with damaged or broken cutters, as injury may occur.
- Always store the appliances in a moisture-free area. Do not store it in temperatures exceeding 60°C (140°F).
- Do not disassemble the detail trimmer cutter assembly.
- Do not submerge the units in water as damage will occur.
• This appliance is for household use only.
SAVE THESE INSTRUCTIONS
NE118AU 3-IN-1 TRIMMER NOSE, EAR & FACE KIT
USE & CARE INSTRUCTION MANUAL
Thank you for purchasing your new Remington ¥ 3-in-1 Trimmer Nose, Ear & Face Kit. Inside this manual you will find tips on using and caring for your Detail Trimmer and Nose & Ear Trimmer.
text_image
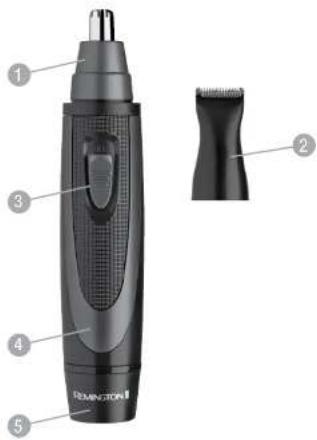
1 2 3 4 5 REMINGTONKey Parts
- Nose & Ear Trimmer Attachment Head
-
Detail Trimmer Attachment Head
-
On/Off Switch
- Trimmer Handpiece
- Battery Compartment
INSERTING THE BATTERY
Your Remington * 3-in-1 Trimmer is powered by one "AA" alkaline battery, (battery included).
- To open the battery compartment, turn the base of the unit approximately 1cm clockwise (to the right) and pull it off.
- Insert the battery into the unit, positive end first.
- Replace the base and turn it 1cm anti-clockwise (to the left) to lock it in place.
Battery Cautions:
- Using non-alkaline batteries will impair the unit's operating performance.
- The battery should not be left in the unit if it is not in use for long periods.
- To prevent battery corrosion, the unit should be stored in a dry environment.
- Dead batteries should be removed immediately and disposed of properly.
- Do not use rechargeable batteries with this appliance. The lower voltage in rechargeable batteries impairs the performance of the cutting unit.
HOW TO USE
Changing The Attachment Heads
This model comes with interchangeable attachments. You may want to use the rotary head to trim hairs from the nose & ear, and the detail trimmer for sideburn hairs.
To Change Heads:
- Turn the trimmer off.
- Detach the cutting head by turning it counter-clockwise to the unlocked position and pulling it off.
- Once the previous head is removed, attach the other head by placing it on top of the unit and turning it clockwise to the locked position.
To Remove Hair From The Nose:
-
Select the nose & ear trimmer.
-
Turn the trimmer on.
-
Insert the trimmer's cutting unit gently into the nostril.
-
Rotate the trimmer in a circular motion around the opening of the nostril.
-
For best cutting efficiency, gently move trimmer in and out of the nostril as you rotate the trimmer.
-
Do not insert the trimmer more than 6mm into your nostril.
Note: Always remember to turn on the trimmer before you insert it into your nose or ear to avoid painfully snagging hairs.
To Remove Hair From The Ear
-
Select the nose & ear trimmer.
-
Turn the trimmer on.
-
Insert the trimmer's cutting unit gently into the outer ear canal opening.
-
Gently rotate the trimmer in a circular motion.
-
To trim hairs protruding from the surface of the area surrounding the
outer ear canal, guide the trimmer around the edge of the ear.
- Avoid inserting the trimmer more than 6mm into your ear canal.
Note: Do not apply pressure as this damages the trimmer and may cause skin injury.
To Trim Sideburns:
-
Select the detail trimmer.
-
Turn the trimmer on.
-
Gently guide the cutting unit to your sidebums holding the unit
horizontally at a 90 degree angle to the sideburns.
- Trim the sideburns moving the trimmer slowly and carefully, to ensure that you do not accidentally cut hairs that you do not intend to trim.
Note: It is not recommended that you use the trimmer to define or trim the eyebrows.
CLEANING & MAINTENANCE
Both your detail trimmer and nose & ear trimmer are designed to give you years of comfortable use. To ensure that you get optimal performance from your trimmers, follow these simple cleaning and lubricating tips:
• After each use, brush or blow accumulated hair from the cutting units.
Rinsing Your Trimmers:
- The heads of your trimmers are washable and can be rinsed with cool or warm water. Simply twist the attachment head 1cm anticlockwise (to the left), remove the head and rinse them under the tap
Caution: Do not use hot water. Do not allow water into the body of the handpiece.
• Afterward, shake excess water from the cutter head. Be sure to be careful when handling the nose trimmer blades as they are sharp.
- Replace the head in the same position as it was removed, turning it 1cm clockwise (to the right) until it locks into place.
Lubricating The Cutters:
- After rinsing the attachment heads, apply a drop or two of lubricating oil or sewing machine oil to the cutting teeth &/or blades (nose & ear trimmer).
- Don't apply too much oil, or it may spray.
- Finally, point the trimmer down and away from you, and turn it on. This spreads the oil evenly and expels any excess.

This product is not suitable to use in the bath or shower.
This product conforms to radio frequency interference requirements. Any product purchased and used commercially carries a limited 90 Day Warranty.
Spectrum Brands Australia Pty Ltd and Spectrum Brands New Zealand Limited WARRANTY AGAINST DEFECTS
In this warranty
Australian Consumer Law means the Australian consumer law set out in Schedule 2 to the Competition and Consumer Act 2010;
CGA means the New Zealand Consumer Guarantees Act 1993;
Goods means the product or equipment which was accompanied by this warranty and purchased in Australia or New Zealand, as the case may be;
Manufacturer, We or us means:
-
for Goods purchased in Australia, Spectrum Brands Australia Pty Ltd ACN. 007 070 573; or
-
for Goods purchased in New Zealand. Spectrum Brands New Zealand Limited, as the case may be contact details as set out at the end of this warranty;
Supplier means the authorised distributor or retailer of the Goods that sold you the Goods in Australia or in New Zealand; and
You means you, the original end-user purchaser of the Goods.
-
Our goods come with guarantees that cannot be excluded under the Australian Consumer Law, or the CGA. You are entitled to a replacement or refund for a major failure and compensation for any other reasonably foreseeable loss or damage. You are also entitled to have the goods repaired or replaced if the goods fail to be of acceptable quality and the failure does not amount to a major failure.
-
The benefits provided by this Warranty are in addition to all other rights and remedies in respect of the Goods which the consumer has under either the Australian Consumer Law or the EGA. The original purchaser of the Goods is provided with the following Warranty subject to the Warranty Conditions:
-
We warrant the Goods for all parts defective in workmanship or materials for the period of two (2) years from the date of purchase (Warranty Period). If the Goods prove defective within the Warranty Period by reason of improper workmanship or material, we may, at our own discretion, repair or replace the Goods without charge.
Warranty Conditions
-
The Goods must be used in accordance with the manufacturer's instructions. This Warranty does not apply should the defect in or failure of the Goods be attributable to misuse, abuse, accident or non-observance of manufacturer's instructions on the part of the user. As far as the law permits, the manufacturer does not accept liability for any direct or consequential loss, damage or other expense caused by or arising out of any failure to use the Goods in accordance with the manufacturer's instructions.
-
Consumable parts (such as shaver heads, cutters and foils) of the Goods are included under this Warranty only where there is a defect in workmanship or materials used.
-
The warranty granted under clause 3 is limited to repair or replacement only.
-
Any parts of the Goods replaced during repairs or any product replaced remain the property of the manufacturer. In the event of the Goods being replaced during the Warranty Period, the warranty on the replacement Goods will expire on the same date as for the Warranty Period on the original Goods which are replaced.
-
In order to claim under the warranty granted under clause 3 you must: (a) Retain this warranty with your record/proof of purchase; and (b) Return the Goods to us at the relevant address below or to the Supplier by prepaid freight within the Warranty Period accompanied with (i) the legible and unmodified original proof of purchase, which clearly indicates the name and address of the Supplier, the date and piece of purchase, the product name or other product serial number and (ii) this warranty.
- This warranty is immediately void it: (a) Any serial number or appliance plate is removed or defaced; (b) The Goods have been serviced or otherwise repaired by a person not authorised to do so by us or where non approved replaced parts are used.
- The Goods are designed for domestic use only. A limited 90-day Warranty applies to any industrial or commercial use of the Goods. The Goods must be connected to the electrical voltage requirements as specified in the ratings label located on the Goods.
- This warranty does not cover the cost of claiming under the warranty or transport of the Goods to and from the Supplier or us.
- This warranty is only valid and enforceable in Australia against Spectrum Brands Australia Pty Ltd and in New Zealand against Spectrum Brands New Zealand Limited.
Contact us or the Supplier for further details.
Spectrum Brands Australia Pty Ltd
Locked Bag 3004
Brackside, VA AUSTRALIA
Customer service in Australia: 1800 623 118
E-mail: consumer.enquiry@remington-products.com.au
Website: www.remington-products.com.au
Spectrum Brands New Zealand Limited
PO Box 9817
Newmarket, Auckland 1149
NEW ZEALAND
Customer service in New Zealand: 0000 736 776
E-mail: info@remington.co.nz
Website: www.remington.co.nz
REMINGTON EST NEW YORK 1973
EST. NEW YORK 1937
REMINGTON SERVICE HOTLINE
©Australia 1800 623 119 (bell free)
© New Zealand 0600 736 776 (doll free)
AUTHORISED REPAIR CENTRES
Visit www.remington-products.com.au for Authorised repair centre details.
③ Registered Trade Mark of Spectrum Brands Inc., (SBI) or one of its subsidiaries
© 2019 Spectrum Brands Inc.
Rev. 02'19
Part No. T22-7000678
Type: PG018
