IAN 345954 - Electric scooter Playtive - Free user manual and instructions
Find the device manual for free IAN 345954 Playtive in PDF.
| Product type | LED wheel scooter |
| Brand | Playtive |
| Model | IAN 345954 |
| Recommended age | From 3 years (under adult supervision) |
| Maximum user weight | 50 kg |
| Adjustable handlebar height | 3 levels, approx. 70 to 80 cm |
| Wheel diameter | 120 mm |
| Bearing type | ABEC5 |
| Brake | Rear brake by brake plate |
| Lighting | LED wheels (non-replaceable) |
| Materials | Aluminum (frame), plastic (grips, wheels) |
| Dimensions (folded) | Not specified |
| Item weight | Not specified |
| Use | Smooth, clean, dry surfaces, off public roads |
| Required protective gear | Helmet, hand, wrist, elbow, knee guards |
| Assembly | Adults only, tools required (hex key provided) |
| Maintenance | Clean and dry after use, grease bearings |
| Storage | In a dry place |
| Warranty | 3 years from purchase date (excluding normal wear) |
| After-sales service France | 0800 919270 |
| Certifications | 2009/48/EC (toy safety), 2014/30/EU (EMC) |
Frequently Asked Questions - IAN 345954 Playtive
User questions about IAN 345954 Playtive
0 question about this device. Answer the ones you know or ask your own.
Ask a new question about this device
Download the instructions for your Electric scooter in PDF format for free! Find your manual IAN 345954 - Playtive and take your electronic device back in hand. On this page are published all the documents necessary for the use of your device. IAN 345954 by Playtive.
USER MANUAL IAN 345954 Playtive
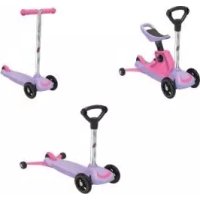
2-WHEEL-SCOOTER MIT LED-ROLLS SCOOTER WITH LED WHEELS TROTTINETTE À 2 ROUES LED
DE AT CH
2-WHEEL-SCOOTER MIT LED-ROLLEN
Gebrauchsanweisung
FR BE
TROTTINETTE À 2 ROUES LED
SCOOTER WITH LED WHEELS Instructions for use
NL BE
DETSKA KOLOBEZKA S LED KOLECKY
Návod k použití
CE
IAN 345954_2004
DE AT CH GB IE FR BE NL PL CZ SK
You have chosen to purchase a high-quality product. Familiarise yourself with the product before using it for the first time.

Read the following instructions for use carefully.
Use the product only as described and only for the given areas of application. Store these instructions for use carefully. When passing the product on to third parties, please also hand over all accompanying documents.
Package contents
1 x scooter with LED wheels
1 x instructions for use
Technical data
Handlebar extension height:
3 stages (approx. 70-80cm)
Wheels: 120mm
Bearing: ABEC 5

Maximum user weight: 50kg

Date of manufacture (month/year): 12/2020
CE Delta-Sport Handelskontor GmbH hereby declares that this product meets
the following basic requirements, as well as other important regulations:
2009/48/EC - Toy Safety Directive
2014/30/EU - EMC Directive
2011/65/EU - RoHS Directive
Intended use
This product is a toy for children over 3 years of age, who have a maximum weight of 50kg , for private use.
WARNING! Protective equipment should be worn. Not to be used in traffic. 50kg max.

Safety information
-
Warning. Not suitable for children under 36 months. Choking hazard. Small parts.
-
Warning. None of the packaging materials or attachments are part of the toy itself, and must always be removed for safety reasons before the product is given to children to play with.
Children may play with this product only under adult supervision.
Risk of injury!
The product must only be assembled by adults as it contains small parts! Caution! Risk of pinching!
The product may only be used by one person at a time.
- Check the product for damage or wear before each use. Always check that all connectors are tight and that the height of the steering column has been adjusted. The product must only be used if it is in perfect condition!
- Make sure that the nuts and bolts retain their self-locking properties.
- Do not modify the product in such a way that it could potentially endanger your safety.
Always wear suitable protective gear (helmet, hand protectors, elbow pads, knee pads and wrist guards) and shoes!
Always watch out for other people!
- Only use the product on suitable surfaces that are smooth, clean and dry. Keep away from other traffic users, if possible. Avoid sloping terrain, stairs and open water.
- Never ride in darkness or when visibility is poor.
- Do not let your child use the product unsupervised as children cannot adequately assess potential dangers.
- Using the product requires skill to prevent falls or collisions, which could result in injury to the user or others.
- No modifications may be made to the product!
Non-replaceable LED.
Preventing damage to the product!
- Avoid water, oil, potholes and very rough surfaces.
Assembly
The product is delivered folded up in transport mode. Proceed as follows to get it ready for scooting:
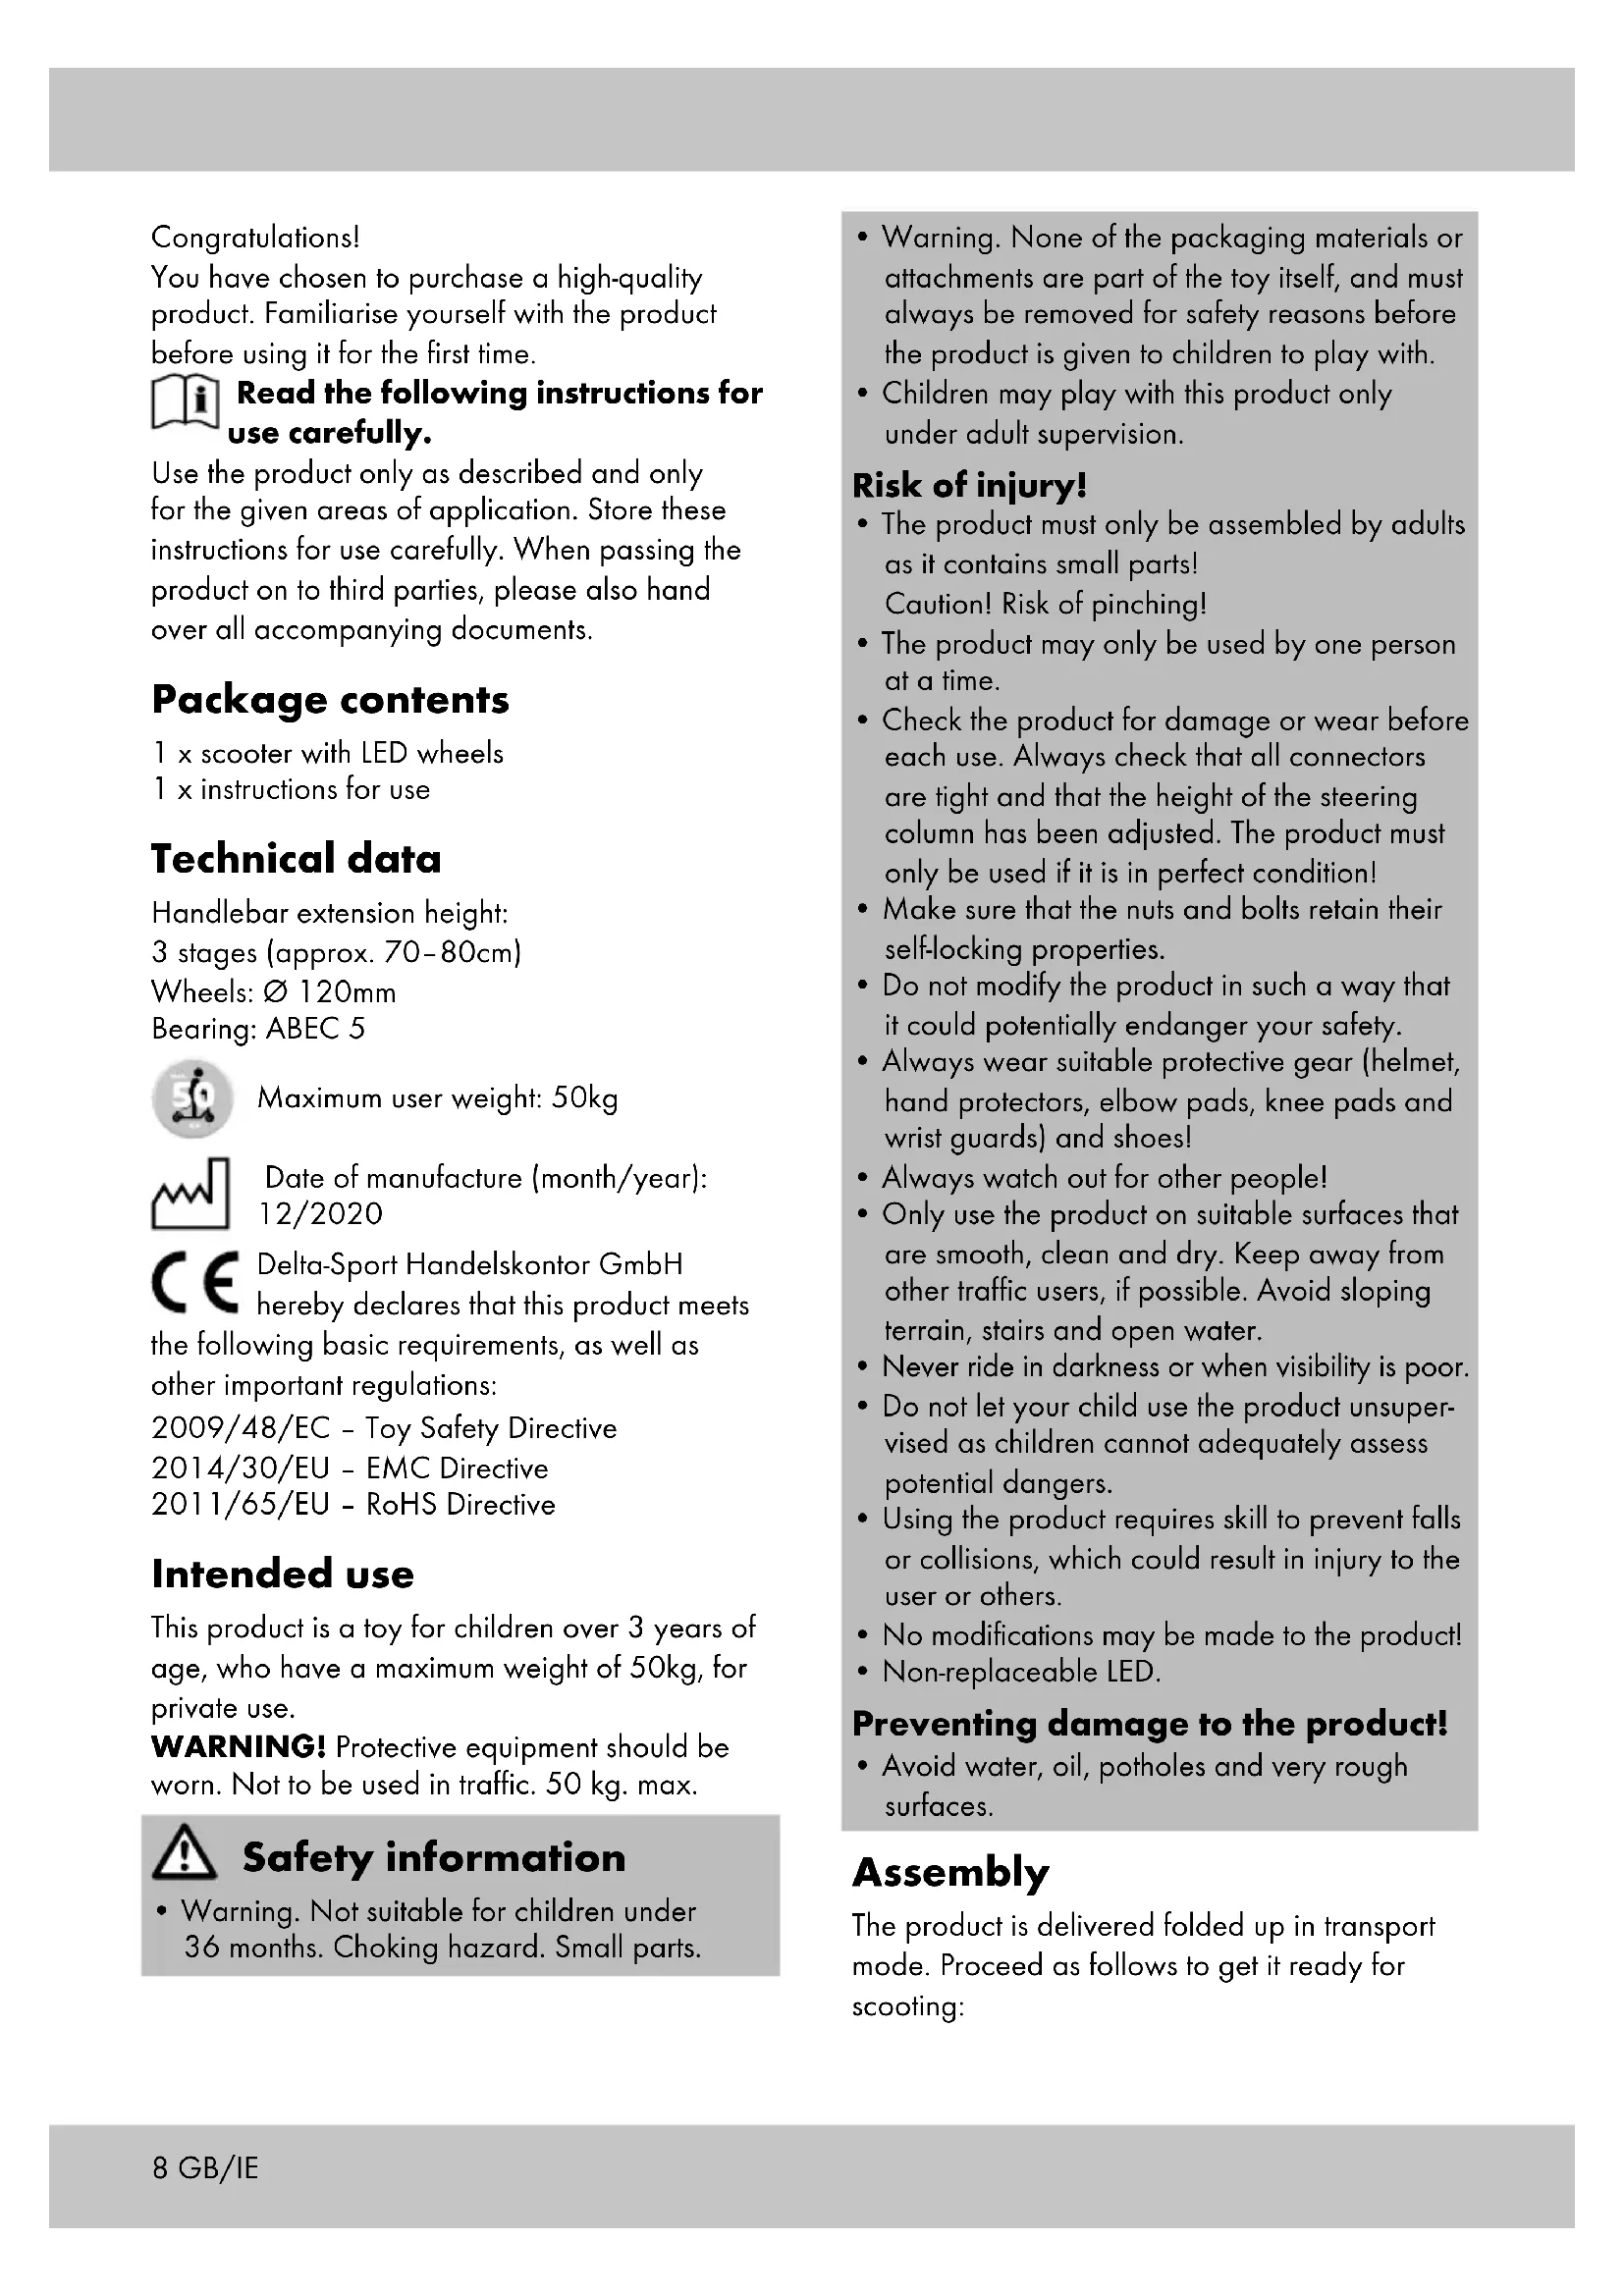
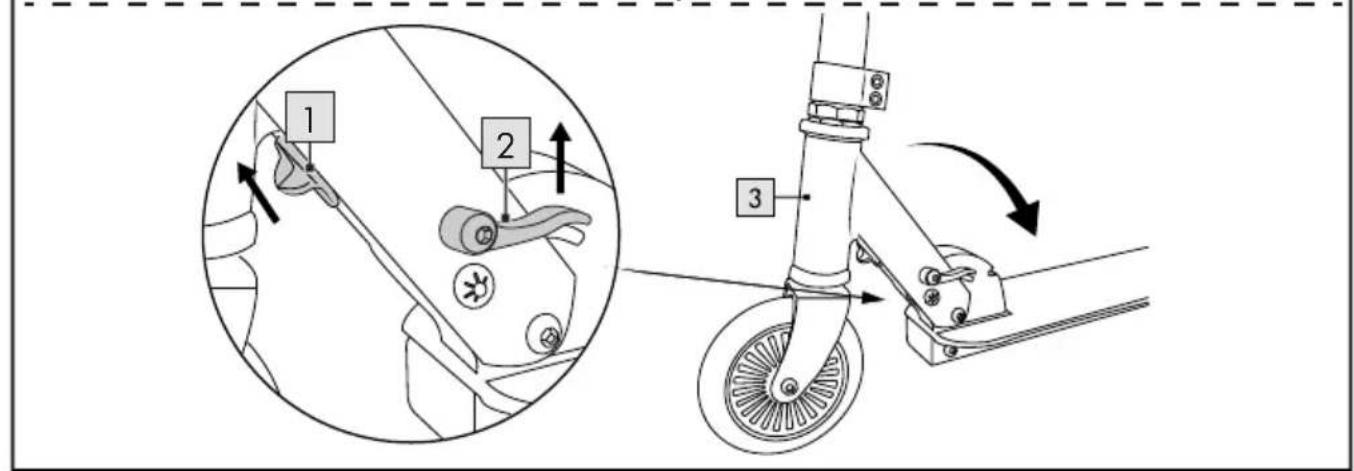
Unfolding (Fig. A)
- Pull the safety lever (1) upwards and hold it.
- Pull the lever (2) upwards, then release the safety lever (1) and fold the steering column (3) forwards until it locks into place.
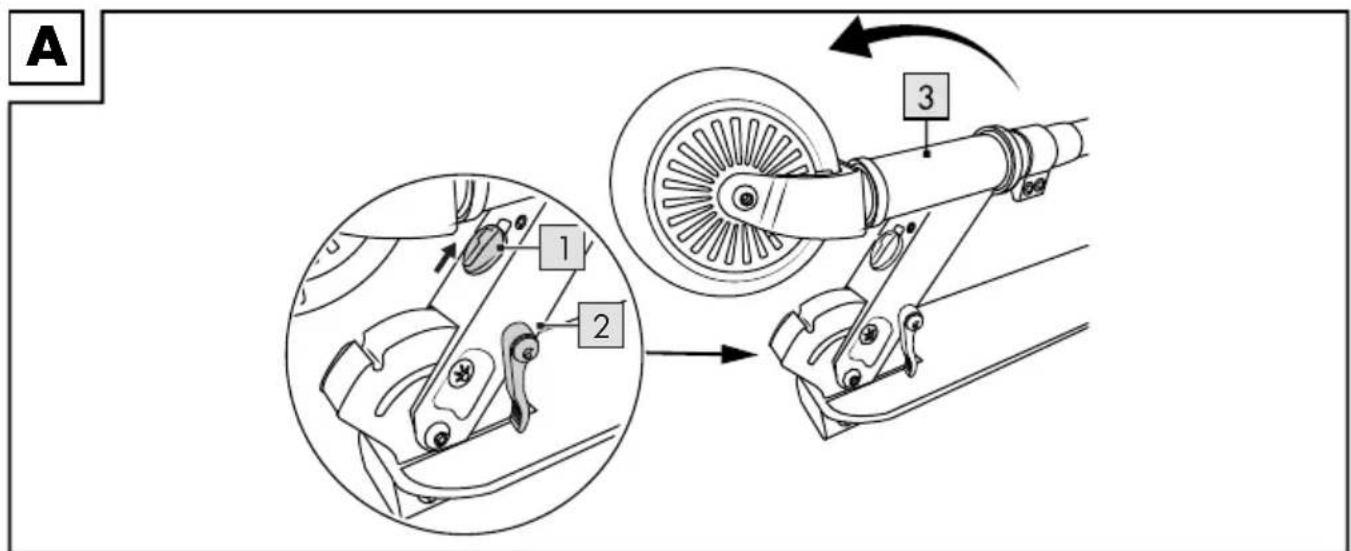
Mounting the grips (Fig. B)
- Remove the grips (4) from the brackets (5).
- Press the locking knobs (6) down on the grips and push the grips on both sides into the T-tube (7) of the steering column. The locking knobs must snap audibly into place into the holes (8) provided.
Adjusting the height of the steering column (Fig. C)
The steering column can be adjusted to three different heights.
The product may only be used if the locking knob is locked in place into one of the three holes provided and the steering column is then secured with the quick release fastener!
Note: if the quick release fastener (9) does not fit snugly on the steering column (3) when tightening, tighten the knurled screw (9a) firmly with a hex key. Make sure that the quick release fastener is secured before tightening.
- Loosen the quick release fastener (9) on the steering column (3).
- Pull the steering column (3) upwards, until the locking knob (10) locks into place in one of the three holes (11).
- Secure the steering column by locking the quick release fastener (9).
Steering head bearing (Fig. D)
The steering head bearing is pre-set when the product is delivered. If, after a while, the handlebars have too much play or become too stiff, get the steering head bearing adjusted by a specialist dealer or at a bicycle shop.
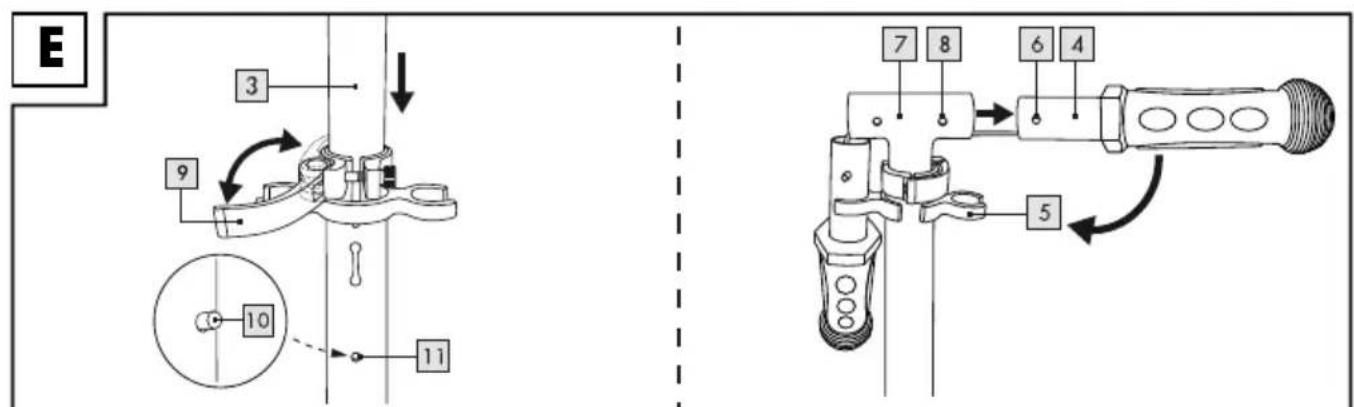
Putting the product into transport mode (Fig. E)
-
Loosen the quick release fastener (9) on the steering column (3).
-
Push the steering column (3) downwards, until the locking knob (10) locks into place in the bottom hole (11).
- Secure the steering column (3) by locking the quick release fastener.
- Press the locking knobs on the grips (4) and pull the grips (4) out of the T-tube (7) and attach them to the brackets (5).
- Pull the safety lever (1) upwards and hold it. Pull the lever (2) upwards, then release the safety lever (1).
- Press the steering column towards the deck until it locks into place.
Use
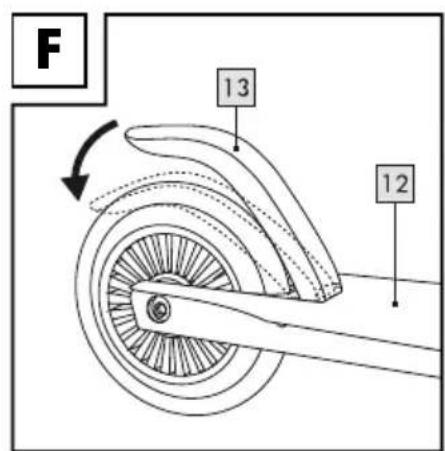
Riding, braking (Fig. F)
- Put one leg on the deck (12) and create momentum by regularly pushing off with the other leg. The scooter can be steered by moving the handlebars, by shifting your weight or using a combination of both.
- Step on the brake plate (13) to brake.
Maintenance
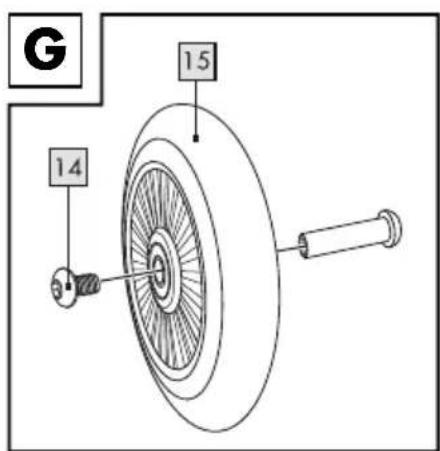
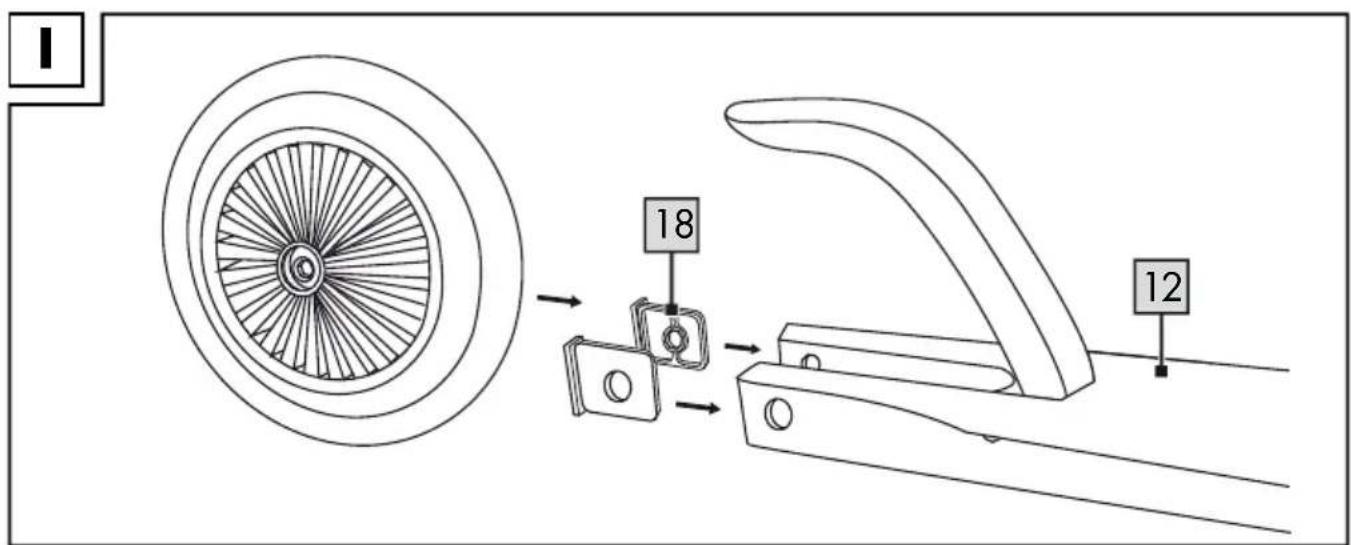
Replacing the wheels (Fig. G) Important!
Pay attention to the technical specifications. Wheels with a different diameter may alter the riding behaviour and possibly endanger the user. Do not use wheels that cannot be installed properly. Never use wheels that are larger than the original wheels on the product.
Wheels wear out. This wear depends on many factors, such as, for example, the terrain, the size and weight of the user, the weather conditions, the material of the wheels and their hardness, etc. Therefore, it is necessary to replace them now and then.
- Loosen the axle bolts (14) with two size 5 hex keys (not included in the package contents).
- Pull out the axle bolts and remove the wheel.
- Install the new wheel (15) and secure it with the axle bolts.
Note: press both plastic parts (18) back into the deck (12) before you install the new wheel (Fig. 1).
After replacing the wheels:
Do not use the wheels if they pull sideways after replacing them! After the first few minutes of riding, make sure that all screws are still tight and that nothing has detached or become loose. Tighten the wheel once more to make sure that it runs smoothly and that there is no noise coming from the bearings.
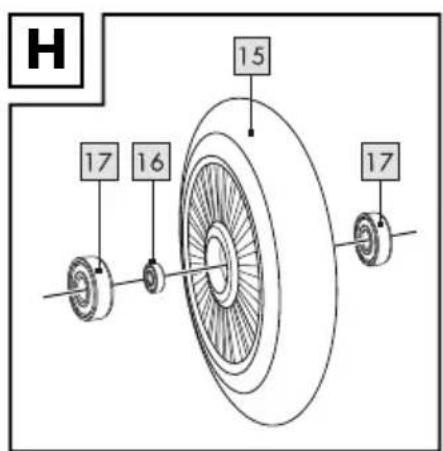
Replacing the ball bearings (Fig. H)
- Remove the wheels (15) as described.
- Push out a bearing by pressing on the spacer (16) with a hex key and remove the spacer.
- Push out the other bearing (17) by pressing with a hex key.
- Press in a new bearing. Turn the wheel over, insert the spacer and then push in a second new bearing.
- Secure the wheels again.
Storage, cleaning
We recommend that you clean and dry the product thoroughly after use.
Remove small stones or other objects that may have become stuck to the wheels.
Dry wet or damp ball bearings with a clean cloth. Grease the bearings with a suitable bearing lubricant from the outside to prevent external rust. Always store the product in a dry place.
Disposal

In the interest of protecting the environment, do not throw your product into the household waste once you are finished
with it, but rather take it to a specialty disposal facility. Find out about collection sites and their hours of operation from your local authority. Packaging materials, such as plastic bags, must be kept away from children. Keep the packaging materials out of reach of children.

Dispose of the product and packaging in an environmentally friendly manner.

Note the label on the packaging materials when separating waste, as these are labelled with abbreviations (a)
and numbers (b) with the following meaning:
1-7: plastics/20-22: paper and cardboard/80-98: composite materials.
The product and the packaging materials can be recycled, dispose of them separately for better treatment of waste. The Triman logo only applies to France. Find out how to dispose of the used product from your municipal or city administration.
Notes on the guarantee and service handling
The product was produced with great care and under constant supervision. You receive a three-year warranty for this product from the date of purchase. Please retain your receipt.
The warranty applies only to material and workmanship and does not apply to misuse or improper handling. Your statutory rights, especially the warranty rights, are not affected by this warranty. With regard to complaints, please contact the following service hotline or contact us by e-mail.
Our service employees will advise as to the subsequent procedure as quickly as possible. We will be personally available to discuss the situation with you.
Any repairs under the warranty, statutory guarantees or through goodwill do not extend the warranty period. This also applies to replaced and repaired parts. Repairs after the warranty are subject to a charge.
IAN:345954_2004

Service Great Britain
Tel.: 0800 404 7657
E-Mail: deltasport@lidl.co.uk

Service Ireland
Tel.: 1890 930 034
(0,08 EUR/Min., (peak))
(0,06 EUR/Min., (off peak))
E-Mail: deltasport@lidl.ie
Felicitations!
2011/65/UE - Directive RoHS