
Forzaspira Slim SR500 - Vacuum Cleaner POLTI - Free user manual and instructions
Find the device manual for free Forzaspira Slim SR500 POLTI in PDF.

| Brand | Polti |
| Model | Forzaspira Slim SR500 |
| Product type | Rechargeable cordless stick vacuum cleaner, convertible to portable vacuum |
| Power supply | Rechargeable Li-ion battery, external charger (included) |
| Charging time | Approximately 4 hours |
| Runtime (stick mode) | Up to 35 min in ECO, 18 min in MAX |
| Runtime (portable mode) | Up to 40 min in ECO, 20 min in MAX |
| Suction programs | ECO, MAX, AUTO (auto-regulation according to surface) |
| Display | Digital touchscreen with charge indicators (3 levels) |
| Main brush | Motorized brush with bristle roller, articulation for corners |
| Filtration system | Washable collector filter + washable upper filter (cleaning recommended every 4 months) |
| Dust container capacity | 0.5 L (estimation) |
| Included accessories | 2-in-1 suction wand (brush and crevice tool) |
| Accessories compatibility | Optional accessories (ref. PAEU...) available at www.polti.com |
| Use | Domestic use, dry materials only |
| Safety | Do not vacuum liquids, ashes, sharp objects; use only with container and filters in place |
| General maintenance | External cleaning with damp cloth; store in a cool, dry place |
| Filter cleaning | Rinse under running water, dry 24 hours away from heat; do not use detergents or dishwasher |
| Warranty | 2 years (legal warranty of conformity), valid upon presentation of proof of purchase |
| After-sales service | Contact an authorized Polti service center or www.polti.com |
Frequently Asked Questions - Forzaspira Slim SR500 POLTI
User questions about Forzaspira Slim SR500 POLTI
0 question about this device. Answer the ones you know or ask your own.
Ask a new question about this device
Download the instructions for your Vacuum Cleaner in PDF format for free! Find your manual Forzaspira Slim SR500 - POLTI and take your electronic device back in hand. On this page are published all the documents necessary for the use of your device. Forzaspira Slim SR500 by POLTI.
USER MANUAL Forzaspira Slim SR500 POLTI
The optional accessories are on sale at all the best domestic appliance retailers, an Authorised Polti Service Centre or online at www.polti.com.
The POLTI FORZASPIRA D-POWER range consists of cordless rechargeable vacuum cleaners: power and performance on all surfaces

ACCESSIONS FOR ALL YOUR NEEDS
Visiting our site www.polti.com or any of the top household appliance stores, you will find a vast range of accessories to enhance the performance and convenience of your appliance and make cleaning your home even simpler.
To check compatibility with your appliance, look for the PAEUXXXX/ code next to each accessory listed on Page 3. If the code of the accessory you want to buy is not included in this manual, please contact Customer Care for more information.

REGISTER YOUR PRODUCT
Visit our website www.polti.com or call our Customer Services department to register your product.
You can receive useful recommendations on using the products, updates on innovations and find all the accessories that make the family of Polti products even more valuable for looking after your home.
To register your product, in addition to your personal information, you must enter the serial number (SN), which you will find on the label, located on the box and on the appliance.
To save time and have your serial number to hand, write it in the space provided on the back cover of this manual.
Do you want to know more? Visit our official channel: www.youtube.com/poltispa.
We will show you the effectiveness of the natural and ecological power of steam in cleaning and ironing operations.
Register on the channel so you are always up-to-date on our video content!
ATTENTION: Safety warnings are found only in this manual.
CORRECT USE OF THE PRODUCT
Polti Forzaspira D-Power is intended for internal home use as a vacuum of dry material, in accordance with the descriptions and instructions contained in this manual. Please read these instructions carefully and keep them. If this manual is lost, it can be viewed and/or downloaded from www.polti.com.
Only vacuum domestic dirt.
Do not vacuum up liquids.
Do not use on debris or chalk, cement or residues from building sites or brick laying.
Do not use on earth and sand/soil, etc.
Do not use on ash, soot and combustion residues (fireplaces, barbecues, etc.).
Do not use on printer, photocopier or fax toner and ink powder.
Do not vacuum pointed, sharp or stiff objects. The appliance only functions correctly with the collector inserted, and complete with all its parts.
Only usage as detailed in this instruction manual constitutes correct usage. Any other use may damage the appliance and invalidate the warranty.
POLTI S.p.A. reserves the right to make the aesthetic, technical and construction changes it deems necessary, without prior notice.
BATTERY DISPOSAL
The batteries supplied contain substances which are potentially harmful to the environment. The Li-ion batteries can explode if exposed to high temperatures or thrown into a fire.
Before disposing of the battery, make sure that it no longer has charge, leaving the appliance to run until it turns off.
To remove the battery, press the button and slide under the handle (1).
To insert the battery, perform these steps in reverse order until the button clicks.
Do not dispose of the battery as domestic waste, but take it to an official collection centre in compliance with the provisions/Regulations of the Municipality of reference.
POLTI FORZASPIRA D-POWER
Polti Forzaspira D-Power is a practical vacuum that can be used both as an electric upright and as a portable, wireless vacuum guaranteeing maximum freedom of movement. Lightweight, manageable, goes everywhere, making everyday cleaning quick and easy.
1. PREPARING FOR USE
Remove the appliance from the packaging, checking that the product is intact and that all the parts are included.
1.1 CHARGING APPLIANCE
The battery must be fully charged before the product can be used for the first time.
- Make sure that the switch is off and connect the charger connector to the battery plug (2-3).
Connect the charger plug to an easily accessible mains socket.
The battery can be charged both when inserted in the product or separately (2-3).
It is normal for the power supply to heat up during charging.
- The display indicators will flash making it possible to read the charge level (4-5).
- Remove the charger when the battery is charged.
ATTENTION: After using the appliance, wait 30 minutes before recharging the battery.
1.2 APPLIANCE ASSEMBLY
- Connect the brush (6) to the extension hose until you hear a "click". Check that it is firmly attached.
- Attach the extension hose and brush to the central body (7) until you hear a click. Check that it is firmly attached.
- To remove the accessories, press the central locking button.
2. USING THE ELECTRIC URIGHT
2.1 Ensure that Chapter 1 has been followed.
2.2 Polti Forzaspira D-Power features a touch-screen digital display through which it is possible to adjust the suction power choosing among 3 programmes (ECO, MAX, AUTO) and display the information on the battery status. When all three indicators flash, it means the battery is discharged. During use, the indicators will turn off as the battery discharges. When the last indicator starts flashing, it means the appliance will turn off in a few seconds due to the battery being fully discharged.
| maximum battery charging level |
| medium battery charging level |
| minimum battery charging level |
| battery discharged |
BATTERY DURATION PORTABLE MODE
| ECO suction power up to 40 min. | |
| MAX suction power up to 20 min. |
BATTERY DURATION PORTABLE MODE
| ECO suction power up to 35 min | |
| MAX suction power up to 18 min |
2.3 To turn on the appliance, press the button above the handle (8).
The appliance will start to operate with the Eco programme. Touching symbol SET regulates the suction power in this order:


To turn off the device, keep the handle button pressed for 1 second (8).
2.4 With the AUTO programme, the appliance automatically adjusts the suction power based on the type of surface.
2.5 The brush has a roller with soft bristles to allow even the finest dust to be collected. The joint is ideal to reach every corner of a surface.
3. USING ON RUGS AND CARPETS
To favour the proper rotation of the motorized brush, adjust the suction power level to the AUTO programme.
4. USING THE PORTABLE VACUUM
4.1 Ensure that Chapter 1.1 has been followed.
4.2 Remove the extension hose with the brush if previously attached by pressing the central locking button (7).
4.3 Connect the 2 in 1 suction lance.
The 2 in 1 suction lance is recommended for deep cleaning hard-to-reach spots, such as skirting-boards and creases in sofas, armchairs, upholstered furniture and car upholstery. A simple movement and the lance becomes a convenient brush to remove dust from wardrobes, drawers, shelves, etc. (12-13). 4.4 For the Polti Forzaspira D-Power SR550 model, it is possible to connect the mini-turbo brush. Using the mini turbo-brush on armchairs and sofas, car interiors etc., is particularly recommended for the removal of animal fur and hair, thanks to the mechanical action of the roller brush.
4.5 To turn on the appliance, press the button above the handle (8). See chapter 2 to adjust the suction programmes.
To turn off the appliance, keep the handle button pressed for 1 second (8).
5. USING THE VACUUM VERTICALLY WITH EXTENSION
5.1 Ensure that Chapter 1 has been followed.
5.2 Remove the brush.
5.3 Connect the suction lance as needed.
Using the vacuum with extension lets you clean the hardest to reach spots, like ceilings and high shelves (14).
5.4 To turn on the appliance, press the button above the handle (8). See chapter 2 to adjust the suction programmes.
To turn off the device, keep the handle button pressed for 1 second (8).
6. EMPTYING THE DUST COLLECTOR TANK
ATTENTION: Since pressing the button opens the lower end of the container, it is best to do it over a waste bin.
6.1 Turn off the appliance by keeping the handle button pressed for 1 second (8).
6.2 Remove any accessories. Press the button on the dust collector tank to open it and empty the dirt inside (15).
6.3 Close the dust collector tank door again.
7. GENERAL MAINTENANCE
Ensure that the appliance is switched off and disconnected from the mains. Remove the battery.
To clean the outside of the appliance, use a damp cloth and tap water only.
Do not use detergents of any kind.
Store the appliance in a cool, dry place, avoiding extreme cold and heat, to protect battery performance.
7.1 CLEANING THE DUST COLLECTOR TANK AND FILTERS
- Empty the dust-collector tank as described in Chapter 6.
- Detach the tank from the main body by pressing the detach button (16)(17).
- Turn the tank filter anti-clockwise and remove it (18-19-20).
- Remove the tank filter (21-22).
- Rinse all the components under running water and let them dry.
Rinse the tank filter using running water only and shake gently to remove any excess dirt or water residue. Before replacing the filter in the appliance, leave to dry naturally, away from sources of heat, for at least 24 hours.
- Replace everything by performing these steps in reverse order.
ATTENTION: Check that all dust collector components are dry before reassembling them.
7.2 CLEANING THE TOP FILTER
- Remove the top filter cover by rotating it anti-clockwise (23).
- Remove the top filter cover (24) and rinse it with running water only and shake gently to remove any remaining dirt or excess water. Before replacing the filter in the appliance, allow it to dry naturally for at least 24 hours away from heat sources.
- Replace everything by performing these steps in reverse order.
The filters should be fully cleaned approximately every four months.
ATTENTION: Do not clean the filters with the brush, as they can be damaged, thereby reducing the filtering capacity. Do not use detergents, do not rub the filter, and do not wash in a dishwasher.
ATTENTION: Check the condition of filters during cleaning. Replace filters when visibly damaged.
To replace the top filter, remove the cover from the filter (29)
Filters are sold at Polti authorized service centres and at www.polti.com.
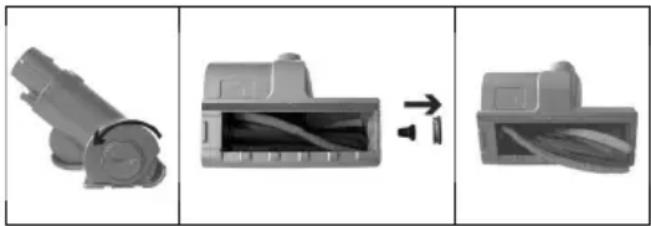
7.3 CLEANING THE BRUSH
To clean the brush (25), proceed as follows:
- Move the locking cursor outwards (26) and remove the roller lock (27).
- Remove the bristle cylinder (28).
Clean the brush bristle cylinder. Makes sure there is no dirt between the gears. If there is, clean it with a fine tool and check that the central pin is free to rotate.

- Replace everything by performing these steps in reverse order.
7.4 CLEANING THE MINI-TURBO BRUSH
only for the Polti Forzaspira D-Power SR550 model)
To clean the mini-turbo brush, proceed as follows:
- Unscrew the mini-turbo brush.
- Remove the bristle cylinder.
- Clean the brush bristle cylinder.
- Replace everything by performing these steps in reverse order.
8. STORAGE
8.1 Ensure that the appliance is switched off and not charging.
8.2 Empty the dust collector tank.
8.3 When not using it for long periods, remove the battery.
- TROUBLESHOOTING
| PROBLEM POSSIBLE CAUSE | SOLUTION | |
| The vacuum cleaner does not turn on. | Battery not charged. Charge the appliance. | |
| Battery not inserted. Insert the battery. | ||
| The brush does not work or makes an unusual sound. | The brush is not attached correctly. | Check and correctly connect the brush. |
| Dirty or blocked brush. Clean the interior of the brush as described in the maintenance paragraph. | ||
| Reduced vacuuming action. Dust collection tank full. Empty | the dust collector tank. | |
| Dirty filters. Proceed with filter | cleaning. | |
| Extension hose clogged. Clean | the extension hose. | |
| Battery charger hot during recharge phase. | This is normal. | |
| The battery charger is connected but the appliance is not charging. | The battery charger is not connected correctly. | Ensure that the battery charger is connected properly. |
| The battery charger or cable is broken. | Contact a service centre. | |
| Batteries flat. Contact a service centre. | ||
| The battery charger is not original model and its voltage is incorrect. | Use the original battery charger provided. | |
| There is extra dust and debris and it falls on the floor. | The dust collector tank has been overfilled. | Empty and clean the tank, fil-ters and brush. |
| The product turns off after few seconds. | The hose, filters or brush may be clogged. | Free and remove the obstruc-tion, clean or replace the fil-ters. |
| Should the problem persist or if it is not in the table, contact an Authorised Polti Service Cen-tre (see www.polti.com for the up-to-date list) or Customer Care. | ||
WARRANTY
This appliance is for domestic and household use only.
It is covered by a legal warranty against defects existing at the time of delivery for two years from the date of purchase, as provided for by European law, unless otherwise specified by conditions (expiry and remedies) in force in the country in which the warranty is requested. The date of purchase must be confirmed with a document valid for tax purposes issued by the seller.
To activate the warranty and for further information, visit www.polti.com
For repairs, the appliance must be accompanied by proof of purchase.
This warranty does not affect the consumer rights deriving from European Directive 99/44/EC as regards some aspects of sale and warranty of consumer goods, rights which the consumer should uphold with respect to the seller.
This warranty is valid in the countries which adhere to European Directive 99/44/EC. For other countries, local regulations on warranties apply.
WHAT THE WARRANTY COVERS
During the warranty, Polti guarantees free repair of a product with a manufacturing or factory defect, and therefore, the client is not liable to pay for any work or materials.
In case of irreparable defects, Polti may replace the product free of charge.
To take advantage of the warranty, the customer should visit one of the Polti Authorised Care Centres with proof of purchase from the seller valid for tax purposes and bearing the date of purchase of the product. Without proof of purchase and the relative date of purchase, the work will require payment. Store the proof of purchase document safely for the whole duration of the warranty.
WHAT THE WARRANTY DOES NOT COVER
- Any defect or damage not deriving from a manufacturing defect.
- Any damage due to improper use or use other than that indicated in the instruction booklet, an integral part of the product sales contract.
- Any damage resulting from force majeure (fires, short circuits) or caused by third parties (tampering);
- Damage caused by the use of non-original Polti parts and repairs or modifications performed by staff or service centres not authorised by Polti;
- Damage caused by the customer;
- Parts (filter, brush, hose, batteries, etc.) damaged by use (consumable goods) or normal wear and tear.
- Any damage caused by limescale;
- Defects resulting from lack of maintenance/ cleaning according to the manufacturer's instructions.
- Attachment of non-original Polti accessories or accessories which have been modified or are unsuitable for the appliance.
Inappropriate use and/or use not compliant with the instructions for use and any other warnings or indications contained in this manual invalidates the warranty.
Polti takes no responsibility for any direct or indirect damage to people, objects or animals caused by non-compliance with the instructions indicated in this instruction booklet regarding warnings for use and product maintenance.
To see the up-to-date list of the Polti Authorised Service Centres, visit www.polti.com.
BIENVENUE DANS LE MONDE DE POLTI
UTILISATION CORRECTE DU PRODUIT
USO CORRECTO DEL PRODUCTO
USO CORRETO DO PRODUCTO
Discover the world and the complete offering of Polti on polti. com, sign up for the newsletter to stay up to date on all the news and offers.