
BK1400R - Electric bike Youin - Free user manual and instructions
Find the device manual for free BK1400R Youin in PDF.

User questions about BK1400R Youin
0 question about this device. Answer the ones you know or ask your own.
Ask a new question about this device
Download the instructions for your Electric bike in PDF format for free! Find your manual BK1400R - Youin and take your electronic device back in hand. On this page are published all the documents necessary for the use of your device. BK1400R by Youin.
USER MANUAL BK1400R Youin
natural_image
Black and white photo of a foldable Youin bicycle with visible branding and front wheel (no text-heavy elements)Thanks for choosing our product. Have fun with this electric bike.
Content
Bike Assembly
Deploy the Product 4
Insert, unlock and remove the battery 4
Technical information
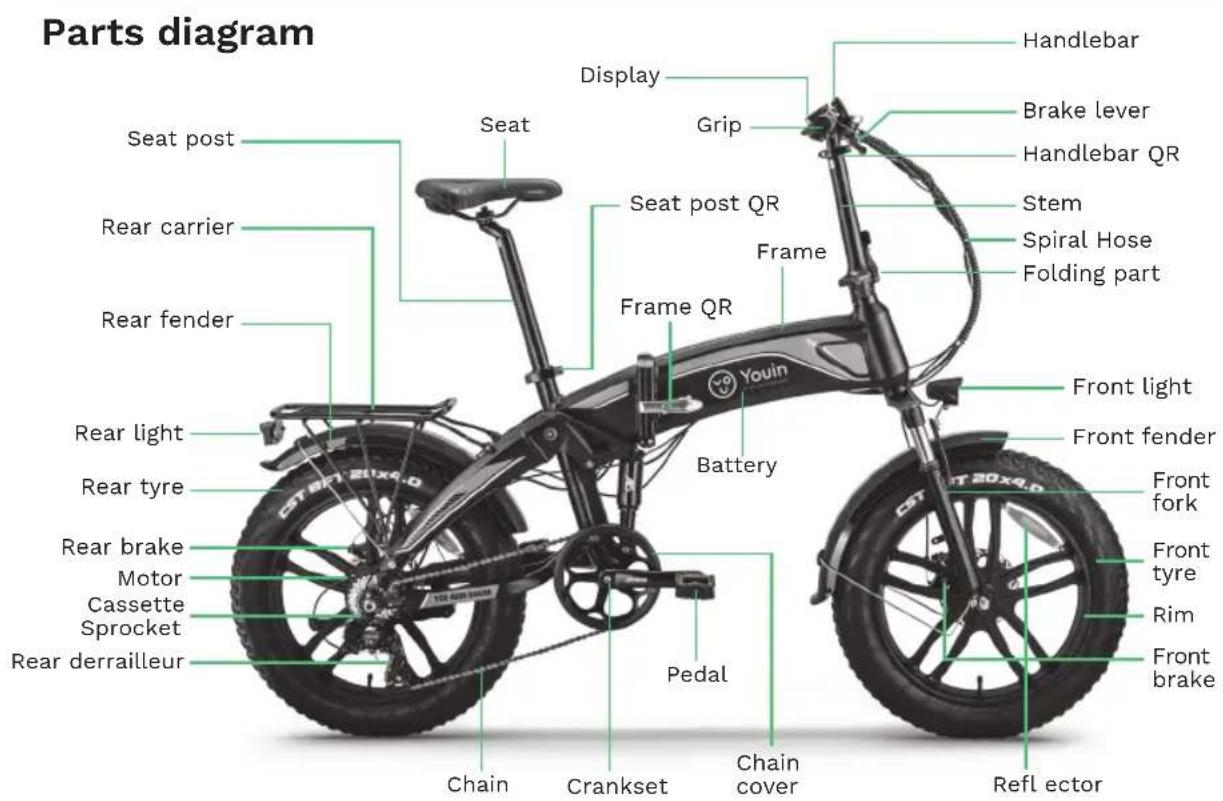
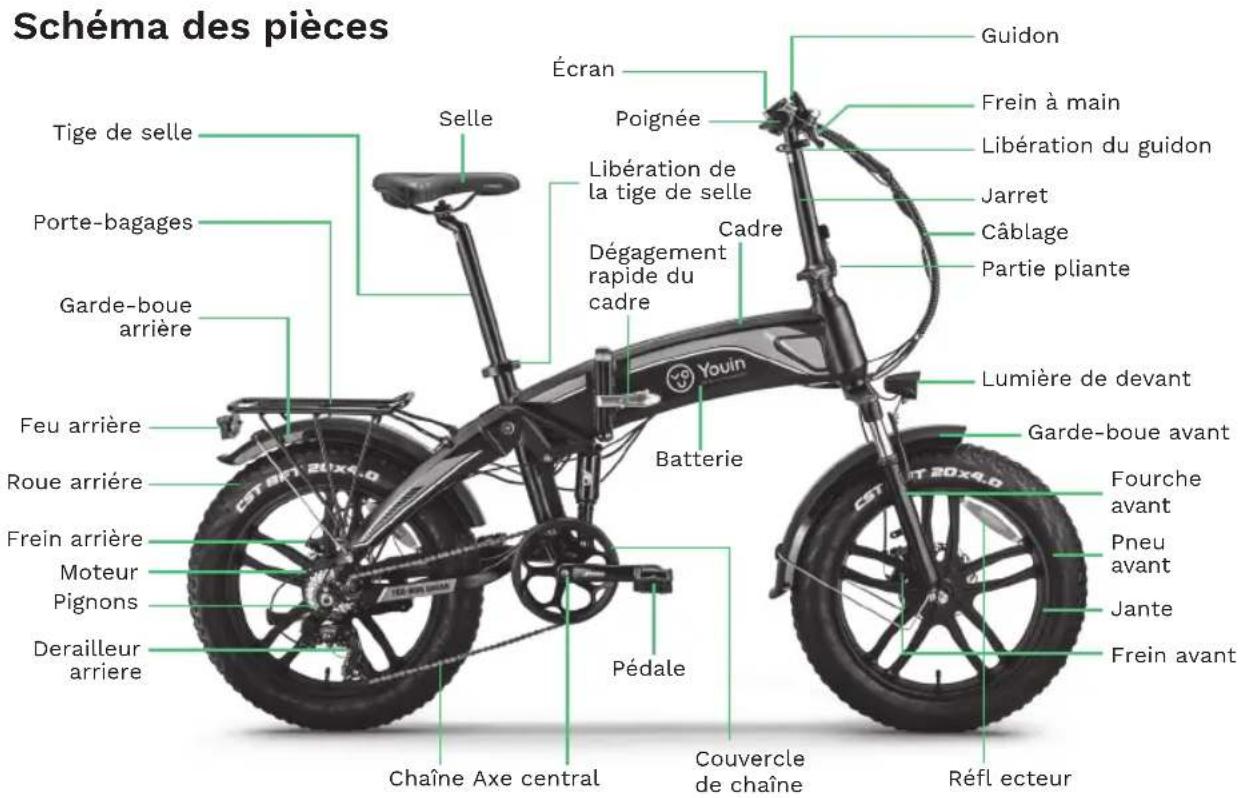
Parts diagram 5
Wiring diagram 5
Technical specifications 6
Security
Use tips 6
Before each use 7
Regular checkups (every 1-2 months)....7
Operation
Screen 7
Front fork 8
Battery charge 9
Checking the battery before using it for the first time 9
Recycling Notice 10
Bike Assembly
Deploy the Product
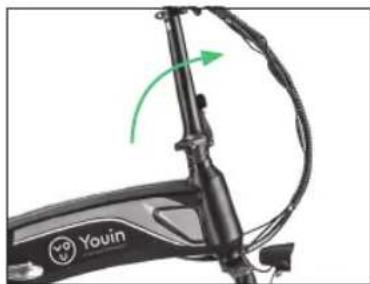
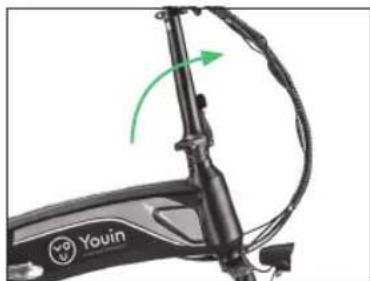
1- Grab the seat and the handlebar. Rotate the front half of the frame forward around the hinge until the front wheel is in the driving position.
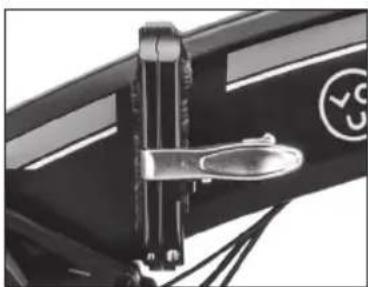
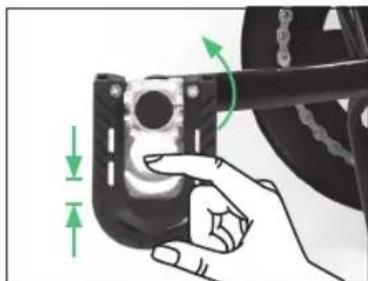
2- Lift the locking lever (picture 1) to fully unfold the frame until you hear a click. Flip the lever forward and close it so the frame is secured.
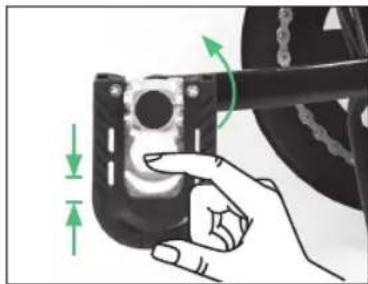
3- Turn the pedals to their horizontal position (picture 2).
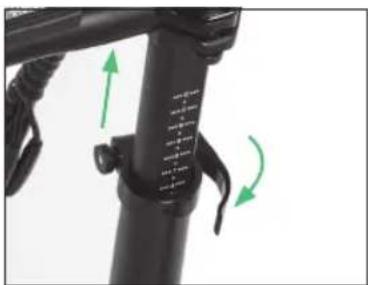
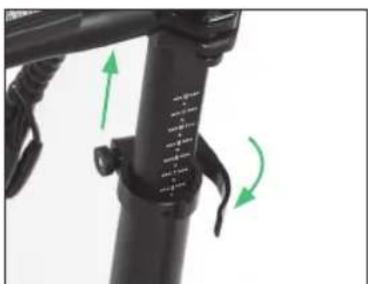
4- Raise the handlebar to its vertical position and close its locking lever (picture 3).
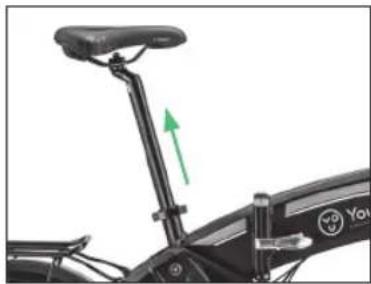
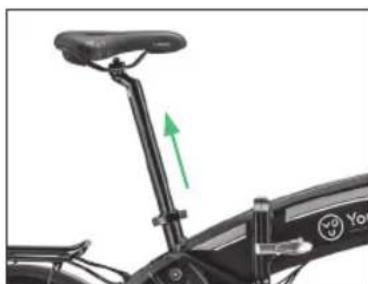
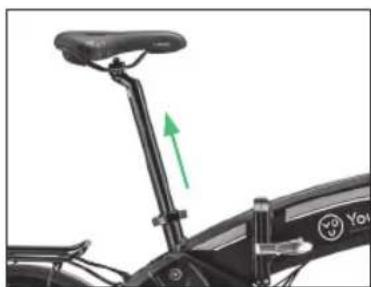
5- Place the handlebar and the saddle at the desired height (picture 4 and 5).
natural_image
Close-up of a mechanical lever mechanism with a circular logo on the side (no readable text or symbols)Picture 1
natural_image
Hand holding a mechanical component with green directional arrows indicating motion or force (no text or symbols)Picture 2

natural_image
Close-up of a black Youin bicycle scooter with green directional arrow indicating motion (no text or symbols on body)Picture 3
natural_image
Close-up of a black bicycle leg with green directional arrows indicating motion or movement (no text or symbols)Picture 4
natural_image
Close-up of a black bicycle seat with green directional arrow indicating motion (no text or symbols)Picture 5
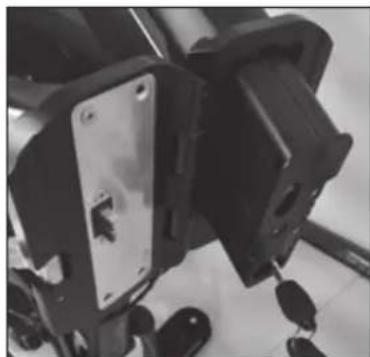
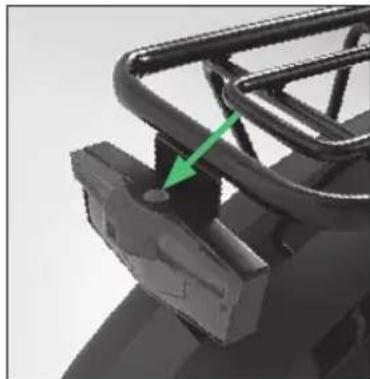
Insert, unlock and remove the battery
The You-ride Dakar battery is located inside the bike frame, follow these steps to remove it:
1- Open the lock lever and fold the bike.
2- Unlock the battery with the key.
3- Take out the battery.
natural_image
Close-up of mechanical components with no visible text or symbolsTechnical information
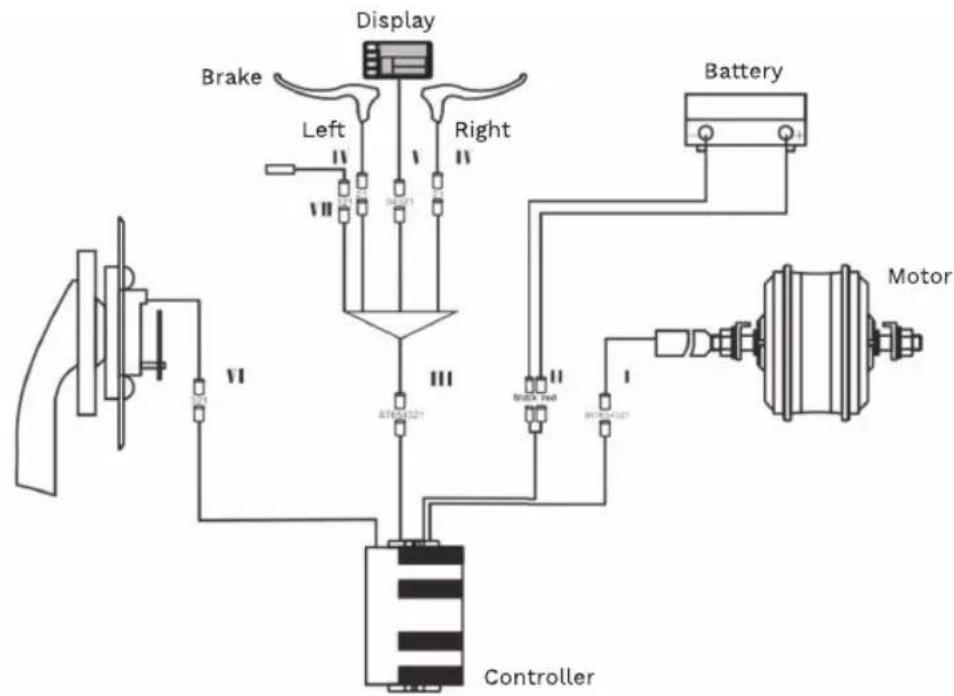
Wiring diagram
flowchart
graph TD
    A["Brake"] --> B["Left"]
    B --> C["Display"]
    C --> D["Right"]
    D --> E["Battery"]
    E --> F["Motor"]
    F --> G["Controller"]
    G --> H["Control"]
    H --> I["Motor"]
    style A fill:#f9f,stroke:#333
    style F fill:#ccf,stroke:#333
    style G fill:#cfc,stroke:#333
Technical information
Technical specifications
| Motor / Battery 36V 250W / 36V 10Ah |
| Maximum speed / Range 25 km-h / 35-45 km |
| Wheel / Rim 20" / Alloy |
| Crankset Prowheel |
| Shifter Shimano |
| Tires CST |
| Brake Disk |
| Saddle Gel |
| Frame 20" alloy folding |
| Cassette Sprocket Shimano |
| Chains KMC |
| Front fork Suspension (Lockable) |
| Rear suspension |
| Front light |
| Rear derailleur |
| Net weight / maximum load |
Security
Use tips
This electric bicycle is designed to transport a single person in each use. Condition your bicycle if you want to transport luggage and try not to exceed the maximum load for which it was designed (130 kg).
Failure to follow the safety advice, or activities that go beyond its intended use, such as going down steps, performing stunts or making improper repairs, will exempt both the manufacturer and the dealer from all liability.
It is recommended to always wear a helmet. In case of driving at night, make sure to turn on the lights, and if possible, also wear a reflective band or vest.
Remember to clean your bike regularly. To do this, avoid the use of pressurized water, since the electronic components can get wet, which can cause a malfunction and even personal injury.
Carefully clean painted surfaces, plastic parts and electronic components. Never use abrasive products such as seawater, saltpeter, soda, etc.
Security
Before each use
Before each ride, you should check that the brakes are secure and working properly. The handlebar and seat post must be in the correct position and firmly fixed. The wheels must have enough pressure and all the nuts and bolts must be well tightened. The battery must have sufficient charge for the use that we are going to give it.
Regular checkups (every 1-2 months)
These controls guarantee the perfect condition of the e-bike and optimal operation.
1- Check that the welds on the frame and fork are in good condition and show no signs of corrosion.
2- Check that the front and rear brakes are attached to the chassis and brake effectively.
3- Check tire pressure and tread depth.
4- Check that the rims are well secured and do not have any loose or broken spokes.
5- Check that the handlebar and the seat post are well inserted and firmly tightened.
6- Check that the cables are sufficiently greased and that they have no obstacles in their path.
7- Check that the battery is charged enough.
Operation
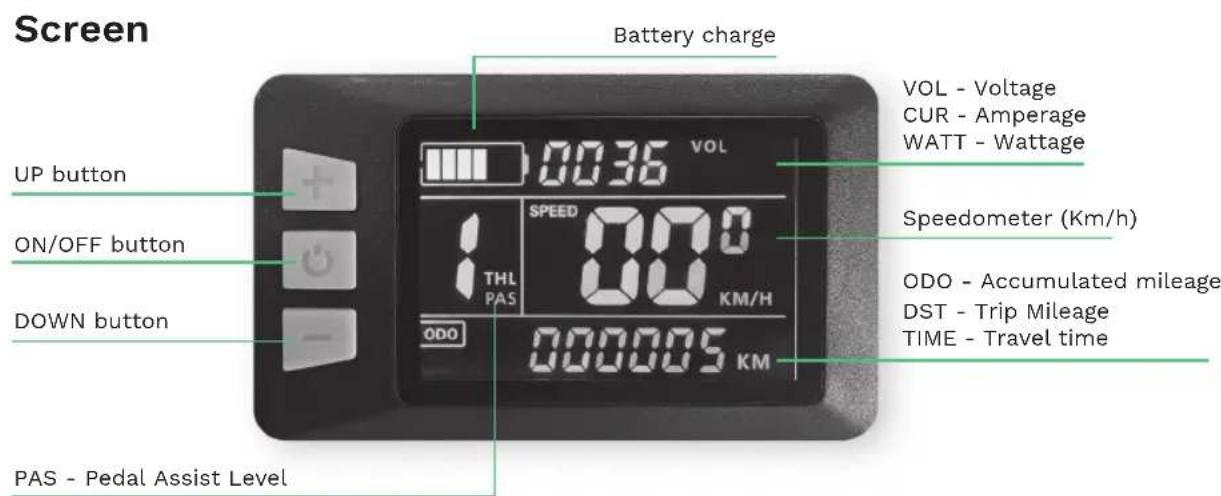
System on/off
Press and hold ⏻ for a few seconds to turn on your You-ride Dakar. Long press ⏻ again to turn it off.
Operation
Change the information on the screen
Briefly press ⏻ to change the information on the screen. You can toggle between the following information:
VOL - Voltage / CUR - Amperage / WATT - Wattage
ODO - Accumulated mileage / DST - Trip mileage / TIME - Trip time
PAS level adjustment
Press + or - to adjust the level of pedal assistance.
Accompaniment mode
If you press and hold the button for 3 seconds, it will start the motor at a constant speed of 6km/h to carry the bike effortlessly while walking next to it. Pressing the brake will deactivate the accompaniment mode.
Do not use it if we are mounted on it. We recommend not to abuse this assistance, especially on long or very steep slopes.
Front light on/off
Long press for + for 3 seconds to turn on the front light. Long press + again to turn it off.
Rear light on/off
The rear light is turned on directly from the power button above it. Press several times to switch between the 3 available modes: steady light, flashing light 1 and flashing light 2.
The tail light is powered by 2 batteries, please remove the screws and open the cover to change them when you run out of battery.
natural_image
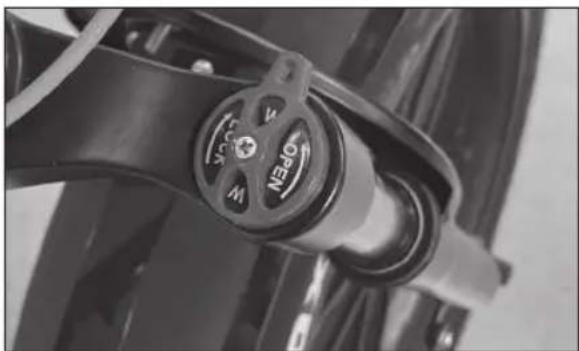
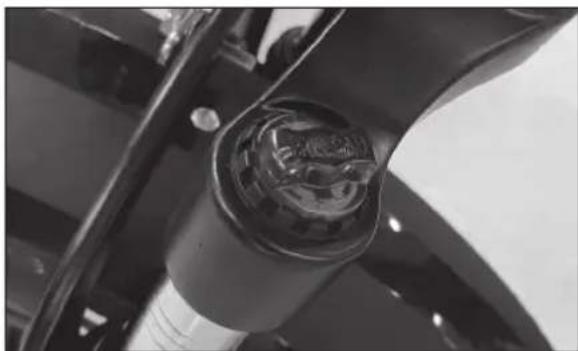
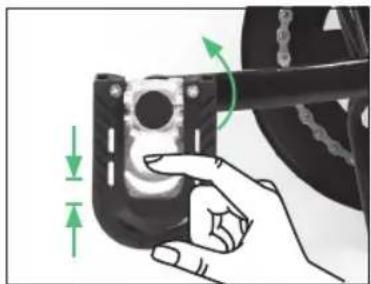
Close-up of a mechanical component with a green arrow pointing to a small feature (no visible text or symbols)Front fork
In the front fork you can lock or unlock the suspension (picture 1) and adjust its pressure (picture 2).
natural_image
Close-up of a motorcycle's brake caliper with no visible text or symbolsPicture 1 Picture 2
natural_image
Close-up of a car's front wheel and engine compartment (no visible text or symbols)Operation
Battery charge
When you finish the trip or the battery is running low, charge it immediately.
Charging methods can be divided into two types: one is to take out the battery and then charge it, the other is to charge the battery directly on the electric bicycle. Connect the charger plug to the battery charging port and to the power. Connect it to a 220V / 50-60Hz power supply.
There is an LED indicator on the power supply. The LED is red when the battery is charging. The LED turns green when the battery is fully charged.
Recommended charging time: 5-6 hours.
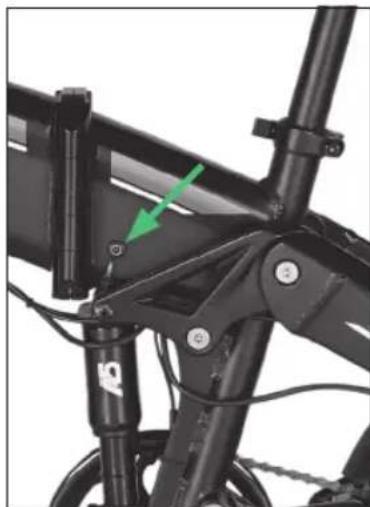
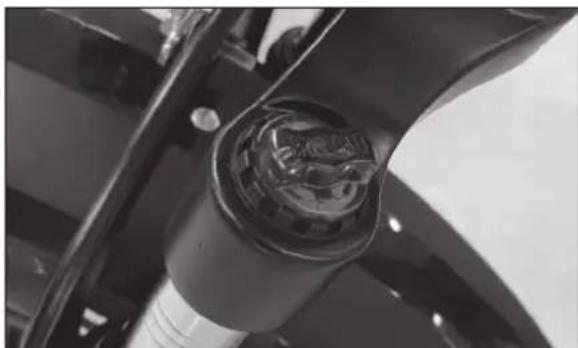
natural_image
Close-up of a black bicycle frame with visible structural components and a green arrow indicating a specific component (no text or symbols)After charging, please unplug the input plug (from the wall outlet) first, and then unplug the output plug (from the bike). The battery charger must have constant voltage. Fluctuating voltage or fluctuating power supply of any kind can damage the storage cells of the battery.
Checking the battery before using it for the first time
WARNING
- The battery is supplied partially charged. To ensure the full capacity of the battery, please fully charge it before using it for the first time.
Battery care
- Even with proper care, rechargeable batteries don't last forever. Each time the battery is discharged and subsequently recharged, its relative capacity decreases by a few percent. You can maximize the life of your battery by following the instructions in this guide. The battery should be fully charged immediately upon receipt for the full recommended charging time
- For a full 100% charge, leave the battery on the charger for a full hour after the indicator light on the charger turns green.
- Lithium-ion batteries have no "memory". Partial charge/discharge cycles will not harm the batteries capacity or performance.
- The nominal output capacity of a battery is measured at 25^ . Any variation in this temperature will alter the performance of the battery and shorten its expected life. High temperatures especially reduce the overall battery life and operating time.
- Always make sure to turn the bike's ignition switch to "OFF" after each use. If you leave the power switch in the "ON" position, or your electric bike has not been charged for an extended period of time, the battery may reach a point where it will no longer hold a charge.
Recycling Notice
Electrical and electronic equipment and batteries contain materials, components and substances that can be harmful to you and your environment, as long as the waste materials (waste electrical and electronic equipment and batteries) are not managed correctly.
Electrical and electronic equipment and batteries are marked with the crossed out bin, as shown below. This symbol means that old electrical and electronic equipment and batteries should not be thrown away; they must be removed separately.
As the end user, it is necessary for you to deliver the exhausted batteries to the appropriate collection points. In this way, you ensure that the batteries are recycled in accordance with the legislation and do not cause any environmental damage.
natural_image
Close-up of a mechanical component with a metallic handle and circular logo (no readable text or symbols)Imagen 1
natural_image
Hand holding a mechanical component with green directional arrows indicating motion or force (no text or symbols)Imagen 2

natural_image
Close-up of a black Youin scooter body with green arrow indicating motion (no text or symbols on the body)Imagen 3

Imagen 4

natural_image
Close-up of a black bicycle's side seat and overhead suspension, with green arrows indicating motion direction (no text or symbols)Imagen 5
natural_image
Close-up of mechanical components with no visible text or symbolsInformación Técnica
natural_image
Close-up of a mechanical component with a green arrow pointing to a small component (no visible text or symbols)Horquilla frontal
natural_image
Close-up of a motorcycle's brake caliper with no visible text or symbolsImagen 1 Imagen 2
natural_image
Close-up of a car's wheel assembly with a metallic brake caliper (no visible text or symbols)Funcionamiento
Carga de la batería
natural_image
Close-up of a black bicycle frame with visible structural components and a green arrow pointing to a component (no text or symbols)Information technique
natural_image
Close-up of a mechanical component with a metallic lever and circular logo (no readable text or symbols)Image 1
natural_image
Hand holding a mechanical component with green directional arrows indicating motion or force (no text or symbols)Image 2

natural_image
Close-up of a black Youin bicycle scooter with green directional arrow indicating motion (no text or symbols on body)Image 3
natural_image
Close-up of a black bicycle leg with green directional arrows indicating motion or movement (no text or symbols)Image 4
natural_image
Close-up of a black electric bicycle with a green arrow pointing to the seat (no text or symbols visible)Image 5
natural_image
Close-up of electrical components including a black rectangular device with mounting holes and wiring (no visible text or symbols)Information Technique
natural_image
Close-up of a black mechanical component with a green arrow pointing to a small feature (no text or symbols visible)Fourche avant
natural_image
Close-up of a motorcycle's brake lever with a circular dial indicator (no text or symbols visible)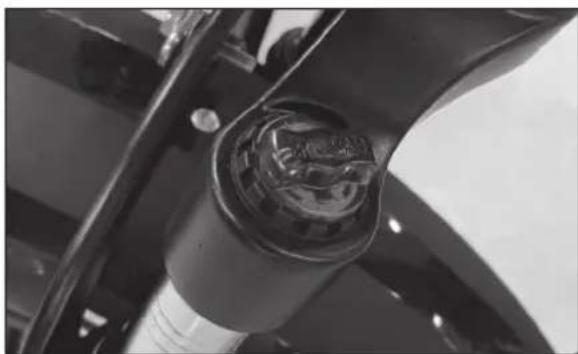
natural_image
Close-up of a car's front wheel assembly with visible engine compartment (no text or symbols)Imagen 1 Image 2
natural_image
Close-up of a black bicycle frame with visible structural components and a green arrow indicating a specific component (no text or symbols)natural_image
Close-up of a black bicycle seat with a metallic handle and logo (no readable text or symbols)immagine 1

natural_image
Hand holding a mechanical component with green directional arrows indicating motion or force (no text or symbols)immagine 2
natural_image
Close-up of a black Youin scooter body with green arrow indicating motion (no text or symbols on the body)immagine 3

immagine 4
natural_image
Close-up of a black bicycle's side seat and overhead suspension, with green arrows indicating motion direction (no text or symbols)immagine 5
natural_image
Close-up of mechanical components with no visible text or symbolsnatural_image
Close-up of a mechanical component with a green arrow pointing to a small component (no visible text or symbols)Forcella anteriore
natural_image
Close-up of a motorcycle brake lever with visible valve and grip (no text or symbols)natural_image
Close-up of a car's engine compartment showing internal components and wiring (no visible text or symbols)Funzionamento
Carica batterie
natural_image
Close-up of a black bicycle frame with visible structural components and a green arrow pointing to a component (no text or symbols)natural_image
Close-up of a mechanical component with a metallic lever and circular logo (no readable text or symbols)Imagem 1

natural_image
Hand holding a mechanical component with green directional arrows indicating motion or force (no text or symbols)Imagem 2
natural_image
Close-up of a black Youin scooter body with green directional arrows indicating motion (no text or symbols on the body itself)Imagem 3

natural_image
Close-up of a black bicycle leg with green directional arrows indicating motion or movement (no text or symbols)Imagem 4
natural_image
Side view of a black electric scooter with a green arrow indicating the seat and body (no text or symbols)Imagem 5
Insira, destrave e remova a bateria
natural_image
Close-up of mechanical components with no visible text or symbolsInformação técnica
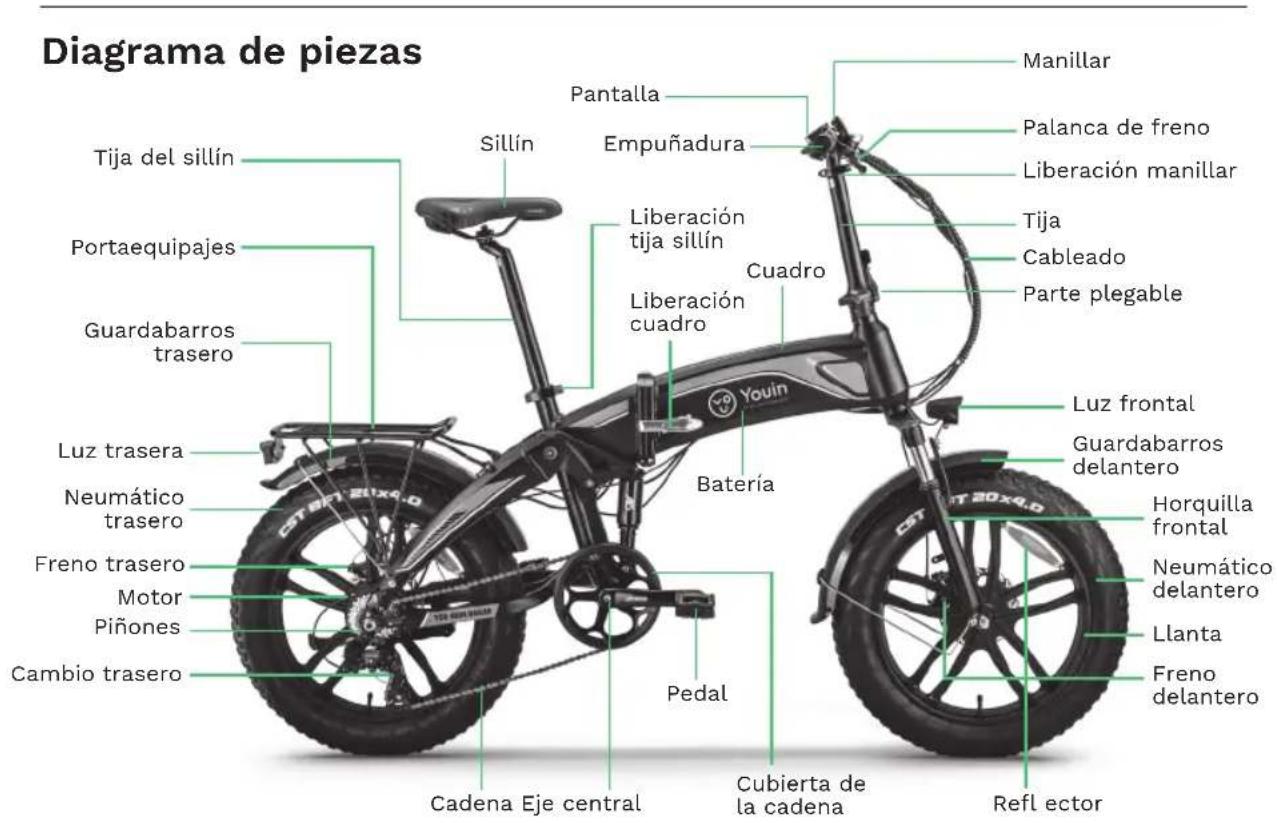
Diagrama de peças
natural_image
Close-up of a mechanical component with a green arrow pointing to a small feature (no visible text or symbols)Garfo dianteiro
natural_image
Close-up of a motorcycle's brake caliper with rotary dial and handle (no visible text or symbols)Imagem 1 Imagem 2

natural_image
Close-up of a car's engine compartment showing internal components (no visible text or symbols)Funcionamento
Carga da bateria
natural_image
Close-up of a black bicycle frame with visible structural components and a green arrow pointing to a component (no text or symbols)Distributor & manufacturer authorized representative:
Hereby, ERSAX TRADE, S.L. declares that these equipments are in compliance with the essential requirements and other relevant provisions of Directives 2014/30/EU (EMC), 2014/35/EU (LVD) and 2006/42/EC (MD)
With the standard or other normative documents:
- Content
- Bike Assembly
- Technical information
- Security
- Operation
- Deploy the Product
- Insert, unlock and remove the battery
- Use tips
- Before each use
- Regular checkups (every 1-2 months)
- System on/off
- Change the information on the screen
- PAS level adjustment
- Accompaniment mode
- Front light on/off
- Rear light on/off
- Front fork
- Battery charge
- Checking the battery before using it for the first time
- WARNING
- Battery care
- Recycling Notice
- Información Técnica
- Horquilla frontal
- Funcionamiento
- Carga de la batería
- Information technique
- Fourche avant
- Forcella anteriore
- Funzionamento
- Carica batterie
- Insira, destrave e remova a bateria
- Informação técnica
- Garfo dianteiro
- Funcionamento
- Carga da bateria
Brand : Youin
Model : BK1400R
Category : Electric bike