PIXMA TS7451a - Printer CANON - Free user manual and instructions
Find the device manual for free PIXMA TS7451a CANON in PDF.
User questions about PIXMA TS7451a CANON
0 question about this device. Answer the ones you know or ask your own.
Ask a new question about this device
Download the instructions for your Printer in PDF format for free! Find your manual PIXMA TS7451a - CANON and take your electronic device back in hand. On this page are published all the documents necessary for the use of your device. PIXMA TS7451a by CANON.
USER MANUAL PIXMA TS7451a CANON
Read Safety and Important Information (addendum) first.
natural_image
Icon showing a printer with a paper airplane and a document, symbolizing file transfer or receipt (no text present)Installing the Printer......page 1
natural_image
Two white icons: a laptop and a smartphone, on a solid red background (no text or symbols)Connecting to a Computer, Smartphone or Tablet...... page 4
natural_image
Line drawing of a hand operating a printer with control panel (no text or symbols)
text_image
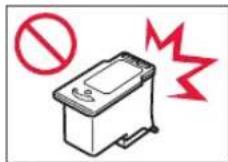
Diagram showing a hand holding a device with a prohibition symbol, indicating no liability or prohibition in the process.Setting Up the Printer

For Setup, visit the URL
https://ij.start.canon/TS7450
or scan the code with your mobile device

- For users without an Internet-connected environment, follow the instructions below.
1. Box Contents
• FINE Cartridges
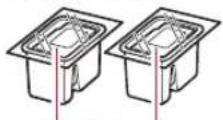
Color Black
Power Cord
- Setup CD-ROM
● Safety and Important Information
- Getting Started (this manual)
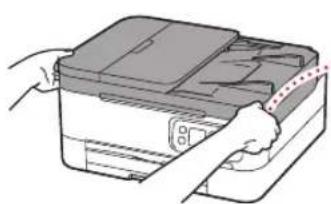
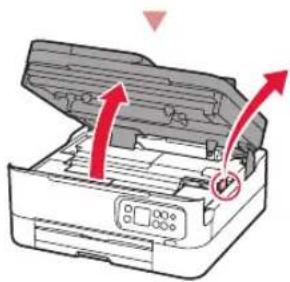
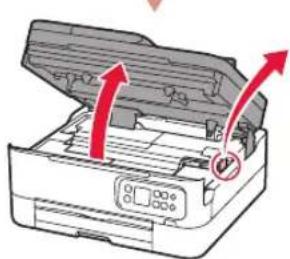
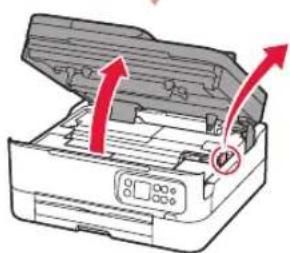
2. Removing Packing Materials

1 Remove and dispose of any packing materials and orange tape.
2 Open the scanning unit / cover, remove and dispose of the orange tape and protective material inside.
natural_image
Illustration of a printer being inserted into a container, showing paper and spine (no text or symbols)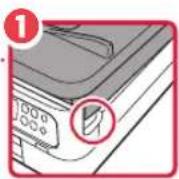
natural_image
Illustration of a printer with red arrows indicating motion or movement, no text or symbols present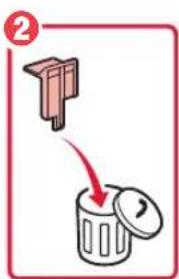
text_image
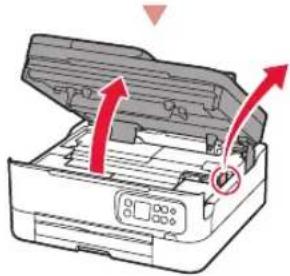
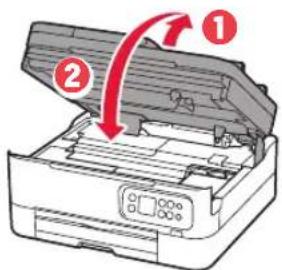
②3 Close the scanning unit / cover.
- Open the scanning unit / cover fully and then close it.
text_image
Diagram showing printer operation with numbered callouts indicating steps ① and ②
Caution
Watch your fingers.
3. Turning on the Printer

1 Connect the power cord.
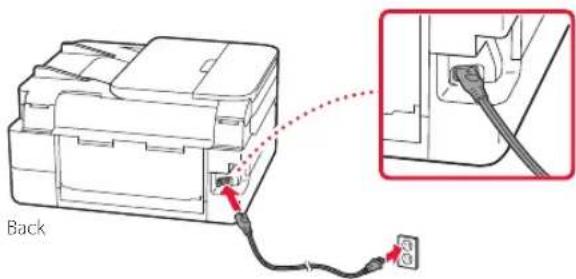
text_image
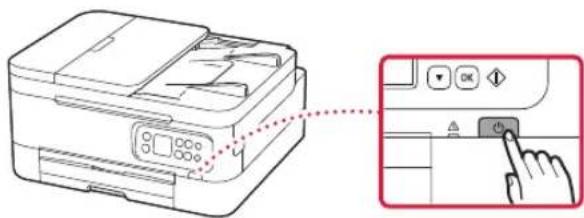
Back2 Press the ON button.
natural_image
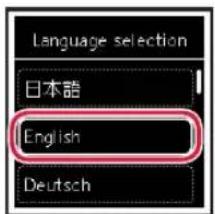
Line drawing of a printer with an open control panel and hand cursor pointing to the button (no text or symbols)3 Use the ▲ and ▼ buttons to select a language, and then press the OK button.
text_image
Language selection 日本語 English Deutsch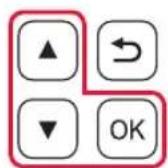

text_image
Set to English? Yes CancelSetting Up the Printer
4. Installing the FINE Cartridges

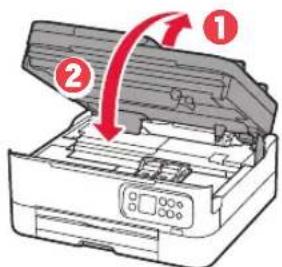
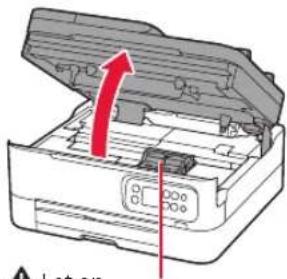
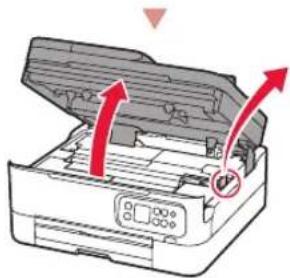
1 Open the scanning unit / cover.
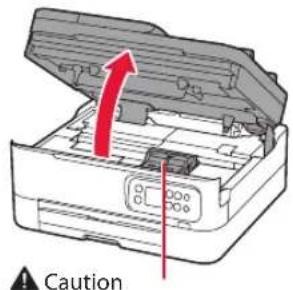
text_image
CautionDo not touch the FINE cartridge holder until it stops moving.
2 Pinch and open the ink cartridge locking cover on the left-hand side.
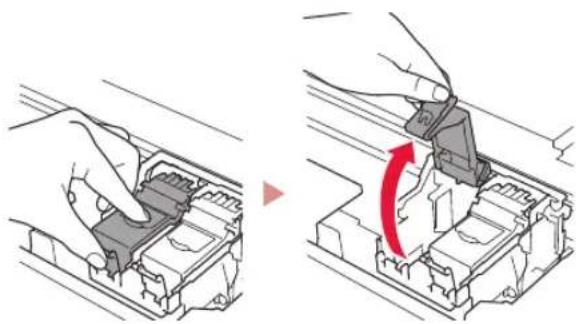
natural_image
Diagram showing two steps of a mechanical assembly: one being inserted into a component, the other adjusting a component with a red arrow indicating rotation (no text or symbols present)3 Remove the Color FINE cartridge from the container and remove the protective tape.
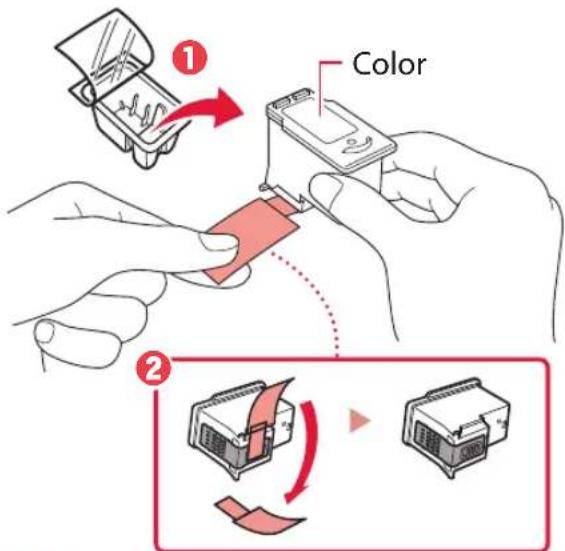
text_image
① Color ②Important
- Do not touch the ink on the protective tape. It could stain your hands or surrounding objects.
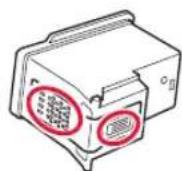
- Do not touch the areas shown in the figure. Otherwise, the printer may not print correctly.
4 Set the Color FINE cartridge in the FINE cartridge holder.
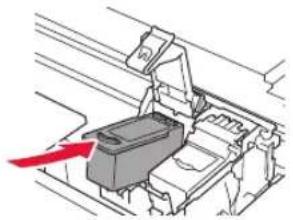
natural_image
Diagram of a vehicle door handle assembly with a red arrow indicating direction (no text or symbols present)Important
Do not bump the FINE cartridge. Doing so may cause a malfunction.

5 Push down the ink cartridge locking cover firmly until it snaps into place to close it completely.
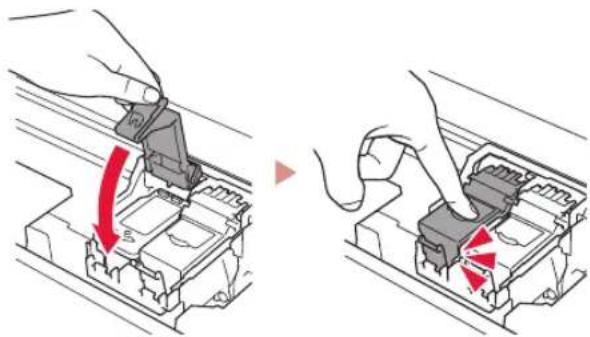
natural_image
Two-step diagram showing hand inserting a component into a device, with red arrows indicating direction (no text or symbols)6 Repeat steps 2 to 5 and install the Black FINE cartridge as well, on the right-hand side.
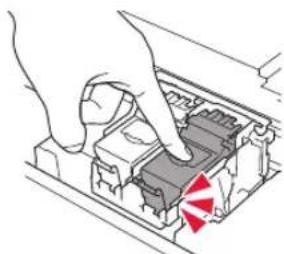
natural_image
Illustration of hands inserting a device into a container with a red warning symbol (no text or labels)7 Close the scanning unit / cover.
• The printer will start initializing.
text_image
Diagram showing printer operation with numbered arrows indicating process flowCaution
Watch your fingers.
5. Loading Paper

1 Press the OK button.

text_image
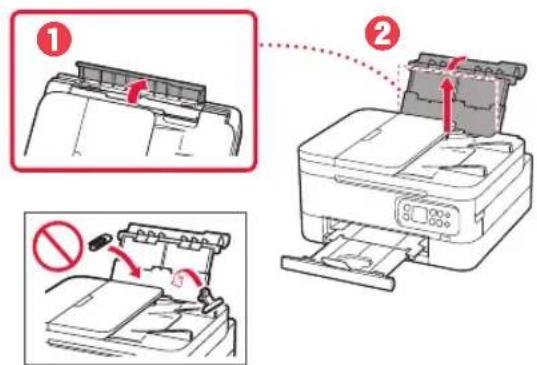
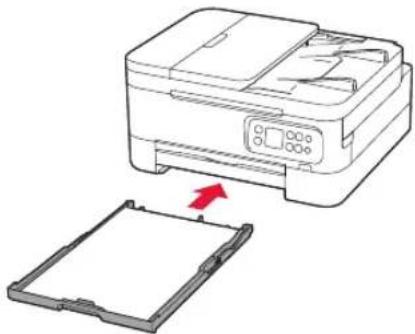
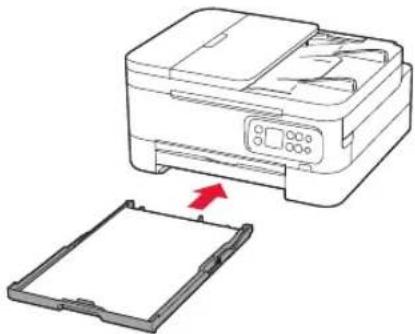
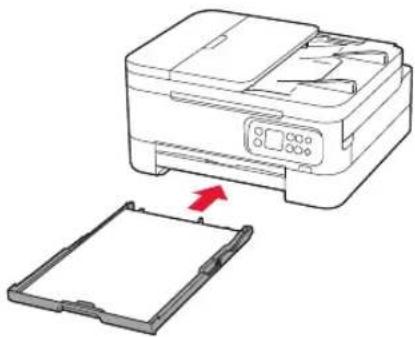
Start alignment to improve print quality? Yes No2 Remove the cassette from the printer.
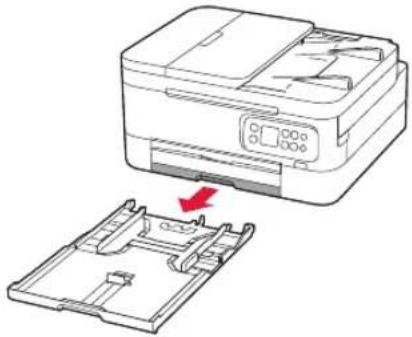
natural_image
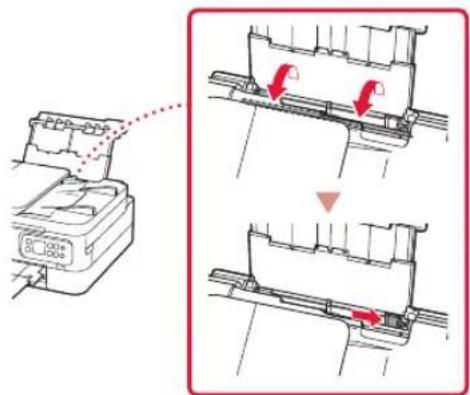
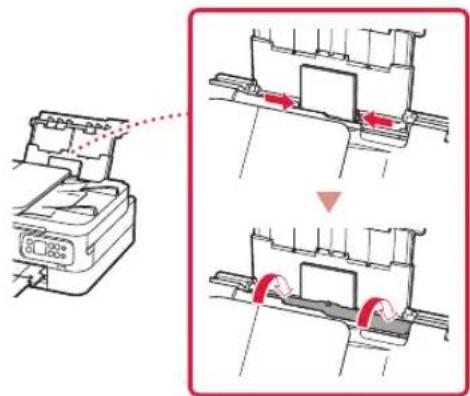
Diagram showing a printer being inserted into a plastic case, with a red arrow indicating the process (no text or symbols present)3 Slide apart the paper guides.
- Slide the right paper guide to the right edge. Align the front paper guide with the Letter or A4 mark.
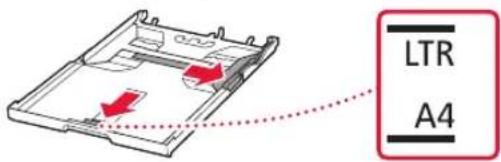
text_image
LTR A44 Load paper.
- Load 2 or more sheets of Letter or A4 sized plain paper.
- Place the paper against the front paper guide, and align the right paper guide to the width of the paper.
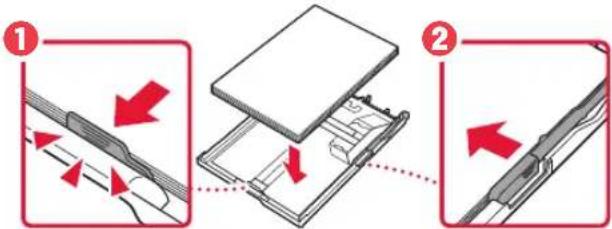
text_image
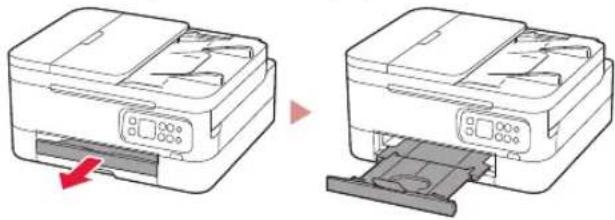
Diagram illustrating two-step assembly process of a device with red arrows indicating movement and alignment.5 Replace the cassette.

natural_image
Diagram showing a printer being inserted into a plastic tray, with a red arrow indicating the process (no text or symbols present)6 Pull out the paper output tray.

natural_image
Two line drawings of a printer with a red arrow indicating compression or disassembly (no text or symbols present)7 Press the OK button.

text_image
Load 2 or more sheets of A4 or Letter sized plain paper in cassette and press OK. Performing initial adjustments... Please wait momentarily About 1 minuteNote
The alignment process prints out two double sided sheets.
Do not pull out the paper or use the printer until alignment is complete.
8 Check that the following screen appears.
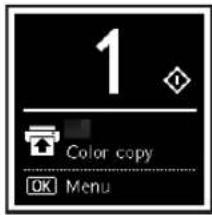
text_image
1 Color copy OK MenuIf you will use the printer without connecting any other devices, setup is now complete.
Select the connection method that best matches how you will use the printer.
• To use the printer without connecting to any other devices
→ Setup is now complete.
• To use the printer connecting to a computer or smartphone
→ Proceed to the next page.
What device are you connecting?

Computer Smartphone

Computer and smartphone

6-a
Connecting to a Computer
If you are using multiple computers, perform these steps on each computer.

1 Access the Canon website from your computer.

https://ij.start.canon
2 Select Set Up.
3 Enter your printer's model name and click Go.
4 Click Start.
5 Click (B) Connecting to a Computer/Smartphone.
• The following steps are for Windows users.
6 Click Download.
7 Run the downloaded file.
8 Click Start Setup.
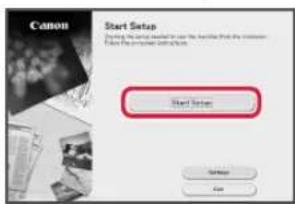
text_image
Canon Start Setup Don't have any options to use the other. But if you want to use the computer will choose. Start Setup OK Cancel9 Follow the on-screen instructions.
• These operations may take some time.
- To connect to a smartphone as well, see "6-b. Connecting to a Smartphone" on page 5.

Using the Setup CD-ROM
Double click EasySetup.exe in the CD-ROM, and then continue from step 3. If you do not have an internet connection, open the win folder in the CD-ROM and double click SETUP.exe. This will install the printer driver.
6-b
Connecting to a Smartphone
If you are using multiple smartphones, perform these steps on each smartphone.

1 Install the "Canon PRINT Inkjet/SELPHY" app on your smartphone.
- Search for "Canon PRINT" in App Store, or Google Play.
- Access the Canon website to download the app.

2 Open the installed app, and follow the on-screen instructions in the app to add your printer.
Once you have added your printer, you can print from your smartphone. To print photos, see "Loading Photo Paper" on page 6.
Loading Photo Paper
Photo paper can only be loaded in the rear tray.
1 Open the rear tray cover and extend the paper support.
text_image
Diagram illustrating printer press operation with numbered steps and a prohibition symbol for disassembly2 Open the feed slot cover and slide the right-hand side paper guide to the far right.
text_image
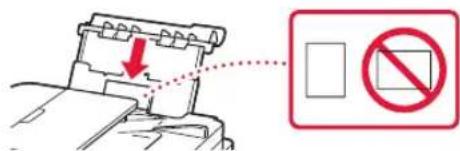
Technical diagram showing a device with red arrows indicating movement or change, likely illustrating a process or assembly.3 Load several sheets of photo paper with the print side facing up.
text_image
Diagram showing a printer with a downward arrow and a prohibition symbol, indicating no printer.4 Align the paper guide to the paper, and then close the feed slot cover.
- Follow the on-screen instructions to set information for the loaded paper.
text_image
Diagram illustrating a printer operation with red arrows indicating movement and rotation stepsCopying
1 Turn on the printer.
2 Load Letter or A4 sized plain paper.
3 Open the document cover and place the document face down on the platen. Align the document with the alignment mark (↓).

text_image
Diagram showing printer operation with red arrows indicating process flow and a magnified view of the right-hand corner detail.4 Close the document cover.
5 Press the OK button.
6 Select Copy settings, and then press the OK button.
7 Specify print settings using the ▲, ▼ and OK buttons.
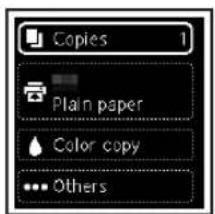
text_image
Copies 1 Plain paper Color copy Others8 Press the Start button.
Configuration de l'imprimante

https://ij.start.canon/TS7450
text_image
Diagram illustrating the process of printer press application, showing steps from opening to recycling with labeled instructions.text_image
Diagram showing printer operation with numbered arrows indicating process flowAttention
natural_image
Line drawing of a printer with a hand pressing a button on the right side (no text or symbols present)text_image
Attentionnatural_image
Illustration showing two steps of a mechanical assembly: one being inserted into a component, the other adjusting a component with a red arrow indicating rotation (no text or symbols present)natural_image
Diagram of a vehicle front panel with a red arrow pointing to the component (no text or symbols present)Important
natural_image
Two-step diagram showing hand inserting a component into a device, with red arrows indicating direction (no text or symbols)natural_image
Illustration of hands installing or adjusting a device into a container with a red warning symbol (no text or labels)text_image
Diagram showing printer operation with numbered arrows indicating process flowAttention
natural_image
Diagram showing a printer being inserted into a plastic case, with a red arrow indicating the process (no text or symbols present)text_image
Diagram illustrating the step-by-step assembly of a device with red arrows indicating direction of movement.natural_image
Diagram showing a printer being inserted into a plastic tray, with a red arrow indicating the process (no text or symbols present)natural_image
Two line drawings of a printer with a red arrow indicating compression or disassembly (no text or symbols present)text_image
Canon Commencer is configuration. Commencer is configuration Position Finishnatural_image
Diagram of a mechanical component with a red arrow indicating a specific section (no text or symbols present)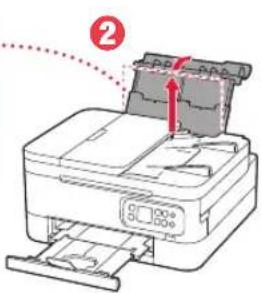
text_image
Diagram showing printer operation with labeled step 2 and directional arrow indicating movement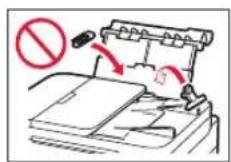
text_image
Technical diagram showing a device's internal structure before and after assembly, with red arrows indicating direction of movement.text_image
Diagram showing a printer with a red arrow pointing to a paper sheet and a prohibition symbol.text_image
Diagram illustrating a printer's internal structure and adjustment mechanism, with Chinese annotations indicating red arrows and directional arrows.Copie
text_image
Diagram showing printer operation with red arrow indicating process and magnified view of corner detailhttps://ij.start.canon/TS7450

natural_image
Illustration of a printer being inserted into a paper case (no text or symbols visible)
natural_image
Illustration of a printer with red arrows indicating process flow (no text or symbols)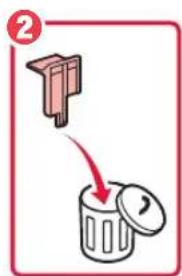
text_image
2text_image
Diagram showing printer operation with numbered arrows indicating process flowVorsicht
natural_image
Line drawing of a printer with a hand pressing a button on the page (no text or symbols present)text_image
Set to English? Yes Cancelnatural_image
Illustration showing two steps of a mechanical assembly: adding a component to a housing, then adjusting a red arrow (no text or symbols present)natural_image
Diagram of a vehicle door handle assembly with a red arrow indicating direction (no text or symbols present)Wichtig
text_image
Diagram showing two-step installation of a device with red arrows indicating direction of movement or change.natural_image
Illustration of hands inserting a component into a device (no text or symbols visible)text_image
Diagram showing printer operation with numbered arrows indicating process flowVorsicht
text_image
Start alignment to improve print quality? Yes Nonatural_image
Diagram showing a printer being inserted into a plastic case, with a red arrow indicating the process (no text or symbols present)text_image
Diagram illustrating two-step assembly process of a device with red arrows indicating direction of movementnatural_image
Diagram showing a printer being inserted into a plastic sheet, with a red arrow indicating the process (no text or symbols present)natural_image
Two line drawings of a printer with a red arrow indicating compression or disassembly (no text or symbols present)text_image
Load 2 or more sheets of A4 or Letter sized plain paper in cassette and press OK. Performing initial adjustments... Please wait momentarily About 1 minute
Hinweis
natural_image
Simple line drawing of a smartphone inside a rounded rectangle (no text or symbols)6-a
text_image
Start Setup Starting from the program to use the other from the computer. From the computer configuration. Start Setup Setup OKtext_image
Diagram illustrating printer press operation with numbered steps and a prohibition symbol for disassemblytext_image
Technical diagram showing a device's internal structure before and after assembly, with red arrows indicating direction of movement.text_image
Diagram showing a printer with a red arrow pointing to a paper sheet and a prohibition symbol with a crossed-out rectangle.text_image
Diagram illustrating a printer's internal structure and mechanical assembly, with red arrows indicating motion or movement.Kopieren
text_image
Diagram showing printer operation with red arrows indicating file path and a magnified view of the paper corner.text_image
Copies 1 Plain paper Color copy ... Othershttps://ij.start.canon/TS7450
text_image
Diagram illustrating the process of printer operation, showing step-by-step steps with Chinese annotations.3 Sluit de scaneenheid / klep.
text_image
Diagram showing printer operation with numbered arrows indicating process flowLet op
text_image
Diagram showing printer operation with control buttons and a hand cursor pointing to the buttontext_image
Language selection 日本語 English Deutsch Set to English? Yes CancelDe printer instellen
4. De FINE-cartridges installeren

1 Open de scaneenheid / klep.
text_image
A lot on
Let op
natural_image
Illustration showing two steps of a mechanical assembly: one being inserted into a component, the other adjusting a component with a red arrow indicating rotation (no text or symbols present)natural_image
Diagram of a vehicle seat assembly with a red arrow indicating direction (no text or symbols present)
Belangrijk
natural_image
Two-step diagram showing a hand inserting a component into a device, with red arrows indicating direction (no text or symbols present)natural_image
Illustration of hands installing or adjusting a mechanical component with a red warning symbol (no text or labels)7 Sluit de scaneenheid / klep.
text_image
Diagram showing printer operation with numbered arrows indicating process flow
Let op
text_image
Start alignment to improve print quality? Yes Nonatural_image
Diagram showing a printer being inserted into a plastic case, with a red arrow indicating the process (no text or symbols present)text_image
Diagram illustrating two-step assembly or cleaning process with red arrows indicating direction of movementnatural_image
Diagram showing a printer being inserted into a plastic tray, with a red arrow indicating the process (no text or symbols present)natural_image
Two line drawings of a printer with a red arrow indicating compression or disassembly (no text or symbols present)text_image
Load 2 or more sheets of A4 or Letter sized plain paper in cassette and press OK. Performing initial adjustments... Please wait momentarily About 1 minuteOpmerking
→ De installatie is nu voltooid.
natural_image
Simple line drawing of a smartphone inside a rounded rectangle (no text or symbols)6-a
text_image
Canon Start Setup To find the system needed to use the hardware that the computer Use the computer to access Start Setup OK Canceltext_image
Diagram illustrating printer press operation with numbered steps and a prohibition symbol for disassemblytext_image
Diagram illustrating a mechanical assembly process with directional arrows indicating movement or force, showing step-by-step assembly steps.text_image
Diagram showing a printer with a red arrow pointing to a paper sheet and a prohibition symbol.text_image
Technical diagram showing a printer's internal structure before and after assembly, with red arrows indicating motion or movement.Kopiëren
text_image
Diagram showing printer operation with red arrow indicating process and a magnified view of the right corner corner detail.text_image
Copies 1 Plain paper Color copy Othershttps://ij.start.canon/TS7450

text_image
Diagram illustrating the step-by-step installation of a printer into a paper airplane, with numbered instructions and directional arrows.text_image
Diagram of a printer with labeled parts showing paper folding and red arrow indicating process flowAttenzione
text_image
Diagram showing printer operation with control buttons and a hand cursor pointing to the buttontext_image
Language selection 日本語 English Deutsch Set to English? Yes Cancelnatural_image
Illustration of hands installing or adjusting a mechanical component, showing a red arrow indicating rotation (no text or symbols present)text_image
① Colore ②Importante
natural_image
Technical line drawing of a mechanical assembly with a red arrow indicating direction (no text or symbols)Importante
natural_image
Two-step diagram showing hand inserting a component into a device, with red arrows indicating direction (no text or symbols)natural_image
Illustration of hands inserting a component into a device (no text or symbols visible)text_image
Diagram showing printer operation with numbered arrows indicating process flowAttenzione
text_image
Start alignment to improve print quality? Yes Nonatural_image
Diagram showing a printer being inserted into a plastic case, with a red arrow indicating the process (no text or symbols present)text_image
Diagram illustrating two-step assembly process of a device with red arrows indicating direction of movementnatural_image
Diagram showing a printer being inserted into a plastic tray, with a red arrow indicating the process (no text or symbols present)natural_image
Two line drawings of a printer with a red arrow indicating compression or disassembly (no text or symbols present)text_image
Load 2 or more sheets of A4 or Letter sized plain paper in cassette and press OK. Performing initial adjustments... Please wait momentarily About 1 minuteNota
Computer Smartphone

Computer e smartphone

6-a
text_image
Canon Start Setup To find the system needed to use the hardware that the computer Use the computer to access.text_image
Diagram illustrating printer press operation with numbered steps and a prohibition symbol for press handlingtext_image
Technical diagram showing a device's internal structure before and after assembly, with red arrows indicating direction of movement.text_image
Diagram showing a printer with a red arrow pointing to a paper sheet and a prohibition symbol.text_image
Diagram illustrating a printer operation with red arrows indicating process steps and directional arrows, showing device placement and scroll movement.Copia
text_image
Diagram showing printer operation with red arrows indicating process flow and a magnified view of the corner detail.text_image
Copies 1 Plain paper Color copy ... Othershttps://ij.start.canon/TS7450
text_image
Diagram illustrating the process of printer operation, showing steps from opening to recycling with labeled arrows and a recycling bin.text_image
Diagram showing printer operation with numbered arrows indicating process flowtext_image
Diagram showing printer operation with control buttons and a hand cursor pointing to the buttontext_image
Language selection 日本語 English Deutsch Set to English? Yes CancelConfigurando a impressora
4. Instalando os Cartuchos FINE

natural_image
Illustration showing two steps of a mechanical assembly: one being inserted into a component, the other being clamped with a red arrow indicating rotation (no text or symbols present)text_image
① Colorado ②Importante
natural_image
Diagram of a vehicle interior showing a car trunk and dashboard with a red arrow pointing to the dashboard (no text or symbols present)Importante
natural_image
Two-step diagram showing hand inserting a component into a device, with red arrows indicating direction (no text or symbols)natural_image
Illustration of hands installing or adjusting a device into a container with a red warning symbol (no text or labels)text_image
Diagram showing printer operation with numbered arrows indicating process flowCuidado
text_image
Start alignment to improve print quality? Yes Nonatural_image
Diagram showing a printer being inserted into a plastic case, with a red arrow indicating the process (no text or symbols present)3 Separe as guias do papel.
text_image
Diagram illustrating two-step assembly or cleaning process with red arrows indicating direction of movement5 Substitua o cassete.
natural_image
Diagram showing a printer being inserted into a plastic tray, with a red arrow indicating the process (no text or symbols present)6 Puxe bandeja de saída do papel.
natural_image
Two line drawings of a printer with a red arrow indicating compression or disassembly (no text or symbols present)7 Pressione o botão OK.

text_image
Load 2 or more sheets of A4 or Letter sized plain paper in cassette and press OK. Performing initial adjustments... Please wait momentarily About 1 minuteNota
text_image
Diagram illustrating printer press operation with numbered steps and a prohibition symbol for press handlingtext_image
Technical diagram showing a printer's internal structure before and after assembly, with red arrows indicating motion or movement.text_image
Diagram showing a printer with a red arrow pointing to a paper sheet and a prohibition symbol.text_image
Diagram illustrating a mechanical assembly process with labeled components and directional arrows indicating movement or force.Copiando
text_image
Diagram showing printer operation with red arrows indicating process flow and a magnified view of the paper corner detail.text_image
Copies 1 Plain paper Color copy ... Othershttps://ij.start.canon/TS7450
text_image
Diagram illustrating the process of printer operation with numbered steps and directional arrows indicating movement.text_image
Diagram showing printer operation with numbered arrows indicating process flowPrecaución
natural_image
Line drawing of a printer with a hand pressing a button on the right side (no text or symbols present)text_image
Language selection 日本語 English Deutsch Set to English? Yes Cancelnatural_image
Diagram showing two steps of a mechanical assembly: one being inserted into a component, the other adjusting a component with a red arrow indicating rotation (no text or symbols present)text_image
① Color ②Importante
natural_image
Technical line drawing of a mechanical assembly with a red arrow pointing to a component (no text or symbols present)Importante
natural_image
Two-step diagram showing hand inserting a component into a device, with red arrows indicating direction (no text or symbols)natural_image
Illustration of hands installing or adjusting a device into a container with a red warning symbol (no text or labels)text_image
Diagram showing printer operation with numbered arrows indicating process flowPrecaución
text_image
Start alignment to improve print quality? Yes Nonatural_image
Diagram showing a printer being inserted into a plastic case, with a red arrow indicating the process (no text or symbols present)text_image
Diagram illustrating two-step assembly or cleaning process with red arrows indicating direction of movement5 Reemplace el cassette.

natural_image
Diagram showing a printer being inserted into a plastic tray, with a red arrow indicating the process (no text or symbols present)natural_image
Two line drawings of a printer with arrows indicating process, no text or symbols presenttext_image
Load 2 or more sheets of A4 or Letter sized plain paper in cassette and press OK. Performing initial adjustments... Please wait momentarily About 1 minuteNota
natural_image
Simple line drawing of a smartphone inside a rounded rectangle (no text or symbols)6-a
text_image
Canon Start Setup To find the system needed to use the hardware that the computer Use the computer to access.text_image
Diagram illustrating printer press operation with numbered steps and a prohibition symbol for press handlingtext_image
Technical diagram showing a device's internal structure before and after assembly, with red arrows indicating motion or movement.text_image
Diagram showing a printer with a red arrow pointing to a paper sheet and a prohibition symbol.text_image
Diagram illustrating a printer operation with red arrows indicating process steps and directional arrows, showing device placement and scroll movement.Copia
text_image
Diagram showing printer operation with red arrows indicating process flow and a magnified view of the right-hand corner detail.text_image
Copies 1 Plain paper Color copy Othershttps://ij.start.canon/TS7450
natural_image
Illustration of a printer with hands inserting or adjusting the cover (no text or symbols visible)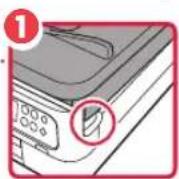
natural_image
Illustration of a printer with arrows indicating process flow (no text or symbols)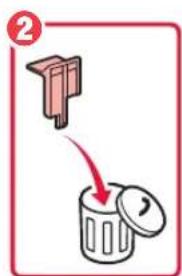
text_image
2text_image
Diagram showing printer operation with numbered arrows indicating process flow⚠️ Προσοχή
natural_image
Line drawing of a printer with an open control panel and hand cursor pointing to the button (no text or symbols)text_image
Set to English? Yes Cancelnatural_image
Illustration showing two steps of a mechanical assembly: adding a component to a housing, then adjusting a red arrow (no text or symbols present)natural_image
Diagram of a vehicle interior showing a car trunk and dashboard with a red arrow pointing to the dashboard (no text or symbols present)Σημαντικό
natural_image
Two-step diagram showing hand inserting a component into a device, with red arrows indicating direction (no text or symbols)natural_image
Illustration of hands inserting a device into a box with a red warning symbol (no text or labels)text_image
Diagram showing printer operation with numbered arrows indicating process flow⚠️ Προσοχή
text_image
Start alignment to improve print quality? Yes Nonatural_image
Diagram showing a printer being placed into a plastic case with a red arrow indicating the process (no text or symbols present)text_image
Diagram illustrating two-step assembly or cleaning process with red arrows indicating direction of movementnatural_image
Diagram showing a printer being inserted into a plastic tray, with a red arrow indicating the process (no text or symbols present)natural_image
Two line drawings of a printer with a paper insert, showing the process from left to right (no text or symbols present)text_image
Load 2 or more sheets of A4 or Letter sized plain paper in cassette and press OK. Performing initial adjustments... Please wait momentarily About 1 minuteΣημείωση
text_image
Canon Start Setup To find the system needed to use the hardware that the computer Use the computer to access.text_image
Diagram illustrating printer press operation with numbered steps and a prohibition symbol for disassemblytext_image
Technical diagram showing a device with red arrows indicating movement or change, likely illustrating a process or assembly step.text_image
Diagram showing a printer with a red arrow pointing to a paper sheet and a prohibition symbol in the background.text_image
Diagram illustrating a printer's internal structure and adjustment mechanism, with Chinese annotations highlighting key components.Αντιγραφή
text_image
Diagram showing printer operation with red arrows indicating file path and a magnified view of the right corner corner.text_image
Copies 1 Plain paper Color copy Othershttps://ij.start.canon/TS7450
natural_image
Illustration of hands inserting a printer into a box (no text or symbols visible)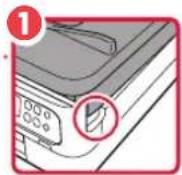
natural_image
Illustration of a printer with red arrows indicating motion or movement, no text or symbols present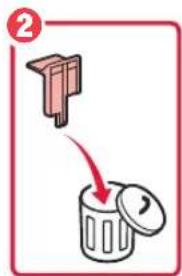
text_image
2text_image
Diagram showing printer operation with labeled parts and red arrows indicating process flownatural_image
Line drawing of a printer with control panel and hand cursor icon (no text or symbols)text_image
Set to English? Yes CancelStälla in skrivaren
4. Installera FINE-kassetterna

natural_image
Diagram of an open industrial machine with a red upward arrow indicating motion or operation (no text or symbols present)⚠ Försiktighet
natural_image
Illustration showing two steps of a mechanical assembly: one being inserted into a component, the other adjusting a component with a red arrow indicating rotation (no text or symbols present)natural_image
Diagram of a vehicle seat assembly with a red arrow indicating direction (no text or labels)Viktigt!
natural_image
Illustration of two hands installing or adjusting a component, showing a red directional arrow indicating movement (no text or symbols present)natural_image
Illustration of hands installing or adjusting a device into a container with a red warning symbol (no text or symbols present)text_image
Diagram showing printer operation with numbered arrows indicating process flowtext_image
Start alignment to improve print quality? Yes Nonatural_image
Diagram showing a printer being placed into a plastic case with a red arrow indicating the process (no text or symbols present)natural_image
Diagram of a mechanical assembly with layered components and a red arrow indicating direction (no text or symbols)
text_image
②5 Byta kassett.
natural_image
Diagram showing a printer being inserted into a plastic cover, with a red arrow indicating the process (no text or symbols present)natural_image
Two line drawings of a printer with a red arrow indicating compression or disassembly (no text or symbols present)7 Tryck på OK.

text_image
Load 2 or more sheets of A4 or Letter sized plain paper in cassette and press OK. Performing initial adjustments... Please wait momentarily About 1 minuteObs!
text_image
Canon Start Setup [ ] If any text is available to use the starting file from the computer. [ ] Use the computer in a local context. Start Button OKtext_image
Diagram illustrating printer press operation with numbered steps and a prohibition symbol for disassemblytext_image
Technical diagram showing a device with red arrows indicating movement or change, likely illustrating a process or assembly.text_image
Diagram showing a printer with a downward arrow and a prohibition symbol, indicating no printer.text_image
Diagram illustrating a printer operation with red arrows indicating movement and rotation stepsKopiera
text_image
Diagram showing printer operation with red arrows indicating process flow and a magnified view of the right-hand corner detail.text_image
Copies 1 Plain paper Color copy ... Others8 Tryck på Start.
Konfigurere skriveren

https://ij.start.canon/TS7450
eller skann koden med mobilenheten

natural_image
Illustration of hands inserting a printer into a box (no text or symbols visible)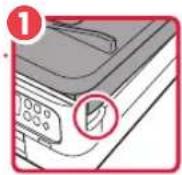
natural_image
Illustration of a printer with red arrows indicating motion or movement, no text or symbols present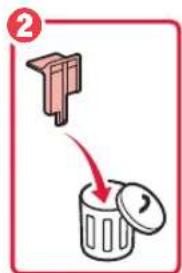
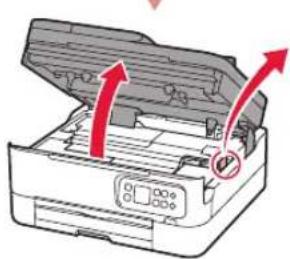
text_image
23 Lukk skanneenheten/dekselet.
text_image
Diagram showing printer operation with labeled parts and red arrows indicating direction of operation⚠ Forsiktig!
Pass på fingrene.
3. Slå på skriveren

text_image
Diagram showing printer operation with control buttons and a highlighted hand cursor pointing to the buttontext_image
Set to English? Yes CancelKonfigurere skriveren
4. Installere FINE-kassettene

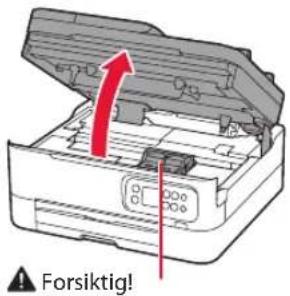
1 Åpne skanneenheten/dekselet.
text_image
Forsiktig!natural_image
Diagram showing two steps of a mechanical assembly: one being inserted into a component, the other adjusting a component with a red arrow indicating rotation (no text or symbols present)text_image
Farge ① ②Viktig!
- Ikke berør blekket på den beskyttende tapen. Det kan sette flekker på hendene dine eller andre gjenstander.
- Ikke berør områdene som er vist på figuren. Skriveren vil ellers ikke kunne skrive ut riktig.

4 Sett FINE-kassetten med farger i FINE-kassettholderen.

natural_image
Diagram of a vehicle door handle assembly with a red arrow indicating direction (no text or symbols)Viktig!
Ikke dunk på FINE-kassetten. Dette kan føre til at det oppstår en feil.
5 Skyv läsedekselet for blekkassetter godt ned helt til det klikker på plass, slik at det lukkes helt.

natural_image
Two-step diagram showing hand inserting a component into a device, with red arrows indicating direction (no text or symbols)natural_image
Illustration of hands inserting a device into a container with a red warning symbol (no text or labels)7 Lukk skanneenheten/dekselet.
• Skriveren starter initialisering.

text_image
Diagram showing printer operation with numbered arrows indicating process flow⚠ Forsiktig!
Pass på fingrene.
5. Legge i papir

1 Trykk på OK-knappen.

text_image
Start alignment to improve print quality? Yes Nonatural_image
Diagram showing a printer being inserted into a plastic case, with a red arrow indicating the process (no text or symbols present)text_image
Diagram illustrating the step-by-step assembly of a device with red arrows indicating direction of movement.5 Skift kassetten.

natural_image
Diagram showing a printer being inserted into a plastic tray, with a red arrow indicating the process (no text or symbols present)6 Trekk ut papirutmatingsbrettet.

natural_image
Two line drawings of a printer with a red arrow indicating compression or disassembly (no text or symbols present)7 Trykk på OK-knappen.

text_image
Load 2 or more sheets of A4 or Letter sized plain paper in cassette and press OK. Performing initial adjustments... Please wait momentarily About 1 minute
Merk
Justeringsprosessen skriver ut to tosidige ark.
Ikke trekk ut papiret, eller bruk skriveren, før justeringen er ferdig.
text_image
Canon Start Setup Don't have any options to use the other. But if you want to use the computer will choose. Start Setup OK Canceltext_image
Diagram illustrating printer press operation with numbered steps and a prohibition symbol for disassemblytext_image
Technical diagram showing a printer's internal structure before and after assembly, with red arrows indicating motion or movement.text_image
Diagram showing a printer with a red arrow pointing to a paper sheet and a prohibition symbol.text_image
Technical diagram showing a printer's internal structure before and after assembly, with red arrows indicating motion or movement.Kopiere
text_image
Diagram showing printer operation with red arrow indicating print direction and a magnified view of the printer's edge detail.4 Lukk dokumentdekselet.
5 Trykk på OK-knappen.
6 Velg Kopiinnstillinger (Copy settings), og trykk deretter på OK-knappen.
7 Angi utskriftsinnstillinger med knappene ▲, ▼ og OK.

text_image
Copies 1 Plain paper Color copy Othershttps://ij.start.canon/TS7450
eller scan koden med din mobilenhed

natural_image
Illustration of a printer with hands inserting or adjusting the cover (no text or symbols visible)
natural_image
Illustration of a printer with arrows indicating compression or disassembly process (no text or symbols)
text_image
2text_image
Diagram showing printer operation with labeled parts and red arrows indicating process flowtext_image
Diagram showing printer operation with control buttons and a highlighted hand cursor pointing to the buttontext_image
Set to English? Yes CancelKonfigurere printeren
4. Installation af FINE-patroner

natural_image
Illustration showing two steps of a mechanical assembly: tool pressing into a component and holding a clip, with a red arrow indicating rotation (no text or symbols present)text_image
Farve ① ②Vigtigt
natural_image
Diagram of a vehicle seatbelt mechanism with a red arrow indicating direction (no text or symbols present)Vigtigt
natural_image
Two-step diagram showing hands installing or adjusting a device component, with red arrows indicating direction (no text or symbols present)natural_image
Illustration of hands inserting a component into a device (no text or symbols visible)text_image
Diagram showing printer operation with numbered arrows indicating process flow▲ Forsigtig
Pas på dine fingre.
text_image
Start alignment to improve print quality? Yes Nonatural_image
Diagram showing a printer being inserted into a plastic case, with a red arrow indicating the process (no text or symbols present)text_image
Diagram illustrating two-step assembly process of a device with red arrows indicating movement and alignment.natural_image
Diagram showing a printer being inserted into a plastic tray, with a red arrow indicating the process (no text or symbols present)natural_image
Two line drawings of a printer with a red arrow indicating compression or disassembly (no text or symbols present)7 Tryk på knappen OK.

text_image
Load 2 or more sheets of A4 or Letter sized plain paper in cassette and press OK. Performing initial adjustments... Please wait momentarily About 1 minuteBemærk
text_image
Canon Start Setup Don't have any options to use the other. But if you want to use the computer will choose. Start Setup OK Canceltext_image
Diagram illustrating printer press operation with numbered steps and a prohibition symbol for disassemblytext_image
Technical diagram showing a device with red arrows indicating movement or change, likely illustrating a process or assembly.text_image
Diagram showing a printer with a downward arrow and a prohibition symbol, indicating no printer.text_image
Diagram illustrating a printer operation with red arrows indicating process steps and directional arrows, showing device placement and scroll movement.Kopiering
text_image
Diagram showing printer operation with red arrows indicating process flow and a magnified view of the right-hand corner detail.text_image
Copies 1 Plain paper Color copy ... Othershttps://ij.start.canon/TS7450
natural_image
Illustration of a printer's internal structure being inserted, showing paper and print layers (no text or symbols)

natural_image
Illustration of a printer with open lid and red arrows indicating motion (no text or symbols)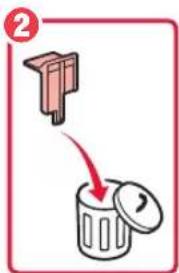
text_image
Diagram showing a trash bin with a red arrow indicating the process, labeled with number 2text_image
Diagram showing printer operation with numbered arrows indicating process flow
Huomio
Varo sormiasi.
natural_image
Line drawing of a printer with a hand pressing a button on the page (no text or symbols present)text_image
Set to English? Yes CancelTulostimen asennus
4. FINE-kasettien asentaminen

natural_image
Diagram showing two steps of a mechanical assembly: one being inserted into a component, the other adjusting a component with a red arrow indicating rotation (no text or symbols present)natural_image
Diagram of a vehicle door handle assembly with a red arrow indicating direction (no text or symbols present)Tärkeää
natural_image
Two-step diagram showing hand inserting a component into a device, with red arrows indicating direction (no text or symbols)natural_image
Illustration of hands inserting a device into a container with a red warning symbol (no text or labels)text_image
Diagram showing printer operation with numbered arrows indicating process flowHuomio
Varo sormiasi.
text_image
Start alignment to improve print quality? Yes Nonatural_image
Diagram showing a printer being inserted into a plastic case, with a red arrow indicating the process (no text or symbols present)text_image
Diagram illustrating two-step assembly process of a device with red arrows indicating direction and movement.5 Aseta kasetti takaisin.
natural_image
Diagram showing a printer being inserted into a plastic sheet, with a red arrow indicating the process (no text or symbols present)natural_image
Two line drawings of a printer with arrows indicating process, showing front and side views (no text or symbols)7 Paina OK-painiketta.

text_image
Load 2 or more sheets of A4 or Letter sized plain paper in cassette and press OK. Performing initial adjustments... Please wait momentarily About 1 minuteHuomautus
text_image
Canon Start Setup File Path: All files named to use the new file from the computer. Browse the new file path (10.0%) Start Setup Setup Helptext_image
Diagram illustrating printer press operation with numbered steps and a prohibition symbol for disassemblytext_image
Technical diagram showing a printer's internal structure before and after assembly, with red arrows indicating motion or movement.text_image
Diagram showing a printer with a red arrow pointing to a paper sheet and a prohibition symbol.text_image
Technical diagram showing a printer's internal structure before and after assembly, with red arrows indicating motion or movement.Kopointi
text_image
Diagram showing printer operation with red arrow indicating process and magnified detail viewtext_image
Copies 1 Plain paper Color copy ... Others8 Paina Aloita (Start)-painiketta.