Primo+ - Smartphone Konrow - Free user manual and instructions
Find the device manual for free Primo+ Konrow in PDF.

| Brand | Konrow |
| Model | Primo+ |
| Product Type | Smartphone |
| Power Supply | DC 5V 500 mA |
| AC Adapter | Input AC 100-240V, 50/60 Hz, output DC 5V 500 mA |
| Network | GSM 900/1800/1900/2100 |
| Battery Type | Li-ion 1300 mAh |
| Dual SIM | Yes |
| SD Card Support | Yes |
| Camera | Front and rear |
| Connectivity | Wi-Fi, Bluetooth, mobile data |
| Operating System | Android |
| Functions | Messaging, browser, music, photo camera, video camera, voice recorder, FM radio, gallery, email, file manager, Play Store |
| Security | Screen lock, PIN code, SIM lock |
| Maintenance | Clean with a soft cloth, avoid moisture |
| Reparability | Only qualified personnel authorized to repair |
| Standards | Compliant with directive 1999/5/EC |
Frequently Asked Questions - Primo+ Konrow
User questions about Primo+ Konrow
0 question about this device. Answer the ones you know or ask your own.
Ask a new question about this device
Download the instructions for your Smartphone in PDF format for free! Find your manual Primo+ - Konrow and take your electronic device back in hand. On this page are published all the documents necessary for the use of your device. Primo+ by Konrow.
USER MANUAL Primo+ Konrow
Security Notifications....25
0.0 Know Your Phone....29
1.0 Getting Started....29
1.1 Installing SIM and Micro SD Card 29
1.2 Turning On/Off the phone....30
1.3 Charging Battery 30
2.0 Learn about the phone....31
2.1 Hand Set Keys .... 31
2.2 Phone Locking Techniques .... 31
2.3 Home Screen....32
2.4 Using Touch Screen 32
2.5 Status Bar, Notification & Toolkit....33
3.0 Network Service Provider....34
3.1 Mobile Network Settings....34
3.2 SIM management....34
3.3 Making a voice Call....34
3.4 Contacts....35
3.5 Sending a Message 36
4.0 Always Stay Connected & Updated 37
4.2 Setting up Email Account 37
4.3 Sending and Receiving Emails....38
4.4 Using Gmail 39
4.5 Using Play Store/Download & Install Apps/Games 39
5.0 Connectivity & Settings 40
5.1 Using Wi-Fi 40
5.2 Using Bluetooth 40
5.3 Sound and Display Settings 41
5.4 Other Settings 42
5.5 USB Computer Connection 43
6.0 Multimedia 19
6.1 File manager 43
6.2 Using Camera and Camcorder 44
6.3 Gallery....20
6.4 Using Music Player 21
6.5 Using Sound Recorder 22
6.6 FM Radio....22
6.7 Using Calculator 23
6.8 Calendar 23
6.9 Updates....24
Taking Care of the device....25
Battery Use & Safety 25
Third Party Accessories 25
Software Notices....25
Copyright 25
natural_image
Exploded view diagram of a smartphone internal structure (no text or symbols)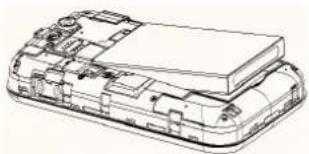
natural_image
Technical line drawing of a layered electronic device casing (no text or symbols)
natural_image
Line drawing of a mobile phone case with a strap and buttons (no text or symbols)text_image
APP5 WIDGETS AnZhi ASE AtActivities AUTOTEST Power off Airplane mode Airplane mode is OFF Restart Camera Clock Dev Tools Downloads Email File Manager FM Radio Fruit Ninjatext_image
18:00 MON, MAY 6 Charged NO SIM CARD | NO SIM CARD
text_image
15:28 THU, MAY 9 USB connected Touch to copy files to/from your con USB debugging connected Touch to disable USB debugging Connected as an installer Touch for other USB options. NO SERVICE | CMCCtext_image
ME 3146 contacts Set up my profile Contacts to display Import/export Accounts Settings Delete Contacts Send text message Share Send contact informationtext_image
New contact
Speed Dial Settings Add to contacts Add 2-sec pause Add wait Settings Send Messagetext_image
Homepage Refresh Forward Bookmarks Save to bookmarks Share page Find on page Request desktop site Save for offline reading Settings Exittext_image
Artists Albums Songs Playlists Michael Learns To Rock Tell Me Why Declan Galbraith That's Why You Go Away Michael Learns To Rock That's Why You Go Away Michael Learns To Rock Unstoppable Rascal Flatts we will rock you(实况足球6) Queen You Don't Miss Your Water Craig David Unstoppable Rascal Flattstext_image
FM Radio 94.6MHz 88.0 108.0Galerie
text_image
Settings WIRELESS & NETWORKS Wi-Fi OFF Bluetooth OFF Data usage More... CALL Call settings DEVICE Profile Setting Display Settings Battery Apps PERSONAL Accounts & sync Location services Security Language & input Backup & reset SYSTEM Date & timeSécurité
text_image
Security Make passwords visible DEVICE ADMINISTRATION Device administrators View or deactivate device administrators Unknown sources Allow installation of non-Market apps CREDENTIAL STORAGE Trusted credentials Display trusted CA certificates Install from SD card Install certificates from SD card Clear credentials Remove all certificates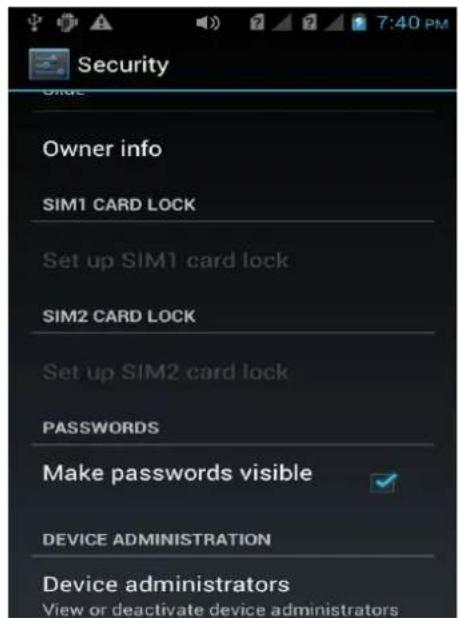
text_image
Security Order Owner info SIM1 CARD LOCK Set up SIM1 card lock SIM2 CARD LOCK Set up SIM2 card lock PASSWORDS Make passwords visible DEVICE ADMINISTRATION Device administrators View or deactivate device administratorstext_image
Backup & reset BACKUP & RESTORE Back up my data Back up app data, Wi-Fi passwords, and other settings to Google servers Backup account Need to set the backup account Automatic restore When reinstalling an app, restore backed up settings and data PERSONAL DATA Factory data reset Erases all data on phonetext_image
15:28 THU, MAY 9 USB connected Touch to copy files to/from your com USB debugging connected Touch to disable USB debugging. Connected as an installer Touch for other USB options. NO SERVICE | CMOCDépannage
Thank you for choosing KONROW PRIMO+ which operates on Google Android KitKat 4.4.2. PRIMO+ supports WCDMA and GSM network environments. Besides the general calling and messaging functions PRIMO+ is capable of performing a variety of useful functions and services including music playback, camera, sound recording, Bluetooth, WiFi, web browsers, email, etc. In addition, the open Android platform offers abundant applications, games, movies, etc. enriching your overall mobile experience to satisfy your all kinds of needs.
Read the Instructions
To ensure safe and proper use we recommend you to read all the instructions and safety precautions in this manual carefully before using this phone. However, Available features and additional services may vary by device, software, or service provider.
Security Notifications
Please read these simple guidelines. Non-compliance may be dangerous or illegal. This user manual provides more detailed information on security matters.
SAFE POWER ON: Do not switch the device on when a wireless device or equipment is prohibited or can cause interference or danger.
SAFE DRIVING: Please obey all traffic rules and regulations and do not use the phone while driving.
INTERFERENCE: All wireless devices may be susceptible to interference, which could affect performance.
SWITCH OFF IN HOSPITALS Please follow the restrictions and switch off near hospitals.
SWITCH OFF IN AIRCRAFT Please follow the restrictions. Wireless devices may cause interference to aircraft.
SWITCH OFF WHEN REFUELING: Do not use the device at a refueling point and near fuels or chemicals.
SWITCH OFF NEAR EXPLOSION: Do not use the device during an explosion process.
Follow the instructions in the manual and use the product properly as recommended.
QUALIFIED SERVICE: This device must be installed or repaired only by the KONROW authorized personnel. Any unauthorized repair is likely to cause huge risk to the device and is also against warranty conditions.
MOISTURE: This device is not waterproof. Please keep it dry.
Remember to backup all important and private information or keep a written record.
When connecting to other devices, read user guide for detailed safety instructions. Do not connect incompatible products.
Emergency call: Ensure there is network available and phone function activated.


Press the end button repeatedly to clear the display content and return to standby mode. Enter the emergency number, then press call button and provide your location. Please do not hang up without permission.
Note: The pictures used in the manual only serve as demonstration function and may be different from the actual phone display.
Contents
Security Notifications....25
0.0 Know Your Phone....29
1.0 Getting Started....29
1.1 Installing SIM and Micro SD Card 29
1.2 Turning On/Off the phone....30
1.3 Charging Battery 30
2.0 Learn about the phone....31
2.1 Hand Set Keys .... 31
2.2 Phone Locking Techniques .... 31
2.3 Home Screen....32
2.4 Using Touch Screen 32
2.5 Status Bar, Notification & Toolkit....33
3.0 Network Service Provider....34
3.1 Mobile Network Settings....34
3.2 SIM management....34
3.3 Making a voice Call....34
3.4 Contacts....35
3.5 Sending a Message 36
4.0 Always Stay Connected & Updated 37
4.2 Setting up Email Account 37
4.3 Sending and Receiving Emails....38
4.4 Using Gmail 39
4.5 Using Play Store/Download & Install Apps/Games 39
5.0 Connectivity & Settings 40
5.1 Using Wi-Fi....40
5.2 Using Bluetooth 40
5.3 Sound and Display Settings 41
5.4 Other Settings 42
5.5 USB Computer Connection 43
6.0 Multimedia 19
6.1 File manager 43
6.2 Using Camera and Camcorder 44
6.3 Gallery....20
6.4 Using Music Player 21
6.5 Using Sound Recorder 22
6.6 FM Radio....22
6.7 Using Calculator 23
6.8 Calendar 23
6.9 Updates....24
Taking Care of the device....25
Battery Use & Safety 25
Third Party Accessories 25
Software Notices....25
Copyright 25
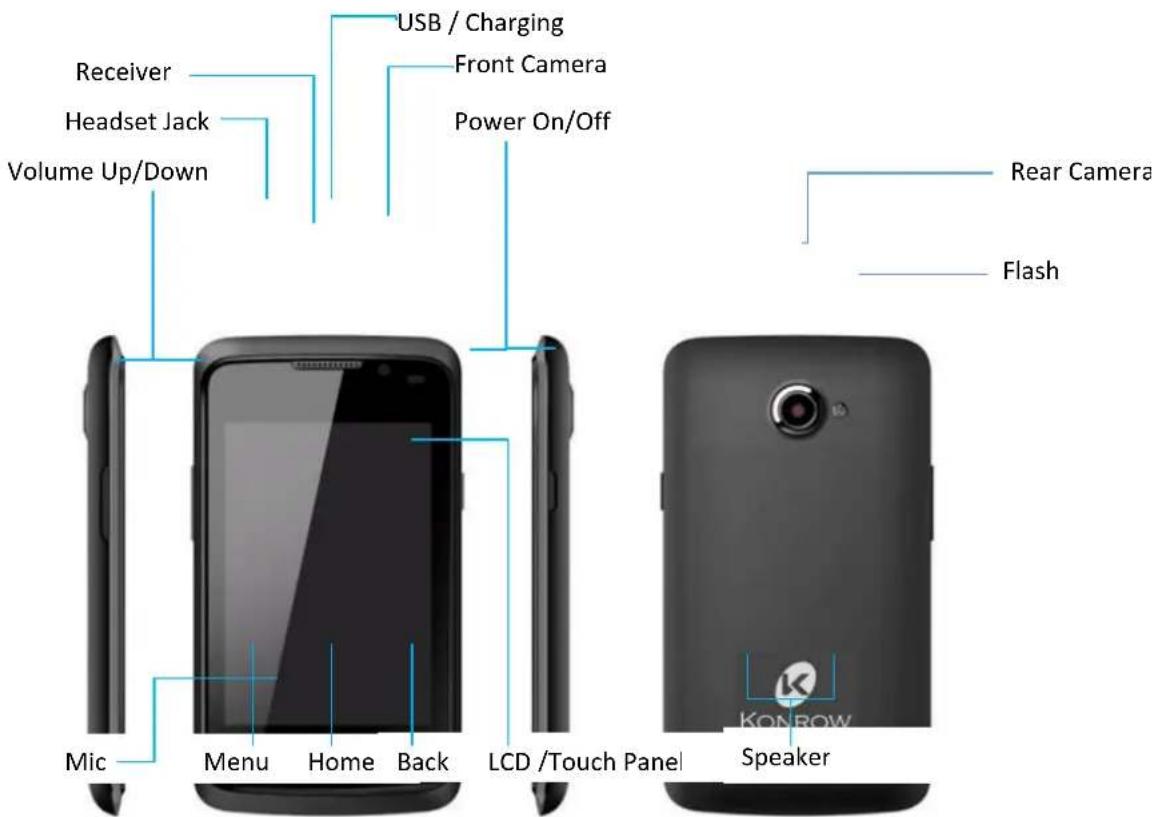
0.0 Know Your Phone
KONROW PRIMO+ gives you the best of all worlds—a compact smartphone with a vivid display, that's intuitive and helpful at every step.
text_image
Receiver Headset Jack Volume Up/Down USB / Charging Front Camera Power On/Off Mic Menu Home Back LCD /Touch Panel Speaker Rear Camera Flash1.0 Getting Started
Be ready to experience the best smartphone experience.
1.1 Installing SIM and Micro SD Card
Switch off the mobile phone and remove the rear cover and battery
Insert SIM correctly in the SIM card slots with the gold contacts facing down. The phone is a Dual SIM mobile phone (one GSM and another WCDMA) allowing you to use the facility of two networks.
Insert SD card into SD Card slot.

text_image
SD CARD SIM 1 SIM 2Place the battery and the rear cover back and Switch on the phone.
① Do not remove the SIM card while the device is turned on. Sudden removal may cause data loss or unpredictable system hang-up.
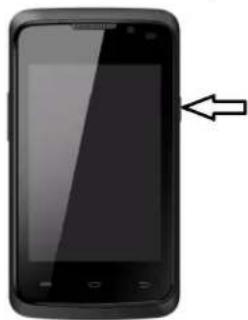
1.2 Turning On/Off the phone
Switch On: Press and hold the Power key for a few seconds to turn on the Phone.
Switch Off: Press and hold the power key and select Power Off to turn off the phone.
Reboot : To restart your phone, long press the Power key and select Reboot.
natural_image
Black smartphone with a screen and an arrow pointing to it (no visible text or symbols)
text_image
Power off Reboot Airplane mode Airplane mode is OFF1.3 Charging Battery
Before using the phone for the first time, you must charge the battery.
You can charge the phone with the USB cable and the travel adapter that comes with the phone. Connect the USB cable to the travel adapter and plug it into Power Outlet to begin charging the battery.
Battery can be also charged by connecting the USB to your PC / Laptop.
i
We recommend you to use only the supplied charger to charge the battery. The battery life depends on the user's usage type.
2.0 Learn about the phone
Take a moment to check out all the things you can do with our highly user friendly Phone.
2.1 Hand Set Keys
| Button Press Press & Hold | ||
 | Wakes up or turns off the screen | Turns on/off the phoneOpens a menu with options: Power off, Airplane Mode, Reboot, Audio Profiles. Chose the action you want to perform. |
 | Adjust the phone volume from the volume keys available on the right side of the device. | Quickly increase/decrease the volume to maximum/minimum. |
 | Opens a menu with items that affect the current screen or application. | |
 | Returns to Home screen from any other screen. | Opens running/most recently opened apps. |
 | Opens the previous screen you were working on. | Double tap returns to home screen. |
2.2 Phone Locking Techniques
You can lock your phone in different ways. You may provide PIN, password, draw a pattern, take your face in front of the phone screen, speak something for voice recognition, or simply slide to unlock your phone.
Slide unlock will be the default unlocking method in the phone to unlock the screen.
Press the power key to wake up the phone.
| Slide Unlock : Slide the lock icon towards the unlock icon to unlock your phone. | |
| Face Unlock : Just need to look at your phone to unlock it. | |
| Pattern Unlock: Draw your set pattern to unlock the screen. | |
| PIN: Enter your set PIN code to unlock the screen. | |
| Password: Enter your set Password to unlock the screen. |
You may set any desired locking technique from ⚙ → Security → Screen lock
2.3 Home Screen
The home screen is your starting point to access all the features on your phone. You can personalize your home screen with shortcuts, widgets, wallpapers and other items.
- Tap to tap Home Screen.
- Tap to open Main Menu tab.
-
To close the tab, tap .
-
Touch and hold the App tab on the main menu, then drag them to the home screen to add app shortcut on home screen.
- Also you can hold and drag widgets to the home screen to add widget on home screen.
- Touch and hold the item on the home screen and drag it to remove icon to remove app icon or widget from home screen.
① You can return to Home screen from any other screen by tapping the △ key on the phone.
2.4 Using Touch Screen
You can access and control your android features by using your finger to touch icons, buttons, menu items, status bar, onscreen keyboard and other items on the screen.
 | Tap once: To open an application on the Home screen, to choose a field such as a search box, to select an item in a list, to select a backward arrow for moving back one screen, or to follow an online link, tap the item once with your finger. |
 | Tap twice: Use this method to enlarge or reduce the display of a Web page or zoom in or out in the Maps app. |
 | Pinch: As an alternative to the tap-twice method, you can pinch your fingers together or move them apart on the screen when you're looking at photos, maps, Web pages, or e-mail messages to quickly reduce or enlarge them. |
 | Drag to scroll (also referred to as swiping): When you press your finger to the screen and drag to the right, left, up, or down, you move around the screen |
 | Slide & Flick: To scroll more quickly on a page, quickly flick your finger on the screen in the direction you want to move. To Slide, you can move your finger across the surface of the screen without pausing your touch. |
 | Press and hold: If you're in any application where you can select text, such as Notes or Mail, or if you're on a Web page, pressing and holding near text will select a word and bring up editing tools that allow you to select, cut, or copy text. |
2.5 Status Bar, Notification & Toolkit
At the top of the screen, the status bar displays time, battery status, network, other information and notifications.
Notification icons inform you of new messages and events as and when it appears in the device. You can slide from top of the screen to get detailed information on the status bar.
Choose toolkit icon that facilitates you to quickly manage basic phone features, such as Airplane Mode, Wi-Fi, Bluetooth,, Data Connection, Display Brightness, Audio Profile, Auto Rotation and many more. Press and hold to enter setting for the specific feature.
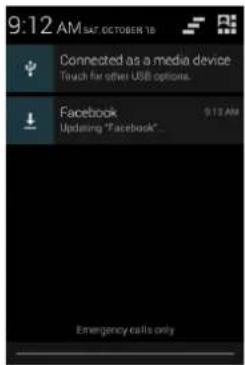
text_image
9:12 AM SAT OCTOBER 18 Connected as a media device Touch for other USB options. Facebook Updating "Facebook" 9:12 AM Emergency calls only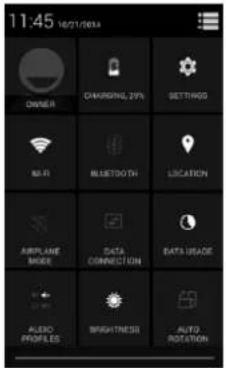
text_image
11:45 16/21/2024 OWNER CHARGING 29% SETTINGG RF Bluetooth LOCATION AIR PLANE MODE DATA CONNECTION DATA USAGE ALBIO PRODUCED BRIGHTNESS AUTO ROTATION3.0 Network Service Provider
When you assemble your phone with SIM card on it, Network indicator will be seen on the status bar, at the top of the screen. You can enjoy the services provided by Network service provider when you are on the service area.
3.1 Mobile Network Settings
You can manage your mobile network for different services provided by Network Service Provider.
-
On Home screen tap ⚠️ > 📋 > More > Select Mobile networks.
-
Tap Mobile Networks.
-
Data connection Tap to start to register. 3G network connection icon will appear, enabling mobile internet functions. You need to set up the phone with recommended settings of the mobile network provider. Please contact your network provide for the GPRS/3G settings.
• Network Mode Switch different network mode among GSM/WCDMA、WCDMA only, GSM only (2G/3G). - Access point Names Switch between WAP and NET functions. Also, create New APN on the Menu. Please contact your network provide for the APN & WAP settings
• Network operator Search and auto-search network.
3.2 SIM management
-
On Home screen tap ⚙ > 📋 > SIM management.
-
Select default voice call, default Data connection and default Messaging SIM.
3.3 Making a voice Call
- Tap on the menu screen or the home screen to open the dial pad for making calls.
You can tap on the top left to get the dial pad. Enter the phone number you want to dial and tap in lower end to call the dialed number. - Tap 🔒 to get the call log. You can tap to dial the contact or number form the list of recent call logs.
- Tap 📷 and make a call to the person in your contact list.
i
- When receiving an incoming call, it will display the information of the incoming call including the caller's name, number, portrait, etc., and adopt the ringtone or vibration according to your settings.
- If the caller's number is not saved in the contacts, it would only display the number and the default picture.
3.4 Contacts
To create new contacts
- On Home screen tap


-
Tap to add new contacts, choose new contact storage location.
-
Insert contact photo, name, number, address, e-mail, etc.
-
Tap Done to save the contact or Cancel to exit without saving any contacts.
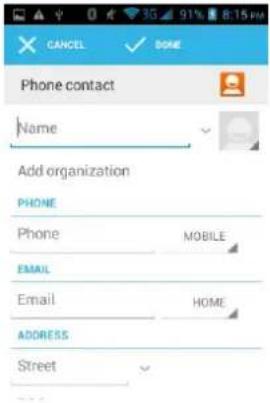
text_image
PHONE Add organization PHONE Phone MOBILE EMAIL Email HOME ADDRESS StreetTo import contacts
-
On Contacts screen, tap 📄 then choose Import/Export select location where you want to export or import from.
-
Please operate one of the following:
• To import a single contact, select the contact and tap OK.
• To import all contacts, select all contacts and tap OK.
• If you import Vcard from SD card, all contacts will be automatically imported.
Search contact
- On Contacts screen, tap
- Input the name of a contact on the search bar. All matching results will appear under the search bar.
- After searching a contact, tap the contact. You can make a voice call or video call with the contact or send message to the contact.

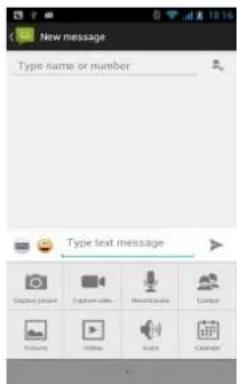
3.5 Sending a Message
You can send short text messages and multimedia messages to your friend, family and people using Short Message Service (SMS) service.
On Home screen, tap 🙏 and then to enter messaging app.

text_image
New message to Type message StartFor text Message
-
Tap to start composing message
-
Input recipient number on the Type name or number bar. While you input the number, matching contacts will appear under the bar for you to select.
i
- Tap 📋 to open contact search screen and select any contact to add to recipient bar.
-
Please use commas between each recipient.
-
Input your message on Type text message bar.
-
After you finish typing, tap ➤ to send.
For Multi-media message
- Tap

- Input recipient number on the Type name or number bar.

- Tap , to add Multimedia message you want to send with options as Capture picture, Pictures, Capture videos, Videos, Record audio, Audio, Contact, Calendar, Slideshow from the attachment list.
text_image
New message Type name or number Type text message- Input text message if you want to add some text message along with multimedia message and tap to send.
4.0 Always Stay Connected & Updated
You can use browser to browse web pages through WiFi network or Data Connection. Keep yourself up-to-date with Email and Download/Install numerous apps/games from Play store that can ease your life and stay connected with the world.
4.1 Using Browser
To open a web page
-
On Home screen, tap ⚠️ > 📄.
-
Tap the address bar and type the URL then tap GO.


(Menu) to access more functions.
Quick search on the web
From the Home screen, you can search information on the web with Google Search.
-
Tap Google Search widget.
-
Type text to search in the Quick Search Box with on-screen keyboard.
-
Tap GO on on-screen keyboard.
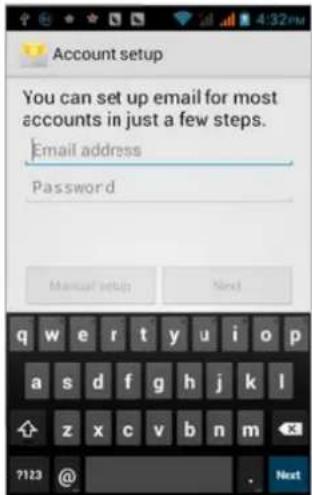
4.2 Setting up Email Account
-
On Home screen, tap ⏻ >
-
Enter your Email address and Password.
-
Tap Next. The device will automatically retrieve email settings. Or Tap Manual Settings to manually set up email.
-
Enter Name and Account display name.
-
Tap Done.
text_image
Account setup You can set up email for most accounts in just a few steps. Email address Password Manual setup Next q w e r t y u i o p a s d f g h j k l z x c v b n m ?123 @ Next4.3 Sending and Receiving Emails
Compose and send an e-mail
-
On Home screen, tap 🤨, then select an email account.
-
Tap > Compose
-
In To field, enter recipient's email address.
-
Enter Subject.
-
Compose contents.
-
Tap to send.
Adding attachments to an email message
-
Tap > Attach file.
-
Select items to attach.
Receiving emails
Emails are automatically received in Inbox folder when your device connects to network.
-
On Home screen, tap ⏻ > 📋, and then select an email account.
-
Tap > Refresh or drag the screen downwards to download new messages.
4.4 Using Gmail
- On Home screen, tap
☐ > ☐, enter your Gmail account and password.
-
Tap Sign in.
-
Start to send and receive emails.
If you do not have any Gmail account, tap New on the screen and follow the steps to set up a new Gmail account.
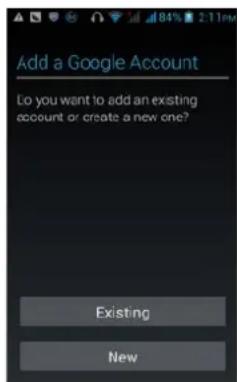
text_image
Add a Google Account Do you want to add an existing account or create a new one? Existing Newi
You must Configure your Google account on this handset to get access to your Google mails, Google Play Store, Google Maps, Navigation, and much more..
4.5 Using Play Store/Download & Install Apps/Games
- On Home screen, tap ⏻ > 📋,
i
- Please connect your phone to 3G or WIFI connection.
-
You must be signed in to your Gmail account to use Play Store to download apps and games. If you are already logged in to Gmail, it will automatically transfer to the Play store interface. If not, you need to create or sign in to your Gmail account. Please refer to related details in the Gmail section (4.4).
-
On market screen, browse/search applications/Games you want, tap them to download and install.
5.0 Connectivity & Settings
Use features like WiFi, Bluetooth to create your home network.. Use your device as a storage device. Play around with system settings to enjoy different features provided by phone.
5.1 Using Wi-Fi
- On Home screen, tap 📋> Wi-Fi.
- Tap Wi-Fi OFF to turn on ON Wi-Fi function.
- Tap Wi-Fi. Then the phone displays all discovered Wi-Fi network names and security settings.
- Tap one of the Wi-Fi networks to connect.
i
Wi-Fi icon will appear and display signal strength when connected to network.
- When you choose an open network, the phone automatically connects to the network. If you choose a locked one, security PIN is required before connection. - When the battery is very low, Wi-Fi will be unavailable in order to protect data of the system.
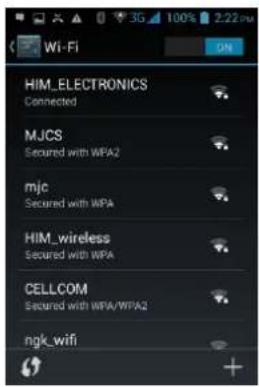
text_image
HIEM ELECTRONICS Connected MJCS Secured with WFA2 mjc Secured with WPA HIM_wireless Secured with WPA CELLCOM Secured with WPA/WFA2 ngk_wifi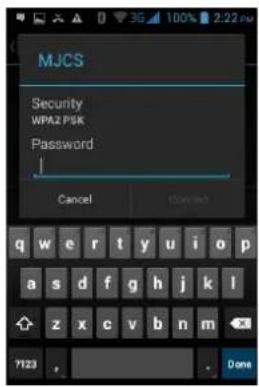
text_image
MJCS Security WPAZ P5K Password Cancel Done5.2 Using Bluetooth
- On Home Screen tap ⏻ > 📋 > Bluetooth.
- Tap Bluetooth to open it. Tap your device Bluetooth name to make it discoverable by nearby Bluetooth devices.
i
- It would automatically scan discoverable Bluetooth devices and display Bluetooth icon on the status bar ( ) after turn on Bluetooth.
- Tap Bluetooth, and select a discovered device to match with.
• Enter matching code.
When the devices are matched and connected, the status bar will show an
icon, and then you can start exchanging data.
Using Google Map
- On Home screen tap > .
- You can use the following applications through Google map:
• My Location Tap to locate your current location
- Directions Enter your starting point and destination to start navigation.
- Search Enter a desired destination and tap search icon to find the location of your target location.
- Layers You can choose Traffic mode and Satellite mode etc.
- Please connect to network before you open the map.
- Some countries and regions maybe unavailable on the map.
5.3 Sound and Display Settings
Set your ringtone
-
On Home screen, tap 🎨> >Audio Profiles.
-
Tap General > Voice call ringtone.
-
Select a ringtone and tap OK.
i
You can also choose to automatically adjust the brightness, by the system according to the current state of the environment automatically adjust screen brightness.
Screen brightness
- On Home screen, tap


-
Tap Display >Brightness.
-
Brightness control: drag the rolling bar to the left (-) or to the right (+).
-
Tap OK.
5.4 Other Settings
Uninstall Applications
You can uninstall only downloaded applications.
- On Home screen, tap


-
Tap Apps, tap the application you intend to uninstall.
-
On the information screen, tap Uninstall.
Language and input
- On Home screen, tap


-
Tap
-
Select Language: This device includes several languages. Select your desired language.
-
Keyboard Settings: Vibrates when buttons are pressed, Plays sound when buttons are pressed, Capitalizes automatically, Speech Input(by microphone on the keyboard), Inputs words (speech can be altered by sliding finger on space key), Displays tips (activate predictive function when you input words); Auto-Texts(Automatically input certain words when press space key or specified keys)
Factory Data Reset
Factory data reset erases all downloaded applications and data on the phone.
- On Home screen, tap


-
Tap Backup & reset >Factory data reset.
-
Tap Reset phone > Erase everything
Please make a backup for all important data before you reset the phone.
5.5 USB Computer Connection
To save some files on your device
1 Connect your device with USB cable.
2 Open Notification menu and tap USB connected
3 Tap USB storage and confirm it for using your device as a data storage device.
4 Tap Media device that lets you transfer media files between your device and computer.
i
- When USB storage device is turned on, some applications will be unavailable, including camera, music player, etc.
- To close the USB mode, tap "Charge Only" which stops all USB functions and lets you speed up USB Charging and decrease Power Consumption.
6.0 Multimedia
You can use default apps/games in the device and enjoy other apps/games after downloading and installing from play store.
6.1 File manager
- On the home page, tap


- Open the list of files, you can create or delete a file / folder.
- Tap the file/folder to open it or tap and hold to select the file / folder
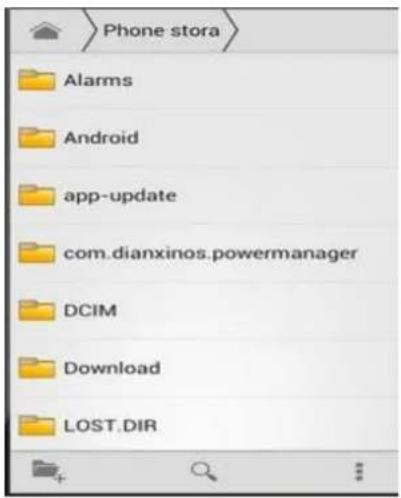
text_image
Phone stora Alarms Android app-update com.dianxinos.powermanager DCIM Download LOST.DIR6.2 Using Camera and Camcorder
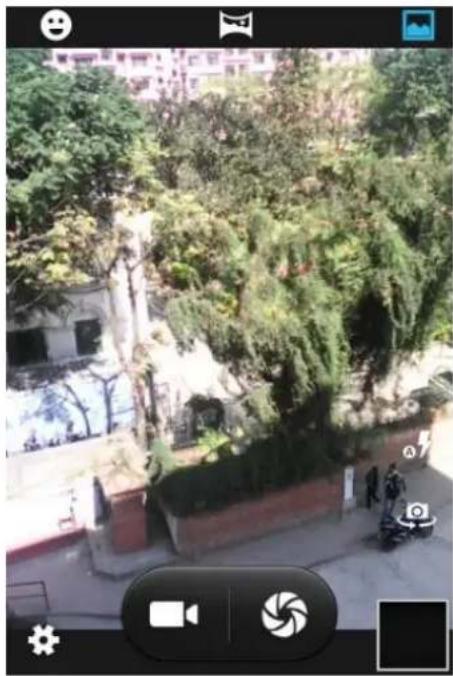
To capture photos
- On Home screen, tap


-
Tap to capture image.
-
You can use different features provided by camera utility like Smile detection, Panorama,
Flash and enhance photography experience with other options found in setting like exposure, color effect, scene mode, white balance, anti-flicker.
The default location to store for phone, please plug the memory card to save images and videos on memory card.
natural_image
Outdoor scene with trees and buildings, no visible text or symbolsTo record video
-
On Camera interface switch to Camcorder.
-
Focus on your object with the lens.
-
Tap to start filming.
-
Tap to stop.
6.3 Gallery
To view photos
- On Home screen, tap
- Tap a photo to view on the screen.
- Slide the touch screen horizontally to switch forward and backward.
- To play slideshow or edit an image, tap to show options.
- To share an image, tap icon on the top right corner.

To play back videos
-
On Home screen, tap ⏻ >
-
Tap a video thumbnail to play in full screen.
-
Tap to rewind/fast forward the video clip.
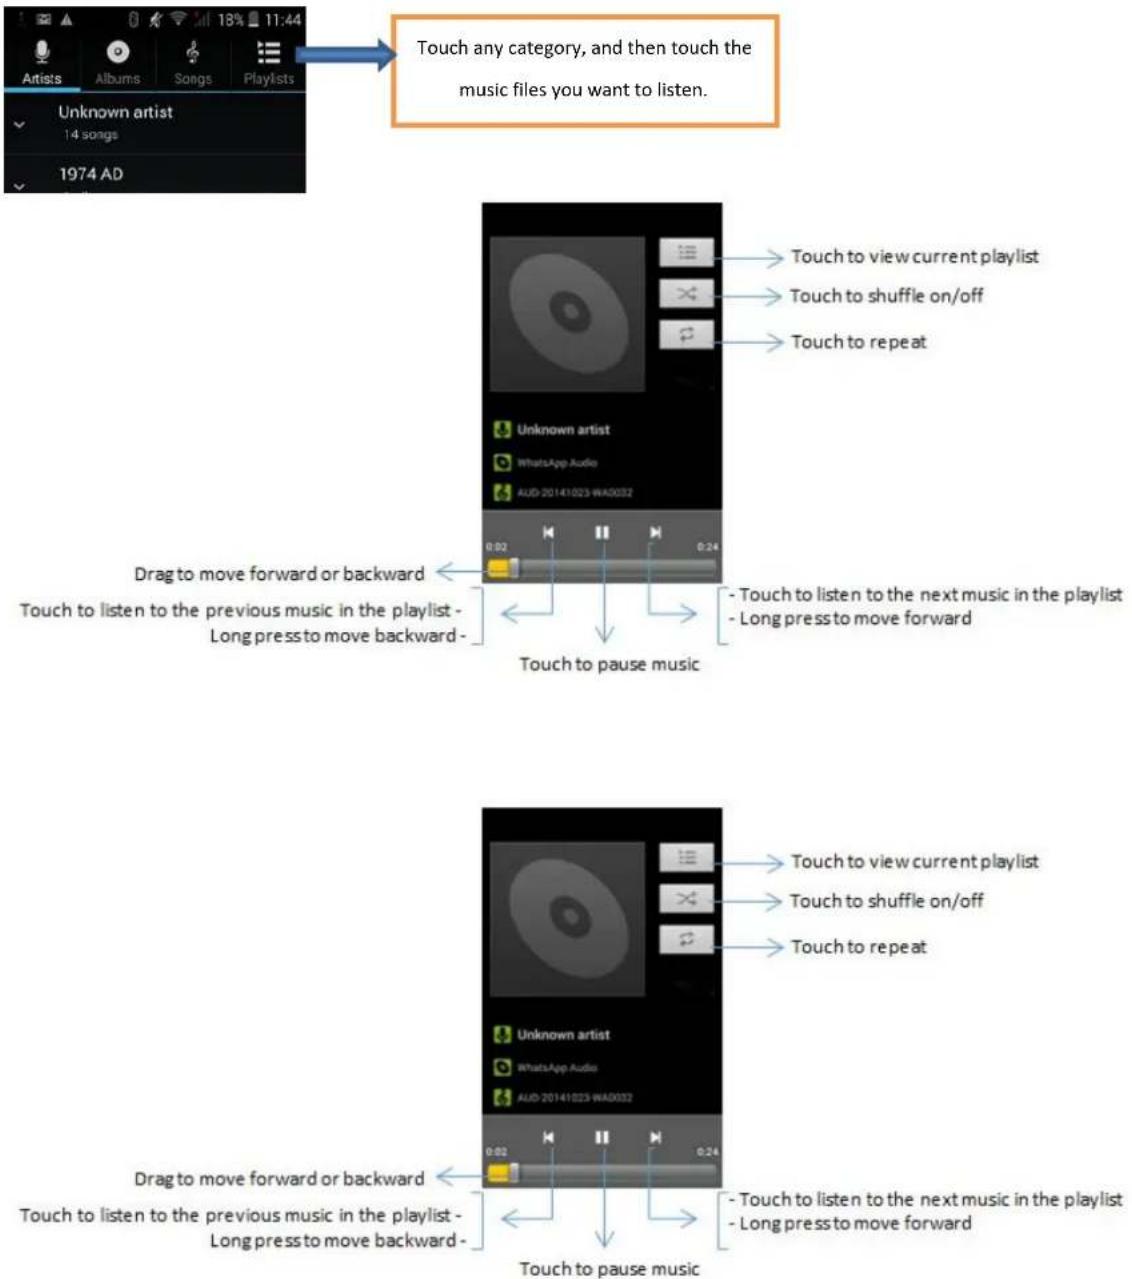
6.4 Using Music Player
Open music player
- On Home screen, tap

- Select a song to play as per your choice with selections options as Artists, Albums, Songs, Playlists.
text_image
Touch any category, and then touch the music files you want to listen. Unknown artist 14 songs 1974 AD Touch to view current playlist Touch to shuffle on/off Touch to repeat Unknown artist WhatsApp Audio AUD 20141023 WA0032 0.02 0.24 Drag to move forward or backward Touch to listen to the previous music in the playlist - Long press to move backward - Touch to pause music - Touch to listen to the next music in the playlist - Long press to move forward Touch to view current playlist Touch to shuffle on/off Touch to repeat Unknown artist WhatsApp Audio AUD 20141023 WA0032 0.02 0.24 Drag to move forward or backward Touch to listen to the previous music in the playlist - Long press to move backward - Touch to pause music - Touch to listen to the next music in the playlist - Long press to move forward- Press and hold a song and tap Use as phone ringtone from the menu. The song will be added to the ringtone list and set as default ringtone.
6.5 Using Sound Recorder

- On Home screen, tap
- Tap to start recording.
-
Tap to stop.
-
Tap Save or Discard button to save the audio file or Discard.
If you want to play back the recorded audio, tap to play.

text_image
Sound Recorder 00:00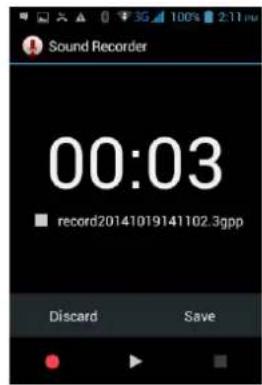
text_image
Sound Recorder 00:03 record20141019141102.3gpp Discard Save6.6 FM Radio
-
Plug in headphone cable.
-
On Home screen, tap
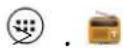
-
Tap on the "search" for automatic scanning search FM channel and channel in list interface, list all channels.
-
Tap "FM recording" if you want to simultaneously listen and record to the radio. The tape records to default file name and can be well-preserved by renaming filename. Default file is saved to FM recording.
-
Tap "Exit" to close FM radio.
When you unplug headphone cable, you cannot listen to FM Stations.
text_image
FM Radio Search Speaker Record FM Exit FM Channel list FM 100.0 MHz Click the five- pointed star, The current channel is added to the channel list add mark for collection Forward adjust a frequency Backward adjusting a frequency Forward search Backward searchTap on Return to key to make the radio program move to the background and continue to listen to the show, and you can also carry out any other program.
6.7 Using Calculator
Basic Calculator
- On Home screen, tap


- Start calculation.

text_image
7 8 9 ÷ 4 5 6 × 1 2 3 - . 0 = +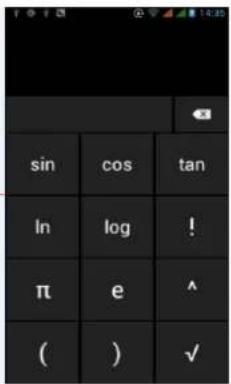
text_image
sin cos tan In log ! π e ^ ( ) ✓Open Advanced panel
-
Tap Menu >Tap Advanced panel.
-
Return to calculator to start.
6.8 Calendar
- On the home page, tap

- You can choose to create an activity or task. You can also view a created activity or task.
6.9.0 Updates
Please check for Software updates we provide time to time for new features, add ups and bug fixes.
For finding new updates;
- On the home screen, tap


- Tap About Phone.
- Tap System Updates, tap Check Now.
- Tap Wireless Updates, tap Check for updates.
Taking Care of the device
1) Place the mobile phone and their parts and components out of reach of small children.
2) Keep the phone dry, protect from rain, humidity and all types of liquids which contain minerals.
3) Avoid placing the device in high temperature environment which can shorten the life of electronic devices, damage batteries, and warp or melt certain plastics.
4) Avoid placing the device in too low temperature environment.
5) Avoid placing the phone in dusty, dirty places, otherwise parts may be damaged.
6) Avoid placing the phone in a lit cigarette, near open flame or any heat source.
7) Do not open the device, non-professional approach will damage the phone.
8) Do not throw it from height, knock or shake the phone, rough handling can damage internal circuit boards.
9) Use clean, soft, dry cloth to clean the camera, light sensor lenses. Prohibit the use of harmful chemicals and cleaning agents, cleaning fluids to clean the phone
10) If mobile phone, battery, charger, or mobile phone accessories are defective, bring to the nearest authorised service center for inspection.
Battery Use & Safety
Please follow the following battery use and safety information. Most battery safety issues arise from improper handling of batteries, and continued use of damaged batteries.
- Always use KONROW-branded batteries and chargers for quality assurance and safeguards
- New batteries are not fully charged. Always charge them fully before first use.
• Always charge your battery at room temperature for efficient battery charging. - Always make sure that any battery, connector and compartment covers are closed and secure to avoid direct exposure of the battery to sunlight, heat, liquid, metal, etc. Exposure to these extreme conditions can lead to the risk of fire, corrosion, leakage, swelling and other malfunction.
- Don't disassemble, crush, puncture, shred, or attempt to change the form of your battery.
- Don't use tools, sharp objects, or excessive force to insert or remove the battery as this can damage the battery.
- Never dispose of batteries in a fire because they may explode.
- Contact KONROW if your mobile device or battery has been damaged in any of the ways listed here.
Third Party Accessories
Use of third party accessories, including but not limited to batteries, chargers, headsets, covers, cases, screen protectors and memory cards, may impact your mobile device's performance. In
some circumstances, third party accessories can be dangerous and may void this mobile device's warranty.
Software Notices
KONROW strongly recommends against any change in the product's operating system, which includes unlocking the bootloader, rooting a device or running any operating software other than the approved versions issued by KONROW. Any changes may permanently damage your product and may lead your product to malfunction. Such changes will also make the device void of warranty.
Copyright
All rights are reserved. Reproduction, transfer, distribution or storage of part or all of the contents in this document in any form without the prior written permission of KONROW is strictly prohibited.