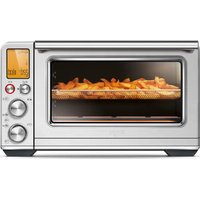
the Smart Oven Air Fryer BOV860 - Oven SAGE - Free user manual and instructions
Find the device manual for free the Smart Oven Air Fryer BOV860 SAGE in PDF.



User questions about the Smart Oven Air Fryer BOV860 SAGE
0 question about this device. Answer the ones you know or ask your own.
Ask a new question about this device
Download the instructions for your Oven in PDF format for free! Find your manual the Smart Oven Air Fryer BOV860 - SAGE and take your electronic device back in hand. On this page are published all the documents necessary for the use of your device. the Smart Oven Air Fryer BOV860 by SAGE.
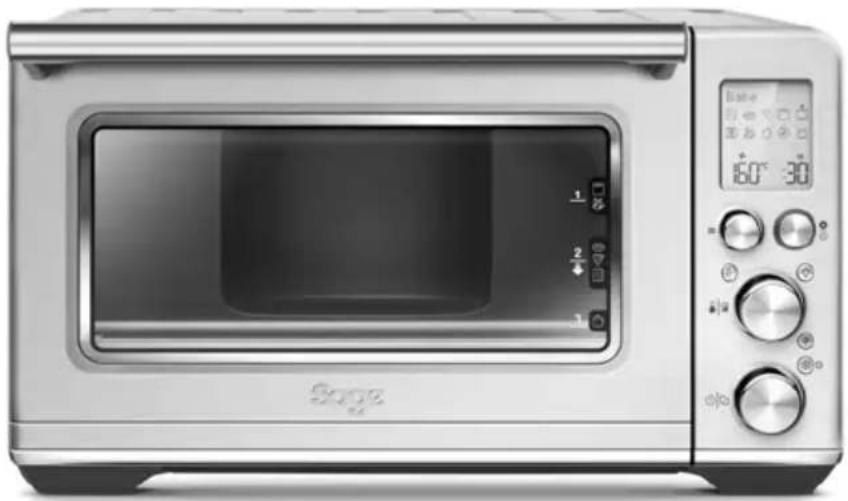
USER MANUAL the Smart Oven Air Fryer BOV860 SAGE
the Smart Oven ^TM Air Fryer
BOV860 / SOV860 - EU
natural_image
Exterior view of a modern B泛esible microwave oven with control knobs and display (no visible text or symbols)EN QUICK GUIDE
DE KURZANLEITUNG
FR GUIDE RAPIDE
NL SNELSTARTGIDS
IT GUIDA RAPIDA
ES GUÍA RÁPIDA
PT MANUAL RÁPIDO
Sage®

Contents
2 Sage® recommends safety first
7 Components
9 Functions
11 Quick Start Guide
14 Care & Cleaning
15 Troubleshooting
17 Guarantee
SAGE®
RECOMMENDS SAFETY FIRST
At Sage® we are very safety conscious. We design and manufacture consumer products with the safety of you, our valued customer, foremost in mind. In addition we ask that you exercise a degree of care when using any electrical appliance and adhere to the following precautions.
IMPORTANT SAFEGUARDS
READ ALL INSTRUCTIONS BEFORE USE AND SAVE FOR FUTURE REFERENCE
- A downloadable version of this document is also available at sageappliances.com
- Before using for the first time please ensure that your electricity supply is the same as shown on the rating label on the underside of the appliance.
- Remove and safely discard any packing materials and promotional labels before using the oven for the first time.
- To avoid choking hazard for young children, remove and safely dispose the protective cover fitted on the power plug.
- Do not use the appliance near the edge of a benchtop or table. Ensure the surface is stable, level, heat-resistant and clean.
- A fire may occur if the oven is covered or touches flammable material, including curtains, draperies, walls, and the like, when in operation.
- Do not use the appliance on (or close to) a hot gas or electric burner, or where it could touch a heated oven or surface.
-
Do not let the power cord hang over the edge of a table or counter, or touch hot surfaces.
-
The oven is not suitable to be used in a small appliance enclosure. Ensure to leave adequate space all around the oven. Minimum space of 10cm is recommended.
- The outer housing of the oven may be hot during and after cooking. Please do not touch hot surfaces. Always keep the power cord of this oven, and those of other appliances near the oven, clear from the oven housing.
- Do not touch hot surfaces. To avoid burns, use extreme caution when removing pans, dishes and accessories such as the included grilling rack and roasting pan, that contain hot oil or other hot liquids.
- Do not lay cooking utensils, roasting pans or dishes on the glass door.
- Do not leave the door standing open for extended periods of time.
- Do not store any item on top of the oven when in operation except those described on page 13 of this book.
- Do not place cardboard, plastic, paper, or other flammable materials in the oven.
-
Do not cover crumb tray or any part of the oven with metal foil. This will cause overheating of the oven.
-
Caution should be exercised when using pans and dishes constructed of materials other than metal. Ensure pans and dishes are oven safe before using in the oven.
- Caution should be exercised when using lids in the oven, as pressure build up in a covered pan or dish may cause hot ingredients to expel or the dish to crack. Do not place sealed or airtight containers in the oven.
- Oversized food and metal utensils must not be inserted in the oven as they may create fire or risk of electric shock.
- The use of accessories and attachments not recommended or supplied with this oven may cause injuries.
- This appliance is for household use only. Do not use in any type of moving vehicles. Do not use the appliance outdoors, or for anything other than its intended use. Misuse can cause injury.
- If the appliance is to be: left unattended, cleaned, moved, assembled or stored, always switch the unit off and unplug the cord from the power outlet and allow to cool completely.
-
Do not clean with metal scouring pads. Pieces can break off the pad and touch electrical parts, creating a risk of electric shock.
-
The appliance can be used by children aged from 8 years and above and persons with reduced physical, sensory or mental capabilities, or lack of experience and knowledge, if they have been given supervision or instruction concerning use of the appliance in a safe way and understand the hazards involved.
• Children shall not play with the appliance. - Cleaning and user maintenance shall not be made by children unless they are older than 8 and supervised.
- The appliance and its cord should be kept out of reach of children aged 8 years and younger.
- It is recommended to regularly inspect the appliance. Do not use the appliance if power cord, power plug or appliance becomes damaged in any way. If damaged or maintenance other than cleaning is required, please contact Sage Customer Service or go to sageappliances.com
- The appliance is not intended to be operated by means of external timer or separate remote control system.
-
The appliance must be used on a properly grounded outlet. If you are unsure the power outlets are properly grounded, please consult an electrician.
-
Do not, under any circumstance, modify the power plug or use an adapter.
- Consult a qualified electrician if the grounding instructions are not completely understood, or if doubt exists as to whether the appliance is properly grounded.
- The installation of a residual current device (safety switch) is recommended to provide additional safety protection when using electrical appliances. It is advisable that a safety switch with a rated residual operating current not exceeding 30mA be installed in the electrical circuit supplying the appliance. See your electrician for professional advice.
SPECIFIC INSTRUCTIONS FOR SOV860
• We recommend the oven is operated on a dedicated circuit separated from other appliances. Consult a licensed and qualified electrician if you are unsure.
- To turn off the oven, press the ⚙ Start/Cancel button on the control panel. The oven is off when the button back-lights turn off.
- Regularly clean the crumb tray. To clean the crumb tray:
–Turn OFF the oven, –Allow the oven to cool completely and then remove the power cord from the power outlet.
- Remove the crumb tray and clean with warm soapy water. - Dry the tray completely before inserting it securely back in place.
NOTICE TO CUSTOMERS REGARDING MEMORY STORAGE
Please note that in order to better serve our customers, internal memory storage has been embedded into your appliance. This memory storage consists of a small chip to collect certain information about your appliance including the frequency of use of the appliance and the manner in which your appliance is being used. In the event your appliance is returned for service, the information collected from the chip enables us to quickly and efficiently service your appliance. The information collected also serves as a valuable resource in developing future appliances to better serve the needs of our consumers. The chip does not collect any information regarding the individuals who use the product or the household where the product is used. If you have any questions regarding the memory storage chip please contact us at privacy@sageappliances.com.

WARNING
TO REDUCE THE RISK OF FIRE, ELECTRIC SHOCK, EXPOSURE TO EXCESSIVE UV RADIATION, OR INJURY TO PERSONS:
• Always unplug the oven and let all parts (including the bulb housing, glass cover and enclosure) cool completely before replacing bulb.
- Only use a 25 Watt, 220–240V, G9 type oven bulb.
• Always use a soft cloth when handling the bulb and do not directly touch the surface as oil from your skin can damage the bulb.
- Do not look directly at a glowing bulb.
- Do not remain in the light if skin feels warm.
- Keep bulb away from materials that may burn.
- The bulb gets hot quickly. Only ever use the light button to turn on the light.
- Do not operate the light if the bulb housing, glass cover, UV filter or enclosure are missing or damaged.
The symbol shown indicates that this appliance should not be disposed of in normal household waste. It should be taken to a local authority waste collection centre designated for this purpose or to a dealer providing this service. For more information, please contact your local council office.
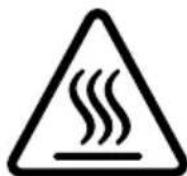
Hot Surfaces
Do Not Touch
This symbol indicates, temperature of accessible surfaces may be high when the appliance is operating and for some time after use.

To protect against electric shock, do not immerse the power cord, power plug or appliance in water or any liquid.
SAVE THESE INSTRUCTIONS
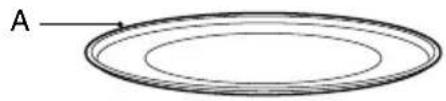
Components
natural_image
Simple diagram of concentric ovals with a labeled point A (no text or symbols beyond label)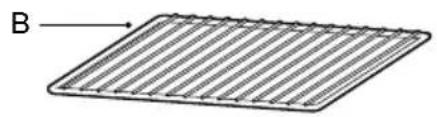
natural_image
Diagram of a rectangular grid structure with labeled point B (no text or symbols beyond label)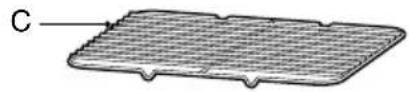
natural_image
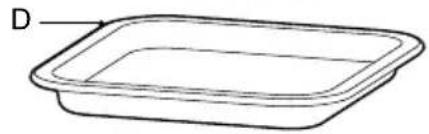
Simple line drawing of a rectangular container with label D pointing to the side (no text or symbols on the container itself)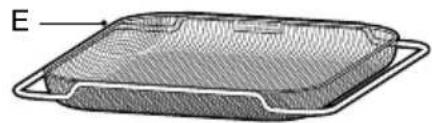
natural_image
Technical line drawing of a rectangular tray with a mesh pattern and labeled point E (no text or symbols beyond label)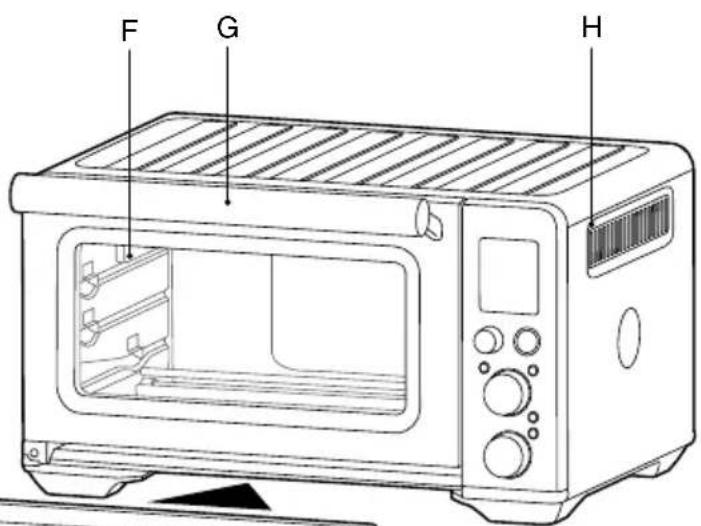
text_image
F G H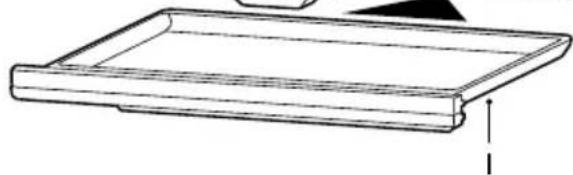
natural_image
Line drawing of a rectangular tray or tray with a small protrusion and a vertical measurement arrow (no text or symbols)A. 30cm non-stick pizza pan
B. Wire rack
C. Grilling rack
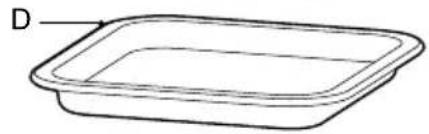
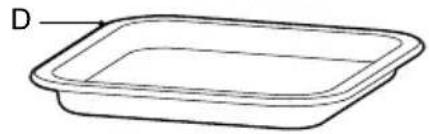
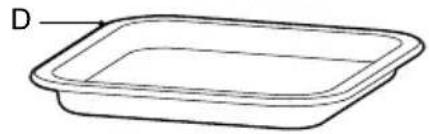
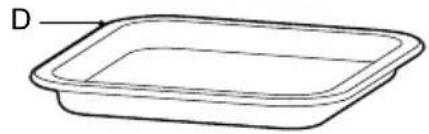
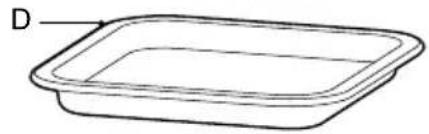
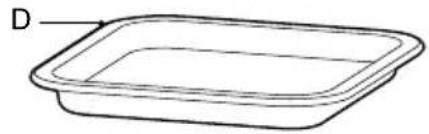
D. 28 x 33.5cm enamel roasting pan
E. Air Fry basket
F. Oven light
G. Door handle
H. Ventilation slots
I. Crumb tray
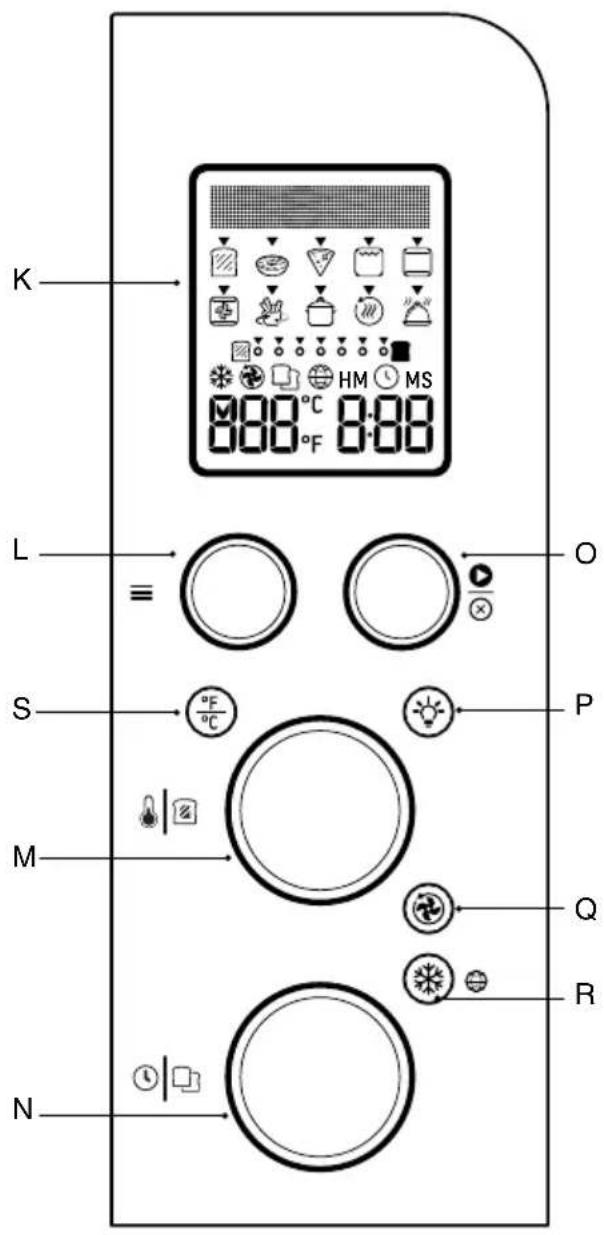
text_image
K L O S P M Q R NK. LCD screen
L. ≡ Function Dial
M. 12 Temperature Dial/Toast and Bagel Darkness Control
N. Ⓤ Time Dial/Toast and Bagel Selection
O. ⑧ Start/Cancel Button
P. ⚙️ Oven Light Button
Q. Convection Button
R. ✿ Frozen Button
S. ^^ Temperature Conversion Button

Functions
PREPARING THE OVEN
Before first use, please run the oven empty for 20 minutes to remove protective substances from the heating elements. Ensure the area is well ventilated as the oven may emit vapours. These vapours are safe and are not detrimental to the performance of the oven.
- Remove and safely discard any packing material, promotional labels and tape from the oven.
- Remove the crumb tray, wire racks, grilling rack, roasting pan, air fry basket and pizza pan from the polyfoam packaging. Wash them with a soft sponge in warm, soapy water then rinse and dry thoroughly.
- Wipe the interior of the oven with a soft, damp sponge. Dry thoroughly.
- Place the oven on a flat, dry surface. Ensure there is a minimum distance of 10cm of space on both sides of the appliance and 15cm above.
- Insert the crumb tray into the oven.
- Unwind the power cord completely and insert the power plug into a grounded power outlet.
- The oven alert will sound and the LCD screen will illuminate. Set desired language. Go to page 12 for guide on language selection.
-
Turnthe ≡ Function dial to the right until the indicator reaches the PIZZA function.
-
Press the ⚙ Start/Cancel button. The button backlight will illuminate red, the LCD screen will illuminate orange and the oven alert will sound.
- The LCD screen will indicate a blinking 'PREHEATING'. Once the oven has completed the preheating cycle, an alert will sound.
- The timer will be displayed and automatically begin to count down.
- At the end of the cooking cycle, the oven alert will sound, the ⚙ Start/Cancel button backlight will go out and the LCD screen will illuminate blue.
- The oven is now ready to use.
ELEMENT IQ™
The Sage Smart Oven™ Air Fryer features Element IQ™, a cooking technology that creates the ideal environment for the food you're cooking. It steers power where and when it's needed and creates the right kind of heat, whether even or intense.
Each of the oven's functions is preset with our recommended heating element configurations and temperatures, that are based on recipes and testing. However, we suggest experimenting with these depending on the recipe, amount of food and your personal taste.

text_image
Pizza 2 10°C :20 Pizza 2 10°C :20OVEN FUNCTIONS OVERVIEW
| ≡Function | SUGGESTED RACK POSITION | OPTIONAL SETTINGS | PRESETS PREHEAT RANGE | ||
| [3XTS] | Toast | Middle | ※ Frozen | Darkness 4 Slices 4 | No Darkness 1-7 Slices 1-6 |
| [T503] | Bagel | Middle | ※ Frozen | Darkness 4 Slices 4 | No Darkness 1-7 Slices 1-6 |
 | Pizza | Middle | ※ Super Convection※ Convection ^oF^oC Temperature Conversion※ Frozen | 210°C※ Convection※ Frozen 15 MINS | Yes 160°C - 230°C Up to 1 HR |
| [48AX] | Grill | Top HI | 10 MINS | No HI-MED-LO Up to 20 MINS | |
 | Bake | Bottom | ※ Super Convection※ Convection ^oF^oC Temperature Conversion | 180°C 30 MINS | Yes 145°C and above = 1 MIN up to 2 HRS 145°C and below = 1 MIN up to 10 HRS |
 | Roast | Bottom | ※ Super Convection※ Convection ^oF^oC Temperature Conversion | 180°C※ Convection 1:00 HR | Yes 145°C and above = 1 MIN up to 2 HRS 145°C and below = 1 MIN up to 10 HRS |
 | AirFry | Top | ※ Super Convection ^oF^oC Temperature Conversion | 220°C 15 MIN※ Super Convection | Yes 160°C - 230°C Up to 1:00 HR |
 | Reheat | Bottom | ※ Convection ^oF^oC Temperature Conversion | 160°C※ Convection 15 MINS | No 70°C - 160°C Up to 2:00 HRS |
| [0TH6] | Keep Warm | Bottom | ※ Convection ^oF^oC Temperature Conversion | 70°C KEEP WARM 1:00 HR | No 50°C - 120°C Up to 2:00 HRS |
 | Slow Cook | Bottom | ※ Convection | HI※ Convection 4:00 HRS | No LO = 4 to 10 HRS HI = 2 to 8 HRS |

Quick Start Guide
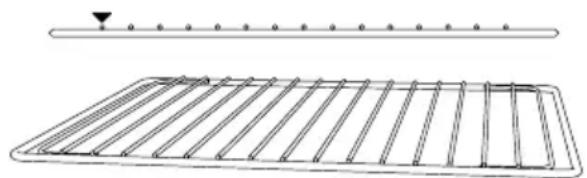
- Position the wire rack so the spokes face upward and insert it into the desired rack position. The rack positions are conveniently printed on the oven door window.
natural_image
Technical line drawing of a grid structure with a horizontal bar and circular elements above (no text or symbols)- Turn the ≡Function dial until the indicator on the LCD screen reaches the desired setting.
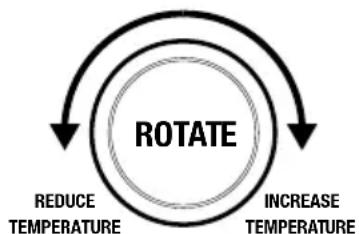
- The screen indicates the preset cooking temperature for the selected setting. Turn the 42 Temperature dial to the left to reduce the temperature or to the right to increase the temperature.
TEMPERATURE
DIAL
flowchart
graph TD
    A["ROTATE"] --> B["INCREASE TENDER"]
    B --> C["REDUCE TENDER"]
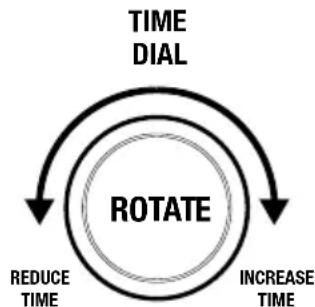
- The screen indicates the preset cooking time for the selected setting. Turn the ①② Time dial to the left to reduce the cooking time or to the right to increase the cooking time.
flowchart
graph TD
    A["TIME DIAL"] --> B["ROTATE"]
    B --> C["INCREASE TIME"]
    C --> D["REDUCE TIME"]
    D --> A
- For settings without a preheat cycle (TOAST, BAGEL, GRILL, KEEP WARM, SLOW COOK), place the food directly on the wire rack or on the included air fry basket, pizza pan, grilling rack and/or roasting pan. Ensure the food is centred in the oven for the most even cooking.
- Close the oven door.
- Press the ⚙️ Start/Cancel button. The button backlight will illuminate red, the oven alert will sound, and the LCD screen will illuminate orange.
- The timer will be displayed and begin to count down. The cooking temperature and time can be adjusted during the cooking cycle.
- For settings that feature a preheat cycle (BAKE, ROAST, PIZZA, AIR FRY), press the Start/Cancel button before placing food in the oven. The button backlight will illuminate red, the oven alert will sound and the LCD screen will indicate a blinking 'PREHEATING' while the oven is heating up.
a) When the oven is ready for use, the blinking 'PREHEATING' will go out, the oven alert will sound and the timer will start counting down. Place the food directly on the wire rack, or on the included air fry basket, pizza pan, grilling rack and/or roasting pan. Ensure the food is centred in the oven for the most even cooking.
b) Close the oven door.
c) The timer will continue to count down. The cooking temperature and time can be adjusted during the cooking cycle. - At the end of the cooking cycle, the oven alert will sound, the Ⓞ Start/Cancel button backlight will go out and the LCD screen will illuminate blue.

NOTE
The cooking cycle can be stopped at any time by pressing the ⚙ Start/Cancel button. This will cancel the cycle and the button backlight will illuminate blue.

NOTE
Press the 📋 Convection button to choose between no convection, convection and super convection. Convection and super convection may adjust the temperature to compensate for the faster air flow. Super convection will deliver a crispier food result.
MAGNETIC AUTO-EJECT RACK
When the wire rack is inserted into the middle rack position, it will automatically eject halfway out of the oven when the door is opened so you can easily remove your food.
Always open the door slowly when the wire rack is in this position to prevent the rack from ejecting too quickly.
LANGUAGE SELECTION
When the oven is being operated for the first time, it will allow you to select the desired language.
Turn the 12 Temperature or 910 Time dials (clockwise or anticlockwise) to select the desired language, then press the 68 Start/Cancel button to confirm your selection. If the desired language is not confirmed within 5 minutes, the oven will automatically save the default language.
In the event the selected language needs to be changed, press the ✿ Frozen button for 3 seconds. The LCD screen will display the languages selection. Turn the 12 Temperature or ①② Time dials (clockwise or anticlockwise) to select the desired language, then press the
Start/Cancel button to confirm your selection. If the desired language is not confirmed within 5 minutes, the oven will automatically go back to the previously saved language.
The check mark icon √ indicates selected language.
REPLACING THE OVEN LIGHT

WARNING
Always unplug oven and let cool before replacing bulb. Only use a 25-Watt, 220-240V, G9 type oven bulb.
- Remove the wire rack from the oven before replacing the light.
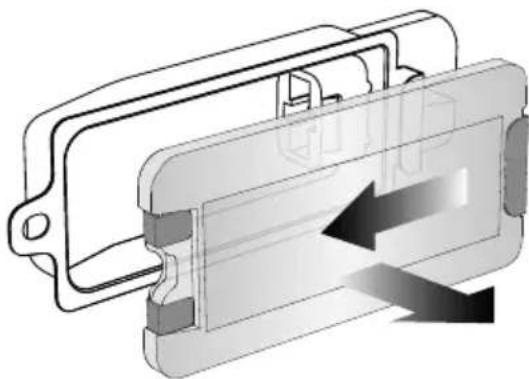
- The light is positioned on the lefthand side of the oven cavity. Position your fingers on the outside of the light housing and gently pull the glass cover away from the oven wall to remove it. If you are unable to pull the cover off, slide a spoon into the left side of the light housing and gently lever the glass cover off. Always hold the glass cover with the other hand to prevent the cover from falling and breaking.
natural_image
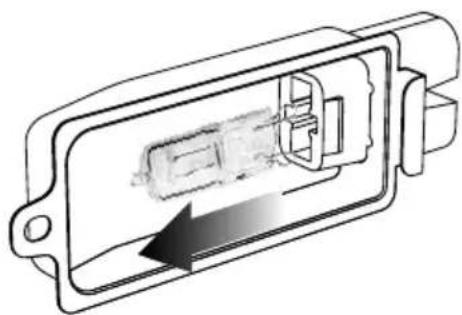
Technical illustration of a mechanical component with internal channels and a directional arrow (no text or symbols)- Remove the used bulb by pulling it directly out of its holder.
natural_image
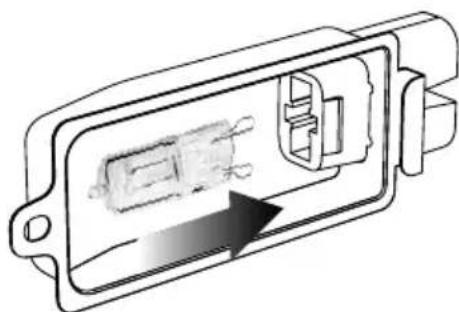
Cross-sectional diagram of a mechanical component with internal structure and directional arrow (no text or symbols)- Use a soft cloth to insert the new bulb. Do not directly touch the surface of the bulb with your fingers as oil from your skin can damage the bulb.
natural_image
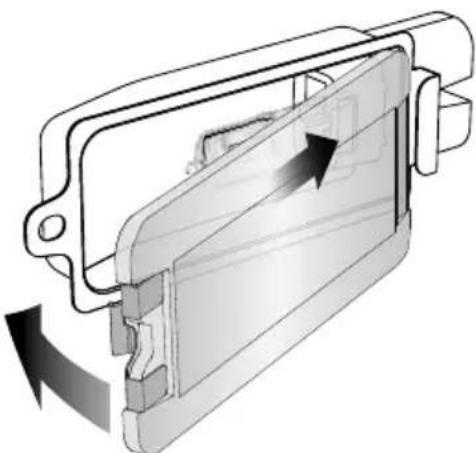
Technical line drawing of an electrical connector with internal components and a black arrow indicating direction (no text or symbols)- To reattach the glass cover, align the metal hook with the left side of the light housing. Slide the opposite end of the glass cover into the metal bracket on the right side of the housing, then push the metal hook into the left side of the housing until it snaps securely into position.
natural_image
Technical illustration of a mechanical component with directional arrows indicating motion (no text or symbols)
NOTE
The top of the oven is very hot during and after operation. As a result, storing items on top of the oven is not recommended.
The only exception is the optional Sage Bamboo Cutting Board and Serving Tray that fits in the ribbed section on top of the oven. Visit www.sageappliances.com for more information.
Care & Cleaning
Before cleaning, ensure the oven is turned off by removing the power plug from the power outlet. Allow the oven and all accessories to cool completely before disassembling and cleaning.
Cleaning the outer body and door
- Wipe the outer body with a soft, damp sponge. A non-abrasive liquid cleanser or mild spray solution may be used to avoid build-up of stains. Apply the cleanser to the sponge, not the oven surface, before cleaning.
- To clean the glass door, use a glass cleaner or mild detergent and a soft, damp sponge or soft plastic scouring pad. Do not use an abrasive cleanser or metal scouring pad as these will scratch the oven surface.
- Wipe the LCD screen with a soft damp cloth. Apply cleanser to the cloth and not the LCD surface. Cleaning with dry cloth or abrasive cleaners may scratch the surface.
- Let all surfaces dry thoroughly prior to inserting the power plug into a power outlet and turning the oven on.

WARNING
Do not immerse the body, power cord or power plug in water or any other liquid as this may cause electrocution.
Cleaning the interior
The walls on the inside of the oven feature a non-stick coating for easy cleaning. To clean any splattering that may occur while cooking, wipe the walls with a soft, damp sponge. A non-abrasive liquid cleanser or mild spray solution may be used to avoid build-up of stains. Apply the cleanser to the sponge, not the oven surface, before cleaning. Avoid touching the quartz heating elements.

WARNING
Use extreme caution when cleaning the quartz heating elements. Allow the oven to cool completely, then gently rub a soft, damp sponge or cloth along the length of the heating element.
Do not use any type of cleanser or cleaning agents. Do not use any standard oven cleaner to clean the interior of the oven as this will deteriorate the metal surface.
Let all surfaces dry thoroughly prior to inserting the power plug into a power outlet and turning the oven ON.
Cleaning the crumb tray
- After each use, slide out the crumb tray and discard crumbs. Wipe the tray with a soft, damp sponge. A non-abrasive liquid cleanser may be used to avoid build-up of stains. Apply the cleanser to the sponge, not the tray, before cleaning. Dry thoroughly.
- To remove baked-on grease, soak the tray in warm soapy water then wash with a soft sponge or soft plastic scouring pad. Rinse and dry thoroughly.
- Always reinsert the crumb tray into the oven with the oven door closed after cleaning and prior to inserting the power plug into a power outlet and turning the oven on.
Cleaning the wire rack, grilling rack, roasting pan and pizza pan
-
Wash all accessories in warm soapy water with a soft sponge or soft plastic scouring pad. Rinse and dry thoroughly. Do not use abrasive cleansers, metal scouring pads or metal utensils to clean any of the accessories as they may damage the surfaces.
-
To extend the life of your accessories, we do not recommend that these be placed in the dishwasher.
Storage
- Ensure the oven is turned off by removing the power plug from the power outlet.
- Allow the oven and all accessories to cool completely before disassembling and cleaning.
- Ensure the oven and all accessories are clean and dry.
- Ensure the crumb tray is inserted into the oven; the broiling rack is inserted into the roasting pan and resting on the wire rack in the middle rack height position.
- Ensure the door is closed.
- Store the appliance in an upright position standing level on its support legs. Do not store anything on top. The only exception is the optional Sage Bamboo Cutting Board and Serving Tray.
Troubleshooting
POSSIBLE PROBLEM EASY SOLUTION
| Oven will not switch "ON" | Check that the power plug is securely inserted into the outlet.Insert the power plug into an independent outlet.Insert the power plug into a different outlet.Reset the circuit breaker if necessary. |
| The LCD display light has gone out | The oven goes into standby mode if not used for 10 minutes.When in standby mode, the LCD screen will cease to illuminate,however all function options will still be visible.To re-activate the oven out of standby mode, press theStart/Cancel button on the control panel, or turn any dial.The LCD screen will re-illuminate. |
| The pizza does not cook evenly | Some large pizzas may brown unevenly in compact ovens.Open the oven door half way through the cooking time and turn the pizza 180 degrees for more even darkness. |
| The Magnetic Auto-Rack Eject comes out too far when I open the door | Always open the door slowly and in a controlled manner when the wire rack is inserted into the middle rack height position to prevent the wire rack from ejecting too quickly. |
| I cannot select theFrozen button | TheFrozen button is only selectable for the following functions:TOAST, BAGEL, BAKE, PIZZA, AIR FRY. When selecting theFrozen button, this will automatically adjust the cooking time for an optimised food result. |
| Steam is coming out from the oven door | This is normal. The door is vented to release steam created from high moisture content food such as frozen breads. Be mindful that the steam can be hot. |
| The heating elements appear to be pulsing | Element IQTMaccurately controls the heat inside the oven by pulsing the power and adjusting the power level in the heating elements in short bursts to give accurate temperature control. This is normal. |
| Water is dripping onto counter from under door | This is normal. The condensation created from high moisture content food such as frozen breads will run down the inside of the door and can drip onto the counter. |
| The temperature reading on the LCD screen doesn’t match the temperature measured inside the oven | To ensure the measurements are standardized, the oven temperatures have been calibrated in the TOAST position (centre of the middle rack with no tray in place). Re-check the temperature in this position, ensuring not to open the oven door for 30 minutes as heat will escape each time the door is opened. Note that the ‘preheat’ alert sounds at 75% of the target temperature. |
POSSIBLE PROBLEM EASY SOLUTION
| The ‘preheat’ alert sounds at a lower temperature than what is displayed on the LCD screen | · The ‘preheat’ alert sounds at 75% of the target temperature. This provides the fastest, combined preheating and cooking time.· This is because when the ‘preheating’ alert sounds, signalling the user to open the oven door and insert food, there is dramatic temperature loss inside the oven. If the alert sounded at 100% of the target temperature, opening the door would mean a lot of this waiting time is “wasted”. We have calculated that by sounding the alert at 75% of the target temperature, followed by the oven door being opened to place food inside the oven, that we still recover to the target temperature up to 2 minutes faster. This is why the temperature on the LCD screen does not match the target temperature at the ‘preheat’ alert. Depending on the set temperature, it can take the oven approximately 8–10 minutes from start-up, including opening the oven door when the ‘preheat’ alert sounds, to reach the target temperature. |
| The LCD screen displays ‘E01’ | · The LCD screen will display ‘E01’ when there is a non-resettable issue with the appliance. Should this occur, immediately remove the power cord from the power outlet and call Sage Consumer Support. |
| The LCD screen displays ‘E02’ | · The LCD screen will display ‘E02’ when there is a non-resettable issue with the appliance. Should this occur, immediately remove the power cord from the power outlet and call Sage Consumer Support. |
| The LCD screen displays ‘E03’ | · The LCD screen will display ‘E03’ if the oven temperature is above the set maximum limit. Remove the plug from the power outlet, allow the oven to cool for 15 minutes, then plug back in.· Call Sage Consumer Support if the ‘E03’ message continues. |
| The LCD screen displays ‘E05’ | · The LCD screen will display ‘E05’ when there is a non-resettable issue with the appliance. Should this occur, immediately remove the power cord from the power outlet and call Sage Consumer Support. |
| Temperature are changing when convection button is pressed | · This is normal. The temperature is calibrated to compensate for the convection fan increasing cooking rates. |

Guarantee
2 YEAR LIMITED GUARANTEE
Sage Appliances guarantees this product for domestic use in specified territories for 2 years from the date of purchase against defects caused by faulty workmanship and materials. During this guarantee period Sage Appliances will repair, replace, or refund any defective product (at the sole discretion of Sage Appliances).
All legal warranty rights under applicable national legislation will be respected and will not be impaired by our guarantee. For full terms and conditions on the guarantee, as well as instructions on how to make a claim, please visit www.sageappliances.com.

Notes
the Smart Oven ^TM Air Fryer
natural_image
Front view of a modern Sono brand microwave oven with digital display and control knobs (no visible text or symbols on main body)
KURZANLEITUNG
Sage®

Inhalt
natural_image
Simple diagram of concentric ovals with a labeled point A (no text or symbols beyond label)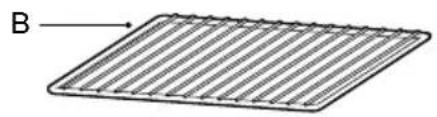
natural_image
Diagram of a striped rectangular plate with label B pointing to its left side (no other text or symbols)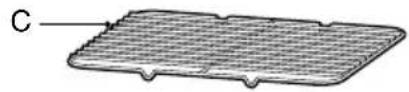
natural_image
Simple line drawing of a rectangular container with label D pointing to the side (no text or symbols on the container itself)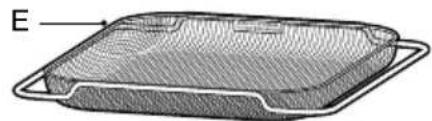
natural_image
Diagram of a rectangular tray with a curved handle and labeled point E, no text or symbols present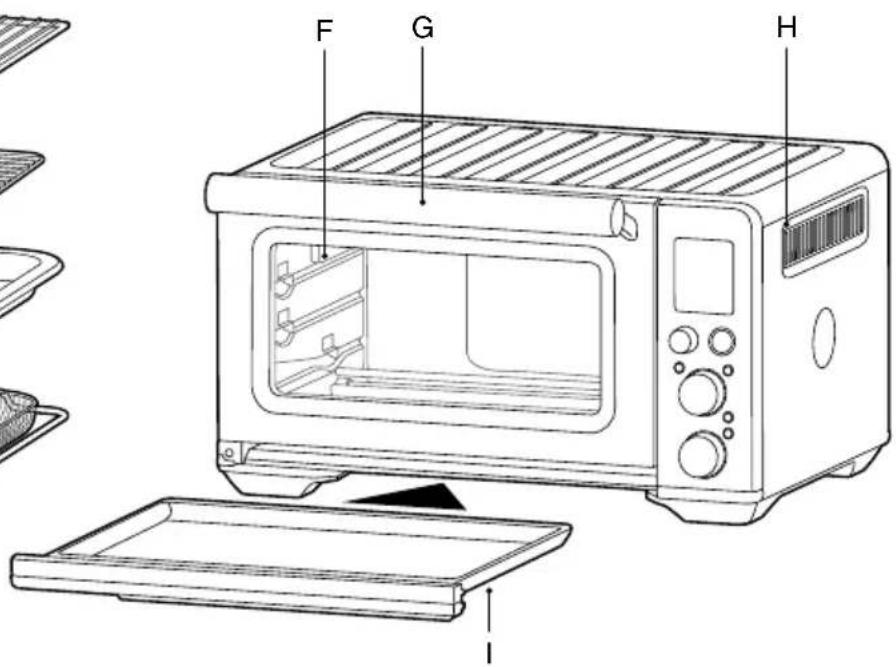
text_image
F G H Itext_image
K L S M N O P Q RK. LCD-Display
L. ≡ „Function“-Drehregler
natural_image
Technical line drawing of a grid structure with a horizontal bar and a small protrusion (no text or symbols)natural_image
Technical illustration of a mechanical component with internal channels and directional arrows (no text or symbols)natural_image
Technical line drawing of a mechanical component with internal structure and directional arrow (no text or symbols)natural_image
Technical line drawing of an electrical connector with internal components and a directional arrow (no text or symbols)natural_image
Mechanical component diagram showing a piston-like structure with directional arrows indicating motion (no text or symbols)
HINWEIS
natural_image
Front view of a modern Sono brand microwave oven with digital display and control knobs (no visible text or symbols on main body)
GUIDE RAPIDE
Sage®

Table des matières
natural_image
Simple diagram of concentric ovals with a labeled point A (no text or symbols beyond label)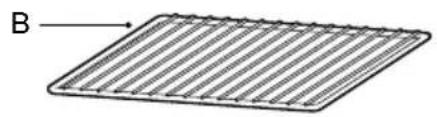
natural_image
Diagram of a rectangular grid structure with labeled point B (no text or symbols beyond label)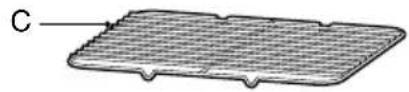
natural_image
Simple line drawing of a rectangular container with label D pointing to the side (no text or symbols on the container itself)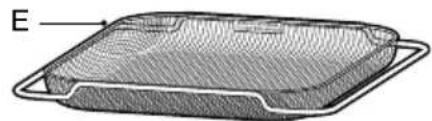
natural_image
Diagram of a rectangular device with internal mesh structure and labeled point E (no text or symbols beyond label)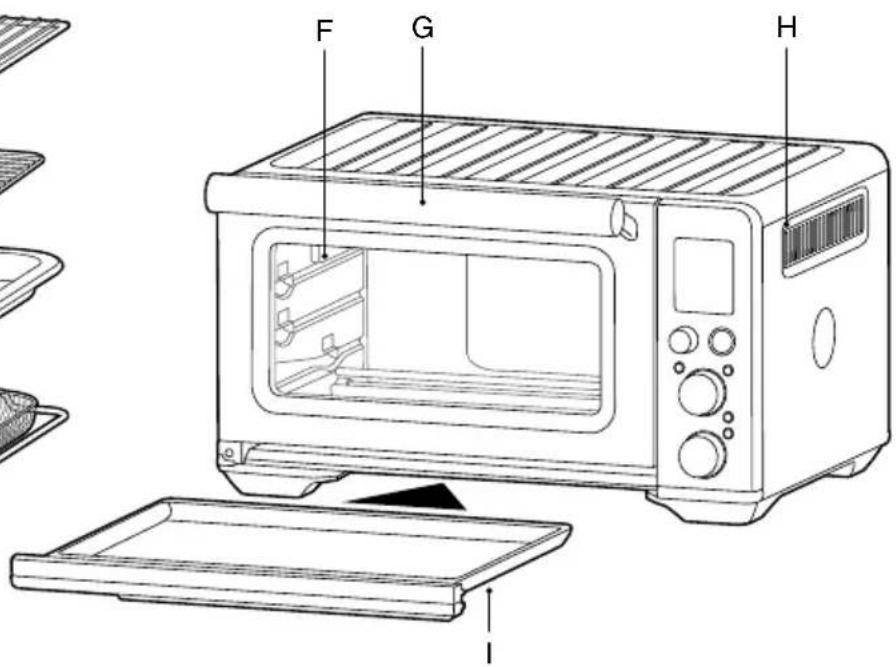
text_image
F G H Itext_image
K L S M N O P Q RK. Écran LCD
L. ≡ Bouton FONCTION
Q. Ⓜ Bouton Convection
R. ✿ Bouton Frozen (congelé)
APERÇU DES FONCTIONS DU FOUR
natural_image
Technical line drawing of a grid structure with a flat rod and a rectangular base (no text or symbols)REPLACEMENT DE LA LAMPE DU FOUR

AVERTISSEMENT
natural_image
Technical illustration of a mechanical component with internal channels and directional arrows (no text or symbols)natural_image
Technical line drawing of a mechanical component with internal channel and mounting bracket (no text or symbols)natural_image
Technical line drawing of an electrical connector with internal components and a directional arrow (no text or symbols)natural_image
Technical illustration of a mechanical component with directional arrows indicating motion (no text or symbols)
REMARQUE
natural_image
Front view of a modern Sono brand microwave oven with digital display and control knobs (no visible text or symbols on main body)
SNELSTARTGIDS
Sage®

Inhoud
natural_image
Simple diagram of concentric ovals with a labeled point A (no text or symbols beyond label)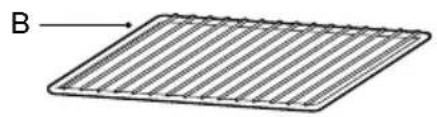
natural_image
Diagram of a rectangular grid structure with labeled point B (no text or symbols beyond label)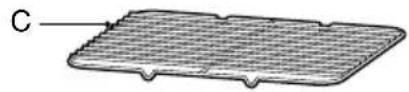
natural_image
Simple line drawing of a rectangular container with label D pointing to the side (no text or symbols on the container itself)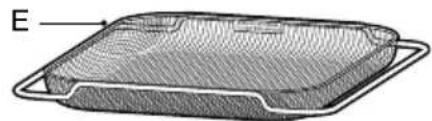
natural_image
Diagram of a rectangular device with internal mesh structure and labeled point E (no text or symbols beyond label)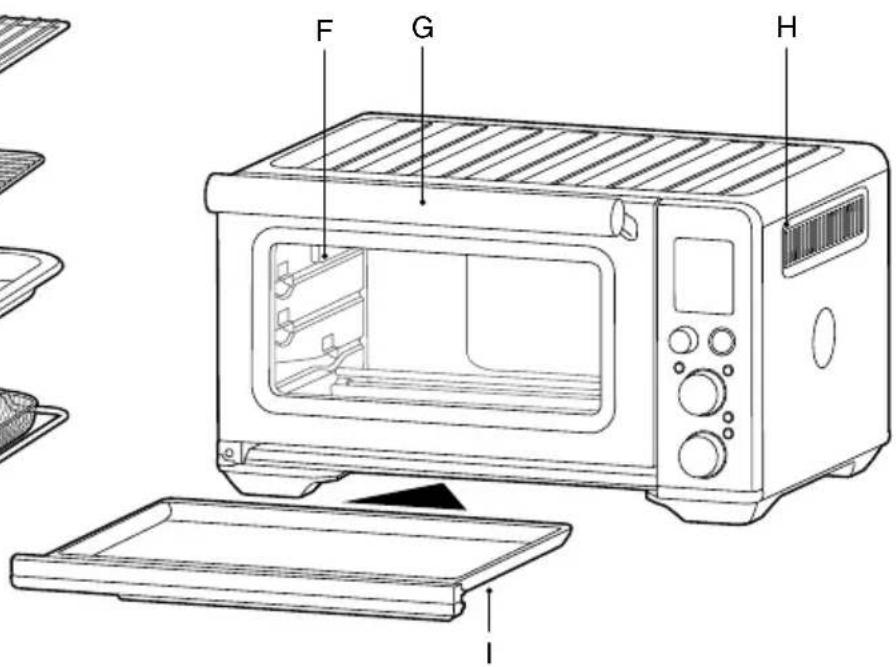
text_image
F G H Itext_image
K L S M N O P Q RK. Lcd-scherm
L. ≡ Draaiknop Function
natural_image
Technical line drawing of a grid structure with a horizontal bar and a small protrusion (no text or symbols)flowchart
graph TD
    A["DRAAIEN"] --> B["DRAAIKNOP TIJD"]
    B --> A
natural_image
Technical illustration of a mechanical component with internal channels and a directional arrow (no text or symbols)natural_image
Cross-sectional diagram of a mechanical component with internal structure and directional arrow (no text or symbols)natural_image
Technical line drawing of an electrical connector with internal components and a directional arrow (no text or symbols)natural_image
Technical illustration of a mechanical component with directional arrows indicating movement (no text or symbols)
OPMERKING
natural_image
Exterior view of a modern B ozone microwave oven with control knobs and display (no visible text or symbols)IT
GUIDA RAPIDA
Sage®

Sommario
natural_image
Simple diagram of concentric ovals with a labeled point A (no text or symbols beyond label)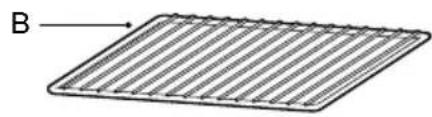
natural_image
Diagram of a rectangular grid structure with labeled point B (no text or symbols on the grid itself)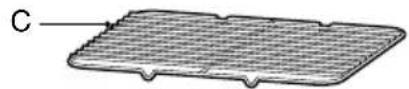
natural_image
Simple line drawing of a rectangular container with label D pointing to the side (no text or symbols on the container itself)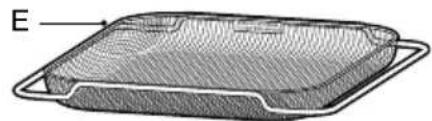
natural_image
Diagram of a rectangular tray with a curved handle and labeled point E (no text or symbols on the tray itself)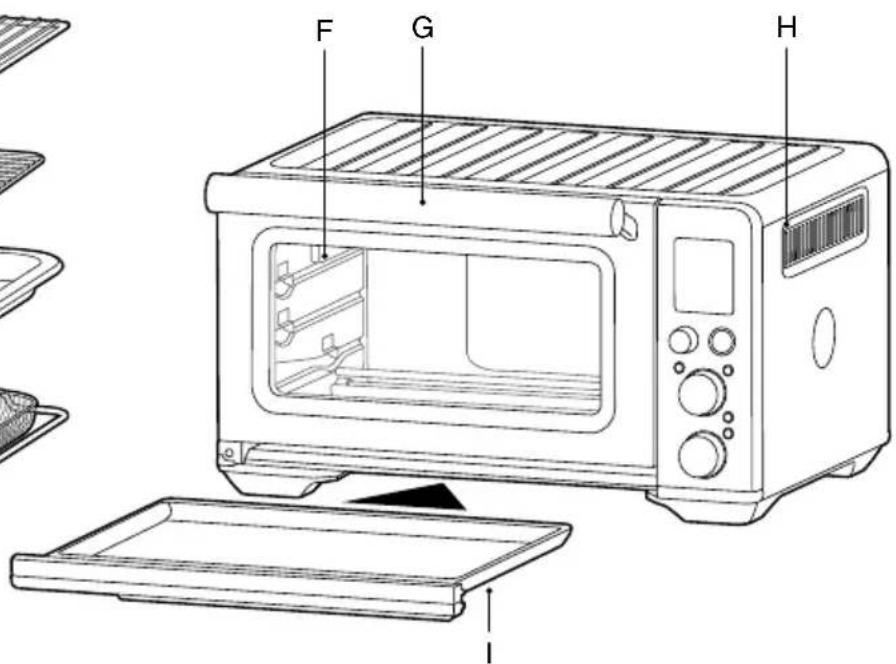
text_image
F G Htext_image
K L O S P M Q R NK. Display LCD
natural_image
Technical line drawing of a grid structure with a horizontal bar and a small protrusion (no text or symbols)flowchart
graph TD
    A["RUOTA"] --> B["RIDUCI TFMPFRATURA"]
    A --> C["AUMENTA TFMPFRATURA"]
natural_image
Technical illustration of a mechanical component with internal channels and directional arrows (no text or symbols)natural_image
Cross-sectional diagram of an electrical component with internal structure and directional arrow (no text or symbols)natural_image
Technical line drawing of an electrical connector with internal components and a directional arrow (no text or symbols)natural_image
Mechanical component diagram showing a piston-like assembly with directional arrows indicating motion (no text or symbols)
NOTA
natural_image
Front view of a modern Sono brand microwave oven with digital display and control knobs (no visible text or symbols on main body)ES
GUÍA RÁPIDA
Sage®

Índice
natural_image
Simple diagram of concentric ovals with a labeled point A (no text or symbols beyond label)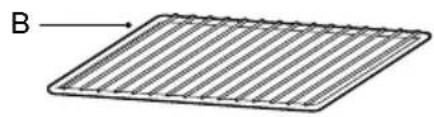
natural_image
Diagram of a rectangular grid structure with labeled point B (no text or symbols beyond label)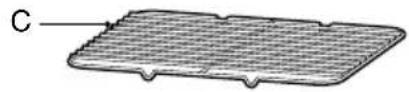
natural_image
Simple line drawing of a rectangular container with label D pointing to the side (no text or symbols on the container itself)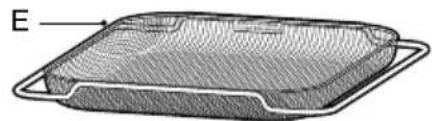
natural_image
Diagram of a rectangular object with internal hatching and labeled point E, enclosed in a wireframe frame (no text or symbols beyond label)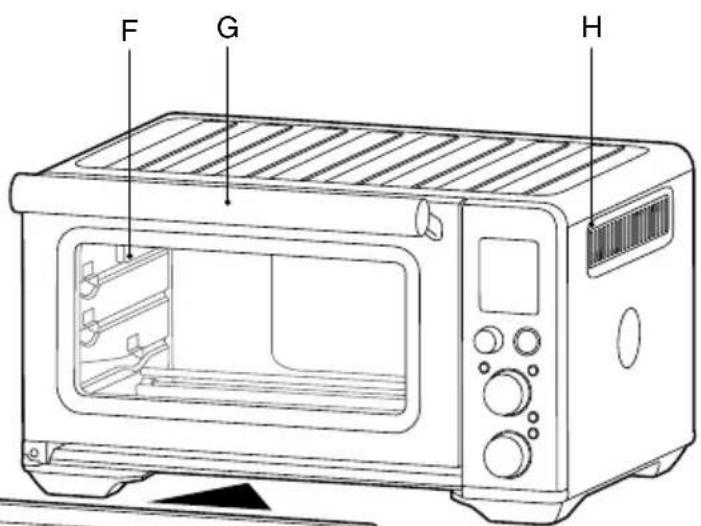
text_image
F G H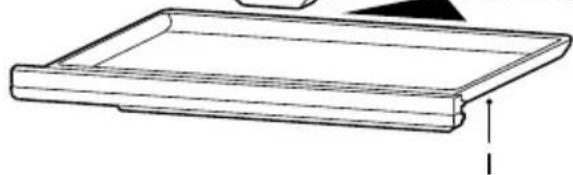
natural_image
Line drawing of a rectangular tray or tray with a small arrow pointing downward (no text or symbols)text_image
K L S M N O P Q RK. Pantalla LCD
L. ≡ Dial Función
natural_image
Technical line drawing of a grid-patterned rack with a flat rod above and a small triangular pointer above (no text or symbols)natural_image
Technical illustration of a mechanical component with internal channels and arrows indicating movement (no text or symbols)natural_image
Cross-sectional diagram of a mechanical component with internal structure and directional arrow (no text or symbols)natural_image
Technical line drawing of an electrical outlet connector with internal components and a black arrow indicating direction (no text or symbols)natural_image
Technical illustration of a mechanical component with directional arrows indicating motion (no text or symbols)
NOTA
natural_image
Front view of a modern Sono brand microwave oven with digital display and control knobs (no visible text or symbols on main body)PT
MANUAL RÁPIDO
Sage®

Índice
natural_image
Simple diagram of concentric ovals with a labeled point A (no text or symbols beyond label)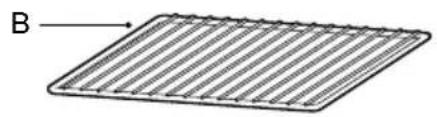
natural_image
Diagram of a rectangular grid structure with labeled point B (no text or symbols beyond label)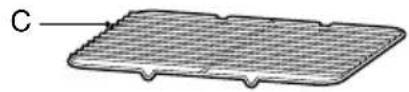
natural_image
Simple line drawing of a rectangular container with label D pointing to the side (no text or symbols on the container itself)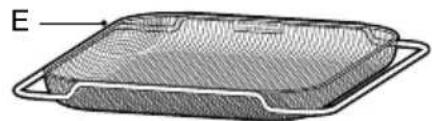
natural_image
Diagram of a rectangular object with internal hatching and labeled point E, enclosed in a wireframe frame (no text or symbols beyond label)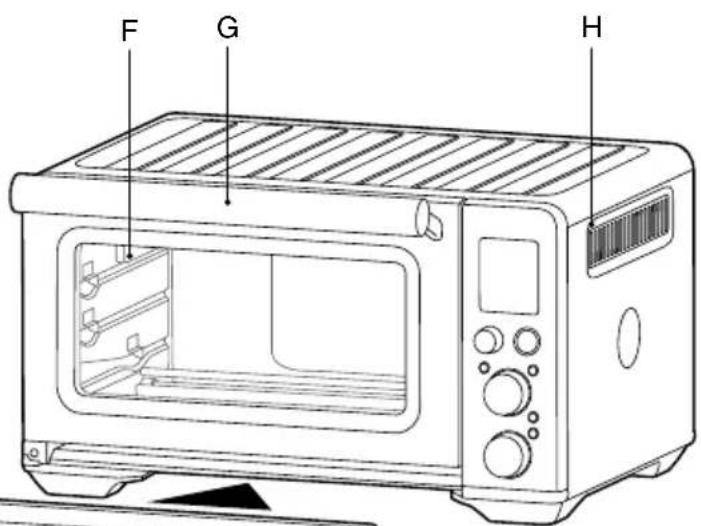
text_image
F G H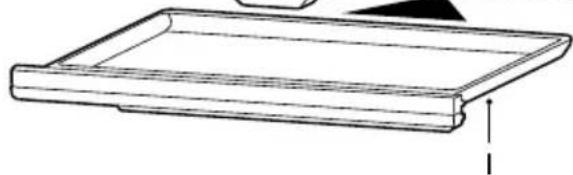
natural_image
Line drawing of a rectangular tray or tray with a small arrow pointing downward (no text or symbols)A. Tabuleiro antiaderente de 30 cm para pizza
B. Grelha
C. Grelhador
D. Tabuleiro esmaltado de 28 x 33,5 cm para assar
text_image
K L S M N O P Q RK. Ecrã LCD
natural_image
Technical line drawing of a grid structure with a horizontal bar and a small protrusion (no text or symbols)natural_image
Technical illustration of a mechanical component with internal channels and a directional arrow (no text or symbols)natural_image
Technical line drawing of a mechanical component with internal structure and directional arrow (no text or symbols)natural_image
Technical line drawing of an electrical connector with internal components and a directional arrow (no text or symbols)natural_image
Mechanical component diagram showing a piston-like assembly with directional arrows indicating motion (no text or symbols)
NOTA
BRG Appliances Limited
Unit 3.2, Power Road Studios, 114 Power Road, London, W4 5PY
Freephone (UK Landline): 0808 178 1650
Mobile Calls (National Rate): 0333 0142 970
DEU
Sage Appliances France SAS
www.sageappliances.com
Registered in England & Wales No. 8223512
Registered in Germany No. HRB 81309 (AG Düsseldorf)
Registered in France No. 879 449 866 RCS
EN Due to continued product improvement, the products illustrated or photographed in this document may vary slightly from the actual product.
Copyright BRG Appliances 2021