
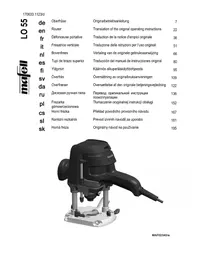
KFU 1000 E - Milling machine Mafell - Free user manual and instructions
Find the device manual for free KFU 1000 E Mafell in PDF.
| Product type | Grooving machine (router) for weldable floor coverings |
| Brand | Mafell |
| Model | KFU 1000 E |
| Dimensions (L x W x H) | 206 x 218 x 216 mm |
| Weight | 3.8 kg |
| Power supply | 230 V~, 50 Hz (or 110 V~, 50 Hz) |
| Power consumption | 900 W continuous operation |
| Protection class | II (double insulation) |
| Maximum milling depth | 4.5 mm |
| Blade diameter | 120 mm (bore 20 mm) |
| Rotation speed | 8000 - 13000 min⁻¹ (continuous adjustment) |
| Cutting speed | 50 - 82 m/s |
| Sound level (idle) | Sound power level 104 dB(A), sound pressure level at operator position 93 dB(A) |
| Hand-arm vibration | Less than 2.5 m/s² |
| Standard equipment | Carbide blade 3.6 mm, bracket and chip bag, support, service tool, transport case, instruction manual |
| Intended use | Milling welding grooves in PVC and weldable coverings |
| Safety devices | Blade guard (tilt), stop button, shaft locking system |
| Maintenance and cleaning | Unplug before cleaning; blow out ventilation openings; permanently lubricated bearings |
| Spare parts and repairability | Use only MAFELL original parts; repairs by authorized service center |
| Additional accessories | Carbide blades (3.6 and 4.2 mm), guide roller, hand plane, long handle |
Frequently Asked Questions - KFU 1000 E Mafell
User questions about KFU 1000 E Mafell
0 question about this device. Answer the ones you know or ask your own.
Ask a new question about this device
Download the instructions for your Milling machine in PDF format for free! Find your manual KFU 1000 E - Mafell and take your electronic device back in hand. On this page are published all the documents necessary for the use of your device. KFU 1000 E by Mafell.
USER MANUAL KFU 1000 E Mafell
Please read all safety instructions and directions. Failure to comply with the safety instructions and directions can cause electric shock, fire and/or serious injuries. Please retain all safety instructions and directions for future reference.
AVERTISSEMENT
GB - EC Declaration of Conformity
We herewith confirm that the machine KFU 1000 E complies with the EU directives quoted. The standards listed were used for design and construction.
Empowered person for the configuration of the technical documents: Mafell AG
1 Signs and symbols 13
2 Product information 13
2.1 Manufacturer's data 13
2.2 Machine identification 13
2.3 Technical data 14
2.4 Noise emission specifications 14
2.5 Vibration specifications 14
2.6 Scope of supply 14
2.7 Use according to intended purpose 14
2.8 Residual risks 15
3 Safety instructions 15
4 Setting/Adjustment 16
4.1 Mains connection 16
4.2 Mounting the chip bag 16
4.3 Change of cutting blade 16
5 Operation 17
5.1 Switching on and off 17
5.2 Adjusting cutting speed 17
5.3 Cutting depth adjustment 17
5.4 Work instructions 17
6 Maintenance 17
7 Troubleshooting 18
8 Special accessories 18
9 Exploded drawing and spare parts list 18
1 Signs and symbols

This symbol appears at places where you will find instructions for your own safety.
Non-compliance with these instructions may result in very serious injuries.
This symbol indicates a potentially hazardous situation.
If this situation is not avoided, the product or objects in its vicinity may get damaged.

This symbol indicates tips for the user and other useful information.
2 Product information
for machines with product no. 951101, 951120, 951121 or 951122
2.1 Manufacturer's data
MAFELL AG, Beffendorfer Straße 4, D-78727 Oberndorf / Neckar, Phone +49 (0)7423/812-0, Fax +49 (0)7423/812-218
2.2 Machine identification
All details required for machine identification are available on the attached rating plate.

Protection class II

CE symbol to document compliance with the basic safety and health requirements according to Appendix I of the Machinery Directive.
For EU countries only
Do not dispose of electric tools together with household waste material!
In accordance with the European directive 2002/96/EC on waste electrical and electronic equipment and transposition into national law, obsolete electrical tools must be collected separately and recycled in an environmentally-compatible manner.

To reduce the risk of injury, please read the operating instructions.
2.3 Technical data
| Cutting depth | 0 - 4,5 mm (0 - 11/64 in.) |
| Cutting blade diameter | 120 mm (4 23/32. in.) |
| Cutting blade bore | 20 mm (1 ¼ in.) |
| Cutting blade speed | 8000 - 13000 rpm |
| Cutting speed | 50 - 82 m/s (164 - 279 ft/sec.) |
| Operating weight | 3,8 kg (8.3 lbs) |
| Dimensions (W x L x H) | 206 x 218 x 216 mm |
| Universal motor, radio and TV interference suppressed | 230 V~, 50 Hz or 110 V~, 50 Hz |
| Power input (continuous operation) | 900 W |
2.4 Noise emission specifications
Noise emission values determined according to EN 60745-1:
| Sound power level | Workplace-related emission value | |
| Leerlauf | 104 dB (A) | 93 dB (A) |
The stated values do not take any series variance into account and are not suitable for determining the evaluation level according to German UVV «noise» regulations since this varies depending on the operating time, the machining operation concerned and environmental factors. The evaluation level can consequently be determined only in the individual instance on the premises of the machine user.
2.5 Vibration specifications
The typical hand-arm vibration is less than 2.5m / s^2
2.6 Scope of supply
Grooving machine KFU 1000 E complete with:
1 TCT groove-cutting blade 120× 3.6× 20mm (423/32 x 1/8 in. x 20 mm), 12 teeth
1 bow for chip bag
1 chip bag
1 chip bag holder
1 service tool
1 carrying case with tray
1 operating manual
1 folder "Safety Instructions"
2.7 Use according to intended purpose
The MAFELL grooving machine KFU 1000 E is intended exclusively for cutting grooves for plastic welding material into floor covering materials which will melt when being heated (PVC and similar material).
The diameter of the groove-cutting blades used must be 120mm (4 23/32 in.).
Any other use beyond this scope is considered as failing to comply with the intended purpose.
The manufacturer is not liable for any damage caused as a result of this; the risk is borne solely by the user.
Use according to intended purpose also includes compliance with the operating, maintenance and repair conditions specified by MAFELL, and adherence to the safety instructions contained in the operating manual.
The grooving machine KFU 1000 E must be operated, tooled and maintained only by persons
more than 18 years old, familiar with the machine and instructed as to the risks.
Repair work must be carried out by authorized MAFELL dealers or a MAFELL customer service station.
The relevant accident prevention regulations and other generally recognized industrial, medical and technical safety rules must be complied with.
Unauthorized modifications to the machine preclude the liability of the manufacturer for any resultant damage.
2.8 Residual risks
Even when used according to the intended purpose and in compliance with all the relevant safety regulations, the design of the machine prescribed by its function gives rise to potential residual risks, for instance from the following sources:
- Touching the groove-cutting blade in the vicinity of the cutting blade aperture at the cutting blade guard when the machine is running.
- Touching the rotating cylinder-head screw from the side.
- Machine kicks back if the cutting depth set of the groove-cutting blade is too large and if the blade is touching the floor pavement.
- Breakage of the groove-cutting blade and risk of the groove-cutting blade or pieces of the groove-cutting blade being hurled away.
- Touching live parts with the housing open and the mains plug not removed.
- Hearing can be impaired when working for long periods without ear protectors.
- Emission of dust: a health hazard when working for long periods on enclosed premises without adequate ventilation.
3 Safety instructions

Danger
If used incorrectly, grooving machines can be dangerous. For this reason, aways comply with the safety instructions summarized in this chapter, the accident prevention regulations of the relevant liability insurance association or equivalent, and the safety regulations applicable in the country concerned!
General instructions:
- Never work without the protective equipment prescribed for the relevant operation and do not make any modifications to the machine that could undermine safety.
- Children and adolescents must not operate this machine. This rule does not apply to young persons receiving training and being supervised by an expert.
- Prior to all work, make sure that the safety and operating equipment is securely attached and undamaged. Damaged protective equipment and parts must be repaired correctly or replaced.
- Always be aware of environmental influences. Do not allow the machine to be exposed to the rain and do not use the machine in a damp or wet environment, or in the vicinity of inflammable liquids or gases.
- When operating the machine outdoors, use of an earth-leakage circuit-breaker is recommended.
- Do not carry the machine by the cable and do not remove the mains plug from the socket by pulling on the cable.
- Protect the cable against oil and high temperatures and do not pull it over any sharp edges.
- Cutting blade cover should only be removed for changing blades.
-
Damaged cables or plugs must be renewed immediately.
-
Only use cutting blades with the technical data stated in this manual.
- Well sharpened cutting blades should be usedonly.
- Store the machine in the dry under lock and key and out of reach of children.
Do not use:
- Cracked and misshapen cutting blades.
- Blunt cutting blades which impose an excessive load on the motor.
Instructions as to the use of personal safety equipment
- Always wear close-fitting industrial clothing and remove rings, bracelets and watches.
- The sound pressure level at the workplace generally exceeds 85 dB (A). Users should therefore wear ear protectors.
Instructions as to operation
- Provide an uncluttered, anti-slip location with adequate illumination.
- Before cutting blade changes and eliminating malfunctions pull out the mains plug.
- Machine must be switched off before being connected to the mains.
- Hold the machine firmly even before switching on.
- Before switching on, make sure that the cutting blade is tightly secured and that the Allen key has been removed.
- Do not begin cutting until the cutting blade has reached full speed.
- Examine the floor covering material for foreign objects. Never attempt to cut nails or other metal objects.
- When cutting, always lead the cable away from the machine to the rear.
- Always keep your hands well away from the chip nozzle or do not press the cutting blade guard (rocker) while the machine is running (risk of injury!).
- Steady feeding during cutting increases the life of the cutting blade and the machine. Never cut backward!
Instructions as to service and maintenance
- Any work on the electric components of the machine must be carried out only by a qualified electrician.
- Regular cleaning of the machine, especially of the adjusting devices, the cutting blade guard (rocker), the chip nozzle as well as the front guide roller and the rear guide roller, is an important safety factor. Before beginning this task, pull out the mains plug.
- Only original MAFELL spare parts and accessories must be used. Otherwise the manufacturer does not offer any warranty and does not accept any liability.
4 Setting / Adjustment
4.1 Mains connection
The gooing machine KFU 1000 E has Class II protective insulation (double-insulated).
Before starting up, make sure that the mains voltage matches the voltage stated on the rating plate.
Machine must be switched off before being connected to the mains.
4.2 Mounting the chip bag
Put both free end pieces of the complete chip bag into the holes of the base plate.
4.3 Change of cutting blade

Always pull out the mains plug before changing the cutting blade! Do not fit cutting blades that are cracked or otherwise damaged. Only use cutting blades with a diameter of 120mm (4 23/32 in.). Do not use cutting blades with a bore diameter other than 20mm . Make sure that the cutting blade being mounted is properly sharpened since this is the basic requirement for perfect joints.
Proceed as follows to change the cutting blade:
Remove cutting blade cover 19 by loosening the 4 flat-head screws 45. Press locking pin 26 and turn the cutting blade slowly until it catches. Loosen the clamping flange with the Allen key (note left-hand thread!). When inserting the new cutting blade, note the correct direction of rotation: the teeth of the
cutting blade must point in the same direction as the arrow on the cutting blade cover. Then put cutting blade cover 19 on and tighten flat-head screws 45.
Make sure that all contact surfaces on the flanges and blade are clean.
If the cutting blade and the guide rollers are not properly aligned, the guide rollers should be adjusted.
5 Operation
5.1 Switching on and off
Do not switch on the machine if the cutting blade is touching the floor covering material.
Temporary operation
Switching on: Press switch 92/1.
Switching off: Release the switch.
Continuous operation
Switching on: Press switch 92/1 first and then press locking button 92/2. The motor runs wiouth keeping the switch pressed.
Switching off: Press switch 92/1 until locking button 92/2 trips, then release the switch.
5.2 Adjusting cutting speed
This grooving machine has an electronic speed control. The cutting speed can be adjusted continuously between 8000 and 13000rpm . Thus, the cutting speed can be adapted to the material used.
The built-in electronics ensure a jerk-free acceleration when switching on and control the speed according to the value set.
The required speed can be set by means of the setting wheel on the motor cover.
5.3 Cutting depth adjustment
The cutting depth is adjusted by turning knurledhead screw 28. Turning clockwise reduces, counterclockwise increases the cutting depth. Turning the knurled-head screw down completely reduces the cutting depth to 0mm . When cutting grooves, make sure that the cutting blade will not cut into the concrete or flooring plaster as this may damage the carbide-tipped teeth.
When the cutting depth has been set, it is recommended to cut a trial groove into a piece of waste material.
5.4 Work instructions
Place the grooving machine down on the floor covering in such a way that the two guide rollers are placed on the slit of the joint between two sheets of floor coverings. The front guide roller 31 in front of the cutting blade has a thin knife-like profile to follow the slit of the joint. Rear guide roller 32 has the same profile as the teeth of the cutting blade so that it completely fills the groove to be cut. Hold the machine firmly, switch on, lower the machine into working position by pressing it down smoothly and start cutting. After a few cm / inches rear guide roller 32 will be fully inserted into the groove providing reliable guidance in conjunction with the front guide roller.
When cutting, make sure that the machine is advanced evenly and firmly, to prevent that chips are heated up, melted and glued together.
Beginning and end of the groove must be completed with a hand grooving tool.
Attention: The thin profile of the front guide roller is rather delicate and may be damaged when hitting concrete or metal, which in turn may reduce its guiding capacity.
6 Maintenance

Danger
Prior to doing any maintenance work always pull out the mains plug!
The grooving machine KFU 1000 E is designed with a low maintenance requirement. The ballbearing are greased for life.
The machine must be regularly cleaned of dust, at the same time blowing out of the motor ventilation apertures.
After a prolonged period of operation, users are recommended to have the machine checked by an authorized MAFELL customer service shop.
7 Troubleshooting

Danger
Determining the causes for existing defects and eliminating these always requires increased attention and caution. Pull the mains plug beforehand!
Some of the most frequent defects and their causes are listed in the following chart. In case of other defects, contact your dealer or the MAFELL customer service.
| Defect | Cause | Elimination |
| Machine cannot be switched on | No mains voltage | Check power supply |
| Carbon brushes worn | Take the machine to a MAFELL customer service shop | |
| Machine stops while cutting is in process | Mains failure | Check mains back-up fuses |
8 Special accessories
The following optional accessories are available for the grooving machine KFU 1000 E:
-
TCT cutting blades:
-
Groove-cutting blade 120× 3,6× 20mm , 12 teeth Ref. No. 091794
- Groove-cutting blade 120× 4,2× 20mm , 12 teeth Ref. No. 091795
- Rear guide roller cpl., R 1,5 Ref. No. 202274
- Hand grooving tool, semi-circular with 5 replacement knives Ref. No.091460
- Replacement knives for hand grooving tool, semi-circular Ref. No. 091467
- Push handle long Ref. No. 202545
9 Exploded drawing and spare parts list
The corresponding information in respect of spare parts can be found on our homepage: www.mafell.com
Sommaire

- AVERTISSEMENT
- GB - EC Declaration of Conformity
- Signs and symbols
- Product information
- Manufacturer's data
- Machine identification
- Technical data
- Noise emission specifications
- Vibration specifications
- Scope of supply
- Use according to intended purpose
- Residual risks
- Safety instructions
- Danger
- General instructions:
- Do not use:
- Instructions as to the use of personal safety equipment
- Instructions as to operation
- Instructions as to service and maintenance
- Setting / Adjustment
- Mains connection
- Mounting the chip bag
- Change of cutting blade
- Operation
- Switching on and off
- Temporary operation
- Continuous operation
- Adjusting cutting speed
- Cutting depth adjustment
- Work instructions
- When cutting, make sure that the machine is advanced evenly and firmly, to prevent that chips are heated up, melted and glued together.
- Maintenance
- Troubleshooting
- Special accessories
- Exploded drawing and spare parts list
- Sommaire
Brand : Mafell
Model : KFU 1000 E
Category : Milling machine