
OFFICEJET PRO K550 - Printer HP - Free user manual and instructions
Find the device manual for free OFFICEJET PRO K550 HP in PDF.
| Product type | Professional inkjet printer |
| Brand | HP |
| Model | OfficeJet Pro K550 |
| Main functions | Automatic color duplex printing (depending on model), wireless printing (model K550dtwn) |
| Connectivity | USB, wired network (Ethernet), wireless 802.11b/g (model K550dtwn) |
| Consumables | HP 88 ink cartridges (black, cyan, magenta, yellow) and HP 88L (XL); HP 88 print heads |
| Tray capacity | Main tray + optional tray 2 (models K550dtn/K550dtwn) |
| Duplex printing | Automatic with auto-duplex unit (models K550dtn/K550dtwn) |
| Power supply | Grounded power outlet, power cord supplied |
| Safety | Safety instructions: use on a stable surface, avoid humidity, unplug before cleaning |
| Maintenance | Automatic print head alignment during installation, external cleaning with printer unplugged |
| Warranty | 1 year for printer, 6 months for ink cartridges, 1 year for print heads |
Frequently Asked Questions - OFFICEJET PRO K550 HP
User questions about OFFICEJET PRO K550 HP
0 question about this device. Answer the ones you know or ask your own.
Ask a new question about this device
Download the instructions for your Printer in PDF format for free! Find your manual OFFICEJET PRO K550 - HP and take your electronic device back in hand. On this page are published all the documents necessary for the use of your device. OFFICEJET PRO K550 by HP.
USER MANUAL OFFICEJET PRO K550 HP
© 2005 Copyright Hewlett-Packard Development Company, L.P.
Edition 1, 10/2005
Reproduction, adaptation or translation without prior written permission is prohibited, except as allowed under the copyright laws.
The information contained herein is subject to change without notice.
The only warranties for HP products and services are set forth in the express warranty statements accompanying such products and services. Nothing herein should be construed as constituting an additional warranty. HP shall not be liable for technical or editorial errors or omissions contained herein.
Trademark credits
Microsoft® and Windows® are U.S. registered trademarks of Microsoft Corporation. All other products mentioned herein may be trademarks of their respective companies.

Windows Connect Now™ is a registered trademark of Microsoft Corporation.
Novell® and NetWare® are registered trademarks of Novell Corporation.
Pentium® is a registered trademark of Intel Corporation.
Adobe® and Acrobat® are registered trademarks of Adobe Systems Incorporated.

SecureEasySetupTM is a registered trademark of HP, Broadcom and LinkSys.
Safety Information

Always follow basic safety precautions when using this product to reduce risk of injury from fire or electric shock.
- Read and understand all instructions in the documentation that comes with the printer.
- Use only a grounded electrical outlet when connecting this product to a power source. If you do not know whether the outlet is grounded, check with a qualified electrician.
- Observe all warnings and instructions marked on the product.
- Unplug this product from wall outlets before cleaning.
- Do not install or use this product near water, or when you are wet.
- Install the product securely on a stable surface.
- Install the product in a protected location where no one can step on or trip over the line cord, and the line cord cannot be damaged.
- If the product does not operate normally, see "Maintaining and troubleshooting" in the onscreen user guide on the Starter CD.
- There are no user-serviceable parts inside. Refer servicing to qualified service personnel.
© 2005 Copyright Hewlett-Packard Development Company, L.P.
Édition 1, 10/2005
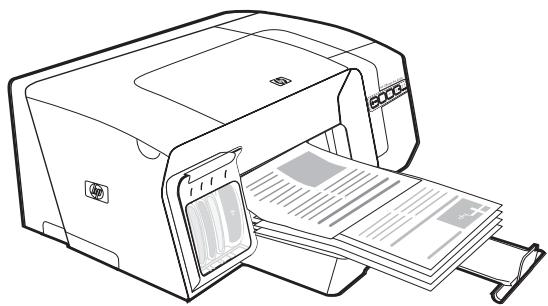
Step 1: Check the package contents.
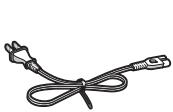
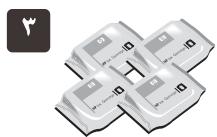
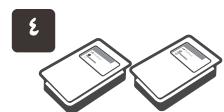
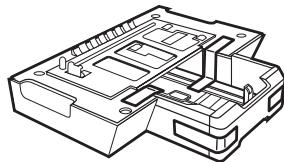
1) Printer, 2) power cord, 3) four ink cartridges (cyan, magenta, yellow, black), 4) two printheads, 5) Starter CD (software and onscreen user guide), 6) printed documentation,
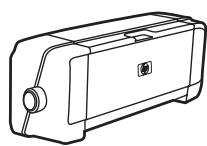
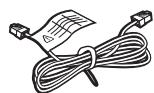
7) automatic two-sided printing accessory (duplex unit) and tray 2 (HP Officejet Pro K550dtn/K550dtwn), and 8) cross cable (HP Officejet Pro K550dtwn).
Note: The printer supports the following printing supplies:
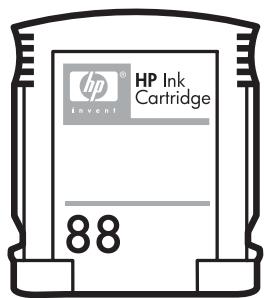
- Ink cartridges: HP 88 Black, HP 88 Cyan, HP 88 Magenta, HP 88 Yellow, HP 88L Black, HP 88L Cyan, HP 88L Magenta, and HP 88L Yellow
- Printheads: HP 88 Black and Yellow, and HP 88 Magenta and Cyan
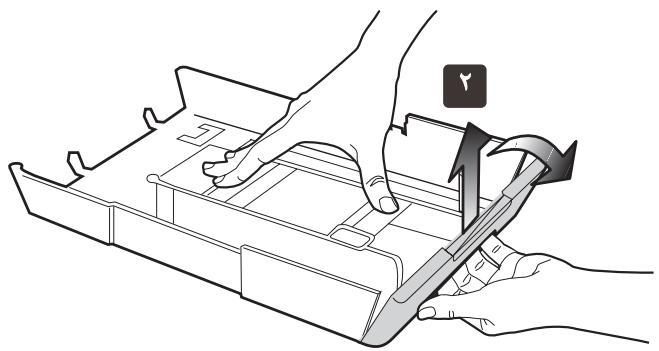
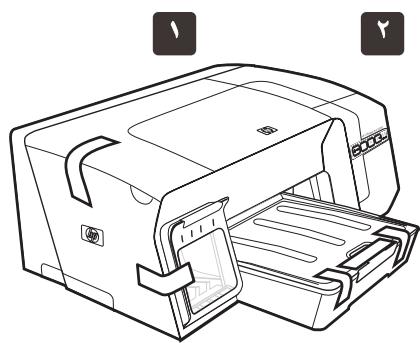
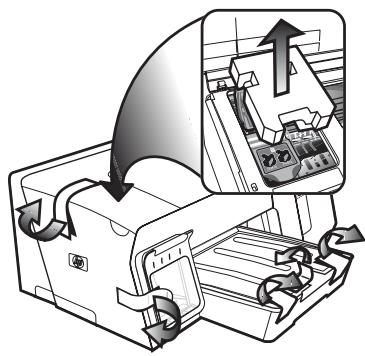
Step 2: Remove the packing tape and materials.
1) Move the printer to the prepared location. The surface must be sturdy, level, and located in a well-ventilated area. Allow space around the printer, including 50~mm (2 inches) for ventilation. 2) Remove all packing tape from the printer. Open the top cover and remove the foam or packing material from the inside of the printer.
1) Set the printer on top of tray 2.
WARNING! Be careful to keep your fingers and hands clear of the bottom of the printer.
2) Remove the packing tapes from the duplex unit. On the back of the printer, insert the duplex unit until it clicks.
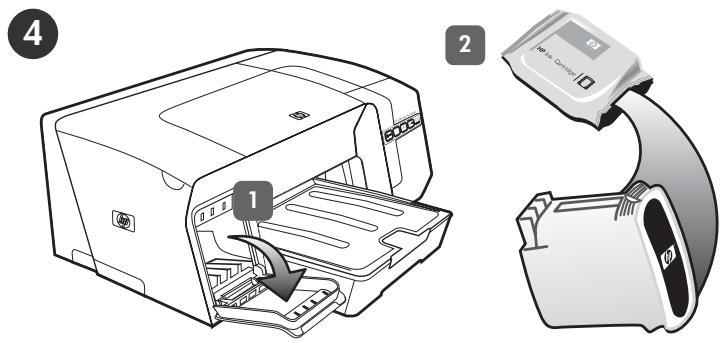
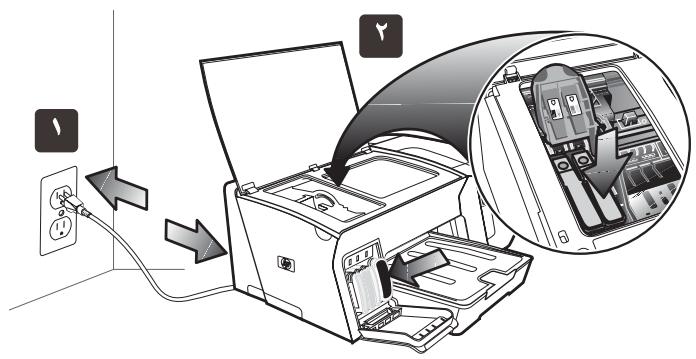
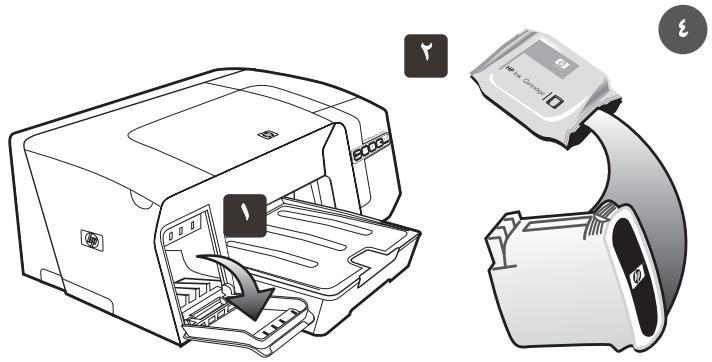
Step 4: Install the ink cartridges.
1) Gently pull open the ink cartridge cover.
2) Remove each ink cartridge from its package.
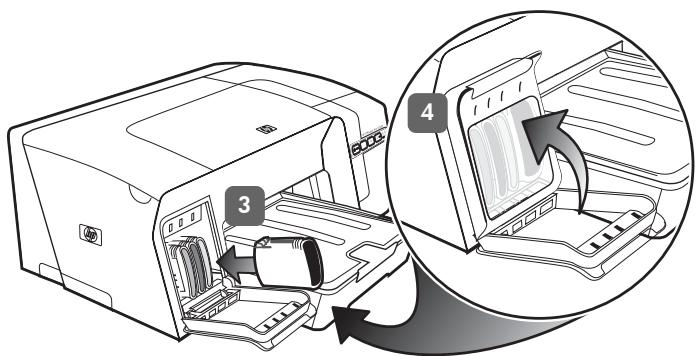
3) Align each cartridge with its color-coded slot, and insert the cartridge into the slot. To ensure proper contact, press down firmly on the cartridges until they snap into place.
Note: All four ink cartridges must be correctly installed for the printer to work. 4) Close the ink cartridge cover.
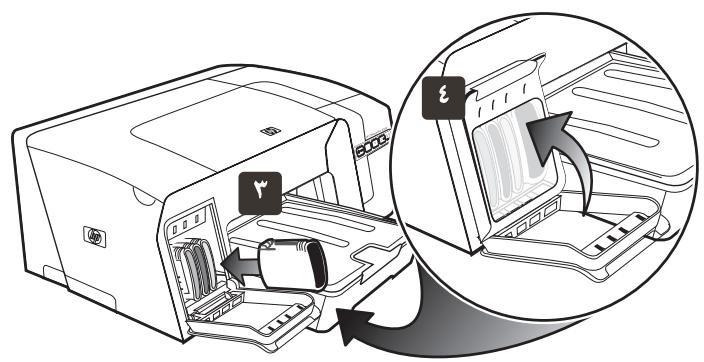
Step 5: Install the printheads.
1) Open the top cover. 2) Lift the printhead latch. 3) While each printhead is still in its packaging, shake each printhead rapidly six times.
4) Remove each printhead from its packaging, and then remove the orange protective caps from each printhead. 5) Insert each printhead into its color-coded slot. Press down firmly on each printhead to ensure proper contact.
6) Pull the printhead latch all the way forward and press down to ensure that the latch is properly engaged. Note: You might have to apply some pressure to engage the latch. 7) Close the top cover.
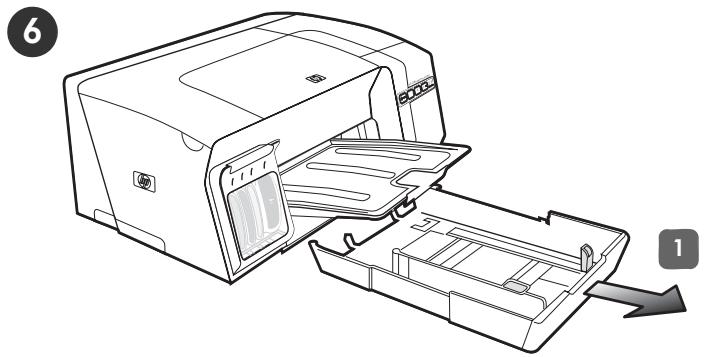
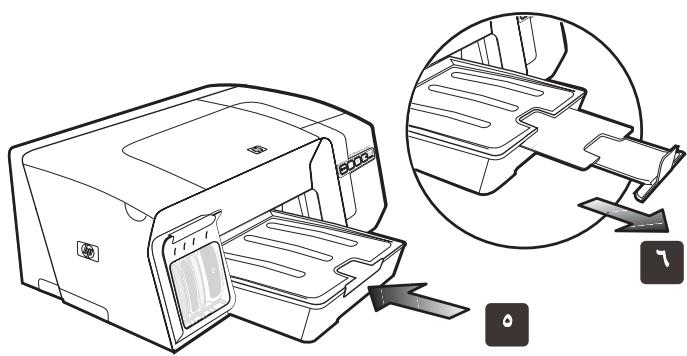
Step 6: Load paper in the trays.
1) Pull the tray out of the printer by grasping under the front of the tray.
6) Ziehen Sie die Druckkopfverriegelung ganz nach vorne, und drücken Sie die Verriegelung vollständig nach unten. Hinweis: Sie müssen möglicherweise etwas Kraft aufwenden, um die Verriegelung zu schreiben. 7) Schreiben Sie die obere Abdeckung.
6) Tirez le loquet des têtes d'impression à fond vers l'avant et appuyez vers le bas pour vous assurer qu'il est correctement engagé. Remarque : il est parfais nécessaire d'appliquer une certaine pression pour engager le loquet. 7) Fermez le capot supérieur.
6) Trek de printkopgrendel helemaal waar voren en druk deze omlaag, zodate grendel goed vastzit. Opmerking: möglichk moet u wat druk uitoefenen om de grendel vast te zetten. 7) Sluit de bovenklep.
6) Tirare completeness il fermo delle testine di stampa e premere.
verso il basso per assicurarsi che sua correttamente agganciato.
Nota: per fissare il fermo potrebbe essere necessario applicare una leggera pressione. 7) Chiudere il coperchio superiore.
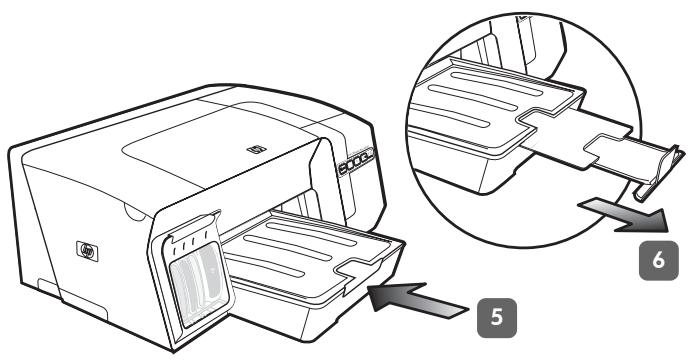
5) Gently reinsert the tray. 6) Pull out the extension on the output tray.
5) Setzen Sie das Fach vorsichtig wieder ein. 6) Ziehen Sie die Veränderung des Ausgabefaches hereus.
5) Replacez delicatement le bac. 6) Tirez les extensions du bac de sortie.
5) Schuif de lade voorzichtig terug. 6) Trek het verlangstuk op deuitvoerbakuit.
5) Reinserire il vassoio con delicatezza. 6) Estrarre l'estensione sul vassoio di raccolta.
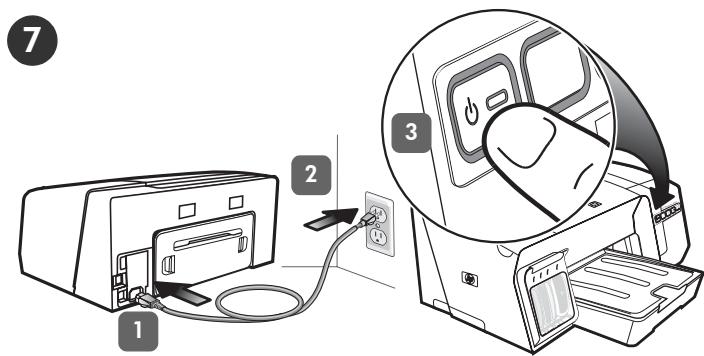
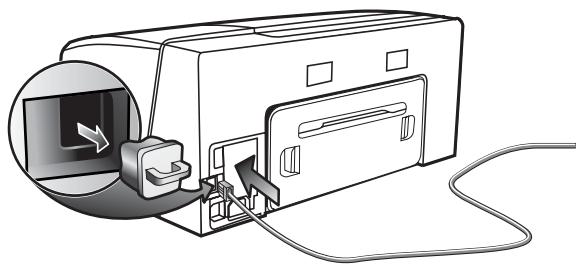
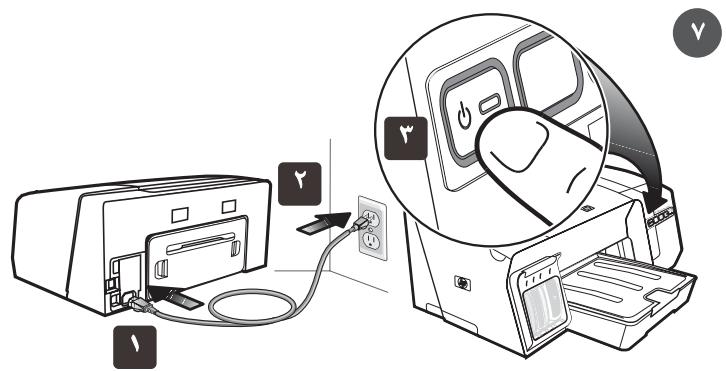
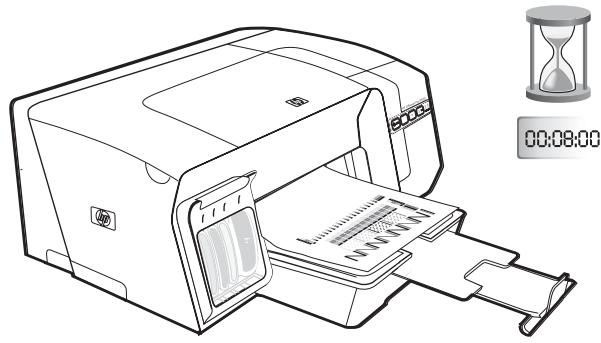
Step 7: Connect the power cord and turn on the printer.
1) Connect the power cord to the printer. 2) Connect the other end of the power cord to an alternating current (AC) power outlet. 3) If the printer does not turn on automatically, press ( ) (Power button) to turn it on.
To ensure the best possible print quality, the printer initializes and aligns the printheads. At the beginning of the process, the Power light blinks and the printer prints an information page. During the process, the printer prints the alignment pages (colored pages). This process takes approximately 8 minutes.
Note: If other printer lights are lit during the printhead alignment process, see "Interpreting control panel lights" on page 18. If the alignment pages do not print, follow these steps. 1) Check that the power cord is connected firmly.
2) Check that the printheads and ink cartridges are properly installed.
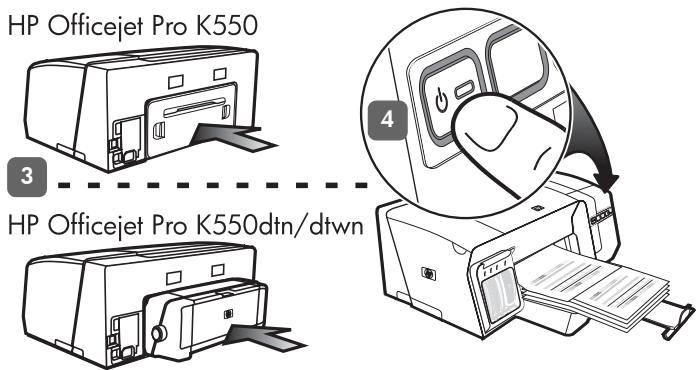
3) Make sure the rear access panel (HP Officejet Pro K550) or duplex unit (HP Officejet Pro K550dtn/K550dtwn) is installed. 4) Turn off the printer, and then turn it on again. If the alignment pages still do not print, see "Problems printing an alignment page" on page 20.
3) Achten Sie darauf, dass die wichtere Abdeckung (HP Officejet Pro K550) bzw. die Duplex-Einheit (HP Officejet Pro K550dtn/ K550dtwn) eingerastet ist. 4) Schalten Sie den Drucker aus und dann wieder ein. Wenn die Ausrichtungsseiten immer noch nicht gedruckt werden, lesen Sie den Abschnitt "Probleme beim Drucken einer Ausrichtungsseite" auf Seite 29.
3) Assurez-vous que le panneau d'accès arrêté
(HP Officejet Pro K550) ou l'unité recto verso
(HP Officejet Pro K550dtn/K550dtwn) est installé(e).
4) Mettez l'imprimante hors tension, puis à nouveau sous tension.
Si les pages d'alignement ne s'impriment toujours pas, reportez-vous à la section « Problèmes d'impression d'une page d'alignement », à la page 39.
3) Controller of het toegangspaneel aan deincerzijde (HP Officejet Pro K550) of de duplex-eenheid (HP Officejet Pro K550dtn/K550dtwn) is geinstalleerd. 4) Schakel de printer uit en wee in. Zie "Problemen bij het afdrukken van een uitlijpagina" op pagina 48 als de uitlijpagina's ook dan nicht worden afgedrukt.
3) Assicurarsi che il pannello di accesso posteriore (HP Officejet Pro K550) o l'unità duplex (HP Officejet Pro K550dtn/K550dtwn) sia installato. 4) Specnere e riaccendere la stampante. Se il problema persistsiste, videere "Problemi durante la stampa di una pagina di allineamento" a pagina 57.
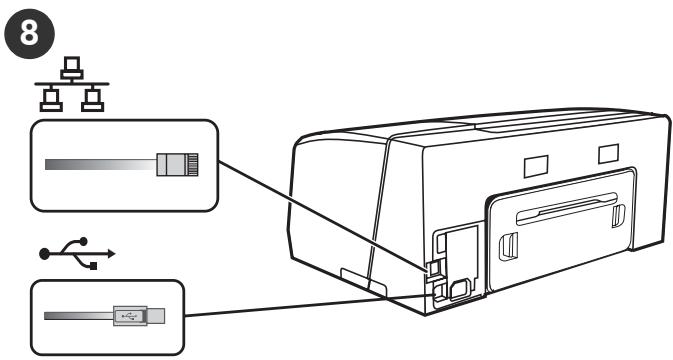
Step 8: Connect the printer. See the following instructions for your connection type (USB or wired network).
To set up wireless communication for HP Officejet Pro K550dtwn printer, see "Setting up the printer for wireless communication (HP Officejet Pro K550dtwn)" on page 22.
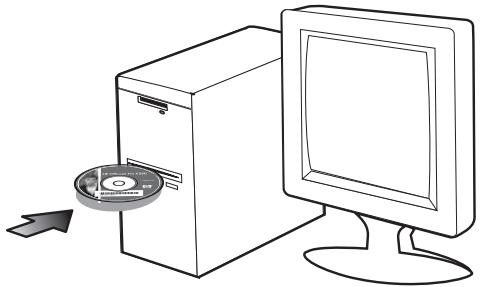
USB connection: 1) Close any running applications and insert the Starter CD into the CD drive. If the CD menu does not start automatically, double-click the setup icon on the Starter CD.
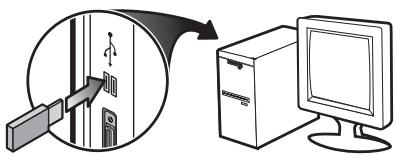
2) On the CD menu, click Install (Windows) or Install Driver (Mac OS), and follow the onscreen instructions to complete the software installation. Connect the USB cable when prompted.
For more information about installing the software, see the onscreen user guide on the Starter CD.
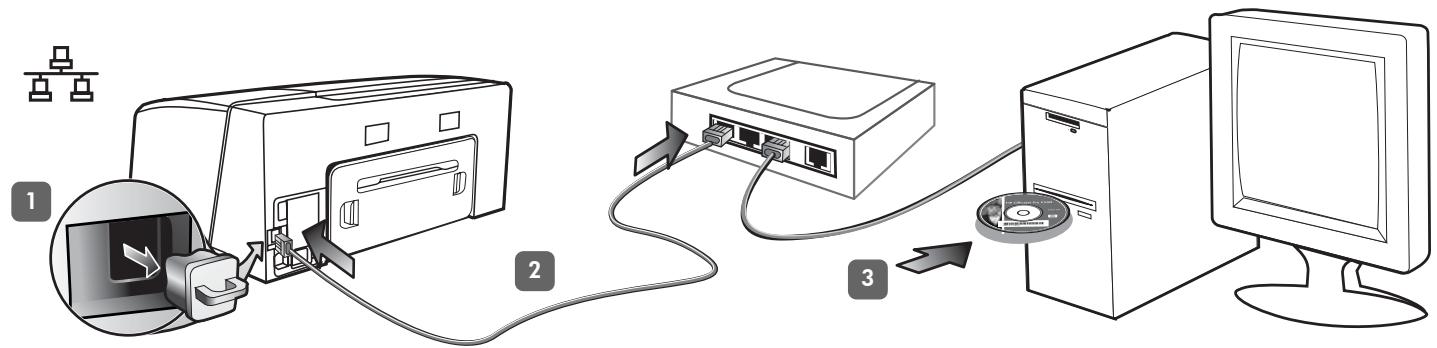
Wired network: 1) Remove the protective cover from the printer's network connector. 2) Connect the network cable to the connector and to an available port on the network hub, switch, or router. CAUTION: Do not plug the network cable into a port labeled WAN, Uplink, or Internet in the hub, switch, or router. Do not plug the cross cable (provided with HP Officejet Pro K550dtwn) into the network hub, switch, or router.
Note: It is recommended that the printer and the computers that use it be on the same subnet. Repeat the step if the network connector's Link light does not turn on. See "Problems connecting to a network" in the onscreen user guide.
3) Insert the Starter CD into the CD drive. If the CD menu does not start automatically, double-click the setup icon on the Starter CD.
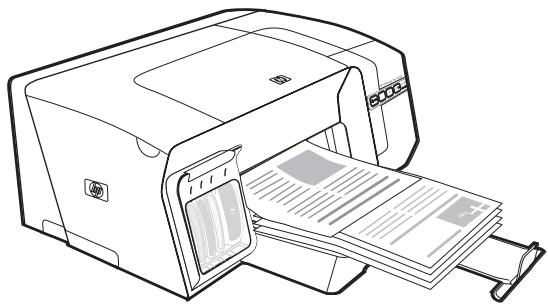
Step 9: Test the printer software installation.
After you complete the software installation and connect the printer to the computer, print a document from an application that you use frequently to ensure that the software is installed correctly. If the document does not print, see "Troubleshooting and configuration tools" on page 21.

Step 10: Register the printer.
Register the printer to receive important support and technical information. If you did not register your printer while installing the software, you can register later at www.registerer.hp.com.
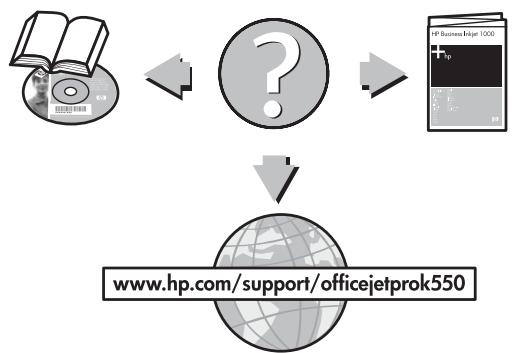
Finding more information.
Your printer is ready to use. For information about using the printer and troubleshooting, as well as warranty information, see the following resources:
- Onscreen user guide and readme file on the Starter CD
HP Instant Support and embedded Web server (see the onscreen user guide)
Product support site at www.hp.com/support/officejetprok550
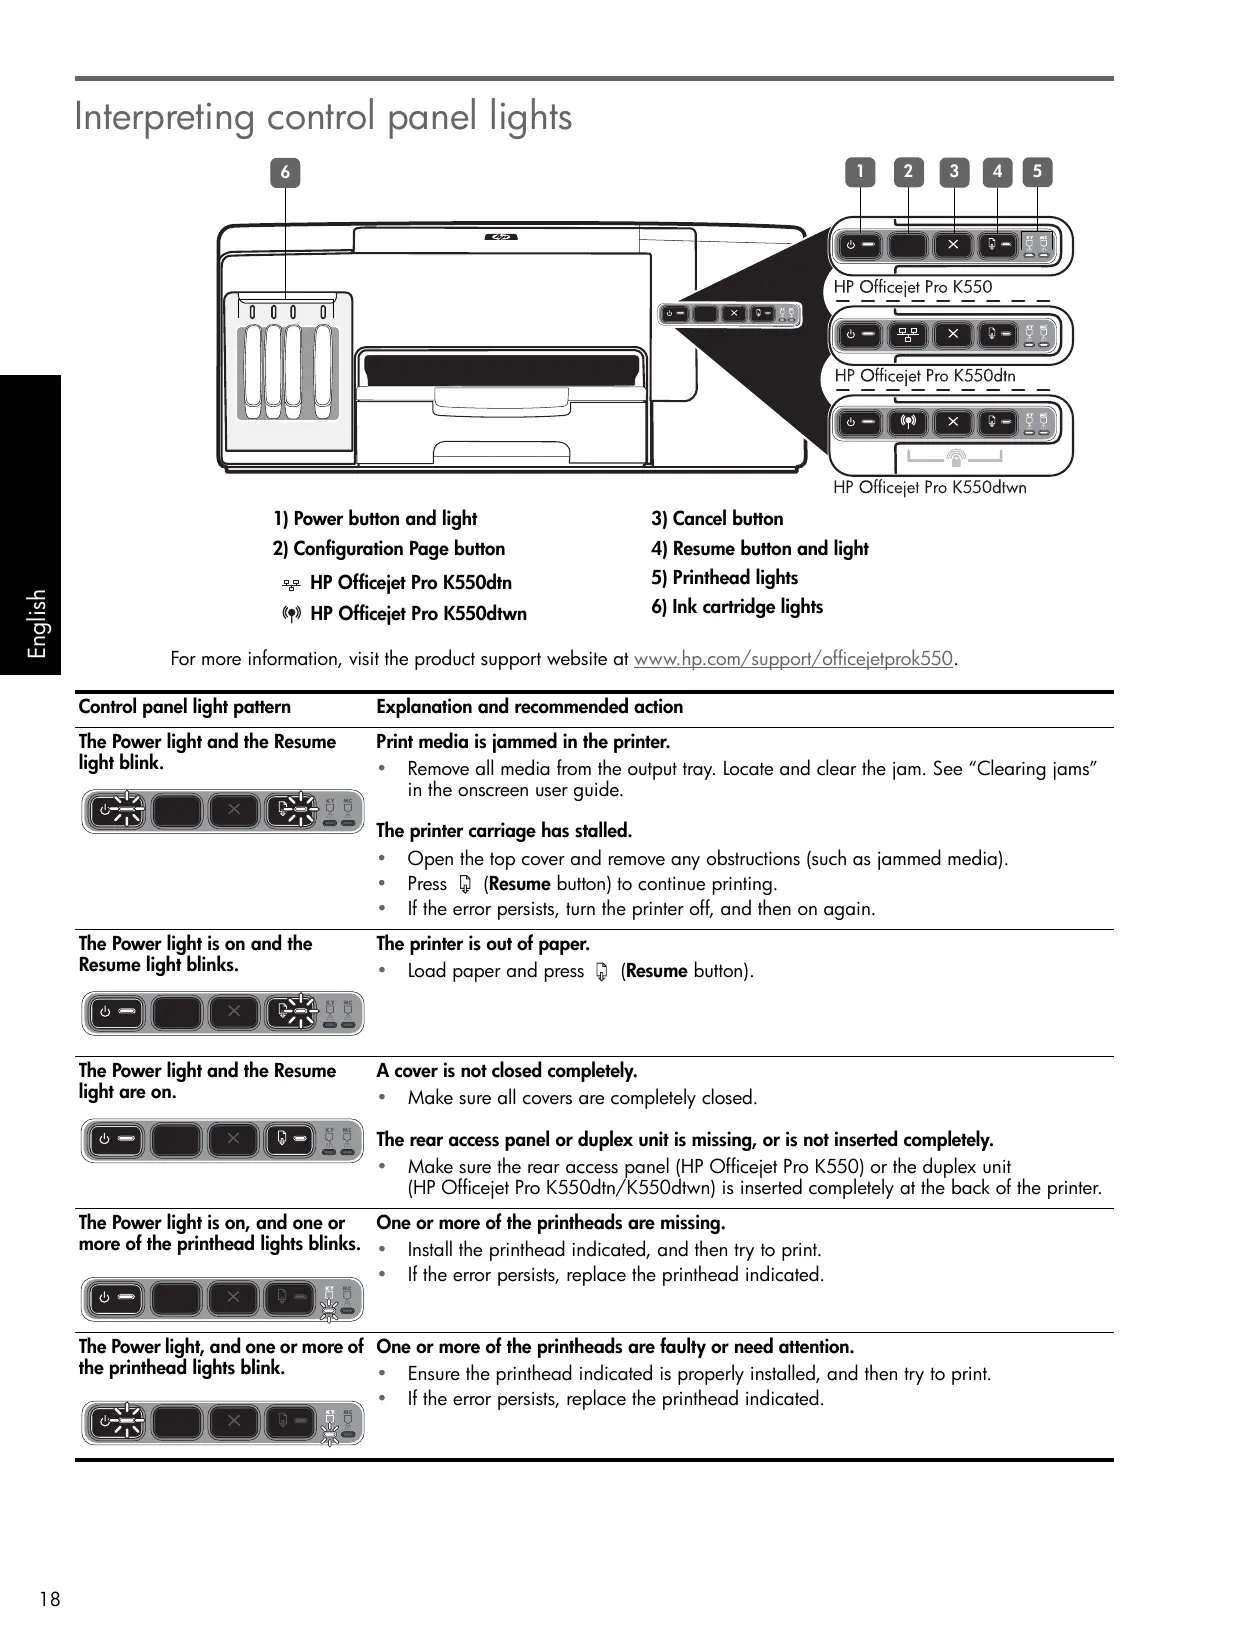
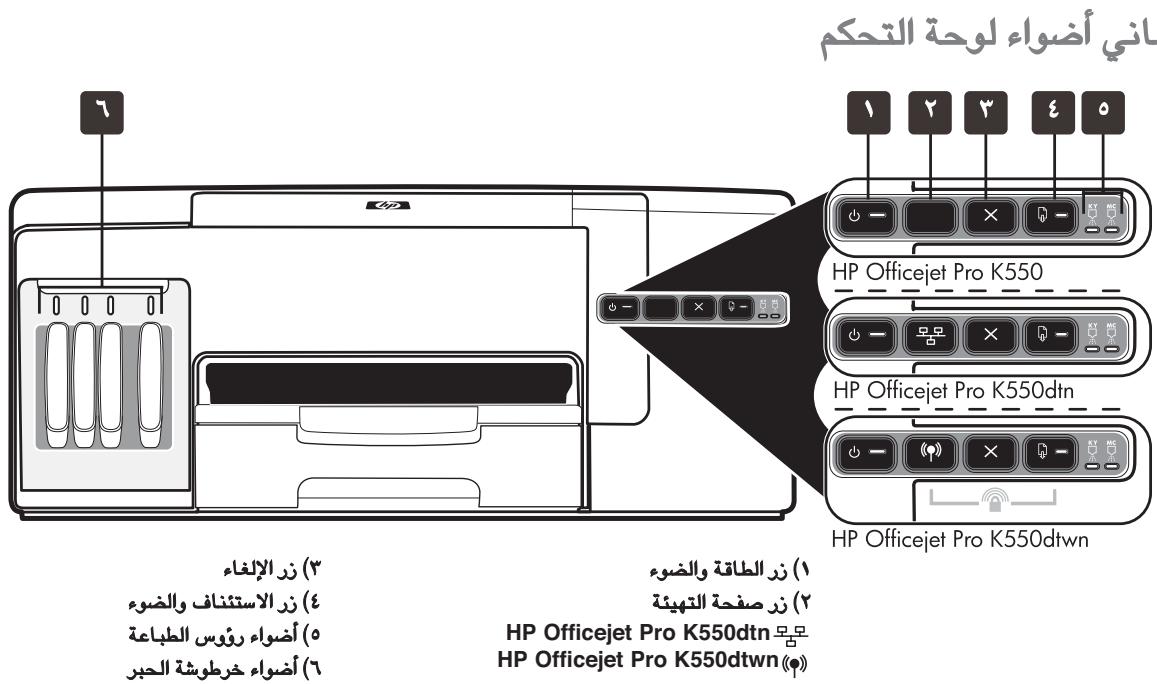
Interpreting control panel lights
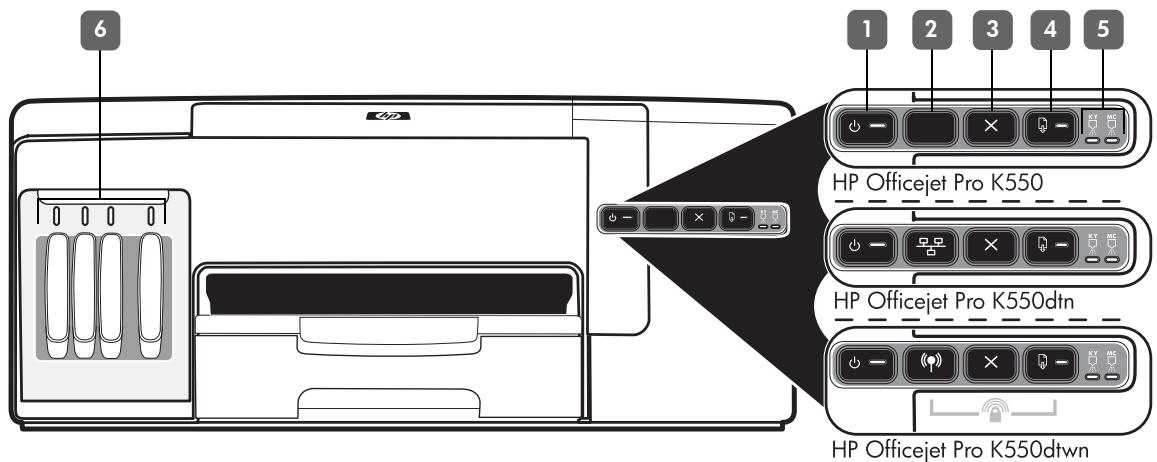
1) Power button and light
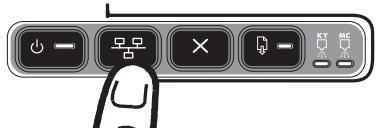
2) Configuration Page button
HP Officejet Pro K550dn
HP Officejet Pro K550dtwn
3) Cancel button
4)Resume button and light
5) Printhead lights
6) Ink cartridge lights
For more information, visit the product support website at www.hp.com/support/officejetprok550.
Control panel light pattern
The Power light and the Resume light blink.

Explanation and recommended action
Print media is jammed in the printer.
- Remove all media from the output tray. Locate and clear the jam. See "Clearing jams" in the onscreen user guide.
The printer carriage has stalled.
- Open the top cover and remove any obstructions (such as jammed media).
Press (Resume button) to continue printing.
If the error persists, turn the printer off, and then on again.
The Power light is on and the Resume light blinks.

The printer is out of paper.
- Load paper and press (Resume button).
The Power light and the Resume light are on.

A cover is not closed completely.
Make sure all covers are completely closed.
The rear access panel or duplex unit is missing, or is not inserted completely.
- Make sure the rear access panel (HP Officejet Pro K550) or the duplex unit (HP Officejet Pro K550dtn/K550dtwn) is inserted completely at the back of the printer.
The Power light is on, and one or more of the printhead lights blinks.

One or more of the printheads are missing.
Install the printhead indicated, and then try to print.
If the error persists, replace the printhead indicated.
The Power light, and one or more of the printhead lights blink.

One or more of the printheads are faulty or need attention.
- Ensure the printhead indicated is properly installed, and then try to print.
If the error persists, replace the printhead indicated.
| The Power light is on, and one or more of the ink cartridge lights blink. | One or more of the ink cartridges are missing. • Install the ink cartridge indicated, and then try to print. • If the error persists, replace the ink cartridge indicated. |
| One or more of the ink cartridges are out of ink and must be replaced before you can continue printing. • Replace the ink cartridge indicated. | |
| The Power light, and one or more of the ink cartridge lights blink. | One or more of the ink cartridges are faulty or need attention. • Ensure the ink cartridge indicated is properly installed, and then try to print. • If the error persists, replace the ink cartridge indicated. |
| The Power light is on, and one or more of the ink cartridge lights are on. | One or more of the ink cartridges are low on ink and will need to be replaced soon. • No action is required. |
| The Power light blinks, and one or more of the ink cartridge lights are on. | |
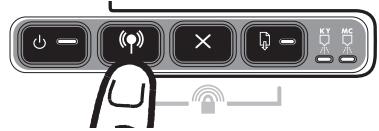
| The Configuration Page light blinks. (HP Officejet Pro K550dtwn) | One of the following processes is taking place: • The printer is initializing for wireless communication. • If you are using SecureEasySetup (SES) to set up the printer, the printer might be trying to connect to the wireless network. • If you are using Windows Connect Now™ to set up the printer, the printer is receiving wireless information from the USB flash drive. Each of the above processes takes less than 2 minutes. • No action is required. |
| The Configuration Page light is on. (HP Officejet Pro K550dtwn) | The printer is in wireless communication mode. • No action is required. |
| All lights are on. | A non-recoverable error has occurred. • Disconnect all cables (such as power cord, network cable, and USB cable), wait about 20 seconds, and reconnect the cables. If the problem persists, visit HP website (www.hp.com/support/officejetprok550) for the latest troubleshooting information, or product fixes and updates. |
Troubleshooting
This section provides troubleshooting suggestions for some of the most common issues associated with hardware and software installation.
For late-breaking information, see theREADME file and release notes, or visit the product support website at www.hp.com/support/officejetprok550.
Problems printing an alignment page
Check the printer to ensure the following:
- Power light is on and not blinking. When the printer is first turned on, it takes approximately 45 seconds to warm up.
- The printer is in the Ready state, and no other lights on the control panel are lit or blinking. If lights are lit or blinking, see "Interpreting control panel lights" on page 18.
- Ensure power cord and other cables are working, and are firmly connected to the printer.
- All packing tapes and materials are removed from the printer.
- Rear access panel (HP Officejet Pro K550) or duplex unit (HP Officejet Pro K550dtn/K550dtwn) is locked into place.
- Paper is loaded correctly in the tray, and is not jammed in the printer.
- Ensure the orange protective caps have been removed from each printhead.
- Printheads and ink cartridges are properly installed in their correct color-coded slots. Press down firmly on each one to ensure proper contact.
- Printhead latch and all covers are closed.
Problems installing software
Check or perform the following:
- Make sure the computer meets the system requirements. See the onscreen user guide on the Starter CD.
- Before installing software on a Windows computer, ensure all other programs are closed.
- If the computer does not recognize the path to the CD drive that you typed, ensure you are specifying the correct drive letter.
If the computer cannot recognize the Starter CD in the CD drive, inspect the CD for damage. You can download the printer driver from www.hp.com/support/officejetprok550. - In the Windows device manager, make sure that the USB drivers have not been disabled.
- If you are using Windows and the computer cannot detect the printer, run the uninstallation utility (Util\Scrubber\Uninstall.exe on the Starter CD) to perform a clean uninstallation of the printer driver. Restart your computer, and reinstall the printer driver.
Problems connecting to a network
Note: After correcting any of the following, run the installation program again.
General network troubleshooting
If you are unable to install the printer software, verify that:
- All cable connections to the computer and the printer are secure.
- The network is operational and the network hub is turned on.
- All applications, including virus protection programs and personal firewalls, are closed or disabled.
- Make sure the printer is installed on the same subnet as the computers that will be using the printer.
- If the installation program cannot discover the printer, print the configuration page (see "To print a configuration page" on page 21), and enter the IP address manually in the installation program.
If you are using a computer running Windows, make sure that the network ports created in the printer driver match the printer IP address:
1) Print the printer's configuration page.
2) From the Windows desktop, click Start, point to Settings, and then click Printers or Printers and Faxes.
3) Right-click the printer icon, click Properties, and then click the Ports tab.
4) Select the TCP/IP port for the printer, and then click Configure Port.
5) Compare the IP address listed in the dialog box and make sure it matches the IP address listed on the configuration page. If the IP addresses are different, change the IP address in the dialog box to match the address on the configuration page.
6) Click OK twice to save the settings and close the dialog boxes.
Problems connecting to a wired network
- If the Link light on the network connector does not turn on, make sure that all of the "General network troubleshooting" conditions listed above are met.
- Though it is not recommended that you assign the printer with a static IP address, you might resolve some installation problems (such as a conflict with a personal firewall) by doing so. For more information, see the onscreen user guide.
Troubleshooting and configuration tools
The following tools are available for troubleshooting or configuring the printer. For more information about these tools, see the onscreen user guide on the Starter CD.
Configuration page
Use the configuration page to view current printer settings, to help troubleshoot printer problems, and to verify installation of optional accessories, such as the duplex unit. The configuration page also contains a log of recent events. If the printer is connected to a network, an additional network configuration page prints; this page shows the network settings for the printer.
If you need to call HP, print the configuration page of the printer before calling.
To print a configuration page
HP Officejet Pro K550: Press and hold (Power button), press × (Cancel button) once, and release (Power button).
HP Officejet Pro K550dtn/K550dtwn: Press / (Configuration Page button).
Embedded Web server
When the printer is connected to a network, you can use the printer's embedded Web server to view status information, change settings, and manage the printer at your computer.
To open the embedded Web server
In a supported Web browser on your computer, type the IP address that has been assigned to the printer. For example, if the IP address is 123.123.123.123, type the following address into the Web browser:
http://123.123.123.123
The IP address for the printer is listed on the configuration page.
After you open the embedded Web server, you can bookmark it so that you can return to it quickly in the future.
Setting up the printer for wireless communication (HP Officejet Pro K550dtwn)
You may set up the printer for wireless communication using one of the following ways:
Using a cross cable or network cable See "To set up the printer for wireless communication" on page 23.
- Using SecureEasySetup (SES) See "To set up wireless communication using SecureEasySetup (SES)" on page 23.
- Using Windows Connect Now
See "To set up wireless communication for multiple printers (Windows only)" on page 24.
Note:
If you encounter problems, see "Troubleshooting problems for wireless communication" on page 24.
- To use the printer with any wireless connection, you must run the installation program at least once from the Starter CD and create a wireless connection.
Make sure the printer is not connected to the network using a network cable.
- The sending device must have built-in 802.11 capabilities or an 802.11 wireless card installed.
It is recommended that the printer and the computers that use the printer be on the same subnet.
Before installing the printer software, you may wish to find out the settings of your network. Obtain the information from your system administrators, or complete the following tasks:
- Obtain the network name (SSID) and communication mode (infrastructure or ad hoc) from the configuration utility for the network's wireless access point (WAP) or the computer's network card.
Find out the type of encryption your network uses, such as Wired Equivalent Privacy (WEP) or Wi-Fi® Protected Access (WPA). - Find out the security password or encryption key of the wireless device.
Understanding 802.11 wireless network settings
Network name (SSID)
By default, the printer looks for the wireless network name or Service Set Identifier (SSID) named "hpsetup". Your network may have a different SSID.
Communication mode
There are two communication mode options:
Ad hoc: On an ad hoc network, the printer is set to ad hoc communication mode, and communicates directly with other wireless devices without the use of a wireless access point (WAP):
All devices on the ad hoc network must:
- Be 802.11 compatible
- Have ad hoc as the communication mode
- Have the same network name (SSID)
- Be on the same subnet and same channel
- Have the same 802.11 security settings
Infrastructure (recommended): On an infrastructure network, the printer is set to infrastructure communication mode, and communicates with other devices on the network, whether the devices are wired or wireless, through a WAP. WAPs commonly act as routers or gateways on small networks.
Security Settings
For the available settings for the printer, see the network configuration page under "Understanding the configuration page" in the onscreen user guide.
For more information on wireless security, visit www. weca.net/opensection/pdf/ whitepaper wifi security4-29-03.pdf.
Network authentication: The printer's factory default setting is 'Open', which does not require security for authorization or encryption. The other possible values are 'OpenThenShared', 'Shared', and 'WPA-PSK' (Wi-Fi® Protected Access Pre-Shared Key).
- WPA increases the level of over-the-air data protection and access control on existing and future Wi-Fi networks. It addresses all known weaknesses of WEP, the original native security mechanism in the 802.11 standard.
- WPA2 is the second generation of WPA security; providing enterprise and consumer Wi-Fi users with a high level of assurance that only authorized users can access their wireless networks.
Data encryption:
- Wired Equivalent Privacy (WEP) provides security by encrypting data sent over radio waves from one wireless device to another wireless device. Devices on a WEP-enabled network use WEP keys to encode data. If your network uses WEP, you must know the WEP key(s) it uses.
WPA uses the Temporal Key Integrity Protocol (TKIP) for encryption and employs 802.1X authentication with one of the standard Extensible Authentication Protocol (EAP) types available today. - WPA2 provides a new, encryption scheme, the Advanced Encryption Standard (AES). AES is defined in counter cipher-block chaining mode (CCM) and supports the Independent Basic Service Set (IBSS) to enable security between client workstations operating in ad hoc mode.
To set up the printer for wireless communication
For Windows
- Remove the protective cover from the printer's network connector.
-
Do one of the following:
-
Temporarily connect the printer to the computer with the cross cable (included with the printer).
- Temporarily connect the printer to an available port on the network hub, switch, or router with a network cable (sold separately).
-
Close any applications that are running on your computer system.
-
Insert the Starter CD into the CD drive. If the CD menu does not start automatically, double-click the setup icon on the Starter CD.
- On the CD menu, click Install and follow the onscreen instructions.
- On the Connection Type screen, select the option to connect through network and click Next.
- Follow the onscreen instructions to complete the installation, and when prompted, disconnect the cable.
For Mac OS
- Open the AirPort Setup Assistant, and then follow the onscreen instructions for joining an existing wireless network (hpsetup).
- Double-click the setup icon on the Starter CD, and then follow the onscreen instructions.
- When prompted, click Open Print Center to add the printer.
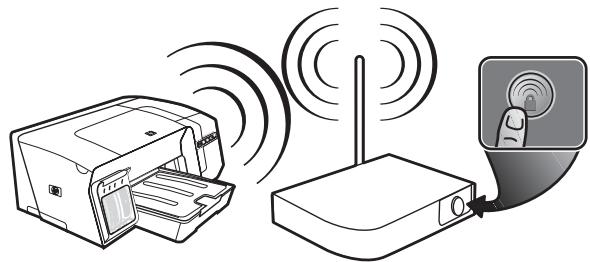
To set up wireless communication using SecureEasySetup (SES)
If your wireless router is SES capable, see the following instructions to set up using SES.
- Press the SES button on the wireless router.

- Within 2 minutes, press and hold (Configuration Page button) on the printer, press (Resume button) once, and release (Configuration Page button). The Configuration Page light blinks.
-
Wait for about 2 minutes, and press (Configuration Page button) to print the printer's configuration page and verify that the SES settings match the router's wireless settings. Note: If the connection fails, you might need to reset the printer's network settings (see "Reset network configuration settings" on page 25) and repeat the steps. See also "Check the wireless communication settings" on page 24.
-
Close any applications that are running on your computer system.
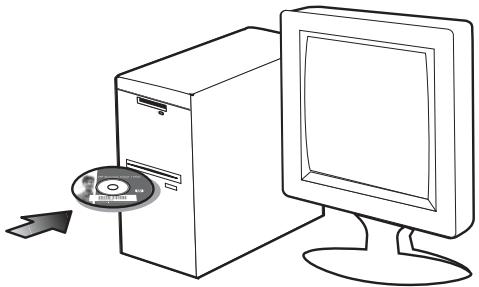
- Insert the Starter CD into the CD drive. If the CD menu does not start automatically, double-click the setup icon on the Starter CD.
- On the CD menu, click Install and follow the onscreen instructions to install the printer software.
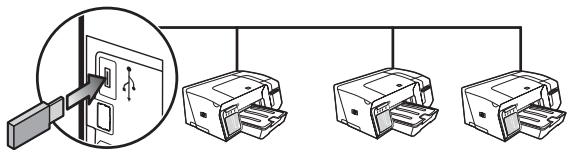
To set up wireless communication for multiple printers (Windows only)
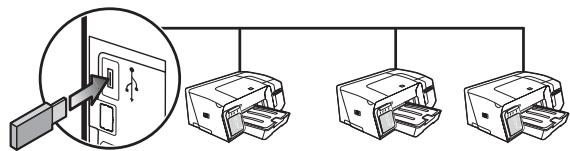
The printer supports the Windows Connect Now™ technology, which allows you to conveniently set up multiple printers for wireless connection. Using the Wireless Configuration Utility provided, export the computer's wireless settings to a USB flash drive, and then configure the printers with these settings by inserting the flash drive into the USB port of each printer.
- Remove the protective cover from the printer's USB host connector.
-
Insert the Starter CD into the CD drive. If the CD menu does not start automatically, double-click the setup icon on the Starter CD.
-
On the CD menu, click Utilities, and then click Wireless Configuration Utility.
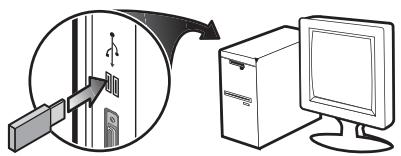
- Follow the onscreen instructions and connect the USB flash drive to the computer's USB port when prompted. The wireless network configuration settings are saved to the flash drive.
- Follow the onscreen instructions and connect the USB flash drive to each printer that you want to add to the network.
Troubleshooting problems for wireless communication
If the printer is unable to communicate with the network after completing the wireless setup and software installation, perform one or more of the following tasks.
Check the wireless
communication settings
- Make sure the computer's wireless card is set to the correct wireless profile. A wireless profile is a set of network settings unique to a given network. A single wireless card might have several wireless profiles (for example, one for a home network and one for an office network). Open the configuration utility for the network card installed on your computer, and ensure that the profile selected is the profile for the printer's network.
- Make sure the printer's network settings match those of your network. Do one of the following to find the settings for your network:
Infrastructure communication: Open the wireless access point's (WAP) configuration utility.
- Ad hoc communication: Open the configuration utility for the network card installed in your computer.
-
Compare the network's settings to those that appear on the printer's configuration page (see "To print a configuration page" on page 21), and note any differences. Possible problems include the following:
-
The WAP filters hardware addresses (MAC addresses). See "Add hardware addresses to a wireless access point (WAP)" on page 25.
- One of these settings in the printer might be incorrect: communication mode, network name (SSID), channel (ad hoc networks only), authentication type, encryption. See "Understanding 802.11 wireless network settings" on page 22.
- Print a document. If the document still does not print, then reset the printer's network settings (see "Reset network configuration settings" on page 25) and reinstall the printer software (see "Setting up the printer for wireless communication (HP Officejet Pro K550dtwn)" on page 22).
If the wireless network settings are correct, the computer might be associated to another wireless network. Ensure that the computer is associated to the same wireless network as that of the printer.
Users can ensure this by checking the wireless settings on their respective computers. In addition, ensure that the computers have access to the wireless network.
If the wireless network settings are incorrect, follow these steps to correct the printer's settings:
- Connect the printer to your network with a network cable or to the computer using the cross cable included with the printer.
- Open the printer's embedded Web server.
- Click the Networking tab, and then click Wireless (802.11) in the left pane.
- Use the Wireless Setup wizard on the Wireless Setup tab to change the printer's settings to match the settings of the network.
- Close the printer's embedded Web server, and then disconnect the network cable from the printer.
- Uninstall the printer software completely, and then reinstall the software.
Add hardware addresses to a wireless access point (WAP)
MAC filtering is a security feature in which a wireless access point (WAP) is configured with a list of MAC addresses (also called "hardware addresses") of devices that are allowed to gain access to the network through the WAP. If the WAP does not have the hardware address of a device attempting to access the network, the WAP denies the device access to the network. If the WAP filters MAC addresses, then the printer's MAC address must be added to the WAP's list of accepted MAC addresses.
- Press 品 / 品 (Configuration Page button) to print the configuration page.
- Open the WAP's configuration utility, and add the printer's hardware address to the list of accepted MAC addresses.
Reset network configuration settings
If the printer is still unable to communicate with the network, reset the printer's network settings.
- Press and hold 回回 / (Configuration Page button), press (Resume button) three times, and release 回回 / (Configuration Page button). The Power light blinks for a few seconds. Wait till the Power light is on.
- Press Configuration Page button) to print the configuration page and verify that the network settings have been reset. By default, the network name (SSID) is "hpsetup" and the communication mode is "ad hoc".
Hewlett-Packard limited warranty statement
| HP product | Duration of Limited Warranty |
| Software | 1 year |
| Accessories | 1 year |
| Ink cartridges | 6 months* |
| Printheads | 1 year* |
| Printer peripheral hardware (see below for details) | 1 year |
*For more detailed warranty information, see www.hp.com/support/inkjet_warranty.
Extent of limited warranty
- Hewlett-Packard warrants to the end-user customer that the HP products specified above will be free from defects in materials and workmanship for the duration specified above, which duration begins on the date of purchase by the customer.
- For software products, HP's limited warranty applies only to a failure to execute programming instructions. HP does not warrant that the operation of any product will be uninterrupted or error free.
- HP's limited warranty covers only those defects that arise as a result of normal use of the product, and does not cover any other problems, including those that arise as a result of:
a. Improper maintenance or modification;
b. Software, media, parts, or supplies not provided or supported by HP; or
c. Operation outside the product's specifications.
d. Unauthorized modification or misuse.
- For HP printer products, the use of a non-HP ink cartridge or a refilled ink cartridge does not affect either the warranty to the customer or any HP support contract with the customer. However, if printer failure or damage is attributable to the use of a non-HP or refilled ink cartridge, HP will charge its standard time and materials charges to service the printer for the particular failure or damage.
- If HP receives, during the applicable warranty period, notice of a defect in any product which is covered by HP's warranty, HP shall either repair or replace the product, at HP's option.
- If HP is unable to repair or replace, as applicable, a defective product which is covered by HP's warranty, HP shall, within a reasonable time after being notified of the defect, refund the purchase price for the product.
- HP shall have no obligation to repair, replace, or refund until the customer returns the defective product to HP.
- Any replacement product may be either new or like new, provided that it has functionality at least equal to that of the product being replaced.
- HP products may contain remanufactured parts, components, or materials equivalent to new in performance.
- HP's Limited Warranty Statement is valid in any country/region where the covered HP product is distributed by HP. Contracts for additional warranty services, such as on-site service, are available from any authorized HP service facility in countries/regions where the product is distributed by HP or by an authorized importer.
Limitations of warranty
TO THE EXTENT ALLOWED BY LOCAL LAW, NEITHER HP NOR ITS THIRD PARTY SUPPLIERS MAKES ANY OTHER WARRANTY OR CONDITION OF ANY KIND, WHETHER EXPRESS OR IMPLIED WARRANTYES OR CONDITIONS OF MERCHANTABILITY, SATISFACTORY QUALITY, AND FITNESS FOR A PARTICULAR PURPOSE.
Limitations of liability
- To the extent allowed by local law, the remedies provided in this Warranty Statement are the customer's sole and exclusive remedies.
- TO THE EXTENT ALLOWED BY LOCAL LAW, EXCEPT FOR THE OBLIGATIONS SPECIFICALLY SET FORTH IN THIS WARRANTY STATEMENT, IN NO EVENT SHALL HP OR ITS THIRD PARTY SUPPLIERS BE LIABLE FOR DIRECT, INDIRECT, SPECIAL, INCIDENTAL, OR CONSEQUENTIAL DAMAGES, WHETHER BASED ON CONTRACT, TORT, OR ANY OTHER LEGAL THEORY AND WHETHER ADVISED OF THE POSSIBILITY OF SUCH DAMAGES.
Local law
- This Warranty Statement gives the customer specific legal rights. The customer may also have other rights which vary from state to state in the United States, from province to province in Canada, and from country/region to country/region elsewhere in the world.
- To the extent that this Warranty Statement is inconsistent with local law, this Warranty Statement shall be deemed modified to be consistent with such local law. Under such local law, certain disclaimers and limitations of this Warranty Statement may not apply to the customer. For example, some states in the United States, as well as some governments outside the United States (including provinces in Canada), may:
a. Preclude the disclaimers and limitations in this Warranty Statement from limiting the statutory rights of a customer (e.g. the United Kingdom);
b. Otherwise restrict the ability of a manufacturer to enforce such disclaimers or limitations; or
c. Grant the customer additional warranty rights, specify the duration of implied warranties which the manufacturer cannot disclaim, or allow limitations on the duration of implied warranties.
- FOR CONSUMER TRANSACTIONS IN AUSTRALIA AND NEW ZEALAND, THE TERMS IN THIS WARRANTY STATEMENT, EXCEPT TO THE EXTENT LAWFULLY PERMITTED, DO NOT EXCLUDE, RESTRICT, OR MODIFY, AND ARE IN ADDITION TO, THE MANDATORY STATUTORY RIGHTS APPLICABLE TO THE SALE OF THE HP PRODUCTS TO SUCH CUSTOMERS.
http://123.123.123.123
http://123.123.123.123
http://123.123.123.123
http://123.123.123.123
. www.hp.com/support/inkjet_warranty jzj 1
zilal
yI yI yI yI yI yI yI yI yI yI yI yI yI yI yI yI yI yI yI yI yI yI yI yI yI yI yI yI yI yI yI yI yI yI yI yI yI yI yI yI yI yI yI yI yI yI yI yI yI yI yI
zglgwall 1
J 1 J 1 J 1 J 1 J 1 J 1 J 1 J 1 J 1 J 1 J 1 J 1 J 1 J 1 J 1 J 1 J 1 J 1 J 1 J 1 J 1 J 1 J 1 J 1 J 1 J 1 J 1 J 1 J 1 J 1 J 1 J 1 J 1 J 1
JLALALLI JLLALALALALALALALALALALALALALALALALALALALALALALALALALALALALALALALALALALALALAL
zuljnlglll
g j 1000000000000000000000000000000000000000000000000000000000000000000
i j 1 i j j j j j j j j j j j j j j j j j j j j j j j j j j j j j j j j j j j j j j j j j j j j j j j j j j j j j j j j j j j j j j j j j j j j j j j j j j j j j j jj
a a a a a a a a a a a a a a a a a a a a a a a a a a a a a a a a a a a a a a a a a a a a a a a a a a a a a a a a a a a a a
:cclll ljj 1s Lss
:aLgJyIyIyIyIyIyIyIyIyIyIyIyIyIyIyIyIyIyIyIyIyIyIyIyIyIyIyIyIyIyIyIyIyIyIyIyIyIyIyIyIyIyIyIyIy
HP 5jL aJy jlll lalalalalalalalalalalalalalalalalalalalalalalalalalalalalalalalal
g 1s s 1s s 1s s 1s s 1s s 1s s 1s s 1s s 1s s 1s s 1s s 1s s 1s s 1s s 1s s 1s s 1s s 1s s 1s s 1s s 1s s 1s s 1s s 1s s 1s s 1s
1 1 1 1 1 1 1 1 1 1 1 1 1 1 1 1 1 1 1 1
g 25s s JbLs plzss w y Lgolzss w g blll lssy 25s y IaIbll j. . aIbll y g oJall yIeIy IaIy Iy yIy Iy
( · ,) 2sLwJgJr (Networking) (Wireless (802.11))
JLw! (Wireless Setup) (Wireless Setup)
a 10
c0olilll l 1
p()
(bao Windows
aLbI J. Windows Connect NowTM aJaa JbI bI
JU 1UUUU
y
s s s s s s s s s s s s s s s s s s s s s s s s s s s s s s s s s s s s
jia jia jia jia jia jia jia jia jia jia jia jia jia jia jia jia jia jia jia jia jia jia jia jia jia jia jia jia jia jia jia jia jia jia jia jia jia jia jia jia
.USB
JUaJIi 1
aJzalal (Starter CD) Jzaiil
Jra Jda (CD menu) aaa (CD drive)
.(Starter CD)
(Utilities) 1
.(Wireless Configuration Utility)
USB 1
iJ 1
K USB 1
JL
a_i a b S_1 S_2 S_1 S_2
SecureEasySetup (SES)
L (SES) 1
.(SES)
SLUULGLALGLL(GLS)jjlebc
(zjglzaiujj)(g)lcjraaiyco baiui,jdzjL
jj) (Configuration Page)
(2011) (2011) (2011) (2011) (2011) (2011) (2011) (2011) (2011)
(Configuration Page)
(Configuration Page) (i j) (4) le bi al, jai jai jai jai
galll (SES) 1aLbI aI IaI aI aI aI aI aI
.
JusyIzKsUJusJusJusJusJusJusJusJusJusJus
Jg (10 a 1
1.8 4
a (Starter CD) (drive CD)
joo joo joo joo joo joo joo joo joo joo joo joo joo joo joo joo joo joo joo joo joo joo joo joo joo joo joo joo joo joo joo joo joo joo joo joo joo joo joo joo joo joo joo joo joo joo joo joo joo joo joo
(Install) (CD menu)
J (Connection Type) J. (Next)
pa dllbaie g, cill aie paiy aill lle sall lil .V
(Mac OS) OS
(AirPort Setup Assistant) (AirPort Setup Assistant) (AirPort Setup Assistant) (AirPort Setup Assistant) (AirPort Setup Assistant) (AirPort Setup Assistant) (AirPort Setup Assistant) (AirPort Setup Assistant) (AirPort Setup Assistant) (AirPort Setup Assistant) (AirPort Setup Assistant) (AirPort Setup Assistant) (AirPort Setup Assistant) (AirPort Setup Assistant) (AirPort Setup Assistant) (AirPort Setup Assistant) (AirPort Setup Assistant) (AirPort Setup Assistant)) (hpsetup)
WEP WEP WEP WEP WEP WEP WEP WEP WEP WEP WEP WEP WEP WEP WEP WEP WEP WEP WEP WEP WEP WEP WEP WEP WEP WEP WEP WEP WEP WEP WEP WEP WEP WEP WEP WEP WEP WEP WEP WEP WEP WEP WEP WEP WEP WEP WEP WEP WEP WEP WEP
WPAJL WPA2 1sWpaI WPA
olil
WEP WEP WEP WEP WEP WEP WEP WEP WEP WEP WEP WEP WEP WEP WEP WEP WEP WEP WEP WEP WEP WEP WEP WEP WEP WEP WEP WEP WEP WEP WEP WEP WEP WEP WEP WEP WEP WEP WEP WEP WEP WEP WEP WEP WEP WEP WEP WEP WEP WEP WEP
(AES) yLd all jaiall Jb b1 WPA2 1011
aegao 1c! (CCM) aee 1e 1e AES
Jlalll Joc 1011 1011 (IBSS) ad hoc
LwUJUaUaUu
(Windows)
JUJI 1
S = L S L S P .
()GgJJIJIJIJIJIJIJIJIJIJIJIJIJIJIJIJIJIJIJIJIJIJIJIJIJIJIJIJIJIJIJIJIJIJIJIJIJIJIJIJIJIJIJIJIJIJIJIJIJIJIJIJIJIJIJIJIJIJIJIJIJIJIJIJIJIJIJIJIJIJIJIJIJIJIJIJIJIJIJIJIJIJIJIJIJIJIJIJIJIJIJIJIJIJIJIJIJIJIJIJIJ
gall llll, 51111111111111111111111
:dllllglalbIguluUulUulUulUd
Jusl 1s Jg j g jg jg j
1.1
SecureEasySetup (SES)
"SecureEasySetup (SES)
Windows Connect Now
" (b) Windows p(bi) 1234567890123456789012345678901234567890123456789012345678901234567890123456789012345678901234567890123456789
设 x_0
A. 4,11 2. i 2i < L ≤ L1 U U L1 U
(SSID)
A. 4, 11, 22, 30, 40, 50, 60, 70, 80
123.123.123.123 IP JJJJJJJ
http://123.123.123.123.123
aalal aal alalalalalalalalalalalal
g i 1 1 1 1 1 1 1 1 1 1 1 1 1 1 1 1 1 1
Ld
A
JL 1000000000000000000000000000000000000000
aall j 1234567890123456789012345678901234567890123456789012345678901234567890123456789012345678901234567890123456789
a 1
oia ggi:2aii aai yaiy iai yaiy ai yaiy ai yaiy
aBblll aalll
JLJIJIJIJIJIJIJIJIJIJIJIJIJIJIJIJIJIJIJIJIJIJIJIJIJIJIJIJIJIJIJIJIJIJIJIJIJIJIJIJIJIJIJIJIJIJIJIJIJIJIJIJIJIJIJIJIJIJIJIJIJIJIJIJIJIJIJIJIJIJIJIJIJIJIJIJIJIJIJIJIJIJIJIJIJIJIJIJIJIJIJIJIJIJIJIJIJIJIJIJI
iYyill iNoo icIbI
(.Printers and Faxes)
jgl jil, aill jor jie jll jji (4
.(Ports) (Properties)
Jll 243
(.Configure Port)
slll l a cLb JSL
Loo
a 0 g jss s oJg aIbll Jie.
= 0
aegle ggealgglg jn Juaeallg y aee blls Looie
aalal aal alalal alalal alalal alalal alalal alalal alalal alalal
Iyill 1j! jS. wlll jilg Jle bia Iq
L 10000000000000000000000000000000
aLalqK aBilg cLall wjyjo
Jololj
y
jki jll pddsslll lalai kijil pllll lllbina jjissll jno
.(Starter CD)
aJxj 10
AED = = 3
j 15i j 15i j 15i j 15i j 15i j
a a
aJd d a 1 1 1 1 1 1 1 1 1 1 1 1 1
Joo aalll jaiy jy jdy di kay ayjgawdall
. www . hp . com / support / officejetprok550
wwwHp.com/support/officejetprok550 100000000000000000000000000000000000000000000000
| الشام و الحرفية بعسية | الشام لحيى |
| .(Resume) (الحشرم) مصطفى نهورلاني حيرنolenالداني مصطفى نهورلاني حيرنolenالداني مصطفى نهورلاني حيرنolenالداني مصطفى نهورلاني حيرنolenالداني مصطفى نهورلاني حيرنolenالداني مصطفى نهورلاني حيرنolenالداني مصطفى نهورلاني حيرنolenالداني مصطفiger نهورلاني حيرنolenالداني مصطفiger نهورلاني حيرنolenالداني مصطفiger نهورلاني حيرنolenالداني مصطفiger نهورلاني حيرنolenالداني مصطفiger نهورلاني حيرنolenالداني مصطفiger نهورلاني حيرنolenالداني مصطفiger نهورнالداني مصطفiger نهورنالداني مصطفiger نهورنالداني مصطفiger نهورنالداني مصطفiger نهورنالداني مصطفiger نهورنالداني مص TFT | .(Resume) (الحشرم) مص TFT |
| .(HP Officejet Pro K550dtn/K550dtwn) (HP Officejet Pro K550) (HP Officejet Pro K550) (HP Officejet Pro K550) (HP Officejet Pro K550) (HP Officejet Pro K550) (HP Officejet Pro K550) (HP Officejet Pro K550) (HP Officejet Pro K550) (HP Officejet Pro K550) (HP Officejet Pro K550) (HP Officejet Pro K55) (HP Officejet Pro K55) (HP Officejet Pro K55) (HP Officejet Pro K55) (HP Officejet Pro K55) (HP Officejet Pro K55) (HP Officejet Pro K55) (HP Officejet Pro K55) (HP Officejet Pro K55) (HP Officejet Pro K55) (HP Officejet Pro K55) (HP Officejet Pro K55) (HP Officejet Pro K55) (HP Officejet Pro K55) (HP Officejet Pro K55) (HP Officejet Pro K55) (HP Officejet Pro K55) (HP Officejet Pro K55) (HP Officejet Pro K55) (HP Officejet Pro K55) (HP Officejet Pro K55) (HP Officejet Pro K55) (HP Officejet Pro K55) (NP) | .(Resume) (الحشرم) مص TFT |
| .(HP Officejet Pro K550dtn/K550dtwn) (HP Officejet Pro K550) (HP Officejet Pro K550) (HP Officejet Pro K550) (HP Officejet Pro K550) (HP Officejet Pro K550) (HP Officejet Pro K550) (HP Officejet ProK550) (HP Officejet ProK550) (HP Officejet ProK550) (HP Officejet ProK550) (HP Officejet ProK550) (HP Officejet ProK550) (HP Officejet ProK550) (HP Officejet ProK550) (HP Officejet ProK550) (HP Officejet ProK550) (HP Officejet Pro K550) (HP Officejet Pro K550) (HP Officejet Pro K550) (HP Officejet Pro K550) (HP Officejet Pro K550) (HP Officejet Pro K550) (HP Officejet Pro K550) (HP Officejet Pro K550) (HP Officejet Pro K550) (HP Officejet ProK550) (HP Officejet ProK550) (HP Officejet ProK550) (HP Officejet ProK55) (HP Officejet ProK550) (HP Officejet ProK550) (HP Officejet ProK550) (HP Officejet ProK550) (HP Officejet ProK550) (HP Officejet ProK550) (HP Officejet ProK550) (HP Officejet ProK550) (HP Officejet ProK550) (HP Officejet ProK55) (HP Officejet ProK550) (HP Officejet ProK550) (HP Officejet ProK550) (HP Officejet ProK550) (HP Officejet ProK550) (HP Officejet ProK 550) (HP Officejet ProK 550) (HP Officejet ProK 550) (HP Officejet ProK 550) (HP Officejet ProK 550) (HP Officejet ProK 550) (HP Officejet ProK 550) (HP Officejet ProK 550) (HP Officejet ProK 550) (HP Officejet ProK 12) | .(Resume) (الحشرم) مص TFT |
| .(HP Officejet Pro K550dtn/K550dtwn) (HP Officejet Pro K550) (HP Officejet Pro K550) (HP Officejet Pro K550) (HP Officejet Pro K550) (HP Officejet Pro K550) (HP Officejet Pro K550) (HP OfficejetPro K550) (HP Officejet Pro K550) (HP Officejet Pro K550) (HP Officejet Pro K550) (HP Officejet Pro K550) (HP Officejet Pro K550) (HP Officejet Pro K550) (HP Officejet Pro K550) (HP Officejet Pro K550) (HP Officejet Pro K550) (HP OfficejetPro K550) (HP Officejet Pro K550) (HP Officejet Pro K550) (HP Officejet Pro K55) (HP Officejet Pro K550) (HP Officejet Pro K550) (HP Officejet Pro K550) (HP Officejet Pro K550) (HP Officejet Pro K550) (HP Officejet Pro K550) (HP Officejet Pro K550) (HP Officejet Pro K550) (HP Officejet Pro K550) (HP Officejet Pro K55) (HP Officejet Pro K550dtn/K550dtwn) (HP Officejet Pro K550) (HP Officejet Pro K550) (HP Officejet Pro K550) (HP Officejet Pro K550) (HP Officejet Pro K550) (HP Officejet Pro K550) (HP Officejet Pro K550) (HP Officejet Pro K550) (HPOfficejet Pro K550) (HPOfficejet Pro K550) (HPOfficejet Pro K550) (HPOfficejet Pro K550) (HPOfficejet Pro K550) (HPOfficejet Pro K550) (HPOfficejet Pro K550) (HPOfficejet Pro K550) (HPOfficejet Pro K550) (HPOfficejet Pro K550) (HP Officejet Pro K550) (HPOfficejet Pro K550) (HPOfficejet Pro K550) (HPOfficejet Pro K550) (HPOfficejet Pro K550) (HPOfficejet Pro K550) (HPOfficejet Pro K550) (HPOfficejet Pro K550) (HPOfficejet Pro K550) (HP Officejet Pro K550) (HP Officejet Pro K550) (HPOfficejet Pro K550) (HPOfficejet Pro K550) (HPOfficejet Pro K550) (HPOfficejet Pro K550) (HPOfficejet Pro K550) (HPOfficejet Pro K550) (HPOfficejet Pro K550) (HP Officejet Pro K550) (HPOfficejet Pro K550) (HP Officejet Pro K550) (HPOfficejet Pro K550) (HPOfficejet Pro K550) (HPOfficejet Pro K550) (HPOfficejet Pro K550) (HPOfficejet Pro K550) (HPOfficejet Pro K550) (HPOfficejet Pro K550) (HP Officejet Pro K550) (HP Officejet Pro K550) (HP Officejet Pro K550) (HPOfficejet Pro K550) (HPOfficejet Pro K550) (HPOfficejet Pro K550) (HPOfficejet Pro K550) (HPOfficejet Pro K550) (HPOfficejet Pro K550) (HP Officejet Pro K550) (HPOfficejet Pro K550) (HPOfficejet Pro K550) (HP Officejet Pro K550) (HPOfficejet Pro K550) (HPOfficejet Pro K550) (HPOfficejet Pro K550) (HPOfficejet Pro K550) (HPOfficejet Pro K550) (HPOfficejet Pro K550) (HP Officejet Pro K550) (HPOfficejet Pro K550) (HP Officejet Pro K550) (HP Officejet Pro K550) (HPOfficejet Pro K550) (HPOfficejet Pro K550) (HPOfficejet Pro K550) (HPOfficejet Pro K550) (HPOfficejet Pro K550) (HPOfficejet Pro K550) (HP Officejet Pro K550) (HP Officejet Pro K550) (HPOfficejet Pro K550) (HP Officejet Pro K550) (HPOfficejet Pro K550) (HPOfficejet Pro K550) (HPOfficejet Pro K550) (HPOfficejet Pro K550) (HPOfficejet Pro K550) (HPOfficejet Pro K550) (HP Officejet Pro K550) (HP Officejet Pro K550) (HP Officejet Pro K550) (HP Officejet Pro K550) (HPOfficejet Pro K550) (HPOfficejet Pro K550) (HPOfficejet Pro K550) (HPOfficejet Pro K550) (HPOfficejet Pro K550) (HP Officejet Pro K550) (HPOfficejet Pro K550) (HPOfficejet Pro K550) (HPOfficejet Pro K550) (HP Officejet Pro K550) (HPOfficejet Pro K550) (HPOfficejet Pro K550) (HPOfficejet Pro K550) (HPOfficejet Pro K550) (HPOfficejet Pro K550) (HP Officejet Pro K550) (HPOfficejet Pro K550) (HPOfficejet Pro K550) (HP Officejet Pro K550) (HP Officejet Pro K550) (HPOfficejet Pro K550) (HPOfficejet Pro K550) (HPOfficejet Pro K550) (HPOfficejet Pro K550) (HPOfficejet Pro K550) (HP Officejet Pro K550) (HPOfficejet Pro K550) (HP Officejet Pro K550) (HPOfficejet Pro K550) (HP Officejet Pro K550) (HPOfficejet Pro K550) (HPOfficejet Pro K550) (HPOfficejet Pro K550) (HPOfficejet Pro K550) (HPOfficejet Pro K550) (HP Officejet Pro K550) (HPOfficejet Pro K550) (HP Officejet Pro K550) (HP Officejet Pro K550) (HP Officejet Pro K550) (HPOfficejet Pro K550) (HPOfficejet Pro K550) (HPOfficejet Pro K550) (HPOfficejet Pro K550) (HPOfficejet Pro K550) (HP Officejet Pro K550) (HP Officejet Pro K550) (HPOfficejet Pro K550) (HPOfficejet Pro K550) (HP Officejet Pro K550) (HPOfficejet Pro K550) (HPOfficejet Pro K550) (HPOfficejet Pro K550) (HPOfficejet Pro K550) (HPOfficejet Pro K550) (HP Officejet Pro K550) (HP Officejet Pro K550) (HPOfficejet Pro K550) (HP Officejet Pro K550) (HP Officejet Pro K550) (HPOfficejet Pro K550) (HPOfficejet Pro K550) (HPOfficejet Pro K550) (HPOfficejet Pro K550) (HPOfficejet Pro K550) (HP Officejet Pro K550) (HP Officejet Pro K550) (HP Officejet Pro K550) (HPOfficejet Pro K550) (HP Officejet Pro K550) (HPOfficejet Pro K550) (HPOfficejet Pro K550) (HPOfficejet Pro K550) (HPOfficejet Pro K550) (HPOfficejet Pro K550) (HP Officejet Pro K550) (HP Officejet Pro K550) (HP Officejet Pro K550) (HP Officejet Pro K550) (HP Officejet Pro K550) (HP Officejet Pro K550) (HP Officejet Pro K550) (HP Officejet Pro K550) (HP Officejet Pro K550) (HPOfficejet Pro K550) (HPOfficejet Pro K55 |
a.1111 1111 1111 1111 9 a.b.
11 11
.ogaleall joo ujo ge Juaaill
Llalil lalil alllalalalalalalalalalalalalalalalalalalalalalalalalalalalalalalalalalalalalalalalalalalalalalalal
HP Officejet Pro K550dtn
HP Officejet Pro K550dtwn
cJlll jlll llll yIaI aIyIaI aIyIaI aIyIaI
alaaa aaii wlll pahid
()
(20 z_iz_j 1g
JaiBai Jiaybi p jui jiu ellu L:V aqbal
aaii ailllll 10g i y lalil jy bi p (r . ailllll jlll r y s y i (1) (2) () baiol, lailll aaiibll jaii pi ai (r . (AC) jaiil
. (Power)
1 1
" 1 1 1 1 1 1 1 1 1 1 1 1 1 1 1 1 1 1 1 1 1 1 1 1 1 1 1 1 1 1 1 1 1 1 1 1 1 1 1 1 1 1 1
a
y y j 1 1 1 1 1 1 1 1 1 1 1 1 1 1 1 1 1 1 1 1 1 1 1 1 1 1 1 1 1 1 1
.
aill g aagabg jk lalpai yolallnllg k aascoaaagabg jsllaqpa (4 1 g aagaaaayi g daiyipiele baiol, pals g ie gae bajlrjll Jlai jnal. qalal
aill jai gia gai ge Iagai jai jai jai jai:
jll a bds e bdi()
j 1
Jai Silll Jai bai jao L aalall gia aalll s yjao wai (
yall 1lll gl (V .alaggl jjoll glc jsl bll all lclai la


V
HP Officejet Pro K550dtn/K550dtwn
A
HP Officejet Pro K550dtwn
(204 1 (204
11 (HP Officejet Pro K550dtn/K550dtwn
.(HP Officejet Pro K550dtwn)
aaylll y
Jgjzjgljzjjjzjjzjjj(1
()
a1 + a2 + a_3 = 6

HP Officejet Pro
K550dtn/K550dtwn
aalil 1gag abzabzll:Y a
jScg yinuuyuuiyue 1e aalll 8y jyauy jIyaiyaiyaiyaiyai
gill (jL) plo 0. Jaua, a ball jz k aluol jil. gill
aill 10g j g j g j g j g j g j g j g j g j
aIbI Joo
aillll clll llojllw aellll pilc: 10
© 2005 Hewlett-Packard Development Company, L.P.
10/7.1
4 1
aeggagagagagagagagagagagagagagagagagagagagagagagagagagagagagagagagagagagagagagagagagagagagagagagagagagagagagagagagagag
111 111 111 111 111 111 111
allll llo gao jolaln JnJnJnJnJnJnJnJnJnJnJnJnJnJnJnJnJnJnJnJnJnJnJnJnJnJnJnJnJnJnJnJnJnJnJnJnJnJnJnJnJnJnJnJnJn
J 1 1
1.
zlllloall
Microsoft Windows Microsoft
Laiy 100000000000000000000000000000000000000000000000
L

. Microsoft 45
. Novell 已 _ 已 NetWare,Novell
. Intel 52
Adobe Systems Incorporate 品 ≤ 分 ≤ 分 Acrobat, Adobe

Broadcom iSjLHP iSjL jJg Jg Jg Jg Jg Jg Jg Jg Jg Jg Jg Jg Jg Jg Jg Jg Jg Jg Jg Jg Jg Jg Jg Jg Jg Jg Jg Jg Jg Jg Jg Jg Jg Jg Jg Jg Jg Jg Jg Jg Jg Jg Jg Jg Jg Jg Jg Jg Jg Jg Jg
LinkSys
Jolli oLoglae

aessssssssssssssssssssssssssssssssssssssssssssssssssssssssssssssssssssssssssssssss
≤ 0
aall jglgdllll lgs aolll g
y
J 1
aaiil aie gikaii alalillll lalil
1
Jus 0
jzbsb
g 1
- Lg≤1 Lg≤Lg
ailllll lalp aallnlaal
Printed in Germany