
EQ.9 plus connect s700 - Coffee maker SIEMENS - Free user manual and instructions
Find the device manual for free EQ.9 plus connect s700 SIEMENS in PDF.

| Product Type | Automatic espresso machine |
| Brand | Siemens |
| Model | EQ.9 plus connect s700 |
| Dimensions (H x W x D) | 392 x 299 x 470 mm |
| Weight (empty) | 10-12 kg |
| Power supply | 220-240 V ~, 50/60 Hz, 1500 W |
| Pump pressure | 19 bar |
| Water tank capacity | 2.3 L (without filter) |
| Bean hopper capacity (single hopper) | 290 g |
| Bean hopper capacity (two hoppers) | 250 g (right) / 270 g (left) |
| Grinder type | Ceramic, adjustable |
| Power cord length | 1000 mm |
| Main functions | Espresso, Café Crème, Cappuccino, Latte Macchiato, Café au lait, Flat White, Americano, Milk foam, Hot milk, Hot water, Coffee maker function, coffeeWorld (via Home Connect) |
| Milk system | Integrated milk container, automatic cleaning after each milk-based drink |
| Customization | User profile creation, saving individual drinks, intensity, temperature, aroma settings (Double Shot, Triple Shot) |
| Cup warmer | Yes, can be turned on/off |
| Connectivity | Home Connect (2.4 GHz Wi-Fi), control via mobile app, remote start |
| Water filter | Yes, optional (ref. TZ70003) |
| Child safety | Appliance lock (milk button held for 4 seconds) |
| Maintenance and cleaning | Automatic programs: descaling, cleaning, Calc’nClean, milk system rinse; manual cleaning of the brewing unit and milk system |
| Spare parts and accessories | Cleaning tablets (TZ80001A/B), descaling tablets (TZ80002A/B), water filter (TZ70003), maintenance kit (TZ80004A/B), milk carton adapter (TZ90008) |
| General information | Warranty according to distributor's terms; after-sales service available; RED declaration of conformity (Directive 2014/53/EU) |
Frequently Asked Questions - EQ.9 plus connect s700 SIEMENS
User questions about EQ.9 plus connect s700 SIEMENS
0 question about this device. Answer the ones you know or ask your own.
Ask a new question about this device
Download the instructions for your Coffee maker in PDF format for free! Find your manual EQ.9 plus connect s700 - SIEMENS and take your electronic device back in hand. On this page are published all the documents necessary for the use of your device. EQ.9 plus connect s700 by SIEMENS.
USER MANUAL EQ.9 plus connect s700 SIEMENS
TI955...connect, TI957...connect
enInstructionmanual
frModed'emploi
Register your product on My Siemens and discover exclusive services and offers. siemens-home.bsh-group.com/welcome
The future moving in.

2


4
5
6
7
8
Table of contents

Intended use 7

Important safety information. . . . 7

Environmental protection . . . . 9
Saving energy 9
Environmentally-friendly disposal . . . . 9

Getting to know your appliance 10
Included in delivery. 10
Assembly and components. 10
Controls 11

Accessories. 12

Before using for the first time. 13
Installing and connecting the appliance. 13
Commissioning the appliance . . . . .13

Operating the appliance. 15
Selecting a drink 15
Preparing coffee using freshly ground beans 17
Preparing coffee using ground coffee . 17
Preparing drinks with milk 18
Dispensing hot water 19
Adjusting beverage settings 20
Setting the grinding level 22
Cup warmer. 22

Customising 23
Creating a user profile 23
Editing or deleting user profile. 23
Saving individual drinks 24

Childproof lock 24
Activating the child-proof lock . . . . .24
Deactivating the child-proof lock . . .24

Menu settings. 25
Changing settings 25
Starting the "Water filter"or "frost protection"programme. 27

Home Connect 28
Setting up. 29
Switching Wi-Fi on and off 30
Additional settings 31
Deviceinfo. 32
Display 32
Remote diagnostics 32
About data protection. 32
Declaration of Conformity. 32

Daily care and cleaning . 33
Cleaning agent 33
Cleaning the appliance. 34
Cleaning the milk system. 34
Cleaning the brewing unit. 35

Service programmes 36
Rinse milk system 37
Dscaling 37
Cleaning 38
calc'nClean. 38

Trouble shooting 39

Customer service 43
Technical data 43
E number and FD number 43
Guarantee 43

Intended use
Check the appliance for damage after unpacking it. Do not connect the appliance if it has been damaged in transport.
This appliance is intended for domestic use only.
Only use the appliance indoors at room temperature and up to 2000 m above sea level.

Important safety information
Please read carefully, follow and retain the operating instructions. When passing on the appliance, enclose these instructions.
This appliance can be used by children aged from 8 years and above and by persons with reduced physical, sensory or mental capabilities or lack of experience and knowledge if they have been given supervision or instruction concerning use of the appliance in a safe way and if they understand the hazards involved. Keep children under 8 years of age away from the appliance and connecting cable and do not allow them to use the appliance. Children shall not play with the appliance. Cleaning and user maintenance shall not be made by children unless they are older than 8 years and supervised.
Warning
Danger of electric shock!
The appliance may only be connected to a power supply with alternating current via a correctly installed socket with earthing. Ensure that the protective conductor system of the domestic electricity supply has been correctly installed.
- Connect and operate the appliance only in accordance with the specifications on the rating plate. If the power cord of this appliance is damaged, it must be replaced by customer service.
- Do not use if the power cable or appliance is damaged. If a fault occurs, pull the mains plug or switch off the mains voltage immediately.
- To prevent hazards, the appliance may be repaired by our customer service only.
- Never immerse the appliance or mains cord in water.
The plug and socket connection of the appliance must not come into contact with liquids.
- Please note the special information on cleaning in the instructions.
Warning
Risk of scalding (Home Connect)!
If an unattended remote start takes place, third parties might be scalded if they reach under the coffee dispenser during drinks dispensing. You should therefore make sure that with an unattended remote start there is no risk to other people, in particular not to children, or to property.
Warning
Hazard due to magnetism!
The appliance contains permanent magnets which may affect electronic implants, e.g. heart pacemakers or insulin pumps. Persons wearing electronic implants must maintain a minimum distance of 10 cm from the appliance and from the following parts upon removal: milk container, milk system, water tank and brewing unit.
Warning
Risk of suffocation!
Do not let children play with packaging material. Store small parts safely as they can be easily swallowed.
Warning
Risk of burns!
The milk system becomes very hot. After use, allow it to cool down first before touching it.
After use, surfaces such as the cup warmer may still be hot for a certain period.
- Freshly prepared beverages are very hot. Leave to cool a little if necessary.
Warning
Risk of injury!
- Improper use of this appliance may result in injury.
- Do not reach into the grinding unit.
Warning
Fire hazard!
The appliance will become hot.
- Never operate the appliance in a cupboard.

Environmental protection
Saving energy
If the appliance is not being used, switch it off.
Set the interval for automatic switch-off to the smallest value.
If possible, do not interrupt coffee or milk froth dispensing. Stopping a process prematurely results in higher energy consumption and the drip tray fills up more quickly.
- Descale the appliance regularly to avoid a build-up of limescale. Limescale residue results in higher energy consumption.
Environmentally-friendly disposal
Dispose of packaging in an environmentally-friendly manner.

This appliance is labelled in accordance with European Directive 2012/19/EU concerning used electrical and electronic appliances (waste electrical and electronic equipment - WEEE). The guideline determines the framework for the return and recycling of used appliances as applicable throughout the EU.
Please ask your dealer about current disposal routes.

Getting to know your appliance
This section provides an overview of the scope of delivery, the assembly and the components of your appliance. It also introduces you to the different controls.
Note: Depending on the appliance model, individual details and colours may differ.
The operating instructions refer to two product variants:
- Appliance with one bean container
- Appliance with two bean containers
How to use these instructions:
The cover pages of the operating instructions can be folded out towards the front. The illustrations are identified using numbers that are referred to in the operating instructions.
Example: Fig. 1
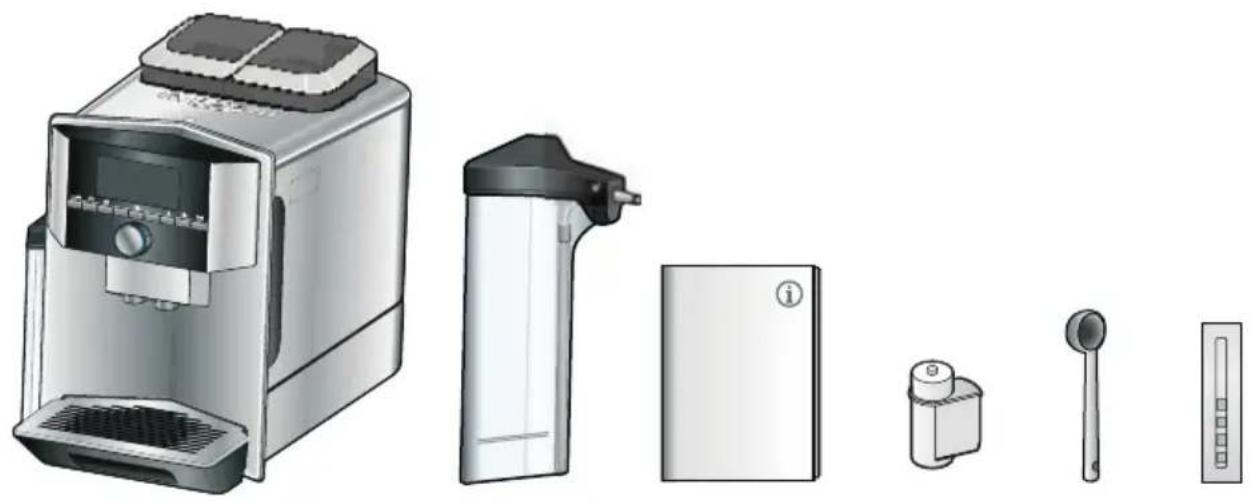
Included in delivery
Fig. 1
A Fully automatic coffee machine
B Milk container (container, lid, riser, connection hose)
C Operating instructions
D ** Water filter
E Measuring spoon
Water hardness testing strip
The item marked with ** is only supplied with certain appliances.
Assembly and components
Fig. 2
1 Display
2 Control panel
3 Rotary selector/start-stop (rotate and press to navigate)
4 Outlet system (coffee, milk, hot water), height adjustable
5 Milk container (container, lid, riser, connection hose)
6 Drip tray (coffee grounds container, drip plate)
7 Brewing chamber cover
8 Water tank
9 Rating plate
10 Recessed grip on water tank
11 Cup warmer
12 Cup warmer LED display
13 Grind compartment (ground coffee/cleaning tablet)
14 Bean container
15 Rotary selector for grinding level setting
16 Aroma lid
17* Aroma lid
18* Bean container
19* Rotary selector for grinding level setting
20* Bean container selector buttons, illuminated
Depending on the model:
Items marked with * are only present in the appliance with two bean containers.
Controls
| Button Meaning | |
| on/off Switches the appliance on and off The appliance rinses automatically when it is switched on and off. The appliance is not rinsed if: ■it is still warm when switched on, or ■coffee was not dispensed before the appliance was switched off. The appliance is ready for use when the symbols for drink selection and the on/off button light up on the display. | |
| Customising The appliance provides the option of saving and calling up customised settings for coffee drinks. → "Customising" on page 23 | |
| Coffee strength Adjusting the coffee strength. → "Adjusting beverage settings" on page 20 | |
| milk Briefly press: Setting for share of milk in the drink in % As a drink or as an ingredient in certain coffee drinks. → "Adjusting beverage settings" on page 20 Press and hold for at least 4 seconds: Child-proof lock → "Childproof lock" on page 24 | |
| ml | Drink quantity in millilitres. → "Adjusting beverage settings" on page 20 |
| Two drinks | Preparation of two drinks simultaneously. Position cups next to one another under the coffe dispenser. → "Adjusting beverage settings" on page 20 |
| / i Menu settings/service programmes Press Ⓒ/i button briefly to call up menu settings, Home Connect settings, cup warmer, service programmes, water filter and frost protection. Briefly press Ⓞ/i button again to return to the drink selection. If no selection is made within approx. 10 seconds, the appli-ance will automatically return to the drink selection. | |
| milk | Navigation buttons For navigating in the display. In "barista mode" additional functions are assigned to the navigation buttons. In this set- ting, further adjustments can be made to the drink, for example. → "Adjusting beverage settings" on page 20 |
Display
The display 1 shows the selected drinks, settings and setting options, as well as messages about the appliance's operating status.
Additional information is shown in the display; this is hidden after a short period of time or once the information is confirmed by pressing a button.
The display also prompts the user to perform certain actions.
The individual steps for performing the action are shown in the display. If the action required was carried out, e.g. "Fill water tank", the corresponding message will disappear.
Rotary selector
The rotary selector 3 has a range of different functions.
- Rotation: navigate in the display and change settings.
- Pressing: start beverage preparation or service programme, confirm menu selection.
- Pressing while drink is being dispensed: prematurely stop dispensing.

Accessories
The following accessories are available from retailers or from customer service:
| Accessory Order number |
| Retail Customer service |
| Cleaning tablets TZ80001A 00312097 |
| TZ80001B 00312098 |
| Descaling tablets TZ80002A 00312094 |
| TZ80002B 00312095 |
| Water filter TZ70003 00575491 |
| Care set TZ80004A 00312105 |
| TZ80004B 00312106 |
| Adapter for milk car-ton TZ90008 00577862 |
The contact data for customer service in all countries can be found at the back of these instructions.

Before using for the first time
In this section, you will learn how to commission your appliance. Before you can use your new appliance, you must make some settings.
Note: Only use the appliance in frost-free areas. If the appliance was transported or stored at temperatures below 0^ , you must wait for at least 3 hours before using it.
Installing and connecting the appliance
- Remove any protective plastic film.
- Place the appliance on a level, water-resistant surface which can bear the weight.
- Using the mains plug, connect the appliance to an earthed socket that has been correctly installed.
Commissioning the appliance
Selecting language
Notes
The language selection appears automatically when the appliance is switched on for the first time.
You can change the language at any time. "Menu settings" on page 25
- Switch on the appliance with the on/off button. The preset language appears in the display.
- Use the rotary selector to select the desired display language.
- Confirm with the right navigation button.
The setting has been saved.
Selecting water hardness
It is important to set the water hardness correctly so that the appliance indicates in good time when the descending programme should be run. The preset water hardness is level 4.
You can check the water hardness using the enclosed test strip or by asking your local water supplier. If a water softening system is installed in the house, please select "Softening device".
The table shows the allocation of the levels to the different degrees of water hardness:
| Level Water hardness German (°dH) French (°fH) | |
| 1 1-7 1-13 | |
| 2 8-14 | 14-25 |
| 3 15-21 | 26-38 |
| 4 22-30 | 39-54 |
Subsequent changes to the water hardness can be made at any time. "Menu settings" on page 25
- Briefly immerse the enclosed test strip in fresh tap water, leave it to drip and read off the result after one minute.
- Use the rotary selector to set the water hardness determined.
- Confirm with the right-hand navigation button.
The setting has been saved.
en Before using for the first time
Do you want to connect to Home Connect?
To now connect the appliance to the WLAN network (home network), confirm "yes" with the right-hand navigation button.
To connect the appliance to the WLAN network later, select "no" with the left-hand navigation button.
Note: When selecting "yes", please read the detailed description in the section "Home Connect".
Do you want to insert a water filter?
If you want to insert a water filter now, confirm "yes" with the right-hand navigation button.
To insert a water filter later, select "no" with the left-hand navigation button.
Note: If selecting "yes", please read the detailed description in the section "Starting the "Water filter" or "Frost protection" programme" from the item "Inserting or replacing a water filter".
The reminder "Fill bean container" lights up briefly.
Either confirm with the right-hand navigation button or wait a few seconds.
The reminder "Please fill water tank" lights up. Fill the water tank.
Filling the bean container
This appliance can be used to prepare coffee drinks from coffee beans or ground coffee (not instant coffee).
- Open the lid 16 of the bean container 14
- Add beans.
- Close the lid again.
Notes
- Coffee beans that have been glazed or caramelised or treated with other sugary additives will block the brewing unit. Only use pure bean mixes that are suitable for use in fully automatic coffee or espresso machines.
Never use unroasted coffee beans.
The coffee beans are freshly ground for each brewing operation.
Store coffee beans in a sealed container in a cool place to ensure optimum quality. - Coffee beans can be kept in the bean container for a number of days without losing their aroma. Only ever add the ground coffee shortly before beverage preparation. "Preparing coffee using ground coffee" on page 17
In models with two bean containers 14, 18^ you can pour in two different types of coffee beans. Select the desired bean container using the selection button 20^ . The LED of the active bean container lights up.
The appliance memorises the most recently used bean container for each drink. This presetting can be modified.
"Menu settings" on page 25
Filling the water tank
Important: Fill the water tank with fresh, cold, still water on a daily basis. Prior to operation, check whether the water tank has been sufficiently filled.
- Hold the recessed grip 10 on the side of the water tank 8 and gently tilt out the water tank to the side.
- Use the handle to remove the water tank and then rinse out.
- Fill the water tank with water up to the "max" marking.
- Re-insert the water tank in the holder and tilt back to the starting position. The brand logo lights up on the display. The appliance heats up and rinses. Some water will run out of the outlet system.
The appliance is ready for use when the symbols for the beverages and the on/off button light up on the display.
Notes
- When the appliance is used for the first time, after running a service programme or if it has not been operated for a long period, the first beverage will not have the full aroma and should not be consumed.
After starting up the appliance for the first time, you will consistently achieve a suitably thick and stable "crema" only after the first few cups have been dispensed.
If the appliance is in use for a long period of time, water droplets will form on the ventilation slots. This is normal.

Operating the appliance
In this section, you will learn how to prepare your appliance for beverage preparation and how to prepare hot drinks. It features information on adjusting the beverage settings and adjusting the grinding level.
Selecting a drink
Use the rotary selector to select the desired beverage.
The display shows the name of the drink and the values currently selected (e.g. strength or cup size).
The drink selected can be prepared with the pre-set values or first adjusted to your individual taste. "Adjusting beverage settings" on page 20 "Menu settings" on page 25
If no controls are activated within approx. 5 seconds, the appliance will exit settings mode. The settings made will be automatically stored.
You can choose from the following drinks:
en Operating the appliance
| Espresso Macchiato |
| Coffee |
| Coffee XL |
| Cappuccino |
| Latte Macchiato |
| Caffe Latte |
| Flat White |
| Café cortado |
| Americano |
| Milk froth |
| Warm milk |
| Hot water |
| Pot function (not available in all product variants) |
| coffeeWorld |
If the appliance is connected to Home Connect, additional drinks can be selected from "coffeeWorld" and adjusted in the app. The last "coffeeWorld" drink selected in the app is shown in the display and can also be adjusted and dispensed directly at the appliance.
Note: With some settings the coffee is prepared in two steps, or Coffee XL in three (aroma setting). Wait until the process is fully completed.
Tip: Cups, particularly small, thick.
espresso cups, should be placed with
their base on the cup warmer. "Cup
warmer" on page 22
Preparing coffee using freshly ground beans
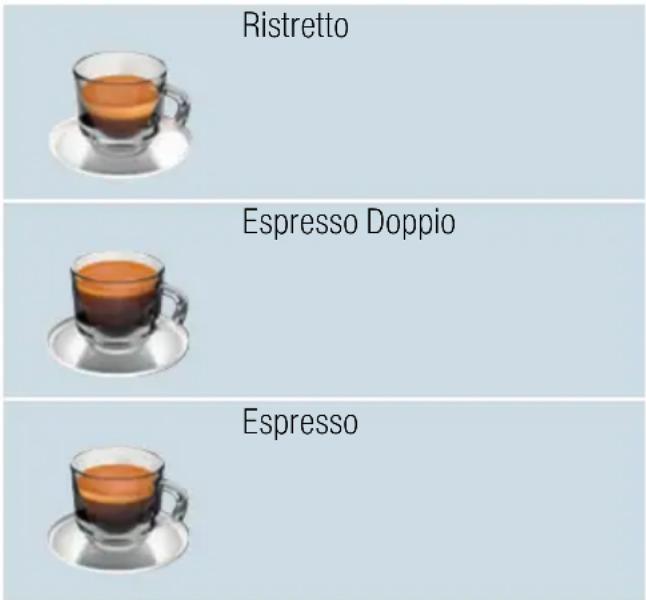
You can choose between Ristretto,
Espresso Doppio, Espresso, Coffee,
Coffee XL and Americano. The
preparation of coffee drinks with milk is
explained in a separate section. "Preparing drinks with milk"
on page 18
The appliance is switched on. The water tank and bean container have been filled.
- Place a cup under the outlet system.
- Use the rotary selector to select the desired drink.
The name of the drink and the currently active values are shown on the display.
- To change the settings for the selected drink. "Adjusting beverage settings" on page 20 "Menu settings" on page 25
- To begin dispensing the drink, press the rotary selector. The coffee is brewed and then dispensed into the cup.
Note: To prematurely stop dispensing the drink, press the rotary selector again.
Tip: In models with two bean containers and if one is empty, it is possible to switch to the full bean tank during dispensing.Dispensing will then continue.
Preparing coffee using ground coffee
You can also operate this appliance using ground coffee. Do not use instant coffee. The preparation of coffee drinks with milk is explained in a separate section. "Preparing drinks with milk" on page 18
The appliance is switched on. The water tank has been filled.
- Place a cup under the outlet system.
- Use the rotary selector to select the desired drink.
- Press the button.
- Use the rotary selector to select "Ground coffee".
- Press the button.
- Remove the aroma lid [16] of the bean container [14] and open the grounds compartment [13].
- Add the ground coffee; do not press firmly. Add no more than two level measuring spoons.
Caution!
Do not place coffee beans or instant coffee in the grounds compartment.
- Close the grounds compartment and the aroma lid.
The name of the drink and the currently active values are shown on the display.
- To change the settings for the selected drink.
"Adjusting beverage settings" on page 20 "Menu settings" on page 25
- To begin dispensing the drink, press the rotary selector.
The coffee is brewed and then dispensed into the cup.
Notes
- Any grounds residue in the grounds shaft should be directed down the shaft using a soft brush.
To prematurely stop dispensing the drink, press the rotary selector again.
For another drink with ground coffee, repeat the procedure. - When ground coffee is used, the aromaDoubleShot function is not available.
Preparing drinks with milk
This appliance features an integrated milk system. The milk system can be used to prepare coffee drinks with milk, as well as milk froth and warm milk. You can choose between Espresso Macchiato, Cappuccino, Latte Macchiato, Caffe Latte, Café cortado and Flat White.
Tip: You can also use plant-based alternatives to milk, e.g. soya milk.
Notes
While milk is being prepared, you may hear a whistling sound. These noises are emitted for technical reasons and are normal.
Dried milk residues are difficult to remove so always perform cleaning. "Cleaning the milk system" on page 34
The quality of the milk froth depends on the type of milk or the plant-based alternative used.

Warning
Risk of burns!
The milk system becomes very hot. After use, always let it cool down before you touch it.
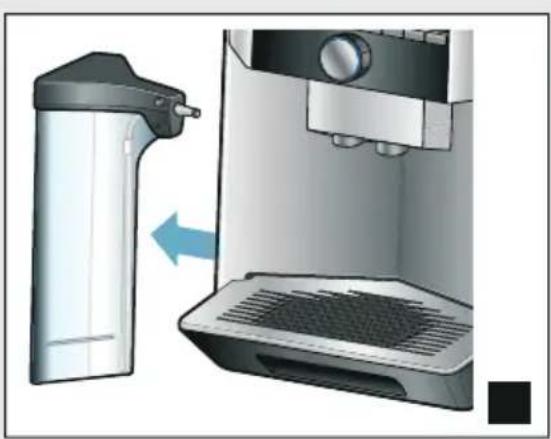
Using the milk container
The milk container 5 has been designed especially for use together with this appliance. It is intended solely for use in the household and for storing milk in the refrigerator.
Important: The milk container can only be connected if the milk system is installed in the outlet system with an adapter and hose. (→ Fig. 3)
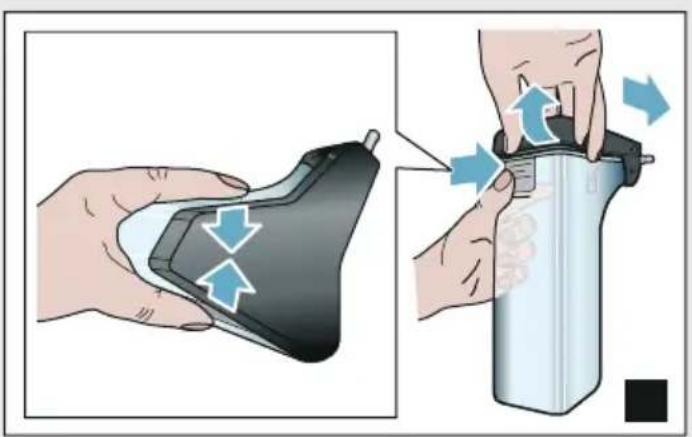
- To remove the lid, press the marking and remove the lid. (→ Fig. 7)
- Pour in the milk.
- Press the lid onto the milk container until it engages.
- Connect the milk container on the left of the appliance. The milk container must engage.
Tip: If the milk container runs empty during dispensing, it can be filled and connected again. Dispensing continues automatically.
Coffee drinks with milk
The appliance is switched on. The water tank and bean container have been filled.
The milk container filled with milk is connected.
- Place a cup or a glass under the outlet system.
- Use the rotary selector to select the desired drink.
The name of the drink and the currently active values are shown on the display.
-
To change the settings for the selected drink. "Adjusting beverage settings" on page 20 "Menu settings" on page 25
-
To begin dispensing the drink, press the rotary selector.
The milk is dispensed into the cup or glass first. The coffee is then brewed and dispensed into the cup or glass. The sequence can be changed for Cappuccino and Espresso Macchiato. "Menu settings" on page 25
Note: Pressing the rotary selector once can prematurely stop the dispensing of milk or coffee; pressing the rotary selector twice stops the drink dispensing completely.
Milk froth or warm milk
The appliance is switched on. The water tank has been filled.
The milk container filled with milk is connected.
- Place a cup or a glass under the outlet system.
- Select "Milk froth" or "Warm milk" with the rotary selector.
The name of the drink and the currently active values are shown on the display.
3. To change the settings for the selected drink.
"Adjusting beverage settings" on page 20 "Menu settings" on page 25
- To begin dispensing the drink, press the rotary selector.
Milk froth or warm milk is dispensed into the cup or glass.
Note: To prematurely stop dispensing the drink, press the rotary selector again.
Dispensing hot water
Note: Before dispensing hot water, clean the milk system and remove the milk container. If the milk system is not cleaned, the dispensed water may contain small quantities of milk. "Cleaning the milk system" on page 34
Warning Risk of burn
The outlet system becomes very hot. After use, always let the outlet system cool down before you touch it.
The appliance is switched on. The water tank has been filled.
- Place a cup under the outlet system.
- Remove the milk container, if connected.
- Select "Hot water" with the rotary selector.
- To change the settings for the selected drink. "Adjusting beverage settings" on page 20 "Menu settings" on page 25
- To begin dispensing the drink, press the rotary selector. Hot water is dispensed into the cup.
Note: To prematurely stop dispensing the drink, press the rotary selector again.
Adjusting beverage settings
Once you have selected a drink, you can adjust certain values depending on the drink. To do so, please use the following buttons and the rotary selector:
| Button Function Selection | ||
| □□Selecting coffee strength, ground coffee | ■very mild* | ■doubleShot strong |
| ■mild | ■doubleShot strong + | |
| ■mild +* | ■doubleShot strong ++* | |
| ■normal | ■TripleShot strong* | |
| ■normal +* | ■TripleShot strong * | |
| ■strong | ■Ground coffee | |
| ■strong +* | ||
| ■very strong | ||
| ■very strong +* | ||
| ■extra strong | ||
| milk Milk/coffee mixing ratio Setting share of milk in % (only for coffee drinks with milk) | ||
| ml Cup size Adjustment of volume in ml increments. Not available for Ristretto. | ||
| □□Two cups at once Place two cups under the outlet. | ||
| Navigation button, left | Water Temperature* e.g. for tea drinks: | ■>80°C (green tea) |
| ■>60°C (special tea prepa-ration) | ■>85°C (rooibos tea) | |
| ■>70°C (white tea) | ■>90°C (black tea) | |
| ■>97°C (fruit tea) | ||
| Navigation button, right | aromalntense*■normal | ■intense + |
| ■intense | ||
| Selection marked with * is only available for certain drinks or when in "barista mode". | ||
The appliance is set to "barista mode" by default. Additional values can therefore be set using the two navigation buttons. "Barista mode" can also be switched off. "Menu settings" on page 25
The factory settings are shown in orange on the display. The currently selected settings are backlit.
Adjusting the coffee strength or selecting ground coffee
A coffee drink is selected.
- Press the button.
- Use the rotary selector to set the coffee strength or select ground coffee.
- Press the button or the rotary selector to confirm.
Aroma setting
The longer coffee is brewed, the more bitter substances and undesirable aromas are released. This has a negative effect on the taste and makes the coffee less easily digestible. The appliance therefore offers special aroma settings for extra strong coffee: doubleShot and TripleShot. Depending on the setting, once half or a third of the volume has been prepared, a second portion of coffee beans is ground and brewed, so that in each case only the pleasant and beneficial flavours and aromas are released.
Notes
The doubleShot setting can be selected for all coffee drinks except for:
- drinks with a small volume of coffee, e.g. Ristretto
- coffee drinks with milk and a small volume of coffee
- a small volume of coffee, e.g. setting 200 ml "Caffe Latte" with a 90% share of milk (10% share of coffee)
- preparation with ground coffee
dispensing two cups
The aroma setting TripleShot can only be selected for Coffee XL.
Dispensing two cups is not possible
Adjusting the milk/coffee mixing ratio
A coffee drink with milk is selected.
- Press the milk button.
- Use the rotary selector to set the share of milk in %.
Example: When a value of 30% is configured, 30% milk and 70% coffee will be dispensed.
- Press the milk button or the rotary selector to confirm.
Selecting cup size
A drink is selected.
- Press the ml button. The preset volume depends on the type of beverage.
- Use the rotary selector to adjust the desired volume in ml increments.
- Press the ml button or the rotary selector to confirm.
Notes
The volume cannot be changed for ristretto.
The volume dispensed can fluctuate depending on the quality of the milk.
Preparing two cups at once
A coffee drink or a coffee drink with milk is selected.
- Press button.
- Place two pre-heated cups on the left and right below the outlet system.
- To begin dispensing the drink, press the rotary selector.
The selected drink will be brewed and then dispensed into the two cups.
Notes
The drink is prepared in two steps (two grinding operations). Please wait until the process is fully completed.
- When selecting _ , the aroma settings are not available.
The setting for Coffee XL is not available.
en Operating the appliance
Adjusting the drink temperature
Only available in "barista mode". "Menu settings" on page 25
A drink of your choice is selected.
- Use the left navigation button to call up the temperature setting.
- Turn the rotary selector to set the desired temperature.
- Press the left navigation button or the rotary selector to confirm.
Setting aromalntense
Only available in "barista mode". "Menu settings" on page 25
The intensity of the taste of a coffee drink can be individually adjusted using the aromalntense setting. When milk is dispensed, this selection does not influence the warm milk or the milk froth.
A coffee drink is selected.
- Use the right navigation button to call up the menu.
- Make the desired setting using the rotary selector.
- Press the right navigation button on the rotary selector to confirm.
Setting the grinding level
This appliance features an adjustable grinder. This enables the grinding level of the coffee to be individually changed.
Warning
Risk of injury!
Do not reach into the grinding unit.
Caution!
The appliance may be damaged! Only adjust the grinding level when the grinder is running!
When the grinder is in operation, use the rotary selector [15], [19] to set the grinding level.
Finer grinding level: turn anticlockwise. (Fig. a)
Coarser grinding level: turn clockwise. (Fig. b)
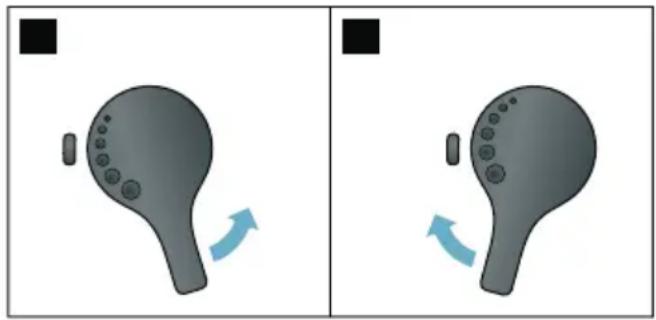
Notes
The new setting will not become apparent until the second cup of coffee.
For dark roast coffee beans, choose a finer grinding level; for lighter beans, choose a coarser grinding level.
Cup warmer
Caution!
The cup warmer becomes very hot!
The fully automatic coffee machine features a cup warmer 11. If the cup warmer is switched on, the cup warmer LED display 12 lights up.
Tip: For optimal cup heating, position the cups with the base of the cup on the cup warmer.
Note: This function can be activated and deactivated in the menu (press 0 /i and turn the rotary selector to the left) or in the "Settings menu". "Menu settings" on page 25

Customising
User profiles can be created in the customising menu. In the user profiles, individual beverages can be stored under names of your choice.
Creating a user profile
- Press button. The menu appears.
- Use the rotary selector to select a new profile.
- Press the right-hand navigation button to confirm the selection. The user name can be entered.
- Use the rotary selector to select the desired letter. Press the rotary selector to save the letter. The letter is saved.
Once the user name has been entered in full:
5. Press the right-hand navigation button to save the user name.
6. Use the rotary selector to select a background picture.
7. Press the right-hand navigation button to save the selection.
8. Use the rotary selector to select a silhouette.
9. Press the right-hand navigation button to save the selection.
10. Use the rotary selector to select "default mode" or "barista mode".
11. Press the right-hand navigation button to save the selection. The selection prompt appears.
12. Press the right-hand navigation button again to confirm the profile. The user profile picture appears.
13. Press button to exit the menu or to save an individual beverage for the user created immediately afterwards.
Saving individual beverages:
- Press the rotary selector. The display shows "char beverages".
- Press the right-hand navigation button to create the beverage.
- Use the rotary selector to select the desired beverage.
The selected beverage can be adjusted in line with personal preference.
"Adjusting beverage settings" on page 20
4. Press the rotary selector.
A prompt appears for you to confirm the selection.
- Press the right-hand navigation button to confirm the selection.
- Press button.
The settings are completed.
- Press button to exit the menu.
The appliance is ready for use again.
Note: The appliance can store up to 10 profiles each with 10 drinks.
Editing or deleting user profile
- Press the button. The menu appears.
- Use the rotary selector to select the desired profile.
- Press the left navigation button to delete the profile.
-or-
Press the right navigation button to edit the settings in the profile.
The settings in the profile can be changed as described. "Creating a user profile" on page 23
- Press the button.
The appliance is ready for use again.
Saving individual drinks
A drink that is currently being dispensed can be saved directly in a new or an existing profile using the individual settings.
- Press and hold button for at least 5 seconds.
If profiles have not yet been saved, a new profile appears immediately.
- If profiles are already saved and the individual drink is to be saved in a new profile, use the rotary selector to select a new profile.
-or-
If the individual drink is to be saved in an existing profile, use the rotary selector to select the desired profile.
- Press the right-hand navigation button to save. If a new profile is being created, enter the name and select the background picture, silhouette and usermode. Save the entries. Info: If a profile is already available, select it and save the drink.
- Press button.
The settings are completed. The appliance is ready for use again.
- Press button to exit the menu.
Note: To exit the menu automatically, select "Leave profiles automatically" under "User profiles". "Menu settings" on page 25
Childproof lock
The appliance can be locked to protect children against scalding and burns.
Activating the child-proof lock
Press and hold the milk button for at least 4 seconds.
"Child-proof lock activated" appears in the display.
It is no longer possible to operate the appliance.
Deactivating the child-proof lock
Press and hold the milk button for at least 4 seconds.
"Child-proof lock deactivated" appears in the display.
The appliance can be used in the usual way.

Menu settings
This menu is used for changing settings individually, accessing information and starting a programme.
Changing settings
- Press / i button, turn the rotary selector to the left and select "Settings". Press the rotary selector. The different setting options will appear in the display.
- Select the desired setting using the rotary selector. The current setting is highlighted in colour on the display.
-
Press the navigation button under "select".
-
Use the rotary selector to change the setting.
- Press the navigation button under "confirm". The setting has been saved.
- Press / button to exit "Menu". The drink selection appears on the display.
Notes
- You can switch to the previous level by pressing the navigation button under "back".
The setting procedure can be aborted by pressing the navigation button under "abort".
Press 空 /i button to exit the menu at any time.
If no entry is made within approx. 2 minutes, the menu closes automatically and the settings are not saved.
The following settings are available:
| Settings Possible settings Explanation | |
| Language Different languages Setting the language to be used for display texts. | |
| Water hardness 1 (soft) | Setting in line with the hardness of the local water supply. |
| 2 (medium) | The preset water hardness is level 4 (very hard). |
| 3 (hard) | The water hardness can be requested for example from your local water supplier. |
| 4 (very hard) | It is important to set the water hardness correctly so that the appliance indicates in good time when the descaling programme must be run. |
| Water-softening system | If a water softening system is installed in the house, please select "Softening device". |
| Home Connect* Settings for connection to WLAN network (home network) and mobile devices (see section "Home Connect"). | |
| Switch off after 5 minutes | Setting that determines how long the appliance should wait after the last beverage preparation before it automatically switches itself off. |
| up to to | The factory setting is 30 minutes. |
| 3 hours | |
| Brightness display Level 1 up to level 10 | Setting that governs the brightness of the display |
| Standard setting 7 | |
en Menu settings
| Select usermode ▪ default mode ■ barista mode | In the "barista mode" setting, the following can be performed directly in the display: ■ The temperature can be set by pressing the left navigation button. ■ The aromalntense (brew speed) can be set in three levels by pressing the right navigation button. |
| Beverage info Shows the volume of drinks dispensed since the appliance was commissioned. For technical reasons, the counter does not represent a precise number of cups. | |
| Factory settings Appliance reset to factory settings | Reset all your own settings to the condition when delivered. |
| Demo mode ▪ on ■ off | For presentation purposes only. The setting "off" must be activated for normal operation. The setting is only possible in the first 3 minutes after switching on the appliance. |
| Beverage settings | |
| Cappuccino sequence | first milk first coffee |
| Espresso Mac-chiato sequence | first milk first coffee |
| Latte Macchiato pause | min 5s 10s |
| Espresso / Cof-fee temperature* | normal high max. |
| User profiles ▪ Leave profiles automatically ■ Delete all profiles | Setting the temperature for coffee drinks. The setting is effective for all preparation types. Applies only to "default mode" -in "barista mode" directly adjustable via drink selection. → "Adjusting beverage settings" on page 20 |
| Cup warmer* ▪ on ■ off | If the cup warmer is switched on, the cup warmer LED lights up. |
| Bean container Setting that determines which bean container is automatically active. The bean container can be selected directly before each dispensing operation using the "Bean container" selection buttons. | |
| ■ most recently selected bean container | The appliance remembers the most recently used bean container. |
| ■ default bean container right | Each time a beverage is dispensed, the appli- ance automatically returns to the right-hand bean container. |
| ■ default bean container left Each time a beverage is dispensed, the appli- ance automatically returns to the left-hand bean container. | |
| ■ Save container with bev- age | The appliance remembers the most recently used bean container and the most recently set beverage. |
| Settings marked with * can also be selected directly in the menu. | |
Starting the "Water filter"or "frost protection" programme
- Briefly press the /i button.
- The rotary selector can be used to select the "Water filter" or "frost protection" programme. The current setting is marked on the display.
Note: The rotary selector can also be used to select a service programme. "Service programmes" on page 36
Water filter
A water filter lessens limescale deposits and reduces impurities in the water. The appliance also does not need to be descaled so often. Water filters are available from retailers or from customer service. "Accessories" on page 12
If a water filter is inserted, the appliance will show when it needs to be changed. The display shows the relevant prompt.
Inserting or replacing a water filter
A new water filter must be rinsed before it can be used.
-
Select "Water filter" in the Settings menu.
-
Use the navigation button to select "insert" or "replace".
- Use the measuring spoon to press the water filter firmly into the empty water tank.
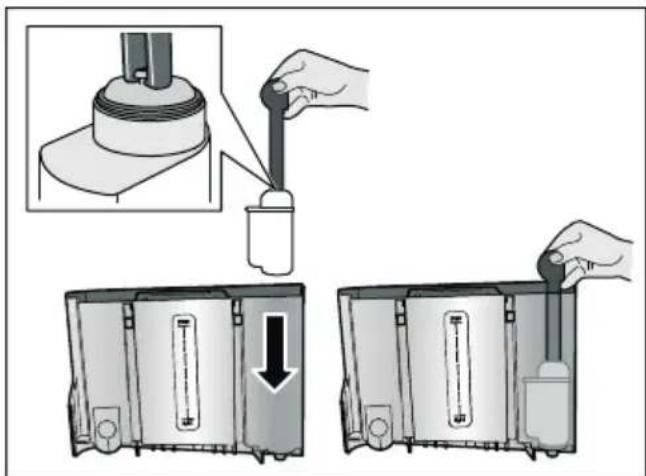
- Fill the water tank with water up to the "max" marking.
- Place a container with a capacity of at least 1.0 l under the outlet and confirm. Water will now flow through the filter. The filter is rinsed.
- Then empty the container. The appliance is ready for use again.
Notes
Rinsing the filter automatically activates the interval for display of the filter change. After this interval or after 2 months at the latest the filter will no longer be effective. It needs to be replaced for reasons of hygiene and to prevent a build-up of limescale (which could damage the appliance).
If the appliance has not been used for a prolonged period (for example, while you are on holiday), the inserted filter should be rinsed before the first time the appliance is used again. To do this, simply dispense a cup of hot water.
Removing the water filter
If a new water filter is not inserted, the "Water filter" function must be deactivated.
- Select "Water filter" in the Settings menu.
- Select and confirm the setting "remove".
- Remove the water filter from the water tank.
- Re-insert the water tank. The appliance is ready for use again.
Frost protection
A service programme to prevent frost damage during transportation and storage. This programme completely empties the appliance. The appliance must be ready for use.
- Press the rotary selector to start the programme.
- Empty the water tank and re-insert it.
- The appliance emits steam.
- Empty the drip tray and thoroughly clean the appliance.
The appliance can now be transported or stored.

Home Connect
This fully automatic coffee machine is Wi-Fi-capable and can be remotely controlled using a mobile device (e.g. tablet, smartphone).
The Home Connect app offers extra functions that complement the networked appliance perfectly. If the appliance is not connected to the WLAN network (home network), it functions in the same way as a fully automatic coffee machine with no network connection and can be operated as usual via the display.
Important:
The home network router must be operated in the 2.4 GHz frequency range (band: 100mW max.). Please check and adjust it if necessary.
The availability of the Home Connect function depends on the availability of Home Connect services in your country. Home Connect services are not available in every country. You can find more information on this at www.home-connect.com.
Note: Please ensure that you follow the safety instructions given at the beginning of this instruction manual and that they are also observed when operating the appliance via the Home Connect app and when away from home. Please also follow the instructions in the Home Connect app. Operation on the appliance itself always takes priority, and during this time it is not possible to operate the appliance using the Home Connect app.
Setting up
To implement settings via Home Connect, you must have installed the Home Connect app on a mobile device (e.g. tablet PC, smartphone).
When doing so, observe the Home Connect installation instructions supplied, which are also available to download in additional languages at http://www siemens-home.com.
Follow the steps specified by the app to implement the settings. Login of the appliance in the WLAN network can be carried out on initial set-up of the fully automatic coffee machine either directly or using the menu (press 品 /i button to open "Menu"):
- Turn the rotary selector to the left and select "Home Connect setting".
- Press the rotary selector.
- The display shows the Home Connect menu, with "Turn on Wi-Fi" highlighted in colour.
- Press the right-hand navigation button under "select" to start the radio link.
- Use the rotary selector to select "Connect to network".
- Press the right-hand navigation button under "select".
- The following selection appears: "Connect automatically" and "Connect manually".
Note: If the router has WPS functionality, please select "Connect automatically", otherwise use "Connect manually".
Automatic registration in the home network
- Use the rotary selector to select "Connect automatically" on the display.
- Press the right-hand navigation button under "confirm".
- The display shows "Automatic network connection".
- Press the WPS button on the home network router within a few minutes and wait until the display of the fully automatic coffee machine shows "Network connection successful".
- Open the app on the mobile device.
- Use the rotary selector to select "Connect to app".
- Press the right-hand navigation button under "select". The fully automatic coffee machine connects to the app. Follow the instructions on the app.
- Wait until "Successfully connected to app" lights up briefly in the display.
- Use the rotary selector to select "Turn on remote start".
- Press the right-hand navigation button under "select". A warning message appears.
- Press the right-hand navigation button under "continue" and read the warning message.
- Press the right-hand navigation button under "confirm".
- Press the _2 / i button to close the menu. With the mobile device the functions of the fully automatic coffee machine can now be used to their full extent via the app.
Note: If "Turn off remote start" is selected, only the modes of the fully automatic coffee machine are displayed in the Home Connect app. You can specify settings but not start drinks dispensing.
Manual registration in the home network
- Use the rotary selector to select "Connect manually" on the display.
- Press the right-hand navigation button under "confirm". The fully automatic coffee machine sets up a separate WLAN network which can be accessed with a tablet or smartphone. The display shows the SSID (the name) and the key (the password) of this network.
- Log the mobile device in to the network of the fully automatic coffee machine with the "HomeConnect" SSID and the "HomeConnect" key.
- Start the app on the mobile device and follow the instructions for network login in the app and the Home Connect documents supplied. The login process is complete when "Network connection successful" lights up briefly in the display of the fully automatic coffee machine.
- Use the rotary selector to select "Connect to app" on the display.
- Press the right-hand navigation button under "select". The fully automatic coffee machine connects to the app.
- Wait until "Successfully connected to app" lights up briefly in the display.
- Use the rotary selector to select "Turn on remote start".
- Press the right-hand navigation button under "select". A warning message appears.
- Press the right-hand navigation button under "continue" and read the warning message.
- Press the right-hand navigation button under "confirm".
- Press the / i button to close the menu. With the mobile device the functions of the fully automatic coffee machine can now be used to their full extent via the app.
Note: If "Turn off remote start" is selected, only the modes of the fully automatic coffee machine are displayed in the Home Connect app. You can specify settings but not start drinks dispensing.
Switching Wi-Fi on and off
Wi-Fi can be switched "on" or "off" as required (e.g. when on holiday).
Note: Network information is retained after the appliance is switched off. After switching on, wait a few seconds until the fully automatic coffee machine has connected to the WLAN network again. In networked standby mode the appliance requires a maximum of 2 W.
- Press / i button to open "Menu".
- Turn the rotary selector to the left and select "Home Connect setting".
- Press the rotary selector.
- Use the rotary selector to select "Turn on Wi-Fi" or "Turn off Wi-Fi".
- Press the right-hand navigation button under "select" to switch the radio module "on" or "off".
- Press / i button to close the menu.
Additional settings
Home Connect can be adapted to your individual needs at any time. Note: The fully automatic coffee machine must be connected to the WLAN network.
Disconnecting
The fully automatic coffee machine can be disconnected from the WLAN network at any time.
Note: If the fully automatic coffee machine is disconnected from the WLAN network, it cannot be operated using Home Connect.
- Press /i button, turn the rotary selector to the left and select "Home Connect setting".
- Press the rotary selector.
- Press the right-hand navigation button under "select".
- Use the rotary selector to select "Disconnect from network".
- Press the right-hand navigation button under "select". The appliance is disconnected from the network and app.
- Press / i button to close the menu.
Note: Information about the WLAN network is cleared.
Connect to the app
The Home Connect app can be installed on any number of mobile devices, which can then be used to connect to the fully automatic coffee machine. The fully automatic coffee machine must already be connected to the WLAN network.
- Open the app on the mobile device.
- Press / i button, turn the rotary selector to the left and select "Home Connect setting".
- Press the rotary selector.
-
Press the right-hand navigation button under "select".
-
Use the rotary selector to select "Connect to app".
- Press the right-hand navigation button under "select" to connect the appliance to the app.
- Press / i button to close the menu.
Remote Start
If you wish e.g. to start drinks dispensing on the fully automatic coffee machine via a mobile device, Remote start must be activated.
Caution!
Risk of scalding!
In the event of an unintentional remote start, third parties may be scalded if they insert their hands under the coffee outlet. Therefore, please ensure that no persons, in particular children, or objects are endangered if the appliance is started remotely by accident.
Note: The text field "Turn on remote start" is only visible if connection with Home Connect has been successfully completed. If Remote start is switched off, only the modes of the fully automatic coffee machine are displayed in the Home Connect app.
- Press /i button, turn the rotary selector to the left and select "Home Connect setting".
- Press the rotary selector.
- Press the right-hand navigation button under "select".
- Use the rotary selector to select "Turn on remote start" in the display.
- Press the right-hand navigation button under "select".
- Press / i button to close the menu.
Device info
Display for network and device information
- Press /i button, turn the rotary selector to the left and select "Home Connect setting".
- Press the rotary selector.
- Press the right-hand navigation button under "select".
- Use the rotary selector to select "Appliance info" on the display.
- Press the right-hand navigation button under "select". The SSID, IP, MAC address and serial number of the appliance are displayed for a few seconds.
- Press /i button to close the menu.
Display
The top right-hand corner of the display shows the Home Connect status with a symbol:
Connected to the network
Not connected to the network
No connection to server
Remote diagnostics
Customer Service can use Remote Diagnostics to access your appliance if you contact them, have your appliance connected to the Home Connect server and if Remote Diagnostics is available in the country in which you are using the appliance.
Note: For further information and details about the availability of Remote Diagnostics in your country, please visit the service/support section of your local website: www.home-connect.com
About data protection
When the fully automatic coffee machine is connected for the first time to a WLAN network which is connected to the Internet, the appliance transmits the following categories of data to the Home Connect server (initial registration):
- Unique appliance identification (consisting of appliance codes as well as the MAC address of the installed Wi-Fi communication module).
Security certificate of the Wi-Fi communication module (to ensure a secure data connection).
The current software and hardware version of the fully automatic coffee machine.
Status of any possible previous resetting to factory settings. This initial registration prepares the Home Connect functions for use and is only required when you want to use these Home Connect functions for the first time.
Note: Please note that the Home Connect functions can only be used in conjunction with the Home Connect app. Information on data protection can be accessed in the Home Connect app.
Declaration of Conformity
BSH HausgerSte GmbH hereby declares that the appliance which features Home Connect is in accordance with the basic requirements and the other relevant provisions of the directive 2014/53/EU.
A detailed RED Declaration of Conformity can be found online at www.siemens-home.bsh-group.com on the product page of your appliance with the additional documents.
CE
2.4 GHz band: max. 100 mW

Daily care and cleaning
With good care and cleaning, your appliance will remain fully functioning for a long time to come. In this section, you will learn how to correctly clean and care for your appliance.

Warning
Risk of electric shock!
Before cleaning the appliance, pull out the mains plug. Never immerse the appliance in water. Do not use a steam cleaner.
Cleaning agent
Please observe the following information to ensure that the different surfaces are not damaged by using the wrong type of cleaning agent.
Do not use:
Harsh or abrasive cleaning agents.
Any cleaning agents containing alcohol or spirits.
Hard scouring pads or sponges.

Notes
- New sponge cloths may contain salts. Salts can cause rust film on stainless steel. Wash new sponge cloths thoroughly before use.
Always remove any limescale, residues of coffee or milk, cleaning or descending solution immediately. This residue may cause corrosion to form.
Caution!
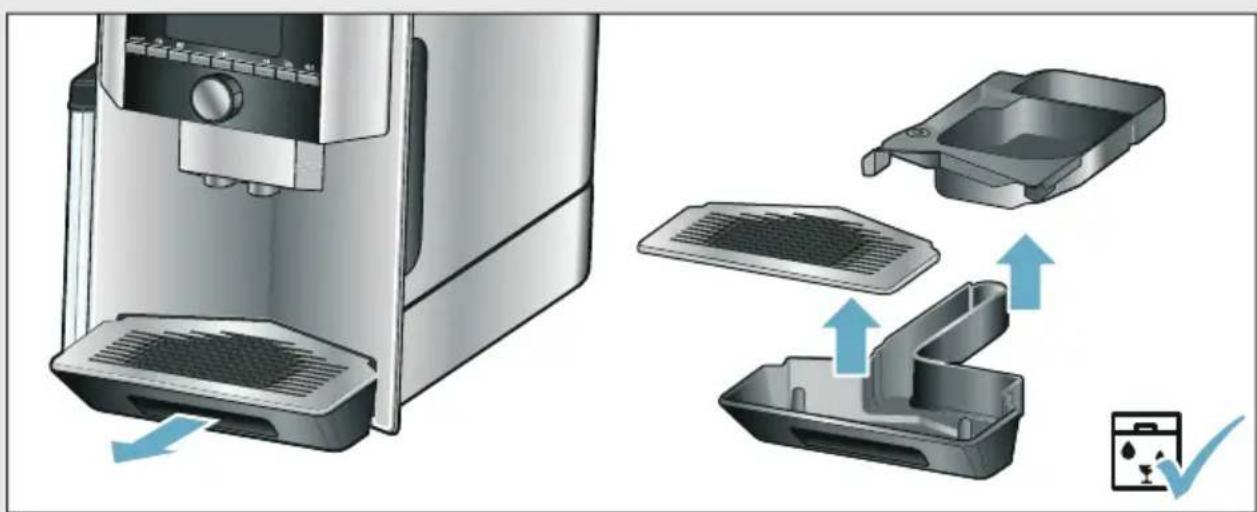
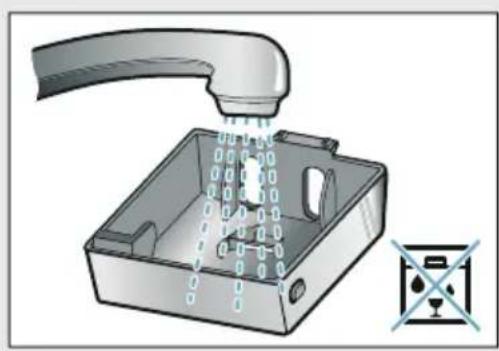
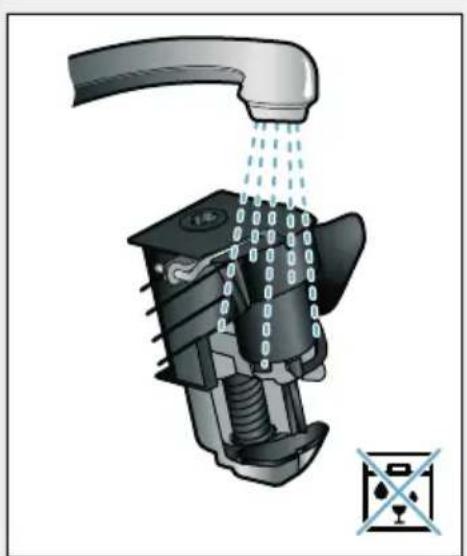
Not all of the appliance's components can be cleaned in the dishwasher.
→Fig.5-8
Not dishwasher-safe:

Outlet system cover
Brewing chamber cover
Brewing unit
Water tank
Aroma lid
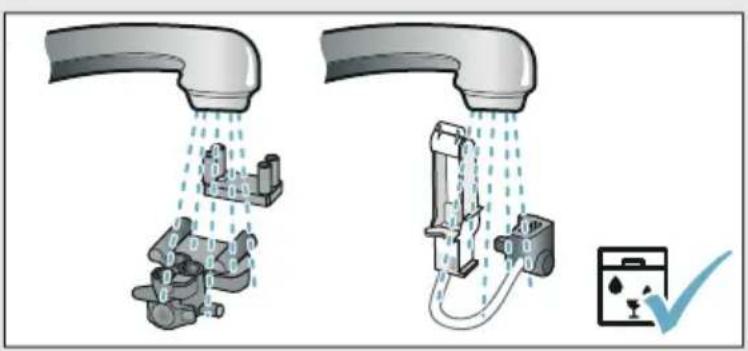
Dishwasher- safe:
Drip plate
Drip tray
max. 60^ C
Coffee grounds container
Coffee grounds slider, red
Brewing unit cover, red
Measuring spoon
Milk system, all parts
Milk container, all parts
Cleaning the appliance
- Wipe down the outside of the appliance with a soft, damp cloth.
- Clean the display using a micro-fibre cloth.
- Any grounds residue in the powder compartment should be pushed down using a soft brush.
Notes
If the appliance is cold when switched on or if it is switched off after dispensing coffee, it rinses automatically. The system is therefore self-cleaning.
If the appliance has not been used for a prolonged period of time (e.g. while you are on holiday), clean the entire appliance thoroughly, including the coffee outlet, water tank, milk system, brewing unit and trays.
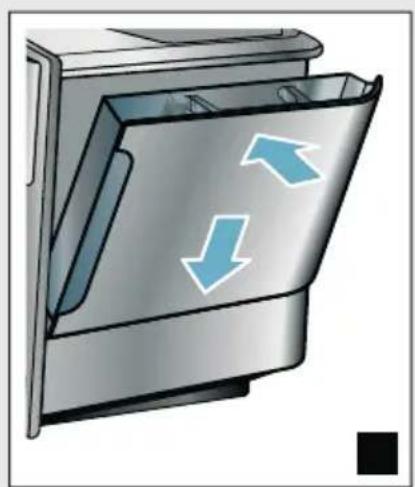
Cleaning the drip tray and coffee grounds container
Fig. 5
Note: The drip tray and coffee grounds container should be emptied and cleaned every day in order to prevent deposits.
- Pull the drip tray with the coffee grounds container forwards and out.
- Remove the drip plate and clean with a brush.
- Empty and clean the drip tray and coffee grounds container.
- Wipe out the interior of the appliance (intake trays).
Cleaning the milk container Fig. 7
Note: For reasons of hygiene, the milk container must be cleaned regularly
- Dismantle the milk container into its individual parts.
- Clean all parts of the milk container or put them in the dishwasher.
Cleaning the milk system
The milk system is automatically cleaned with a short jet of steam directly after preparing a milk drink.
Warning Risk of burns!
The outlet system becomes very hot. After use, always let the outlet system cool down before you touch it.
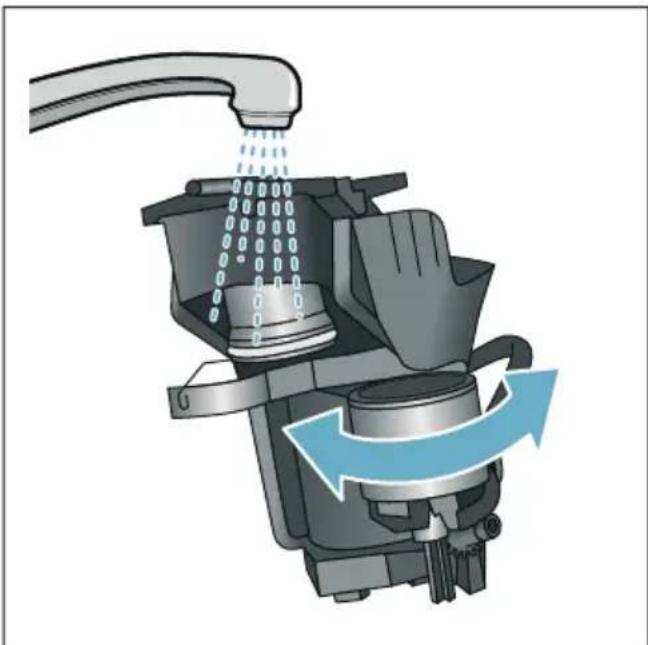
Manually clean the milk system on a weekly basis or more frequently if required. For particularly thorough cleaning, the milk system can be additionally rinsed with water. "Rinse milk system" on page 37
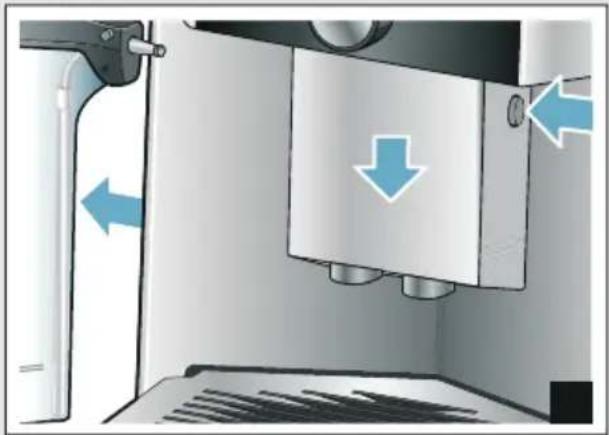
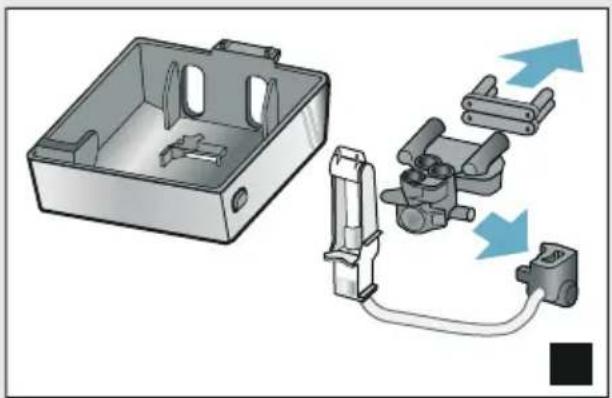
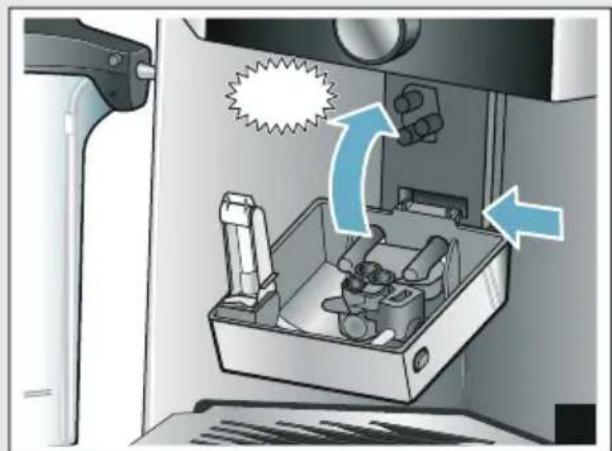
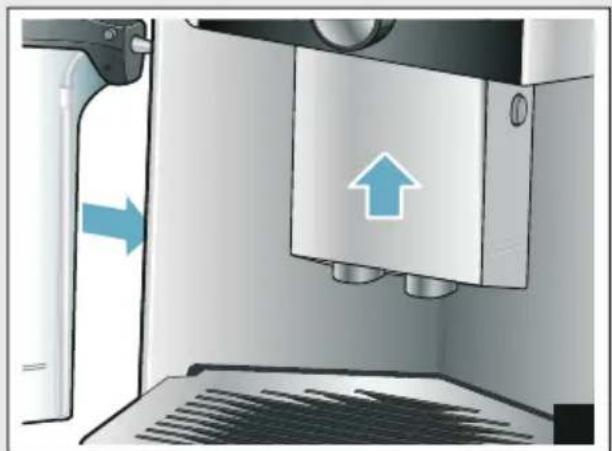
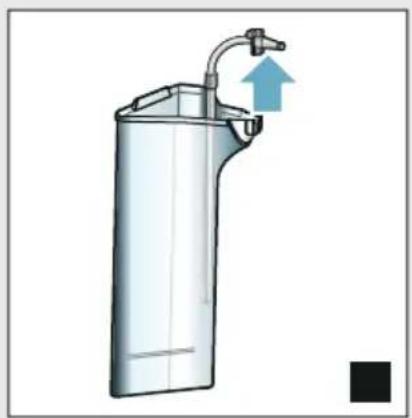
Removing the milk system Fig.3:
1. Remove the milk container from the appliance.
2. Slide the outlet system to the bottom position.
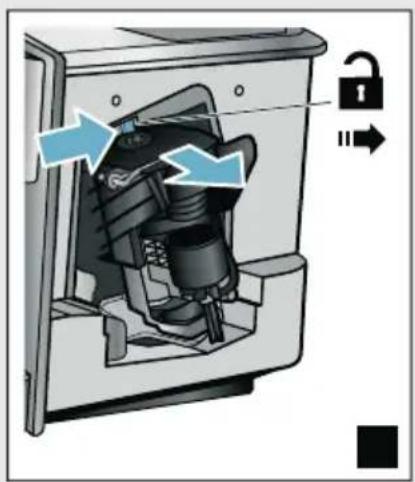
3. Press the unlocking mechanism at the top right.
4. Fold the cover down towards the front and remove.
5. Remove the milk system and dismantle into individual parts.
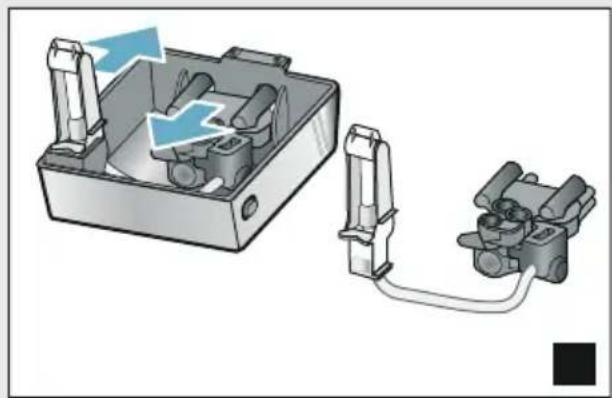
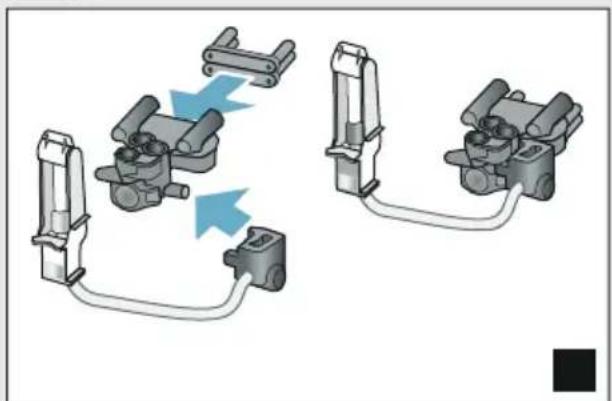
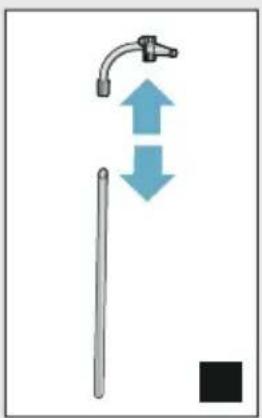
6. Clean the individual parts with detergent solution and a soft cloth Fig. 6.
7. Rinse all parts with clean water and leave to dry.
Notes
All parts of the milk system can be cleaned in the dishwasher. Detergent residues in the milk system must be thoroughly removed following the rinsing process.
Important: The outlet system cover is not dishwasher-safe.
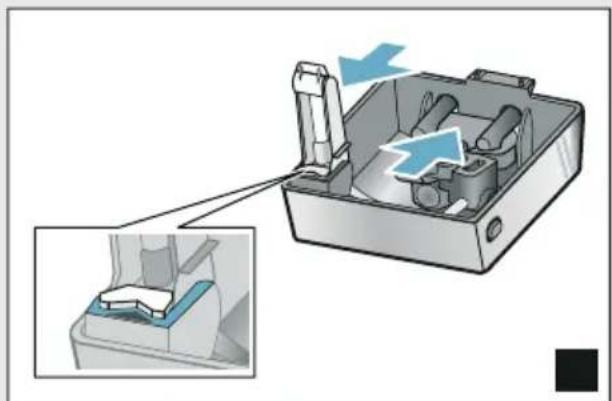
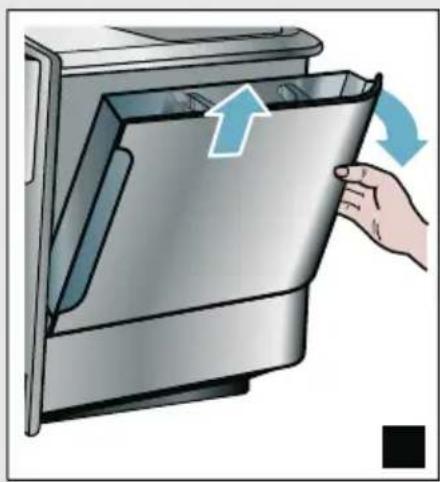
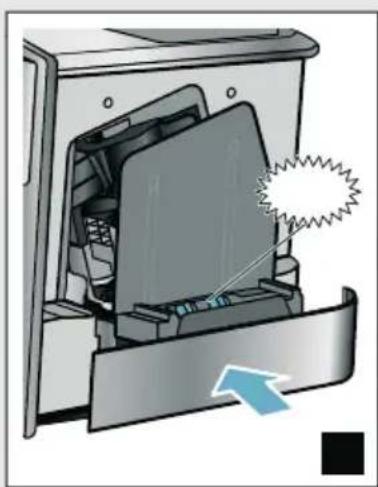
Inserting the milk system: Fig. 3:
- Assemble the individual parts of the milk system.
- Insert the milk system into the cover.
- Slide the outlet system to the bottom position.
- Position the cover at the bottom and pivot it upwards until it engages.
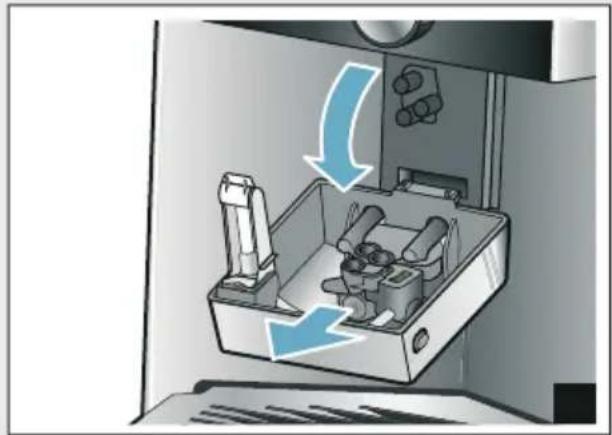
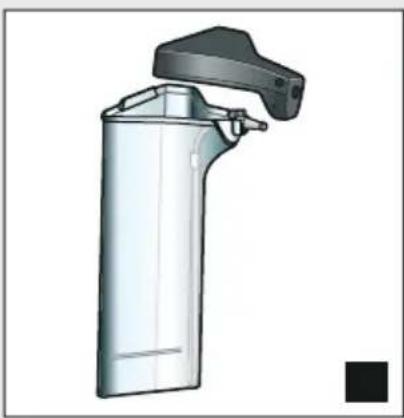
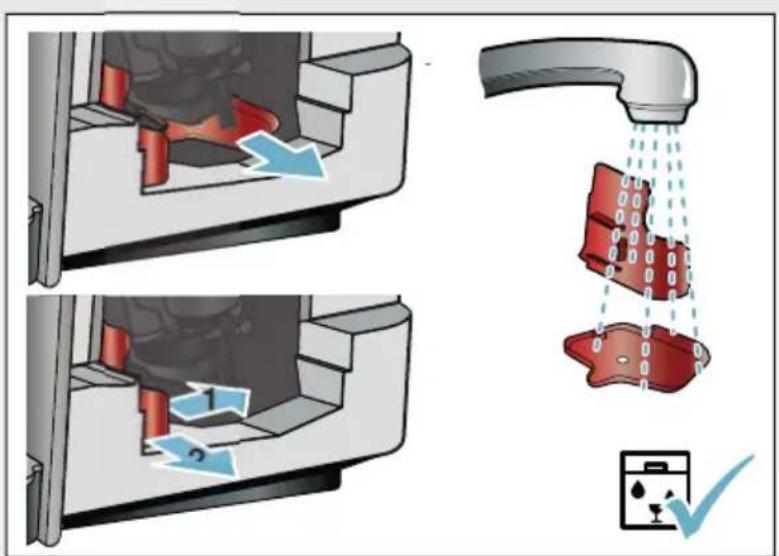
Cleaning the brewing unit
→Fig.4,→Fig.8
In addition to the automatic cleaning programme, the brewing unit should be removed regularly for cleaning.
Caution!
Clean the brewing unit without detergent and do not put it in the dishwasher.
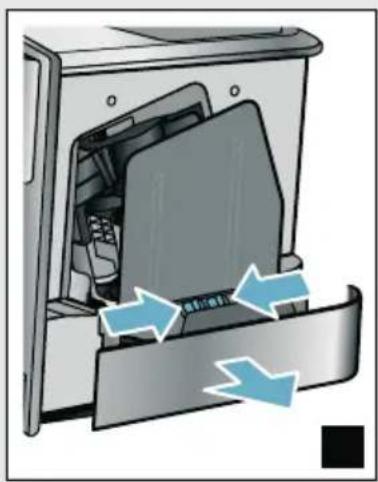
Remove the brewing unit:
- Switch the appliance off.
- Remove the water tank.
- Slide both red locking sliders towards one another and remove the cover.
- Remove, clean and dry the coffee grounds slider (red) and the brewing unit cover (red).
-
Slide the red lock to the right across the brewing unit.
-
Carefully remove the brewing unit and clean thoroughly under running water.
- Clean the interior of the appliance thoroughly with a damp cloth, removing any coffee residues.
- Allow the brewing unit and the interior of the appliance to dry.
Insert the brewing unit:
- Push the brewing unit into the appliance in the direction of the arrow. The arrow is located on top of the brewing unit. Position the brewing unit from above, suspend on the guide rails and push into the appliance.
- Slide the red lock to the left across the brewing unit.
- Insert the coffee grounds slider (red) and the brewing unit cover (red).
- Insert the cover until it engages.
- Insert the water tank.

Service programmes
Every so often - the exact frequency depends on usage and water hardness - one of the following messages will appear in the display in place of the coffee selection:
Rinse milk system
■ Run descending program urgently!
Run cleaning program urgently!
Run calc'nClean program urgently!
The appliance should immediately be cleaned or descaled using the appropriate programme. Alternatively, the two processes Descale and Clean can be carried out together using the calc'nClean function. Failure to carry out the service programme according to the instructions may damage the appliance.
You can also start the service programmes at any time without having to wait for a reminder to appear in the display. Press the 品 /i button, select the desired programme and run it.
Notes
- Important: If descending is not performed on the appliance in good time, the following appears "Descaling programme overdue. Device will shortly be locked!". Immediately perform the descending process in accordance with the instructions. If the appliance is locked, it can only be operated again once descending has been carried out.
Caution! For each of the service programmes, use descaling and cleaning agents as described in the instructions and observe the (relevant) safety information. - Do not drink the liquids.
- Never use citric acid, vinegar or any vinegar-based agents to descale the appliance.
For cleaning and descaling, only use the tablets intended for such purpose. They have been specially developed for this appliance, and new stocks can be ordered through customer service. "Accessories" on page 12
- Never insert descending tablets or other products into the grounds compartment.
- Never interrupt the service programme.
Prior to starting a service programme, remove, clean and re-insert the brewing unit. Rinse the milk system.
At the end of a service programme, wipe down the appliance using a soft, damp cloth to immediately remove any descaler residue. This residue may cause corrosion.
- New sponge cloths may contain salts. Salts can cause rust film on stainless steel, so cloths must always be washed out thoroughly before use.
Using a water filter increases the intervals until a service programme needs to be performed.
If one of the service programmes is interrupted, e.g. by a power failure, proceed as follows: The appliance automatically starts a special rinsing process.
1. Rinse out the water tank.
2. Pour in fresh, still water up to the "max" marking and confirm. The programme starts and rinses the appliance.Duration: approx. 2 minutes.
3. Empty, clean and re-insert the drip tray.
4. Empty, clean and re-insert the milk container. The programme has finished. The appliance is ready for use again.
5. Press /i button to close the programme.
Rinse milk system
The milk system is automatically cleaned with a short jet of steam directly after preparing a milk drink.
For particularly thorough cleaning, the milk system can be additionally rinsed with water.
Duration: approx. 2 minutes
- Press the / i button to open the menu.
- Use the rotary selector to select "Rinse milk system".
- Press the rotary selector to start the programme.
- Empty, clean and re-connect the milk container.
- Place an empty glass under the outlet system and confirm.
The programme runs.
- Empty, clean and re-connect the milk container.
- Empty the glass.
The programme has finished. The appliance is ready for use again. - Press the / i button to exit the programme.
The milk system should also be subject to thorough manual cleaning at regular intervals. "Cleaning the milk system" on page 34
Dscaling
Duration: approx. 21 minutes
The line at the bottom of the display indicates in how many minutes the water tank will need to be rinsed and refilled with water, for example.
- Press the / i button to open the menu.
- Use the rotary selector to select "Descale".
- Press the rotary selector to start the programme.
The instructions in the display guide you through the programme.
- Empty the drip tray and re-insert.
- Empty, clean and re-connect the milk container.
- Remove the water filter (if present) and confirm.
- Fill the empty water tank with lukewarm water up to the marking "0.5 l". Dissolve 1 descaling tablet in the water.
- Place a container with a capacity of at least 1.0 l under the outlet system and confirm.
- Press the rotary selector.
The programme runs.
Duration: approx. 19 minutes
Info: If there is not enough descending solution in the water tank, you will be asked to: Refill with still water and confirm.
-
Rinse out the water tank and (if removed) re-insert the water filter.
-
Pour in fresh still water up to the "max" marking and re-insert the water tank.
The programme runs.
Duration: approx. 2 minutes
- Empty the container and confirm.
- Empty the drip tray and re-insert.
- Empty, clean and re-connect the milk container.
The programme has finished. The appliance is ready for use again.
- Press the /i button to exit the programme.
Duration: approx. 6 minutes
- Press the 品 button to open the menu.
- Use the rotary selector to select "Clean".
- Press the rotary selector to start the programme.
The instructions in the display guide you through the programme.
- Empty the drip tray and re-insert.
- Open the grounds compartment, add a cleaning tablet, close the grounds compartment and confirm.
- Place a container with a capacity of at least 1.0 l under the outlet system and confirm.
The programme runs.
Duration: approx. 5 minutes
7. Empty the container and confirm.
The programme has finished. The appliance is ready for use again.
8. Press the / i button to exit the programme.
calc'nClean
Duration: approx. 26 minutes
calc'nClean combines the functions "Descale" and "Clean". If the two programmes are due close together, the appliance suggests this service programme automatically.
The line at the bottom of the display indicates in how many minutes the water tank will need to be rinsed and refilled with water, for example.
- Press the /i button to open the menu.
- Use the rotary selector to select "calc'nClean".
- Press the rotary selector to start the programme.
The instructions in the display guide you through the programme.
-
Empty the drip tray and re-insert.
-
Empty, clean and re-connect the milk container.
- Open the grounds compartment, add a cleaning tablet, close the grounds compartment and confirm.
- Remove the water filter (if present) and confirm.
- Fill the empty water tank with lukewarm water up to the marking "0.5 I". Dissolve 1 descaling tablet in the water.
- Place a container with a capacity of at least 1.0 I under the outlet system and confirm.
The programme runs.
Duration: approx. 19 minutes
Info: If there is not enough descending solution in the water tank, you will be asked to: Refill with still water and confirm.
10. Rinse out the water tank and (if removed) re-insert the water filter.
11. Pour in fresh still water up to the "max" marking and re-insert the water tank.
The programme runs.
Duration: approx. 7 minutes
12. Empty the container and confirm.
13. Empty the drip tray and re-insert.
14. Empty, clean and re-connect the milk container.
The programme has finished. The appliance is ready for use again.
15. Press the / i button to exit the programme.

Trouble shooting
Faults often have simple explanations. Before calling the customer service, please refer to the fault table and attempt to correct the fault yourself.
Please read through the safety information at the beginning of these instructions.
Fault table
| Problem Cause Solution | ||||
| Coffee or milk froth quality var-ies widely. | Build-up of limescale in the appliance. | Descale the appliance as described in the instructions. | ||
| The quality of the milk froth var-ies. | The quality of the milk froth depends on the type of milk or the plant-based alternative used. | Optimise the result by selecting your milk or plant-based alternative as appropriate. | ||
| No hot water dispensed. The milk system or the intake of the milk system is soiled. | Clean the milk system or the intake. → "Cleaning the milk system" on page 34 | |||
| Too little or no milk froth. The milk system or the intake of the milk system is soiled. | Clean the milk system or the intake. → "Cleaning the milk system" on page 34 | |||
| Unsuitable milk. Do not use milk that has already been boiled. Use cold milk with a fat content of at least 1.5%. | ||||
| Build-up of limescale in the appliance. | Descale the appliance as described in the instructions. | |||
| No intake of milk by the milk system. | The milk system is assembled incorrectly. | Correctly assemble all parts. → Fig. 3 | ||
| Incorrect connection sequence for milk container and milk sys-tem. | Connect the milk system in the outlet system first, then the milk container. | |||
| The milk/blended milk drinks are too cold. | The milk used is too cold. Use lukewarm milk. | |||
| The individually selected per-cup quantity is not reached. Coffee dispensing slows to a trickle or stops completely | The grinding level is too fine. The ground coffee is too fine. | Set a coarser grinding level. Use coarser ground coffee. | ||
| Heavy build-up of limescale in the appliance. | Descale the appliance as described in the instructions. | |||
| Air in the water filter. Immerse the water filter in water until no more air bubbles escape, then insert the filter again. | ||||
| No coffee dispensed, only water. | The bean container is empty. Add coffee beans Note: The appliance will adjust to the coffee beans on the next dispensing process. | |||
| The coffee shaft on the brewing unit is blocked. | Clean the brewing unit. → "Cleaning the brewing unit" on page 35 | |||
| The appliance no longer responds. | Fault in the appliance. Press and disconnect the appliance from the mains and leave to cool for 10 seconds. | |||
| The grinder will not start. The appliance is too hot. Disconnect the appliance from the mains and leave to cool for 1 hour. | ||||
| Coffee has no "crema". Unsuitable type of coffee. Use a type of coffee with a higher proportion of robusta beans. | ||||
| The beans are no longer freshly roasted. | Use fresh beans. | |||
| The grinding level is not suitable for the coffee beans. | Set a finer grinding level. | |||
| The coffee is too "acidic". The grinding level is set too coarse or the ground coffee is too coarse. | Set a finer grinding level or use finer ground coffee. | |||
| Unsuitable type of coffee. Use a darker roast. | ||||
| The coffee is too bitter. The grinding level is set too fine or the ground coffee is too fine. | Set a coarser grinding level or use coarser ground coffee. | |||
| Unsuitable type of coffee. Change the type of coffee. | ||||
| The coffee tastes burnt. The brewing temperature is too high | Reduce the temperature. → "Adjusting beverage settings" on page 20 | |||
| The grinding level is set too fine or the ground coffee is too fine. | Set a coarser grinding level or use coarser ground coffee. | |||
| Unsuitable type of coffee. Change the type of coffee. | ||||
| The appliance is not dispensing drinks. | Air in the water filter. Immerse the water filter in water until no more air bubbles escape, then insert the filter again. | |||
| Residues of limescale remover are blocking the water tank. | Remove the water tank and clean thoroughly. Dissolve the descaling agent in lukewarm water. | |||
| The water filter does not stay in position in the water tank. | The water filter is not secured in place correctly. | Remove the water filter, then firmly press it straight down into the tank con- nection. | ||
| The coffee grounds are not compact and are too wet. | The grinding level is set too fine or too coarse, or not enough ground coffee has been used. | Set a coarser or finer grinding level or use 2 level measuring spoons of ground coffee. | ||
| Water dripped onto the inner floor of the appliance when the drip tray was removed. | Drip tray removed too early. Wait a few seconds after the last drink was dispensed before removing the drip tray. | |||
| The drip tray cannot be removed. | The coffee grounds container is very full. The coffee grounds slider is stuck. | Clean the interior of the brewing unit. → "Cleaning the appliance" on page 34 Correctly insert the coffee grounds slider. | ||
| The outlet system cannot be assembled or disassembled. | Incorrect sequence Connect the outlet system (with milk system) first, then connect the milk container. Alternatively, on disassembling first remove the milk container and then the outlet system. | |||
| Display shows "Fill bean container". Displayed although the bean container 14 is already full, or the grinder is not grinding any coffee beans. | Beans are not falling into the grinding unit (beans too oily). | Gently tap the bean container. Possibly change the type of coffee. When the bean container is empty, wipe it with a dry cloth. | ||
| Display shows: "Empty drip tray" even if the drip tray is empty - what to do? | Emptying is not detected when the appliance is switched off. | When the appliance is switched on, remove and re-insert the drip tray. | ||
| The drip tray is soiled. Clean the drip tray thoroughly. | ||||
| Display shows "Refill with still water" or "Remove filter" | Water tank wrongly inserted. Insert water tank correctly. | |||
| Carbonated water in the water tank. | Fill the water tank with fresh tap water. | |||
| Float is stuck in the water tank. Remove the water tank and clean thoroughly. | ||||
| New water filter not rinsed according to the instructions. | Rinse the water filter according to the instructions and then switch on. | |||
| Air in the water filter. Immerse the water filter in water until no more air bubbles escape, then insert the filter again. | ||||
| Water filter is old. Insert a new water filter. | ||||
en Trouble shooting
| Problem Cause Solution | ||
| Very frequent display that descaling is necessary. | Water is too hard. Check whether the correct water hardness is set in the menu. Insert water filter and activate according to the instructions. → "Starting the "Water filter"or "frost protection" programme" on page 27 | |
| Home Connect is not working correctly. | Go to www.home-connect.com | |
| Display shows "Clean brewing unit". | Brewing unit soiled. Clean the brewing unit. | |
| Too much ground coffee in the brewing unit. | Clean the brewing unit.Add no more than 2 level measuring spoons of ground coffee. | |
| The brewing unit mechanism is stiff. | Clean the brewing unit. → "Daily care and cleaning" on page 33 | |
| If you are unable to solve the problem, always call the hotline. You will find the telephone numbers at the back of these instructions | ||

Customer service
Technical data
| Electrical connection (voltage - frequency) | 220-240 V ~, 50/60 Hz |
| Power rating 1500 W | |
| Maximum static pump pressure 19 bar | |
| Maximum capacity of water tank (without filter) 2.3 l | |
| Maximum capacity of right/left bean container 250/270 g | |
| Maximum capacity of appliance with one bean container 290 g | |
| Length of power cable 1000 mm | |
| Dimensions (H x W x D) 392 x 299 x 470 mm | |
| Weight, empty 10-12 kg | |
| Type of grinder Ceramic |
E number and FD number
When calling us, please give the full product number (E no.) and the production number (FD no.) so that we can provide you with the correct advice. These numbers can be found on the rating plate 9. ( Fig. 2)
To save time, you can make a note of the data for your appliance and the telephone number for customer service here, should this be required.
E no.
FD
Number
Customer service
The contact data for customer service in all countries can be found at the back of these instructions.
Guarantee
The guarantee conditions for this appliance are as defined by our representative in the country in which it is sold. Details regarding these conditions can be obtained from the dealer from whom the appliance was purchased. The bill of sale or receipt must be produced when making any claim under the terms of this guarantee. Changes reserved.
Table des matieres

Diagnostic a distance. 72
Programme de service. 76
PnroToBHeHne KoepHOro HAnITka n3 CBexMeJOnTbIX KoepeHbIX 3epeH.212
PnroToBHeHne KofoeHOro HAnNTka 13 MoIOTOro Kofoe. 212
PnroToBneHHe HAnNTKOB C MoNOKOM. 213
PnroToBleHne ropeuB.214
I3meHHe HaCTpoEe HAnNTKOB 215
HactpoKa cTepeHn nomJa .217
PoiorpeB yawek 217

PepcoHaJIH3aIe 218
Co3daHne npoФnIЯ noJIb3OBATeIЯ .. 218
O6pa6oTkα nIydaIeHne npocnna I0nb3OBaTeJI. 218
CoxpaHeHne B nAmrtn INHINBnDyaJbHbIX HaNITKOB 219

Блоковka Ддя 6e3oNaChocTN dete.. 219
BkIIOUeHHe 6LOKIpOBKn dJa
6e3OpaChocTn DeTei. 219
BbIKIoUeHne 6LOKIpOBKn dJa
6e3OpaChocTn DeTei. 219

HacTpoiKMeHIO 220
U3MeHeHne yCTaHOBOK. .220
3aynck npoqpaMMbI «ΦnIbTpДЯ BOdbI» nII «3aunTa ot 3amep3aHnra>.222

Home Connect 224
HacrpoKa 224
BkJIIOUeHne N BbIKIIOUeHne Wi-Fi .226
Дугпеснстюки 226
HΦopMaunO npnbope 227
Ducnnei .227
ДиСТанцИОНная ДиагноCTИКа . . . . .228
O 3aunTe daHHbIX. 228
ДeКларачи O COOTBETCTBn 228

EKeDHeBHyIyXoI N OuchTka . 229
YnCTaIeecpeIcTBO.229
OuicTka npioopa. .230
Ounstka cncTeMbI noaun MoJoka..230
Ounstka 3aBapouHoro 6Ioka .231

CepBnchIe nporpaMMbl 232
PpOMbIBKa CnCTeMbI Npaun MoLoKa .233
YdaJIeHne HaKnII .233
OuInCTka .234
calc'nClean .234

UTo DeIaTb B Cnyuae HenCnpaBHOCTn? 235

Cnyk6a cepBnca 239
TexHnueckne xapaKTepeNCTnKn . 239
Homep E n Hoomep FD. 239
YcnoBna rapaHTnHoro
O6CnyXnBaHn . 239

B 3aBcHMoCTH OT MoJeHN:
I03nC O6o3HaueHHeM * IMeOTcTTOJIbKO B IprOope C DByMЯ EMKOCTAMNДЯ KOpEnHbIX 3epeH.
Злем entblу упраьени
BbI6paTb JHeCTKOcTB BOdBi
IpaBnIbHna HAcTpoNka JecCTKoCTN BODbl
BaxHa IJIa CBOEbpemEHNO
HaONMHaHnO HeO6XOnMOCTN
ydaJIeHnHaKnII. PpeBapntelbHO
yCTaHOBJIeH peKIM JecCTKoCTN BODbl 4.
JKeCTKOCTb BObl MOxHO y3HaTb B
MeCTHO BDOCHa6KaIOUSeI OpraHn3aUIN
IIN ONpeJeNTb PnI NOMOUI
PpIlaRaEMOI INDkATOPHO NOLOCKNI.
EcII B DOME IMeETcYCTaHOBka IJIa
ymrueHn BObl,TO Tpe6yeTc HAcTPOKa
CnCTema yMaIrueHn BObl>.
B Ta6nue npeCTaBHeHO COOTBeTCTBHepeKIMOB pa3nHbIM CTeNEHMJECTKOCTN BObl.
| Рек imm CTepeHb JxecTKocTn BOДbl | |
| Hemeцкая shkaJa (°dH) | ФразиуЗckaя shkaJa (°fH) |
1 1-7 1-13
28-14 14-25
315-21 26-38
422-3039-54
IocneNyUoUee n3MeHHe JKeCTKoCTN BOdbI BO3MOXHO BJIIOOIMOMeHT.
→“HactpoynKmMeHIO"Ha ctpaHnua 220
- Ha KopoTkoe BpemI NOrpy3nTe npnilaraemyIO INDnKATOpHyIO NOLOCKy B CBexkyIO BOOnpOBOdHyIO BDOy IN CnyCTa MNHyTu NPOBepbTe pe3yNbTaT.
- Поворотьим поpeклочателем установпесулчehню кость boды.
- Подтвердп Te npaBoH Habnraционн HoNkoJ.
HactpoKa coXpaHeHa B nAmrTn.
YTO6bI yCTaHOBHTb CB83b CHome Connect
UTo6bI NOdCOeHNHTb TeNepb np6Op KDOMaUSHen CeTN WLAN,NoDTBepDnTe npaBOH HABnraCNOHON KHONKOB Bbl6Op «Ja>.
YTO6bI NOcOeHnHTb Pn6Op K DomaUHei CETn WLAN No3dHee, BbIePeITe JbeoH HABrAunHOHKnHONK
Yka3aHne: PnBbIbOpe «Ja» npoUHTte noDpo6Hoe OncaHne B rIabe «Home Connect».
YTo6bI HcNoJb3OBAtB HnIbTp IJIa BOdBi
Прижелашии NGОьБОВаТь ФИЛБТРДЯ ВODы ПОДТВердNTe праВОнНавИГАЦИОН"HКONКО«Дa>.
YTo6bI N03dHee IcNoJIb3OBaTb ⅡJIbTpДЯ BOdBi, Bbl6epnTe JelBOH HABINrAQUHOHON KHOJKOH «HET»
Yka3aHne: PnBbIbope «da» npOuTITe NOdpOBHoe ONIcAHne B rIabe
«Pporpamma «ΦnltprДЯ BObl» nll
«3aunTa OT 3amep3aHnra», NaHHa C
pa3deIa «YctaHOBka nll 3ameHa
Φnltpa Dnla BObl>.
HaKopoTkoe BpeMnOBHTcHaHOMnHaHHe HAnOJHnTB EMKOCTb IaKoPeHbIX 3epeH.
IoTBePdTe npaBOHabraUHOHON KHONKO INBbIXDITe HeCKOJIbKO CEkyHd.
IOnBntcHAnOMHaHHe HAnOJIHTb pe3epByap dIa BObl, NocJe yero HAnOJIHTb pe3epByap.
HanoJIHeHHe eMKoCTn IJI KoΦeIHBIX 3epeH
B npnbope MoJHo npnroTaBnBaTb KOeHbIe HaNTKn N3 KOeHbIX 3epeH NIN N3 MOJTOrO KoPe (He NCNoJIb3OBaTb paCTBOpIMbI KoPe).
- OTKpoIte KpbIshKy 16 eMkoCTn IJRA KOpeHbIX 3epeH 14.
- 3arpy3nTe KofoeHbIe 3epHa.
- Choba 3aKpoIe KpbIuKy.
yKa3aHHa
Ila3npoBaHHbIe, KapamEni3npoBAHHbIe IIN Coepkaune Dpyrne caxapHbIe O6aBKn KOpeHbIe 3epHa Bbl3bIBaHT 3aKynOpNBaHne 3abapOuHoro 6JOKa. NcnoJIb3yInTe TOnbKO uNCTbIE Cmecn KopeHbIX 3epEN IpNIroTOBJIeHN Icnpcecco IIN aBTOMaTnueckNX KoeMaunH.
Kateropnueckn 3anpeaetcnaIOJIb3OBaTb 3epHa Heo6kapeHHoro Kofoe.
При ИСПОЛБОВАИΝ KOФЕИHBIX 3epeH BыПОЛНЯТСЯ IX CBEXКI ПOMОЛ ДЯ КжДоB ВapКИ.
XpaHnTe KoFeHbIe 3epHa B IPOxHaIHom MeCTe N B 3aKpbITbIX EMKOCTAx DJIa ONTImaJIbHOrO COxpaHeHry INx KaueCTBa.
B emkoctn dny KofoeHbix 3epen MOxHNO XpaHnTb KofoeHhie 3epHa B TeueHne HeCKoJIbKnx DHei 6e3 NOTepn apomata.MoIOTbI KOpe CJeDyET BCErda 3acbInaTb TOnbKO HENOCpeDCTBeHHO NpeEd PnIRTOBJIeHNEM HaNTKa.
→ "PnpuroToBneHne KOpeHOro HaNTka 13 MoIOTOrO KOpe" Ha cTpaHnua 212
BMOeJIAX C DByMЯ EMKOCTaMnДЯ KOΦeHbIX 3epeH [14],[18]* MOxHO 3aCbIaTb KOΦeHbIe 3ePHa DByX pa3JIuHbIX COPTOB. BbIePte HuxHyIO EMKOCTb IJRA KOΦeHbIX 3epeH KHOJKOy BBIOpa [20].CBeToINoD BbI6paHHo EMKOCTN DIA KOΦeHbIX 3epeH FOpNT.
Ipn6op 3aONmHaet IJn KaXdoRo
HaNTka eMKoCTb IJn KoΦeHbIX 3epeH,
BbIbpaHHyIO nocJeDHeN. 3Ty
IpeBaPHTeJIbHyIO HaCTPOINKU MOxHO
N3MeHITb. "HaCTpOIN KIn MeHIO"
Ha cTpaHnua 220
HanoJIHeHne pe3epByapa IJRA BOIbI
BaHNO: ExeIHeBHO 3aJIbAaiTe B pe3epByap IJI BAoBi CBexkyIO XOIoNDHyO BOy 6e3 yIeKncIOTbl. Ipeed 3KcIIyaTaUnei npioBopa npOBepbTe, DOCTaTOUHO IIN HApONHeN pe3epByap IJI BAoBl.
1.Bo3bMntecb 3a yToPnIeHHHyO pyuKy 10 c6oKy Ha pe3epByape dIra BoDbl 8 n CJIerKa HaKIOHnTe B6OK pe3epByap.
2. ПОДнHMITE 3a pyuky i npomOnTe pe3epByap ДЯ BODbl.
3. 3aIeIte BODy B pe3epByap IJIY BOIbI DO OTMeTKN «MaKc.»
4. BcTaBbTe pe3epByap IJRA BOdBi O6paTHO B DepeKaTeIb N BepHnTe B INCXoNDHe NOLOXKeHne.
Ha nCnIe NOBnE TcN IOTnT ToproBOMapKn. PnpOp noDorpe BOy, n 3 DnCnEhcepa BbJIbETcH HeoJbOoe KOINueCTBO BOdbl.
Pnp6op roTOB K paBoTe, ecn Ha dncnlee CBETATC CmBOJI DJI HAHNTKOB IN KHONKa on/off.
Yka3aHnA
Pn nepbom nCnoJb3ObaHnn npnbopa, nocne BbINOJIHeHn cepBnCHoI nporpaMMbl nn Nocne dInTeJbHOrO nepepbBa B paBoTe apOMaT haNtKa B nepBOy aUKe He packpblBaETcB NOHOn Mepe, n 3TOT HAnITOK nITb He peKOMeHNyETcR.
I Oscne hauana paobtbpnpbopa MeIkoOpnCTa, Kpemoo6pa3na KOHCnCTeHcNr PehbI DOCTnraeTcA TOlbKO Iocne npriTOBHeHnHECKOJIbKx YaWeK.
ПридinteьHOMИСПОЛБ3OBAHIN RAJIETCH HOPMaJIbHbIM,чTOHa BEHTNIAUHOHBIX OTBepCTIaX O6pa3yIOTc KaIeJIbKIN BObl.

YnpaBJIeHne 6bITOBbIM npn6opom
B 3TOI rIaBe OINcAHO, KaK NODrOToBnTb npN6Op K PpNrTOBNeHnO HAnNTKOB, IN KaK PpNrTOBnTb RopYne HaNTKn. OINcAHO TaKKe, KaK N3MeHeHnTb NaCTpoiKN pN6Opa I CTeNEh NOMoJa.
BbI6Op HAnNTka
BbIepeHTe NOBOPOTHbIM nepeKJIouaTeJeM HyXHbI HaNTOK.
Ha3BaHne HApNTka uYcTaHOBJIeHHbIe B DaHHbIMOMeHT 3HaueHnra (HaNPmEp, KpeNoCTb KoFe n pa3Mep yauKn) OTo6paKaIoTc Ha DInCpIee.
BbI6paHhbI HaNTOK MOKeT 6bITb PnIroTOBJIeN C BblIOJHeHHbIMn paHee HAcTpoiKaMn IJI NocLe I3MeHeHnHaCTPOeK NO INHINBUNDaJIbHOMy BKycy. "ImeHneHaCTPOeK HaNTKOB" Ha cTpaHnca 215 "HaCtpoiKn MeHIO" Ha cTpaHnca 220
EcIn B TeueHne npimepeHo 5 cekynd ynpabIeHne Ha npbope He npOn3BOIDNTc, np6Op BbIXoDNT n3 peKIma HAcTpoE.K. BbINOJIHeHHbIe HAcTPOIN COxpaHHTcA BTOMaTnueCKN.
Ha BbIbOp npedlaIarAOCTc CneDyIOUne HAnITKN:
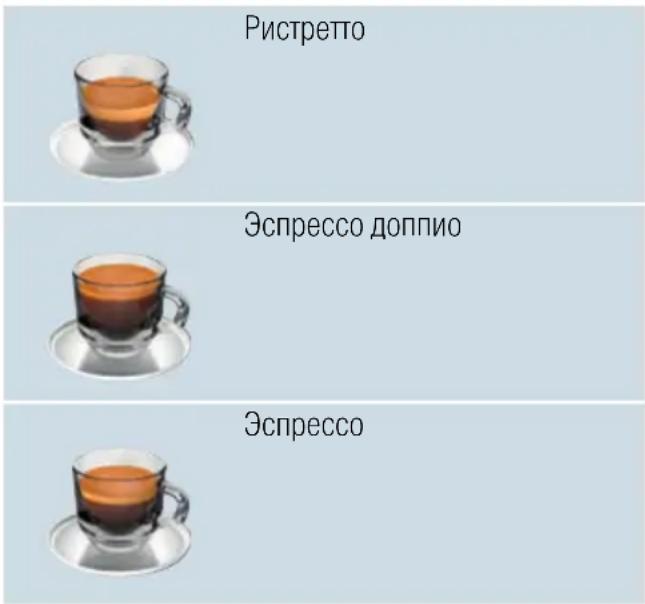
Yka3aHHe: OndHOKpaTHbIM HaKaTneM NOBOPOTHOpeKJIIOUaTeIaMOxHO npExDeBpeMeHHo PpeKpaTnTb npiroTOBLeHne MOLOKa NII KOe; npi DByXkpaTHOM HaxaTIu BeCb IpoUeCC npiroTOBHeHn HAHTKa PpeKpaUaETc.
MoIouHa IeHa HIN TeIIIOe MOJOKO
Ppnbop BkIoueH. Pe3epByap HaonHeH. HanoJIHeHHa MOLOKOM eMKoCTb dJa MOLOKa NOcOeINHeHa.
PnroTOBJIeHne ropeyB BoIbI
Yka3aHHe: Ipeep npnroTOBneHnem
Ropayen BObl OunchTE CnCTeMy NOdauM
MOLOKa N CHIMNTe EMKoCTb DJIa MOLOKa.
Ecnn CnCTema NOdau MOnOka He 6ydet
OunSeHa, NOUYaEma BOa MoKeT
CoedePkaTb He6OJbUoe KOJnueCTBO
MOLOKa. "OuchTka CnCTeMbI NOdauM
MOLOKa" Ha cTpaHnua 230
!IpeDynpexKdeneHne
Onachoctb oxkora!!
IncnHcep cTahOBNTcOueHb TOpaHm.
Iocne nCpOJIb3OBAHn CHaHaJa
DOxNITecb OXJAAKeHn INCnEHCepa,
Ipejde yem 6paTbc 3a Hero.
Pn6Op BkIoueH. Pe3epByap HanoJIHeH.
- NocTabbTe yauKy noD nucnHecep.
- Ecnn noDCoeDnHeHa emKoCTb dna MOLOka, CHIMITE ee.
- BbIbePnte NOBOpOTHbIM nepeKIOUaTeJIem «Fopraua BODa»
- UTo6bI N3MeHnTb HaCTpoiKNДЯ BblOpaHHoHaNTKa "N3MeHeHne HaCTpoeK HaNTKOB" Ha CtpaHnca 215 "HaCtpoiKn MeHIO" Ha CtpaHnca 220
- UTo6bI Haayatb npnroTOBJeHne HAnITka, HaxMnte Ha NOBOPOTbI IpeekIOUaTeJIb.
Topya Boda noctynaet B yaSky.
Yka3aHHe: UTo6bI npExKeBpeMeHHO 3aKoHcHTb PnroTOBLeHne HaNTKa, CHOBa HaxMITE Ha NOBOPOTbI nepeKlIOuateJIb.
HactpoHa KpeocTn KoFe HIn BbI6Op MoIOTOro KoFe
BbIbpaH KoΦeHbI HaITOK.
- Haxmte KhONky 00.
- NOBOPOTbIM NepeKIOUaTeIeM BbIOJIHnTE HAcTPOy KpeIOCTN KoOe IIN BBIOEpITe MOJToB IN KoOe.
3.ДЯ NOДТВЕРЖDEHINHAJKMITE KHOПКУ 00 NII NOBOPOTHBI INepeKJIIOUaTeJIb.
Hac troika apomata
YemdoJIbWe 3aBapnBaETcKoFe,TeM
60JIbWe TOpkIX BeIeCTB N
HexeJATEJIbHbIX apOMATOB IOnaJaET B
HaHTOK.3TO OTpUcaTeJIbHO Cka3bIBaETc
Ha Bkyce n DeJaET KoFe MeHee npnTbIM
dIy yNtpe6JIeHn.II OToMY dIa
PnIROTOBLeHnOueHb KpeNKOrO KoFe
Pnp6Op OChaSeH CneuJaNbHbIM
fYHKzIaMn HAcTPOiKn apomata
DoubleShot n TripleShot.B 3aBncmoctn
OT HAcTPOiKn IocIe PnIROTOBLeHn
IIOBOHbI INI TpeTI PnIROTaBLBaEMOro
KOJIuYeCTBa KoFeIhBiE 3epHa
NEpeMaJIbBAIoTCr IM MoIOTbIKoFe
3aBapnBaETcRe eIe pa3,B pe3yJIbTaTe
yeRo IOnlyuaeTCR BkyChbIKoFe C
PnIRTHbIM apOMaTOM.
Yka3aHn
HactpoJa DoubleShot MoXeT 6bITb BbIpaHa IJRA BCEX KoOeINbIX HApNTKOB KpOME:
- HapNTKOB C MaJIbIM KOJIInueCTBOM KoΦe, HApPImEp, pIcTpeTTO
- KOΦeHbIX HaINTKOB C MOJOKOM MAnIOrO KOJIuYeCTBa KOΦe
MaIOrO KOJIuYeCTBa KoΦe, HApPIMep, npn HacTpoIKe «KoΦe C MoIOKOM» 200 mI c DoJeM MoIoka 90% (dOJa KoΦe 10%)
-Ппг�OTOBЛЕнИ N3 MONOTOGO KOФe -Ппг�OTOBЛЕнИ DBYxЧаш经
Hactpoika Triple Shot moKet 6bItb BbIbpaHa TOnbKO dJa KOpe XL.
- PnIroTOBJIeHHe IByx YaWeK HeBO3MOXHO
HactpoHa COOTHOseHnMoJOKa H Koe
BbI6paH KoΦeHbI HaINTOK C MoIOKOM.
BbI6op pa3mepa yawkn
Hannitok BblpaH.
- HaxmTe KhoNky ml. IpeBapnteHbHO NaCTpoEHHOe KOINueCTBO 3aBnCt OT Tnna HAnrTa.
- BbIbepnte HxHoe KOINueCTBO C NOMOuIO NOBOpOTHOr OpeKluoyateJIa WaRAMB Ml.
3.ДЯ NOДТВЕРЖDEHЯ HAKMITE KHOПКу ml ИЛ NOBOPOTьн IpepeKJIIOUaTeJIb.
yKa3aHn
Дя ристпетто КоличесТВО ИЗМЕнтБ HeBO3MOXKH0.
HaJIbAeMOe KOJIuYeCTBO MOJKeT MeHrTbcR B 3aBnCIMOcTN OT KauecTba MOLOKa.
PnroToBJeHne DByx ChaWeK cpa3y
BbI6paH KoFeHbH HaNTOK NJI KcFeyHbH HaNTOK C MOJOKOM.
- Haxmte KhoNky
- NocTaBbTe IBe IIOOrpeTbe YaShKn CneBa I cnpaBa IOI dncnHeHcep.
- UTo6bI Haayatb npriTOBJeHne HAnITka, HaxMITE Ha NOBOPOTbI NepeKIOUaTeIb.
BbI6paHHbHnITOK 3aBapnBaETcH npa3nBaETcH 3aTeM B O6e Yawkn.
Yka3aHn
HaHTOK npiroToBnBaETcB Dba 3Tana (Dba npoCecca CmaIbBaHnKoΦe).PdoXdnte, noka npoceC PONHOCTbIO He 3aKOHNTCa.
■Пи ВьIope HacTpOuKn apomata HeBO3MOxHbI.
HactpoIka HeBO3MOxHa IJIa KOpe XL.
IzhmeheHne TempepaTypbHaHTKa
Bo3MOxHToJIbKO B «PeXIM 6apnCTa». → "HaCtpoiKmMeHIO" Ha cTpaHnua 220 BbI6paHJIIO6OHN HAnITOK.
- Левий Навигацно"HОй КНКОй ВиЗОВпЕ ржим HabТpoйКИ Temператypbl.
- YctaHOBNTe Tpe6yEmyTo TemnepaTpy C NOMOuIIO NOBOPOTHOI PepeKJIouaTeJ.
3.ДлЯ NOДТВЕРЖDEHЯнЖМITEJIeByIO HABINrAциОнHуIO KHOПКУ ИЛ NOBOPOTНьIпepeKJIQUaTeIb.
Hac troika aromalntense
Bo3MOxHToJIbKO B «PeKIM 6apnCTa». → "HaCtpoiKmEHO" Ha cTpaHnua 220
HHTeHcNBHOCTb BkyCa KofoeHOro
HaNTKa MOxHo yCTaHOBtB
HINIBNdyaJIbHO NOCpeIcTBOM HAcTPOKn
aromalntense. Ppr nCNoJIb3OBAHN
MOLOKa BbIOOp He BInReT Ha TeNlOe
MOLOKO N Ha MOnOuHyIO NeHy.
BbI6paH KoΦeHbI HAnITOK.
- ПраВОй HabигагонHoNКоь BыЗOBиTe MeHIO.
- BbIOnHInTe HxKHyIO HaCTpOiKy IOBOPOTbIM NepeKJIouaTeJeM.
3.ДлЯ NOДТВЕРЖДЕнЯ HAZKMITE npaByIO HABNIGAцИОнHуO KHOПКУ ИЛ NIOBOPOTьI NepeKJIQUaTeIb.
Hac troponka ctenen nomona
DaHbI np6op o6OpydoBaH perynpeMoKoFemolKo.3To PO3BOJReT HnBnDyaJIbHO 13MeHrTb CTenHeN pOMOJa KoFe.
!PpeDynpEeHdEHe
Onachoctb TpaBMnpoBaHHa!
He npikacaiTecb K BHyTpehHm qactrMo KofoemOJIKN.
BHHMaHHe!
Bo3MOxHbI NOBpeXdEHHa np6opa! CTepeHb NOMoJa MOxHo peYJnPoBaTb TOnbko pR paOtaUoSe Kofemolke!
Iprn paobotaoue Kooemolke yctaHOBNTe IOBOPOTbIM nepeKIOUaTeJeM [15], [19]*.
ToHKnI NOMOI: BpaueHne npOTNB uacOBoi cTpeKn. (Pnc. a)
Bollee rpyobn nOmoI:BpaueHne no yacobon cTpeKe.(Pnc.b)
yKa3aHn
I3meHHe HacTPOkN 6yDet 3aMeTHO IINb HaUNHa CO BTOPO uAaKn KoPe.
Для зерен Temнов обжарки HeобхODIMO yCTaHOBNTь 60лee Toнkyю CTeпeнь ПOMOLA, a 3ерн 60лee CBetлои обжарки - 60лee rpyбую.
Ponorpeb yawek
BHHMaHHe!
IodorpeBaTeIb yawek cTaHOBNTcOyeHb ropaum!
AByOMaTnueeCKa KOFemaunHa
OBOpyIOBaHa NODOrpeBaTeIeM
UaWeK 11.EcIn NODOrpeBaTeIb UaWeK
BKJIoueH,ROPIT CBeToIDNoIDHyI
INDnKaTop 12 NOOrpeBaTeIaWeK.
PekomeHa:IyONTUMaJIbHOrO NOOrpeBa yCTaHOBInTe YaShKn IHom Ha NOOrpeBaTeJIb.
Yka3aHHe: 3Ty 4yHKUHO MOKHO BKJIIOHTb IIN BbIKJIOHTb B MeHIO (HaKaTb 念 /i n NOBepHyTb NOBOPOTbI INepeKJIIOUaTeIb BJIeBO) IIN B «HaCTpoIkax MeHIO>. "HaCTpoIKN MeHIO" Ha cTpaHnua 220

Персандаця
Bo3MOxHocTb IcNoIb3OBAHnI yHKnU Home Connect 3aBncuT OT HaJIuYn cepBaCa Home Connect B BaWei CtpaHe. CepBnC Home Connect npEJaRaTeCn He BO BCEX CTPaHax.DoOpJHnTeJbHbIe CBedeHnI npVBedeHbI Ha caHTe www.home-connect.com.
Yka3aHHe: Co6IIOdaIte n3IoxeHHbIe B HauaIe DaHHoIN HCTpyKuIN IpaBnla TexHNK 6e3ONaCHocTn. ObecneYbTe INx CO6JIIODeHne TaKJKe IprN DnCTaHcUHOHOM UnpabLeHIn Ipn6Opom Upe3 npIoXeHne Home Connect B To Bpem, KOrDa Bbl OTCyTCTByeTe DOMa. Co6IIOdaIte TaKJKe Yka3aHn, coDEpXaUncEaB IpnIoXeHnH Home Connect. YnpabLeHne Ha np6ope Bcerda NMeet npOpITeT, B 3TO Bpem ynpabLeHne np6Opom Upe3 npIoXeHne Home Connect HeBO3MOxHo.
Hac troponka
A B T O M A T H U E C K A P E R N C T P A Z N A B D O M A S H E N C E T H
- Поворотьим поpeклочаелем Вьберпес на диссгет «АВТOMатч. COЕДИН.».
- Haxmte npaByu HaBnraCNoHHyo KHOkky NOI INDnKaunie «POnTBeprd.>
- HaДиСплел ПОВИТСА «АВТ. сЕТБОЕ COЕДИЗЕНЕ».
- B TeueHne HeCKoJIbKnx MmHyT DepeKnTe HaxaToN KhoNky WPS Ha poyTepe DOMaUHe N CetTu N NOIOxJnTe, NOKa Ha DInCnIe e ABTOMaTnueckOu KOΦeMaUHHbl NOBHTcA «CeTeBoe COeDINHeHne BbINOJnHEO YcNeuHO»
- OTKpoIte npINIOXeHne Ha MObUNbHOM yCTPOIcTBe.
- Поворотьим поеклочателем Вьберпг «Соед.с пиюженим».
- HaxMMTe npaByU HoBnraCIOHHyO KHOKNy NOI INHdNkauNei «BbI6paTb». ABTomatNuecka KOpemaunHa yCTaHOBNT CBA3b C npINLOXeHNEm. CJeDyIte yka3aHnM B npINLOXeHNn.
- ПоJOЖДИTe, ПОka Ha ДИСПЛeE KpaTKOBpeMeHNo ПОВИТСА «Успшhoe COeДиHеHne C npINIOJKeHnEМ».
- NOBOPOTHbIM nepeKJIIOUaTeIeM BbIepeRte «BkJIIOuHT bIcTaN. 3aNyCK»
- Haxmte npaByIO HABnIraCNoHHyO KhoNky IOI INDnKaUnei «BbI6paTb» Ha dincJIee nOBuTcR npeDynpexKdEHe.
- Haxmte npaByIO HaBnraCNoHHyIO KHOKNy IOI INDnKaueN «JaIbSe» I npOHTe npedynpeKdEHNie.
- HaxMMTe npaByIO HaBnraCNoHHyIO KHOKNy IO nHnKauNei «NoTBePd.>
13.ДЯ ВыхОда n3 MeHIO HaЖMITE KHOПКу /i.Tenepb MOxHObI NOJb3OBaTbcRA BCEMNФyHKUЯMn aBTOMaTueeCKO KOpEmaSINHbICMObIbHOrO yCTPOIcTBa NocpeIcTBOM npINLOXKeHnI.
Yka3aHne: Pn BbIbope «BbIKIOUHTb DnCTaH. 3aIyCK» B npInIOxKeHN Home Connect OTO6paXkaIOTc TOnbKO peKIMbI pa6Otbl aBTOMaTNUeCKo KOpemaUNHbl. MoKHO BbIPOJHNTb HaCTpOiKN, HO HeBO3MOXHO 3aIyCTNTb PnIROTOBJIeHne HAnITka.
PyuHaI perHcTpaunB IdomaShnei cTeN
- Поворотьим посякюателем Вьберпту на дислес «Соединту Врууну».
- Haxmte npaByIO HaBnraCNoHHyIO KHOKNy NOI INDnKaUnei «POnTBePd.». ABTomatuecka KoFemaunHa CO3JaCT Co6CTBeHHyIO cetb WLAN, DOCTyn K KOTOpO B03MOJKeH uepe3 PAnhWeT nIN CMapToOH. DIncJIeN POKa3bIBaET SSID (nM) n Key (napoIb) 3TOI CETn.
- 3apeRnCTpnpuYTe MoBnJIbHoe yCTpoIcTBO B CeTN aBTOMaTHueCKoI KoΦeMaUHbI, nCNoJIb3OBAv SSID «HomeConnect» n Key «HomeConnect».
- 3anyctte npinloxeHne Ha MObInbHom yCTpoNCTBe n CLeynte Yka3aHnM NO peRnCTpaunB CeTn, IMeIOUIMC8 B npINLOXeHn N B DOkymeHTaun N3 KOMnEKTa NoCTabKn Home Connect. IpoueDypa peRnCTpaun 3aKoHcHeNa, KOrDa Na DnCnlee aBTOMaTnueCKO KoΦemaUnHbl IONBUTcR «CeTeBoe CoeDInHeHne BbINOJHeHO ycNeuHO»
- ПоворOTьМпеpeклЮчATEелм BыберпTe на диспee «СоeД. с пиLOжЕнeM».
- Haxmte npaByIO HabnraCNOHHyIO KHOKNy IOI INDnKaUnei «BbIpaTb». ABTomatueckaKoFemaunHa yCTaHOBNTCB3b C npINLOXeHNEM.
- ПоJOЖДИTe, NOka Ha ДиСплee KpaTKOBpeMeHNo NOBHTcA «YcNeшhoe COeДиHHeHne C npINIOJKeHnEM».
- ПоворOTьМпеpeКluоаТelem BbIберпTe «ВклочьДиСтан.ЗаусК».
- Haxmte npaByu HabnraunHnyo KhoNky noi nHnkaue «BbIpaTb»Ha dinCnlee nOABNTc npedynpexKdene.
- Haxmte npaByIO hABnraCNoHHyIO KHOKNy IOI INDnKaueN «Даьшe» I npOHTte npedynpeKdHne.
ru Home Connect
- Haxmte npaByIO HaBnraCNoHHyIO KHOKNy IO INDnKaunei «IoDTBePd.>
12.ДЯ BBIXOda n3 MeHIO HAXMITE KHOIky /i.TeNepb MOxHO NOJIb3OBaTbcB BCEMnФyHKUINMn ABTomATnueCKoI KOΦemaUNHbIC MObNbHOrO yCTPOJCTBa NOCpeDCTBOM PrINLOXKeHnI.
Yka3aHne: Pn BbIbOpe «BbIKIOUHTb DnCTaH. 3aIyCK» B npInIOxKeHn Home Connect oTo6paXkaHOITc TOnbKO peXIMbI pa6Otbl aBTOMaTNUeCKo KOpemaUNHbI. MoKHO BbINOHb HAcTPOiKN, Ho HEBO3MOXHO 3aIyCTNTb PpNROTOBHeHne HaNTKa.
C8a3b C CeTbO yCTaHOBneHa

CBA3b C cetbIO He yCTaHOBnEHa

HeT CBA3n C cepBepom
EkeiHeBHyIyXoI N OuchTka
Pn TuaTeBHom yXoJe n OuNCTKe BaI npnbOp HAnOJr COxpaHIT CBOIO 4yHKUHOHaJIbHOCTb. B DaHHoI rIabe ONiCaHbI npaBnIbHbI yXoJ 3a npnbOpOM I erO ouNCTka.

PpeynpeKdeneHne
OnachocTb nopaxHeHn 3JIeKTpHuYeCKnM TOKOM!
Ipeed ouinctkoon OTCOeHNHTb CeTeBOK Ka6eJIb OT cETn. 3aInpeuaaetcnaorpykaTb npnbop B Body. He nCnoJb3ynte napOBbie ouinCTNTeII.
UncTaaee cpeIcTBO
YTO6bI He dOnyCTnTb NOBpeXdEHNpa3InuHbIX NOBepxHOCTe B pe3yIbTaTeNCNoJIb3OBAHnHENoDxOJaux YnCTaUxCpeIcTB, CO6JIoJaTe CJeNyIOuNe yKa3aHnI.
He nCnoJIb3yITe
eKne nn a6pa3nBhie YnCTaune CpeDCTBa,
YnCTaIe CpeIcTBA, CoepKaIue CnIPT,
JXecTKHe MoaJIKNI rOKn.
Yka3aHn
B HObIx ry6uAtbIX caIΦeTKax MOryt CoIepXaTbcr CoIi. CoIi MOryt npINBeCTn K O6pa3OBAHnIO HaJIeTa pXaBvHbI Ha CTAJIbHbIX DeTaJIaX. HOBbl ErykN IJRA MbITbY NOCyDbI TuaTeJIbHO BbIMoITe Nepei NCNoJIb3OBAHNem.
OCTaTKHaKnH, KoFe, MoIOKa, MOIOxN CpeDCTB N pACTBopa dIydaJIeHn HaKnH ydaJIaIYe HEmeJIeHNo. IoTakIMN OCTaTKaMIMOryt O6pa3OBbIBaTBcR OuaRKnoppo3H.
BHHMaHne!
He Bce yactn npnbopa pa3pewaeTcMbITb BV NOCyDOMOeHOn MaUNHe.
PUC.5-8
OuHCTHa POnDoHa H eMHOCTn IJN KofoeHoi rUun
Puc. 5
Yka3aHHe: IOnIOH n EMKoCTb dIy KaOeHoi rUuH NyKHO ONOPOKHrTb N OuyuAtb KaKdbI DeHb BO n36eXaHne CLOE BTOJoxKeHn.
- BbHbTe POnDoH C eMKoCTbI O IJI KooFeiHOI rUuN, NotaHyB IVX BnpeI.
- CHIMITE NOДОн И OЧИCTITE UIETKON.
- Onopoxhnte n ounctnte noDOnH n EMKoCTb dJa KOpseHoi ryuN.
4.ПртпгБИТРЕНСЕ ПОСТРАСТВОпибopa(Г He3Да ДЯ NOДДОНов)
OuHCTKa eMKoCTn Ia MoJOKa
Puc. 7
Yka3aHne: IIO rIrueHnueCKM COO6paXeHNm EMKoCTb DnRA MOnOKa CNeDyET peYJrPHO OUnuTaB
- Pa36ePnte emKoCTb IJIa MOnIka HaOTDeJIbHbIe Yactn.
- OuNCTnTe BCE qaCTn EMKoCTn dIa MoJOKa IJI NOMeCTnTe INB PocydomOeHyIO MaShInHy.
OuNTka cNCTeMbI NOaHu MOJOKa
CnCTema NODaun MOLOKA HeNOCpeDCTBENHO NocLe PnIroTOBJeHn MOLOUHOro HAnNTka OUnuaeTcKpATKObPeMeHHOn NODauee CTpyn npa.
IpeynpeKdHne Onachoctb oXora!!
IinCneHcep CTAHOBNTcO ueHb TOpaHm. IocNe nCNoJIb3OBaHn CHaHaJa DOxNITecb OXlaJKeHnI DInCpeHcepa, npexJe Yem OpaTbc 3a Hero.
CnCTEmy nOdaun MOLOKa HxKHO OUnuTaB BpyHyIO eKeHeJeIbHOb, pni HeoBXoIMocTn DaJce yAaSe.IJa Oco60 TuaTeJIbHO OUnCTKN MOXHO IpOMbITb CnCTEmy NDoaun MOLOKa BOIo. "IpombIBKa CnCTeMbI NDoaun MOLOKa" Ha cTpaHnca 233
Pa36opka cncTeMbI noDaun MoLoKa pnc. 3.
- OToCoeIINHInTe OT npHbOpa eMKoCTb JIa MoJOKa.
2.ПеремecTteДиСпенсерВcamoe HIXKHeI NOLOXKeHne. - Haxmte pa36loKpyUOyU KhoNky cnpaBa BBepxY.
- Onyctnte Bnepei n Chmnte Koxyx.
- BbInbTe CnCTeMy NOnaUn MoJOKa I pa36epnte ee Ha OTdeJIbHbIe Yaactn.
- OuNTte DeTaIIMbJIbHbIM pactBOpOM IN MraKoTkaHbIO PNC. 6.
- Помоше ВсЕ DeTaJIиЧИСТОЛ BODОЛ И ДайтEs IM BBICOXHyTb.
yKa3aHn
Bce yactn cnctembl noaun MOLOKa MOxHOMbITb B NOCyDOMOeHON MaunHe. Nocne npombIKN TuaTeNbHO ydaIte OCTaTKMblbHOro pactbopa n3 cnCTembl NOaun MOLOka.
BaxHo. KoxyX nucnEhcepa He npiroDeH dIaMbITbB NocydOMoeHOn MaunHe.
YCTaHOBInTe CnCTeMy NODaUN MOJOKa pnc. 3.
- BbINOJIHnTe c6OpKy OTdJIbHbIX YacTei CnCTeMbI NOdauM MOLOKa.
- YCTaHOBInTe CnCTeMy NODaUN MOLOKa B KOxIyX.
- Nepemecnte IncnEhcep B caMOe HIXKHeI NOIOXKeHne.
- BcTaBbTe Koxy Chn3y n, NOdHAB BBepx, 3aФнкCnpuTe.
Ounstka 3abapouhoro 6loka
Pnc.4,→pnc.8
Дононтелбно К abTomatniecko nporpaMMe OuNCTKN HeO6xOdmo peYIaRHO CHIMATb ДЯ OUcTKn 3aBapouhbl 6lOK.
BHHMaHHe!
Для ounstkn 3aBapouhoro 6loka 3anpeuaetcN NCNoIb3OBaTb MOUuNe CpeDCTBa N MbITb erO B NOcydOMoeHOn MaunHe.
I3BneueHne 3aBapOuHoro 6loka
- Bbiklouynte npnbop.
- BbInbTe pe3epByap Ia BOdbI.
- IpeBnHbTe npR K npry oba KpaChbIX pKcAtopa n CHMITE KOJyX.
- BbHbTe, BbIMOnTe n BbICyUInTeCKpe6OK dIa KoPeHOn rUuN (KpaChb) n Koxyx 3abapOuHOro 6loka (KpaChb).
-
IpeBnHbTe BnpaBO KpaHbI nKcTOp Hd 3aBaOpUHbIM 6JOKOM.
-
OctopoxHo BbIHbTe 3aBapOuHbI 6nok 3aBapNBaHnI TuaTeJIbHO IpOMoITe ERO NpOTouHO BOdOi.

- TuaTeIbHO OUnCTnTe BHyTpEnHHee npocTpaHCTBO npuOpa BlaXHoI TKaHbIO u ydaJIte OCTaTKn KoFe npn IX HauNHy.
- Поождente,пoka 3аВарочьй 6лOKи BHyTppeHHee npoctpaHCTBO npnbopa BBICOXHyT.
YctaHObKa 3abapouHOro 6Ioka
- BCTaBbTe 3aBapOuHbI 6LOK B npn6op B HApPaBHeHn CTrpeKn. CTrpeKa HaxoHITcA C BepxHeN CTOpOHbI 3aBapOuHOrO 6LoKa. YCTaHOBInTe CBepxU 3aBapOuHbI 6LOK, BCTaBbTe eRo B HApPaBnIOuNe n 3aDbHbTe B npn6op.
2.Перевиные Влево Красьй DKCATOPнДЗварочьIM6JOKOM. - BCTaBbTe cKpe6ok IJIa KoPeHOnIyUu (KpaCHbI) N KoxyX 3aBaPouHOrO6IOka (KpaCHbI).
- BCTaBbTe n 3aΦnKcnpyIte KoxyX.
- BCTaBbTe KOHTeHep Ira BOdbI.

CepBnchbIe npoRpaMMbl
B 3aBnCmOCTN OT JecTkoCTN BODI IN CTepeH N3HOca Pnpbopa uepe3 OnpdeJIeHHbIe IpOMeKytKn BpeMeHn Ha DIncJIeE BMeCTO OKHa BblOpa KoPe 6yDet NOBtbcr OndHa n3 CLeNyUoInx INDnKauN:
Ppombibka moJou.CnCTembl
CpouHo BbIIOJIHITb IporpaMMy ydaJIeHnHaKnIi
CpoHOBbIIOJIHNITb npOprpamMy OuNCTKIN
CpouHo BbIIOJIHITb npOprpAMMy Calc'nClean
Pnp6op Heo6xOIMO HeMeIeHNO OuNCTnTb Pn NOMOUI COOTBeTCTByIOUeI npOrpaMMbl IIN ydaJIHTb HaKINb. YdaJIeHne HAKINn IOuNCTKy MOXHO NO BbIOOpY OBeENHtB cyHKUnei Calc'nClean. Pn HApUSeHn yka3aHn NO BbINOJIHeHIO cepBnCHOn pOropaMMbl BO3MOJHO NOBpeJdeHne np6Opa.
CepBnchIe nporpaMMbIO MoXHO TaKKe 3aNyCTnTb B IIO6OIMoMeHT 6e3 3aNpoca Ha DnCnIee.HaxMnte KHONKy O/i, BBIOpeNTe HxKHyIO npOrpaMMy IN BBINOHNHe ee.
Yka3aHH
BaxHo. EcIn CBOeBpeMeHNO He OunchTb npOp OT HaKUnn,Ha DInCnlee NOBtCra «DaBHO nopa BblOHNtbpoPamMy ydaJeHn HaKUnn. PnpOp BCKope 6ydet 3a6IOknpoBaH!. HemeJenHo BblOHNte pOceCC ydaJeHn HaKUnn COIlaCHO INCTpyKUnn. EcIn npOp 6LOknpoBaH, IM MOxHO 6yDet CHOBa POJIb3OBaTbCRA TOnbKO IocLe BblOHNHeHOro pOucecca ydaJeHn HaKUnn.
BHHMaHHe!ДЯΚKaJDoI cepBnCHOH npoRpaMMbI NcNoJIb3yIte CpeIcTBa dJa YdaJIeHnHaKINN OUcNTKN B COOTBETCTBnC INHCTpyKcIeN, CO6JIIOJa IprN 3TOM (COOTBETCTByIOUne) yKa3aHnN IO TEXHnke 6e3ONaCHOCTN.
He neiTe npImeHReMbIe XnKoCTN.
Дя удалени накип karTeгорчесkn 3anpeuaetcЯ nCNoIb3OBaTb IIMOHHyKICNOTy, yKCycИПСРEDCTBaHa OCHOBE yKCcyca.
Дя удаленин haКипи n OчИСТКI npибopa ИспОльь3уйTe TOLьКО NOДхОДЯшпЕ ДЯ 3TOGO Ta6ЛeТКИ.Он CпeциальНо pa3pa6OTаны ДЯ ДaHHOrO npибopa, IX MOЖHO ДОПОЛнITельНо пиОБpeCTN uepe3 cepВиСнHyO cLnyK6y. → "ПринадлесХHOCHTn" Ha CTpaHnua 207
Kateropnueckn 3a npeeaaetcna pykatab TaIeTKn dny ydaenHnHaKnII IN IpOuNe CpeDCTBa B OTceKdNMOJOTOrKOoFe.
HnB Koem cnyuae He npepbBaIte cepBnCHyIO npoPpAMMy.
Ipeed 3aynckom cepBnCHOn IPOrpaMMbI BbIHbTe, OuNCTITe IN BCTaBbTe 6oPaTHO 3aBapOuHbI 6lOk. IpomOIte cnCTEmy nOdaun MOLOka.
I OKOHuaHn CepBnCHOn npoPamMbI npOTpnte npOBop MmKoB BnaJHoN TkaHeBOcAΦeTKoU, UTo6bI cpa3y JxeyCTpaHHTb OCTaTKn pactBOPa dny UdaJIeHnHaKIN. PoJ TaKIMN OCTaTKaMn MOrYt O6pa3OBBiBaTbcR OuaRn KoppOzHN.
B HOBbIX ry6uAtbIX caIΦeTKax MOrY T coIepKATbCS coII. CoII MOrY npINBeCTN K O6pa3OBAHnIO HaJIeTa pXaBHyHa CTaJIbHbIX DeTAlJx, I03TOMy IpeE INCNoIb3OBAHnEM ry6uAtbIX caIΦeTOK IX CJIeDyET TuaTeJIbHO IpOMblb.
■ПиИСПОЛБЗOBAHINФИьТраДЯВODыИНТЕРВалыВрemeHIDOBIПОЛHEHNA CLEdYIOUeCEPBUCHONIporpaMMbI yBelenuBaIOTcA.
EcIn,HaPnIpMep,BCJeDCTBVe nepeboeB 3HeproCha6KeHm 6bla octaHOBHeHa OHa n3 cepBnCHbIX npoRpaMM, DeiCTByIte CLeNyIOUIM o6pa30m. PnpOp aBTOMatNueCKn 3aNycTIT npoRpaMMy CPeuaJIbHOJ IpomblKN.
- ПомоиTe KOHTeHepДЯВОдbl.
- 3aIeITe CBeKyIO HeRa3nPoBAHHyIO BDO IO OTMeTKN «MaHC.» I NOITBepdnte KHOKNoI.
IporpaMma 3aNyCTiTcN n IpPOMoET npi6Op.IpOdoJXitJIbHoCTb npi6J. 2 MInHyTbl. - OnopoxHHTe NOdoH, ouNCTHTe IN BCTaBbTe erO o6paTHo.
- Onopoxhnte emKoCTb dIa MoJOKa, ouNCTnTe N BCTaBbTe ee o6paTHO. Iporpamma 3aBepseHa. Pnpob cHOBa rTOB K pa6Ote.
- Haxmte KhONky /i I nIy BbIXOda n3 npoPamMbI.
PpOdoJXKeIbHOCTb Pnp6JI.6 MmHyT
- Haxmte KhoNky /i, yTo6bl OTKpbITb MeHIO.
- NOBOPOTHbIM IpeKJIIOUaTeJeM Bbl6epnte «OuNCTKa»
- Haxmte Ha noBopOtHbI nepeKIOUaTeIb Ira 3aNycka npoPamMbI.
Pporpamma cOpnoBoxkaeTcayka3aHnMa Na dncnnee.
- Onopoxhnte noDIOH IN BCTaBbTe erO o6paTHo.
- OTKPOIte OTCEK ДЯ MONOTORO KOpe, NOLOXHTe TaBJeTKy ДЯ OUHCTKN, 3aKPOIte OTCEK И NODTBepdTe KHOIIKOJ.
6.ПОДСТАБTe EMKOCb ObbeMOM MInH.1,0л под диссери поТВердTe.HaunHaETcBbINOJIHeHne nporpaMMbl.PpoJOnJXITeMbHOCTb Pn6I.5MHHT - Onopoxhnte emKocTb n IOITBepdnte. Iporpamma 3aBepweHa. Pn6Op cHOba rTOB K pa6Ote.
- Haxmte KhoNky 念 i nBbIXOda n3 npoRpaMMbl.
calc'nClean
PpoJOnKInTeIbHOCTb npNoI. 26 MmHyT
Pporpamma Calc'nClean o6beDnHReT B ce6e yHKuIN «YdaIeHne HaKInN» I «OuncTkA». EcIn cPok dJa BbIOnHeHHa OBeHX PporpAMM npIMepHO COBnaJaET, npIbOp aBTOMaTnueckn ppeJnraeT 3Ty cepBnCHyIO PporpAMMy.
CTpoka Bn3y Ha DnCnIee NOKa3bIBAeT, HApnpMep, YpeE3 CkOJIbKO MmHyT HxJHOpPOMbITb pe3epByap ДЯ BOdBi N Do6aBNTb BOdy.
- HaxMMTe KhoNky /i, yTo6bl OTKpbITb MEHIO.
- NOBOPOTHbIM IpeKJIouaTeJem BbIepeNTe «OuNCTKa».
- Haxmte Ha noBopOtHbI nepeKIOuATEIb Ia 3aNycka npoPamMbI.
Прогамma coppoBokJaeTcnyka3aHЯMu NaДиСпjee.
- OnopoxHnTe IOnIOH n BCTaBbTe eO o6paTHo.
- OnopoxHnTe eMKoCTb Ia MoIOKa, OuHCTnTe n CHOBa IOdCOeHNHTe.
- OTKpoIte OTceK IJIa MOnOTOrO KoΦe, NIOJXnte TaIeTky IJIa OUnCTKN, 3aKpoIte OTceK I NOITBepdnte KHOJKOJ.
7.ИЗВЛЕКИТеФильТРДЯВОДы(приНалуни)иПОДТВЕРДИТЕKHONКОJ. - HanolnTe npCToN KOHTeHep dIa BObI TeIIOB BOOJ DO OTMeTKN «0,5 n». PactbOpTe B Hei 1 Ta6JIeTKy dIa YdaJIeHnHaKIN.
- ПОДСТАББЕ EMKOCTБ OББЕМOM MИH. 1,0 Л NOД ДИССЕНСЕР И NOДТВЕРДITE. НачиHAETСВ ВИПОЛНЕНUEnporpaMMbl.
IpoJOnJxNtTeNbHocTb npn6JI.19 MmHyT HΦopMaun: Ecnn B KOHTeHepe dJa BObl CnIshKOM MaIO CpeICTBa IJa YdaIaHEnHaKnPi, NOBNTc COOTBeTCTByUoUsn 3aIpc. DObabte HeRa3InpOBaHHyU BOdy n PoDTBepdnte.
10.ПROMOHTe KOHTeHepДЯ BODbl (ecnOH6blBbHyT) yCTaHOBNTe O6paTHoФINbTpДЯBOdbl.
11.3aJIeITe CBexkyo HeRa3npoBaHHyIO BODy DO OTMeTKN «max» I YCTaHOBNTe Ha MeCTO KOHTeHep DЯ BOdbl.
Haunhaetc BbIOJHHeHne npoRpaMMbl. PpOdoJKNTeIbHOCTb npn6l.7 MNHyT
12. Onopoxhnte emKoCTb I NOtBepdnte.
13. OnopokHNTe IOdON H BCTaBbTe eO6paTHo.
14. OnopoxHnTe eMKoCTb IJIa MoJOKa, OuNCTnTe n CHOBa NODCOEINHnTe. Iporpamma 3aBepseHa. Pn6Op cHOBa rTOB K paOte.
15.HaKMnte KHONky /i Inra BbIXOda n3 npoRpaMMbl.

Stsrungen, was tun? .273

Kundendienst 277
www.siemens-home.bsh-group.com
AE 048030501
LI 052741788
AL 0662064794
LU 26349300
AT 0810550522
LV 067425232
AU 1300368339
ME 050432575
BA 033213513
MK 022454600
BE 070222142
NL 0884244020
BG 029315062
NO 22660600
CH 0434554095
PL 801 191 534
CN 400889999
PT 214250720
Call rates depend on the network used
RO 021 203 9748
CZ 0251095546
RU 88002002962
DE 091170440044
SE 0771 11 22 77 (local rate)
DK 44898985
SK 0244452041
EE 06278730
SL 012007017
ES 902118821
TR 4446688
FI 0207510700
Calls charged at local or mobile rate
XS 0112139552
GR 18182 (AotnKxPwON)
HR 013028226
HU 003614895461
IE 014502655
0.03 € per minute at peak. Off peak 0.0088 € per minute.
IL 089777222
IS 05203000
IT 800018346 (Line Verde)
BSH group is a Trademark Licensee of Siemens AG. Manufacturer's Service for Siemens Home Appliances.
DE Deutschland, Germany
www.siemens-home.bsh-group.de
AE United Arab Emirates,
a
BSH Home Appliances FZE
Round About 13, Plot Nr MO-0532A
Jebel Ali Free Zone - Dubai
Tel.:048814401*
mailto:service.uae@bshg.com
www.siemens.home.bsh-group.com/me
*Sun-Thu 8am to 5pm (exclude public holidays)
AM Armenia, ZUWJUUNUTZIG ZAG LLC
Charenci str. 25
Yerevan 375025
Tel.: 010 55 60 10
mailto:service@zigzag am
www.zigzag.am
Gate 1, 1555 Centre Road
Clayton, Victoria 3168
Tel.: 1300 167 425*
mailto:aftersales.au@bshg.com
www.siemens-home.bsh-group.com/au
*Mo-Fr 24 hours
AZ Azarbaycan Respublikasi, Azerbaijan
Baku Service Company MMC
Azadllq Pr. 116
Baku
Tel.: 125309035
mailto:info@ser-con.az
www.ser-cen.az
Yurd Service MMC
- Bakikhanov Str.
Baku, AZ1007
Tel.: 124803301
mailto:info-service@yurd.az
www.yurd.az
BE Belgique,Belgi,Belgium
BSH Home Appliances S.A - N.V.
Rue Picard 7, box 400
www.siemens-home.bsh-group.com/ be
BH Bahrain,
Bahrain Gas WLL
Bidg 725 / Road 117 / Block 701
Sheikh Salman Highway,
Tubil-701;Bahrain
Manama
Tel.: 01753 11 11
mailto:info@bahraingas.bh
*Sun-Thu 8am to 6pm (exclude public holidays)
BY Belarus, Bénapycb
OOO"BCX BbITOBaTexHnka
ten:4957372962
mailto:mok-kdhl@bshg.com
CH Schweiz, Suisse,
www.siemens-home.bsh-group.com/ch
CN China. 中国
BSH Home Appliances Service
Jiangsu Co. Ltd.
19F, Jinling Asia Pacific Tower,
No.2 Hanzhong Road,
Gulou District,
210005 Nanjing, Jiangsu Province
Service Tel.: 400 8899 999
mailto:careline.china@bshg.com
www.siemens-home.bsh-group.cn
*phone rate depends on the network used
CY Cyprus, Kuppo
BSH Ikiakes Syskeves-Service
39, Arh. Makaariou III Str.
2407 Egomi/Nikosia (Lefkosia)
Tel:77778007
mailto:EGO-CYCustomerService@
bshg.com
CYN Turkish Rep. Of North
Cyprus
Argas Limited Company
37 Osman Pasa Cad. K. Çiltlik
Lefkosa
Tel.: 02284070
mailto:argas.teknik@yar-group.com
Semson Ticaret Sti. Ltd.
Bedrettin Demirel Cad. no 17
Girne
Tel.: 0816 04 94
mailto:m defterali@ercantangroup.com
CZ Ceska Republika, Czech Republic
Vice informaci (napr. zaručni podminky, prodloužena zaruka aj.) naleznete na webovych strankéch www.siemens-home.bsh-group.com/cz/ nebo naskontaktujeta +420 251 095 511
BSH Home Appliances Ltd. Grand Union House Old Wolverton Road Wolverton
Milton Keynes MK12 5PT
To arrange an engineer visit, to order
spare parts or accessories or for
product advice please visit
www.siemens-home.bsh-group.com/uk
Or call
Tel.: 0344 892 8999*
*Calls are charged at the basic rate please check with your telephone service provider for exact charges.
GE Georgia,
Elit Service Ltd.
Vake-Saburtalo district,
Intersection of Al. Kazbegi ave.
and Kavlaradze Str. 0160
Kavtaradze str. 1
Tbilisi
Tel.: 32 300 020
mailto:info@es.ge
GR Greece, EAA
BSH Ikiakes SiskevesA.B.E. Central Branch Service 17km E.O.Athinon-Lamias & Potamou 20 14564 Kifisia TnIepuvo:2104277600 mailto:knf-CustomerService@bshg.com www.siemens-home.bsh-group.com/gr
HK Hong Kong, 香港
BSHHomeAppliancesLimited
香港新界至湾南山公路388號中染大厦23楼07室
Unit07,23/F,CDWBuilding,
388CastlePeakRoad
Tsuen Wan,New Territories,
HongKong
Tel.:25656151(HK)
Tollfree0800030(Macao)
mailt:siemens.hk.service@bshq.com
www.siemens-home.bsh-group.com.hk
IE Republic of Ireland
BSH Home Appliances Ltd
M50 Business Park,
Ballymount Road Upper,
Walinstown
Dublin 12
To arrange an engineer visit, to order spare parts and accessories or for product advice please call Tel.:014502655* www.siemens-home.bsh-group.com/ie * Cals are charged at the basic rate, please check with your telephone service provider for exact charges.
IL Israel
C/S/B/ Home Appliance Ltd.
- Hamasger St.
North Industrial Park
Lod. 7129801
Tel.: 089777222
mailto:csb-serv@csb-td.co.il
www.siemens-home.bsh-group.com/vil
IN India, Bhārat,
BSH Household Appliances Mfg. Pvt. Ltd,
Arena House, Main Bldg, 2nd Floor,
Plot No. 103, Road No. 12,
MIDC, Andheri East
Mumbai 400093
Toll Free 1800 209 1850
www.siemens-home.bsh-group.com/in
Mo-Sa 6am to 8pm (exclude public holidays)
IS Iceland
Smith & Norland hf. Noatuni 4
105 Reykjavik
Tel:05203000
www.sminor.is
IT Italia, Italy
www.siemens-home.bsh-group.com/it
JO Jordan,
Tahboub Brothers For International
Supplies Co
16 Salim Bin Al Hareth Street
Amman,11844
Tel:065861555
mailto:service@tahboub.org
mailto:crm@tahboub.org
www.tahboub.org
KG Kyrgyzstan,
Kbipnb3 Pecnybnikacbi
OcOO Alfa Systems
Jibek Jolu str. 40
Bishkek
Tel.: 0702 985353
mailto:alfas-service@mail.ru
LU Luxembourg
www.siemens-home.bsh-group.com/lu
MT Malta
Aplan Limited
The Atrium
Mriehel by Pass
BKR3000 Birkirkara
Tel.: 025495122
mailto:services@theatium.com.mt
NL Nederlande, Netherlands
www.siemens-home.bsh-group.nl
NO Norge, Norway
BSH Hushholdningsapparater A/S
Grensesvingen 9
0661 Osp
Tel.: 22 68 05 73
maillo: Siemens-Service-NO@bshg.com
www.siemens-home.bsh-group.com/no
PL Polska, Poland
www.siemens-home.bsh-group.pl
PT Portugal
BSHP Electrodomésticos,
www.siemens-home.bsh-group.com/pt
RU Russia, Poccow
OOO"5CX BbTObBle PnpOpby
CepBnO r npOn3Bognten
Manar Kanyckaa, 15
119071 MockBa
Ten: 8 (800) 200 29 62
mailto:hotlineru@bshg.com
www.siemens-home.bsh-group.ru
SE Sverige, Sweden
BSH Home Appliances AB
Landsvagen 32
169 29 Solna
Tel:0771195500
mailto:Siemens-Service-SE@bshg.com
www.siemens-home.bsh-group.com/se
SK Slovensko, Slovakia
www siemens-home.bsh-group.com/sk/
Yakkacinarskaya street No. 144/4
Dushante
Tel.: 446007872
mailto:Lola.Mirzoeva@vostok.tj
www.volna.tj
TM Turkmenistan, Turkmenistan
Bayram Anna Yuryewna
Stariya marka, Atabeyeva str.
Spectrum magaza
Ashgabat
Tel.: 012 26 94 16
mailto:steptm@mail.ru
TR Türkiye, Turkey
BSH Ev Aletleri Sanayi
ve Ticaret A.S.
Fatih Sultan Mehmet Mahallesi
Balkan Caddesi No. 51
34771 Umraniye, Istanbul
Tel.: 02164446688*
mailto:careline.turkey@bshg.com
www.siemens-home.bsh-group.com/tr
^ Cagiri markazni sabit halldarsn
aramann bedeli sehir icucretendirme
Cep telefonlanndan isakullanlan
tarfeyegoredeigiskenlikgostermektedir
UA Ukraine, YkpaHa
TOB "BCX Nobytoba Texhika"
Ten:0600300153*
maito: BSH-serviceua@bshg.com
www.siemens-home.bsh-group.com/ua
BekouTBAHIO-NIINIIN
39.00 10 18.00
UZ O'zbekiston Respublikasi, Republic of Uzbekistan
Elektronik Magnat
Beruni street No: 5/6
Tashkeni
Tel:712156333
mailto:magnet.service.uzb@gmail.com
ZA South Africa
BSH Home Appliances (Pty) Ltd.
96 Fifteenth Road, Randjespark
1685 Midrand-Johannesburg
Tel. 086 002 6724
mailto:bsh@iopen.co.za
mailto:applianceserviceza@bshg.com
www.siemens-home.bsh-group.com/za

BSH Hausgeräte GmbH
Carl-Wery-StraBe 34
81739 München
GERMANY
siemens-home.bsh-group.com

8001212965 (001119)


- Table of contents
- Intended use
- Important safety information
- Warning
- Danger of electric shock!
- Risk of scalding (Home Connect)!
- Hazard due to magnetism!
- Risk of suffocation!
- Risk of burns!
- Risk of injury!
- Fire hazard!
- Environmental protection
- Saving energy
- Environmentally-friendly disposal
- Getting to know your appliance
- How to use these instructions:
- Included in delivery
- Assembly and components
- Depending on the model:
- Controls
- Display
- Rotary selector
- Accessories
- Before using for the first time
- Installing and connecting the appliance
- Commissioning the appliance
- Selecting language
- Notes
- Selecting water hardness
- en Before using for the first time
- Do you want to connect to Home Connect?
- Do you want to insert a water filter?
- Filling the bean container
- Filling the water tank
- Operating the appliance
- Selecting a drink
- en Operating the appliance
- Preparing coffee using freshly ground beans
- Preparing coffee using ground coffee
- Caution!
- Preparing drinks with milk
- Using the milk container
- Coffee drinks with milk
- Milk froth or warm milk
- Dispensing hot water
- Warning Risk of burn
- Adjusting beverage settings
- Adjusting the coffee strength or selecting ground coffee
- Aroma setting
- Adjusting the milk/coffee mixing ratio
- Selecting cup size
- Preparing two cups at once
- Adjusting the drink temperature
- Setting aromalntense
- Setting the grinding level
- Cup warmer
- Customising
- Creating a user profile
- Editing or deleting user profile
- Saving individual drinks
- Childproof lock
- Activating the child-proof lock
- Deactivating the child-proof lock
- Menu settings
- Changing settings
- The following settings are available:
- en Menu settings
- Starting the "Water filter"or "frost protection" programme
- Water filter
- Inserting or replacing a water filter
- Removing the water filter
- Frost protection
- Home Connect
- Important:
- Setting up
- Automatic registration in the home network
- Manual registration in the home network
- Switching Wi-Fi on and off
- Additional settings
- Disconnecting
- Connect to the app
- Remote Start
- Risk of scalding!
- Device info
- Remote diagnostics
- About data protection
- Declaration of Conformity
- CE
- Daily care and cleaning
- Risk of electric shock!
- Cleaning agent
- Not dishwasher-safe:
- Dishwasher- safe:
- Cleaning the appliance
- Cleaning the drip tray and coffee grounds container
- Cleaning the milk container → Fig. 7
- Cleaning the milk system
- Warning Risk of burns!
- Cleaning the brewing unit
- Service programmes
- Rinse milk system
- Dscaling
- calc'nClean
- Trouble shooting
- en Trouble shooting
- Customer service
- Technical data
- E number and FD number
- Guarantee
- Table des matieres
- B 3aBcHMoCTH OT MoJeHN:
- Злем entblу упраьени
- BbI6paTb JHeCTKOcTB BOdBi
- YTO6bI yCTaHOBHTb CB83b CHome Connect
- YTo6bI HcNoJb3OBAtB HnIbTp IJIa BOdBi
- HanoJIHeHHe eMKoCTn IJI KoΦeIHBIX 3epeH
- yKa3aHHa
- HanoJIHeHne pe3epByapa IJRA BOIbI
- Yka3aHnA
- YnpaBJIeHne 6bITOBbIM npn6opom
- BbI6Op HAnNTka
- MoIouHa IeHa HIN TeIIIOe MOJOKO
- PnroTOBJIeHne ropeyB BoIbI
- !IpeDynpexKdeneHne
- HactpoHa KpeocTn KoFe HIn BbI6Op MoIOTOro KoFe
- Hac troika apomata
- Yka3aHn
- HactpoHa COOTHOseHnMoJOKa H Koe
- BbI6op pa3mepa yawkn
- PnroToBJeHne DByx ChaWeK cpa3y
- IzhmeheHne TempepaTypbHaHTKa
- Hac troika aromalntense
- Hac troponka ctenen nomona
- !PpeDynpEeHdEHe
- Onachoctb TpaBMnpoBaHHa!
- BHHMaHHe!
- Ponorpeb yawek
- Персандаця
- Hac troponka
- A B T O M A T H U E C K A P E R N C T P A Z N A B D O M A S H E N C E T H
- PyuHaI perHcTpaunB IdomaShnei cTeN
- ru Home Connect
- EkeiHeBHyIyXoI N OuchTka
- PpeynpeKdeneHne
- OnachocTb nopaxHeHn 3JIeKTpHuYeCKnM TOKOM!
- UncTaaee cpeIcTBO
- BHHMaHne!
- OuHCTHa POnDoHa H eMHOCTn IJN KofoeHoi rUun
- OuHCTKa eMKoCTn Ia MoJOKa
- OuNTka cNCTeMbI NOaHu MOJOKa
- IpeynpeKdHne Onachoctb oXora!!
- Ounstka 3abapouhoro 6loka
- CepBnchbIe npoRpaMMbl
- Yka3aHH
- CZ Ceska Republika, Czech Republic
- GE Georgia,
- GR Greece, EAA
- HK Hong Kong, 香港
- IE Republic of Ireland
- IL Israel
- IN India, Bhārat,
- IS Iceland
Brand : SIEMENS
Model : EQ.9 plus connect s700
Category : Coffee maker