
PGHW1010 - Boiler QLIMA - Free user manual and instructions
Find the device manual for free PGHW1010 QLIMA in PDF.

| Product Type | Water Heater (Portable Shower) |
| Brand | Qlima |
| Model | PGHW1010 |
| Use | Outdoors or well-ventilated area; camping and leisure |
| Power Source | LPG (butane, propane, or mixtures) |
| Max. Gas Tank | 15 kg |
| Gas Pressure | 30 mbar (low-pressure regulator EN 16129:2013) |
| Gas Connection | Flexible hose 80-150 cm, inner diameter 8-12 mm |
| Water Connection | Water inlet and outlet (fig. 7); pump + filter recommended |
| Ignition | Automatic by battery (2 D-type batteries) |
| Controls | Button M (on/off), B (gas flow), H (water flow) |
| Operating Temperature | 1 °C to 60 °C; do not use in strong wind (<3 Beaufort) |
| Frost Protection | Drain water after each shower (open valve K) |
| Safety | Do not cover; keep away from flammable materials; do not use indoors; flame detection |
| Maintenance | Deep cleaning twice a year; leak check before each use |
| Spare Parts and Repairability | Original manufacturer parts; repair by approved installer; annual maintenance by certified service station |
| Warranty | 24 months from date of purchase |
| Weight | Not stated |
| Dimensions | Not stated |
Frequently Asked Questions - PGHW1010 QLIMA
User questions about PGHW1010 QLIMA
0 question about this device. Answer the ones you know or ask your own.
Ask a new question about this device
Download the instructions for your Boiler in PDF format for free! Find your manual PGHW1010 - QLIMA and take your electronic device back in hand. On this page are published all the documents necessary for the use of your device. PGHW1010 by QLIMA.
USER MANUAL PGHW1010 QLIMA
natural_image
White Qlima portable water heater with attached hose and control knobs (no visible text or symbols)guarantee
2
YEARS
| D | GEBRAUCHSANWEISUNG | 6 |
| DK | BRUGERVEJLEDNING | 18 |
| F | MANUEL D’UTILISATION | 28 |
| FIN | KÄYTTÖOHJEET | 40 |
| GB | USER MANUAL | 50 |
| N | BRUKSANVISNING | 60 |
| NL | GEBRUIKSAANWIJZING | 70 |
| PL | INSTRUKCJA OBSŁUGI | 80 |
| S | ANVISNINGAR FÖR ANVÄNDNIN | 92 |
SPECIFICATIONS
PORTABLE GAS WATER HEATER

| Model name, Type, Tipo, Modèle, Model, Modello, Modell | PGWH1010 | |
| Capacity profile, Kapacitetsprofil, Perfil de capacidad, Profil de capacité, Kapasiteettiprofili, Profilo di capacità, Capaciteitsprofil, Kapasitetsprofil, Kapacitetsprofil | A1 | |
| Gas category, Gaskategori, Categoría de gas, Catégorie de gaz, Kaasuluokka, Categoría di gas, Gascategorie, Gasskategori, Gaskategori | I3B/P(30) propane, butane or their mixtures, 28-30 mbar, G30/G31: 30 mbar*I3+ butane, 28-30 mbar / Propane, 37 mbar, G30: 28-30 mbar, G31: 37 mbar** | |
| Consumption, Gasforbrug, Consumo, Consommation, Kaasun Kulutus, Consumo, Verbruik, Styrke, Gasförbrukning | 828 gr/h (max.) | |
| DK, NL, NO, SE | * | Countries of destination |
| FR, BE, IT, | ** | |
| Min/Max ambient temperature, Temperatura ambiente mínima / máxima, Min / Max température ambiante, Temperatura ambiente min / max, Min./max. omgivende temperature, Suurin/pienin ympäristön lämpötila, Min / Maks omgivelsestemperatur, Min-Max omgevingstemperatuur, Min./maks. temperatura otoczenia,Min-Max omgivningstemperatur | 1/60 °C | |
| Q nom/min | = 1 | 0.5/6.8 KW |
| P nom/min | = 9,0/5.8 KW - 5,5 L/MIN | |
| pw (max) = 10 barpw(min) = 0,3 bar | DC 3V | |
| PIN nr. 0063DM7739 | ||
Distributed in Europe by PVG Holding B.V.
Made in P.R.C.
PVG Holding BV, Kanaalstraat 12 C, 5347 KM Oss, the Netherlands PO. Box 96, 5340 AB OSS, The Netherlands, Qlima.com


More info:

0063/22
Fig. 1
| DE | DK | FR | FI | GB | NO | NL | PL | SV | |
| A | Flammensicht - fenster | Vindue til flammetjek | Fenêtre de vérification de la flamme | Liekin tarkastu-sikkuna | Flame check window | Flammekontrol- Ivindu | Venster voor vlamcontrole | Okienko do sprawdzania płomienia | Kontrollfönster för eldląga |
| B | Flammenkapa - zitätsregler | Regulator til flammekapa-citet | Régulateur de capacité de flamme | Liekin kapasite-etin säädin | Flame capacity regulator | Flamme kapasi-tetsregulator | Regelaar voor vlamintenstiteit | Regulator wydajności płomienia | Kapacitets-regulator för eldląga |
| C | Entzündungs-anzeige | Antændingsin-dikator | Témoin d'allumage | Sytytyksen merkkivalo | Ignition indicator | Tenningsindi-kator | Ontstekingsin-dicator | Wskaźnik zapłonu | Tändningsindi-kator |
| D | Batteriefach Batte | iboks Coffre de batterie | batterie | Paristorasia | Battery Box | Batteriboks | Batterijcompar-timent | Przedział na baterie | Batteriląda |
| E | Gaseinlass | Gasindgang | Entrée de gaz | Kaasun syöttö | Gas Inlet | Gassinntak | Gasinlaat | Wlot gazu | Gasinlopp |
| F | Heißwasser-auslass | Udløb til varmt vand | Sortie d'eau chaude | Kuuman veden ulostulo | Hot water outlet | Varmtvann-sutlop | Uitlaat heet water | Wylot ciepłej wody | Varmvattenut-tag |
| G | Abdeckung | Dæksel | Couvercle | Suojus | Cover | Deksel | Afdekking | Pokrywa | Lucka |
| H | Wasserfluss - steuerung | Vandstrøms-kontrol | Contrôle du débit d'eau | Veden virtauk-sen ohjaus | Water flow control | Vannstrøms-kontroll | Regeling water-debiet | Pokrętło do sterowania przepływem wody | Vatten-mängdregle-ring |
| I | Heißwas-ser-Temperatur-anzeige | Temperaturvis-ning for varmt vand | Affichage de la température de l'eau chaude | Kuuman veden lämpötilan näyttö | Hot water temperature display | Varmtvanns temperaturin-dikator | Weergave tem- peratuur heet water | Wyświetlacz wskazujący temperaturę ciepłej wody | Visning av varmvatten-temperatur |
| J | Wassereinlass | Vandindløb | Entrée d'eau | Veden syöttö | Water inlet | Vanninntak | Waterinlaat | Wlot wody | Vatteninlopp |
| K | Druckablass - ventil/Ablauf | Trykaflast-ningsventil/afløb | Soupape de sécurité/drain | Paineenrajoi-tusventtiili/tyhjennys | Pressure relieve valve/Drain | Trykkavlast-ningsventil / avløp | Overdrukven-tiel/Afvoer | Zawór bezpieczeń-stwa/spust | Tryckavlast-ningsventil/avlopp |
| L | Trage-/Monta-gegriff | Bære-/monte-ringshåndtag | Poignée de transport/montage | Kanto-/asen-nuskahva | Carrying / mounting handle | Bære-/monte-ringshåndtak | Draag/monta-gehandvat | Uchwyt do przenos-zenia/mocowania | Bär-/monte-ringshandtag |
| M | ON/OFF-Taste | Tænd/sluk-knap | Bouton on/off | Virtapainike | On/off button | På / av-knapp | Aan-uit knop | Przycisk Wł./ Wył. | På/Av-knappen |
Tabel 1
INSTALLATIONSMETHODE:
INSTALLATIONSMETODE:
INSTRUCTIONS RELATIVES AU STOCKAGE
CONDITIONS DE GARANTIE
Read this user manual carefully before using the appliance and keep it for future reference. Install this device only when it complies with local/national legislation, ordinances and standards. This product is intended to be used as a portable water heater on camping sites and around residential houses in normal household conditions. Use only outdoors or in well ventilated areas! Only use this appliance with LPG containers max 15 kg, filled with butane, propane or their mixtures. All as specified on the rating label and the technical paragraph in this manual. Do not use with any other gas. Do not use with natural gas. It is important that every space where the product is used has sufficient air ventilation as otherwise dangerous situation can occur. No modifications to the safety system are allowed, as that will invalidate the guarantee that the air probe will work properly. Consult your dealer in case of doubt. This appliance requires a hose and a regulator. In case of doubt ask for information from your gas supplier. This appliance is constructed in conformity with the applicable Gas Appliance Regulation (EU) 2016/426 (GAR) and keeping the standard EN26:2015 as a guideline.

WARNINGS
- Read the Directions for Use before using the heater.
- Install the heater according to the instructions as described in the installation section of the directions for use.
- This appliance is manufactured according to CE safety standards. Nevertheless, as with any other device, care must be taken.
- The appliance is only suitable for use in dry, not dusty, locations.
- Do not use in leisure vehicles such as caravans and auto caravans.
- Make sure that the correct gas is used and that the gas containers are not exposed to heat or extreme temperature changes. Always store the gas containers in a cool, dry and dark place.
- Always use a suitable and approved low pressure regulator. In case of any doubt contact your local dealer.
- Use the heater only outdoors or in well-ventilated spaces. In this way the gases produced by combustion will be removed by fresh air.
- Never use the appliance in places where harmful gases or fumes may be present (e.g. exhaust gases or paint fumes).
- WARNING: If the appliance is positioned too close to inflammable materials you may risk fire.
- For safety reasons take care when children or animals are in the proximity of the appliance, as with any other device, and make sure that children are always aware of the presence of a burning appliance.
- This appliance is not intended for use by persons (including children) with reduced physical, sensory or mental capabilities, or lack of experience and knowledge, unless they have been given supervision or instruction concerning use of the appliance by a person responsible for their safety.
• After use close the gas container.
- Follow the instructions to find any gas leakage as described in these Directions for Use.
- Children should be supervised to ensure that they do not play with the appliance.
- In order to avoid overheating, do not cover the device.
- The device must not be located immediately below a socket outlet.
- The cover of this appliance is intended to prevent direct access to heating elements and must be in place when the heater is in use.
- The cover does not give full protection for young children and infirm persons.
- This appliance can be used by children aged from 8 years and above and persons with reduced physical, sensory or mental capabilities or lack of experience and knowledge if they have been given supervision or instruction concerning use of the appliance in a safe way and understand the hazards involved.
• Children shall not play with the appliance.
- Cleaning and user maintenance shall not be made by children without supervision.
- Only replace gas cylinder in a flame free environment.
- WARNING: Do not move the appliance when in operation.
WARNING: Make sure to follow these
instructions for use. Incorrect use and/or not following the instructions can lead to dangerous situations causing severe injuries to humans and/or serious damage to property.
- Warning: Do not interfere with any of the sealed components.
- Conversion to other gases shall be carried out by a qualified installer, as described in the installation instructions.
- Contact an autorised gas appliance installer for installation, maintenance and adjusting of the appliance
- Maintenance to this appliance should be done 2 times per year by an autorised gas appliance installer
- This heater is intended and able to operate OUTDOORS within the ambient temperature 1° and 60°C. Do not use for the supply of drinking water. This water heater is not dedicated for providing (hot) drinking water and is not dedicated for delivering sanitary water. Use only for cleaning materials.
- Use rain water or water from other natural source such as a lake. Use a pump + filter to supply the water to the heater at the correct pressure and without dirt/pollution. Alternatively place a water reservoir at a higher level than the water heater in order to have the water coming into the water heater at sufficient pressure.
ASSEMBLING THE APPLIANCE
Before connecting the low-pressure regulator, please follow the instructions provided with the low-pressure regulator.
The manufacturer is not responsible for any harm or damage if attention is not paid to the points described above. Do not twist the flexible tubing or the hose. Gas hose to be minimal 80 cm and max 150 cm. Internal diameter between 8 and 12 mm. Make sure that the gas hose applies with local legislation and standards.
INSTALLATION REQUIREMENTS
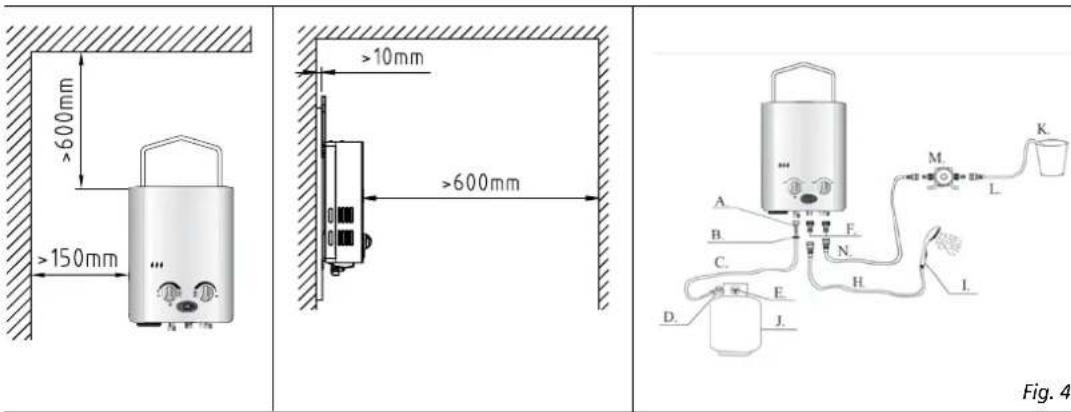
- The flame-check window of the water heater shall be at eye level of the user.
- Make sure all electrical lines or electric equipment is at least 400mm away from the appliance in all directions.
• Clearance distances: see fig. 2 and fig. 3. - The product must be positioned vertical with the gas- and water connections mounted perfectly downwards.
- Make sure the product is fixated thoroughly so it cannot fall.
INSTALLATION METHOD:
Carefully remove your appliance from the box and check the contents for any damage. Mount the product as shown in fig 6.
DIRECTIONS FOR USE
If you have any doubts concerning the heater, please contact qualified service personnel. Keep all packaging material out of the reach of young children. Before connecting the low-pressure regulator, please check and read the following: The appliance should only be powered by propane-butane in a container with a maximum weight of 15 kg. Connect the low-pressure regulator with a fixed calibration of maximum 30 mbar that complies with EN 16129:2013. The hose should be according to national standards. For correct connection, follow the instructions provided with the low pressure regulator.
- Connect the regulator to the gas container.
- Connect the correct end of the gas hose to the regulator (see fig. 4).
- Connect the other end of the gas hose to the appliance (see fig 4). Use the 3 in 1 multi country connector if required. (refer to separate delivered picture manual related to the 3 in 1 multi country connector).
Before connecting the low-pressure regulator to the gas container, make sure that the gas container is closed and that there are no open flames (i.e. a lit oven) in the place where you are working. Connect the low-pressure regulator according to the user instructions that are provided with the low-pressure regulator. Check for gas leaks: see relative section.
- To replace the gas container, make sure that the gas container is closed (follow the user instructions provided with the low-pressure regulator).
- Make sure that there are no open flames or other sources of heat in the area in which you are working.
- Only change the gas cylinder in a amply ventilated area, away from any ignition source (candle, cigarettes, other flame producing appliances, ...).
- In addition it is recommended that the gasket seals of the regulator and the flexible rubber hose be checked to ascertain their condition. If you have any doubt concerning the condition of the hose or the seals, replace them.
- Make sure that you do not damage the connection or any other components.
- Never turn the gas container upside down in order to make full use of the contents. This may release liquid residues left in the container that damage the appliance Irreparably.
-
For disconnection or connection of the low-pressure regulator, always follow the user instructions provided with the regulator.
-
The manufacturer is not responsible for any harm or damage if attention is not paid to the points described above.
- Do not twist the flexible tubing or the hose.
- Connect the water hose water-in and water-out as shown in fig 7.
- Mount the shower head bracket using the 2 screws provided in the package show in figure 8.
BATTERY:
Install the two pieces D cell batteries as shown in fig 5. NOTE the "+" and the "-" to be in correct position!
Before use: check for any GAS LEAKS
- Close the gas container.
- Make sure there is sufficient ventilation.
- Prepare a bucket of soapy water.
- Open the gas container.
- Brush the soapy water on all fittings and connections of the gas circuit.
- If there is a gas leak, bubbles will rise up from the location of the leak.
- If a leak is found, close the gas container.
- Tighten the fitting and the metal rings of the connection.
- Open the gas container and repeat the procedure again.
USE
For outdoor use only.
WARNING:
Make sure the appliance cannot get wet. Protect from water and rain.
- Turn the regulation knob on the gas container into the open position.
- Release the knob and turn it to the position corresponding with the desired amount of heat.
- Open the water tap.
- The product is now ready to use.
- See fig, 1: control panel.
M = Turn on the appliance with button M
B = more / less heat/gas
H = more / less water flow
WARNING:
The water from the appliance maybe very hot. Always carefully check the water temperature. Risk of burned skin!
- Most hot water: Turn B (gas flow) clock wise to max. and turn B counter clockwise to min.
-
Reduce the temperature of the water: turn H counter clockwise to min. and turn B clockwise to max.
-
When Button M is in on position "1" and there is sufficient gas and water flow than the appliance will ignite automatically. During the ignition phase the light C will light up. The light C will extinguish again when the flames are in full operation.
- To turn off the device, close the gas container and close the water tap. Switch button M to the "0" position.
- Turn off the appliance after every use.
WARNING:
Frost will damage the product beyond repair and is not covered by the warranty. In order to prevent freezing damage: drain the water from the appliance after every shower by opening the pressure relief valve K counter clockwise.
After draining the water close valve K again.
Do not use the appliance when there is strong wind (only use at <3 beaufort wind force)
WARNING:
Only use approved gas tubes.
Only use gas tubes between 60 and 150 cm. with a diameter between 8 and 12 mm.
Check the gas tube every 3 months for cracks or leakage. Immediately replace if any cracks or leakages are found.
NEVER cover the appliance!
Keep inflammable, volatile and/or explosives away from the appliance.
Do not use the water from the appliance as drinking water!
In case of any abnormal burning (smoke, yellow flame, unstable flame etc) stop the use and contact your local dealer.
Do not touch any part of the Appliance during or short after use as the body of the appliance might be hot. Only the turning knobs B and H and the on/off button M.
SWITCH OFF AND DISCONNECT
Additional instructions for disconnecting the hot water geyser in the correct order to prevent (water) damage:
- Turn off the power switch and remove the batteries.
- Close the gas bottle and then disconnect the gas pipe.
- Turn off cold water supply tap.
- Empty the spray head and the water hose (e.g. in a bucket).
- Disconnect the cold water supply hose and disconnect the hot water hose (towards the spray head). Allow the device to drain for a while and then mount the sealing caps back on the pipes.
CAUTION: the device may still contain water. When disconnecting the cold and hot water pipe, this water will flow out!
- Let the unit and the accessories dry. Store everything when it's dry in the original packaging.
MAINTENANCE
- Switch off the appliance and close the valve on the gas container. Allow it to cool down for at least 10 minutes before cleaning it.
- Keep the appliance clean. Remove any dust and other dirt with a damp cloth. Use regular cleaning products for stubborn stains. Clean the heater thoroughly two times a year.
- Inspect it each time before using it. Use a mixture of soapy water and water to check the connections for leaks. If any bubbles occur, there is a leak. It should be repaired immediately.
- Check the hose / regulator connection each time before using it. If the hose shows any sign of wear and tear or has any cracks, it should be replaced immediately.
- The appliance should be inspected by a certified service station once a year. The appliance should not be installed and/or used in rooms.
- The appliance maintenance operations necessary to enable it to be put back into service after these devices have operated.
- If this device or one of their parts are dismantled previously existing seals shall be remade.
- Only manufacturer's original parts should be used for replacements.
- WARNING: The safety device shall not be put out of operation. Inappropriate interference with the safety device can cause serious injuries and/or damage.
If you fail to consult and/or follow up the rules, instructions and explanation, the warranty will no longer be valid, and the manufacturer will no longer deal with any damage to the appliance and/or your environment under the warranty.
The use of this product and the elements required for that purpose is entirely at the end user's own risk.
TROUBLESHOOTING
| PROBLEM SOLUTION | |
| No flame/no ignition in winter (temp. <7 °C) | Check whether butane or propane is being used: butane will burn ever more poorly as the temperature drops below 7 °C because it then turns into liquid. With LPG (=propane/butane mixture), it will often help to give the gas cylinder a shake. |
| No flame | - Too low water flow. Solution: Increase water flow.- Too low water pressure. Solution: Increase water pressure to a pressure >0.03 MPa.- The pressure relief valve is open. Solution: Tighten the pressure relief valve by turning the valve clockwise.- Not enough gas: Exchange gas bottle. |
| Yellow flame instead of blue flame Con | Contact service center immediately for help. |
| Reasons\Troubles | The flame goes out | No ignition after opening water valve | Tickking noise in ignition | Yellow flame | Abnormal smell | Low water temperature under highest temperature setting | Extremely hot temperature under highest temperature setting | Burning after closing the water valve | Indicator light is on | The lowest possible water outlet temperature from the geyser remains too high. | Solutions | |
| Gas valve not open • • | Turn on main valve or replace the gas cylinder | |||||||||||
| Gas valve half open • • | Turn on the main valve | |||||||||||
| Unsuitable pressure gas | High • • | Contact the repairer to check the gas pressure valve | ||||||||||
| Low • • | ||||||||||||
| Cold water valve closed • | Turn on the water supply main valve | |||||||||||
| Freezing • | Use after defrosting | |||||||||||
| Inadequate water supply • • | • | • | • | Call repairer to check water pressure, then clean the filter | ||||||||
| Water temperature control mistake | • | • • | Turn the temperature and gas rods properly | |||||||||
| Insufficient fresh air | • | • | Open the ventilation hole to let enough fresh air in | |||||||||
| Power shortage | • • | Replace the batteries | ||||||||||
| Burner clogged | • • | Contact the service center | ||||||||||
STORAGE INSTRUCTIONS
If it is decided that the appliance is not to be used any more, it is recommended that it be disconnected from the gas container. Also cut the rubber hose. If children play with the appliance, make sure that dangerous parts are removed. Never dispose of non-biodegradable products in the environment, but dispose of them in accordance with current national legislation.
GUARANTEE CONDITIONS
The appliance is supplied with a 24-month guarantee, commencing on the date of purchase. All material and manufacturing defects will be repaired or replaced free of charge within this period. The following rules apply:
- We expressly refuse all further damage claims, including claims for collateral damage.
- Repairs to or replacement of components within the guarantee period will not result in an extension of the guarantee.
- The guarantee is invalidated if any modifications have been made, non genuine parts are fitted or repairs are carried out by third parties.
- Components subject to normal wear, such as filters, batteries, lamps and heating elements are not covered by the guarantee.
- The guarantee is valid only when you present the original, dated purchase invoice and if no modifications have been made.
- The guarantee is invalid for damage caused by neglect or by actions that
deviate from those in this instruction booklet.
- Transportation costs and the risks involved during the transportation of the appliance or components of the appliance shall always be for the account of the purchaser
- Damage caused by not using suitable spare parts is not covered by the guarantee. To prevent unnecessary expense, we recommend that you always first carefully consult the instructions for use. Take the appliance to your dealer for repairs if these instructions do not provide a solution.
NO - FRASKRIVELSE GASS VARMEAPPARATER
Distributed in Europe by PVG Holding B.V.
Benötigen Sie weitere Informationen oder treten Probleme auf, besuchen Sie bitte unsere Website www.qlima.com, oder setzen Sie sich mit unserem Kundendienst in Verbindung (T: +31 412 694 694).
© For alle yderligere oplysninger eller ved eventuelle problemer med apparatet henvises til www.qlima.com eller det lokale Kundecenter (T: +45 77 34 33 30).
ES Si necesita información o si tiene algún problema, visite nuestra página Web www.qlima.es, o póngase en contacto con el servicio cliente (T: +34 916 113 113).
F Si vous souhaitez obtenir des informations supplémentaires ou si vous rencontrez un problème, rendez-vous sur notre site Web (www.qlima.fr / www.fr.qlima.be) ou contactez notre service client (T : +33 2 32 96 07 47 / +32 (0)3 326 39 39).
FHN Jos haluat huoltoapua, lisätietoja tai laitteen kanssa tulee ongelmia, tutustu verkkosivustoon osoitteessa www.qlima.com tai kysy neuvoa PVG kuluttajapalvelukeskuksesta (T: +45 77 34 33 30).
(68) If you need information or if you have a problem, please visit the our website (www.qlima.com) or contact our sales support (T: +31 412 694 694).
① Per informazioni e in caso di problemi, visitate il sito Web www.qlima.it oppure contattate il Centro Assistenza Clienti (T: +39 0571 628 500).
Hvis du trenger informasjon, eller hvis du har et problem med produktet, kan du gå til nettsidene www.qlima.com. Alternativt kan du kontakte med PVG' forbrukertjeneste (T: +45 77 34 33 30).
NL Als u informatie nodig hebt of als u een probleem hebt, bezoek dan de onze website (www.qlima.nl / www.qlima.be) of neem contact op met de afdeling sales support (T: +31 412 694 694 / +32 (0)3 326 39 39).
Se necessitar de informações ou se tiver problemas, visite o Web site www.qlima.es ou contacte o Centro de Assistência (T: +34 916 113 113).
PL W przypadku problemów i w celu uzyskania szczegółowych informacji odwiedź stronę internetową Qlima dostępną pod adresem www.qlima.com lub skontaktuj się z Centrum kontaktów Qlima (T: +48 48 613 00 70)
⑤ Om du behöver service eller information eller har problem med apparaten kan du besöka www.qlima.com eller kontakta Qlima kundtjänst (T: +45 77 34 33 30).
⑤Dl Če želite dodatne informacije, obiščite spletno mesto podjetja na naslovu www.qlima.si ali pokličite na telefonsko (T: +386 (0)41 674 139).