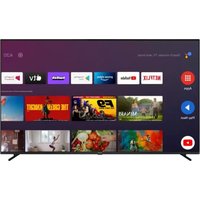
LED436UHD - TV AIWA - Free user manual and instructions
Find the device manual for free LED436UHD AIWA in PDF.


User questions about LED436UHD AIWA
0 question about this device. Answer the ones you know or ask your own.
Ask a new question about this device
Download the instructions for your TV in PDF format for free! Find your manual LED436UHD - AIWA and take your electronic device back in hand. On this page are published all the documents necessary for the use of your device. LED436UHD by AIWA.
USER MANUAL LED436UHD AIWA
natural_image
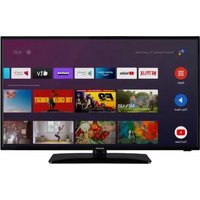
Front view of a flat-screen TV with two side supports at the bottom (no text or symbols visible)43 LED
4K ULTRA HD
ENGLISH
Read these safety instructions before using your device and store them for possible future reference.
-
If the cord is damaged, have it repaired by the manufacturer, its service or a similarly qualified person in order to avoid any hazard.
-
The power supply must be replaced by a new one in case of malfunction, because this power supply is not repairable.
-
The socket-outlet should be installed near the equipment and should be easily accessible.
-
The product is not intended for use by persons (including children) with reduced physical, sensory or mental capacity. Persons who have not read the manual, unless they have received explanations by a person responsible for their safety and supervision should not use this unit.
-
Children should be monitored to ensure that they do not play with the product.
-
When connected the cord should always be readily accessible.
-
The apparatus should not be exposed to dripping or splashing of water or liquids and no objects filled with liquids such as flowers vases shall be placed on the product.
-
Do not impede the normal ventilation of the product when intended to use.
-
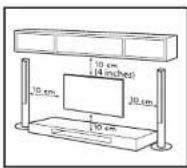
Always leave a minimum distance of 10cm around the unit to ensure sufficient ventilation.
-
Open flame sources, such as candles, should not be placed on top of the device.
-
The device is intended for use only in a temperate climate.
12. CAUTION:
Danger of explosion if battery is incorrectly replaced or not replaced by the same type or equivalent.
-
The battery should not be exposed to excessive heat such as sunshine, fire or similar.
-
Different types of batteries, new and used batteries should not be mixed.
-
The battery must be installed according to the polarity.
-
If the battery is worn, it must be removed from the product.
-
The battery must be disposed off safely. Always use the collection bins provided (check with your dealer) to protect the environment.
Thank you for purchasing LED-436UHD: 4K UHD HDR PRO 43 inch tv with Android TV System.
This is your assurance of quality, performance and value. Our engineers have included many useful and convenient features in this product. Please be sure to read this instruction Manual completely to make sure you are getting the maximum benefit from each feature.
This product was manufactured using the highest quality components and standards of workmanship. It was tested by inspectors and found to be in perfect working order before it left our factory.
Model: LED-436UHD
TO PREVENT FIRE OR SHOCK HAZARD DO NOT EXPOSE THIS APPLIANCE TO RAIN OR MOISTURE.
text_image
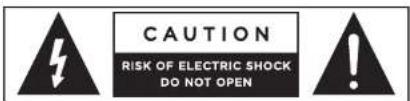
CAUTION RISK OF ELECTRIC SHOCK DO NOT OPENEN 3

LIGHTNING FLASH WITH ARROWHEAD SYMBOL
The lightning flash with arrowhead symbol within an equilateral triangle, it is intended to alert the user of the presence of uninsulated dangerous voltage within the products' enclosure that may be of sufficient magnitude to constitute a risk of electric shock to persons.

EXCLAMATION POINT
The exclamation point within an equilateral triangle, is used to indicate that a specific component should be replaced only by the component specified in the literature for safety reasons.
Notes:
• The images appearing in this manual are for reference only.
• Due to continual revision and improvement of our products designs and specifications are subject to change without further notice.
SAFETY PRECAUTIONS
1. READ INSTRUCTIONS:
All the safety and operating instructions should be read before the product is operated.
2. RETAIN INSTRUCTIONS:
The safety and operating instructions should be retained for future reference.
3. HEED WARNINGS:
All warnings on the product and in the operating instructions should be adhered.
4. FOLLOW INSTRUCTIONS:
All operating and use instructions should be followed.
5. CLEANING:
- Turn Off the unit if it's On before cleaning. - Unplug the unit from the wall outlet before cleaning.
- Do not use liquid cleaners or aerosol cleaners. - Use a damp cloth for cleaning.
6. WATER AND MOISTURE:
Do not use this product near water.
For example:
Near a bath tub, wash bowl, kitchen sink, or laundry tub; in a wet basement; or near a swimming pool; and similar.
7. ACCESSORIES:
Do not place this product on an unstable cart, stand, tripod, bracket, or table. The product may fall, causing serious injury to a child or adult and serious damage to the product.
Use only with a cart, stand, tripod, bracket, or table recommended by the manufacturer, or sold with the product. Any mounting of the product should follow the manufacturer's instructions, and should use a mounting accessory recommended by the manufacturer. A product and cart combination should be moved with car - quick stops, excessive force and uneven surfaces may cause the product and cart combination to overturn.
8. VENTILATION:
Slots and openings in the unit are provided for ventilation and to ensure reliable operation of the product and to protect it from overheating, and these openings must not be blocked or covered. The openings should never be blocked by placing the product on a bed, sofa, rug or other similar surface. This product should not be placed in a built-in installation, such as a bookcase or rack, unless proper ventilation is provided or the manufacturer's instructions have been adhered.
9. POWER SOURCES:
This product should be operated only from the type of power source indicated on the marking label. If you are not sure of the type of power supply of your home, consult your product dealer or local power company. For products intended to operate from battery power, or other sources, refer to the operating instructions.
10. POWER-CORD PROTECTION:
Power-supply cords should be routed so that they are not likely to be walked on or pinched by items placed upon or against them, paying particular attention to cords at the power plug and jack plug socket. During movement, please take care of the power cord. For example: Tie the power cord with a cable tie.
11. NON-USE PERIODS:
The power cord of the product should be unplugged from the outlet when left unused for long periods of time.
If the speaker has to be left unused for a long time, please leave the battery fully charged, otherwise it will cause damage to the battery.
12. LIGHTNING:
For added protection of this product during a lightning storm, or when it is left unattended and unused for long periods of time, unplug it from the wall outlet and disconnect the antenna or cable system. This will prevent damage to the product due to lightning and power-line surges.
13. POWER LINES:
An outside antenna system should not be located in the vicinity of overhead power lines or other electric light or power circuit. When installing an outside antenna system, extreme care should be taken to keep it from touching such power lines or circuits as contact with them might be fatal.
14. OVERLOADING:
Do not overload wall outlets and extension cords as this can result in a risk of fire or electric shock.
15. OBJECT AND LIQUID ENTRY:
Never push objects of any kind into this product through the openings as they may touch dangerous voltage points or shoot-out parts that could result in a fire or electric shock.
Never spill liquid of any kind on the product.
16. SERVICING:
Do not attempt to repair this product yourself as opening or removing covers may expose you to dangerous voltage or other hazards. Refer all to qualified service personnel.
17. DAMAGES REQUIRING SERVICE:
Unplug this product from the wall outlet and refer to qualified service personnel under the following conditions.
a) When the power-supply cord, battery or plug are damaged.
b) If the product has been exposed to rain or water.
c) If liquid has been spilled, or objects have fallen into the product.
d) If the product does not operate normally by following the operating instructions, adjust only those controls that are covered by the operating instructions, as an improving adjustment of other controls may result in damage and will often require extensive work by a qualified technician to restore the product to its normal operation.
e) When the product exhibits a distinct change in performance it indicates a need for service.
18. REPLACE PARTS:
When parts require to be replaced, be sure the service technician has used official parts specified by the manufacturer or they have the same characteristics as the original parts, unauthorized substitutions may result in fire, electric shock and other hazards.
19. HEAT:
The product should be situated away from heat sources such as radiators, heat registers, stoves or other products that produce heat.
PREPARATION FOR USE
Carefully take out all the components from the carton and remove all packaging materials from the components. Make sure that nothing is accidentally discarded with the packing materials.
If possible, save the carton and packaging materials for the unlikely event that the product ever needs to be sent for service. Using the original carton and packing materials is the only proper way to protect the unit from shipping damage.

43" UHD Android smart TV x1 Scre


Remote control x1
AAA type batteries x2

Power cord x1

Base stands x2

Declaration document x1

Quick start guide x1
FEATURES OF THE TELEVISION
• Powered by Android TV.
• Google Assistant
- Wifi Built-in.
• Auto TV Scanning.
- Channel Editor.
• TV Guide Function.
- Teletext FLOF/TOP.
• USB Multimedia Playback.
• Multi-languages On Screen Display.
• Support HDMI, COMPOSITE, LAN, TUNER, USB and CI Slot.
• Digital Audio Output (COAXIAL & OPTICAL Output).
• Audio Output Power 8W+8W
- Surround Mode.
• Detachable Stand Holder.
• TV and Satellite TV Antenna Jack,
- Sleep Timer,
- Hotel Mode.
DISASSEMBLY AND INSTALLATION
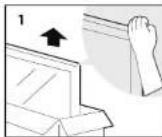
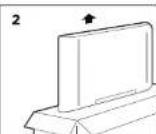
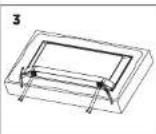
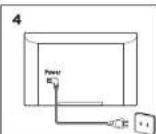
- Open the package.
-
Take out the TV.
-
Install the TV stands.
- Connect the power card.
STAND INSTALLATION
- Place the TV faced down on a soft cloth or cushion to prevent the panel from being damaged.
- Align the Stand with the bottom of the TV and then push the end of stand until the TV is fully seated on the stand. Tighten it with a screw driver (screws are included).
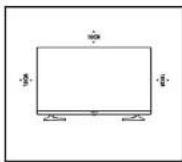
- Install the screen on a solid horizontal surface such as a table or desk. For ventilation, leave at least 10cm all around the set.
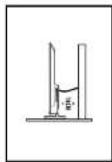
WARNING!
Never place the television on an unstable location. The television set may fall, causing serious personal injury or even death. Many injuries, particularly to children, can be avoided by taking simple precautions such as:
- Using cabinets or stands recommended by the manufacturer of the television.
- Only using sturding furniture to safely place the television.
- Ensuring the television is not overhanging from the edges of the furniture on which it's placed.
- Not placing the television on a high furniture (for example, cupboards or bookcases) without previously securing both the furniture and the television set.
- Not placing a cloth or other objects between the television set and the furniture on which it's placed.
- Educating children about the dangers of climbing on furniture to reach the television or it's controls.
If you are keeping or relocating your current television set, please follow these safety instructions too. (Only for the TV with mass exceeding 7kg).
WALL-HANGING BRACKET
An optional wall mount can be used with your television.
Consult with your local dealer to purchase the recommended wall mount bracket.
Carefully attach the wall mount bracket to the rear of the TV.
Install the wall mount bracket on a solid wall perpendicular to the floor.
Please contact qualified personnel to install the wall mount in any other place other than a perpendicular wall.
Detailed instructions will be included with the wall mount.
Please use a wall mount bracket that adequately secures the apparatus to the wall leaving enough space to connect other external devices.
- Disconnect the power before moving or installing the TV. Otherwise, electric shock may occur.
- Remove the stand before installing the TV on a wall mount.
- The TV may fall causing severe injury if you install it on the ceiling or a slanted wall. Use an authorized wall mount and contact your local dealer or qualified personnel or it won't be covered by the warranty.
- Do not over tighten the screws as this may cause damage to the TV and void your warranty.
- To prevent injury, this apparatus must be securely attached to the floor/wall according to the installation instructions.
- Use screws and wall mounts following these instructions.
Any damages or injuries caused due to misuse or use of unauthorized accessories will not be covered by the warranty.
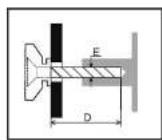
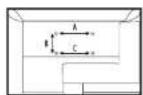
| Model Size: 43" | Top | Down | ||
| Screw | Diameter(mm) "E" | M6 | M6 | |
| Depth(mm) "D" | Max | 21 | 14 | |
| Min | 10 | 5 | ||
| Quantity | 2 | 2 | ||
| VESA (A*8*C) | 200*200*200 | |||
Notes:
- For TV sets with terminals towards the wall, in order to leave enough space to use the terminals, a rubber cushion is needed with each screw to fix the wall mount.
It's a small hollow pillar with an 8mm internal diameter, 18mm external diameter and >30mm height. - The information in this document is subject to change without notice. The manufacturer accepts no liability for damage resulting directly or indirectly from faults, incompleteness or discrepancies between the user manual and the product described.
- In a dry environment due to static electricity, the product may restart and return to the main OSD interface, USB player interface or the previous source mode. It's normal, please continue to operate the TV as you normally would.
DESCRIPTION OF THE TELEVISIOND
FRONT VIEW
natural_image
Simple diagram of a rectangular frame with three labeled corner points (1, 2, 3) and no text or symbols on the frame itself.BOTTOM VIEW
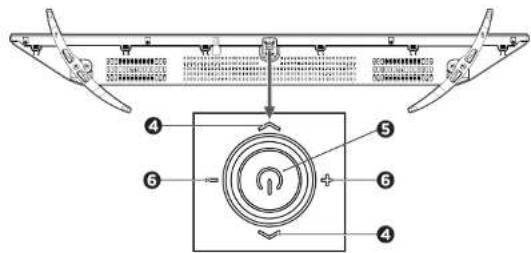
text_image
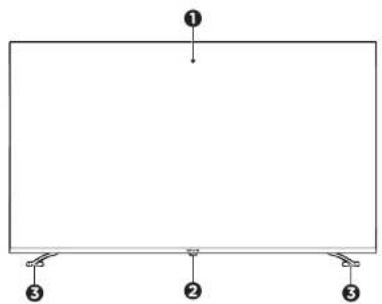
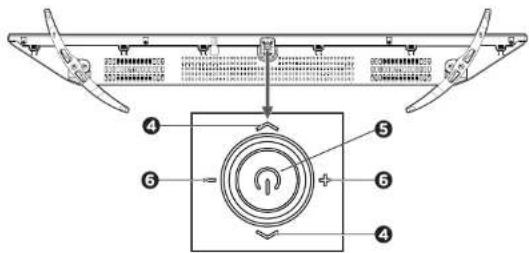
Technical diagram of a mounted air duct system with labeled components and a circular component with a power button symbol.①LED DISPLAY SCREEN
2R REMOTE CONTROL SENSOR & POWER INDICATOR
In standby mode the indicator light is red; when switching on the TV the indicator light turns blue.
3STAND HOLDERS
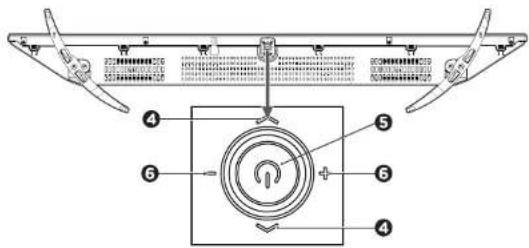
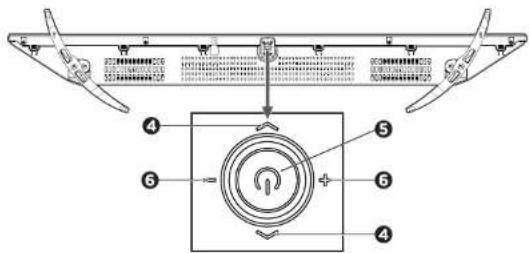
④ CH+ / CH- (CHANNEL +/-)
Press forward to select the next channel or backward to select the previous channel.
5 MULTIFUNCTION & POWER BUTTON
During standby, press to turn on the TV. When TV is on, short press to access the source list, and short press again to access to the selected source. When the TV is on, long press to turn it off.
⑥OL+ / VOL- (VOLUME +/-)
Press left to increase volume or right to decrease the volume level.
EN 10
DESCRIPTION OF THE TELEVISION
BACK VIEW
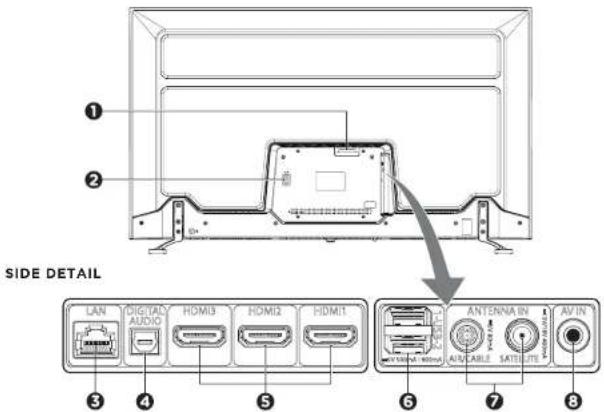
text_image
SIDE DETAIL LAN DIGITAL AUDIO HOM13 HOM12 HOM11 ANTENNA IN AN CABLE SATELENTs AV IN①Cl+
Cl+ card port.
2POWER INPUT
③LAN
Network port.
4 DIGITAL AUDIO
Digital audio output terminal.
5HDMI 1/2/3
HDMI input terminals 1,2 & 3.
ARC function is enabled on HDMI 1 port only
6USB 1 / USB 2
Input slots for USB 1 and USB 2.
7 ANTENNA IN
AIR/CABLE
SATELLITE.
8AV IN
Mini AV input terminal.
CONNECTIONS
BASIC CONNECTION
Ensure all the cables are disconnected from the main unit before connecting it to an AC. Read through the instructions before connecting other equipment.
CI+ CARD PORT
Insert your CI card (Conditional Access Module) to watch special digital channels in your area.
DIGITAL AUDIO OUTPUT
Use a an optical cable to connect the unit with an amplifier or other audio decoding devices for digital audio signal output.
USB 1 / USB 2 CONNECTION
Connect a USB in order to playback music, play videos or display pictures.
AV IN (COMPOSITE VIDEO) CONNECTION
For basic connection, use the composite Audio L/R (white/red) and CVBS (yellow) cable to connect the unit with other devices.
LAN NETWORK PORT
Plug a network cable to the LAN network port to connect your TV to media streaming services and browse the internet.
HDMI 1 / HDMI 2 / HDMI 3 CONNECTION
Use HDMI cable to connect the TV with other devices to a high-definition multimedia signal such as a DVD player.
ANTENNA IN
Connect a coaxial cable to receive signal from the antenna, cable or satellite.
Notes:
- External equipment and cables mentioned herein are not supplied with the TV.
- Make sure all the equipment and power plugs are connected properly and the unit is set in the correct mode before any kind of operation.
BATTERY INSTALLATION & BASIC OPERATION DE
Batteries must be inserted correctly to avoid damaging the remote control. Always remove the batteries when the remote control will not be used for a long period of time, as this may cause leakage to the batteries and subsequently damage the remote.
BATTERY INSTALLATION
Slide out the cover and install 2 AAA TYPE batteries (included), making sure to match the polarity markings inside the compartment as shown:
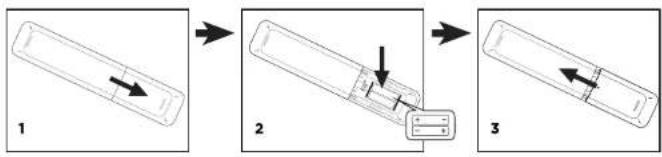
flowchart
graph TD
    A["Component 1"] --> B["Component 2"]
    B --> C["Component 3"]
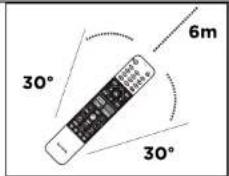
text_image
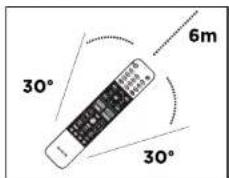
30° 6m 30°Point the remote control towards the remote sensor from no more than 5m and within 60° of the player.
Notes:
• The TV control button must be 'ON' for the remote control to operate.
- Do not shake the remote control vigorously.
- Don't splash liquid on the remote control. Also, do not keep the remote control in a highly humid place.
• Do not place the remote control under direct sunlight as it may damage the unit due to the heat.
- When the remote sensor is under direct sunlight or strong lighting, the remote control will not work. Please change the lighting or TV's position, or operate the remote control closer to the remote sensor.
- If the distance required between the remote control and the apparatus decreases, the batteries are exhausted. In this case, replace the batteries with new ones.
- Do not use different types of batteries (for example, Manganese and Alkaline batteries) together.
• The batteries (battery pack or batteries installed) should not be exposed to excessive heat such as sunshine, fire or the like.
- Please abide by the relevant environmental regulation when disposing the batteries.
- Do not place objects between the remote control and the remote control IR sensor.
- If the remote control is operated near other appliances which generate infrared rays, or if other remote controlled devices using infrared rays are used near the apparatus, it may operate incorrectly.
OF REMOTE CONTROL
text_image
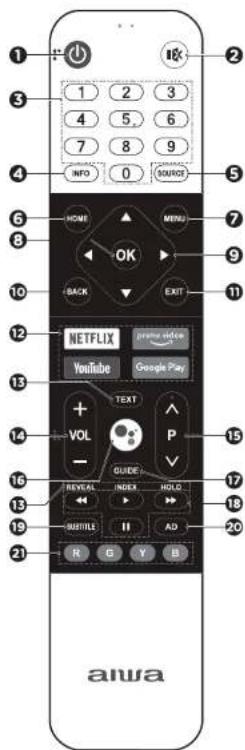
1 2 3 4 5 6 7 8 9 INFO 0 SOURCE HOME MENU OK BACK EXIT NETFLIX breme video YouTube Google Pay + TEXT VOL P - GUIDE REVEAL INDEX HOLD SUBTITLE II AD R G Y B aiwaPOWER ON / OFF ( )
Turn the TV on or to standby mode.
2MUTE()
Mute or restart the TV sound.
3 NUMERICAL BUTTONS
Select the channel directly, or input a number.
4NFO
Access the information interface.
5SOURCE
Select the input source.
6HOME
Access the home page.
⑦MENU
Access the main menu for quick settings.
8DK
Confirm selection.
9NAVIGATION BUTTONS ( , ▲, ▼ ◀ ◀
Navigate through the menu to select the content you need.
10BACK
Return to upper-level content Exit the current screen.
11EXIT
Exit the current operation.
12 APPLICATION BUTTONS
Access specific applications directly.
13TELETEXT BUTTONS
TEXT: Access the teletext menu.
REVEAL: Display/hide the concealed information.
INDEX: Access the index page.
HOLD: Hold the teletext page on screen without updates or changes.
14VOL+/VOL-(VOLUME)
Increase or decrease the volume.
Note:
- Some buttons may not be available for some regions or some models.
DESCRIPTION OF REMOTE CONTROL B
15P / (PROGRAM UP/DOWN)
Change to previous or next channel.
16MIC()
Start talking to the Google Assistant of the TV.
17GUIDE
Access the EPG Interface in DTV mode.
USB PLAY CONTROL BUTTONS
▶ (PLAY): Start playback.
II (PAUSE): Pause playback.
(FAST BACKWARD):
Fast backward the playback.
(FAST FORWARD):
Fast forward the playback.
19 SUBTITLE
Turn on or turn off the subtitle function.
20AD
Turn on or turn off the function of audio description to help the blind or visually-impaired viewers enjoy the program.
21 COLOR BUTTONS (R/G/Y/B)
Execute the prompt function in specific mode.
HOW TO USE THE E-MANUAL
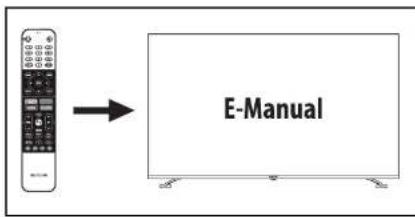
The E-Manual is built into your TV and can be displayed on the screen. To learn more about your TV features, access your E-Manual by referring to the following.
text_image
E-Manual- Press HOME button to access the home page.
- Press ▲/▼/◄/► and OK button to select "E-Manual" in "Apps".
- To check the detailed functions of the remote control, please select the icon and press OK
- Select the ⑦ icon, in order to display how to use the E-Manual, and to learn the meaning of each symbol.
CARE OF THE SCREEN
The screen of your TV can easily accumulate dust or other residual particles depending on its location; therefore, we recommend that you clean it weekly.
- To prevent fire or shock hazard, be sure to turn off and disconnect your unit from the AC power source when cleaning.
- To clean your TV screen, use only a completely dry microfiber cloth. Smoothly wipe the surface of the screen horizontally to avoid scratching the screen.
- If the screen is excessively dirty, you can moisten a cloth minimally with a solution of mild soap and distilled water.
Do not use paper towels to clean the screen, as they may damage and scratch the surface. - Never spray any liquid directly on the screen as it may penetrate the equipment and cause irreparable damage.
- Do not use products containing ammonia, ethyl alcohol, acetone or ethylene chloride. These components may damage the screen.
TO CLEAN THE TERMINALS
If the terminals get dirty, your TV may not recognize easily the different attached sources. To take care of the terminals follow the steps below:
- Turn off and disconnect your TV from the AC power source and unplug any other connected cables and appliances.
- Use a vacuum cleaner with a narrow hose attachment to clean the connections.
- You may need a cleaning liquid in order to clean the TV terminals and connections. If that's the case, we recommend the use of isopropyl alcohol (99%). Although alcohol can work too, it's known to leave some residue as it evaporates.
You should never use water nor any water-based cleaning solutions to clean the terminals. - Completely dry the terminals with a dry cloth once cleaned and reconnect the wires.
CARE OF THE CHASIS
Depending on the location of your TV, dirt may accumulate very easily, so we recommend that you clean hard-to-reach areas at least once a month, such as ventilation slots or speaker grilles, which are very prone to dust and lint:
- The frame and back of the TV can be cleaned using a cloth slightly moistened with a mild soap and distilled water. Clean the TV with gentle circular movements to avoid scratching the outside of the TV.
- To remove dirt from the slots, use a vacuum cleaner with a narrow nozzle attachment at low power. A cotton swab lightly moistened with isopropyl alcohol can be used to supplement the cleaning.
- To clean the speakers, use a lint roller. Dust particles will adhere easily.
CARE OF THE REMOTE CONTROL
The remote control continuously accumulates dirt, dust or grease from hand contact. That's why for a correct functioning during its whole life we recommend cleaning it at least once a month.
- First remove the batteries from their compartment.
- Turn the remote control and tap it gently against the palm of your hand, with the buttons facing down. This will help loosen and remove any dirt that may accumulate on the buttons.
- Use a slightly moistened cloth with warm water and a mild soap to clean the remote control thoroughly.
Use a cotton swab or toothpick in the narrow gaps and small spaces around the buttons. - Finally, rub the remote control again with a soft, dry cloth.
TROUBLE SHOOTING GUIDED
If a fault occurs, first check the points listed below before taking the set to repair.
Do not open the set as there is a risk of electric shock.
If you are unable to solve a problem by following these suggestions, consult your dealer or service center. Under no circumstances should you try to repair the set yourself, as this will invalidate the warranty.
| SYMPTOM CORRECTION | |
| No power Insert the power plug securely into the power outlet. | |
| No operations can be performed with the remote control | Check the batteries are installed with the correct polarities.If the batteries are exhausted, replace them with new ones.Point the remote control at the remote control sensor and operate it again.Operate the remote control from a distance of no more than 6m from the remote control sensor.Remove the obstacles between the remote control and the sensor of the remote control. |
| No key operation (by the main unit and/or the remote control unit) is effective | Disconnect the power plug and then reconnect it. (The TV may not be operating properly due to lightning, static electricity and/or other factors.) |
| No picture or poor picture | Ensure that the equipment is connected properly.Adjust the antenna or use an external antenna.Relocate the unit near a window (if inside a building).Move devices that may cause interference away from the TV.Try auto Tuning again.Try another channel. |
| No sound or distorted sound | Ensure that the equipment is connected properly.Ensure that the input setting for the TV and stereo system are correct.Adjust the master volume to a suitable volume by pressing VOL+/VOL· button.Check the audio settings.Press the MUTE button on the remote control to cancel the mute function. |
| Noise or other interference | Other electronic equipment near the unit may cause interference. Relocate the unit or move the equipment. |
| The web page cannot be displayed completely | Some extensions present on the current WEB page are not supported by the TV. |
| The browser closes automatically | The WEB page contains too much content, which causes not enough memory and the browser closes. |
EN 18
TECHNICAL SPECIFICATION
| MODEL | LED-436UHD |
| Panel type: | UHD (Ultra High Definition) |
| Rated voltage: | AC 110 - 240V- 50/60 Hz |
| Power consumption: | <100 W |
| Standby mode consumption: | <0.5 W |
| Audio output power (L+R): | 8W + 8W (+_10%) |
| Remote control power supply: | DC 3V=, x2 1.5V batteries (AAA/LR03) |
| SIGNAL RECEIVING SYSTEM | |
| ATV receiving system: | PAL / SECAM BG / DK / IATV: 47.25MHz - 865.25MHz |
| DTV receiving system: | DVB-T/T2/S/S2/CDVB-S/S2: [KU] 950MHz - 2150MHz[C] 5150MHz - 5750MHzDVB-T/T2: 174MHz - 230MHz470MHz - 860MHzDVB-C: 50MHz - 858MHz |
| EXTERNAL SIGNAL RECEIVING SYSTEM | |
| Composite unit: | PAL 50Hz/60Hz / SECAM / NTSC3.58/4.43 |
| HDMI input: | 480I /480p/720p/1080I (60Hz) (Video Format)(PC Format) |
| FEATURES | |
| Picture display size: | P2PAuto / 4:3 / 16:9 / Panorama / Zoom |
| Noise reduction | |
| Dolby digital + | |
| HDMI: | CEC+ARC |
| Sleep timer | |
| Auto programming | |
| Software update: | By USB, also internet |
| Language of OSD: | Multiple languages |
| TERMINALS CONFIGURATION | |
| HDMI: | 3 |
| USB: | 2 (USB 2.0 x1, USB 3.0 x1) |
| CI slot: | 1 |
| AV (Audio/Video) Input: | 1 (mlnl) |
| Antenna: | 2 (ATV/DTV x1, S/S2 x1) |
| Optical: | 1 |
| LAN: | 1 |
| DIMENSIONS & STUFFING | |
| Diagonal screen size: | 109 cm |
| Dimensions with stand: | W 958.2° D 189.7° H 596.4 mm |
| Dimensions without stand: | W 958.2° D 89.4° H 555.7 mm |
| Net weight with stand: | 6.9 kg |
| Net weight without stand: | 6.7 kg |
END OF LIFE DISPOSAL
WARNING!
The European directive 2002/96/EC on Waste Electrical and Electronic Equipment (WEEE), requires that old household electrical appliances must not be disposed of in the normal unsorted municipal waste stream.
Old appliances must be collected separately in order to optimize the recovery and recycling of the materials they contain, and reduce the impact on human health and the environment.
The crossed out "wheeled bin" symbol on the product reminds you of your obligation, that when you dispose of the appliance, it must be separately collected.
SUPPORTED TECHNOLOGIES

The terms HDMI and HDMI High-Definition Multimedia Interface, and the HDMI logo are trademarks or registered trademarks of HDMI licensing LLC in the United States and other countries.

Manufactured under license from Dolby Laboratories. Dolby and Dolby Audio and the double-D symbol are trademarks of Dolby Laboratories.
androidtv
Android TV. Google Play, Chromecast and Youtube are trademarks of Google LLC.

For DTS patents, see http://patents.dts.com. Manufactured under license from DTS Licensing Limited. DTS, the Symbol, DTS and the Symbol together, and TruSurround are registered trademarks and/or trademarks of DTS, Inc. in the United States and/or other countries. DTS, Inc. All Rights Reserved.

DVB-T and the DVB logo are trademarks of the DVB Project.
ESPAÑOL
natural_image
Simple diagram with a rectangle and three labeled corner points (①, ②, ③) at the bottom, no text or symbols present.VISTA INFERIOR
text_image
Technical diagram of a mounted air duct system with labeled components and control panel1PANTALLA LED
②SENSOR DE CONTROL REMOTO /R E INDICADOR LED DE ENCENDIDO
text_image
30° 6m 30°natural_image
Simple diagram with a rectangle and three labeled corner points (①, ②, ③) at the bottom, no text or symbols present.VUE DU BAS
text_image
Technical diagram of a smart air conditioner unit with labeled components and control panel1ÉCRAN LED
2SCAPTEUR DE TÉLÉCOMMANDE ET INDICATEUR D'ALIMENTATION À LED DE L'IR
flowchart
graph TD
    A["1"] --> B["2"]
    B --> C["3"]
text_image
6m 30° 30°OPÉRATION DE CONTRÔLE À DISTANCE
▶ (REPRODUCTION): Démarrer la reproduction.
II (PAUSE): Pause de la reproduction.
(REMBOBINAGE):
COMMENT UTILISER LE E-MANUAL (MANUEL ELECTRONIQUE)
text_image
Diagram of a smart air conditioner unit with labeled components and control panel①LED-BILDSCHIRM
text_image
6m 30° 30°- Some buttons may not be available for some regions or some models.
DF 68
WIE MAN DAS E-MANUAL

43" UHD Android smart TV x1

Viti x4

Telecomando x1
Batterie tipo AAA x2
natural_image
Simple diagram with a rectangle and three labeled corner points (①, ②, ③) at the bottom, no text or symbols present.VISTA DAL BASSO
text_image
Technical diagram of a mechanical or electronic component with numbered parts and a central circular button symbol.1 SCHERMO A LED
2R SENSORE DI CONTROLLO REMOTO E INDICATORE A LED DI POTENZA
USCITA AUDIO DIGITALE
text_image
30° 6m 30°
43" UHD Android smart TV x1

Parafusos x4

Controle remoto x1
Baterias tipo AAA x2
natural_image
Simple diagram with a rectangle and three labeled corner points (①, ②, ③) at the bottom, no text or symbols present.VISTA INFERIOR

text_image
Technical diagram of a mechanical or electronic device with labeled components and a central circular component.VISOR LED
2 SENSOR DE CONTROLE REMOTO IR E LED DE POTÊNCIA
text_image
30° 6m 30°text_image
Row of five black-and-white social media platform icons: Facebook, Twitter, Instagram, Pinterest, and YouTubewww.eu-aiwa.com
AIWA CO., LTD.
Shinagawa-Ku