
VCO 42702 AD - Vacuum Cleaner BEKO - Free user manual and instructions
Find the device manual for free VCO 42702 AD BEKO in PDF.

| Product type | Canister vacuum cleaner |
| Brand | Beko |
| Model | VCO 42702 AD |
| Rated power | 750 W |
| Supply voltage | 220-240 V~ |
| Frequency | 50-60 Hz |
| Action radius | 9 m |
| Noise level | 75 dB(A) |
| Filter type | HEPA (exhaust and motor protection filter) |
| Dust container capacity | 2 L (estimated) |
| Power cord length | 6 m (estimated) |
| Appliance weight | 5 kg (estimated) |
| Dimensions (L x W x H) | 30 x 25 x 40 cm (estimated) |
| Body material | Plastic |
| Container type | Bagless, transparent container |
| Power adjustment | 4 positions (Carpet, Eco, Hard floor, MAX) |
| Automatic cord rewind | Yes, with rewind button |
| Telescopic tube | Yes, with adjustment latch |
| Included accessories | Carpet/parquet brush, hard floor brush, crevice tool, upholstery brush, sofa brush |
| Protection class | Class II (double insulation) |
| Intended use | Domestic |
| Filter maintenance | Wash with cold water, dry for 24 hours minimum |
| Warranty | 2 years (standard) |
Frequently Asked Questions - VCO 42702 AD BEKO
User questions about VCO 42702 AD BEKO
0 question about this device. Answer the ones you know or ask your own.
Ask a new question about this device
Download the instructions for your Vacuum Cleaner in PDF format for free! Find your manual VCO 42702 AD - BEKO and take your electronic device back in hand. On this page are published all the documents necessary for the use of your device. VCO 42702 AD by BEKO.
USER MANUAL VCO 42702 AD BEKO
EN-DE-BG-CS-HU-RO-SL-ES-PL-IT-FR
Please read this manual first!
Dear Valued Customer,
Thank you for preferring this Beko appliance. We hope that you get the best results from your appliance which has been manufactured with high quality and state-of-the-art technology. For this reason, please read this user manual and all other provided documents carefully before using the appliance and keep it as a reference for future use. If you hand over the appliance to someone else, give the user manual as well. Follow the instructions by paying attention to all the information and warnings in the user manual.
Meanings of the Symbols
Following symbols are used in various sections of this manual:

Important information and useful hints about usage.

WARNING:Warnings against dangerous situations concerning the security of life and property.

Protection class for electric shock.

This product has been manufactured in environmental friendly modern plants without giving any harm to the nature.
CONTENTS
| ENGLISH | 4-11 |
| DEUTSCH | 12-21 |
| BULGARIAN | 22-30 |
| ČESKY | 31-39 |
| MAGYAR | 40-48 |
| ROMANIAN | 49-59 |
| SLOVENŠCINA | 60-68 |
| ESPÁÑOL | 69-79 |
| POLSKI | 80-91 |
| ITALIANO | 92-101 |
| FRANÇAIS | 102-110 |
1 Important safety and environmental instructions
This section contains safety instructions that will help protect from risk of personal injury or property damage.
Failure to follow these instructions invalidates the granted warranty.
1.1 General safety
- This appliance complies with international safety standards.
- This appliance can be used by children aged from 8 years and above and persons with reduced physical, sensory or mental capabilities or lack of experience and knowledge if they have been given supervision or instruction concerning use of the appliance in a safe way and understand the hazards involved. Children shall not play with the appliance. Cleaning and user maintenance shall not be made by children without supervision.
-
If the power cable or the appliance itself is damaged, do not use it. Contact an authorised service.
-
Your mains power supply should comply with the information on the rating plate of the appliance.
- The mains supply on which you will use the appliance must be secured with a 16 A fuse minimum.
- Do not use the appliance with an extension cable.
- To avoid any damage to the power cable, prevent it from being squeezed, bent or rubbed on sharp edges.
- Do not touch the plug when the appliance is plugged in if your hands are damp or wet.
- Do not pull the power cable when unplugging the appliance.
- Do not vacuum flammable materials and when vacuuming cigarette ash, make sure that it has cooled down.
- Do not vacuum water or other liquids.
- Protect the appliance from rain, humidity and heat sources.
- Never use the appliance in or near places where combustible or inflammable ambience or places are present.
1 Important safety and environmental instructions
- Unplug the appliance before cleaning and maintenance.
- Do not immerse the applians or its power cable in water for cleaning.
- Check the hose of the appliance regularly. Do not use if it is damaged and contact an authorised service.
- Do not dismantle the appliance.
- Only use the original parts or parts recommended by the manufacturer.
- Do not use the appliance without filters; otherwise, it can get damaged.
- When vacuum-cleaning the stairs, the appliance should be located below the user.
- If you keep the packaging materials, store them out of the reach of children.
1.2 Compliance with the WEEE Directive and Disposing of the Waste Product
This product complies with EU WEEE Directive (2012/19/EU). This product bears a classification symbol for waste electrical and electronic equipment (WEEE).
This symbol indicates that this product shall not be disposed with other household wastes at the end of its service life. Used device must be returned to official collection point for
recycling of electrical and electronic devices. To find these collection systems please contact to your local authorities or retailer where the product was purchased. Each househol performs important role in recovering and recycling of old appliance. Appropriate disposal of used appliance helps prevent potential negative consequences for the environment and human health.
1.3 Compliance with RoHS Directive
The product you have purchased complies with EU RoHS Directive (2011/65/EU). It does not contain harmful and prohibited materials specified in the Directive.
1.4 Package information
Packaging materials of the product are manufactured from recyclable materials in accordance with our National Environment Regulations. Do not
dispose of the packaging materials together with the domestic or other wastes. Take them to the packaging material collection points designated by the local authorities.
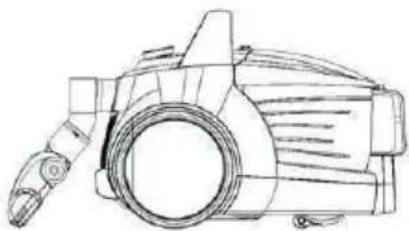
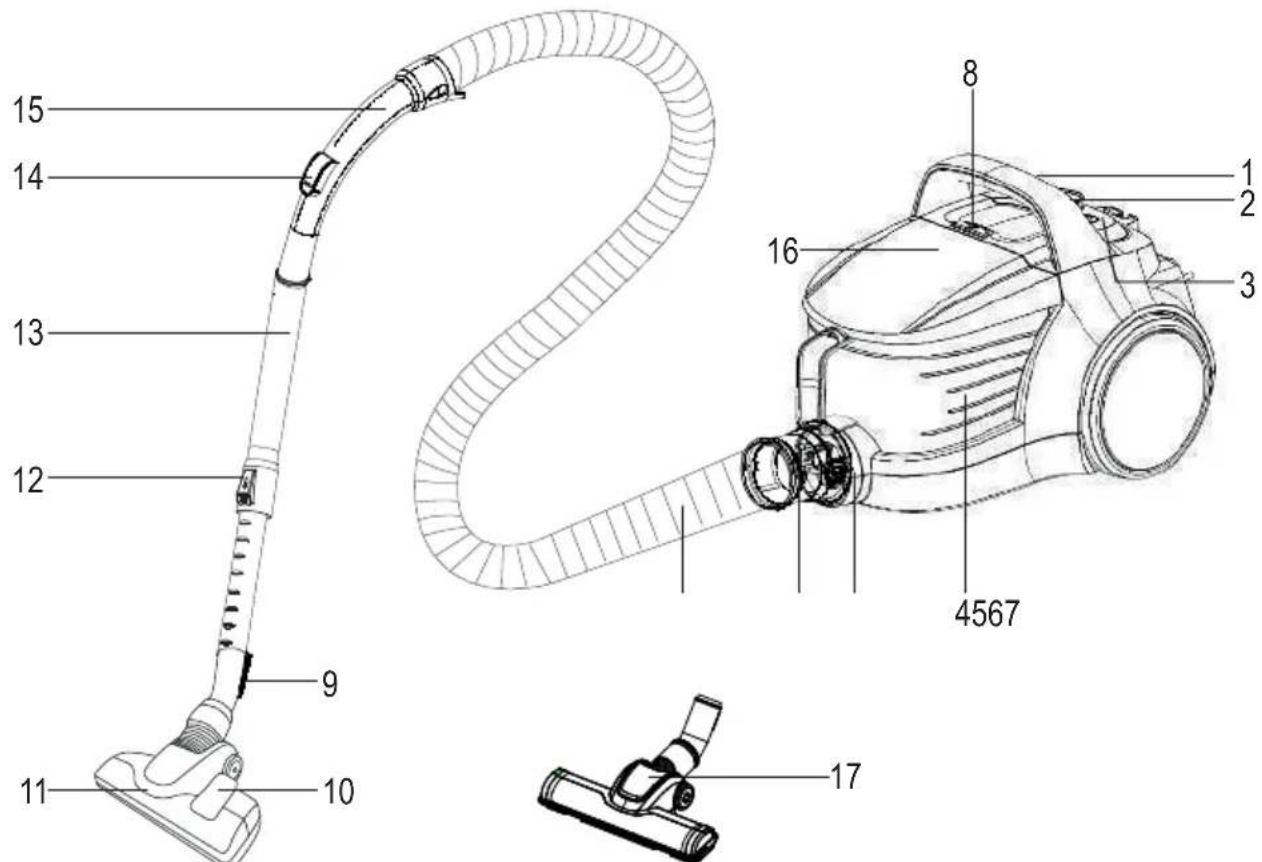
2 Your vacuum cleaner
2.1 Overview
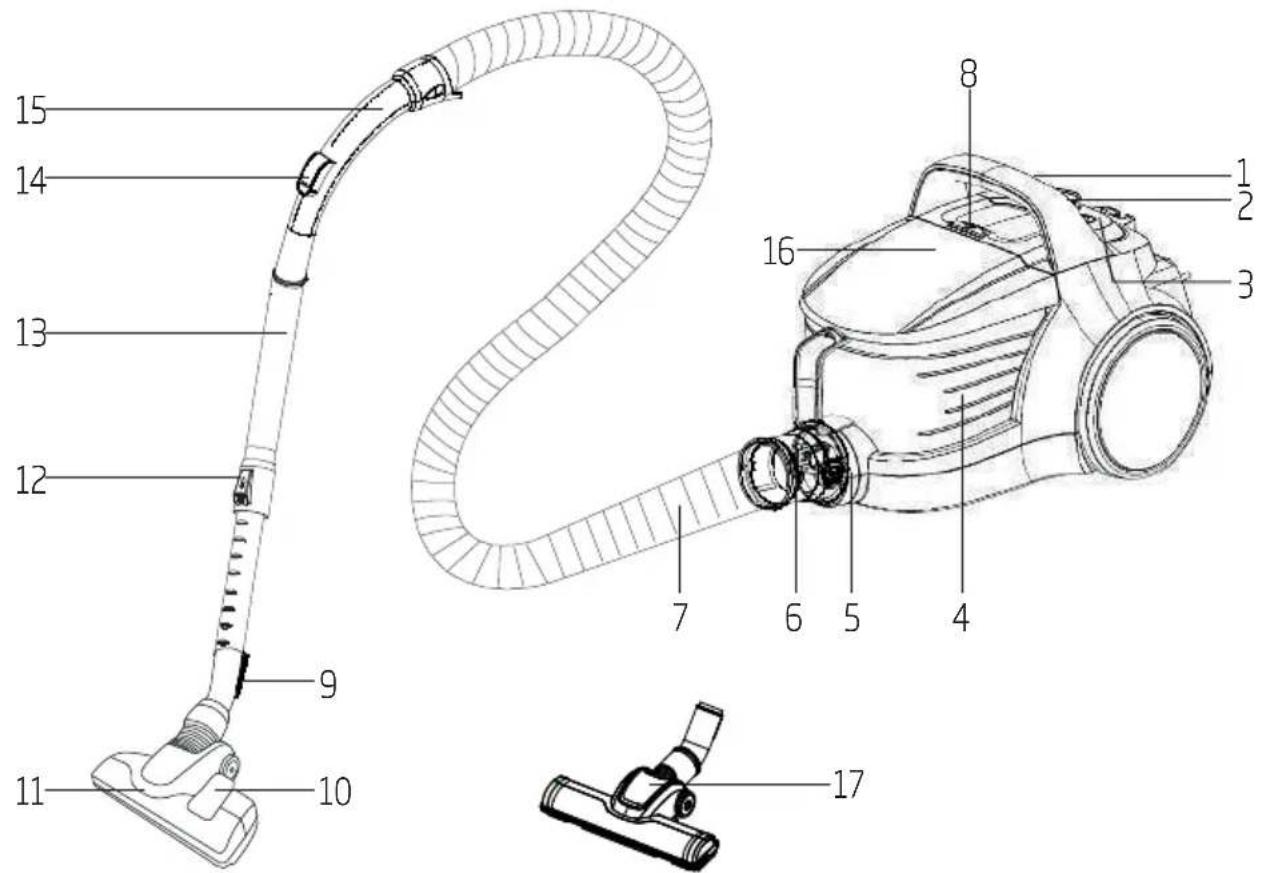
- On/Off button
- Suction power adjustment knob
- Power cable winding button
- Dust container
- Suction nozzle
- Hose cap
- Hose
- Dust container removal button
- Parquet/carpet brush parking hook
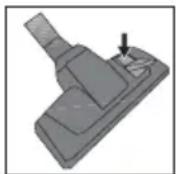
- Brush adjustment latch
- High performance parquet/carpet brush
- Telescopic tube adjustment latch
- Telescopic tube
- Vacuum control
- Handle
- Top lid
- Hard floor brush
2.2 Technical data
Supply voltage: 220-240V\~,50-60Hz
Power : 750W
Operating radius : 9m
Sound : 75 dB(A)
Rights to make technical and design changes are reserved.
The values which are declared in the markings affixed on your appliance or other printed documents supplied with it represent the values which were obtained in the laboratories pursuant to the pertinent standards. These values may vary according to the usage of the appliance and ambient conditions.
3 Usage
3.1 Intended use
The appliance has been designed for household use and is not suitable for industrial use.
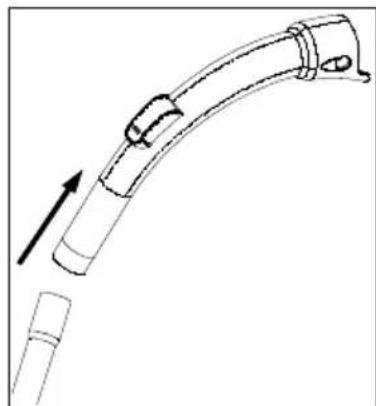
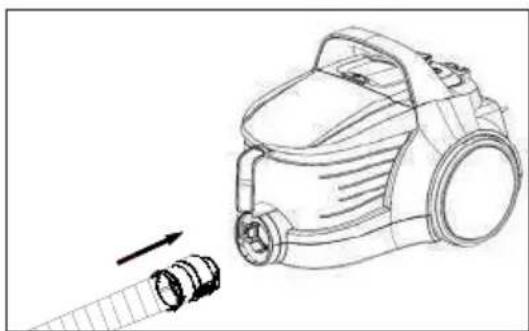
3.2 Attaching/removing the hose
- To attach the hose (7), push the hose cap (6) in the direction of arrow until it is aligned with the housing (you will hear a click).
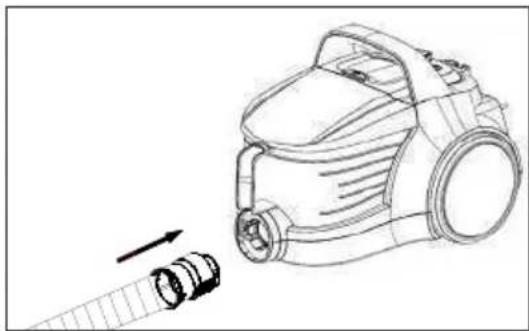
-
Projecting parts on the hose cap should be aligned correspondingly.
-
To remove the hose (7), press the unlocking buttons on the sides of the hose cap (6) and pull the hose.
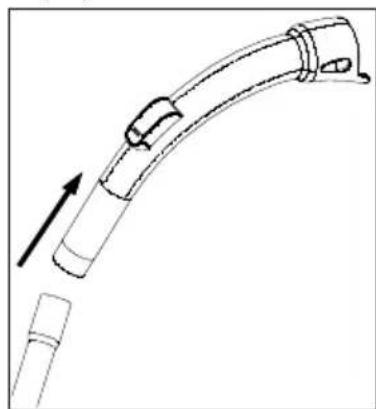
3.3 Attaching/removing the telescopic tube
- Attach the telescopic tube (13) to the handle (15).
2.Pull the telescopic tube (13) from the handle 15) to remove it.
- You can extend or shorten the telescopic tube (13) by sliding the telescopic tube adjustment latch (12) back and forth.

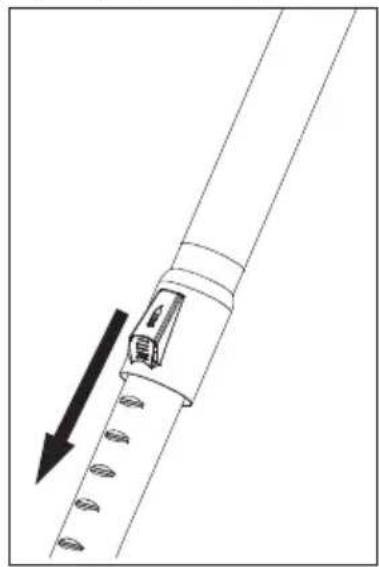
3.4 Attaching/removing the parquet/carpet brush
- Attach the telescopic tube (13) to the parquet/ carpet brush (11) in the arrow direction.
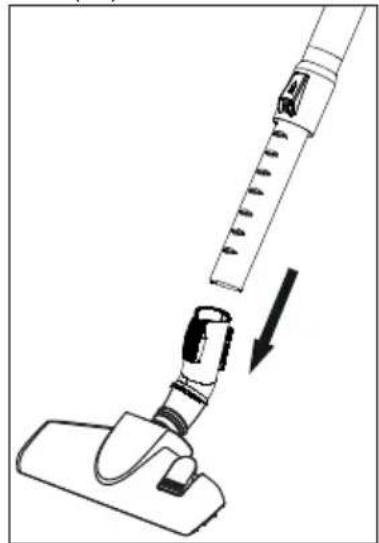
- You can remove the telescopic tube (13) from the parquet/carpet brush (11) by pulling it.
3 Usage
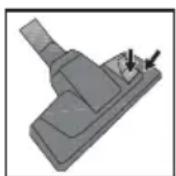
3.5 Adjusting the parquet/ carpet brush
Press the adjustment latch (10) located on the parquet/carpet brush (11) and;
Vacuum on firm ground and parquet; extend the brush before vacuuming.
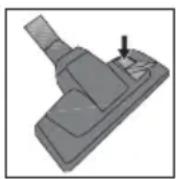
Vacuum on carpets and rugs; retract the brush before vacuuming.
3.6 Adjusting the suction power
You can adjust the suction power of the appliance according to the type of the surface to be cleaned. You can turn the suction power adjustment knob (2) found on the appliance's body clockwise to increase the suction power. Turn the suction power adjustment knob anti-clockwise to decrease the suction power.
There are four settings for suction power:

- Turn the suction power adjustment knob (2) towards the carpet icon to clean carpets.
eco
- Turn the suction power adjustment knob towards the eco icon to clean curtains, tablecloths and sofas.

- Turn the suction power adjustment knob towards the parquet icon to clean hard surfaces.

- Turn the suction power adjustment knob towards the MAX icon to clean heavily soiled hard surfaces and carpets.
3.7 Operation
- Plug in the appliance after pulling the power plug located at the back of the appliance.
- Use the suction power adjustment knob (2) found on the appliance to set it to the desired suction power (see 3.6).
- Press the on/off button (1) to switch on your appliance.
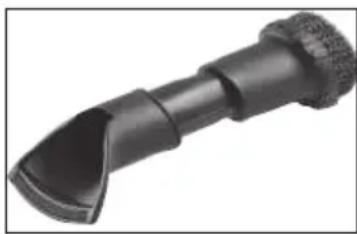
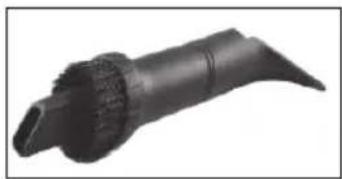
3.8 Accessories
Accessories have been designed in one piece to save space and provide practical use.
Upholstery tool
- Grasp it from the dust brush area and pull it backwards slowly.
- A click will be heard, indicating that the button on the body has seated into its slot.
- Attach the end of the handle or the telescopic tube (13) to the inner side of the dust brush.
- You can now start vacuum cleaning.
3.Pull the accessory to remove it when the process is complete.
3 Usage
Dust brush
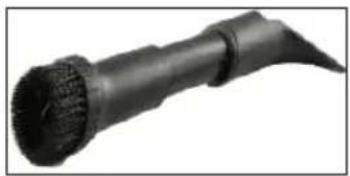
- Grasp it from the dust brush area and pull it backwards slowly.
- A click will be heard, indicating that the button on the body has seated into its slot.
- Attach the end of the handle or the telescopic tube (13) to the inner side of the upholstery tool.
- You can now start vacuum cleaning.
3.Pull the accessory to remove it when the process is complete.
Crevice tool
- If the accessory is on, press the button found on the body and push it slightly to close.
- It clicks.
- Attach the end of the handle or the telescopic tube (13) to the inner side of the upholstery tool.
- You can now start vacuum cleaning.

WARNING: The crevice tool must be adjusted to remain outside.
3.Pull the accessory to remove it when the process is complete.

WARNING: Do not make cleaning by using the handle's (15) end part.
3.9 Hard floor brush
The hard floor brush (17) was developed for use on hard floors such as tile, ceramic, parquet, wooden floors etc.
It prevents potential scratches while cleaning hard floors thanks to its specially-developed soft hair.
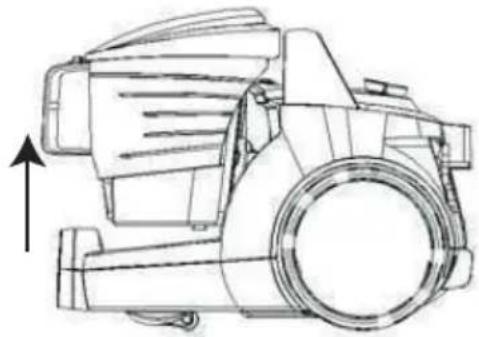
3.10 Switching off the vacuum cleaner and parking feature
- Switch off the appliance with the on/off button (1) and unplug it.
- Press the cable winding button (3) to wind the cable inside the appliance.
Vertical parking feature
Attach the hook of the parquet/carpet brush (9) to the parking groove located at the bottom part of the appliance.
Horizontal parking feature
Attach the hook of the parquet/carpet brush (9) to the parking groove located at the rear side of the appliance.
4 Cleaning and care
Switch off and unplug the appliance before cleaning it.

WARNING: Never use gasoline, solvent, abrasive cleaning agents, metal objects or hard brushes to clean the appliance.
4.1 Emptying the dust container
- Press the dust container removal button (8) to remove the dust container (4) and remove the dust container in the direction of the arrow by holding from the dust container carrying handle.
- Open the lid of the dust container (4) by pressing the inner latch and empty the container.
- When you have emptied the dust, close the dust container lid (4).
- A click will be heard.
- Insert the dust container (4) into its place by holding it from the handle.
4.2 Cleaning the filters

WARNING: Do not use appliances producing hot air such as hair dryer or heater to dry the filters.

WARNING: Do not install the filters without completely drying them; otherwise, smell of moisture may occur during use, water can leak from the back of the appliance or the filters may get damaged.

WARNING: Attach the filters into their places after they have dried.
4.2.1 Motor protection filter and HEPA filter
These filters are located on the rear side of the dust container (4).
- Press the dust container removal button (8) and remove the dust container (4).
- Remove the HEPA filter and motor protection filter found at the back of the dust container (4).
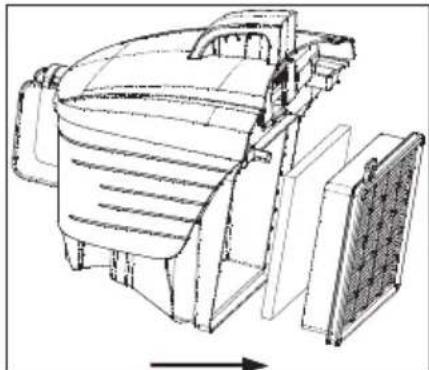
- After washing the sponge protection filter under running water, wring it out slightly and leave it to dry (for 24 hours minimum).
- Shake off the HEPA inlet filter to eliminate the dusts on it. After that, you can wash it by holding its clean side under running cool water.
- If you wash the HEPA filter, dry it at room temperature (for 24 hours minimum). Do not use it before ensuring that it is completely dry.
4 Cleaning and care
4.2.2 HEPA filter and outlet filter
HEPA outlet filter is located on the rear side of the appliance.

- Remove the HEPA filter by pulling it from its handle.
- Shake off the HEPA outlet filter to eliminate the dusts on it. After that, you can wash it by holding its clean side under running cool water.
- If you wash the HEPA filter, dry it at room temperature (for 24 hours minimum). Do not use it before ensuring that it is completely dry.
- Remove the outlet filter that is found at the back of the cover.
- After washing the outlet filter under running water, wring it out slightly and let it dry (for 24 hours minimum).
4.3 Storage
If you do not intend to use the appliance for a long time, store it carefully.
Unplug the appliance.
- Keep the appliance out of the reach of children.
4.4 Handling and transportation
- During handling and transportation, carry the appliance in its original packaging. The packaging of the appliance protects it against physical damages.
- Do not place heavy loads on the appliance or on the packaging. The appliance may get damaged.
- Dropping the appliance may render it non-operational or cause permanent damage.
Hecna3BaHeTo Ha HnCTpyKuNTe BODI Do OTMaHa Ha IpeDoctaBe- HaTa rapaHcNia.
1.1 067a
6e30nacHOCT
To3n npOdyKT cboTBeTCTBa MekdUnapOnHnte CtaHdApTn 3a 6e30napocT.
To3n ypei moKe Da Ce n3- PON3Ba OT Deua Had 8-roDnHa Bb3pact N OT Xopa C HamaJIeHn FIn3nueCKN, CetNBn IIN YMCTBeHn CnOCOBHOCTN IIN OT Xopa, KOnTO HAMAT ONIT N 3HaHN, CTnra Te Da CE Ha6IIODaBAT N Da IM Ce DaIAT Yka3aHnIa TNO OTHOWeHne Ha 6e3OpaChata YnotpeBa Ha ypea N CpeuA-Hnte OnaCHOCTITE. DeaTa He Tpr6Ba Da INrpaT C ypea. PoNCTBaHeTo N IOdIbPkKaTa He Tpr6Ba Da Ce n3BbPswBat OT Deua, OCBeH aKO He Ca KOHTPOJIpAHN OT Bb3pactTHN.
Hnkora He n3noJ3BaIte ypeDa, aKO 3axpaHbAaT Ka6eI nn camnT ypeE NOBpeDen. CbpxTe ce c otOpn3npaH cepBn3.
- Правец далданнite 3a MeCTHOTO eIeKtpo3axpaHbaHe OTROBaprT Ha INΦopMaцЯТа Bbpxy TaBeIkata C daHn.
3axpaHbHeTo Ha ypeDa Tp86Ba Da 6bDe oBe3OpacEno C nped- a3nteI OT MmHmym 16 A.
He n3noJ3BaIte ypeDa c ydJI-XnTeI Ka6eI.
3a da n36eHHeTe eBentyaJIHn NOBpeN Ha 3axpaHbAunia Ka6eI, He ro npNTsckaiTe, He ro npErbBaIte i He ro TbpKaITe IIO OCTPN p6OBe.
Hnkora He nnpaTe ypeDa nIu IeNceJa, KOrato Ca BkIouyeHn, C MOKpn IJI N BJaXHn pBZe.
He n3KJIIOUyBaIte OT KOHTaKTa IbprnKn Ka6eNa Ha ypeDa.
He nouchte c npaxocmykackaTa 3aapanm MaTePnAIn N KOrato NouchBaTe OCTaTbCn OT znrapn, yBepTe ce, ye ca n3raChaJI.
He BcmykBaIte Boa nI npuA Ako peHnte da 3ana3nte onaKoTeuHOCTn. BbUHnte MaTePnaJI, Na3eTe rN
3aunTeypea ot bXn n3- daJeu OT deca.
TOUHnCn Ha BnaRa N TOJInHa.
Hnkora He n3noJ3BaIte ypeDa BnIN B 6JIn3OCT Do n36yXnIBN, Bb3PnAmEHmM MeCTa N MaTe- pnaJI.
- Изклочete урEDA OT eLEeKtpn.YeckaTа Мржа пpeДи NOuNCTBaHе И NOДрьЖka.
He notanayte ypeda nnn K 6eNa BbB Boda Korato rN nouctBaTe.
- PeioBHO npOBepaIte map KyaHa ypeHa. He n3noJ3BaIte ypeHa, aKo e noBpeJeH, I ce CBbpxKeTe C yIbJIHOMOueH cepBn3.
He pa3rno6ybaIte ypeia.
- Изполизвайтесамо оригиналн части плп takива, пpenopьчанOT пон3ВODNTeЯ.
He n3noI3BaIte ypeDa 6e3 qnItpn; B npOTnBeH cIyauM MoKe Da Ce NOBpeN.
- При поочиствае на CTыбу уретг Тябва да ce hamupa podnotpebntela.
1.2 CbBmecTnMoCT c WEEE AnpekTnBa 3a INXBbpJHe Ha OTnaDbuHn npOdykTn:
IpoDyKTbT OTROBapra Ha n3nCKBaHnraHa dIpuEKNBata Ha EC 3a IxBbPnHe Ha OTnAbuHn npOdyKTn (2012/19/EU). To3n npOdyKT Hocn KnaCnФkaCuNoHcNMBoJ 3a OTnAbuHo eNeKtpueecko n eNeKJPOHNO O6OpyDbAhe (WEEE).
To3n CnMBOJ NOKa3Ba, Ye npOdyKbT He 6nBa Da Ce N3XBbPnC dpyra HecOpTnpaHa 6BTOBa CMeT B Kpa Ha N0e3Hna Cn XnBOT. N3NoJ3BaHnT ypeD Tp8Ba Da ce BbpHe B OToPiuPA nYHKT 3a peUKNIIPA
He Ha eIeKtpnueckn I eIeKtpoHn ypeiN. 3a da OT-KpneTe Te3n NyHKTOBe 3a Cb6npaHe, MoJra OobpHeTe Ce KbM MeCTHnA OprAH Ha peDa NIN TbProBEcT, OT KOInTo e 3aKynen npOdykTbT. BcRAKO DomaknHCTBO n3-OBnHaBaBaxHa pOJI B Cb6npaHTo n PeuNKnPaHTo HA N3NoJ3BaHn ypeiN. PpaBnHOTo N3XBpJnHe Ha N3NoJ3BaHn ypeiN cPOMara 3a npEDoTbPaTaBAHeTo Ha NoteHuaHn HeratNBn NocJeNi BbpXy OKoJHaTa CpeiN uOBeWKOTO 3dpabe.
1.3 CbBMeCTUMOcTc ДиpeKTHBaTa 3a OrpaHnUaBaHe Ha yNtpe6aTa Ha onpeJeIeHn ФпаСн ВeSceCTBa
3akyneHnT OT BAC npOdyKT OTROBapr Ha n3NcKBaHnTa Ha dIpeKTHBaTA 3a OrpAHnUaBaHe Ha yNtpe6aTa Ha onpeDeJIeHN OnaCHn BeIecTbHa EC (2011/65/EU). ToH He cBdIbPxa HnKO ON BpeDnITE n 3a6paHn Ma- TepnaHn,OnncAHn B dIpeKTHBaTA.
1.4 Информаця за onakobkaTa
Onakobkata Ha npodykta e n3rotbeHa ot noJexaun Ha peuiknnpaHe MaTePuaBn B cbOTBeTCTBue C haUHOHaHO- TO HN 3aKoHoaTeIcTBO. He n3XBp- Jyte OnakOBbHHTe MaTe
pnaN C 6n- TOBn nn DpyrN OTnAdbuN. OTheCte r N B ceHTbp 3a Cb6npaH e Ha onako- BbUHN MaTePnaJIn, NocOueH OT MeCT-HNTe Bnactn.
2.1 Перлес
- ByToH „BKn./M3Kn."
- Konque 3a cmykaTeHHaTa MOUHOCT
- BytoH 3a HABINBaHe Ha 3axpaHbauJn Ka6eN
- KoHTeINHeP 3a npax
- 3acmykbaaHaKpaHHK
- Kanayka Ha Mapkya
- Mapkyu
- BytoH 3a oTcTaHЯBaHe Ha KOHTeHepa 3a npax
- Kyka 3a 3akaYBaHe Ha yeTkata 3a napKeT/ KINIM
- Perylnpyema 6IokpOBka Ha yeTkata
- BucokoepeKTHBHa YeTka 3a napKeT/kJIMM
- TeneckonuHa Tpb6a n perynpyema 6noknpOBka
- TeneckonuHa Tpb6a
- KoHTpOHa BCMyKaTeHHaTa MoUHOCT
- PboKoXBaTka
- Topeh Kanak
17.3aDpbcTeHa nooBa yetka
DaeHNTe cToHocTN Bbpyx fKcnpaHNTe KbmypeaO603NaueHnN INB npytn neaHTe DOKyMeHTN, KOINTo ce IOCTABRT C Hrero, npectabnBaT CTOnHocTN, KOINTO ca noynyeHN B na6opatopHN ycnoBnCnped onpeedeHnTE cTaHapTN. Te3n cToHocTN MoKe da BapnPAT Cbo6pa3Ho yNoTe6bata Ha ypea NycOBnraTBAcpeTata.
2.2 TexHnueckn daHHN
3axpaHbauo HanpeXeHne :
220-240 V\~, 50-60 Hz
Mouhoct : 750 W
Pa6oTeH paIynyc 9m
HnboHa yma : 75dB(A)
IpaBOTO Ha TexHnueckn MoiNcKauuN I npOMeHN B dN3aHa e 3Ana3eHo.
3 ynoTe6a
3.1 Праздаизауне
YpeBt c6b3daeH da ce n3POn3Ba B DOMOBe Hne e PONXODa3a INDyCTpnaJHa ynoTpe6a.
3.2 3aKenBaHe/OTcTpaHЯBaHeHa Mapkyu
1.3a da 3akpenite Mapkyua (7), HATnchete KaanaykaTMy (6) no nocokata Ha cTpeIkata, Dokato ce npapBn C Kopnyca (ue yyeTe upaKaBaHe).
- I3daeneHnte yactn Ha kanaykaTa Ha Mapkya Tp6Ba CbOTBEtHO da ce n3paBHrt.
2.3a da OTCTpaHnTe Mapkyu (7), HATNCHeTe 6yToHa 3a OTKIOUvBaHe OTCTpaHn Ha KaNaYkata (6) n N3DbpnaIte Mapkyu.
3.3 NocTabaHHe/OTCTpaHЯBaHHe Ha TeleckOnnHaTa Tpb6a
1.3aKaYeTe TeneckOnnUHaTa Tpb6a (13) KbM npBxKata (15).
2.Издьрnaite TeileeckonuHata Tpb6a (13) otdpbkkata (15), 3a daЯ OTCpaHnte.
- Moxe Te da pa3TeHHeTe nIa Ckbcnte TeleckOnuHaTatp6a (13),nIb3raKn peYnpyeMaTa6IoKupOBka HaTeLeckOnuHaTa tp6a (12) HappeN Ha3ad.
3.4 ПикpenBaHe/OTCTpaHЯBaHe Ha YeTkata 3a napKeT/KnIIM
1.3aKaayete YeTkata 3a napKeT/KNIM (11) KbM TeneckOnnHaTa Tpb6a (13) no nocokata Ha CTpeIKNTE.

- Moxe Ta otctpaHte TeleckonuHaTa Tpb6a (13) ot Yetkata 3a napKeT/KnIM (11) KaTo Ra n3dbpNaTe.
3 YnOTope6a
3.5 PerynlipaHe Ha yeTkata 3a napKeT/KNJIM
HaTnchTe peryInpyeMaTa 6NoKIpOBka (10), pa3noJIOKeHa Bbpxy YeTKaTa 3a napKeT/KNJIM (11) n;
- Почиствае на Тьрд подови napкет: удьлжete чека тпедида зашичete дуоститe.
n3cuBaHe Ha qntpTe, He n3no3BaIte ypeN, c3daBauu NOTOK OT TObI Bb3dUx, HapnmeCewoapn.

ПЕДУПЕХДECHNE: He
noCTabRnTe fHHTPte, aKo He ca HAnbJHo n3cbXHaN; B npOTnbEH CnyaH e Bb3MOxHO da ce o6pa3yBa MmPnc Ha Bnara No Bpeme Ha yNoTpe6a. Bb3MOxHO e, n3TuHaHe Ha Boda ot 3aHaTa CTpaHa Ha yPeDa nn NobpeDa BB fHnTpTe.

PPEyPExEHN: CneI
KATO Ca n3cbxhaJn 0uNTpnte, NOCTaBeTe rHa MeCTaT aM.
Chere cliente, cher client,