
Infinity Rebel 55 HFC - Vacuum Cleaner DIRT DEVIL - Free user manual and instructions
Find the device manual for free Infinity Rebel 55 HFC DIRT DEVIL in PDF.
| Product Type | Bagless multi-cyclonic canister vacuum cleaner |
| Model | Infinity Rebel 55 HFC (DD5255) |
| Voltage | 220-240 V ~, 50/60 Hz |
| Power | 800 W |
| Dust container capacity | Approx. 2.5 litres |
| Cord length | Approx. 6 metres |
| Weight | Approx. 5.2 kg |
| Filtration system | Washable motor protection filter and non-washable exhaust air filter |
| Included accessories | Furniture brush, crevice tool, cushion nozzle, combination brush (carpet/hard floor) |
| Optional accessories | Mini turbo brush, parquet brush, hard floor brush, flexible long crevice tool |
| Telescopic tube | Yes, adjustable in length |
| Power control | Mechanical slider on the hose |
| Cord rewind | Yes, automatic |
| Clean/empty indicator | Yes, lights up when the container is full or filters are clogged |
| Safety | Overheat protection, automatic shut-off in case of blockage |
| Intended use | Household use only, dry floors, furniture with 3-in-1 accessory |
| Maintenance | Container and components washable with water (not dishwasher), dry 24 h before reassembly |
| Spare parts | Filter kit (5255001), container components (5510002), optional brushes |
| Warranty | Legal warranty according to European directive 1999/44/EC |
Frequently Asked Questions - Infinity Rebel 55 HFC DIRT DEVIL
User questions about Infinity Rebel 55 HFC DIRT DEVIL
0 question about this device. Answer the ones you know or ask your own.
Ask a new question about this device
Download the instructions for your Vacuum Cleaner in PDF format for free! Find your manual Infinity Rebel 55 HFC - DIRT DEVIL and take your electronic device back in hand. On this page are published all the documents necessary for the use of your device. Infinity Rebel 55 HFC by DIRT DEVIL.
USER MANUAL Infinity Rebel 55 HFC DIRT DEVIL
GB Operating Manual bagless multi-cyclonic vacuum cleaner
1.1 About the operating manual
Read this operating manual completely before working with the appliance. Keep the operating manual in a safe place. Include the operating manual if you pass the appliance on to someone else. Failure to comply with these instructions can lead to serious injuries or damage to the appliance. We take no responsibility for damage due to failure to comply with these operating instructions.
Always comply with the notices marked as follows to avoid accidents and damage to the appliance.
WARNING:
Wrns of health hazards and indicates possible risks of injury.
CAUTION:
Warns of possible dangers to the appliance or other objects.
NOTE:
Highlights tips and information for you.
1.2 Concerning certain groups of persons
These appliances can be used by children of 8 years and upwards and persons with impaired physical, sensory or mental abilities, or insufficient experience or knowledge, providing they are supervised or have been instructed in the proper use of the appliance and understand the risks involved.
Children are not permitted to play with the appliance.
Children must not carry out cleaning tasks or maintenance unless they are supervised.
Children under the age of eight should be kept away from the appliance and the connection cable whilst it is switched on or cooling down.
Packing material must not be used to play with. There is danger of suffocation.
1.3 Concerning the power supply
The appliance is operated with electrical power which means there is always a risk of electric shock. Therefore, please comply with the following:
Never immerse the appliance in water or other liquids; keep it away from rain and moisture.
Never touch the plug with wet hands. Do not operate the appliance outside or in rooms with a high level of humidity.
Take care that the power cord is not kinked, pinched, or rolled over and ensure it does not come into contact with heat sources. Also take care that it does not become a stumbling hazard.
Before connecting to the power supply, make sure that the voltage stated on the type plate matches the voltage of your plug socket.
Always check the power cord for possible damage before using the appliance.
Never carry the appliance by its power cord. It could be damaged.
Before you clean or maintain the appliance, switch off the appliance and pull the mains plug from the socket.
1 Safety instructions
Always pull directly on the plug if you want to disconnect the appliance from the mains. Never pull on the power cord as this could damage it.
If possible, do not use extension cords. If you must use an extension cord, use only safety-certified, water-protected single extension cords (no multi-socket distributors) designed for the power consumption of the appliance.
1.4 Concerning intended use
The cylinder vacuum cleaner is intended for home use only.
It is not suitable for commercial use.
Use the cylinder vacuum cleaner only for cleaning dry, normally soiled floors. Once you have attached the 3-in-1 combi-nozzle, you will also be able to use the appliance to vacuum furniture and upholstery.
Any other use is considered non-intended use and is prohibited.
Particularly prohibited:
Use in the vicinity of explosive or highly-flammable substances. There is a risk of fire or explosion.
To use the appliance outdoors. There is danger of rain or dirt destroying the appliance.
Sticking objects into the appliance's openings. It could overheat.
To modify or repair the appliance yourself.
Vacuuming of:
- Persons, animals, plants, especially hair, fingers and other parts of the body as well as articles of clothing on the body. These might be drawn in. This could result in injuries.
- Water and other fluids, especially damp carpet cleaners. Moisture inside the appliance can cause a short-circuit.
- Toner (for laser printers, copying machines, etc.). There is danger of fire or explosion.
- Hot ash, burning cigarettes or matches. This could cause a fire.
- Pointed objects, such as glass shards, nails, etc. They can damage the appliance.
- Rubble, plaster, cement, fine drilling-dust, make-up, etc. These might damage the appliance.
1.5 If the appliance is defective
Never use a defective appliance or operate an appliance with a defective power cord. If the power cord of this appliance is damaged, it must be replaced by the manufacturers, their authorised service representative or a similarly qualified person to avoid danger.
Refer a defective appliance to an authorised dealer or the Dirt Devil Service (▶Page 46, 'International Service') for repair.

2.1 Assemble appliance and adjust nozzles to surface


WARNING:
Danger of injury! Only attach the appliance parts when the appliance is not connected to the power supply. Otherwise the machine might start up and parts of your body, hair or pieces of clothing might be sucked in.

CAUTION:
Before assembling, make sure that the fitted nozzle suits the surface to be cleaned. Do not clean e.g. any floors or objects with a brush with rotating bristles that you would not clean without a second thought with a conventional brush. Also observe the flooring manufacturer's recommendations.
NOTE:
You might have to twist the parts when connecting them so they are securely in place. Ensure that installed parts are secure by trying to pull them apart.
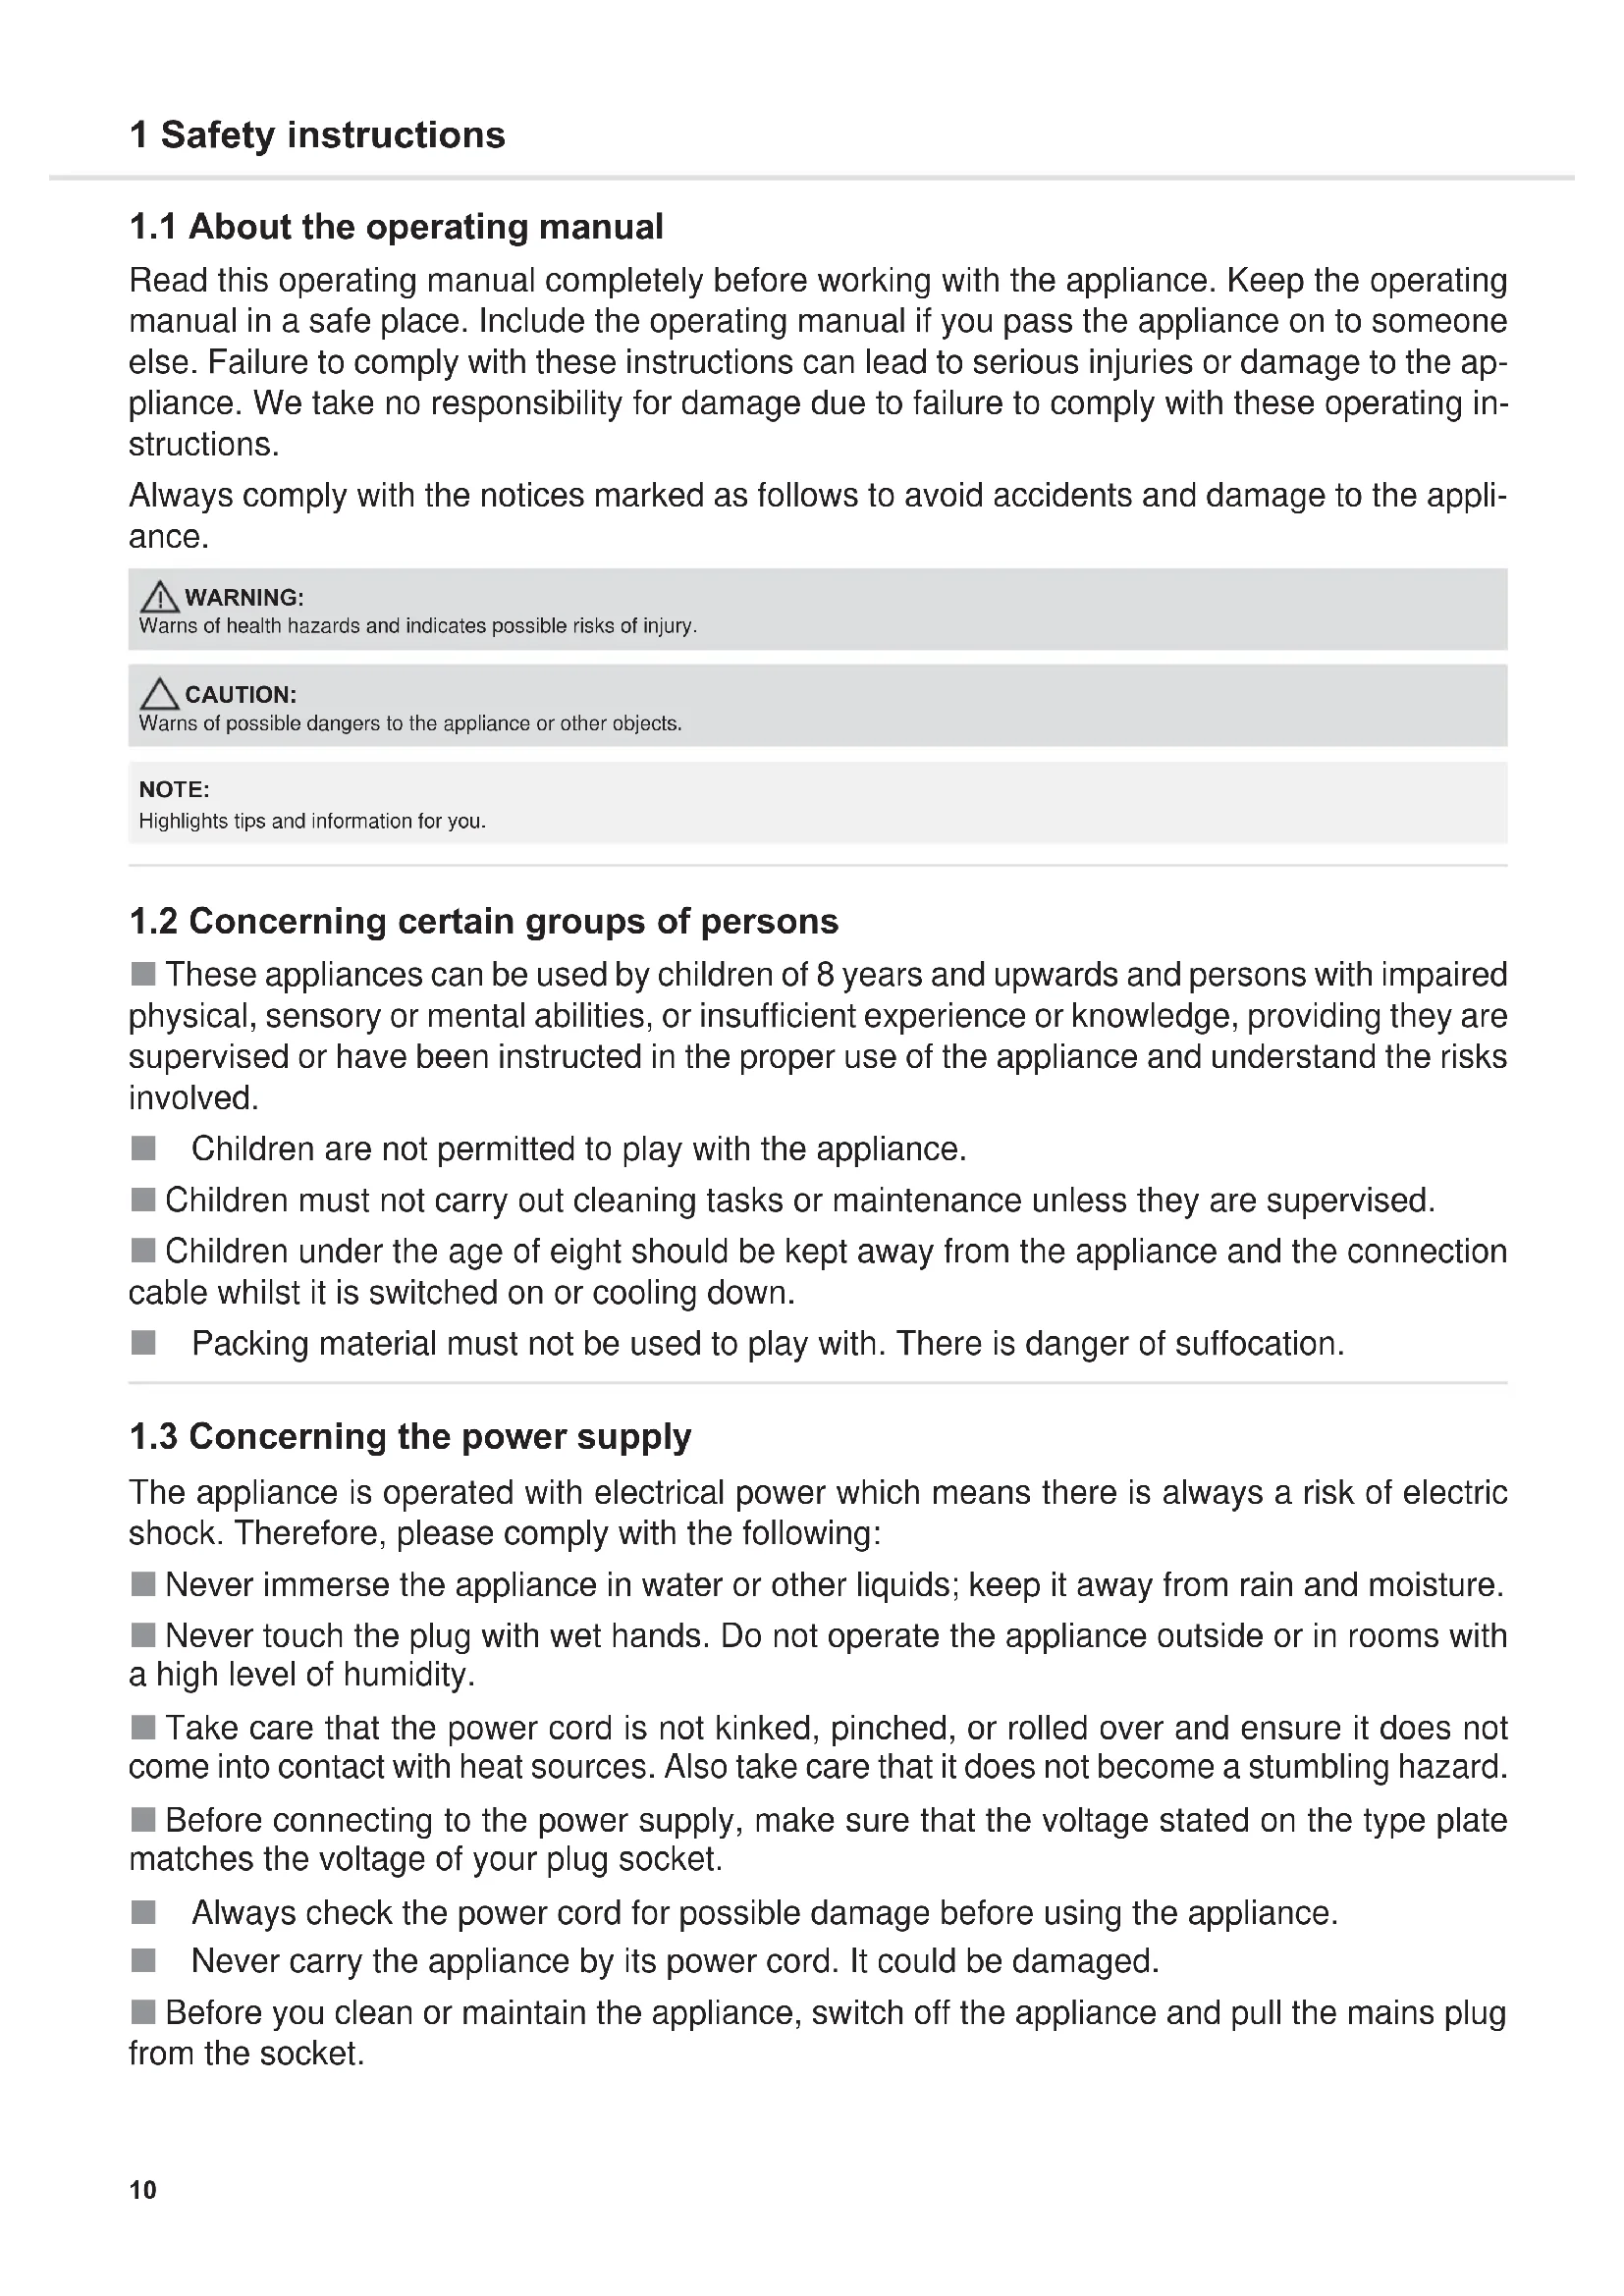
- Connect suction hose and appliance (Fig. 1).
-
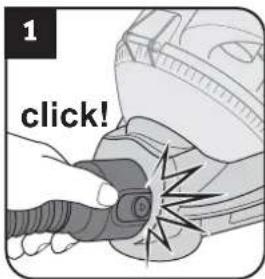
Insert the accessory included in the scope of delivery onto the handle (Fig. 2 - 10) depending on what type of surface you want to vacuum:
-
Furniture brush (Fig. 2) for objects with a sensitive surface
- Crevice nozzle (Fig. 3) for crevices in upholstery
- Upholstery nozzle (Fig. 4) for upholstery, mattresses, and the like
- Optional mini turbo brush (Fig. 5) for non-sensitive upholstery, runner, mats, and the like
- Floor nozzle with switch position as in Fig. 8 for carpets
- Floor nozzle with switch position as in Fig. 7 for hard floors
- Optional parquet brush (Fig. 9) for sensitive hard floors
-
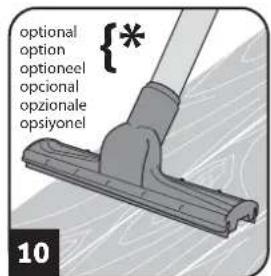
Optional hard floor nozzle (Fig. 10) for hard floors with crevices
-
Ensure that the bypass vent is closed (Fig. 15).
- If you use the telescopic tube, adjust its length.
2.2 Vacuum cleaning


WARNING:
Danger of injury! Check appliance and power cord before each use. A damaged appliance must never be used.

CAUTION:
Only use the appliance with all filters undamaged, dry and correctly fitted. Make sure that no objects obstruct the telescopic tube, the suction hose or other openings.
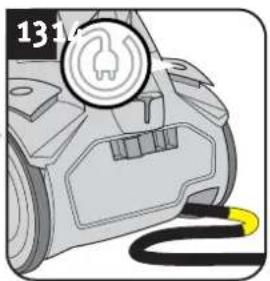
- Pull the cable out of the appliance (Fig. 11) and plug into a socket.

WARNING:
Danger of electric shock! If the red marking shows (Fig. 12) retract the cord by pressing the retraction button ( ) to pull in the cord up to the yellow mark (Fig. 13) again. Otherwise, the power cord may be damaged.
- Switch on the appliance using the on/off switch () (Fig. 14).
NOTE:
The auxiliary air regulator (Fig. 15) must be completely closed for vacuum cleaning. With the auxiliary air regulator you can quickly reduce the suction power, to release objects (such as curtains) that have been sucked in. If the hard floor nozzle (Fig. 10) has become stuck to the floor, you can reduce the suction power just as easily using the bypass vent (Fig. 15).
- Vacuum clean.

WARNING:
Danger of injury! Especially when vacuum-cleaning stairs make sure that you always stand on a higher level than the appliance.
3.1 Emptying and cleaning the dust container


NOTE:
The dust container has to be emptied and cleaned regularly. Otherwise emptying will get harder and harder or smells and bacteria might develop, depending on what you have vacuumed up.
Therefore, it is best to empty the dust container after each vacuuming session.
Empty and clean the dust container at the latest when the cleaning/ emptying display lights up (Fig. 16).
Also empty and clean the dust container every 3 months at the latest before storing for a long time or before sending the appliance.
CAUTION:
Switch off the appliance before removing the dust container. This will prevent dust from damaging the appliance.
- Switch off the appliance ( )
- Pull the plug out of the plug socket.
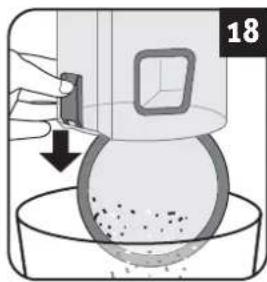
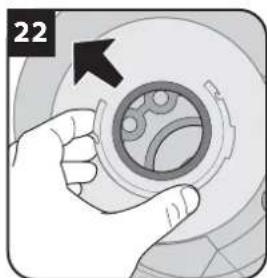
- Remove the dust container (Fig. 17).
- Empty the dust container (Fig. 18).
NOTE:
You can dispose of the dust container with your regular domestic trash as long as it contains no waste materials prohibited in domestic trash.
-
At this point you can also check the components inside the dust container:
-
Main cyclone (Fig. 19-20),
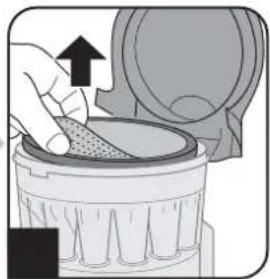
-Filter screen (Fig. 21) and -
Reflector (Fig. 22).
-
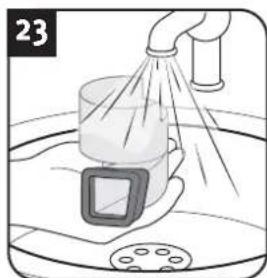
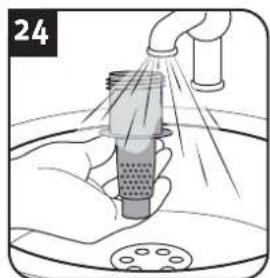
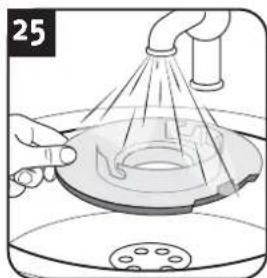
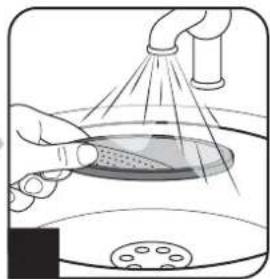
If these 3 dust container components (Fig. 19-22) are dirty, clean them under running cold or hand-warm water until all soiling has been removed (Fig. 23-25).
CAUTION:
The 3 dust container components from the interior of the dust container are washable (Fig. 23-25), but they are dishwasher safe.
Also, do not use cleaning agents or brushes with hard bristles to clean the dust container components.
Leave the dust container components to dry after cleaning them with water (approx. 24 hours at room temperature). Only put the components back into the appliance when they are completely dry.
Replace damaged or deformed filters immediately (Order information, see Chapter 3.4, 'Spare parts and accessories').
CAUTION:
The dust container cannot be washed! If the dust container comes into contact with water, soiling can adhere to the inside.
- Leave the dust container components to dry after cleaning them with water (approx. 24 hours at room temperature).
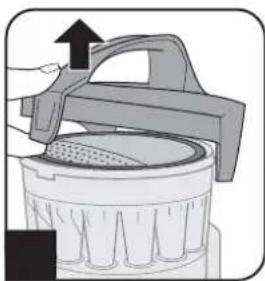
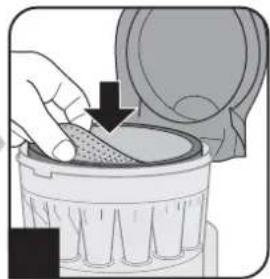
- Put the dust container components back in (Fig. 26-29).
NOTE:
The dust container components are constructed so that they will only go all the way down if in the right position. Do not use force upon insertion.
Lower the reflector completely in the dust container (Fig. 26). Make sure that its recess engages precisely in the protuberance of the dust container.
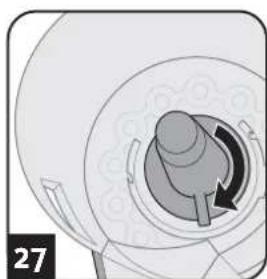
Lock the filter screen by tightening it approx. 3-4 rotations in clockwise motion (Fig. 27).
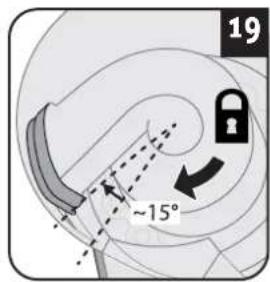
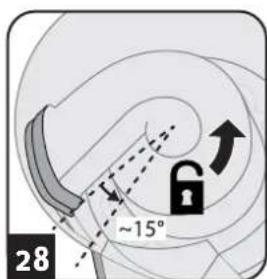
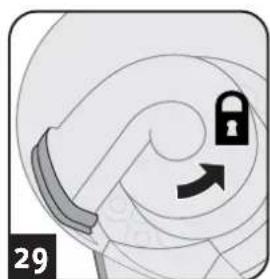
Lock the main cyclone by tightening it approx. 15^ in anti-clockwise motion (Fig. 28 and 29).
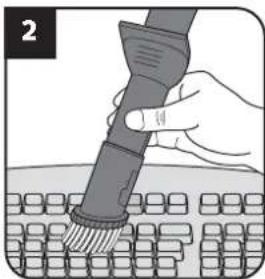
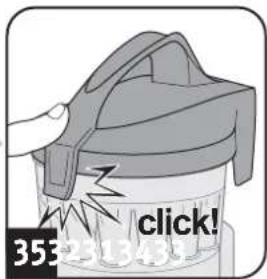
- Replace the dust container (Fig. 30).
You should feel and hear it clicking into place.
3.2 Cleaning / changing the motor protection filter
CAUTION:
Clean the filter each time you clean the dust filter. Replace the filter if it is damaged or deformed (see Chapter 3.4, 'Spare parts and accessories' for ordering information).
CAUTION:
The filter is washable, but it may not be cleaned in dishwashers or washing machines. Also, do not use detergents or brushes with hard bristles. Leave the filters elements to dry after cleaning them with water (approx. 24 hours at room temperature). Only put the filter back in place when it is completely dry.
- Switch off the appliance ( )
- Pull the plug out of the plug socket.
- Remove the dust container (Fig. 17).
- Open the dust container cover (Fig. 31).
- Remove the motor protection filter (Fig. 32).
- Rinse out the motor protection filter thoroughly under running water (Fig. 33).
- Leave the filter to dry (approx. 24 hours at room temperature).
- Put the filter back in (Fig. 33 and 34).
- Close the dust container cover (Fig. 35). It clicks shut audibly.
3.3 Cleaning / changing the exhaust filter


CAUTION:
Clean the filter each time you clean the dust filter. Replace the filter if it is damaged or deformed (see Chapter 3.4, 'Spare parts and accessories' for ordering information).
CAUTION:
The exhaust filter cannot be washed.
NOTE:
The exhaust filter cover can be locked more easily if you hold the unlocking mechanism (Fig. 40) and only release it once the exhaust filter cover is in its limit position.
- Switch off the appliance ( )
- Pull the plug out of the plug socket.
- Unlock the exhaust filter cover as shown (Fig. 36).
- Unlock the exhaust filter by pulling the removal tab to the side (Fig. 37).
- Tap the dirt out of the exhaust filter over a dustbin.
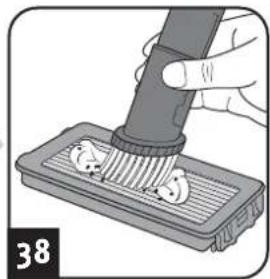
- Finally, remove the dirt from the exhaust filter with a soft brush, e.g. the furniture brush supplied with the appliance (Fig. 38).
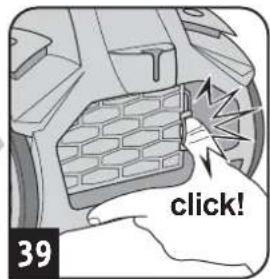
- Press the exhaust filter back into its console until the removal tab audiably engages (Fig. 39).
- Attach the exhaust filter cover at the bottom first.
- Lock the exhaust filter cover (Fig. 40).
3.4 Spare parts and accessories
You can order accessories and spare parts in various ways:
CAUTION:
Only use original spare parts from the scope of delivery or those that you have purchased by reordering.
Ordering address: Page 46, 'International Service'
The following accessories and spare parts can be reordered:
Item number Description
5255001 Filter set consisting of:
1 motor protection filter (Fig. 33)
1 exhaust filter (Fig. 38)
5510002 Dust container components:
1 main cyclone (Fig. 19-20) +
1 filter screen (Fig. 21) +
1 reflector (Fig. 22)
M203-51 parquet brush
M219 1 mini-turbo brush "Fellino"
M221 1 midi-turbo brush
M232 1 long, flexible crevice nozzle
M236-1 1 hard floor nozzle
4 Troubleshooting and technical data
4.1 Before you send in the appliance
WARNING:
Danger of injury! Never use a defective appliance! Always switch off the appliance and disconnect it from the mains before starting troubleshooting.
Before contacting us or even sending the appliance to us, use the table to check whether you can correct the problem yourself.
Problem Possible cause/solution
The cleaning results are unsatisfactory in spite of the appliance working correctly.
The bypass vent (Fig. 15) is open. Close the bypass vent (Fig. 15).
The attached nozzle is unsuitable. Change the nozzle, Chapter 2.1, 'Assemble appliance and adjust nozzles to surface'.
The collar brush of the floor nozzle is not in a position appropriate to the type of floor (Figures 7-8). Adjust the position of the collar brush to the type of floor using the floor nozzle switch (Figures 7-8).
The dust container is full. Empty and clean the dust container Chapter 3.1, Emptying and cleaning the dust container'.
The filters are dirty. Clean the filters, Chapter 3.1, Emptying and cleaning the dust container' that is Chapter 3.3, Cleaning / changing the exhaust filter'.
Nozzle, telescopic tube or suction hose is blocked. Remove the obstruction. If necessary, use a long wooden stick (e.g. a broomstick) to do this.
Problem Possible cause / solution
Cleaning / emptying display lights up (Fig. 16).
The dust container is full.
Empty and clean the dust container Chapter 3.1 Emptying and cleaning the dust container
The filters are dirty.
Clean the filters, Chapter 3.1, 'Emptying and cleaning the dust container' or Chapter 3.3, 'Cleaning / changing the exhaust filter'.
Nozzle, telescopic tube or suction hose is blocked. Remove the obstruction. If necessary, use a long wet stick (e.g. a broomstick) to do this.
The vacuum cleaner stops suddenly.
The overheating protection has tripped (possibly due to blocked suction channels, filters, or similar).
- Switch the appliance off and pull the plug out of the socket.
- Remove the cause of overheating (e.g. by disassembling telescopic tube and suction hose and removing the obstacle and/or cleaning filters).
- Wait approx. 45 minutes until the appliance has cooled off.
- After the appliance has cooled off, you may switch it on again.
NOTE:
If you cannot solve the problem following these instructions, contact our customer services (▶Page 46, 'International Service').
4.2 Warranty
The statutory warranty regulations in accordance with the EU Directive 1999/44/EC apply.
In non-EU countries the minimum requirements of the warranty in the respective country apply.
4.3 Disposal
Dispose of the appliance in compliance with the environmental protection laws of your country. Electrical waste may not be disposed of together with domestic waste. Use local old-appliance collection points instead.
The filters are made from environment-friendly materials. You can dispose of these — as opposed to the appliance — in your domestic waste unless you have cleaned up substances that are prohibited from disposal in this way.
4.4 Technical data
Type of appliance : bagless multi-cyclonic
vacuum cleaner
Model name: Infinity Rebel 55
Model: DD5255 [-0/-1/..-8/-9]
Voltage:220-240V\~,50/60Hz
Power:800W
Maximum usable volume of the approx. 2.5 litres dust container
Power cord length : approx. 6 m
Weight: approx. 5.2 kg


Technical and design specifications may be changed in the course of continuous product improvement.
Royal Appliance International GmbH

1.1 Mode d'emploi
一 0 . 1 4 per minute from German landlines, maximum German mobile phone tariff E 0.42 per minute.
The cost of calls from abroad—outside Germany—depend upon the current prices of the respective foreign telephone company.
FR
- About the operating manual
- WARNING:
- CAUTION:
- NOTE:
- Concerning certain groups of persons
- Concerning the power supply
- Safety instructions
- Concerning intended use
- Particularly prohibited:
- If the appliance is defective
- Assemble appliance and adjust nozzles to surface
- Vacuum cleaning
- Emptying and cleaning the dust container
- Cleaning / changing the motor protection filter
- Cleaning / changing the exhaust filter
- Spare parts and accessories
- Item number Description
- Troubleshooting and technical data
- Before you send in the appliance
- Problem Possible cause/solution
- Problem Possible cause / solution
- Warranty
- Disposal
- Technical data
- Mode d'emploi
- FR
Brand : DIRT DEVIL
Model : Infinity Rebel 55 HFC
Category : Vacuum Cleaner