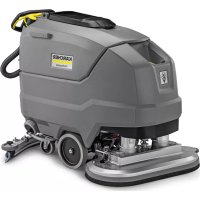
BD 80100 W Classic Bp - Sweeper Kärcher - Free user manual and instructions
Find the device manual for free BD 80100 W Classic Bp Kärcher in PDF.



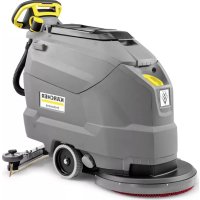
| Product type | Ride-on floor scrubber |
| Brand | Kärcher |
| Model | BD 80100 W Classic Bp |
| Application | Professional and industrial cleaning of flat floors |
| Power supply | Battery 24 V – 160 Ah (Li-Ion recommended) |
| Average power consumption | 1320 W |
| Drive motor | 300 W |
| Suction turbine | 500 W |
| Brush drive | 2 x 500 W |
| Fresh water tank capacity | 100 liters |
| Dirty water tank capacity | 100 liters |
| Working width | 800 mm (31.5 in) |
| Brush diameter | 410 mm (16.2 in) |
| Brush rotation speed | 140 rpm |
| Brush pressure | 400 N (normal) / 900 N (high) |
| Theoretical surface performance | 4000 m²/h |
| Empty weight | 325 kg |
| Total weight with load | 435 kg |
| Dimensions (L x W x H) | Battery compartment: 622 x 384 mm |
| Maximum permissible slope | 2% |
| Sound power level | 81 dB(A) |
| Maximum water temperature | 50 °C |
| Safety | Safety switch, key switch, deep discharge protection |
| Main spare parts | Brushes (different hardness), suction lips, filters, batteries, suction bar |
| Warranty | According to country conditions (standard 1 to 2 years) |
Frequently Asked Questions - BD 80100 W Classic Bp Kärcher
User questions about BD 80100 W Classic Bp Kärcher
0 question about this device. Answer the ones you know or ask your own.
Ask a new question about this device
Download the instructions for your Sweeper in PDF format for free! Find your manual BD 80100 W Classic Bp - Kärcher and take your electronic device back in hand. On this page are published all the documents necessary for the use of your device. BD 80100 W Classic Bp by Kärcher.
USER MANUAL BD 80100 W Classic Bp Kärcher
natural_image
Line drawing of a KARCHER cleaning machine with visible wheels and control panel (no text or symbols)Contents
IMPORTANT SAFETY INSTRUCTIONS .... 3
OPERATING SAFETY RULES AND PRACTICES ...... 3
MAINTENANCE AND REBUILD PRACTICES .... 4
FIRE SAFETY STANDARD 4
General notes 4
Function 4
Intended use 4
Environmental protection 5
Accessories and spare parts.... 5
Scope of delivery 5
Safety instructions .... 5
Description of the unit 6
Installation....7
Initial startup 9
Operation 10
Transport.... 11
Storage 12
Care and service.... 12
Troubleshooting guide 14
Warranty 15
Accessories 15
Technical data.... 16
IMPORTANT SAFETY INSTRUCTIONS
READ ALL INSTRUCTIONS BEFORE USING THIS APPLIANCE
⚠ WARNING
To reduce the risk of fire, electric shock, or injury:
DO NOT LEAVE appliance unattended when plugged in.
Unplugfrom outlet when not in use and before servicing.
⚠ WARNING
TO REDUCE THE RISK OF ELECTRIC SHOCK-USE IN- DOORS ONLY
- Do not allow to be used as a toy. Close attention is necessary when used by or near children.
- Use only as described in this manual. Use only manufacturer's recommended attachments.
- Do not use with damaged cord or plug. If the unit is not working as it should, has been dropped, damaged, left outdoors, or dropped into water, return it to a service center.
- Do not pull or carry by the cord, do not use cord as a handle, do not close a door on the cord, or pull cord around sharp edges or corners. Do not run appliance over cord. Keep cord away from heated surfaces.
- DO NOT UNPLUG BY PULLING CORD. To unplug, grasp plug, not cord.
- Do not handle plug or appliance with wet hands.
- Do not put any objects into openings. Do not use if openings are blocked; keep free of dust, lint, hair, and anything that may reduce air flow.
- KEEP HAIR, CLOTHING, LOOSE JEWELRY, FINGERS and all parts of the body away from openings and moving parts.
- Turn off all controls before unplugging.
- Use extra care when cleaning on stairs.
- Do not use to pick up flammable or combustible liquids, such as gasoline, or use in areas where they may be present.
-
Connect to a properly grounded outlet only. See Grounding Instructions.
-
Always disconnect cord from electrical outlet before servicing appliance.
- Never sweep off explosive liquids, combustible gases or undiluted acids and solvents. This includes petrol, paint thinner or heating oil which can generate explosive fumes or mixtures upon contact with the air. Acetone, undiluted acids and solvents must also be avoided as they can harm the materials on the machine.
- Do not vacuum up burning or smouldering objects!
GROUNDING INSTRUCTIONS
This device must be grounded. If it should malfunction or break down, grounding provides a path of least resistance for electric current to reduce the risk of electric shock.
This device is equipped with a cord having an equipment grounding conductor and ground plug.
The plug must be plugged into an appropriate outlet that is properly installed and grounded in accordance with all local codes and ordinances.
⚠️DANGER
Improper connection of the equipmentgrounding conductor can result in a risk of electrocution.
Check with a qualified electrician or service personnel if you are in doubt as to whether the outlet is properly grounded.
Do not modify the plug provided with the product - if it will not fit the outlet, have a proper outlet installed by a qualified electrician.
Do not use any type of adapter with this product.
This appliance is for use on a nominal 120-volt circuit and has a grounding attachment plug that looks like the plug illustrated in sketchpicture A.
Make sure that the appliance is connected to an outlet having the same configuration as the plug.
No adaptor should be used with this appliance.
CONNECT TO A PROPERLY GROUNDED OUTLET ONLY

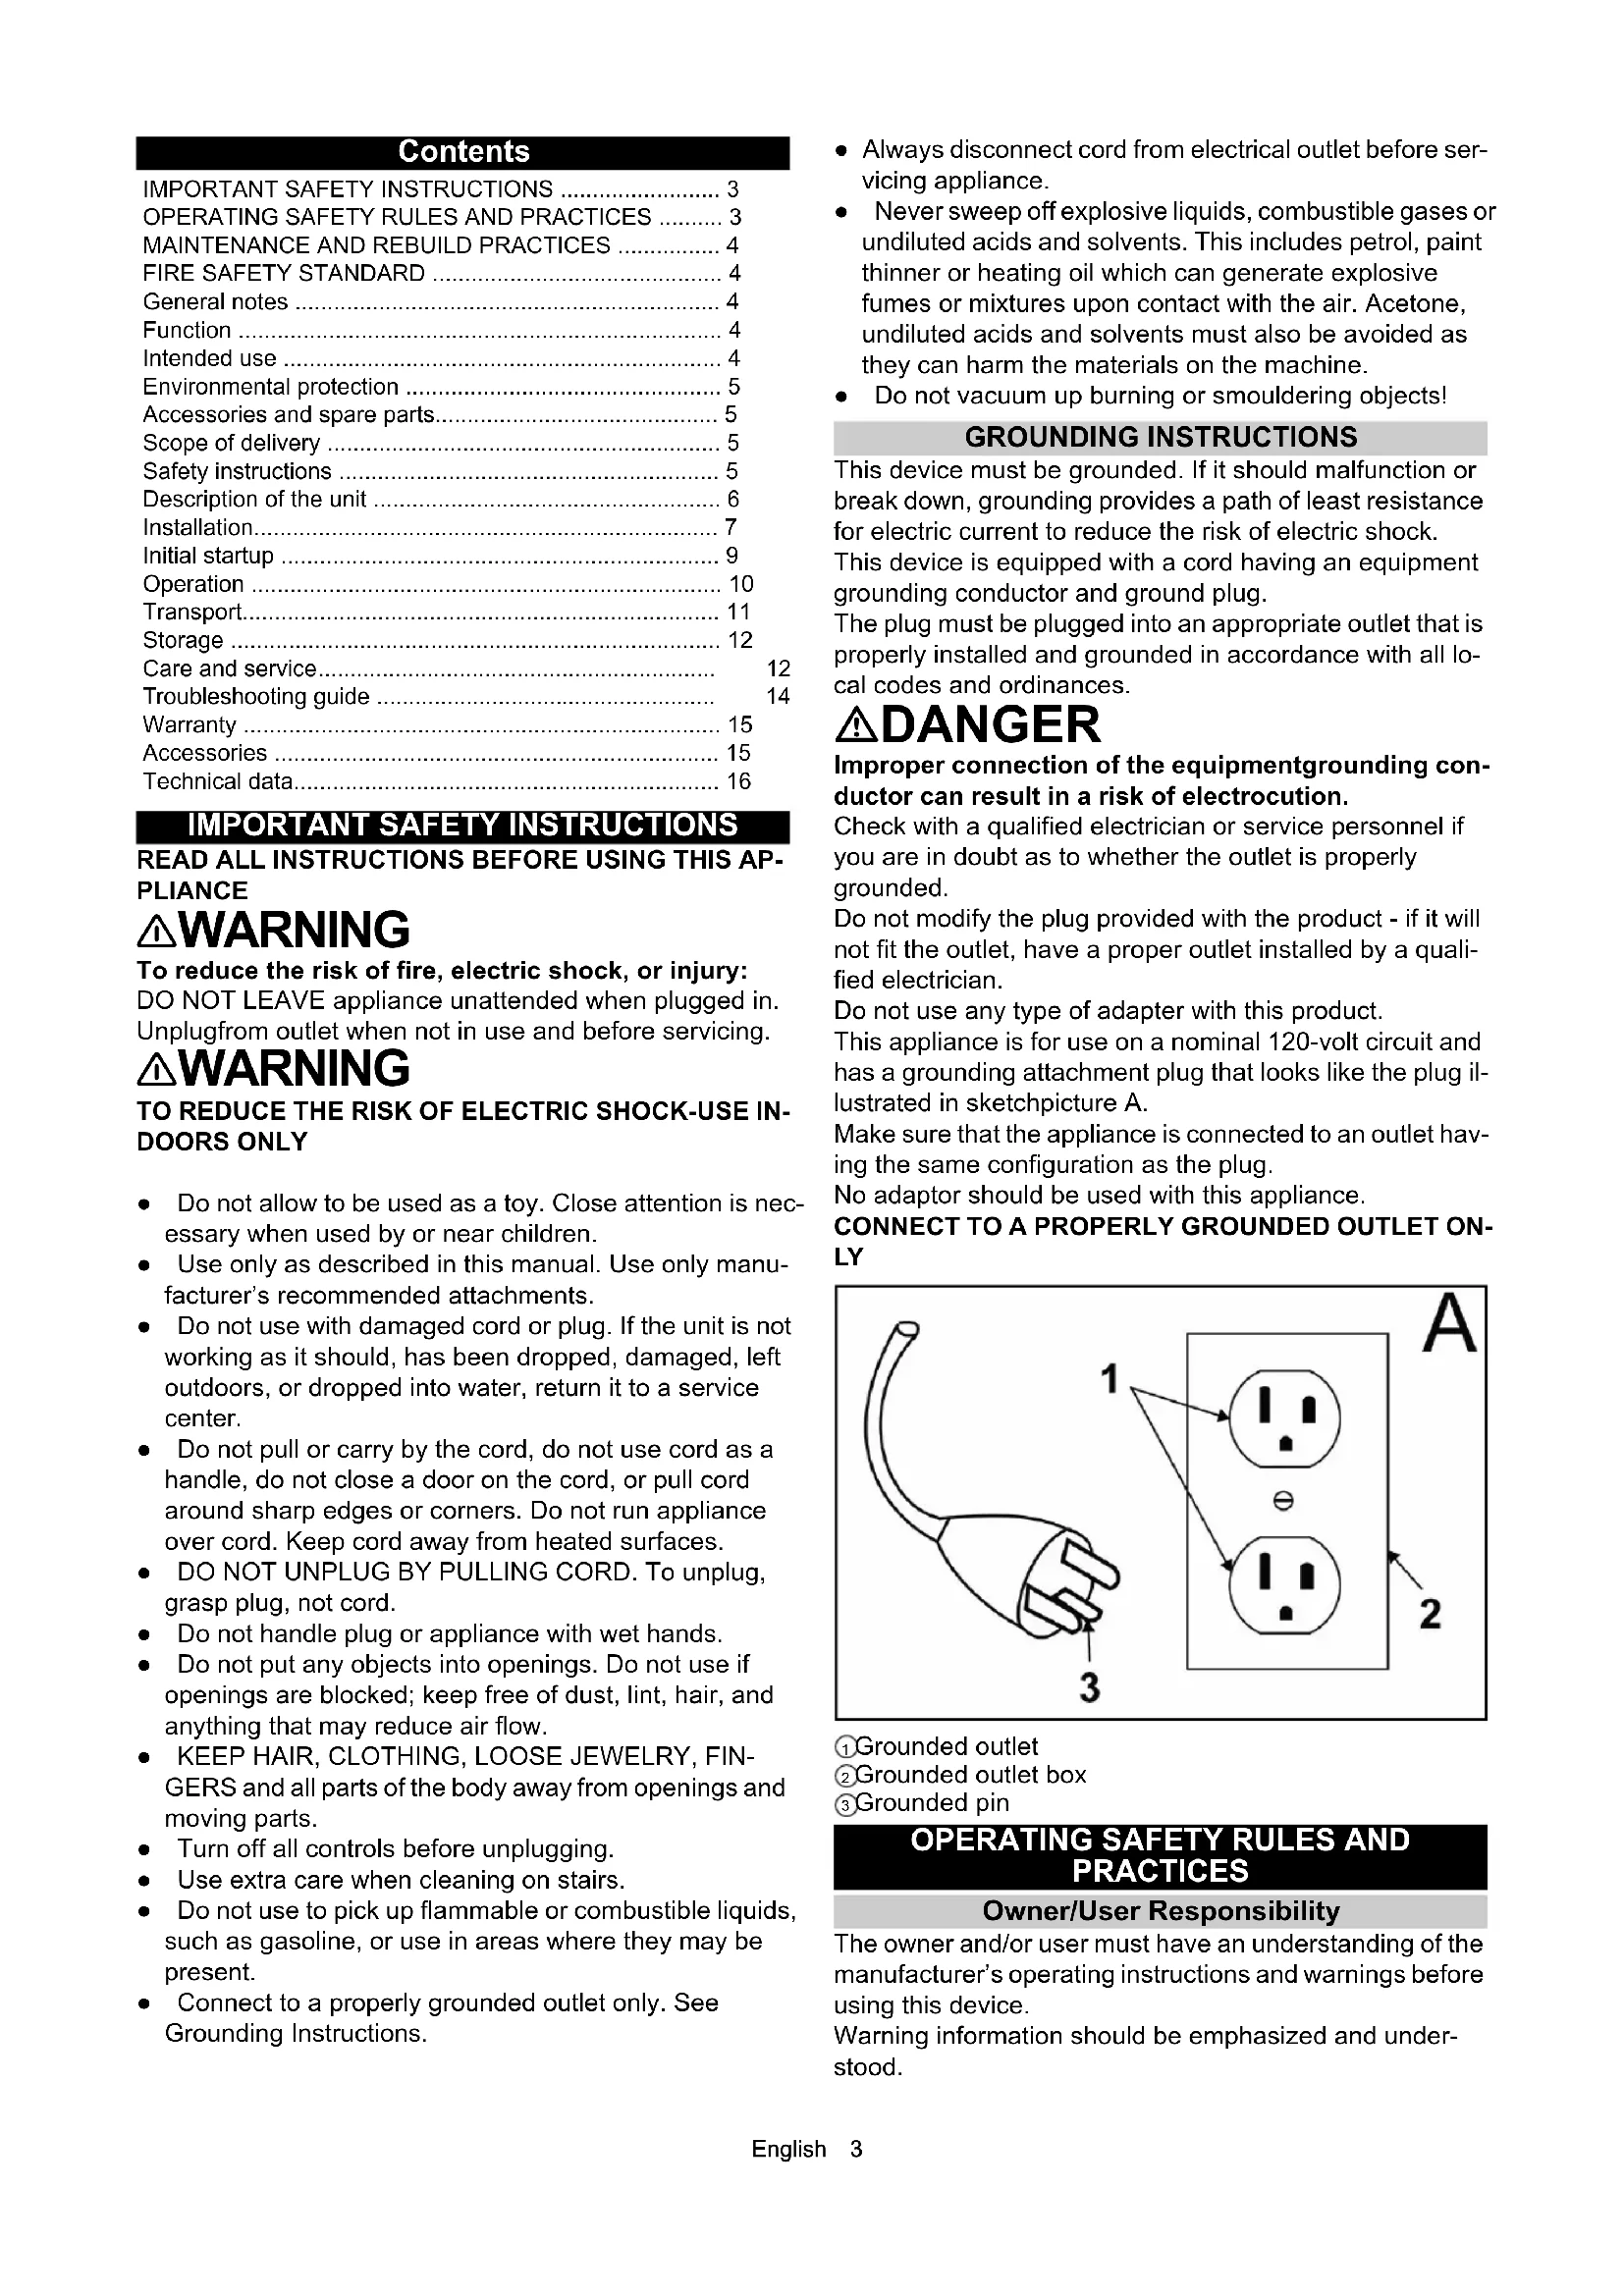
① Grounded outlet
② Grounded outlet box
③Grounded pin
OPERATING SAFETY RULES AND PRACTICES
Owner/User Responsibility
The owner and/or user must have an understanding of the manufacturer's operating instructions and warnings before using this device.
Warning information should be emphasized and understood.
If the operator is not fluent in English, the manufacturer's instructions and warnings shall be read to and discussed with the operator in the operator's native language by the purchaser/ owner, making sure that the operator comprehends its contents.
Owner and/or user must study and maintain for future reference the manufacturers' instructions.
General
Before starting operation, the device must be in the operating position.
Do not start or operate the device, any of its functions or attachments, from any place other than from the designated operator's position.
Before leaving the operator's position:
1 bring the device to a complete stop;
2 if the device must be on an incline, block the wheels.
Maintain a safe distance from the edge of ramps, platforms, and other similar working surfaces.
Do not add to, or modify the device.
Do not block access to fire aisles, stairways or fire equipment.
Traveling
Yield the right of way to pedestrians and emergency vehicles such as ambulances and fire trucks.
Cross railroad tracks at an angle wherever possible. Do not park closer than 6 ft (1800 mm) to the nearest rail of a railroad track.
Keep a clear view of the path of travel and observe for other traffic, personnel, and safe clearances.
Under all travel conditions, operate the device at a speed that will permit it to be brought to a stop in a safe manner. Do not indulge in stunt driving or horseplay.
Slow down for wet and slippery floors. Before driving over a dockboard or bridge plate, be sure that it is properly secured. Drive carefully and slowly across the dockboard or bridge plate, and never exceed its rated capacity.
When negotiating turns, reduce speed to a safe level consistent with the operating environment. Make the turns smoothly.
Operator care of the device
If the device is found to be in need of repair or in any way unsafe, or contributes to an unsafe condition, the matter shall be reported immediately to the user's designated authority, and the device shall not be operated until it has been restored to safe operating condition.
If during operation the device becomes unsafe in any way, the matter shall be reported immediately to the user's designated authority, and the device shall not be operated until it has been restored to safe operating condition.
Do not make repairs or adjustments unless specifically authorized to do so.
MAINTENANCE AND REBUILD PRACTICES
Operation of the device may be hazardous if maintenance is neglected or repairs, rebuilds, or adjustments are not performed in accordance with the manufacturer's design criteria. Therefore, maintenance facilities (on or off premises), trained personnel, and detailed procedures shall be provided.
Maintenance and inspection of the device shall be performed in conformance with the following practices:
1 a scheduled planned maintenance, lubrication, and inspection system shall be followed; consult the manufacturer's recommendations.
2 Only trained and authorized persons shall be permitted to operate a powered floor scrubber. Operators of powered floor scrubbers shall be qualified as to visual, auditory, physical, and mental ability to operate the equipment safely.
Avoid fire hazards and have fire protection equipment present in the work area. Do not use open pans of fuel or flammable cleaning fluids for cleaning parts.
FIRE SAFETY STANDARD
Any device not in safe operating condition shall be removed from service.
Repairs shall not be made in Class I, Class II, and Class III locations.
Fire Prevention. The device shall be kept in a clean condition and reasonably free of lint, excess oil, and grease. Noncombustible agents are preferred for cleaning the device. Flammable liquids [those having flash points at or above 100^ F (37,8°C)] are not allowed. Precautions regarding toxicity, ventilation, and fire hazard shall be appropriate for the agent or solvent used.
Nameplate Visibility. The device type designations as shown on the nameplate and the type markers shall not be covered over with paint so that their identification information is obscured.
General notes
Read these original operating instructions and the enclosed safety instructions before using for the first time. Proceed accordingly.
Keep both books for future reference or for future owners.
Function
This scouring and vacuum machine is used for wet cleaning of level floors.
The device can be adjusted to suit the respective cleaning task by setting the water volume and detergent volume appropriately. The detergent dosing unit is adjusted via the amount added to the tank.
The working width and the capacity of the fresh and waste water tanks (see chapter "Technical Data") allow effective cleaning over long working times.
The device has a drive.
Note
The device can be equipped with various accessories to suit the respective cleaning order. Request a copy of our catalog or visit our Internet website at www.kaercher.com.
Intended use
This device is suitable for commercial and industrial use, e.g. in hotels, schools, hospitals, factories, shops, offices, and rental companies. Use the device only in accordance with the information in these operating instructions.
- The device may only be used for cleaning smooth surfaces that are insensitive to water and polishing.
- The device is not suitable for cleaning frozen floors (e.g. in cold stores).
- The device is not suitable for use in potentially explosive environments.
- The device is approved for operation on surfaces with a maximum slope (see chapter Technical data).
Environmental protection

The packing materials can be recycled. Please dispose of packaging in accordance with the environmental regulations.

Electrical and electronic appliances / devices contain valuable, recyclable materials and often components such as batteries, rechargeable batteries or oil, which
- if handled or disposed of incorrectly - can pose a potential threat to human health and the environment. However, these components are required for the correct operation of the appliance / device. Appliances / devices marked by this symbol are not allowed to be disposed of together with the household trash.
Notes on the content materials (REACH)
Current information on content materials can be found at: www.kaercher.de/REACH
Accessories and spare parts
Only use original accessories and original spare parts. They ensure that the appliance will run fault-free and safely.
Information on accessories and spare parts can be found at www.kaercher.com.
Scope of delivery
During unpacking, check the contents for completeness. If any accessories are missing or in the event of any shipping damage, please notify your dealer.
Safety instructions
Before using the device for the first time, read and observe these operating instructions and the accompanying brochure: Safety instructions for brush cleaning units spray retraction devices, No. 5.956-251.0.
The device is approved for operation on surfaces with a specified limited slope (see Chapter Technical data).

WARNING
Device tipping over
Danger of injury
Do not operate the device on sloping surfaces.
The device may only be operated when the hood and all covers are closed.
Safety devices

CAUTION
Missing or modified safety devices
Safety devices are provided for your own protection.
Never modify or bypass safety devices.
Safety button
The device switches off when the safety button is released.
Key-operated switch
Pulling the key out of the key-operated switch secures the device against unauthorized use.
Warning symbols
Observe the following warnings when handling the batteries:

Observe notes in the instructions of the battery, on the battery and in these operating instructions.

Wear eye protection.
Keep acids and batteries away from children.

Risk of explosion
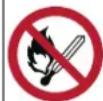
Fire, sparks, open flames and smoking are prohibited.

Risk of acid burns

First aid.

Warning

Disposal
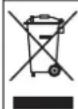
Do not throw batteries in the bin.
Description of the unit
Overview of the device
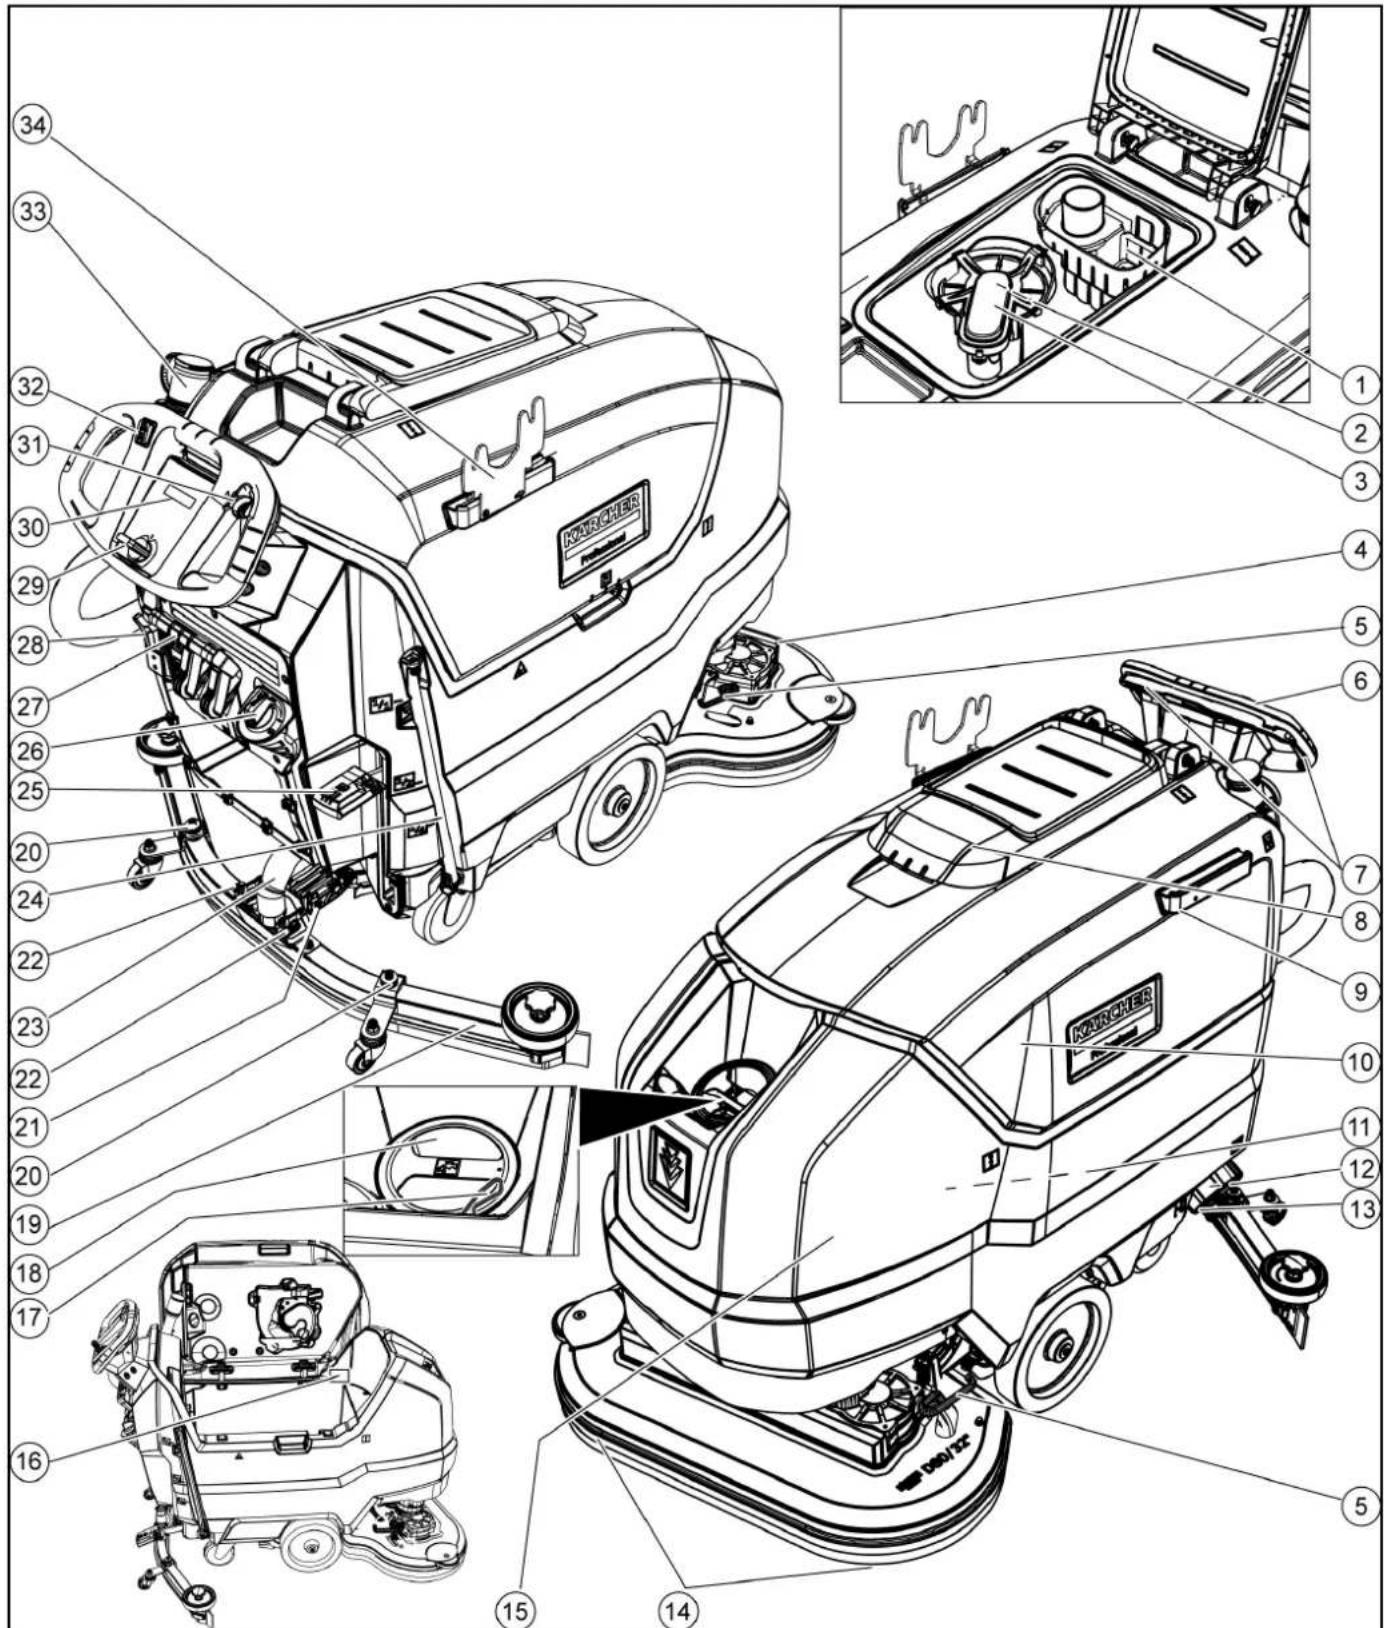
①Coarse dirt sieve
②Fluff filter
③Float
④Cleaning head
⑤Brush replacement pedal
⑥Push handle
⑦Safety button
⑧ Waste water tank cap
⑨Homebase retaining rail
⑩ Waste water tank
⑪Battery
⑫Fresh water filter
⑬Fresh water tank lock
⑭Disc brush
⑮Fresh water tank
⑯Type plate
⑰Hose switch
⑱Fresh water tank filling hole
⑲Suction bar
⑳Suction bar height adjustment
②1Suction bar inclination adjustment
②2 Wing nuts for fastening the suction bar
②3Suction hose
⑳Fresh water filling level display Fresh water drain hose
25 Cleaning head lever
26 Water volume regulation knob
27 Suction bar lever
28Battery plug connector
29Key-operated switch
30Display
③1 Working speed rotary knob
32Travel direction switch
③3 Waste water tank drain hose with dosing unit
34 Transport holder for suction bars
Battery

①Button
②Charge level indicator
③Battery
Color coding
• Control elements for the cleaning process are yellow.
- Control elements for maintenance and servicing are light gray.
Symbols on the device

Fresh water tank drain opening

Waste water tank drain opening

Increased cleaning head contact pressure

Battery access

Fresh water tank filling level (50%)

Insert the charger plug here

Eyelet point

* Mop holder

ATTENTION
Incorrect socket
Risk of damage
DO NOT insert the charger plug here
Normal cleaning head contact pressure

Raise the cleaning head

Pedal for raising/lowering the cleaning head

Brush replacement pedal

* optional
Installation
Unloading
- Remove the carton.
- Remove the straps.
- Remove the wooden blocks fastened to the pallet by screws.
- Put a ramp in front of the pallet using the 3 upper reinforcement boards from the carton packaging and the safety board screwed across the pallet and fasten with particle board screws.
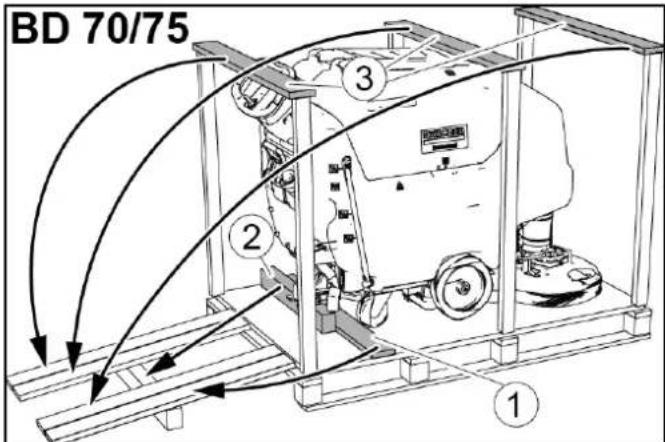
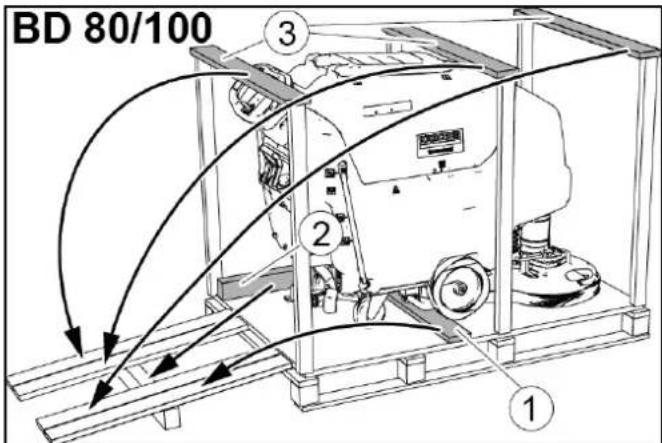
①Safety board
②Squared timber
③Reinforcement board
-
Push the squared timber unscrewed from the pallet under the ramp for support and screw tight.
-
Press the cleaning head lever downwards and engage it towards the right.
-
For BD 80/100 only: Press the brake lever down.
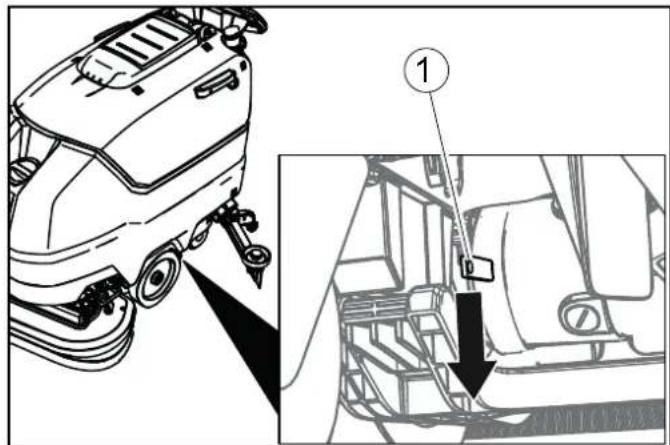
①Brake lever
Note
There is no brake for BD 70/75. Releasing the brake is not necessary with this device.
- Pull the device backwards off the pallet.
- For BD 80/100 only: Press the brake lever up.
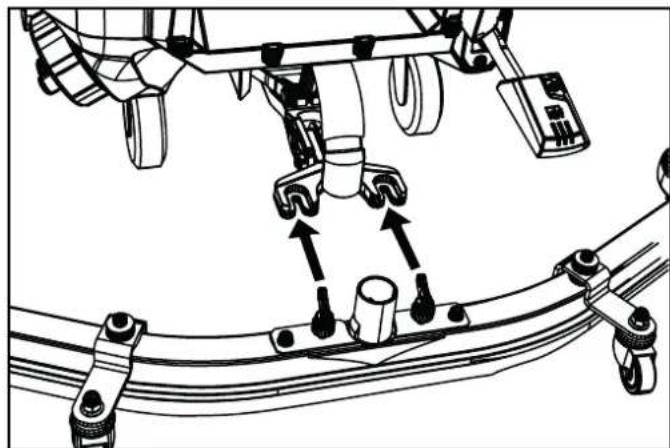
Installing the suction bar
- Insert the suction bar in the suction bar mount.
natural_image
Mechanical assembly diagram showing linkage components and motion arrows (no text or labels)- Tighten the wing nuts.
- Fit the suction hose.
Batteries
Recommended batteries
| Device Battery | |
| BD 70/75 W Classic Bp Pack 80 Ah Li | 1 x 6.654-454.0 |
| BD 70/75 W Classic Bp Pack 160 Ah Li | 2 x 6.654-454.0 |
| BD 80/100 W Classic Bp Pack 160 Ah Li | 2 x 6.654-454.0 |
ATTENTION
Risk of damage
Using other batteries may damage the device.
Use only the recommended batteries.
Installing and connecting batteries
⚠️CAUTION
Removing and installing the batteries
Unstable machine position
Ensure that the machine is positioned stably when removing and installing the batteries.
ATTENTION
Incorrect connection polarity
Destruction of the control electronics
Take care to ensure the correct polarity when connecting the batteries.
ATTENTION
Deep discharge
Risk of damage
Charge the batteries before starting the device.
- Drain the waste water.
- Pivot the waste water tank upwards.
- Disconnect the battery connector.
- Place the battery in the device as shown.
BD 80/100:
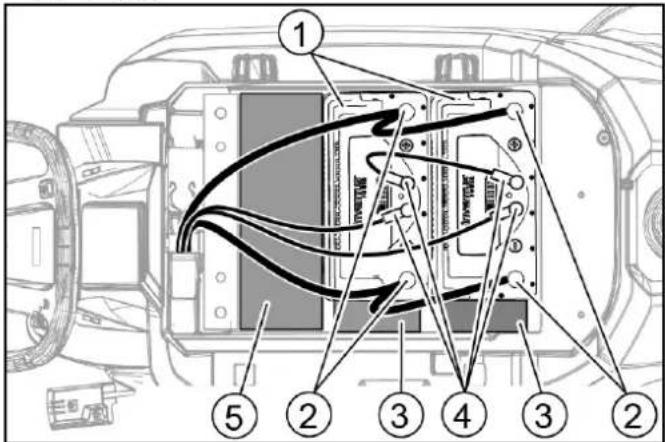
①Battery
②Battery terminal
③Spacer 150x150x65
④Circular connector
⑤Spacer 90x185x335 (2 pieces on top of each other)
BD 70/75 80 Ah:
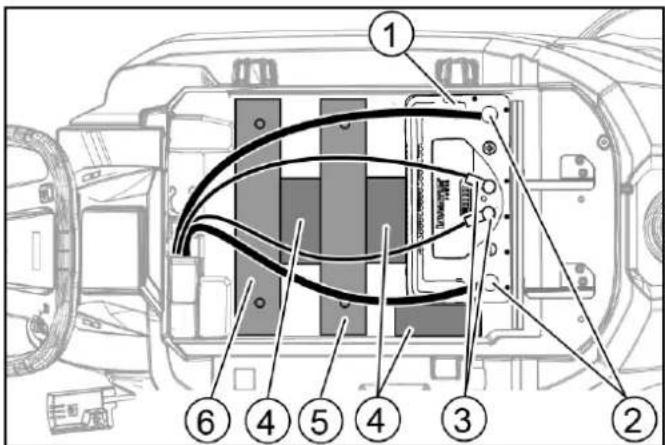
①Battery
②Battery terminal
③Circular connector
④Spacer 150x150x65
⑤Additional weight, 6 plates
⑥Additional weight, 14 plates
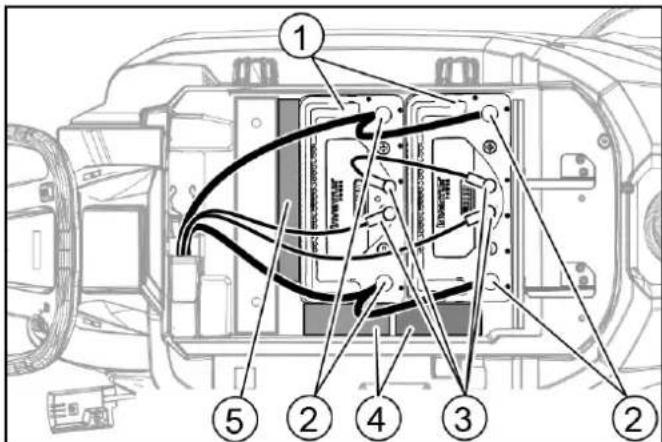
①Battery
②Battery terminal
③Circular connector
④Spacer 150x150x65
⑤Spacer 155x300x60
- Insert the spacers and additional weights as indicated.
ATTENTION
Risk of damage
If the polarity (positive and negative terminal) is reversed, the control electronics will be damaged.
Connect the red cable to the positive terminal and the black cable to the negative terminal.
Observe the above illustrations when connecting the cables.
- Clamp the connecting cable on the (+) and (-) battery terminals.
- For the devices with 2 batteries, attach the connecting cable between the two batteries.
- Plug the circular connector into the batteries.
- Connect the device-side battery connector to the battery-side battery connector.
- Pivot the waste water tank downwards.
Note
Charge the batteries before operating the device (see section "Charging the batteries").
Removing the battery
△CAUTION
Removing and installing the batteries
Unstable machine position
Ensure that the machine is positioned stably when removing and installing the batteries.
- Turn the key-operated switch to "0" and remove the key.
- Disconnect the battery connector.
- Drain the waste water.
- Pivot the waste water tank upwards.
- Unplug all circular connectors.
- Disconnect the device-end cable from the negative terminal at the battery.
- Disconnect the remaining cables from the battery.
- If necessary, remove the spacers.
- Remove the battery.
- Dispose of the used batteries in accordance with statutory provisions.
Initial startup
Charging the battery
⚠️DANGER
Inappropriate use of the charger
Electric shock
Adhere to the mains voltage and fuse values specified on the device type plate.
Only use the charger in dry rooms with sufficient ventilation.
ATTENTION
Using an unsuitable charger
Risk of damage
Do not connect the charger to the device-side battery connector.
Use only a charger suitable for the type of battery installed. Read the operating instructions of the charger manufacturer and observe the safety instructions in particular.
The device cannot be used during the charging process.
Note
The device has deep discharge protection, i.e. the brush motor and turbine are switched off automatically when the permitted minimum capacity level is reached.
- Drive the device directly to the charger and do not drive on slopes.
- Pull out the device-side battery connector.

①Battery plug, device side
②Battery plug, battery side
ATTENTION
Risk of damage
Do not connect the charger to the device-side battery connector.
Note
Read the operating instructions of the charger manufacturer and observe the safety instructions in particular!
- Connect the battery-side battery connector to the charger.
- Plug the mains plug of the charger into the socket.
- Carry out the charging process in accordance with the operating instructions for the charger.
The charging time depends on the battery condition and the charger. When the battery is empty, the charging time is approximately:
| Charger Battery capacity Charging time approx. | ||
| 6.654-483.0 80 Ah | 7 hours | |
| 6.654-484.0 80 Ah | 2 hours | |
| 160 Ah | 4 hours | |
- After the charging process is complete:
a Unplug the mains plug of the charger.
b Disconnect the battery connector from the charger.
c Connect the device-side battery connector to the battery-side battery connector.
Operation
ATTENTION
Risks during operation
Danger of injury
Release the safety button in the case of danger.
Filling with operating materials
Filling with fresh water
- Open the fresh water tank lock.
- Fill fresh water (max. 122 °F (50 °C)) to the lower edge of the filling nozzle.
Note: The fresh water hose can be clamped in the hose switch during filling. - Close the fresh water tank lock.
Notes on detergents
⚠ WARNING
Unsuitable detergents
Health risk, damage to the device
Use only recommended detergents. The operator carries all increased risks relating to operational safety and increased risk of accidents if using other detergents.
Use only detergents free of solvents, salt and hydrofluoric acid.
Adhere to the safety instructions stated on the detergent packaging.
Note
Do not use heavily foaming detergent.
Recommended detergents
| Usage Detergent | |
| Maintenance cleaning of all water-resistant floors | RM 746RM 780 |
| Maintenance cleaning of polished hard surfaces (e.g. granite) | RM 755 es |
| Maintenance cleaning and basic cleaning of industrial floors | RM 69 ASF |
| Maintenance cleaning and basic cleaning of fine stone tiles | RM 753 |
| Maintenance cleaning of tiles in sanitary areas | RM 751 |
| Cleaning and disinfection in sanitary areas | RM 732 |
| Coating removal on all alkaline-resistant floors (e.g. PVC) | RM 752 |
| Coating removal on linoleum floors RM | 754 |
Detergent
- Fill the detergent into the fresh water tank.
Note: The cap of the fresh water tank filling hole can be used for measuring the detergent. It is fitted with a scale on the inside.
Adjusting the water volume
- Adjust the water volume via the regulating knob to suit the degree of contamination of the floor covering.
Note
Perform initial cleaning tests with a low water volume. Increase the water volume step by step until achieving the desired cleaning result.
Note
The cleaning head continues operating without a liquid supply if the fresh water tank is empty.
Adjusting the suction bar
Adjusting the inclination
The inclination must be adjusted so that the suction lips of the suction bar make even contact with the floor over the entire length of the suction bar.
- Loosen the screw.
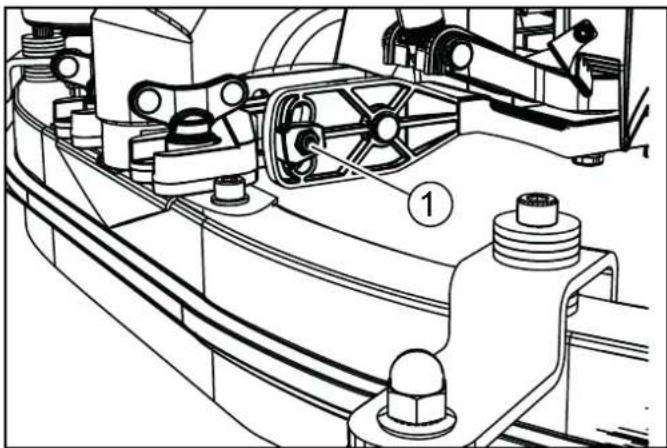
natural_image
Technical line drawing of a mechanical assembly with no visible text or symbols①Screw
- Adjust the inclination of the suction bar.
- Tighten the screw.
Adjusting the height
The height adjustment affects the bending of the suction lips on contact with the floor.
- Push the device a small distance forwards.
- Compare the bending of the suction lips with the illustration below.
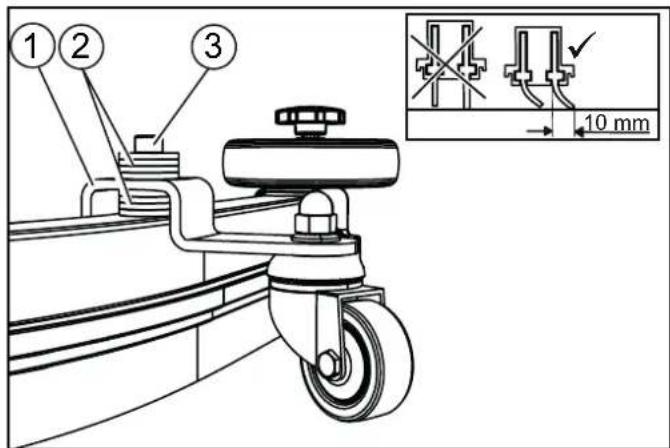
① Spacer roller with holder
② Washer
③Screw
-
Unscrew the screw.
-
Position a sufficient number of washers between the suction bar and spacer roller so that the suction lips have the correct bend.
- Fit the remaining washers above the spacer roller.
-
Screw in and tighten the screw.
-
Repeat the entire procedure at the other spacer roller.
- Push the device a small distance forwards.
- Check the bending of the suction lips over the entire length.
- If necessary, repeat the entire adjustment process.
Cleaning
Switching the device on
- Turn the key-operated switch to "1".
The display shows the following one after the other: - Period of time until the next after-sales Customer Service
- Software version, control panel
- Charging state of the battery and number of operating hours
Driving
Note
The travel direction can be changed during the cleaning operation. This way, a certain position can be intensively cleaned by driving back and forth several times.
- Set the travel direction switch to "forward".
Note
To reduce vehicle width, the suction bar can be fastened to the transport holder. Narrow spaces can then be easily passed through.
Cleaning
Note
The inclination and height of the suction bar can be adjusted to improve the vacuuming results (see chapter Adjusting the suction bar).
Note
When the waste water tank is full, the float switch closes the suction opening and the suction turbine runs at a higher speed. In this case, raise the suction bar and drive to the location for emptying the waste water tank.
- Turn the working speed rotary knob to the desired value. The speed is shown on the display during the adjustment. The display is shown in percentage of the maximum speed.
- Set the water volume at the regulating valve.
- Press the suction bar lever downwards.
The suction bar lowers.
Suctioning begins. - Press the cleaning head lever downwards, unlatch it and allow it to move upwards.
- Pull the safety button towards the push handle. The cleaning head starts up and the device moves at the set speed.
Increasing the brush contact pressure
- Let go of the safety button.
- Lift the cleaning head lever up with your hand and engage it towards the right.
Finishing operation
Finishing cleaning
- Let go of the safety button.
- Press the cleaning head lever downwards and engage it towards the right.
- Continue moving a short distance.
The residual water is vacuumed up. - Lift the suction bar.
The suctioning continues to run for 10 seconds afterwards.
-
Turn the key-operated switch to "0".
-
Charge the batteries if necessary.
Draining the waste water
⚠ WARNING
Improper disposal of waste water
Environmental pollution
Observe the local waste water treatment regulations.
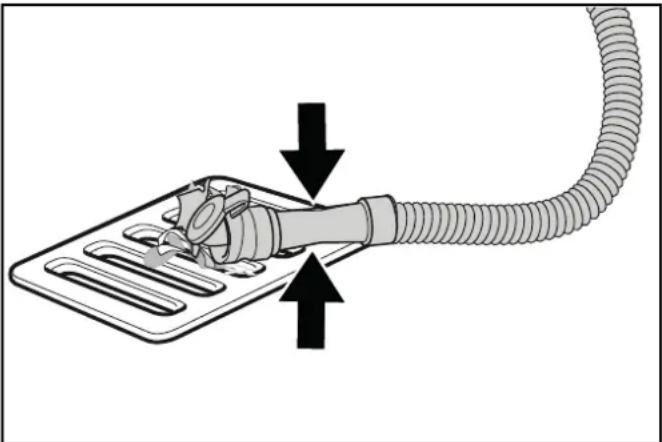
- Remove the drain hose from the support and lower it over a suitable collecting device.
natural_image
Diagram of a plug connecting a cable to a tray, with arrows indicating direction (no text or symbols)- Press the dosing device together or kink the hose.
- Open the dosing device cover.
- Drain the waste water. Regulate the water volume by pressing or kinking.
- Rinse the waste water tank with clear water.
Draining fresh water
- Pull off the filling level display hose and swivel it down.
Draining fresh water quickly
- Unscrew the fresh water tank lock.
- Allow the fresh water to drain away.
- Fit the fresh water tank lock and screw into place.
Note: Ensure that the hose connection in the fresh water tank lock lies at the lowest point after screwing tight.
Transport
⚠️DANGER
Driving on slopes
Danger of injury
Observe the maximum permissible inclination when driving the device on slopes for loading and unloading purposes (see chapter "Technical Data").
Drive slowly.
⚠️CAUTION
Failure to observe the weight
Risk of injury and damage
Be aware of the weight of the device during transportation. Only load the device with the assistance of another person or by using the drive.
- Press the cleaning head lever downwards and engage it towards the right.
- Raise the suction bar.
- Turn the key-operated switch to "1".
- Select the travel direction at the travel direction switch.
-
Pull the safety button towards the push handle.
-
When transporting in vehicles, secure the device against slipping and tipping over according to the applicable guidelines.

- First fit the strap under the waste water tank.
Storage
⚠CAUTION
Failure to observe the weight
Risk of injury and damage
Be aware of the weight of the device during storage.
ATTENTION
Frost
Destruction of the device through freezing water
Drain all water from the device.
Store the device in a frost-free location.
• This device may only be stored indoors.
• Before prolonged storage:
1. Bring the battery/batteries to a charging state between 30% and 50%.
2. Disconnect the charger from the battery connector.
3. Press the button on the battery for 20 seconds to put the battery into sleep mode.
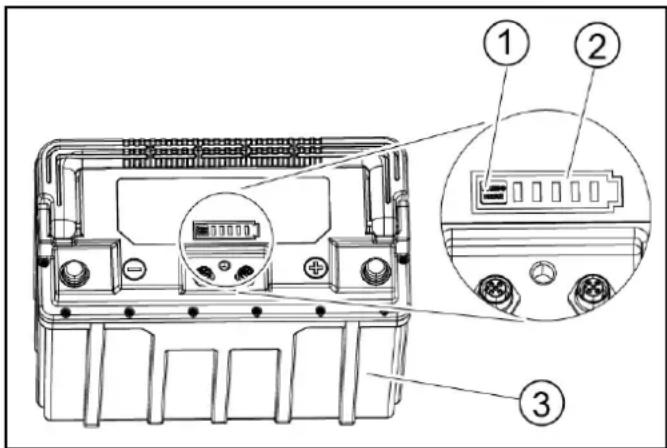
①Button
②Charge level indicator
③Battery
The LEDs of the charge level indicator all light up and go out one after the other. The charge level indicator now no longer responds when the button is pressed briefly.
Note
For devices with multiple batteries, this procedure only needs to be performed on one battery. The other batteries take over the sleep mode automatically.
Care and service
⚠️DANGER
Inadvertently starting up device
Risk of injury, electric shock
Turn the key-operated switch to "0" and remove the key before performing any work on the device.
Pull out the charger mains plug.
- Drain and dispose of the waste water and fresh water.
Safety inspection/maintenance contract
You can agree on regular safety inspections or close a maintenance contract with your dealer. Please seek advice on this.
Maintenance intervals
Each time after use
ATTENTION
Incorrect cleaning
Risk of damage.
Do not spray the device with water.
Do not use aggressive detergents.
A detailed description of the individual maintenance work is provided in Chapter Maintenance work.
- Drain the waste water.
● Rinse the waste water tank with clear water. - Clean the exterior of the device using a damp cloth, wetted with a mild washing lye.
- Check the fluff filter and clean if required.
- Clean the coarse dirt sieve.
- Clean the suction lips, check for wear and tear and re-adjust or replace if necessary.
- Check the disc brushes for wear and tear and replace if necessary.
- Charge the battery.
- If the charging state of the battery is below 50%, charge the battery fully and without interruption.
- If the charging state of the battery is above 50%, only recharge the battery if the entire operating duration will be required when next used.
Monthly
A detailed description of the individual maintenance work is provided in the chapter "Maintenance Work".
- Drain the fresh water tank and flush out deposits.
- Clean the fresh water filter.
- Clean the float and fluff filter.
- Check battery poles for oxidation, brush off if necessary. Make sure the connection cables are firmly in place.
- Clean the seals between the waste water tank and the cover, check for leaks and replace if necessary.
- For a longer downtime, shut down the device when the battery is fully charged. Fully charge the battery at least once a month.
Annually
● Have the prescribed inspection performed by Customer Service.
Maintenance work
Turn over or replace the worn suction lips
The suction lips must be turned over or replace when they have worn down to the wear mark.

①Wear mark
②Suction lip
- Remove the suction bar.
- Unscrew the star handles.
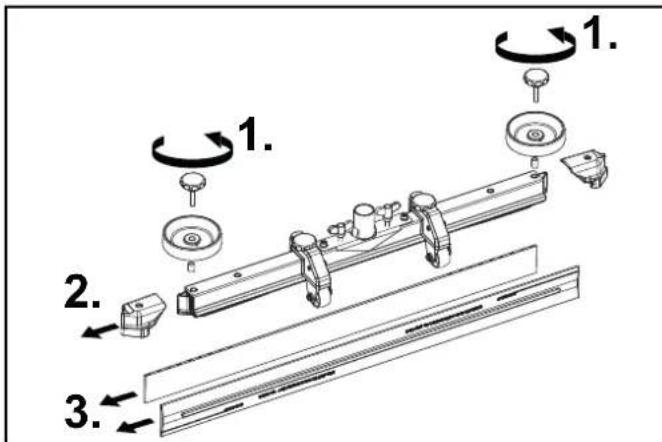
- Pull off the plastic parts.
- Pull off the suction lips.
- Push in the turned over or new suction lips.
- Push on the plastic parts.
- Screw in and tighten the star handles.
Cleaning the coarse dirt sieve
- Open the waste water tank cover.

natural_image
Technical line drawing of a car interior showing fan and vent components (no text or symbols)①Coarse dirt sieve
- Pull the coarse dirt sieve upwards and off.
- Rinse off the coarse dirt sieve under running water.
- Reinsert the coarse dirt sieve into the waste water tank.
Cleaning the fresh water filter
- Drain the fresh water (see Chapter Draining fresh water).
- Unscrew the fresh water tank lock.

①Fresh water tank lock
②Fresh water filter
3. Pull out the fresh water filter and rinse with clean water.
4. Insert the fresh water filter.
5. Fit the fresh water tank lock.
Note: Ensure that the hose connection in the fresh water tank lock lies at the lowest point after screwing tight.
Clean the float and fluff filter
- Open the waste water tank cover.

① Latching hooks
②Float
③Fluff filter
④Float housing
- Release the latching hooks.
- Pull the float housing downwards and off.
- Remove the float from the float housing and clean it.
- Remove the fluff filter and clean it.
- Assemble all parts in the reverse order.
Replacing the disc brushes
- Raise the cleaning head.
- Press the brush replacement pedal down, beyond the zone of resistance.

natural_image
Technical line drawing of a mechanical assembly with labeled component (1), no readable text or symbols present①Brush replacement pedal
- Pull the 1st disc brush sideways and out from underneath the cleaning head.
- Hold the new disc brush under the cleaning head, then press upwards and latch it into position.
- Repeat the procedure for the 2nd disc brush.
Troubleshooting guide
⚠️DANGER
Inadvertently starting up device
Risk of injury, electric shock
Turn the key-operated switch to "0" and remove the key before performing any work on the device.
Pull out the charger mains plug.
- Drain and dispose of the waste water and fresh water.
- Contact Customer Service in the case of malfunctions that cannot be corrected using this table.
| Malfunction Rectification | |
| The device cannot be started | 1. Turn the key-operated switch to "1".2. Unlock the emergency stop button on the control panel by turning it. (Note: not all device versions are equipped with an emergency stop button)3. Actuate the safety button.4. Insert the battery plug.5. Check the battery and charge if necessary.6. Check that the battery terminals are correctly connected. |
| The water volume is insufficient | 1. Check the fresh water filling level and fill the tank if necessary.2. Increase the water volume at the water volume regulating knob.3. Clean the fresh water filter.4. Check the hoses for clogging and clean if necessary. |
| The suction performance is too low | 1. Shut down the device and drain the waste water.2. Clean the seals between the waste water tank and the cover, check for leaks and replace if necessary.3. Check that the suction hose is correctly connected to the waste water tank.4. Check the fluff filter for contamination and clean if necessary.5. Clean the suction lips at the suction bar, turn over or replace if necessary.6. Check that the cap on the waste water drain hose is closed.7. Check the adjustment of the suction bar.8. Check the suction hose for clogging and clean if necessary. When fitting the suction hose again, the white marking on the hose must lie at the retaining clip.9. Check the suction hose for leaks and replace if necessary. |
| The cleaning results are unsatisfactory | 1. Reduce the driving speed.2. Check the brushes for wear and tear and replace if necessary.3. Check the suitability of the brush type and detergent used. |
| The suction turbine runs at an increased speed | 1. Drain the waste water.2. Clean the float.3. Check the fluff filter and clean if necessary.4. Check the suction hose for clogging and clean if necessary.5. Check the suction bar for clogging and remove any clogging if necessary |
| The brushes do not rotate | 1. Check if the brushes are blocked by a foreign body and remove the foreign body if necessary. |
| The device vibrates during cleaning | 1. Use a softer brush. |
| The "Battery disconnected" LEDs, 80% and 100% on the charger light up several times in succession | 1. The charger is in the recharging phase. In this phase, the charging state of the individual battery cells is equalized. A fault is only present if the "Battery disconnected" LED lights up continuously. |
| The battery cannot be charged | The battery is deeply discharged and cannot be woken up by the charger.1. Connect the charger to the power supply and to the battery.2. Press the button on the battery for longer than 5 seconds. The battery is woken up and the charging process starts. |
Warranty
The warranty conditions issued by our relevant sales company apply in all countries. We shall remedy possible malfunctions on your appliance within the warranty period free of cost, provided that a material or manufacturing flaw is
the cause. In a warranty case, please contact your dealer (with the purchase receipt) or the next authorized customer service site.
(See overleaf for the address)
Accessories
| Description BD 70/75 | part no. | BD 80/100 part no. | Description |
| Disc brush, white (soft) | 4.905-011.0 | 4.905-030.0 | For cleaning lightly contaminated or sensitive floors |
| Disc brush, natural color (soft) | 4.905-012.0 | 4.905-031.0 | Made of natural fibers for cleaning and polishing |
| Disc brush, red (medium, standard) | 4.905-010.0 | 4.905-000.0 | For use in all common cleaning orders |
| Disc brush, black (hard) | 4.905-013.0 | 4.905-032.0 | For heavy contamination and basic cleaning, only for non-sensitive surfaces |
| Pad drive board | 4.762-590.0 | 4.762-447.0 | For cleaning with pads, with quick-change coupling and center-lock |
| Pad, white – 6.371-331.0 For polishing floors | |||
| Pad, red (medium soft) 6.369-00 | 03.0 6.371-14 | 47.0 For cleaning all floors | |
| Pad, green (medium hard) | 6.369-002.0 | 6.371-148.0 | For cleaning heavily contaminated floors and for basic cleaning |
| Pad, black (hard) | 6.369-001.0 | 6.371-169.0 | For stubborn soiling and for basic cleaning |
| Pad, brown (SPP) | 2.639-290.0 | 2.639-288.0 | For protective film application on hard and elastic surfaces |
| Pad, melamine | 6.371-021.0 | 6.371-336.0 | For effective cleaning of micro-porous surfaces |
| Suction bar, 1030 mm, curved | 4.777-108.0 | – | |
| Suction bar, 1160 mm, curved | – 4.777-102.0 | ||
| Suction lip set, natural rubber | 4.037-144.0 | 4.037-138.0 | |
| Suction lip set, PU (oil resistant) | 4.037-145.0 | 4.037-140.0 | |
| Suction lip set, Linatex | 4.181-011.0 | 4.181-006.0 | |
Technical data
| BD 70/75 WClassic | BD 80/100 WClassic | ||
| Device performance data | |||
| Nominal voltage V 24 24 | |||
| Battery capacity Ah 80 / 160 160 | |||
| Mean power input W 1270 1320 | |||
| Engine power W 250 | 300 | ||
| Suction turbine power | W 500 | 500 | |
| Brush drive power | W 2 x 500 | 2 x 500 | |
| Theoretical surface performance | ft^2/h (m^2/h) | 37600(3500) | 43000(4000) |
| Fresh water tank volume | gal (l) 19.8 (75) 26.4 | ||
| (100) | |||
| Waste water tank volume | gal (l) 19.8 (75) 26.4 | ||
| (100) | |||
| Water temperature max. | °F (°C) | 122 (50) | 122 (50) |
| Water pressure max. | psi (bar) | 0.87(0.06) | 0.87(0.06) |
| Aisle turn width | in (mm) | 61(1550) | 65(1650) |
| Max. working area slope | % | 2 | 2 |
| Suctioning | |||
| Suction performance, air quantity | CFM (l/s) | 50.8 (24) | 50.8 (24) |
| Suction performance, depression | psi (kPa) | 2.3 (16) | 2.3 (16) |
| Cleaning brushes | |||
| Working width | in (mm) | 27.5(700) | 31.5(800) |
| Brush diameter | in (mm) | 14.1(359) | 16.2(410) |
| Brush speed | 1/min | 140 | 140 |
| Brush contact pressure | lbf (N) | 67 / 150(300 /680) | 90 / 200(400 /900) |
| Dimensions and weights | |||
| Approved total weight | lbs (kg) | 717(325) | 959(435) |
| Net weight (transport weight) | lbs (kg) | 553(251) | 716(325) |
| Battery compartment dimensions | in (mm) | 22.6 x14.9(575 x380) | 24.5 x15.1(622 x384) |
| Determined values in acc. with EN 60335-2-72 | |||
| Overall vibration value | m/s^2 | <2.5 | <2.5 |
| Uncertainty K | dB(A) | 0.2 | 0.2 |
| Sound pressure level L_pA | dB(A) | 65 65 | |
| Uncertainty K_pA | dB(A) | 2 | 2 |
| Sound power level L_WA + K uncertainty_WA | dB(A) | 81 81 | |
Subject to technical changes without notice.
Contenu
①Levier du frein
Remarque
natural_image
Mechanical assembly diagram showing linkage components and motion arrows (no text or labels)①Batterie
natural_image
Technical line drawing of a mechanical assembly with no visible text or symbolsnatural_image
Diagram of a plug inserted into a tray with a coiled hose, showing fluid flow direction (no text or symbols)natural_image
Technical line drawing of a car interior showing fan and vent components (no text or symbols)natural_image
Technical line drawing of a mechanical assembly with labeled component (1), showing internal components and a circular component (no text or symbols beyond label)①Pulsar la tecla
①Palanca de freno
Nota
natural_image
Mechanical assembly diagram showing linkage components and motion arrows (no text or labels)natural_image
Technical line drawing of a mechanical assembly with no visible text or symbols①Tornillo
natural_image
Diagram of a cable being inserted into a device with arrows indicating direction (no text or symbols)natural_image
Technical line drawing of a car interior showing fan and vent components (no text or symbols)natural_image
Technical line drawing of a mechanical assembly with labeled component (1), showing internal components and a circular component (no text or symbols beyond label)natural_image
Black silhouette of a hand giving a thumbs-up gesture (no text or symbols)THANK YOU!
MERCI! DANKE! iGRACIAS!

Register your product and benefit from many advantages.
www.kaercher.com/welcome


Rate your product and tell us your opinion.
natural_image
Icon showing a gear and wrench, no text or symbols presentwww.kaercher.com/dealersearch
Alfred Kärcher SE & Co. KG
Alfred-Kärcher-Str. 28-40
71364 Winnenden (Germany)
Tel.: +49 7195 14-0
Fax: +49 7195 14-2212

- Contents
- IMPORTANT SAFETY INSTRUCTIONS
- READ ALL INSTRUCTIONS BEFORE USING THIS APPLIANCE
- ⚠ WARNING
- TO REDUCE THE RISK OF ELECTRIC SHOCK-USE IN- DOORS ONLY
- GROUNDING INSTRUCTIONS
- ⚠️DANGER
- OPERATING SAFETY RULES AND PRACTICES
- Owner/User Responsibility
- General
- Traveling
- Operator care of the device
- MAINTENANCE AND REBUILD PRACTICES
- FIRE SAFETY STANDARD
- General notes
- Function
- Note
- Intended use
- Environmental protection
- Notes on the content materials (REACH)
- Accessories and spare parts
- Scope of delivery
- Safety instructions
- WARNING
- Device tipping over
- Safety devices
- CAUTION
- Missing or modified safety devices
- Safety button
- Key-operated switch
- Warning symbols
- Description of the unit
- Overview of the device
- Color coding
- Symbols on the device
- ATTENTION
- Installation
- Unloading
- Installing the suction bar
- Batteries
- Recommended batteries
- Risk of damage
- Installing and connecting batteries
- ⚠️CAUTION
- Removing and installing the batteries
- Incorrect connection polarity
- Deep discharge
- Removing the battery
- △CAUTION
- Initial startup
- Charging the battery
- Inappropriate use of the charger
- Using an unsuitable charger
- Operation
- Risks during operation
- Filling with operating materials
- Filling with fresh water
- Notes on detergents
- Unsuitable detergents
- Detergent
- Adjusting the water volume
- Adjusting the suction bar
- Adjusting the inclination
- Adjusting the height
- Cleaning
- Switching the device on
- Driving
- Increasing the brush contact pressure
- Finishing operation
- Finishing cleaning
- Draining the waste water
- Improper disposal of waste water
- Draining fresh water
- Draining fresh water quickly
- Transport
- Driving on slopes
- Failure to observe the weight
- Storage
- ⚠CAUTION
- Frost
- Care and service
- Safety inspection/maintenance contract
- Maintenance intervals
- Each time after use
- Monthly
- Annually
- Maintenance work
- Turn over or replace the worn suction lips
- Cleaning the coarse dirt sieve
- Cleaning the fresh water filter
- Clean the float and fluff filter
- Replacing the disc brushes
- Troubleshooting guide
- Inadvertently starting up device
- Warranty
- Remarque
- Nota
- THANK YOU!
- MERCI! DANKE! iGRACIAS!
Brand : Kärcher
Model : BD 80100 W Classic Bp
Category : Sweeper