
CEBDS4022B3 - Soundbar CONTINENTAL EDISON - Free user manual and instructions
Find the device manual for free CEBDS4022B3 CONTINENTAL EDISON in PDF.

| Product type | Soundbar |
| Brand | Continental Edison |
| Model | CEBDS4022B3 |
| Dimensions (W x D x H) | 90 x 7.2 x 9.3 cm |
| Net weight | 1.75 kg |
| Power supply | AC 100-240 V ~ 50/60 Hz, adapter 19 V / 1.5 A |
| Power consumption | 28.5 W |
| Standby consumption | < 0.5 W |
| Speakers | 4 x 10 W, impedance 4 Ω |
| Frequency response | 50 Hz - 18 kHz |
| Wireless connectivity | Bluetooth 5.0 (range up to 10 m) |
| Audio inputs | HDMI ARC, optical, AUX (3.5 mm jack), USB |
| Main functions | Equalization modes (Music, Movie, News), USB repeat, automatic standby after 15 min |
| Installation | Free-standing or wall mounting (brackets provided) |
| Remote control | AAA batteries (not included), range up to 6 m |
| Maintenance | Clean with a soft, dry cloth |
| Safety | Do not expose to water, do not obstruct ventilation openings, keep out of reach of children |
| General information | Limited warranty (see manual for details) |
Frequently Asked Questions - CEBDS4022B3 CONTINENTAL EDISON
User questions about CEBDS4022B3 CONTINENTAL EDISON
0 question about this device. Answer the ones you know or ask your own.
Ask a new question about this device
Download the instructions for your Soundbar in PDF format for free! Find your manual CEBDS4022B3 - CONTINENTAL EDISON and take your electronic device back in hand. On this page are published all the documents necessary for the use of your device. CEBDS4022B3 by CONTINENTAL EDISON.
USER MANUAL CEBDS4022B3 CONTINENTAL EDISON
natural_image
Abstract geometric design with two overlapping gray semicircles (no text or symbols)Continental Edison
natural_image
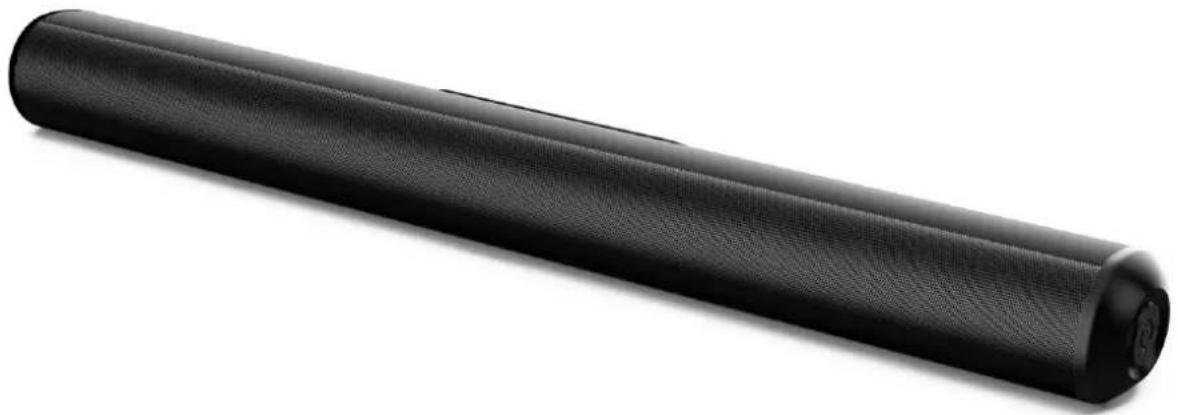
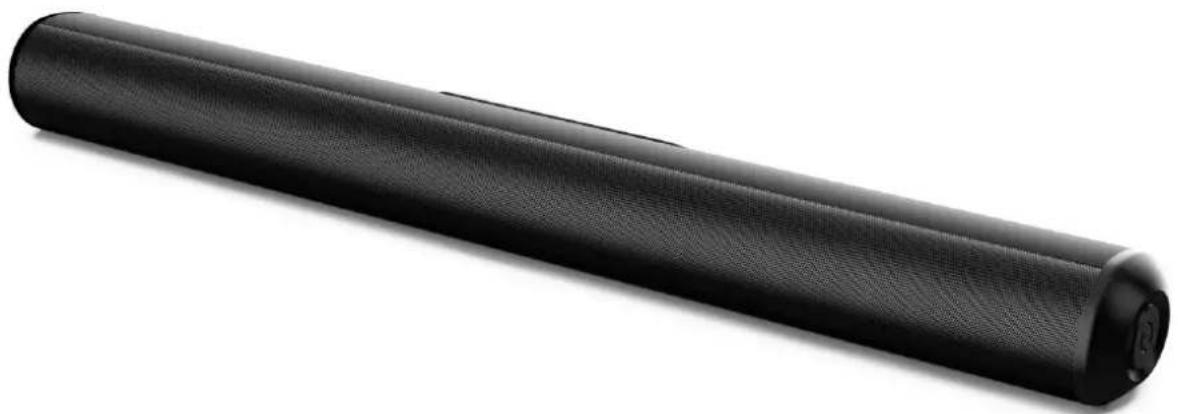
Black cylindrical object with mesh texture, possibly a sensor or device (no visible text or symbols)CEBDS4022B3
BARRE DE SON
Guide d'utilisation
natural_image
Black triangular warning symbol with a white lightning bolt inside, indicating electrical hazard (no text)ATTENTION
RISQUE DE CHOC ÉLECTRIQUE. NE PAS OUVRIR.

natural_image
Black triangular warning symbol with an exclamation mark (no text or numbers)ATTENTION : POUR RÉDUIRE LES RISQUES D'INCENDIE OU DE CHOC ÉLECTRIQUE, N'OUVREZ PAS L'APPAREIL. NE RETIREZ PAS LE BOÎTIER (NI L'ARRIÈRE).
AUCUNE PIÈCE DE CET APPAREIL NE PÉUT ÊTRE REPARÉE OU REMPLACÉE PAR L'UTILISATEUR. CONFIEZ LES RÉPARATIONS ET L'ENTRETIEN EXCLUSIVEMENT À UN PERSONNEL QUALIFIÉ. TOUT DÉMONTAGE DE L'APPAREIL ENTRAINERA L'ANNULATION DE LA GARANTIE.

natural_image
Black triangular warning sign with white lightning bolt symbol (no text)natural_image
Black triangular warning symbol with exclamation mark (no text or numbers)- EN (translated from the original)
natural_image
Two technical diagrams showing a battery being switched by an arrow, with no text or symbols present.natural_image
Pure horizontal line drawing of a cylindrical object with rounded ends and a small circular element at the top (no text or symbols)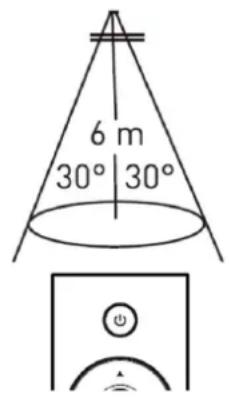
natural_image
Black triangular warning symbol with exclamation mark (no text or numbers)natural_image
Simple line drawing of a TV setup with a monitor and two adjacent panels (no text or symbols)
natural_image
Black triangular warning symbol with exclamation mark (no text or numbers)natural_image
Black triangular warning symbol with exclamation mark (no text or numbers)Connexion optique
Mode égaliseurs
natural_image
Abstract geometric shapes resembling partial quotation marks (no text or symbols)Continental Edison
natural_image
Black cylindrical object with textured surface, possibly a motor or sensor device (no visible text or symbols)CEBDS4022B3
SOUNDBAR
Instruction Booklet
Please read through this user manual thoroughly, its detailed instructions, warnings and safety precautions to ensure you get the most out of your product.
Keep this manual for future reference.
SAFETY WARNINGS

natural_image
Black triangular warning symbol with a white lightning bolt and downward arrow (no text)WARNING
RISK OF ELECTRIC SHOCK. DO NOT OPEN.

natural_image
Black triangular warning symbol with an exclamation mark (no text or numbers)CAUTION: TO PREVENT SHOCK HAZARDS, DO NOT OPEN THE UNIT. DO NOT REMOVE THE HOUSING (OR THE BACK). THIS DEVICE DOES NOT CONTAIN ANY SPARE PARTS THAT CAN BE REPAIRED OR REPLACED BY THE END USER.
ONLY A QUALIFIED TECHICIAN SHOULD SERIVCE THIS PRODUCT. ANY DISASSEMBLY OF THE APPLIANCE WILL VOID THE WARRANTY.
natural_image
Black triangular warning symbol with a white lightning bolt symbol (no text or numbers)The lightning symbol in an equilateral triangle draws the user's attention to the presence, in the case of the device, of a high voltage, not isolated the amplitude of which could be sufficient to constitute a risk. of electric shock to people.

natural_image
Black triangular warning symbol with exclamation mark (no text or numbers)The exclamation mark written in an equilateral triangle draws the user's attention to the presence of important operating or maintenance safety instructions (routine maintenance) in the instructions accompanying the device.
READ CAREFULLY THE INSTRUCTIONS BEFORE INSTALLING AND USING THIS APPLIANCE. IN THE CASE YOU RESELL THIS APPLIANCE, PLEASE MAKE SURE TO PROVIDE THIS INSTRUCTION MANUAL TO YOUR BUYER.
WARNING! To prevent any fire or electrical hazards:
- The apparatus shall not be exposed to dripping or splashing.
- No objects filled with liquids, such as vases, shall be placed on the apparatus.
-
Minimum distance around the apparatus for sufficient ventilation is 10cm.
-
The ventilation should not be impeded by covering the ventilation openings with items, such as newspapers, tablecloths, curtains, etc....
- No naked flame sources, such as lighted candles, should be placed on the apparatus.
- The apparatus shall be used in moderate climates only.
- The plug shall remain readily operable.
- If the supply cord is damaged, it must be replaced by the manufacturer, its service agent or similarly qualified persons in order to avoid a hazard.
natural_image
Warning symbol with a sine wave inside a triangle (no text or numbers)Risk of hearing damage due to high sound pressure: In order to avoid possible hearing damage, do not listen at high volume levels for prolonged periods of time.
General precautions
- Do not let children to play with this unit and its accessories alone without adult supervision.
- Do not hit or slam this product. Don't walk on the unit. Don't let the unit fall.
- Keep the device away from liquids, humid and dusty environment; put it away from excessive hot or cold temperature. It's recommended to use the device only with temperature indicated on the technical specification. This device is not adapted to a tropical climate.
- Keep the device away from all metallic objects (coins, keys...). Don't let it close to magnetic field which could damage the device.
- Do not block the area above the speaker mesh
- This device is intended for domestic use and should not be used for any purpose or any other application.
- Respect the instruction of use of external devices that you connect to the tower (USB charging port connection and USB playing port connection)
- The power supply cord is used as the disconnect device, for pluggable equipment, the socket-outlet shall be easily accessible.
Avoid electric shock, fire and explosions
- Do not use any damage power cords and cables or loose electrical outlets.
- Place cable in such a manner that it cannot be walked on, especially the ends connected to the device and the AC adapter.
- Do not twist or bend the power cord.
- Do not pull the power cord when removing it from the outlet
- Do not operate this appliance with wet hand, especially during charging.
- Do not touch the cord or plug if your hands are wet.
- Do not cover or block any ventilation openings.
- Do not overload the electrical outlet. Plug the product into a proper power source as described on the operating instructions.
- In order to prevent any overheating, when the device is on, do not let it in a place without ventilation like a bag for example.
- Do not short circuit in any way.
- Do not drop the device or the AC adapter and avoid jolting shocks.
- Unplug this apparatus during lightning storms or when unused for long periods of time.
- To ensure normal operation of the equipment and your personal safety, we recommend you to choose a power adapter whose characteristics correspond to those provided by the manufacturer (see technical specification). Make sure that the adapter receives
CE certification, as this could result in overheating and cause a fire, endangering your own life. Charging can cause interference that will disappear immediately after you have disconnected the device.
- The unit must not be installed at sites with gas / flammable sources or explosives (in a petrol station for example).
- Protect the unit from rain and excessive moisture. If water (or any liquids) is introduced into the apparatus, it must be turned off immediately and wipe it.
- Avoid exposing the device to high external pressure, which can lead to an internal short circuit and overheating
- Never put the device in or close to heating appliances such as microwave ovens, stoves, cooking tables, heaters or other (including audio amplifiers).
- Install away from electric or magnetic fields.
Protect the device and AC adapter for any damage.
- Do not use harsh chemicals, cleaning solvents or strong detergents to clean the unit otherwise promote corrosion. Clean it with soft and dry tissue.
- Never use any charger that is damaged.
- Never dispose the device in fire.

AND HANDLING OF BATTERIES:
WARNING: Danger of explosion if the batteries are not inserted correctly or if they are replaced by non-like or no similar model. Replaced the batteries only by same type of batteries or equivalent. Batteries must not be exposed to excessive heat like sun or fire. Never throw batteries into fire or expose them to sources of heat. Different types of batteries, or new and used batteries must not be mixed.
Batteries have to be inserted with the correct polarity like indicated on the remote control.
Exhausted batteries have to be removed from the remote control. Only dispose of batteries in specific collection containers (contact your retailer for more information) in order to protect the environment.
Don't ingest the battery, danger of chemical burn
Keep news and used batteries out of reach of children.
If the battery is swallowed, it can cause serious intern burn in 2 hours only and cause the death.
If the battery compartment doesn't close properly, stop using the product and keep away from children.
In case of doubt concerning that the batteries may have been swallowed or introduced into any part of the body, call immediately a doctor.
Information on the signification of the marking presents on the external power supply:

This marking indicates that the external power supply has an electrical insulation of type class II.


This marking indicates that the external power supply is designed to be used only indoor.
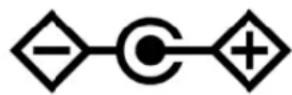
This marking allows to identify the positive and negative connections (the polarity) of a D.C. power supply, or the positive and negative connections on a piece of equipment to which a D.C. power supply may be connected
This symbol indicates direct current.
This symbol indicates alternating current.
The marking indicates that the external power supply has an electrical insulation of type class II.
The marking indicates that the external power supply is designed to be used only indoor.
For installation, handling, cleaning, and disposal of the device, refer to the following chapters of the User's Guide.
This instruction manual can be modified without prior notice.
Information on the marking of the Conformity Compliance.
The marking C indicates that this product meets the quality requirements set by the European Directives 2014/53/UE (RED), 2014/35/EU (Low voltage), 2014/30/EU (Electromagnetic Compatibility CEM), 2011/65/UE (restriction of the use of certain hazardous substances in electrical and electronic equipment RoHS).
TABLE OF CONTENTS
SAFETY WARNINGS 27
I. DESCRIPTION.... 33
- PRODUCT DESCRIPTION ...... 33
- REMOTE CONTROL DESCRIPTION 34
II. TECHNICAL INFORMATION ...... 36
III. SET UP AND USE 37
- BEFORE FIRST USE 37
- REMOTE CONTROL SET UP 38
- FREE STANDING INSTALLATION 39
- WALL MOUNTING INSTALLATION 39
- CABLES CONNECTIONS 41
- AUTOMATIC STANDBY MODE 44
IV. CLEANING AND MAINTENANCE.... 44
V. TROUBLESHOOTING 45
VI. ENVIRONMENT: RECYCLING 46
VII. WARRANTY 47
I. DESCRIPTION
1. Product & accessories description
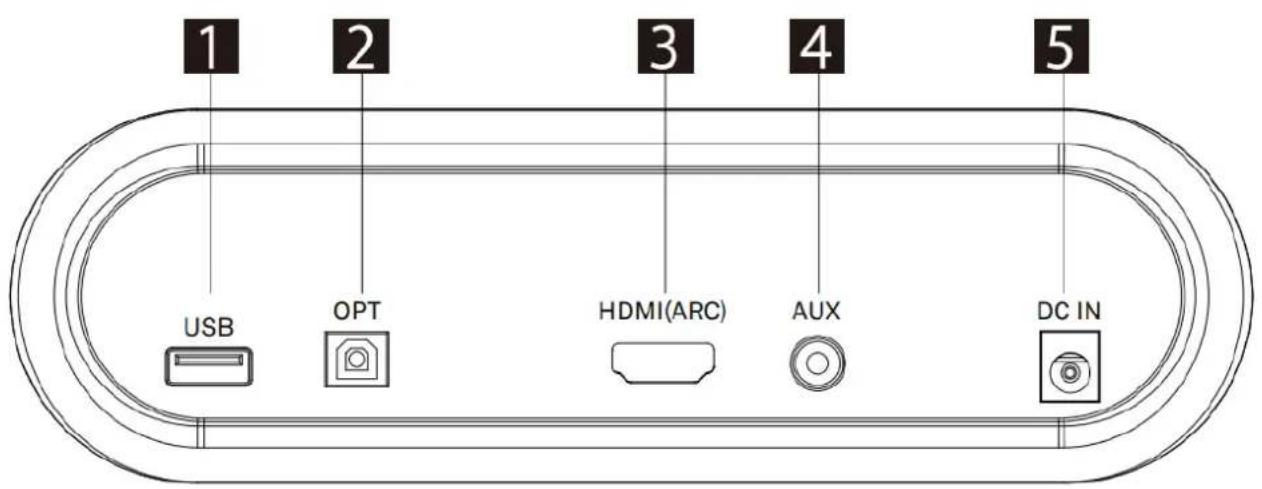
- USB IN: Use to connect a flash drive for direct MP3/WAV playback (FAT32 format and 64GB max).
- OPTICAL IN: Use to connect compatible devices using an optical cable (not provided).
3.HDMI(ARC): Use to connect compatible devices using a HDMI cable (not provided).
4.AUX IN : Use to connect compatible devices using the 3.5mm - 3.5mm stereo jack cable (provided).
5.DC IN: Use to connect the DC power supply (provided power adapter).
2. Remote control description
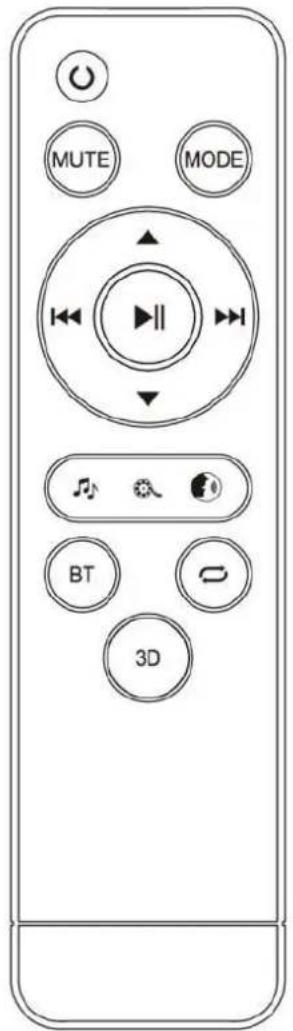
| Button | Function |
| Power on/off | |
| MUTE | Mute or recover the volume |
| MODE | Cycle through different inputs |
| Volume turning up | |
| Volume turning down | |
| USB and BT Previous | |
| Pause/Play | |
| USB and BT Next | |
| Choose Music sound effect | |
| Choose Movie sound effect | |
| Choose News sound effect | |
| BT | Shifting into BT Mode |
| USB Playback Repeat | |
| 3D | 3D ON/OFF |
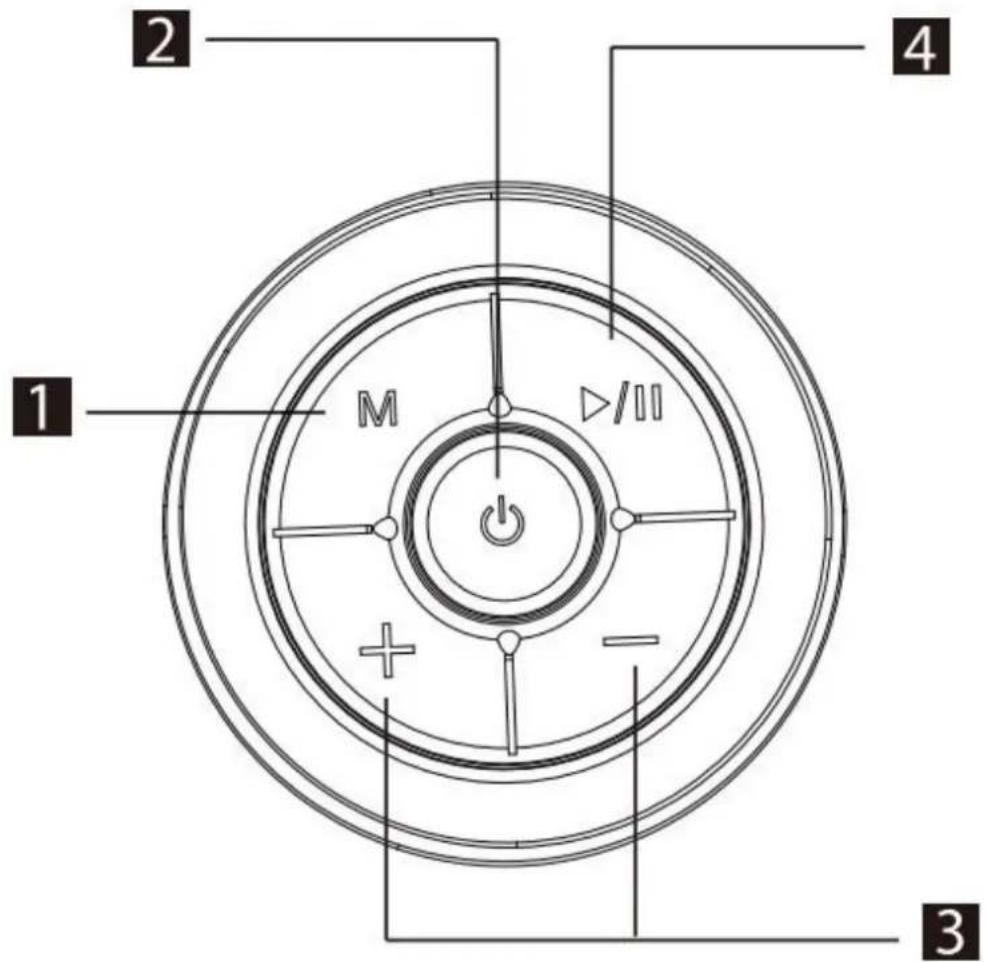
- Mode button
- Power ON/OFF
- Volume turning up/Next track Volume turning down/Previous track
- Pause/Play
II. TECHNICAL INFORMATION
Soundbar
| Brand | Continental Edison | |
| Reference | CEBDS4022B3 (Modèle HD008) | |
| Product information | Electrical parameters | AC 100-240V~50-60Hz |
| Output current | 19V ±5A | |
| Power consumption | 28,5W | |
| Standby power consumption | <0.5W | |
| Entrée port | 1 × USB port1 × jack input ∅ 3.5mm AUX1 × optical input1 × coaxial input1 × HDMI ARC input | |
| Supplied cables | 1 × 3.5mm / 3.5mm Jack cable | |
| Dimension (LxPxH) | 90x7.2x9.3cm | |
| Net weight | 1.75 kg | |
| Bluetooth | Bluetooth version | Version 5.0 |
| Protocole | A2DP AVRCP AVDTP AVCTP GAVDP | |
| Transmission range | Jusqu'à 10m | |
| Maximum emitted power | 0 Dbm | |
| Frequency band | 2.4GHz-2.480GHz | |
| Speakers | Impedance | 4 Ω |
| Max output power | 10W x 4 | |
| Frequency in response | 50Hz-18KHz | |
| Remote control | Power supply | 2 x AAA/R03 (non supply) |
| Transmission range | Up to 6m (Angle ≤30°) | |
Adapter
| Information publiée | Valeur et précision | Unité |
| Marque Continental Edison | - | - |
| Model identifier: JZB024-190150EX | - | - |
| Input voltage | 230 | V~ |
| Input AC frequency | 50-60 | Hz |
| Output voltage | 19 | V--- |
| Output current | 1.5 | A |
| Output power | 28,5 | W |
| Average active efficiency | 88.9 | % |
| Efficiency at low load (10 %) | 83.1 | % |
| No-load power consumption | 0.08 | W |
III. SET UP AND USE
1. Before first use
Unpacking the appliance and disposing of the packaging elements:

Remove all packing materials that is protecting the appliance and the protective elements inside the appliance compartments.
- The packing box and the papers sheets are recyclable. They must be thrown in the collection bins provided for this purpose.
- The materials bearing the symbol are recyclable:
PE<= polyethylene; >PS<= polystyrene; >PP<= polypropylene
This means that they can be recycled by depositors in appropriate collection containers.
- The other packaging elements (adhesive, fasteners ...) must be thrown away with household waste.
To know further: www.quefairedemesdechets.fr
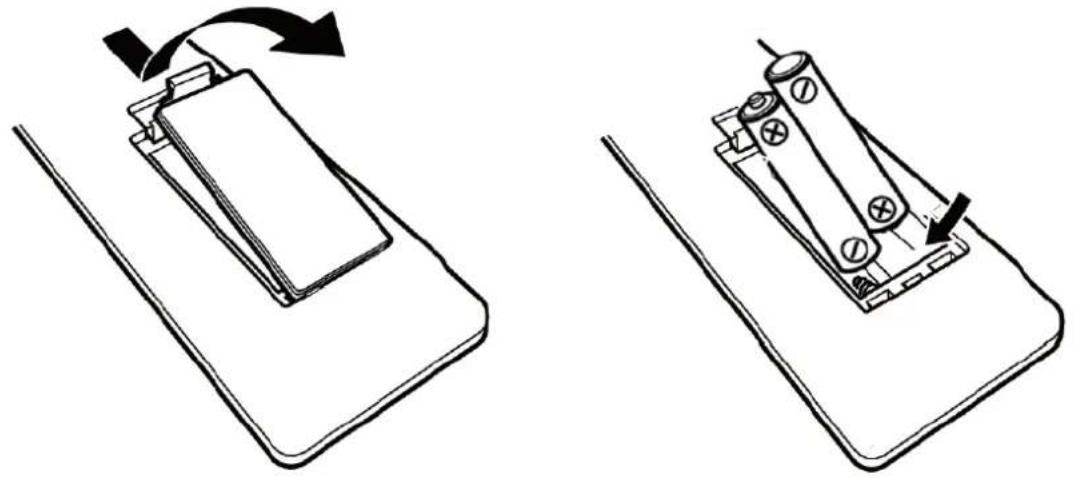
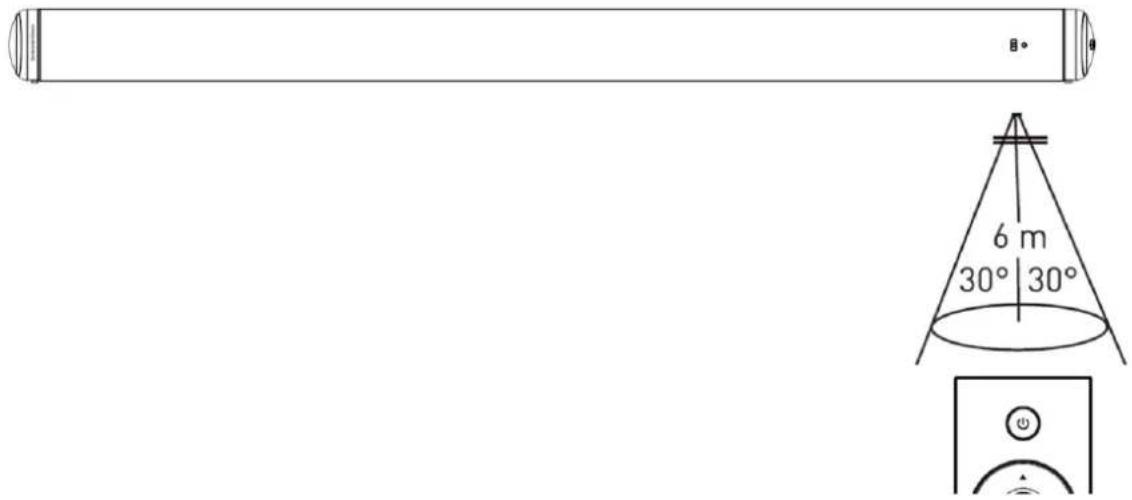
2. Remote control set up
Pull the battery compartment cover towards you to remove it as shown in the diagram below. Then insert two R03 / AAA batteries (not supplied) respecting the polarities (+/-). Replace the cover on the battery compartment and close it by pushing lightly until you hear a click.
natural_image
Two technical diagrams showing a battery being switched by an arrow, with no visible text or symbols.The performance of the remote control is optimal at an angle of 30^ and up to a distance of 6m from the remote-control sensor. If the operating range is reduced, the battery may need to be replaced.

natural_image
Black triangular warning symbol with exclamation mark (no text or numbers)Keep batteries, new or used, out of the reach of children. Take care not to swallow the batteries, otherwise there is a risk of chemical burns.
If you do not plan to use your soundbar for a long time, remov the batteries from the remote control.
Make sure there are no obstacles between the unit's remote control sensor and the remote control.
Do not expose the infrared remote control sensor to direct sunlight or other strong light.
3. Free standing installation
You can choose to install your soundbar by placing it on a table.
To make the most of the sound quality of the product, the sound bar should be installed centrally below your TV, facing the listening position, as shown in the diagram below.
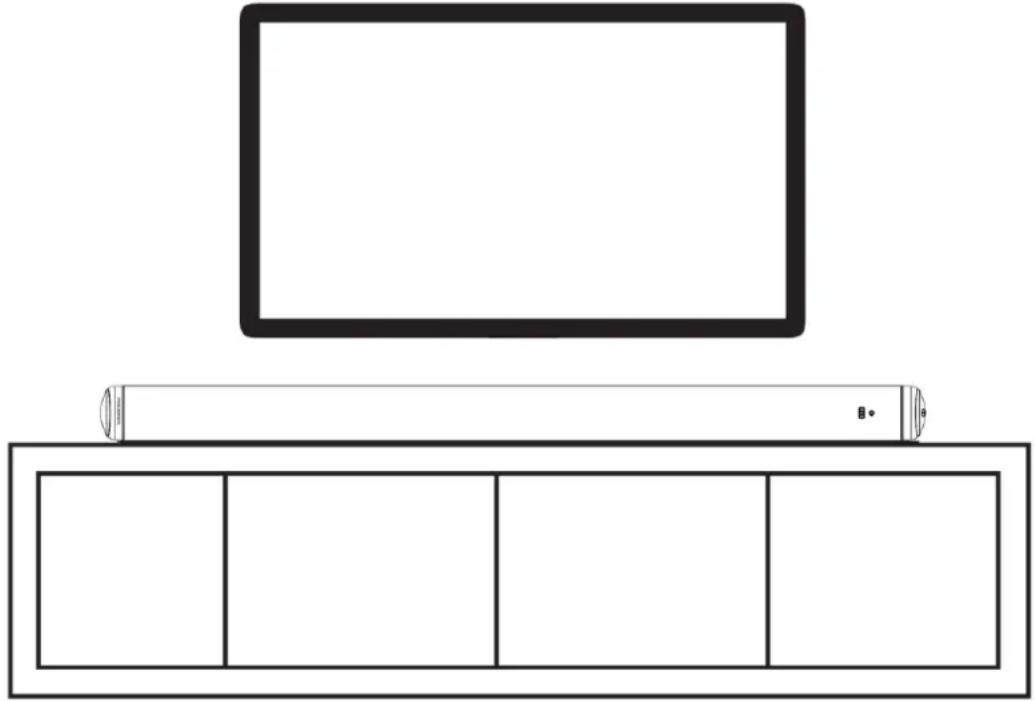
natural_image
Simple line drawing of a TV setup with a blank front panel and a top screen (no text or symbols)4. Wall mounting installation
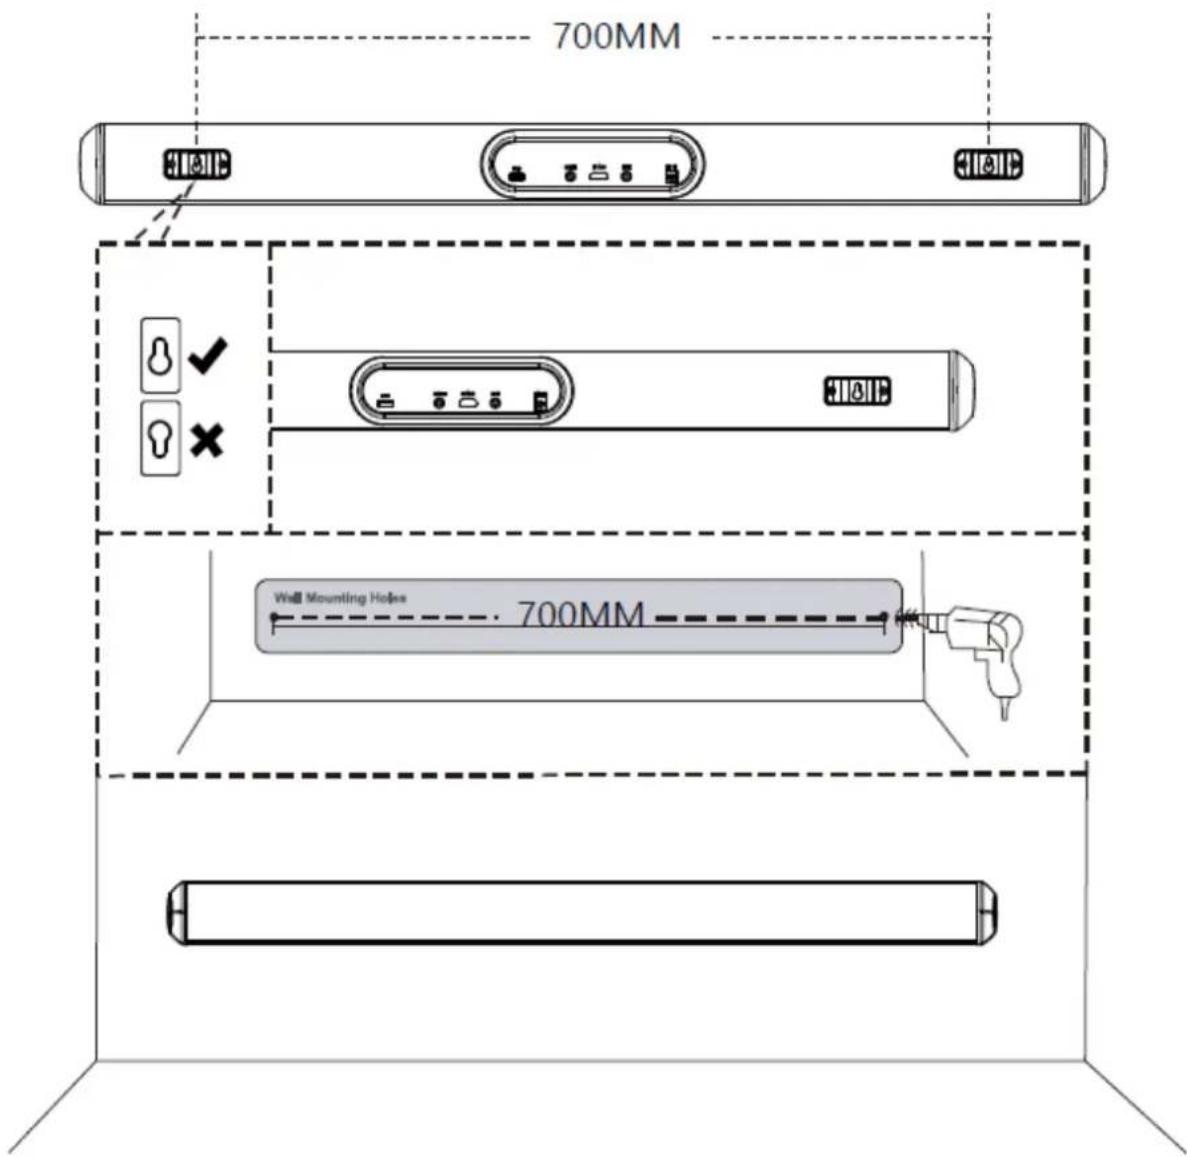
You can choose to hang your sound bar on the wall by mounting it directly under the TV screen.
Follow the steps below:
- Place each wall mount bracket in its location at the back of the sound bar, then screw each bracket using the screws provided.
- Measure the locations of the two holes in the wall mount bracket and mark two points on the wall for drilling depending on the measurement. Make sure the holes on the wall (concrete) are in the correct positions before drilling.
Note: The recommended diameter for the hole is 6mm.
- After drilling, insert 2 wall plugs (not supplied) into the drilled holes; use a hammer if necessary.
Do not drill into plasterboard walls, plaster plastered, wooden slats, etc.
-
Insert the 2 screws (supplied) into the holes and tighten them. Make sure to leave 8mm between the screw heads and the wall.
-
Connect the cables to the soundbar.
-
Lift the unit with its wall brackets fixed above the screw heads. Slide it into place. fix the screws in the holes with dowels. The screws must protrude far enough for mounting.

natural_image
Black triangular warning symbol with white exclamation mark (no text or numbers)The installation must only be carried out by qualified personnel. Improper mounting can cause serious personal injury and property damage. If you have decided to do the wall installation by yourself, make sure that there is no installation such as electrical wiring and piping in the wall. It is the responsibility of the installation to ensure that the wall can safely support the full load of the device and the wall mounts. Additional tools (not supplied) are required to complete the installation.
5. Cables connections
natural_image
Black triangular warning symbol with exclamation mark (no text or numbers)Before making any connections, make sure that the device is disconnected from any electrical supply.
During use, if cables or wires must be reconnected, first disconnect the power cable or the device may be damaged.
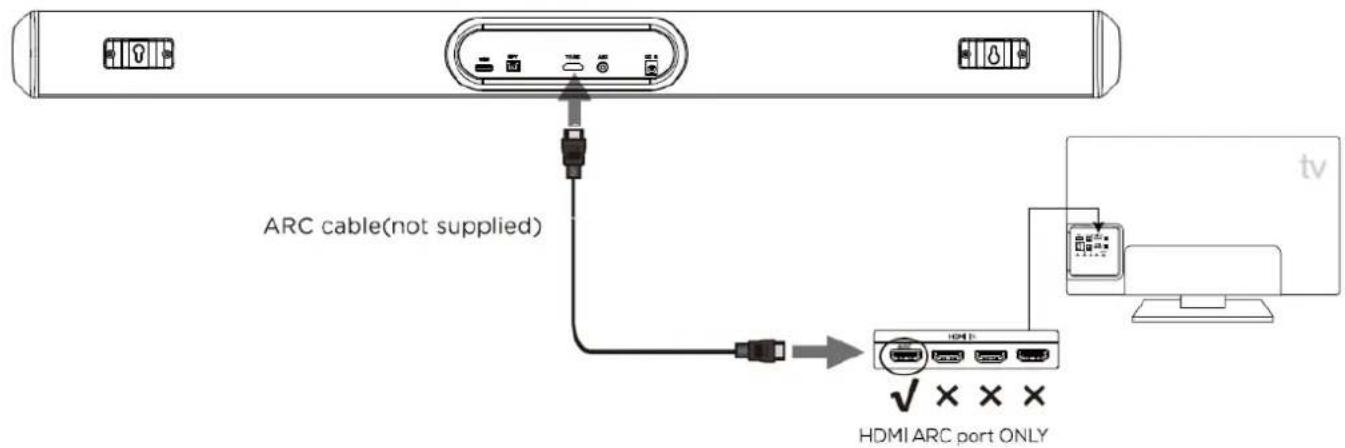
HDMI ARC connection
If you connect your soundbar to an HDMI ARC (Audio Return Channel) compatible TV, you can output audio from your TV via your soundbar without using an additional audio cable.
- Use a high-speed HDMI cable that supports ARC (not supplied) to connect the HDMI ARC port on your soundbar to the HDMI ARC connector on your TV. For more details on the location of this connection, refer to the TV's user manual.
- On your TV, activate the HDMI CEC / ARC functions. For this, refer to its user manual.
- Press on the unit button M or press on the remote-control button MODE. The Led screen will shown ARC
- Once the connection is established, use the remote control of your TV or soundbar to adjust the volume.
Note: If your TV is not HDMI CEC / ARC compatible, you need to connect an audio cable to output the sound from your TV through your soundbar speakers.
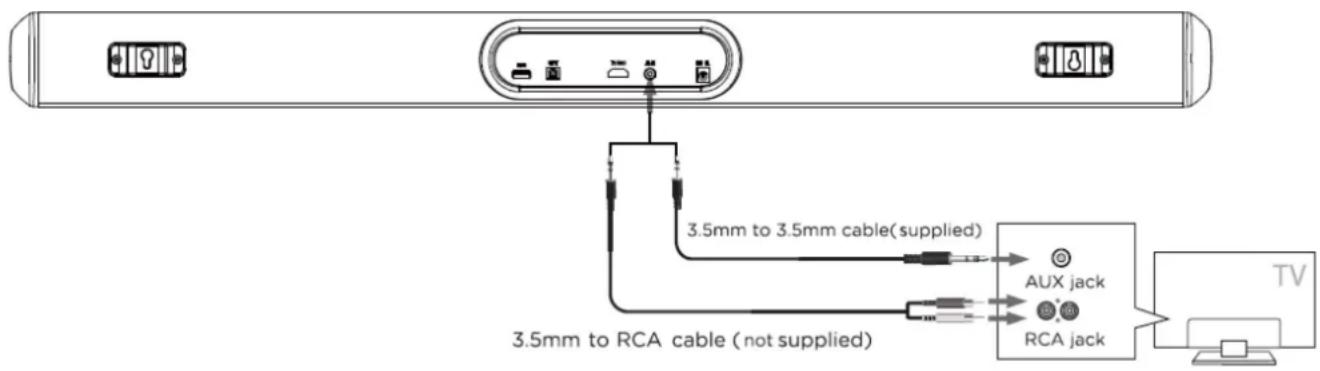
Analog connection with a 3.5 / 3.5mm jack cable (supplied)
You can also connect an external audio device to the soundbar using the AUX jack. This analogy socket is used for the audio connection of all types of sources (smartphone, tablet, CD player or MP3 player, game console, television ...).
- Use the supplied 3.5mm jack / 3.5mm jack cable to connect the headphone jack of your audio source to the AUX jack on the soundbar.
- Press on the unit button M or press on the button MODE. The Led screen will shown ARC
- Start playback on your external audio source. Sound is played through the speakers in the soundbar. Use the remote control of your TV or soundbar to adjust the volume.
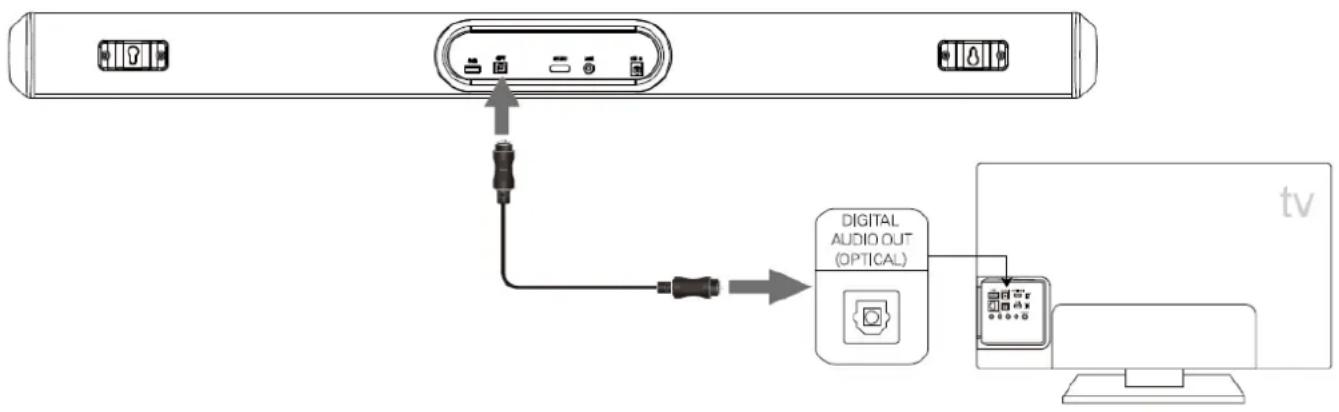
Optical connection
You can also connect an external audio device to the soundbar using the optical jack. This audio connection allows the most exact sound retransmission via a fiber optic cable (not supplied) without loss of signal.
- Use the optical cable (not supplied) to connect the OPTICAL jack on your audio source to the OPTICAL jack on the soundbar.
- Press on the unit button M or press on the remote-control button until the LED screen shown OPT
- Start playback on your external audio source. Sound is played through the speakers in the soundbar. Use the remote control of your TV or soundbar to adjust the volume.
flowchart
graph TD
    A["TV Cable"] --> B["Optical Audio Out"]
    B --> C["Computer Monitor"]
    B --> D["Switch"]
    style A fill:#f9f,stroke:#333
    style B fill:#ccf,stroke:#333
    style C fill:#cfc,stroke:#333
    style D fill:#fcc,stroke:#333
Bluetooth connection
You can also connect an external audio device to the soundbar using Bluetooth wireless mode. This audio connection lets you listen to music stored on your device without using a cable.
Press the BT button on the remote control or repeatedly pressing the MODE button on the soundbar control panel until BT is shown on the LED display.
The LED display will flash to indicate that the soundbar is in Bluetooth pairing mode. Ensure that the device you wish to connect is also in pairing mode and search for "CEBDS4022B3" in its device list.
When the two devices are paired, the LED display on the soundbar will stop flashing and remain constant. (The soundbar will now automatically re-pair with this device whenever it is within range and has Bluetooth turned on.)
Notes:
- This sound bar can be paired with all devices equipped with Bluetooth wireless technology.
- After pairing, your audio source and the soundbar will reconnect automatically as soon as the Bluetooth source is selected.
- The Bluetooth function of the soundbar automatically switches to standby mode after two minutes if no Bluetooth signal is detected. Press the key for 3 seconds to reactivate the Bluetooth mode.
- The device can only be paired with one Bluetooth device at a time. To pair with another device, cancel the Bluetooth pairing of your device then repeat steps 1 to 4 above with the new device.
- For optimal transmission quality, make sure that the sound bar and your Bluetooth device are within 10 meters of each other and that no wall or electronic devices are interfering with the transmission.
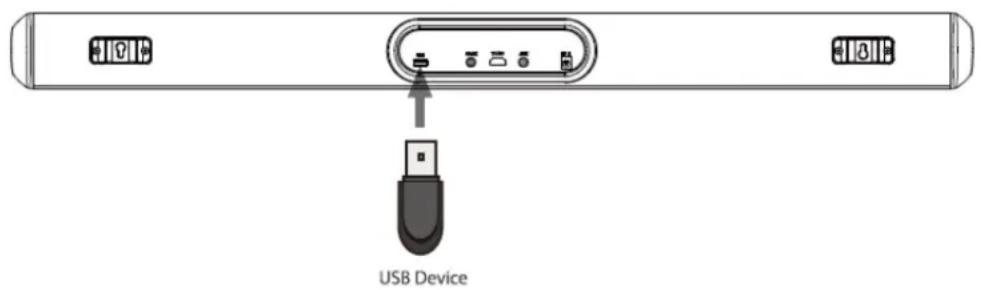
USB mode
The soundbar is compatible with USB flash drives of up to 64GB(Fat32 format) in size and can play MP3 and WAV audio files directly.
Simply insert a compatible drive into the USB port on the back of the soundbar and the unit will automatically switch to USB mode and play the first compatible track.
USB repeat mode (also accessed via the remote control) enables single track repeat (ONE), all track repeat (ALL)
The media player also has a memory function that will recall and continue from the last-played point when a USB flash drive that has previously been used with the soundbar is reinserted.
Equalizer modes
The soundbar has 3 equalizer presets, tailored to complement various styles of music.
Press the EQ button on the remote to choose between Music (EQ1), Movie (EQ2), News (EQ3).
Connection to mains socket
After making the connections to your source cables, proceed to the electrical connection of the soundbar.
Insert the end of the AC adapter into the DC 19V / 1.5A power connector port on the back of the sound bar.
Wall mount your soundbar if necessary.
Then plug the other end of the AC adapter into the electrical outlet.
6. Automatic standby mode

Your soundbar complies with the standards in force in European legislation regarding the deadlines for automatic standby imposed by the ERP (Energy Related Products) directive.
If the sound bar remains idle (no signal input) for about 15 min, it will shut down automatically.
During normal use of the sound bar, make sure to set the amount of volume from sound bar and external devices (such as DVD, TV, or mobile phone) at normal volume, if the volumes in sound bar or external devices are indeed low, the sound bar may not detect the input signal and it will power off the sound bar automatically
IV. CLEANING AND MAINTENANCE
- At the end of your use, turn off your device by unplugging the power cable from the power outlet.

AWARNING! Always make sure to unplug the appliance before cleaning. Do not immerse the device in water.
Do not use sharp, toxic and aggressive products such as methylated spirits, industrial strippers, solvents to clean your device because they may damage it.
Cleaning the body of the soundbar:
Use a soft cloth to clean the surface of the soundbar.
V. TROUBLESHOOTING
| Anomalies | Causes | Solutions |
| No power supply | The device is not plugged in. | Plug in the soundbar. |
| The device is not switched on. | Press on the button ⏻ | |
| The soundbar does not emit sound. | The volume is set to minimum or is disabled. | Adjust the volume.Press on the remote-control button ✗ to reactivate the sound. |
| The connections are not correctly made. | Connect an audio cable between your audio device and the soundbar. However, you do not need a separate audio connection if the soundbar and the TV are connected by an HDMI ARC connection. | |
| The selected source is not correct | Select the appropriate audio source using the button M on the unit or the button MODE on the remote control. | |
| The remote control does not work. | The distance between the remote control and the sound bar is too large. | Bring the remote control closer to the device. |
| The batteries are discharged. | Change the batteries. | |
| There is an obstacle between the remote control and the device. | Remove any obstacle between the two elements. | |
| LED off.Keys do not work. | The control panel is damaged. | Contact the After-Sales Service. |
| No light indicator. | The device is not plugged in. | Plug in the soundbar. |
| The control panel is damaged. | Contact the After-Sales Service. | |
| Dysfunction | The soundbar works abnormally, or makes an unusual sound. | Unplug the appliance for 30 minutes. After 30 minutes, turn on the soundbar again. |
| Bluetooth connection cannot be established. | A device cannot connect with the soundbar | Restart the Soundbar and try pairing againYou have not enabled the Bluetooth function of the device.See the user manual of the device on how to enable the function.The device is not correctly connected.The Soundbar is already connected with another Bluetooth deviceDisconnect the connected device, then try again |
| Quality of audio play from a connected bluetooth device is poor | The Bluetooth reception is poor.Move the device closer to the soundbaror remove any obstacle between the device and the soundbar | |
| The connected bluetooth device connects and disconnects constantly | The Bluetooth reception is poor.Move the device closer to the soundbaror remove any obstacle between the device and the soundbar |
For any problem occurring on your device: contact the After-Sales Service.
VI. ENVIRONMENT: RECYCLING
The European Directive on Waste Electrical and Electronic Equipment (WEEE)

requires that old household electrical appliances must not be disposed of in the normal unsorted municipal waste stream. Old appliances must be collected separately in order to optimize the recovery and recycling of the materials they contain, and reduce the impact on human health and the environment.
The crossed out “wheeled bin” symbol on the product reminds you of your obligation, that when you dispose of the appliance, it must be separately collected.
Consumers should contact their local authority or retailer for information concerning the correct disposal of their old appliance.
VII. WARRANTY
The warranty does not cover the wear parts of the product, nor the problems or damage resulting from:
- superficial deterioration due to normal wear of the product;
- defects or deterioration caused by the product coming into contact with liquids and corrosion caused by rust;
- any incident, misuse, misuse, alteration, disassembly or unauthorized repair;
- Any unsuitable maintenance, use not in accordance with product instructions or incorrect voltage connection;
- any use of accessories not supplied or not approved by the manufacturer.

The warranty will be void if the rating label and / or serial number of the product is removed.
natural_image
Abstract geometric design with two gray semicircles and a right-angle shape (no text or symbols)Continental Edison

- Continental Edison
- ATTENTION
- Connexion optique
- Mode égaliseurs
- CEBDS4022B3
- SAFETY WARNINGS
- WARNING
- READ CAREFULLY THE INSTRUCTIONS BEFORE INSTALLING AND USING THIS APPLIANCE. IN THE CASE YOU RESELL THIS APPLIANCE, PLEASE MAKE SURE TO PROVIDE THIS INSTRUCTION MANUAL TO YOUR BUYER.
- WARNING! To prevent any fire or electrical hazards:
- General precautions
- Avoid electric shock, fire and explosions
- Protect the device and AC adapter for any damage.
- AND HANDLING OF BATTERIES:
- TABLE OF CONTENTS
- SAFETY WARNINGS 27
- DESCRIPTION.... 33
- TECHNICAL INFORMATION ...... 36
- SET UP AND USE 37
- CLEANING AND MAINTENANCE.... 44
- TROUBLESHOOTING 45
- ENVIRONMENT: RECYCLING 46
- WARRANTY 47
- DESCRIPTION
- Product & accessories description
- Remote control description
- TECHNICAL INFORMATION
- Adapter
- SET UP AND USE
- Before first use
- Remote control set up
- Free standing installation
- Wall mounting installation
- Cables connections
- HDMI ARC connection
- Analog connection with a 3.5 / 3.5mm jack cable (supplied)
- Optical connection
- Bluetooth connection
- Notes:
- USB mode
- Equalizer modes
- Connection to mains socket
- Automatic standby mode
- CLEANING AND MAINTENANCE
- ENVIRONMENT: RECYCLING
- WARRANTY
Brand : CONTINENTAL EDISON
Model : CEBDS4022B3
Category : Soundbar