B004VUA2KR - Switch Tripp Lite - Free user manual and instructions
Find the device manual for free B004VUA2KR Tripp Lite in PDF.
| Brand | Tripp Lite |
| Model | B004VUA2KR (B004-VUA2-K-R) |
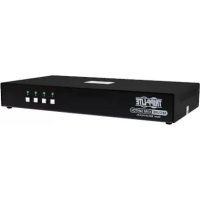
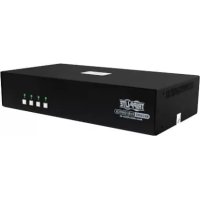
| Product Type | Compact 2-port USB KVM Switch with Audio |
| Number of Ports | 2 USB ports for PC |
| Main Functions | KVM switching, independent audio/microphone, switching software, keyboard hotkeys, manual buttons, auto-scan |
| Selection Methods | Manual buttons, keyboard hotkeys (Ctrl+Alt+1/2 by default, or Scroll Lock+Scroll Lock), KVM software |
| Included Software | Yes, for Windows 98 SE and higher, Mac OS 10.4 (Tiger) and higher |
| Audio Compatibility | Separate or PC selection-linked audio and microphone |
| Power Supply | Via USB cable (bus-powered) |
| Dimensions | Approximately 10 x 6 x 2 cm |
| Weight | Approximately 0.2 kg |
| Warranty | 3-year limited |
| Package Contents | KVM Switch, CD-ROM (software), cables (unspecified) |
| Care and Cleaning | No special maintenance required |
| Safety | Follow standard USB connection guidelines |
| General Information | Note: fast switching requires the software to be installed; hotkeys only work after the operating system has started |
Frequently Asked Questions - B004VUA2KR Tripp Lite
User questions about B004VUA2KR Tripp Lite
0 question about this device. Answer the ones you know or ask your own.
Ask a new question about this device
Download the instructions for your Switch in PDF format for free! Find your manual B004VUA2KR - Tripp Lite and take your electronic device back in hand. On this page are published all the documents necessary for the use of your device. B004VUA2KR by Tripp Lite.
USER MANUAL B004VUA2KR Tripp Lite
2-Port Compact USB KVM Switch with Audio
Model: B004-VUA2-K-R
Introduction 2
Installation 2
Operation 4
KVM Switching Operation Reference 5
Warranty and Product Registration 6
Espanol 8
Français 15
Pycckn 22
PROTECT YOUR INVESTMENT!
Register your product for quicker service and ultimate peace of mind.
You could also win an ISOBAR6ULTRA surge protector—a $100 value!
www.triplite.com/warranty


Manufacturing
Excellence
1111 W. 35th Street, Chicago, IL 60609 USA • www.triplite.com/support
Copyright © 2017. All rights reserved.
All trademarks are the property of their respective owners.
Introduction
The B004-VUA2-K-R is a 2-port Compact USB KVM Switch with optional audio and microphone switching function. It allows you to access, control, boot and reboot multiple USB-enabled PCs. The independent audio/mic switching function allows an uninterrupted audio signal from either PC even when you switch to the other PC.
For Windows® and Macintosh® users, it provides innovative, easy-to-use KVM Switcher Software—a small windows client application to facilitate your KVM switching operations such as PC selection and hot key sequence programming, auto-scanning, auto-scan delay time programming, independent/simultaneous audio & PC switching and more.
Installation
Take the companion CD-ROM and the KVM Switch out of the box and follow the steps below for installation.
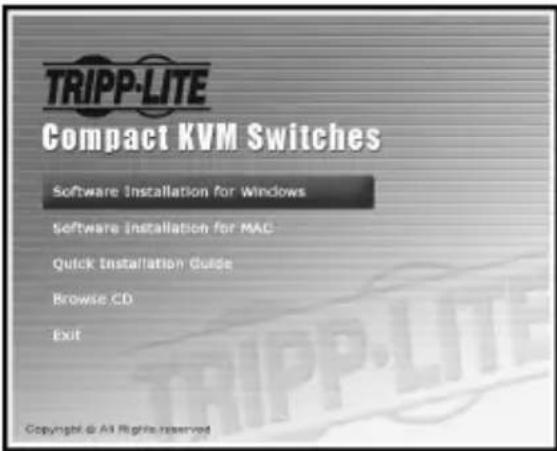
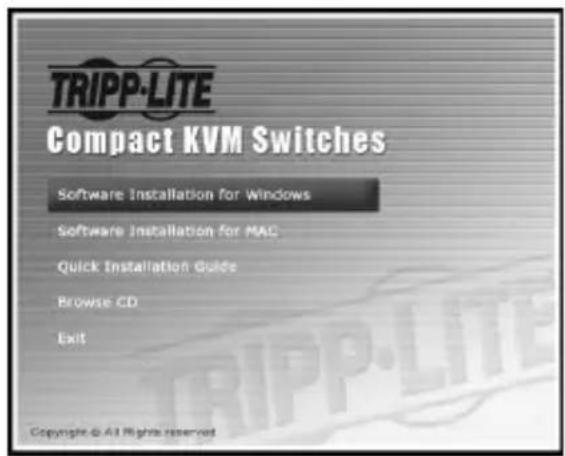
Step 1. Insert the companion CD-ROM into your CD drive, and the Auto-run screen will pop up (If the Auto-run feature has not been enabled on your computer, just find the Autorun.exe on the CD-ROM and double-click it to start).
Installation
Step 2. For Windows/Mac: Click the "Software Installation for Window/Mac" to start the installation. (If the Mac version software does not start, you will need to copy it to your local hard drive on your Mac). Follow the instructions to completion. When the installation is complete, you will see a KVM Switcher icon on the system tray of your desktop. Right-click to evoke the operation menu and double-click to evoke the configuration box. For operation details of the KVM Switcher software, please refer to the KVM Switcher Operation Reference.
- The Windows switching software is recommended for use on Windows 98 SE or later. The Mac switching software is recommended for use on Mac OS 10.4 [Tiger].
- The KVM Switcher Software supports both Windows and Mac OS operating systems. For other OS platforms such as Linux, you can still use the keyboard hot key - ScrLk + ScrLK - to switch PCs. However, this switching hot key is not available on non-PC platform such as Mac OS.
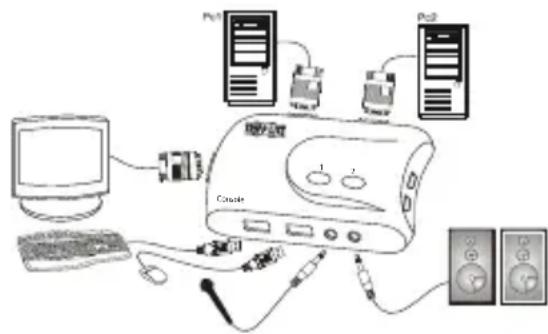
Step 3. Connect the console (USB keyboard, mouse, monitor, speaker/headphone and microphone) to the respective ports on the KVM Switch.
Step 4. Connect each KVM PC port to a computer, using the slim 3-in-1 KVM combo cable and the audio/mic cable. After you have connected the KVM and computers properly, you can operate the KVM Switch immediately.
- Some older computers with USB interface might need to manually enable the USB option in the BIOS settings before you can use any USB devices. If your USB interface does not work, please check the USB option in the BIOS.
- If you use Windows 95/98/SE or Mac OS and have not yet installed a USB mouse on your computer, there may be an error message telling you that mouse is not detected and prompting you to decide whether to ignore the same message in the future. You will also find that there isn't any mouse movement to disable this message. You will need to install your USB mouse on your computer first, before connecting it to this KVM Switch.

Operation
There are three methods to control your KVM Switch for PC and Audio/Mic channel selection: using (1) the face-panel push buttons, (2) the hot key sequences, or (3) the KVM Switching Software.
Manual Push-Buttons
The manual push Buttons on the unit allow you direct control over KVM switching operation. Simply press the button to switch to the corresponding PC port (and audio/ mic channel, if binding is enabled). By default, PC port switching and audio/mic port switching are bound together, unless you specify the audio to be fixed a specific port.
- You can use the face-panel button to switch to an empty port that is not connected with any computer. If you use keyboard hotkeys or the KVM Switcher software, you will not be able to switch to an empty port.
Keyboard Hot Keys
User-definable hot keys for PC selection:
Hot key sequence = Ctrl - Alt - [command key]*
- Please refer to the next section for keys that are qualified to be used as a command key.
Note: These 3 keys should be pressed and held together. And it is upon the release of all three keys that the switching action will be executed.
Universal hot key for switching to next port:
Universal hot key sequence = ScrLk + ScrLk
- For other operating systems on PCs such as Linux, you can still use this special hot key to facilitate PC switching. This special hot key is not available for Mac.
- Both the universal hot key, ScrLk + ScrLk and the user-definable hot key, Ctrl - Alt - [command key] WILL NOT allow you to switch to an empty port that is not connected with any computer. To force your KVM to switch to an empty port, just press the manual push-button to switch.
Each keystroke within a hot key sequence should be pressed within 2 seconds. Otherwise, the hot key sequence will not be validated. - After port switching, you have to wait until the KVM Switching icon shows the target port before you can perform the next switch.
- All the hot keys are functional only after your PCs are booting into the OS. If you want to switch PC in the BIOS/pre-boot stage, press the face-panel button to switch.
KVM Switcher Software (for Windows and Mac)
In addition to PC switching, the KVM Switcher Software also allows you more advanced functions such as described in the next section.
KVM Switching Operation Reference
Switching PCs Using Operation Menu
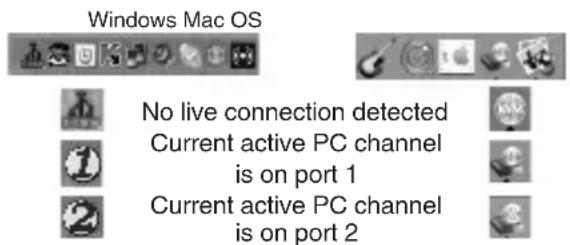
Right-click the KVM Switcher icon to evoke the operation menu, then select whichever PC that is available for switching. Once you select a PC channel, it will immediately switch to that PC.
Windows
Mac OS
Note: The unconnected port(s) or the active port will be grayed-out and hence non-selectable.
Switching PCs Using Keyboard Hot Key
Hit the hot key using your current hot key definition:
Hot key sequence = Ctrl - Alt - [command key]*
- The factory default hot key setting is Ctrl + Alt + 1/2 for PC 1/2. You can also use ScrLk + ScrLk to switch PC.
Start Auto-Scan
Right-click the KVM Switching icon to evoke the operation menu, then select Start Auto-Scan to activate auto-scanning.
Stop Auto-Scan
While auto-scanning, right-click the KVM Switching icon to evoke the operation menu, then select Stop Auto-Scan to de-activate auto-scanning. Or you can press any of the manual buttons to stop Auto- scan.
Auto-Scan Period
Select the Auto-scan period from 10 60 seconds with an increment of 5 seconds. The Auto-scan period is the time your KVM Switch will wait before switching to next PC.
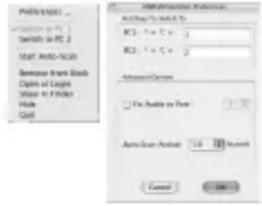
KVM Switcher Configuration
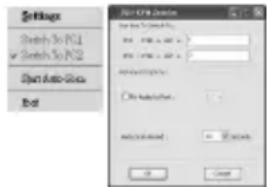
Right-click the KVM Switcher icon and select Settings or double-click the icon to bring up the configuration dialog box.
Define Hot Key Commands
You can specify the command key you desire by typing it in. For example, you can specify the hot key for switching to PC 1 as CTRL - ALT - A by typing an A (not case-sensitive) in the editable field.
KVM Switching Operation Reference
Hot Key Sequence = CTRL - ALT - [command key]*
- The command key is user-definable via the configuration dialog box
- Please note that if you intend to modify the command key, you have to modify them on each and every of the connected computers, since the hotkey setting is stored within each connected computer.
- Except those control keys such as Alt, Ctrl, Shift, CAPS, Tab, Esc and those functions keys and edit keys, all other keys on the keyboard, including number keys on the number pad, are all keys that are qualified to be used as hot key command keys. In addition to the software, KVM Switching by the operation menu and the user-defined hot keys, you can always use the universal hot key for PC switching - ScrLk + ScrLk
Fix Audio Port to One PC
Check this option and then select the PC to fix the audio/mic channel to the selected PC. Once this option is checked, the audio/mic channel will be fixed and become non-switchable.
Warranty and Product Registration
3 Year Limited Warranty
TRIPP LITE warrants its products to be free from defects in materials and workmanship for a period of three (3) years from the date of initial purchase. TRIPP LITE's obligation under this warranty is limited to repairing or replacing (at its sole option) any such defective products. To obtain service under this warranty, you must obtain a Returned Material Authorization (RMA) number from TRIPP LITE or an authorized TRIPP LITE service center. Products must be returned to TRIPP LITE or an authorized TRIPP LITE service center with transportation charges prepaid and must be accompanied by a brief description of the problem encountered and proof of date and place of purchase. This warranty does not apply to equipment, which has been damaged by accident, negligence or misapplication or has been altered or modified in any way.
EXCEPT AS PROVIDED HEREIN, TRIPP LITE MAKES NO WARRANTYES, EXPRESS OR IMPLIED, INCLUDING WARRANTYES OF MERCHANTABILITY AND FITNESS FOR A PARTICULAR PURPOSE.
Somestates do not permit limitation or exclusion of implied warranties; therefore, the aforesaid limitation(s) or exclusion(s) may not apply to the purchaser.
EXCEPT AS PROVIDED ABOVE, IN NO EVENT WILL TRIPP LITE BE LIABLE FOR DIRECT, INDIRECT, SPECIAL, INCIDENTAL OR CONSEQUENTIAL DAMAGES ARISING OUT OF THE USE OF THIS PRODUCT, EVEN IF ADVISED OF THE POSSIBILITY OF SUCH DAMAGE. Specifically, TRIPP LITE is not liable for any costs, such as lost profits or revenue, loss of equipment, loss of use of equipment, loss of software, loss of data, costs of substitutes, claims by third parties, or otherwise.
Warranty and Product Registration
Product Registration
Visit www.triplite.com/warranty today to register your new Tripp Lite product. You'll be automatically entered into a drawing for a chance to win a FREE Tripp Lite product!*
- No purchase necessary. Void where prohibited. Some restrictions apply. See website for details.
FCC Notice, Class A
This device complies with part 15 of the FCC Rules. Operation is subject to the following two conditions: (1) This device may not cause harmful interference, and (2) this device must accept any interference received, including interference that may cause undesired operation.
Note: This equipment has been tested and found to comply with the limits for a Class A digital device, pursuant to part 15 of the FCC Rules. These limits are designed to provide reasonable protection against harmful interference when the equipment is operated in a commercial environment. This equipment generates, uses, and can radiate radio frequency energy and, if not installed and used in accordance with the instruction manual, may cause harmful interference to radio communications. Operation of this equipment in a residential area is likely to cause harmful interference in which case the user will be required to correct the interference at his own expense. The user must use shielded cables and connectors with this equipment. Any changes or modifications to this equipment not expressly approved by Tripp Lite could void the user's authority to operate this equipment.
Tripp Lite has a policy of continuous improvement. Specifications are subject to change without notice.


Manufacturing Excellence
1111 W. 35th Street, Chicago, IL 60609 USA • www.tripplite.com/support
1111 W. 35th Street, Chicago, IL 60609 USA • www.triplite.com/support
1111 W. 35th Street, Chicago, IL 60609 USA • www.tripplite.com/support
Guide d'utilisation
Manufacturing Excellence
1111 W. 35th Street, Chicago, IL 60609 USA • www.triplite.com/support
Sequence de touches = Ctrl - Alt - [touch de commande]*
Sequence de touches = Ctrl - Alt - [touch de commande]*
Manufacturing Excellence
1111 W. 35th Street, Chicago, IL 60609 USA • www.tripplite.com/support
PykoBODCTBO N0Ib30BaTeJia
2-nopToBbI KOMnakTHbI KBM- npeKlOuataIb c pa3beMaMu USB n
aydnokhaJom
Manufacturing Excellence
1111 W. 35th Street, Chicago, IL 60609 USA · www.triplite.com/support
0xpaHaeTcA ABTopcKm npaBOM © 2017. NepeneuAtKa 3anpeuaetcA. Bce ToproBbIe 3HaKn ABJIaIOCTc CO6CTBeHHOCTbIO CBONX COOTBeTCTByIOxN BnaJeNbIeB.
BVepeHne
UcpoBMO Mo. B004-VUA2-K-R npedctabnaretco6oKOMnakTHbI 2-noptobb (cpa3beMaMUSB) KBMnepeKnIOaTeNb cdoonHntenbHO yHKue He3aBcUMoro nepeKIOueHnaayuN MmKpOoHHbx KaHaNoB.
Oho o6ecneuBaet Bo3MOxHocTb DoctyNa K HeckoJIbKIM PIc pa3beMaMn USB, a TaKke ynpaBHeHn TaKmN KOmbIOTepaMn, IN 3arpy3KN I nepe3arpy3Kn. FyHKUra He3aBcUMOro nepeKJIOueHn ayDIO-/MkPofoHbIX KaHaIOB o6ecneuBaet Bo3MOxHocTb 6ecnepe6oHoro npoxoKeHn 3ByKOBOrO cHrHa n CIOBOrO PI daXe npi nepeKJIOueHn Ha dpyroKOMNbIOTeP.
Дяпьзовател Windows' Macintosh npedoctabnaeTc npnHnHnHbHO HOBOe n npocToe B nCNoB3OBAHm IIO KVM Switcher He6obIbwoe kIneHTCKoe npnoJoxHe, o6neruaOoee npon3BoIMbIe onepaun KBM-nepeKluoyenr, TAKne KaK bbl6op IN pporpaMMNPOBaHne KOMbHaqin "TopaX" KlaBn, ABTOckAHpOBaHne, nporpaMMNPOBaHne BpeMeHn 3aDePxxk ABTOckAHpOBaHn, He3aBucmoe nIOn ODHOBpeMeHHoe nepeKluoyehne ayDnOKaHnOB/ KOMNbIoTePoB n np.
yctahOBka
BbHbTe n3 Kopo6Kn KomnakT-DnCK n KBM-nepeKIOuYaTeNb, a 3aTeM npoN3BeIte erO yCTaHOBky, BblONHb ONcaHHbIe HIXke DeiCTBna.
War 1. BCTaBbTe KOMNaKT-DnCK B CD-DnCKOBOD, nocne yero Ha 3KpaHe NOBNTcO KHO aBTo3anycKa (npn OTCyTCTBm HA KOMNbTOpe ΦyHKuM aBTo3anycKa HainTe Ha KOMNaKT-DnCKe faiJ Autorun.exe n 3anyCTnte ero DBOHBIM UeJIYKOMMbIuN).
yCTaHOBka
War 2. Дя Windows/Mac: habtmite" Software Installation for Window/Mac" ("YCTAHOBKa nporpaMMHoro obecneueHnЯ Window/Mac") Дя зауcka npocecca yctahOBKn (eCm Bepcna IIO Дя Mac He 3aynckaeTcra,TO Bam He06xOIMoCKONpOBaTB erHa loKAbhBn Jxck CBOero yctpoCTBaMac).Дя 3abepweHn npoceca BblONHnTe yka3aHn, NOBJIIOUncEca H ekpaHe. Pocne 3abepweHn yctahOBKn B o6naTn yBeDOMJeHn NaHeN 3aDaN pOBuTc3HaouK KVM SSwiCher. Habtmite Ha Hero npaBoN KhoNkoMbIIN Dny BBIOBa OnpaUNHOrMeHIO, a 3aTeM Bbl3OBtE OKHO CNTEmbIX HAcToeK (configuration box).Поюбн ИфОрмаць O paOte nporpaMMHoro obecneueHnKVM SSwiCher npedctabHeA CnpaBOOHom pykoBODCTbe no paOte c KVM SSwiCher.
- ПО посяклоченя Дд Windows pekomehnyetca Испьзова Т ha komпьтepax c OC Windows 98 SE Иибоile поднх Всрсь. ПО посяклоченя Дд Масpekomehnyetca Испьзова T ha komпьтepax c Mac OS 10.4 [Tiger].
- PporpamMnHoe o6ceueHHe KVM Swtcher noDepxNBAeT onepaunOHbIe CNTEmbl Windows m Mac OS. Ppu pa6ote c npyrnnn OpepaunOHbIMn CNTeMaMM (HaNPmEp, Linux) nnepeKlnouHEnMa MekJy NK MoXHO nOJIb3ObTaBcra "rOpAmm" KnaBnAmn ScrLk + ScrLK. Ondako npu pa6ote Ha INaTΦopMax,
Windows Mac OS


TeKuyuamakTINBnI PK-KaHAnJ DeNCTByeT cep3 npT 1
TekuyiakTnBbI NK-KaHJI DeIcTByeT cep3 npT 2


OTnHbIXoPC (HaNPmep,Mac OS),pepeKIOUeHHe c NMOsBIO yKa3aHHbIX "Topuix" KlaBNI HeBO3MOxHO.
War 3. NIOKNIUHTE KOHCOB (USB-KNabNaTpy, MbIb, MOHITOP, aKyCTNUeCKyO CnCTeMy/HayuHNKn MKNPOOH) K COOTBEcTBYIOUM NOPAM KBM-nepeKluOaTeJI.
War 4. CoeHnHte KaJbI npT KVM PC c KOMnbIOTePOM npn NMOUToHKOro KOM6HnpOBaHHoro (3 B 1) KBM-Ka6eN aayno-/MnKpOfoHHoro Ka6eN. Iocne npabunbHoro coeHHeNk KBM-apeKJIouaTeN i KOMNbIOpeOB MOxHO HeMeJeHNo npCTynatb K pa6ote c KBM-nepeKJIouaTeNem.
HaKeKoTOpbIX KOMNbIOTePax 6Oone paAHnX NOKOJIeHm C USB- HHTepFeIcOM dIa OBeCneUeHnBa3MOxHOCTn pa6OtBJ C USByCTpoiCTBaMIMoKet Notpe6ObaTcBpyuHoe pa36IOknpoBaHne onuIN USB B HAcTpoIkAX BIOS.Ecnus USB-HHTepFeIc He YHKUOnHIpye,TpOBepbTe cocToaHne onuIN USB B HAcTpoIkAX BIOS.
EcnHa KOMbItepe ConepaHOnHnCnCTeMoWindows 95/98/ SE m Mac OS eue He yctaHOBHeA USB-MbIb, To Ha kpcane MoKet nOBJIbTaCg COo6UeHne O6 oWu6Ke cyKa3aHmE Ha To, QTo MbIb He obHapyKeHa, N ppeNoXeHm E rHOpuPoBaT aHaONuHbE Coo6UeHn B 6dyuEe. Kpome TOrO, 6yTe HBeO3MOxHo nepMeUeHne Kyccopa Mbln Dn6NOKupOBKn DaHHoro COo6UeHn. B 3tOM cnUyae neped noKnIOUeHmE KombItepe Ka DaHHomy KBM-nepeKIOvateIIO nOtpe6yeTc Chauana YCTaHOBtB Ha Hero USB-MbIb.
Popraok əkcnnyaTaun
CyueTbyIOT TpN CnO6a UnpaBneHnKBM-NepeKnIOuATEeM B cEnax BbIbopa PI K n ayDno-/MkPofoHHoro KaHana, a mEmHO NcPONb30BaHne (1) KHOJOK, HAXIMMaEBIX Ha IInCeBOI NaHEN, (2) KOMbHaIIN "ToprUx" KJIABNIUI (3) nporpaMMHOrO oecneueHnKVM Switcher.
Haxmaeble KhoNkn
HaKmaeMbIe KhoNk Ha naHeH yCTpojCTBa oecneuBAOT Bo3MOxHOCTb HnOcpeiCTBeHHoro ynpaBHeHra pa6ToB KBM-NepeKIOUaTeJI. IpocTo haxMtte Ha KhoNkY dIe nepeKIOUeHna HA COoTBETCTByIOJn nopT PI (n ayDnO-/ MKNpOoHNb KaHJI, eCNI TAKa CBA3b yCTaHOBHe). IIO yMonuaHIO nepeKIOUeHne npTOB PI N pekeKIOUeHne ayDnO-/MKNpOoHOrO nOpTOB CBa3aHb MeKdY c60B, eCNI aynokHaI cneuaNbHO He npBra3bBaETcR noJIb3OBaTeMe K KaKOMy-NI60 KOHKPeTHOMy npOly.
KhoNka Ha IaueBOn NaHeM MoKeT NcNoIb3oBaTbCra InepeKnOyeHnHa Cbo6oNbI npT, He NoKIOeHHb H K ODHMy n3 KOMNbItePOB. PpN cNoIb3oBaHm "Topaynx" Knabu nn nporpaMMHOrO oecneeyn KVM Swtcher Bo3MOxHOCTb nepeKnOyeHn Ha CBO6oNbI npOT OTCYCTByET.
"Topaune" KlaBnun
3aabaembe noBb0BaTelem "topyue" knabn nIy Bb6pa K:
KOM6nHaunra"ropnynx"KnaBnU = Ctrl - Alt - [KoMaHnHaer KnaBnUa]*
* KlaBUNI, npEynCMOTpeHbIe IINcNtB3OBAHnB KauyeCTBe KOMaHbIbIX, npEeCTaBHeIbI B CJIeDyUHMe pa3dJe.
PnmeaHne.3KnabuHn DOJIxHbI HaxmAtbCn UyepXnBaTbCn BMeCTe.IpeeknOueHne BblONHReTc nocne OTnyckanBceX Tpex KnaBn.
YnBepcAbnHaa "topaay" KnaBnua dIy nepeKlnouehna Ha cIeDyOu npT:
YHnBepcAbaH naocneIOBaTeNbHocTb "Topaux"KnaBnSi = ScrLk + ScrLk
Ipnpa6oTeHaIKcpyrHMOnonepaunOHbIMnCCTeMaMn(HanpHMeP,Linux)3aCneuaNbHaa"ropa"KnaBnlaTaKaKe MoKeT nCnoB30BaTbcaDn4bctporo nepeKnUeHmEexNy K. DnA yctpoNtB Mac 3a CneuaNbHaa"ropa"KnaBnlaHa He npdeycmTopeHa.
Hn yHnBepcAnbHa "topa"KnabuHa (ScrLk + Scrlk), Hn "topa"KnabuHa, 3adabaemn nonb3oBaTeMe (Ctrl - Alt - [komanHa knabua]), HE daet Bo3MoXHoCTn nepeKIOUeHn Ha cbo6OHy nOpT, He noKIOUeHHn Hn K ODHmY 3 KomIbTopeOB. IpnHyDntelbHoro nepeBoDa KBM-nepeKIOUaTeHa cbo6OHy nOpT cneyET haxTa h coOTBeCTByOHy KOhONky BpyHyio.
KaKdoe HaxaTne B noCleDobatbHcToN "Toprux" knabuI dOnkHO npO3BouNTbc TteueHe 2 cekyHd. B npOTUBHom cnuyae Takay nocleDobatbHcTb HaxaTne HE BOCpInHMaetc KaK KOM6nHaun "Toprux" knabuI.
Iocne nepeknouhen Mekny nopTaMn Cneyet DoxkDaTcN OaBHeHnaKvM Switching cyka3aHem ceneBOro npTa, nToNbko noce 3TOrO BbINnHaTb CneDyUooee nepeknouhneHne.
Bce "Topyme" knabnHa nauHnAOT fHKuOHnPoBaT toNko nocne 3aRpy3Kn OpeauHOHc nCtEmbI PIK. Ina nepeKIOueHn IIK B peKM HAcToPknBIOS / ha npEz3arpy3OHyO CTyeHb HAKMNTe COOTBeCTByOuOy KONkY Ha NmueBoi naHei.
PporpamMHe o6ecneueHne KVM Switcher (nA Windows n Mac)
POMMnO nepeKnUoyEnna Mexdy PK, nporpamMHOe oecneueHne KVM Switcher oecneuBaET BO3MOXHOCTb NcnoB30BaHnra paCwpeHHOro fynKcuOHana, onncAHORo B cndyUoem pa3dene.
CnpaBoHoe pyKoBOdCTBO no pa60Te c KVM Switcher
IpeeknueHne MeKdy PK cncnoB30BaHHeM onepaunOHoro MeHIO
HaxMMTe npaBoi KhoNko MbluHa 3Nauyok nporpaMMbI KVM Switcher nBbIOBa onepauOnHO MeHIO, 3aTeM Bb6epTe IIOBO u3 PI, DocTyNHbIX dny peeknOeyHna. Pocne Bb6opa OdHoro u3 KOmNbIoTePbIx KaHAnOB npoU3BOuNTc HEmeDHeHoe nepeKnOueHne Ha COOTBeTCTByUoiuPiK.
PpmeaHne. HnoKIOueHHbI(-e) nopT(-bi) uNn aKTNBbI npT OKpaWBAOTcB cepb ICBETu, CNEOBoTeNbHo, CTaHOBTcA HeocTyINbIMn DnIy BbOpa.

Windows

IpeeknoueHne mexdy PK cncnoB30BaHneM "topaunx" KnaBn
Haxmnte Ha "topauyo" KnaBnuy cornacho Tekyuemy paonpeeneHIO yHKcuM Mekdy "Topaumn" KnaBnshaMu:
Kombuaua "topaynx" KnaBn = Ctrl - Alt - [KoMaHnA KnaBn]
- 3abOndka nactpoika "ropuix" knabni: Ctrl + Alt + 1/2 nIg PIK 1/2. Ing nepeeknoeHnM MeXNy PIk taKke moKet nCnOb3oBaTbcK KOM6nHaun ScrLk + ScrLk.
3anyck aBToMaTnueckOro cKaHnpOBaHHa
HaKMMte npaBoN KhoNkoMbIuHa 3NaUOK nporpaMMbI KVM Switcher nra BbIzOBA onepauOnHoro MeHIO, 3aTeM bI6epHe OunIO Start Auto-Scan drr BKnUoyEnH yHKcIMn ABToMaTuYeCKOrO cKaHnpOBaHN.
PpeKpaueHne aBToMaTuYeCKoRcKaHnpOBaHn
Bo Bpem aBToMaTHueCKoro cKaHnpoBaHnHaXMMte npaBoi KhoNko MbluHa 3HaQok nporpaMbl KVM Switcher nBbI3Oba OpeauOnHO rO MeHIO, 3aTeM Bbl6epnte onuio Stop Auto-Scan dIra otKlUoyehn FyHKm u AToMaTHueCKoro cKaHnpoBaHn. Kpome TOrO, dIra npekpaSeHn aBToMaTHueCKoro cKaHnpoBaHn MoxHo HaxKaTb Ha IIO6yIO N3 KhoNOK liueBOI naHeli.
dntbHOCTb aBtOMaTnuecko RCKaHnpOBAHNA
Bb6epnte IInTeIbHoctb abTOMaTHueckoro cKaHIpOBaHNb Dnana3oHe oT 10 do 60 ceKynd C warom 5 ceKynd. IInTeIbHoctb aTOMaTHueckoro cKaHIpOBaHN npedctabnietcoboi BpeM, B teueHne KOTporo KBM-nepeKnioatelb HaxOHTcB pexmme OxndanHnpeNd nepeKluoyehnem Ha cnedyounnl PK.
Hacroika KVM Switcher
HaKMMte npaBoN KhoNko MbluHa 3NaOoK KVM Switcher N BbIbePuTe onuio Settings (HaCTpoiKn) nIn DbaXdbI HaKMTE Ha 3NaOoK dJa BbIOda dHaIanoROBOrO OKHa HaCTpoiKn.
3aHaHne KOMaHd CnCNoB3oBaHHeM "TopaYnx"KlaBnH
Kenaemay KomaHnHa KlaBnHa MoKeT 6bItb 3aHa NaTe Mee BBOda C KlaBnAtypbl. HappImep, c eIbIO 3aHaHn "Topaey" KlaBnCH CTRL - ALT - A nna nepeKnUeHn Ha PIK 1 MoXHo BBecTu A (B IIObOM perncTp) B peJaKTnpyeMoE nole.
CnpaBoHoe pyKoBOdCTBO no pa60Te c KVM Switcher
Kom6nhaunra "ropuyn" knabu CTRL-ALT-[ropuaa knabua]
*KomahnHaJ KnaBmHa MoKeT 3aDaBaTbCn Nb3oBaTeMe Nyepe 3 DaIanoRoBOe OKnHO HaCTpoiKN
- 06paTnte BHMaHHe Ha To, TTO npI Heo6xOIMOCn M3MeHeHn KOMaHNo KNaBnO hA DoNkHa 6bTb N3MeHeHa H Bce XoKnIOeHHbIX KOMnbOpax, NoKoNbKy HaCTpOuKN "TopaNX" KnabNcoXcpaHOTc HA KaJdON PNOKIOUeHHOM KOMnbTepe.
3a ncknoueHem ynpabnnox knabu Alt, Ctrl, Shift, CAPS, Tab, Esc, a taKke fynknohaNbix knabu u knabupe daKtpoBaHna, BCE octalb hle knaBniu, mneouneca ha knabnatype, BKIOUaA u npObo KnaBnHa u npOpOBou KnaBnAtype, Moryt nObn30BaTbcB B kaueCTBe "topynx" Komahnbix knabu. POMMIO nepeKnueHc n opoBIO opeauHO rmo HIO pOprpMbki VM Switching n "topynx" knabu, 3aDaBaembx noIb3oBaTelem, nepeKnueHme MeJy PK Bcerda Bo3MoXHO npn nomouu yHnBepcaNbHoi "topye" knabu (ScrLk + ScrLk)
Manufacturing Excellence
1111 W. 35th Street, Chicago, IL 60609 USA · www.triplite.com/support