
BP480V10NIB - Battery Tripp Lite - Free user manual and instructions
Find the device manual for free BP480V10NIB Tripp Lite in PDF.

| Product Type | External Battery Cabinet |
| Brand | Tripp Lite |
| Model | BP480V10NIB |
| Dimensions (H x W x D) | 836 x 250 x 779 mm |
| Net Weight | 55 kg |
| Gross Weight | 82 kg |
| Battery Capacity | 80 batteries (9 Ah or 10 Ah) – not included |
| Nominal Voltage | 480 V |
| Protection | Fuse 30 A / 600 V |
| Connectivity | DC connector for UPS |
| Temperature Range | 0 to 40 °C |
| Humidity | 30 to 90 % non-condensing |
| Material | Steel |
| Usage | Indoor |
| Warranty | 1 year |
| Included Accessories | Connection cable, fuse holder, user manual |
| Safety Instructions | Installation by qualified electrician, high voltage |
| Maintenance | Battery recharge every 3 months |
| Main Functions | Increases runtime of Tripp Lite S3MX series UPS |
Frequently Asked Questions - BP480V10NIB Tripp Lite
User questions about BP480V10NIB Tripp Lite
0 question about this device. Answer the ones you know or ask your own.
Ask a new question about this device
Download the instructions for your Battery in PDF format for free! Find your manual BP480V10NIB - Tripp Lite and take your electronic device back in hand. On this page are published all the documents necessary for the use of your device. BP480V10NIB by Tripp Lite.
USER MANUAL BP480V10NIB Tripp Lite
External Battery Pack for Use with 3-Phase Online S3MX Series (S3M30KX/40KX)
Models: BP480V09, BP480V10, BP480V10-NIB
- Important SafetyWarnings 2
- Installation and Setup 3
2.1 Rear Panel View 3
2.2 Battery Pack Installation and Setup 3
2.3 Installing Batteries in an External Battery Pack Cabinet 6
-
Specifications 8
-
Storage and Service 9
- Warranty 9
Espanol 10
Français 19
Pycckn 28
Deutsch
37


Manufacturing Excellence.
1111 W. 35th Street, Chicago, IL 60609 USA · www.triplite.com/support
Copyright © 2018 Tripp Lite. All rights reserved.
1. Important SafetyWarnings
SAVE THESE INSTRUCTIONS
All sections of this manual contain instructions and warnings that must be followed during the installation and operation of the battery cabinet described in this manual. Read ALL instructions thoroughly before attempting to move, install or connect your battery cabinet. Failure to heed these warnings may affect your warranty and cause serious property damage and/or personal injury.

DANGER! LETHAL HIGH VOLTAGE HAZARD!
All wiring should be performed by a qualified electrician, in accordance with the warnings in this manual and all applicable electrical and safety codes. Incorrect wiring may cause serious personal injury and property damage.
Installation and LocationWarnings
- Install the battery cabinet in a controlled indoor environment, away from moisture, temperature extremes, flammable liquids and gasses, conductive contaminants, dust and direct sunlight.
- Install the battery cabinet in a level, structurally sound location.
- The battery cabinet is very heavy; use extreme caution when moving or lifting the unit.
- Operate the battery cabinet at indoor temperatures between 0^ and 40^ ( 32^ and 104^ ) and 30-90% non-condensing humidity only. For optimum battery performance, maintain an ambient indoor temperature of 25^ ( 77^ ).
- Leave adequate space around the front and rear of the battery cabinet for proper ventilation. Do not block, cover or insert objects into the external ventilation openings of the battery cabinet.
- Do not place any object on the battery cabinet, especially containers of liquid.
- Do not attempt to stack the battery cabinet. Attempting to stack the battery cabinet may cause permanent damage and create a potential for serious personal injury.
- Do not attempt to unpack or move the battery cabinet without assistance. Use appropriate handling equipment rated to bear the weight and bulk of the battery cabinet, such as freight elevators, pallet jacks and forklifts. (Fully extend forks under load. Spread forks to maximum possible width under load. Lift cabinet from bottom only. Wear safety shoes.)
- For emergency use, install a fire extinguisher rated for energized electrical equipment fires (Class C rating or exact equivalent, with a non-conductive extinguishing agent) near the battery cabinet.
ConnectionWarnings
- The battery cabinet contains hazardous high voltages that have the potential to cause personal injury or death from electric shock.
- The battery cabinet has its own energy source. The output terminals may be live even when the battery cabinet is not connected to a UPS system.
- The battery cabinet must be suitably grounded according to all applicable electrical wiring regulations.
- Use of this equipment in life support applications where failure of this equipment can reasonably be expected to cause the failure of the life support equipment or to significantly affect its safety or effectiveness is not recommended.
- De-energize all input and output power sources before installing cables or making electrical connections.
- Use flexible cable of sufficient length to permit battery cabinet servicing.
- Use ferrule caps to cover termination cables and prevent frayed ends from shorting on terminal blocks. Use cabling rated VW-1, FT-1 or better. Use cable sleeves and connector clamps.
- Confirm that all cables are marked correctly according to their purpose, polarity and diameter.
- Observe proper polarity by connecting negative to negative and positive to positive (and center string to center string, where applicable). Failure to observe proper polarity may damage the batteries and create a serious risk of personal injury and property damage.
- Wiring should be performed by trained, qualified electricians only. Refer to the UPS unit's Owner's Manual for wire sizing.
BatteryWarnings
The battery cabinet does not require routine maintenance by the user. There are no user-serviceable parts inside. Only qualified, knowledgeable service personnel familiar with all required precautions should open the access panels for any reason. Keep unauthorized personnel away from batteries.
- The battery cabinet contains valve-regulated recombinant lead-acid (VRLA) batteries. Do not attempt to add water to these batteries or sample the electrolyte specific gravity.
- Valve-regulated recombinant lead-acid (VRLA) batteries can contain an explosive mixture of hydrogen gas. DO NOT SMOKE when near batteries. DO NOT cause flames or sparks near batteries. Discharge static electricity from body before touching batteries. DO NOT open or mutilate batteries—released electrolyte is harmful to the skin and eyes and may be toxic. DO NOT dispose of batteries in a fire—they may explode.
1. Important SafetyWarnings

- Batteries present a risk of electrical shock and burns from high short-circuit current. Battery connection or replacement should be performed only by qualified service personnel, observing proper precautions. Use tools with insulated handles. Remove watches, rings or other metal objects. Wear rubber gloves and boots. Do not short or bridge the battery terminals with any object. Do not lay tools or metal parts on top of batteries. Use tools with insulated handles. There are no user-serviceable parts inside the battery cabinet. Battery replacement should be performed only by authorized service personnel using the same number and type of batteries (sealed lead-acid). The batteries are recyclable. Refer to your local codes for disposal requirements or visit http://www.triplite.com/support/recycling-program for recycling information. Tripp Lite offers a complete line of UPS System Replacement Battery Cartridges (R.B.C.). Visit Tripp Lite on the Web at https://www.triplite.com/products/battery-finder/ to locate the specific replacement battery for your UPS.
- Replace batteries with equivalent batteries (same number and type) available from Tripp Lite.
- Fuse replacement should only be performed by qualified service personnel. Replace with only the same type and rating: 30A, 600V.
- The batteries are recyclable. Refer to local codes for disposal requirements. Do not dispose of batteries except through approved channels in accordance with all applicable local, state and national regulations.
- Do not connect or disconnect batteries when the UPS system is operating from the battery supply or when the unit is not in bypass mode. Disconnect the charging source prior to connection or disconnecting battery terminals.
- If the charging source remains off for an extended period of time, it should be turned on periodically to allow the batteries to recharge. The charging source should be turned on and the batteries should be recharged at least one uninterrupted 24-hour period every 3 months. Failure to recharge the batteries periodically may cause permanent battery damage.
- Allow batteries to charge uninterrupted for 24 hours after installation.
2. Installation and Setup
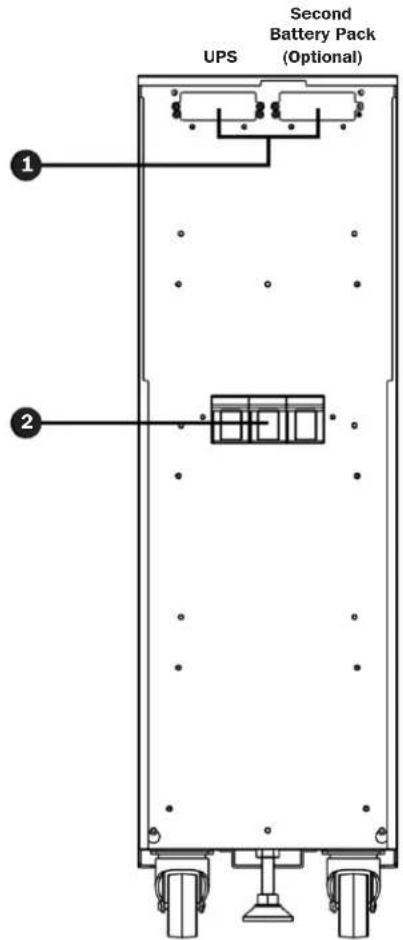
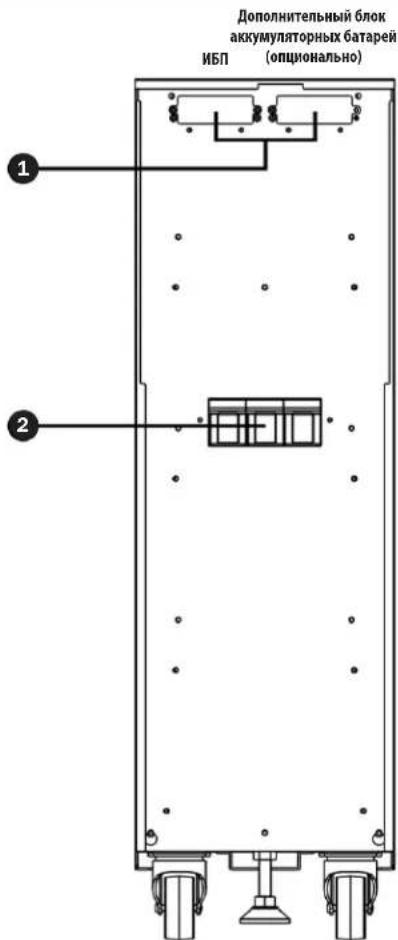
2.1 Rear Panel View
Note: Inspect the unit before performing installation. Make sure nothing inside the package is damaged. Keep the original packaging for future use.
DC Connector: Connects to UPS or a second battery pack. For more information, see Connecting a UPS to the Battery Pack in section 2.2 Battery Pack Installation and Setup.
Fuse Holder: Battery over-current protection fuse holder.
2.2 Battery Pack Installation and Setup
Unpacking and Inspection
- Remove the battery pack from the packaging.
Note: The battery pack is very heavy. Be cautious when unpacking and lifting the unit to avoid injury.
-
Inspect the package contents for impact or other damage:
-
Battery Pack Unit
Owner's Manual - Battery Connection Cable
80-pc. Battery Pack
2. Installation and Setup
Selecting Installation Site
To minimize the possibility of damage to the battery bank and extend the life of the batteries, follow the instructions below:
- Maintain at least 20 cm (8 inches) clearance between the unit's rear panel and a wall (or other obstructions).
- Do not block airflow to the unit's ventilation openings.
- Ensure the installation site environmental conditions are in accordance with the unit's working specifications to avoid overheating and/or excessive moisture.
- Do not place the unit in a dusty or corrosive environment or near any flammable objects.
- This unit is not designed for outdoor use.
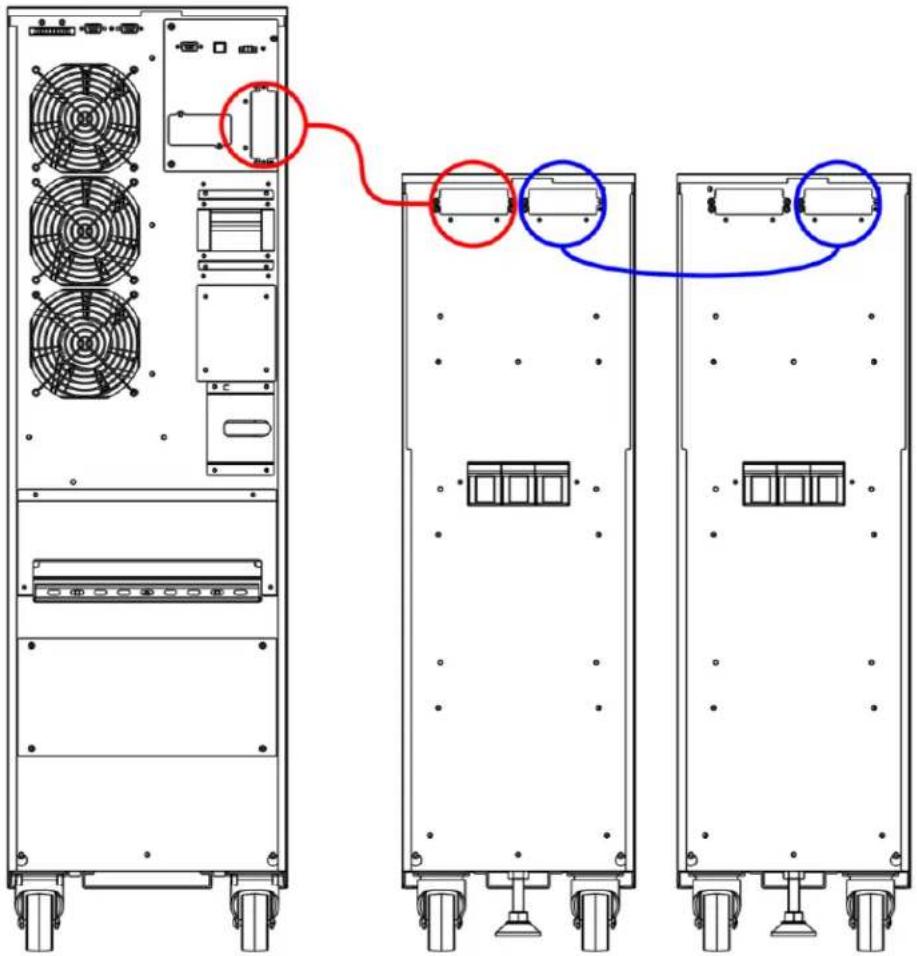
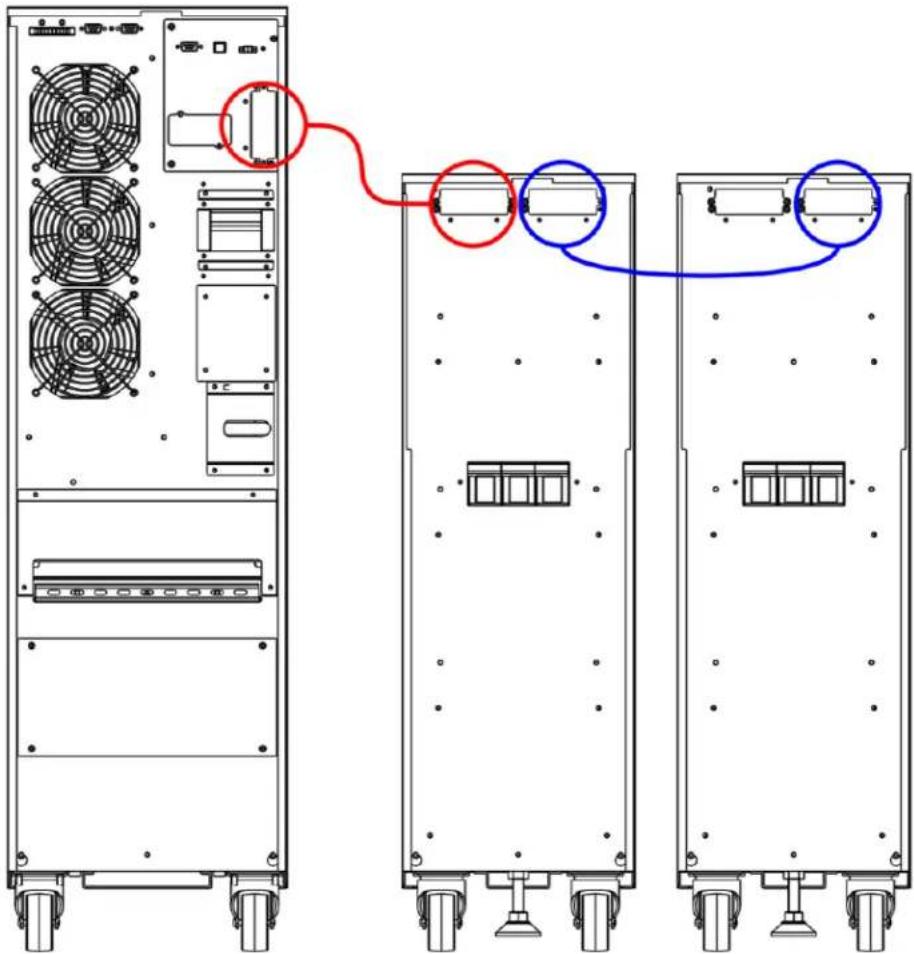
Connecting a UPS to the Battery Pack
The external battery pack will increase the battery runtime. As a result, recharge time will also increase. The diagram below shows a UPS connected to a battery pack using the included cable, and the battery pack connected to an optional second battery pack.

Before attempting to connect the battery pack to a UPS, please follow the Removing Battery Connector Cover and Installing Battery Cable Bracket procedure.
2. Installation and Setup
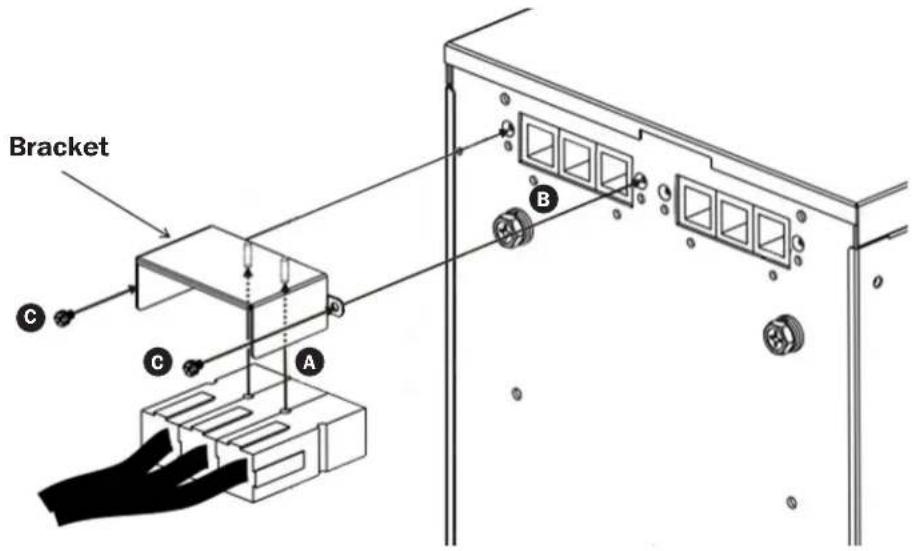
Removing Battery Connector Cover and Installing Battery Cable Bracket
- Unscrew the screws securing the cover of the battery pack's UPS DC connector. Remove cover and save screws for step 4.
Note: The UPS DC connector is located on the left side.
- Attach the cable bracket to the battery cable A.
- Connect the external battery connector to battery pack B.
Notes:
- Make sure the cable is fully inserted into their connectors.
- Small sparks may result during battery connection; this is normal.
-
Be sure to connect the protective earth wire ring terminals to the earth bonding screw on each cabinet.
-
Use the two screws removed in step 2 to secure the battery cable to the battery pack cabinet C.
2. Installation and Setup
2.3 Installing Batteries in an External Battery Pack Cabinet

If your external battery pack cabinet does not include batteries installed, follow the proper procedures to install batteries inside the unit.
MAKE SURE THE BATTERY PACK CABINET IS DISCONNECTED FROM THE UPS BEFORE PERFORMING THE FOLLOWING SEQUENCE OF OPERATIONS.
WARNING:
- Equipment should be installed by service personnel.
- When installing the batteries, use the same battery number and type as shown on the battery label.
- Do not open or mutilate the battery or batteries. The released electrolyte is harmful to the skin and eyes.
- A battery can present a risk of electric shock and high short-circuit current. Observe the following precautions when working on batteries:
o Remove watches, rings or other metal objects.
o Use tools with insulated handles.
Install Batteries in an External Battery Pack Cabinet:
Note: Refer to the External Battery Pack Wiring Diagram and External Battery Pack Cabinet Battery Wiring Table for more information.
- Remove the two side plates and four barrier plates.
- Install 80 batteries into the battery pack.
- Route the cables through the opening behind the battery breaker. DO NOT route cables through or around the shelves.
- Reinstall the four barrier plates to secure all batteries.

When installing the barrier plates, do not short circuit the battery terminals. Injury or fire may result.
- Connect the two red wires, two black wires and four blue wires from the fuse holder to the batteries.
- Connect four 320mm wires.
- Connect 72 100 mm wires.
External Battery Pack Wiring Diagram
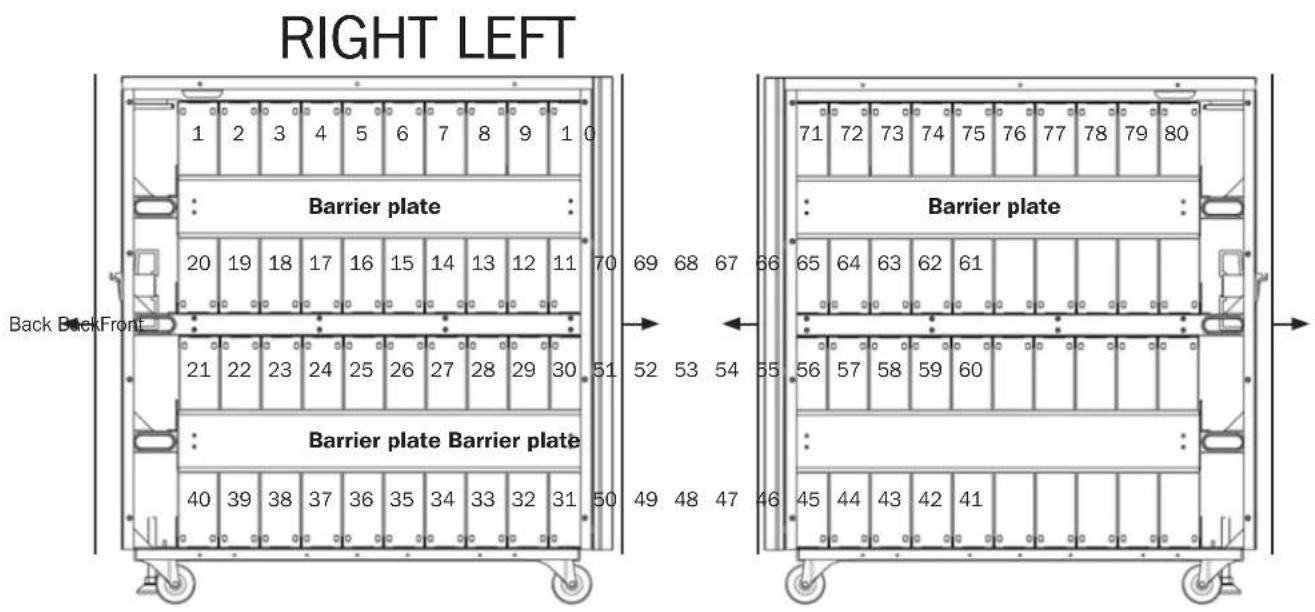
2. Installation and Setup
Notes:
The numbers listed in the diagram are "Battery Numbers" from 1 to 80, which are used for battery position identification.
- Connector cables are labeled by polarity and the respective battery number it connects to. For example, the cable labeled "40 (+)" should connect to battery number 40's positive battery terminal. Refer to the battery connection diagram for all connector cable assignments.

External Battery Pack Wiring Table
| BAT Number | 1 | 2 | 3 | 4 | 5 | 6 | 7 | 8 | 9 | 10 | ||||||||||
| Terminal | - | + | - | + | - | + | - | + | - | + | - | + | - | + | - | + | - | + | - | + |
| Connection Wire | Black Wire from Fuse Holder | 100 mm Wire | 100 mm Wire | 100 mm Wire | 100 mm Wire | 100 mm Wire | 100 mm Wire | 100 mm Wire | 100 mm Wire | 100 mm Wire | See Below | |||||||||
| BAT Number | 10 | 11 | 12 | 13 | 14 | 15 | 16 | 17 | 18 | 19 | ||||||||||
| Terminal | - | + | - | + | - | + | - | + | - | + | - | + | - | + | - | + | - | + | - | + |
| Connection Wire | 320 mm Wire | 100 mm Wire | 100 mm Wire | 100 mm Wire | 100 mm Wire | 100 mm Wire | 100 mm Wire | 100 mm Wire | 100 mm Wire | See Below | ||||||||||
| BAT Number | 19 | 20 | 21 | 22 | 23 | 24 | 25 | 26 | 27 | 28 | ||||||||||
| Terminal | - | + | - | + | - | + | - | + | - | + | - | + | - | + | - | + | - | + | - | + |
| Connection Wire | 100 mm Wire | Blue Wire from Fuse Holder | Blue Wire from Fuse Holder | 100 mm Wire | 100 mm Wire | 100 mm Wire | 100 mm Wire | 100 mm Wire | 100 mm Wire | 100 mm Wire | 100 mm Wire | 100 mm Wire | 100 mm Wire | 100 mm Wire | 100 mm Wire | 100 mm Wire | See Below | |||
| BAT Number | 28 | 29 | 30 | 31 | 32 | 33 | 34 | 35 | 36 | 37 | ||||||||||
| Terminal | - | + | - | + | - | + | - | + | - | + | - | + | - | + | - | + | - | + | - | + |
| Connection Wire | 100 mm Wire | 100 mm Wire | 320 mm Wire | 100 mm Wire | 100 mm Wire | 100 mm Wire | 100 mm Wire | 100 mm Wire | 100 mm Wire | See Below | ||||||||||
| BAT Number | 37 | 38 | 39 | 40 | ||||
| Terminal | - | + | - | + | - | + | - | + |
| Connection Wire | 100 mm Wire | 100 mm Wire | 100 mm Wire | Red Wire from Fuse Holder | ||||
2. Installation and Setup
| BATNumber 4 | 1 42 43 44 45 46 | 47 48 49 50 | ||||||||||||||||||
| Terminal | - | + | - | + | - | + | - | + | - | + | - | + | - | + | - | + | - | + | - | + |
| Connection Wire | Black Wire from Fuse Holder | 100 mm Wire | 100 mm Wire | 100 mm Wire | 100 mm Wire | 100 mm Wire | 100 mm Wire | 100 mm Wire | 100 mm Wire | 100 mm Wire | See Below | |||||||||
| BATNumber | 50 51 52 53 54 55 56 57 58 59 | |||||||||||||||||||
| Terminal | - | + | - | + | - | + | - | + | - | + | - | + | - | + | - | + | - | + | - | + |
| Connection Wire | 320 mm Wire | 100 mm Wire | 100 mm Wire | 100 mm Wire | 100 mm Wire | 100 mm Wire | 100 mm Wire | 100 mm Wire | 100 mm Wire | See Below | ||||||||||
| BAT Number | 59 | 60 | 61 | 62 | 63 | 64 | 65 | 66 | 67 | 68 | ||||||||||
| Terminal | - | + | - | + | - | + | - | + | - | + | - | + | - | + | - | + | - | + | - | + |
| Connection Wire | 100 mm Wire | Blue Wire from Fuse Holder | Blue Wire from Fuse Holder | 100 mm Wire | 100 mm Wire | 100 mm Wire | 100 mm Wire | 100 mm Wire | 100 mm Wire | 100 mm Wire | See Below | |||||||||
| BATNumber | 68 69 70 71 72 73 74 75 76 77 | |||||||||||||||||||
| Terminal | - | + | - | + | - | + | - | + | - | + | - | + | - | + | - | + | - | + | - | + |
| Connection Wire | 100 mm Wire | 100 mm Wire | 320 mm Wire | 100 mm Wire | 100 mm Wire | 100 mm Wire | 100 mm Wire | 100 mm Wire | 100 mm Wire | See Below | ||||||||||
| BATNumber | 77 78 79 | 80 | ||||||
| Terminal | - | + | - | + | - | + | - | + |
| Connection Wire | 100 mm Wire | 100 mm Wire | 100 mm Wire | Red Wire from Fuse Holder | ||||
3. Specifications
| Battery Cabinet Model | Included Breakers | Unit Dimensions (H x W x D) | Shipping Dimensions (H x W x D) | Unit Weight | Shipping Weight Description | |
| BP480V09 | kg 290 kg100A Fuses | 836 x 250 x 779 mm 10 | 18.5 x 380 x 919.5 mm | 246.5 kg 2 | 73.5 kg | Battery cabinet with 80 x 9Ah batteries pre-installed. |
| BP480V10 273 | Battery cabinet with 80 x 10Ah batteries pre-installed. | |||||
| BP480V10-NIB 55 | kg 82 kg | Battery cabinet without batteries installed, but designed for 80 x 10Ah/9Ah batteries. Battery links and fuses included. |
4. Storage and Service
Storage
If the charging source remains off for an extended period of time, it should be turned on periodically to allow the batteries to recharge. The charging source should be turned on and the batteries should be recharged for at least one uninterrupted 24-hour period every 3 months. Failure to recharge the batteries periodically may cause permanent battery damage.
Service
Your Tripp Lite product is covered by the warranty described in this manual. A variety of Extended Warranty and On-Site Service Programs are also available from Tripp Lite. For more information on service, visit www.triplite.com/support. Before returning your product for service, follow these steps:
- Review the installation and operation procedures in this manual to ensure that the service problem does not originate from a misreading of the instructions.
- If the problem continues, do not contact or return the product to the dealer. Instead, visit www.triplite.com/support.
- If the problem requires service, visit www.triplite.com/support and click the Product Returns link. From here you can request a Returned Material Authorization (RMA) number, which is required for service. This simple on-line form will ask for your unit's model and serial numbers, along with other general purchaser information. The RMA number, along with shipping instructions will be emailed to you. Any damages (direct, indirect, special or consequential) to the product incurred during shipment to Tripp Lite or an authorized Tripp Lite service center are not covered under warranty. Products shipped to Tripp Lite or an authorized Tripp Lite service center must have transportation charges prepaid. Mark the RMA number on the outside of the package. If the product is within its warranty period, enclose a copy of your sales receipt. Return the product for service using an insured carrier to the address given to you when you request the RMA.
5. Warranty
1-YEAR LIMITED WARRANTY
Seller warrants this product, if used in accordance with all applicable instructions, to be free from original defects in material and workmanship for a period of one (1) year from the date of initial purchase. If the product should prove defective in material or workmanship within that period, Seller will repair or replace the product, in its sole discretion. Service under this Warranty can only be obtained by your delivering or shipping the product (with all shipping or delivery charges prepaid) to: Tripp Lite, 1111 W. 35th Street, Chicago, IL 60609 USA. Seller will pay return shipping charges. Visit www.triplite.com/support before sending any equipment back for repair.
THIS WARRANTY DOES NOT APPLY TO NORMAL WEAR OR TO DAMAGE RESULTING FROM ACCIDENT, MISUSE, ABUSE OR NEGLECT. SELLER MAKES NO EXPRESS WARRANTIES OTHER THAN THE WARRANTY EXPRESSLY SET FORTH HEREIN. EXCEPT TO THE EXTENT PROHIBITED BY APPLICABLE LAW, ALL IMPLIED WARRANTYES, INCLUDING ALL WARRANTYES OF MERCHANTABILITY OR FITNESS, ARE LIMITED IN DURATION TO THE WARRANTY PERIOD SET FORTH ABOVE; AND THIS WARRANTY EXPRESSLY EXCULES ALL INCIDENTAL AND CONSEQUENTIAL DAMAGES. (Some states do not allow limitations on how long an implied warranty lasts, and some states do not allow the exclusion or limitation of incidental or consequential damages, so the above limitations or exclusions may not apply to you. This Warranty gives you specific legal rights, and you may have other rights which vary from jurisdiction to jurisdiction).
WARNING: The individual user should take care to determine prior to use whether this device is suitable, adequate or safe for the use intended. Since individual applications are subject to great variation, the manufacturer makes no representation or warranty as to the suitability or fitness of these devices for any specific application.
Regulatory Compliance Identification Numbers
For the purpose of regulatory compliance certifications and identification, your Tripp Lite product has been assigned a unique series number. The series number can be found on the product nameplate label, along with all required approval markings and information. When requesting compliance information for this product, always refer to the series number. The series number should not be confused with the marketing name or model number of the product.
WEEE Compliance Information for Tripp Lite Customers and Recyclers (European Union)

Under the Waste Electrical and Electronic Equipment (WEEE) Directive and implementing regulations, when customers buy new electrical and electronic equipment from Tripp Lite they are entitled to:
- Send old equipment for recycling on a one-for-one, like-for-like basis (this varies depending on the country)
- Send the new equipment back for recycling when this ultimately becomes waste
Tripp Lite has a policy of continuous improvement. Specifications are subject to change without notice.


1111 W. 35th Street, Chicago, IL 60609 USA · www.triplite.com/support
1111 W. 35th Street, Chicago, IL 60609 EE UU • www.triplite.com/support
PykoBODCTBO N0Ib30BaTeJia
BheuHn 6Iok 6aTapei
1111 W. 35th Street, Chicago, IL 60609 USA - www.triplite.com/support
OxpaHaeTc ABTOPCKIM npaBOM 2018 Tripp Lite. Iepeneuatka 3anpeaaetor.
1. Baxkhble npdeynpekxdenno texnke 6e3onacchoctn
COXPAHNTHE HACTOUIUE YKA3AHNA
Bo Bcex pa3dennax Hactoienpo pykoobctba coepkatay kka3aHn H npdynpkeJeHH, KOtOpbIe Heoo6doMo c6bnOaTb B npocece yctahOBKn N KcNpyaunnn OnncanHO B hem 6atapeHoro WkaFa. BHNMaTeBnH 3yUHTe BCE yka3aHn, npEeJe Yem npctynatb K npemeueHHO, yCTAHOBKe HnN NOKIOeHHIO npno6peTeHoro Bamn 6atapeHoro WkaFa. HrhopopobAHne 3TNX npdynpkeJeHH MoKET npHBecn K aHHyIpobAHNO rapANTHn N pInHHNTb cyueCTBeHHbIMatepHaNBhnyep6 n/nnn Bpe 3doopBbIOIOeJ.

BHIMAHHE! BbICOKOE HAPRJXEHNE OIACHO JIA XN3HN!
Bce 3eKpomontaxHbte paobtdoNkbl BbIIOHnTc KBAINHnPObAHbIM 3eKtpomexAHKOM cyTeTom npdynpeXJdeHH, H3JNOeHHbIX Hactoem pykoBcTbe, a TAKKe BcEx DeIcTByUOxN 3eKtpoxTHnuecknx HopM nPabIn TeHNK6eONacnoctn. HenpaHbHb moHTaX MoKet npuHHTb cyueCTBeHHbBpe3DopOBbIO IIOeN MaTePNAbHbY uep6.
Ipeynpexdenn OTHOCHTbHO npraK MeCTa yctahOBKn
BatapeHbIuKaΦdoJxHeB6bIyUcTaHOBnE B3aKbTOM NOMEuHm CpeYUmPyEmbM NcObMaM MKKoKlMaTa BdaNt OCTouHKnOB BnaH N KCTpeMaNbHbIX TeMnpaTp, BocPiMaHnoXcxJXKoKTeH Ta30B, 3eKTpOpPbOBDhix 3arpaHHTeJe, PbH N pAmoro COJIneHOro CBeta.
BaTapeHbIyIkaΦdoJIKeH6bITyCTaHOBNeHaPOBHOINKOHCTpyKUHOHOIOPOuHOINOBepxHOCTM.
- 5aTapeHnblkzaepbIeTcKpaHneTaeJIIOBcHbIM, noTOMy npn ero nepMeueHHN mnoIbEme Heo6xoJIMo Co6HdAaTBoc6OyU octopoxHOCTb.
3Kcnnyataaia bataeHoro 1kaqda onyckaeTc Tbko B 3akpbtBx nmeueHH x npn Tempeatype o0do 40^ nTOHCHTbHO BnAkhOu BO3dyxa 30-90% (6e3oP3OBAHK KOHNcata).Ira oecneueHn ONTMnabHbIX pe3yntaTOB eropabTo cneayet noDnepkmbATb BHTpni nomeeHn TEMpepatpy h ypOBHe 25°C.
Ipeep6aTapeHbIM uKafoM nO3aHn Hero Heo6xDmIO o6ceNHT bOCTaOHy CBO6DHO pOcTpaHCTBa dIra ero HaJIeKaUe IPOBeTpHBnHa. He 3aropaxnBaTe H He HaKpbBaTe BHeuHHe BeHTnuaOHHe OTBepCTna 6TaapeHoro uKafoA a TaKHe HE BCTaBnTe B HIX KaKe-Imo PneDMtbl.
- He KlaaIte Ha 6aTaapeHbIu KaKaHa KaKHe-NiIbO PpeMTeBt, OcoBeHNO KOHTeHepBc CxNkIOCTaMn.
He yctanabnbae 6aapehne hhe kkafoyra. YctaHObKa 6aapeHbIX xkafoB npyra MoKet npnbecTN Kx HEObpaTMOMO NOBpeXeHNIO CO3daTb OnacHocTB npuHHENH TReJeIoro Bpe Da 3doOpBoHIOIOeJ.
He bttteb paacakobibatn npnepeaatb 6ataeHmbl kaf B OINHOUky. HcnoIb3yite COOTBETCYOue e noIbemHO-tpaHcnpTHe o6pOBOAHie, paccHTAHoe ha MaccorabapHThe npametpybI 6ataeHoro 6ka, a IMHenHO rpy30ble NOBEMHNK, pOKNb I BNIOOHIE nporpyuNK. (PioHocTBbYbIDBraIte BUNOCHBe 3axBaTbI nD rpy3. Pa3boNTe BINOHTbe 3xAbaTbIO pRy3OM Ha MaMKcIMAbHo BO3MOXHyO uPHN. PNOHMAtb 6kaCneJeT ToBko CHMz. NIOByTEc 3aunTHo 6yyBo).
Ha cnyaai Bo3HKHOBHeHn abapHHoC mTuayuYCTAHOBHTe pAOM C 6bapeHbIM uKaΦom ORHeTuWntEnb, paccHTaHHb H a BocTnAmeneHne 3NeKTPOobpyObaHn, haxOdaIeroC noD napJaeHmE (Knacca C nI CTporo COOTBcTBCTByouu emy 3aIpaBHeHbOr HeTuWaaUM CoCTaBOM, He npOBOaHMM 3NeKTpUeCKTOkTa).
PpeynpexkdeHnOTHoCHTeBHO NOKIOUeyHn
BHytpn 6atapeHoro 5kafoa HMeOTcra OAnchbIe Ira KU3HN BbICOKHe HApJxEHH, cNoC6hBe IpuMHHTb BpeD 3IOPOBbIO UIN CTaTb npMHNHO r6eIN B pe3yNbTaTe nopaxhenr ENEKTPmueckm TOKOM.
- BatapeHbI WkaF MeET CO6CTBeHHbI NCTOCHK 3HePrrn. BixOHNbIe KNeEMMbI MOrT HaxoINbTa NOI HapJRAEHHem DaXe B ToM CNYae, eCNi BatapeHbI WkaF He NoNDKIOUENK IV5Pi.
BaTapeHbI WkaΦdoJnKHeB 6bIt HaJnEkaUIM oBa3OM 3aEmJIe B COOTBeTCTBm CO BcEMn DeCTByOuIMN IpabUNAMn 3JeKTpOMoHTaKa.
He peKoMeHdyetra NcNtBbOBAHmE daHnro 06OpDyOBaHnB B CNTeMax X3HeOBeCneYehn, rTe erO bByXOn H3 cTPOr npEtnIOxMteBHO MoKET npHBecTN K nepe6oAM B pa6ote 06OpDyOBaHnJ X3HeOBeCneYehn IN IN B 3NaHTeBHO Mepe CHNtB erO 6e3OanCHOCTB INI eFekTMBOCTb.
Ipeep npoklndkO kabeene nBbInnHeHmE 3neKtpuecknx CoeinHeHm CneJeT OTKIOUHTb BCE MTOCHNKn BxOHO T N BixOHO T mTaHn.
ДлгобсчесиьВОЗМохностиТЕЧИССКORAБатейногушkaфипьэгнкькабелдбг�атониДПИНБ.
IIN30aHnOroJIeHHbXuaTeKoHcEbbXKa6eBbX3aDenokNppeTbpaAeHMa3bkaHMAHCTepbX KOHIOBaKIOAnICIOB3yTe 3aUHTHe NIOIMepHBte Btyn. IcnoNb3yIte Ka6eBnKlaccA VW-1,FT-1nn BBIe.IcnoNb3yIte Ka6eBbHBe Myfbl NoeDHNITeBbHBe 3JeMeHTbC KKNCPyUmmM 3aKMMAM.
y6eHITcBbTOM,HTO Bce Ka6eHIN MmEOT npABnIbHyIO mapKpOBky BOOTBETCBM CxN H3NaHcHEm, NOJrPHoCTbU IN dAmEtPOM.
CobnDnTne npabnBny noJrphocb, coeHnna Mmhyc mMHycom, a nio-c - cnoom (u, cooTBcTBEHNO, eHTpaNbIe Jmbl MeKdy Coo). HecoNIODeHne NOJIrpHOCTM MoKet npmbctn K nobpeXdHMO 6atape u co3aTb cepE3HyO onaHOCT bpnuHHeHb Bpda 3doOpBBIO IIOe HIMyUecTeBHOrO yIep6a.
3neKtpMOHTaXbIbe pOToBtIOxNbI IPOn3BOITbCra TOnbKO 3NeKtpOMexAHkAMn, HMeOuMMn COOTBeCTByOuYIO NOIROTOBky KBaAMnKaUHO. PeKomeHdyEmble pa3Mepbl npoBOOB CM B PykoBDCTBe nol30BaTeTn l5I.
IpeDynpexKeHnOTHocTeJbHo 6aTapei
- 5aTapeHnhIshkaFHe Tpe6byet perynapHoro TexHmueckoro 06cnykBaHnna CoToPOhbl Nol3oBateN. BHytpn Hrero Het Detaley, 06cnykBaembIX Nol3oBateEm. OKpbBaHne BHEuHnx NaHeneNo IIO6oPiunHMe DOnKHO PNO3BOuTBcra ToJIbKO KBAHnCnupOaHBnMn KOMnTeHTHbMn CnEuaAImCTAMN No 06cnykBaHnIO pEMOTy, MΦOpMnPoBaHbIMN O6o BCEx Tpe6ymbX MEPax PpeOctoPoxKHOCTN. He OnyckaiTe HaxOXdEHnnoctoPOnHrero nepcoHana B6m36aTaapei.
B 6aTaepHOM xkaFy haoqatc knaanahno-perynipemybIe CBnHcOBO-KNCIOThbIe aKKMyIaTOpHbIe 6aTapei CpeKOMbHaue H3a. He doabnTe B 3Tu 6aTapeu BOH He 3aMePnTe PNOTHOCb HxOAnuEoCBA HHX 3NeKTPoNIta.
KnaHnO-perynpyembe CBNIOBO-KNIOTHbE AKKyMylTOpHbIe 6batape n cpekomBuaauei r3a Moryt CoepKaTb B3pbboOnacHycMecb Ra3o06pa3HO BoOpoda. HE KYPNTb B6n36 batape. HE npcyKatb 6p30BaHn PnAmEH Nmckp B6n36 batape. Pepe npKocHOBeHMe K batapeH He6xOIMo HeTpAn3OBaT h KaONHe Hh Ha TeNeKtpoTaTuweckn 3apd. HE BcPbAtb N HE NoBpeKaTaB Kopnyca 6batape: BteKaUoiu Hn Hnx 3neKToPiOn OnaceH Ira Koxu n Tn3 a MoKet ABnTBCa TokChyblm. HE ytnIn3npobatb 6batape nytem CKrHaH, NOCKOBky B 3OTm CNYae OH CTahOBATC B3pbBOOnaCHblm.
1. Baxkhble npdeynpeXdHnnoTexnke 6e30naCHOCTN

Batae Hecyt B Ce6e onachocb 3neKtpueckoro ydaapn nolnyehn OKOROI NOB 03deCTBmE CMBHORO TOKA KOPOTKOr 3aMbKaHn. IIOKNHOHHe Nn 3aMeHa 6aTapeonkHbOcuiectbTaTOBko KBaHINPHUPOBAHHIM cepBNCbHM nepcoHAMC C6oHNOHEHM HADNEXAUXM Mep PnpEOCTOPOXHCTN. cnoNb3yHTe HCTPymETbC hONIOPOBAHHIM pykaHn.
PipeD paobOt CHMMTE Cce6a hapyHuBte HaCb, KObua n DpyrHe MeTAANUECKNE PpEmTe. HAdHeBe PE3INOBbe PEPaTuN n D3NeKTPuNCKE 60tB. He 3akopauBaIe N He uHTpyuTE
KEMMbI batae KaHMM-Nb6 ppeMetAm. He KnaIte INCTPymEtbl Nm MeTANUECKNE Detanu Ha BepXHe NOBepxHOctn 6aTapei. NcNoB3yTe INCTPymETb C hONIOPOBAHHIM
pykamn. BHytnbataeHoro WkaFa Het Detanei, o6cynKbaembix NoB3OBATelem. 3aMeHa 6aTapei DonJHKn npOn3BOITBCR ATOPI3OBAHHBM CEBHCbIM nepcoHAnOM C
ICNIOB3AOHM EpaTe aHAnOTNHO Tnla (repMeTHbX CBNHIOBO-KNCHIOHBX AKKYMnTOpbIX 6aTapei) tAKM Jke Homepom. Batae npriOdbI dR BTOpHou nepeBaotkn.
CM. MeTHbIe HopMaTHbI n TpeOBaHn NO yTNIN3aum N160 pykoBDCTByte CB NfOpmaueH no yTNIN3aum HA Be6-CTpAHue http://www.triplite.com/support/recycling-program.
KomnaHII Tripp Lite ppeNaarTnHb accpTIme CMENbIX 6aTapeHbX KapTpndKe (R.B.C.). Iocette Be6-CTpAHu KOMNAHN Tripp Lite no aDpecy https://www.triplite.com/
products/battery-finder/, rge BB cmokete noo6bpabcmEHHy 6aTapeo dnra CBOe moenn IVI.
Ia3AmehbHcNcNb3yHte paBHOeHHbe 6tApen (B TAKOM KHe KOJIueCTBe N Takoro KHe Tnna), NoctabJIeMbIe KOMIaHne Tripp Lite.
3aMeHa npdoxpaHntenI dOJIKHa npOn3BouNTbCra TOnbKO KBaIMnIpOBaHHbIM cepBnCHbIM nepcoHaIOM. IInr 3aMeHbI CIEyET NcNtB3OBaTb TOnbKO npdoxpaHntenI TORo JHe TUNa HOMHHana (30A,600B).
- 5aTape npiroDnI DnI BTOpHNo HnepeaOToK. Tpe6oBaHn No yTHmHaOn OnpEeHOTc MeCtBbMn HopMaMn N ppaBnAMn. He yTHm3pyTe 6aTape KaKMn-N60 CnOCoBAmN, Kpome pa3peSeHHbX COoTBcTBMN CdeCTByUOMM MeCtBbIMN, peYHOaJIbHbIMN NIO BOIEcOyApCTBeHHbIMN HopMaTHBaMn.
He noKIOHuaTe H He OTKIOUaTe 6bapem B TO BpeM, KOJa I5Pi paOtaeT OT 6bapeH Nn H HaxoHITcB peKHMpeBa0tB No 6xOHOH cHm. PpeI NOKIOUeHEm K KneMMam 6bapeHnn OTKIOUeHMe OT HXN CNeDyET OTOeHNrHb NTouHHK 3apdHorTo Ka.
B Cnyae haxoJHnna HcTOnHHa 3apAHO TO KA BbKIOUeHOM COCTOAHn Ha npTaeHHn DmTeNbHO rpeHn er cneJeYr nepHOuHECKn BkIOUaTB c cIeNIOBecHeHn BO3MOXHOCTn IO3APdIKn 6aTaape. IVcTOHnK 3apAHO TOKA DOJIeH BKIOUaTBc C cIeBIO NO3APdIKn 6aTaape He MeHee Yem Ha 24 aca HnpepbIBHO paobTo KaqDble 3 Mecua. HeblnoHNHeHne Tpe6oBaHn OTocHTeBHO npNOuueckO No3apdIKn 6aTaape MoKet HAHeCTn MM Heo6paTumbl BPeD.
06ecnebeTOB3MOKHOCTbHnpepbHBHOIO3apAikn 6aapeB TeueHMe 24acobnoeYctahOBKn.
2.YctaHOBKa nHaCTpoiKa
2.13IeMeHbI 3aDHe IaHeI
PnmeHne. Iepa yctahOBKO yCTPOBCTBA pno3BEnIe erO cmoTOp. Y6eHTIeCB B OTCyTcBn KAKHX-NHO NOBpeKDeHH BHYTPN ynakOBKn. CoxpaHnTE 3abOckyynakOBKY DnCIOJIb3oBaHN B 6dyueM.
Pa3bem NoctoHHoro ToKa: cnJyHnI IaI NOKJIoueHnK INI INI INI Dpyromy 6noky 6atape.IIOpO6Hee CM. B nyHKTe "NoKJIoueHne INI K 6noKy 6atape" pa3dena 2.2 "YcTahOBKa HnAcTpOka 6noKa 6atape."
2 Natpon npedoxpahnten: ot neperepy3knIO TOKy rHe3da npedeoxpahnten.
2.2 YctaHOBKa HacTpoJa 6noka 6aTapei
Pacnakobka n ocmotp
- 13BneKte6nok6aTapeHn ynaKOBKn.
PnmeHne.6aTepeAeBnTcBeCbMa TKeJeOBecbM.Bo 36KaeHMe TpaBM coNDAIte OCToPkoHcTB pH paNaKOBKe INOHTHM yCTPOHCTBA.
- Ocmotpnte coepkmoe ynaokBn Ha npedmet Hannmry MexaHnuecknx nnnnHbix nobpekdeHH:
BLOKAKKymyIaTOpbIxBaTaPeI
PykoBcTB0nIb3BaTeTn
Ka6ebIy IaonKJIIOUeHnIbSaTapeI
Bnok Akkymynrtohbx 6aatape Ha 80 utyk
2. YctaHOBka n HacToPOkA
BbI6Op MeCTa yCTaHOBKn
IaTTO TTO CBECTK MHNHMYB BPOAHTHOCTb NOBpeJeHnBaTaepHOrO bOkaHn PpOINbT cPOK CnyKb6bTaapeB, BInoHnHaTe CneJeuOnye Yka3aHn:
1.06eCneuHTbHe MeHoe 20cm Cbo6oDHO npocTaPcHCTBa MExdy 3aDHei NaHeBko bOka H CTeho (INM DpyrMMn PpEYTCTBnMM).
2.He npenrCTBOBbT NOCTynneHNO BO3dyxA K BEHTnnaIOHbIM OTBepCTHM 6NOKA.
3.Bo n36exahne nepepeBa m/nn Co3dHaHn 36bItoHOBn BlaXHOtB oecneuHb COOTBeTcBHe yCIOBn OKpykaOooi cpeBb IMeCTyCTaHOBN KxHNUCKM yCIOBnAM paobTo b6Noka.
4. He yctahabmbatb 6nok B nomeueHHx C nobuieHHO 3aBbIeHHOTbIO mI arpeCBHbIMCpeJAM, a taKke B6nIbNBOcJIaMeHHOxCR npdMetOB.
5.DaHHeOe UcTPOIcTBo HE npeHa3NaueHO nIra IcNIOJIb3OBaHmHa HOtKpblTOBOM 03dyXe.
IpoKluoyHe N5N K 6NoKy 6aTapei
NcnoB30aHHe BneHrO 6noka aKkymyTOpHbX 6batape o6ceNeuBaet npDnHHe BpeMeHH ABOHOH paboTB. Bpe3yIbTaTe BpeM 3apAkn TaKke yBeHnuBaTcHa. Ha npBbeHNO HKe Cxme NOKa3aHO NOkKnOueHMe I6Pi K 6nOKy 6batape eep3 noctabnaembl B kOMnKeTe Kaebn IO NKnOueHMe YkazAHoro 6noka 6batae KdoONHHTenbHomy 6nOKy 6batape.

Ipeep noKIOHcHEm 6noka 6aTape K N6II bInonHte npOeDpy"ChrTne KpbuKu 6aTapeHoro pa3bema n yctahOBKa KPOHTeHa dna KpenHeHH 6aTapeHoro Ka6e#.
2. YctaHOBKa nHaCTpoK
Chatne KpbuKb 6aTaapeHoro pa3bema uYctaHOBKa pOHNTeHa dJa KpenHeHn 6aTaapeHoro Ka6ena
- BbBepHNTe BnHTb, fNkCnpUoMne Kpblky pa3bema noCTOaHHoro TOka dna nOdknIOueHn 6noka 6atapeK NbI. CmHNTe KpbuKy u coxpaHnTE BnHTb dna nx noCneDyouero nCnoB3OBaHnHa 4.
PnmeaHne. Pa3bem nocToaHHoro ToKa dIra NIOKnIOueHMeK IVIpaCnoIOKeH cNeBcTOpOHe.

1111 W. 35th Street, Chicago, IL 60609 USA - www.triplite.com/support
Bedienungsanleitung
Manufacturing Excellence
1111 W. 35th Street, Chicago, IL 60609 USA · www.triplite.com/support
1111 W. 35th Street, Chicago, IL 60609 USA www.triplite.com/support