
WS100 - Microphone NUMARK - Free user manual and instructions
Find the device manual for free WS100 NUMARK in PDF.
| Product Type | Wireless Microphone (UHF system) |
| Brand | Numark |
| Model | WS100 |
| Transmitter Power Supply | 2 AA batteries (not included) |
| Receiver Power Supply | Mains adapter included |
| Maximum Range | 60 meters (line of sight) |
| Audio Outputs | 2 x 6.35 mm (mic and line, unbalanced) |
| Antennas | Fixed vertically adjustable antennas |
| Operating Frequency | Fixed regional frequency |
| Box Content | Transmitter, receiver, carry case, 6.35 mm cable, mains adapter, user guide |
| LED Indicators | Power, RF, Audio (on receiver); Power (on transmitter) |
| Volume Control | Rotary knob on receiver |
| Care and Cleaning | Wipe with a dry cloth; avoid moisture and shocks |
| Safety | Do not expose to water or excessive heat; observe battery polarity |
| Repairability | Spare parts available from manufacturer; contact Numark support |
Frequently Asked Questions - WS100 NUMARK
User questions about WS100 NUMARK
0 question about this device. Answer the ones you know or ask your own.
Ask a new question about this device
Download the instructions for your Microphone in PDF format for free! Find your manual WS100 - NUMARK and take your electronic device back in hand. On this page are published all the documents necessary for the use of your device. WS100 by NUMARK.
USER MANUAL WS100 NUMARK
User Guide (English)
Introduction
Box Contents
WS100 Microphone Transmitter
WS100 Receiver
Carrying Case
1/4" (6.35 mm) cable
Power Adapter
User Guide
Safety & Warranty Manual
Support
For the latest information about this product (system requirements, compatibility information, etc.) and product registration, visit numark.com.
For additional product support, visit numark.com/support.
Setup
Connection
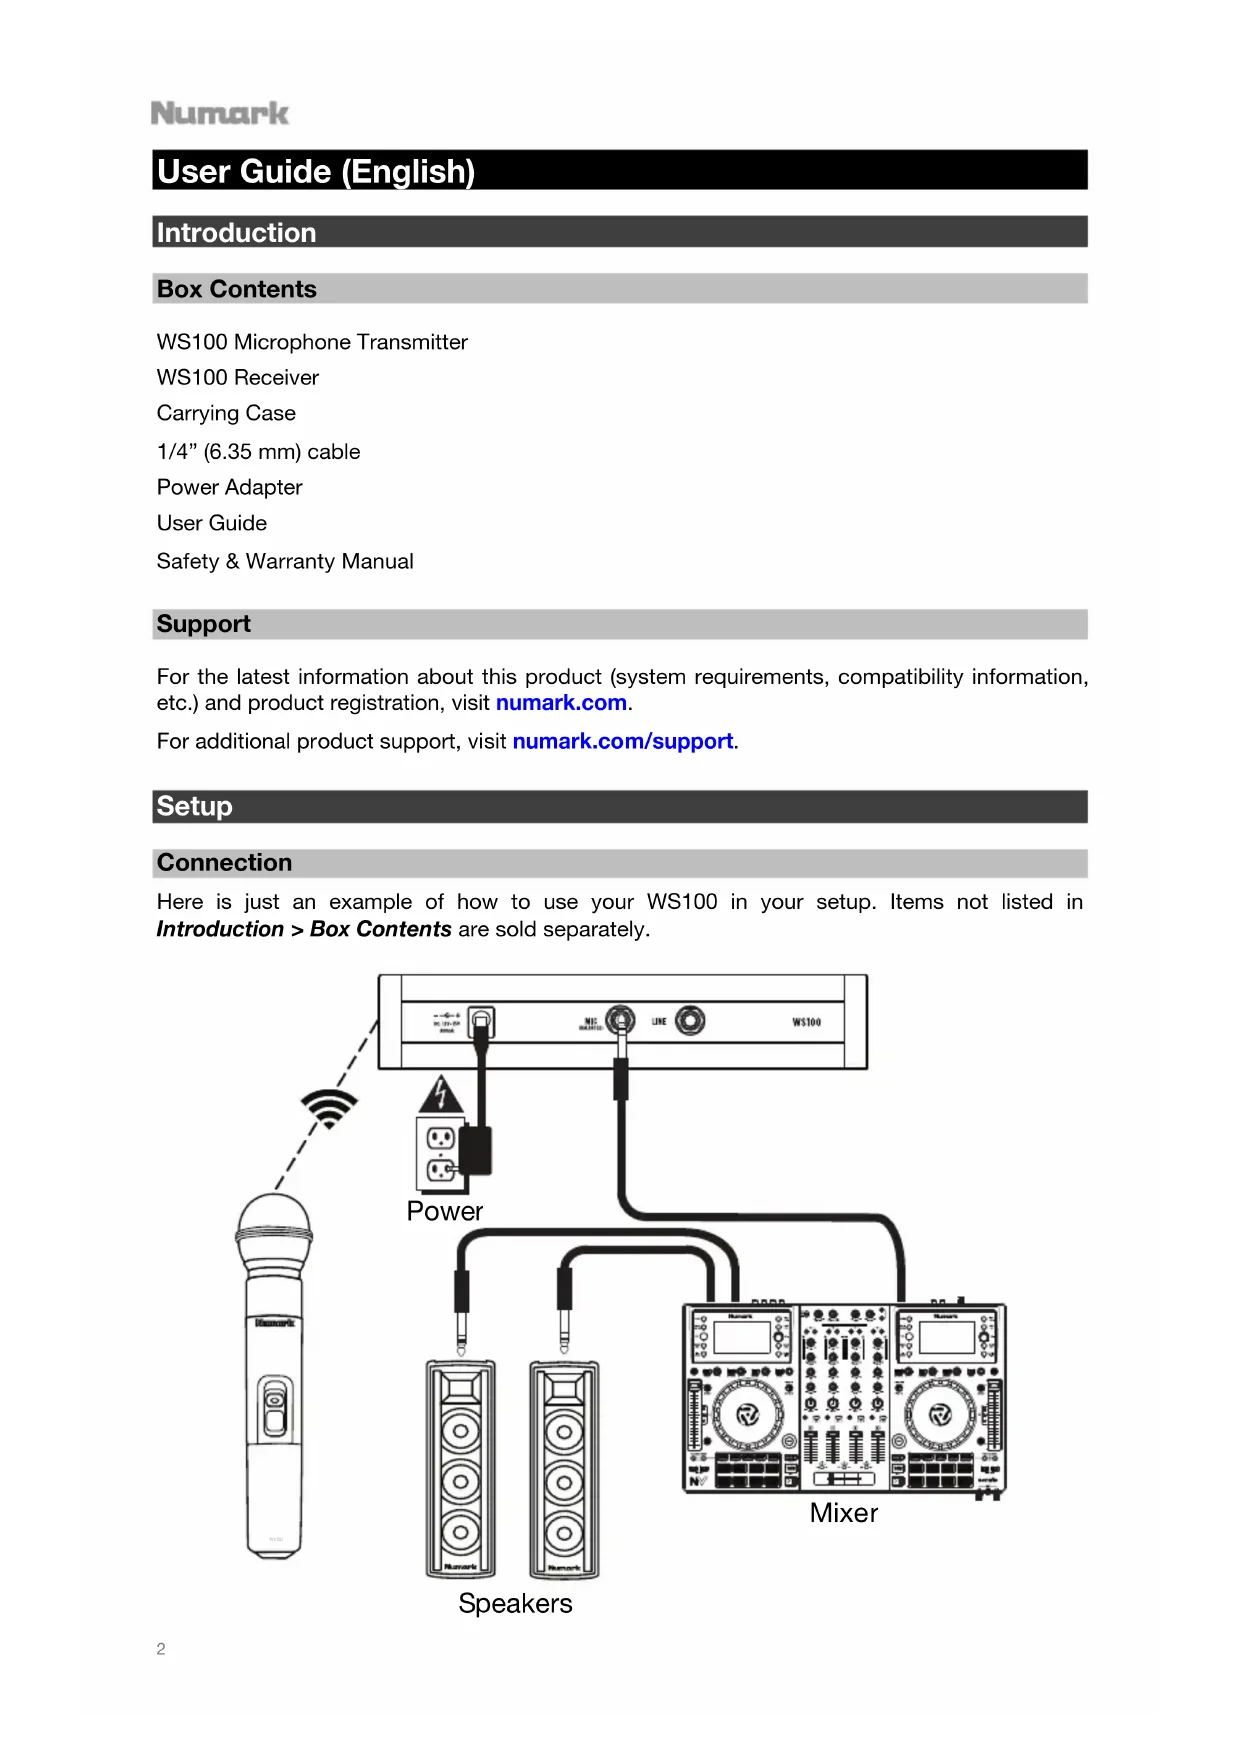
Here is just an example of how to use your WS100 in your setup. Items not listed in Introduction > Box Contents are sold separately.
Setting Up the Microphone Transmitter
- Remove the microphone transmitter's battery compartment cover and insert 2 AA batteries into compartment. Make sure the polarities of the batteries (+ and -) are correct.
- Reattach the battery compartment cover.
- Slide the power switch into the on position. The power indicator will flash briefly to indicate the microphone transmitter is on.
Setting Up the Receiver
- For best results, place the receiver at least 3 feet (1 meter) above the ground and place the antennae in a vertical position.
- Use the included power adapter to connect the receiver's power input to a power outlet.
- Use a standard 1/4 (6.35 mm) cable to connect one of the receiver's audio outputs to your mixer or PA system. Do not use both audio outputs at the same time; this can result in signal loss or increased noise.
- Press the power button to turn the receiver on.
- If the microphone transmitter is on, the receiver's RF indicator will light to show that the two devices are connected and within range. The receiver and microphone transmitter are pre-programmed to operate on a regional fixed frequency.
- Adjust the volume knob to set the audio signal level sent from the audio output to your mixer or PA system.
Features
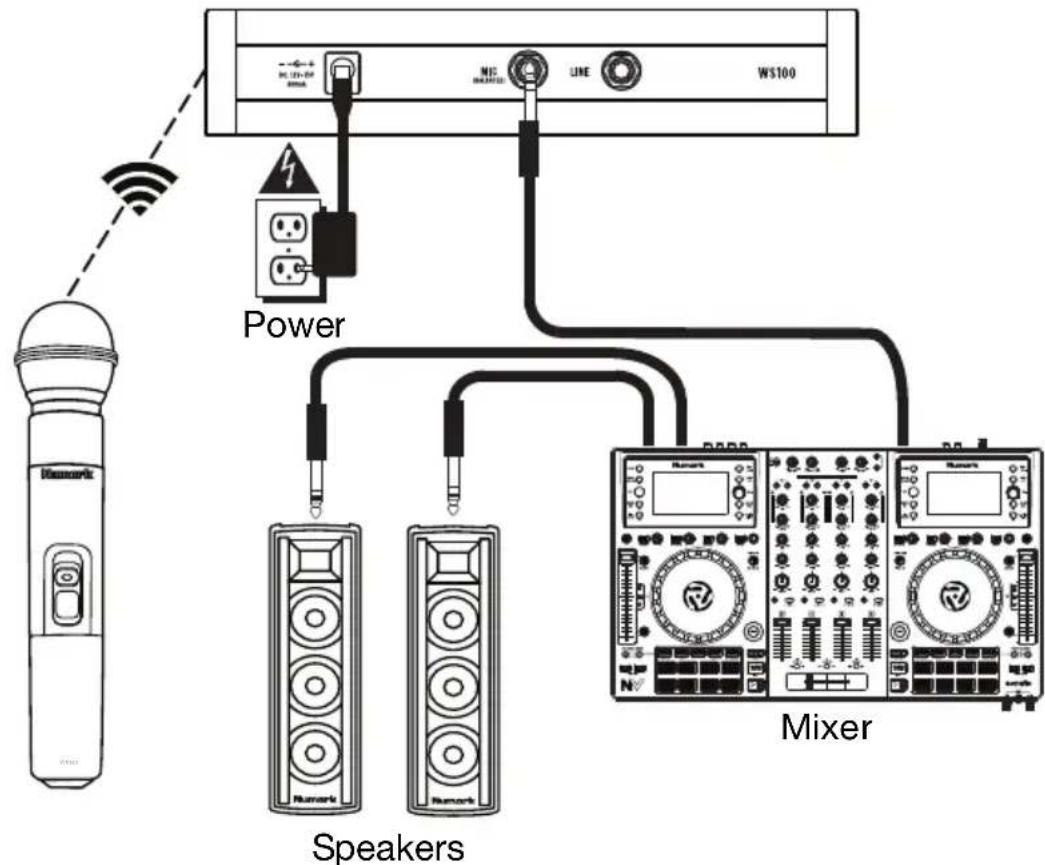
Microphone Transmitter
- Grille: This cover protects the microphone capsule and reduces noise from air and breath.
- Power Switch: This three-position switch turns the transmitter on or off.
i. The transmitter is off.
ii. The transmitter is on, but the audio signal is muted.
iii. The transmitter is on and sending audio to the receiver.
- Power Indicator: This LED will flash briefly when the power switch is moved into the on position.
- Battery Compartment: Insert 2 AA batteries into the compartment. Make sure the polarities of the batteries (+ and -) are correct.
Receiver
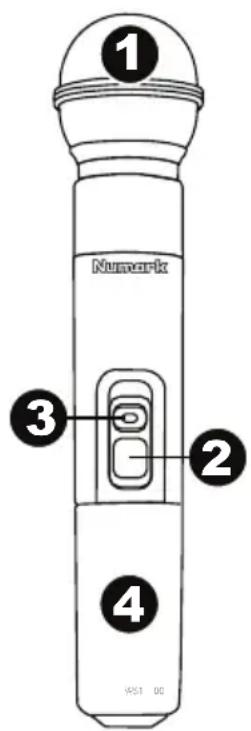
Front Panel
- Power Button: Press this button to turn the receiver on or off.
- Power Indicator: When lit, this LED indicates the receiver is powered on.
- RF Indicator: When lit, this LED indicates that the receiver is receiving a signal from the transmitter.
- AF Indicator: When lit, this LED indicates the current audio signal level received from the transmitter.
- Volume Knob: Turn this knob to adjust the volume level of the Mic Output and Line Output.
- Antennae: These antennae receive the signal from the transmitter. Place the antennae in a vertical position for the best signal quality.
Rear Panel

- Power Input: Use the included power adapter to connect this input to a power outlet.
- Mic Output (1/4" / 6.35 mm): Use a standard 1/4" (6.35 mm) cable to connect this balanced output to your mixer, PA system, etc. Make sure the input of the connected device is set to receive a mic-level audio signal.
- Line Output (1/4" / 6.35 mm): Use a standard 1/4" (6.35 mm) cable to connect this unbalanced output to your guitar amplifier, mixer, PA system, etc. Make sure the input of the connected device is set to receive a line-level audio signal.
Troubleshooting
Problem
Solution
The receiver does not produce any sound.
Make sure the receiver's power adapter is properly connected to the power input and a power source.
Make sure the microphone transmitter's batteries are properly inserted and that their polarities (+ and -) are correct.
Make sure the receiver's audio output is properly connected to your mixer, amplifier system, etc. Also, make sure the input of the connected device is set to receive the correct mic-level or line-level audio signal, depending on which audio output is being used.
Make sure the receiver and microphone transmitter are within 200 feet (60 meters) and have a clear line of sight. Also, make sure the receiver is not immediately near any metal objects or devices that could cause RF interference (other wireless systems, TVs, radio, etc.).
There is audible interference in the transmission.
Make sure the receiver and microphone transmitter are within 200 feet (60 meters) and have a clear line of sight. Also, make sure the receiver is not immediately near any metal objects or devices that could cause RF interference (other wireless systems, TVs, radio, etc.).
If you are using multiple transmitter-receiver pairs, use only one pair at a time.
The signal is distorted.
Make sure the receiver is not immediately near any metal objects or devices that could cause RF interference (other wireless systems, TVs, radio, etc.).
Lower the setting of the receiver's Volume knob.
Make sure the input of the connected device is set to receive the correct mic-level or line-level audio signal, depending on which audio output is being used.
Technical Specifications
Specifications are subject to change without notice.
Receiver
| UHF Band Operation | 500-980 MHz (region-specific) |
| Transmission System | PLL-Synthesized |
| Modulation | DQPSK |
| Reception Range | 200 feet / 60 meters |
| Signal-to-Noise Ratio | >96 dB (A-weighted) |
| Reception Sensitivity | < -90 dBm |
| AF Response | 50 Hz-18 kHz |
| THD+N | < 0.1% |
| Audio Delay | 3 ms |
| Audio Output | 1 balanced 1/4" (6.35 mm) 1 unbalanced 1/4" (6.35 mm) |
| Power | 15 V, 800 mA, center-positive (adapter included) |
| Dimensions (width x depth x height) | 7.0" × 4.5" × 1.5" 17.8 cm × 11.4 cm × 3.8 cm |
| Weight | 0.85 lbs. 0.38 kg |
Transmitter
| UHF Band Operation | 500-980 MHz (region-specific) |
| Transmission System | PLL-Synthesized |
| Modulation | DQPSK |
| Transmission Range | 200 feet / 60 meters |
| Frequency Stability | ± 0.005% |
| RF Power Output | 10 mW |
| Dynamic Range | > 100 dB (A) |
| Input Sensitivity | 2.1 mV/Pa |
| Power | Supply: 3 V DC (1.5 V via 2 AA batteries) Consumption: 100 mA at 3 V |
| Dimensions (width x depth x height) | 9.75” × 2.0” × 2.0” 24.75 cm x 5.1 cm x 5.1 cm |
| Weight | 0.60 lbs. 0.27 kg |
Trademarks and Licenses
Numark is a trademark of inMusic Brands, Inc., registered in the U.S. and other countries.
All other product or company names are trademarks or registered trademarks of their respective owners.