340022 - Scale Sammic - Free user manual and instructions
Find the device manual for free 340022 Sammic in PDF.

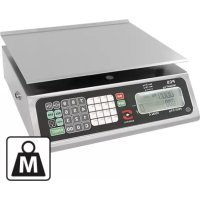
| Product Type | Counter Scale |
| Brand | Sammic |
| Model | 340022 |
| Housing Material | Stainless Steel |
| Platform Material | Stainless steel with sloped, rounded edges |
| Weighing Capacity | 3 kg (model l-eq 4, equivalent) |
| Accuracy | 1 g (0.001 kg) |
| Display | Alphanumeric LCD display with backlight |
| Keyboard Type | Membrane keyboard with 9 tactile keys |
| Weighing Functions | Tare (keyboard or external foot pedal), zero reset, high/low limit alarm, printing, backlight |
| Communication | RS-232 serial port for PC or printer |
| Transmission Speed | 9600 bps, 8 data bits, 1 stop bit, no parity |
| Power Supply | AC/DC 120 VAC or 220 VAC, output 9 VDC |
| Internal Battery | 6 V rechargeable, life up to 100 hours after full charge |
| Standby Time | Automatic shut-off timer after 15 minutes without AC power |
| Visual Indicators | Low battery, zero, tare/net, AC power, high and low alarm |
| Leveling | 4 leveling feet and bubble level under the platform |
| Included Accessories | AC/DC power adapter |
| Optional Accessories | Deep platform, tare foot pedal, cigarette lighter plug, serial cable, Scale.exe software |
| Maintenance and Cleaning | Damp cloth, do not use solvents or corrosive detergents, never wash with water |
| Environmental Conditions | Operating temperature: -10°C to 40°C, avoid moisture and dust |
| Safety | Do not open, do not use sharp objects on the keyboard, warranty void if modified |
| Country of Origin | Manufactured by Sammic, Spain |
Frequently Asked Questions - 340022 Sammic
User questions about 340022 Sammic
0 question about this device. Answer the ones you know or ask your own.
Ask a new question about this device
Download the instructions for your Scale in PDF format for free! Find your manual 340022 - Sammic and take your electronic device back in hand. On this page are published all the documents necessary for the use of your device. 340022 by Sammic.
USER MANUAL 340022 Sammic
text_image
Illustration of a vintage typewriter with a paper feed and printed text, showing internal circuitry and page layout.
natural_image
Cartoon illustration of a soldering iron with three tools (no text or symbols)
text_image
Illustration of a computer with a sad face and directional arrows, showing text editing interface
natural_image
Cartoon illustration of two anthropomorphic devices interacting with a computer, one holding a magnifying glass (no text or symbols present)
natural_image
Illustration of a cartoon printer emitting water spray from a bucket (no text or symbols)
natural_image
Cartoon illustration of a kitchen appliance with three kitchen slices flying around it (no text or symbols)
text_image
PUM4 NEDERLANDS
natural_image
Illustration of a person lying on the ground next to a bottle and a container, with no visible text or symbols.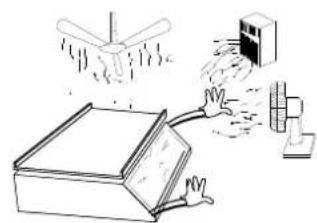
natural_image
Illustration of a hand spraying liquid onto a device with a spray bottle nearby (no text or symbols)
natural_image
Cartoon illustration of a steamer with a sad face and a broom, no text or symbols present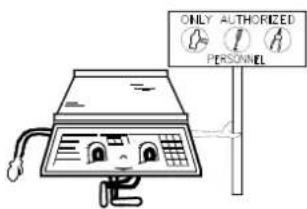
text_image
ONLY AUTHORIZED PERSONNELIII.-INSTRUCTIES VOOR INSTALLATIE
natural_image
Illustration of two cartoon characters resembling a computer with legs and arms, no text or symbols present.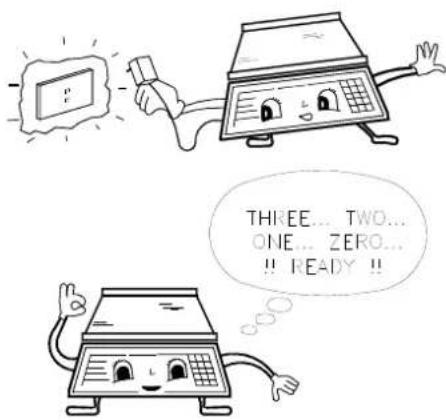
text_image
THI-EE... TWO... ONE... ZERO... !! READY !!natural_image
Line drawing of a connected electrical device with a cable and terminal (no text or symbols)natural_image
Illustration of four electronic devices: a bowl, a switch, a power adapter, and a floppy disk (no text or symbols)VI.-NAAM EN LOCATIE VAN BELANGRIJKE ONDERDELEN
VOORAANZICHT

text_image
Diagram of a printer with numbered parts for identification and assembly referencetext_image
OK ZERO ON ON HI A OUT LIGHT LED1.- ON Bets:
7.- "High" alarm indicator:
HOE EEN PRODUCT TE WEGEN?
HOE DE ALARMGRENZEN WEERGEVEN?
| Start bit | 1 bit |
| Data bits | 8 bits |
| Parity bit | 0 bit |
| End bit | 1 bit |
5.- Bits volgorde.

text_image
Mark Space Start bit b0 b1 b2 b3 b4 b5 b6 b7 End bit- CONFIGURATIE SERIËLE KABEL
text_image
DB9 N/C 1: RXD 2: :2 TXD TXD 3: :3 RXD DTR 4: :4 RTS GND 5: :5 CTS DSR 6: :6 DSR RTS 7: :7 GND CTS 8: :20 DTR N/C 9:text_image
DB9 N/C 1: :1 N/C RXD 2: -2 RXD TXD 3: -3 TXD DTR 4: -4 DTR GND 5: -5 GND DSR 6: -6 DSR RTS 7: -7 RTS CTS 8: -8 CTS N/C 9: -9 N/Ctext_image
Text section Weight section Units section N E T N E G . R A N G E O V E R . L O A D O U T . O F . R A N G E CR - # # # . # # # k g l b o z CRTIMERFUNCTIE UITSCHAKELEN:
IMPORTANT: Before operating this scale, please read this manual thoroughly.
INDEX
I Introduction 3
II Important warnings 3
III Instructions for installation 4
IV Accessory (included) 5
V Optional accessories (not included 5
VI Name and localization of parts
- Front view 6
- Keyboard 7
- General view finder (lcd display) 8
VII Operations description
• How to weight a product 9
• How to use "tare" (keypad/footswitch) 9
• How to use the "reference to zero" 10

- Use of the ⚙️ key 11
• How to use the "alarm" function 11
• How to display alarm limits 12
• Use of the "print" key 12
• How to disable alarm function 12
- Pc "serial" communication 12
• Power off timer function 15
• Use of the battery 15
• Low battery indicator 16
- Connection to the car's cigarette lighter (optional) 16
IX Other important messages that appear on the scale 17
X Maintenance and cleaning 17
XI Troubleshooting guide 18
XII Technical specifications 19

WARNING Warning
!!Do not openii
Risk of short circuit
Caution: To reduce the risk of short circuit in your scale, do not remove the cover or substitute any of the parts for others that are not original only authorized distributor

Important Note
Making any change or modification to thescale in its parts or components will have the warranty annulment
2 ENGLISH
I.- INTRODUCTION
Dear customer:
We appreciate that you have chosen this product we assure you that you will get the maximum satisfaction of the new acquisition for your business.
We suggest you to read carefully this manual and make sure to keep it at hand for later consultations.
Note: all the examples in this manual were performed in an I-eq 4 scale model.
IMPORTANT WARNINGS
- In case you have a problem with the scale, first read the warranty conditions.
- Do not open the scale on your own. Your warranty will be canceled.
- "Never" press the keyboard with objects such as pencils, pens, knives, etc.
- Use a 220 v ac outlet exclusive for the scale avoiding overload or voltage variations.
- "Never" wash the scale using a flow of water .this can damage the electronic components. For more information read "maintenance and cleaning" section.
- Protect the scale from insects (mainly from roaches) they can seriously damage the electronic components. Use solid products against roaches.
- Do not drop or hit the scale with the product to be weighted because as time goes by it will damage the weight sensor.
natural_image
Cartoon illustration of a computer with a scroll and a document, no text or symbols present
natural_image
Cartoon illustration of a soldering iron with scissors and a tool, no text or symbols present
text_image
Cartoon illustration showing a hand pointing at a document with text and arrows, depicting a sad face on the document.
natural_image
Cartoon illustration of a computer and a book character interacting with a screen (no text or symbols present)
natural_image
Cartoon illustration of a megaphone spraying water with raindrops, no text or symbols present
natural_image
Cartoon illustration of a computer with speech bubbles and floating objects (no text or symbols)
text_image
PUM4 ENGLISH
- Do not use solvents or detergents for cleaning only use a damp rag.
- Do not place fans or heaters directed towards the scale.
- Do not place the scale where there is a lot of moisture and/or dust.
- Only authorized and qualified personnel should check and repair your scale.
natural_image
Illustration of a bottle pouring liquid into a container with a cartoon character nearby (no text or symbols)
natural_image
Illustration of a hand spraying liquid from a container onto a surface, with no text or symbols present.
natural_image
Cartoon illustration of a steamer with steam clouds and a broom, no text or symbols present
text_image
ONLY AUTHORIZED PERSONNELIII.-INSTRUCTIONS FOR INSTALLATION
-
Unpack the scale and check the conditions of the product. If it is damaged report it immediately to your authorized distributor.
-
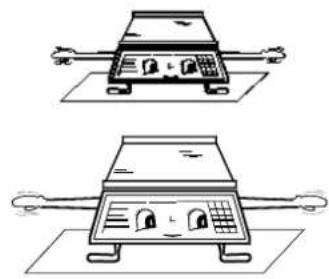
Place the scale where there is not any movement or vibration, make sure it is leveled adequately checking that the four leveling bases are supporting the scale over the surface were it has been placed and if the level bubble (under the plate) is centered, to adjust, tighten or loosen the leveling bases until the bubble is in the center of the circle.
-
Connect the ac/dc power supply to 120 vac outlet or 220 vac
-
Power on the scale, your scale will display zeros, being ready to use.
natural_image
Two identical line drawings of a mechanical device with arms and legs, shown from different angles (no text or symbols)
text_image
THREE... TWO... ONE... ZERO... !! READY !!IMPORTANT NOTE: If your scale displays "HELP" after you followed the previous steps and after the initial countdown, it means that it was handled roughly and/or got hit during the shipment, which cause irreversible damage in its operation. Call your authorized distributor. Is possible that the scale displays "HELP" when you turn it on with weight on the plate, when this happens, remove the weight and turn the scale off and then turn it on
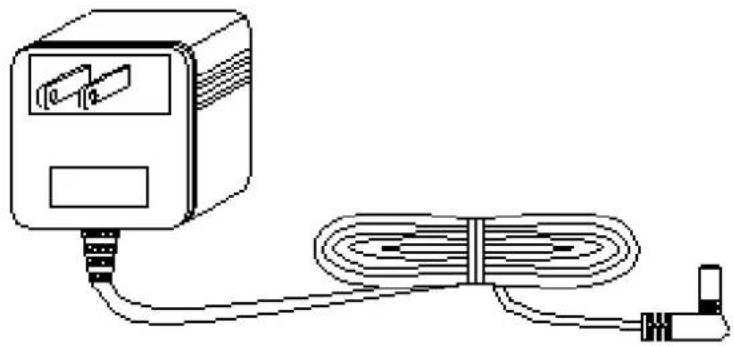
IV.-ACCESSORY (INCLUDED)
natural_image
Line drawing of a connected electrical device with a cable and terminal (no text or symbols)Ac/dc power supply to 120 vac/9 vdc or 220 vac/9 vdc.
V.-OPTIONAL ACCESSORIES (NOT INCLUDED)
DEEP PLATER.
(USE ONLY IN "TARE" FUNCTION)
TARE FOOTSWITCH
CAR'S LIGHTER PLUG.
SERIAL CABLE
INTERFASE SOFTWARE 'SCALE.EXE' [DOWNLOAD PROGRAM FROM INTERNET http://www.fabatsa.com.mx]
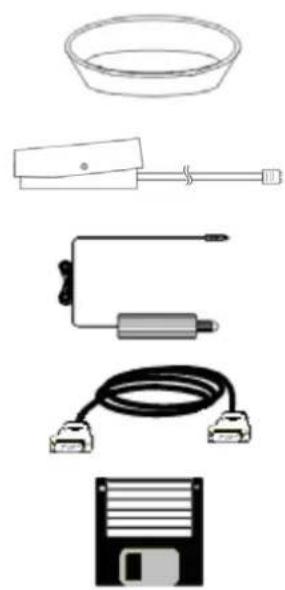
natural_image
Illustration of four electronic devices: a bowl, a switch, a power adapter, and a floppy disk (no text or symbols)VI.-NAME AND LOCATION OF IMPORTANT PARTS
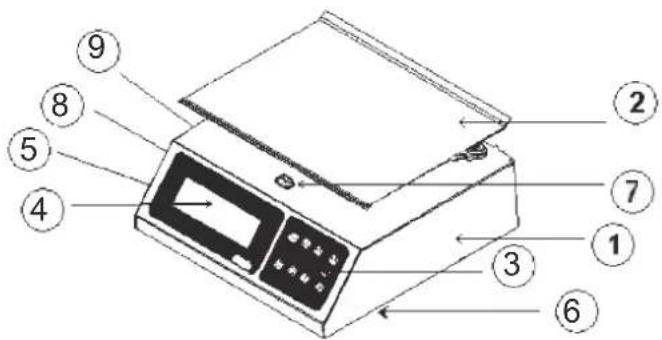
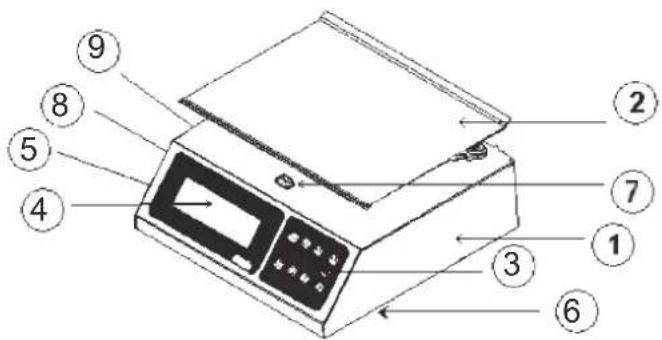
FRONT VIEW
text_image
Diagram of a printer with numbered parts labeled for identification- CABINET: Manufactured in stainless steel and resistant to corrosion and strokes.
- PLATE: Also manufactured in stainless steel with the border bent and rounded.
- MEMBRANE KEYBOARD: With big membrane and readable keys. It is very easy to handle.
- DISPLAY (LCD): It shows the weight of the products in kilograms. The display is liquid crystal..
- LEVELING BASES: They "level" the scale tightening or loosening them.
- JACK: Connects the ac/dc power supply to the scale which is located in the bottom of the scale (in the base).
- BUBBLE LEVEL: Is use as a reference to level the scale..
- PC/PRINTER CONNECTOR: For connect pc (serial) cable or serial printer.
9.- TARE FOOTSWITCH CONNECTOR: For connect external tare footswitch..
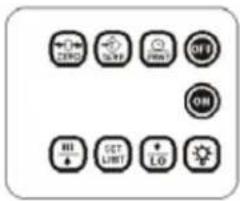
KEYBOARD
text_image
OK ZERO ON ON HI A OUT LIGHT LED1.- ON key:
when you press the key, the scale turns on.
2.- OFF key:
When you press the key, the scale turns off.
3.- ZERO key:
When you press this key the scale starts with zeros.
4.- key:
When you press this key you eliminate any container's weight that you do not wish to consider during a transaction (for example: boxes, bags, bottles, etc.).
5.- key:
This key is used to turn on and turn off the backlight.
6.- key:
When you press this key, the scale send the displayed weight to the printer via the serial port.
7.- SET LIMIT key:
This key is used to set alarm limits.
8.- ③ key:
This key is used to display high alarm limit (when alarm is enabled), or for increment value when setting high/low alarm limits.
9.- 10 key:
This key is used to display low alarm limit (when alarm is enabled), or for decrement value when setting high/low alarm limits.
10.- "general view finder":
Used to indicate the weight of the product.
DISPLAY (LCD)
text_image
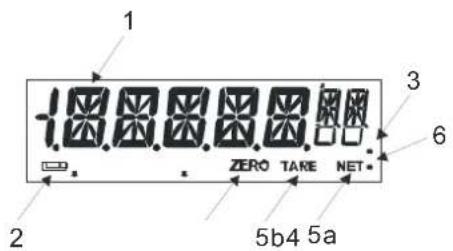
1 2 3 6 ZERO TAKE NET* 5b4 5a1.- "ALPHANUMERIC" INDICATOR:
SHOWS THE PRODUCT'S WEIGHT IN KILOGRAMS, THE ALPHANUMERIC INDICATOR CAN SHOW THE FOLLOWING READINGS:
OVRLOAD IS SHOWN WHEN THERE IS AN OVERWEIGHT ON THE SCALE.
NEG. IS SHOWN WHEN THERE IS A NEGATIVE WEIGHT.
LOWBAT. IS SHOWN WHEN THE BATTERY DOES NOT HAVE ENOUGH ENERGY.
HELP IS SHOWN WHEN YOU TURN ON THE SCALE WITH AN EXCESSIVE WEIGHT.
UNLOAD IS SHOWN WHEN THE SCALE IS TURNED ON WITHOUT THE PLATE.
HI LMT? IS SHOWN WHEN THE SCALE IS READY TO SET ALARM LIMITS. LO LMT?
2.- (☐) "low battery" indicator:
Is shown when the energy of the battery is too low, this indicator turns on to tell us that it is necessary to recharge it.
3.- "AC/DC" power supply indicator:
When the ac/dc power supply is connected to the scale this indicator turns on.
4.- "Zero" indicator :
These references to zero indicate that the scale is ready to start weighting products. The zero indicator disappear when a load is placed on the scale.
5a.- "Net" indicator:
Indicates that the "tare" function has been activated. The readings shown correspond to the net weight.
6.- "Low" alarm indicator:
When it is setting low alarm limit or when low limit is displayed, or when weight is lower than low alarm limit this indicator turns on.
7.- "High" alarm indicator:
When it is setting high alarm limit or when high limit is displayed, or when weight is higher than high alarm limit this indicator turns on.
HOW TO WEIGHT A PRODUCT
Turn your scale on pressing the key. At this moment the scale is ready to weight.
Then place the product to weight on the plate and you will see the weight in the alphanumeric display. The "kg" symbol will appear in the display. For example, if you place a product whose weight is 3 ~kg , you will see the following
3000kg
HOW TO USE THE "TARE" (KEYPAD/FOOTSWITCH)
When you wish to weight a product in a container and you do not want to consider the container's weight during the operation, you can use the "tare" function. To use this function, follow these steps: suppose you are going to weight 5 kg of some product in a container that weight 10 kg.
1.- Place the empty container on the scale.
1000K9
2.- Press the 🔒 key or the footswitch. Then the display will show: Note: if the weight displayed on the display is changing the tare function can't be enabled.
3.- Put the product inside the container and the scale shows only the weight of the product without the container's weight. Note: when you remove the container a negative number (weight of container) appears in the display
1000kg
NET
1000K9
TARE
It is important to mention that this function is subtractive. For example, if we have a container that weight 1 kg, the scale will only be able to weight up to 1 kg of product to complete the maximum capacity (3 kilograms in a l-eq 4 model).to cancel the tare function just press the 🔒 key or the footswitch and the scale will return to the normal function. The tare symbol will disappear
The two following observations are specially important.
A) when there is no weight on the scale (container) you can not activate the "tare" function.
B) when a container is "tared", but when you remove it from the plate and you remove a larger weight than the container, (grease, remaining of a product, etc.), or when the plate is slightly lifted with your hand. "neg" (negative) will appear.
NE8.
NET
NE6.
TARE
When this happens :
A) Let go the plate if you are holding it.
B) If the message continue, turn off the scale and turn it on again.
HOW TO USE THE "REFERENCE TO ZERO"
It is possible for the scale to show a number in the display without having any product on the plate due to voltage variations, rough handling, or some other factor. When this happens, simply press the 🔒 key and the view finder will return to "zero". The word "zero" will appear in the display. This operation is commonly known as "resetting to zero".
HOW TO USE THE KEY
When you do not have enough light you can use the backlight to improve the readability of the data on display. To turn on and turn off the backlight just press the Ⓞ key.
HOW TO USE ALARM FUNCTION
Press the Ⓗ key, it'll be display "hi lmt?" In the display
HILM TP
Then press ⏻ or ⏻ keys for set high alarm limit.
0.000Kg
Press 📄 key for increment or 🔍 key for decrement value, if key still pressed the increment / decrement will be faster. For save high alarm value and go to adjust low alarm value press Ⓗ. I'll be display "lo lmt?" In the display.
LO LM ^TP
Then press 📁 or keys for set low alarm limit.
0.000Kg
[ ☐ Key for increment or ☐ key for decrement value, if key still pressed the increment / decrement will be faster]. For save low alarm value press ☐. The scale it'll be ready to weight. Note: for disable alarm, make the same procedure but set high and low alarm to zero (0.000)
HOW TO DISPLAY ALARM LIMITS
Press 📄 or 🖱 for display high or low alarm limit. For exit press .
12 ENGLISH
HOW TO DISABLE ALARM FUNCTION
Press SET LIMIT key, when hi lmt? Is displayed press again SET LIMIT key and alarm function will be disable
USE OF THE "PRINT" KEY
When press the 📄 the scale send via serial port the displayed weight. Previously connect the serial printer to the scale.
PC "SERIAL" COMMUNICATION
The following information will be useful for users who make computer programs and require to communicate with the scale.
HOW TO READ WEIGHT FROM THE COMPUTER.
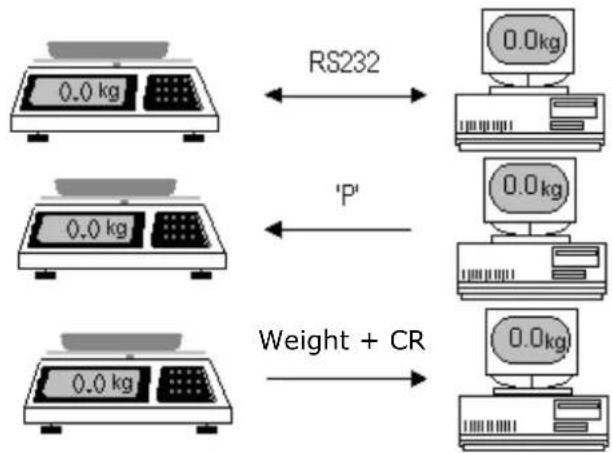
flowchart
graph LR
    A["RS232"] <--> B["0.0kg"]
    C["'P'"] <--> D["0.0kg"]
    E["Weight + CR"] --> F["0.0kg"]
Connect the scale to the serial port [RS-232] of the computer
Computer have to the send 'P' character in ASCII code
Scale answer sending weight and the control character (carriage return)
Serial port technicals specifications.
1.- Asynchronous communication.
2.- Transmission and reception speed 9600 bps (baud rate).
3.- Polarity of the signal:
RS 232c mark: 1 logical (-3v to -12v)
Space: 0 logical (+3v to +12v)
4.- Length of the word:
| Start bit | 1 bit |
| Data bits | 8 bits |
| Parity bit | 0 bit |
| End bit | 1 bit |
5.- Bits sequence.

text_image
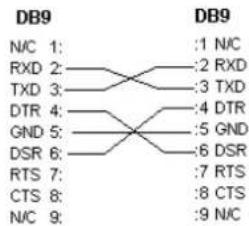
Mark Space Start bit b0 b1 b2 b3 b4 b5 b6 b7 End bit- SERIAL CABLE CONFIGURATION
Serial cable configuration
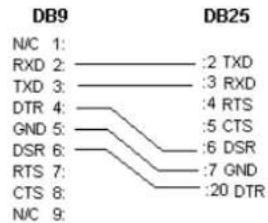
text_image
DB9 N/C 1: RXD 2: :2 TXD TXD 3: :3 RXD DTR 4: :4 RTS GND 5: :5 CTS DSR 6: :6 DSR RTS 7: :7 GND CTS 8: :20 DTR N/C 9:Serial cable configuration
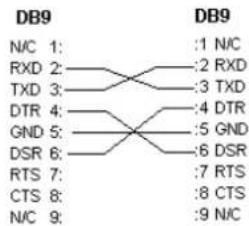
text_image
DB9 N/C 1: :1 N/C RXD 2: -2 RXD TXD 3: -3 TXD DTR 4: -4 DTR GND 5: -5 GND DSR 6: -6 DSR RTS 7: -7 RTS CTS 8: -8 CTS N/C 9: -9 N/CDemonstrative program of pc communication
The purpose of demonstrating pc and weight scale communication, we develop a software for check weight on the pc monitor.
| Program name System requirements | |
| Scale.exe - 80386sx processor or higher | - mouse- windows 3.1 or higher |
Connection
Firstly connect the scale to the pc serial port, using the serial cable. First power on the scale and later the pc.
Scale.exe program
1.- download the scale.exe program from http://www.fabatsa.com.mx in soporte select software y manuales, then click on software scale and save it on your hard disk.
2.- unzip the downloaded file on c:\scale\
3.- go to scale subdirectory.
4.- select scale.exe program and press
Information format sended to pc
Normally, it was sent through port serial, the following information in ascii code:
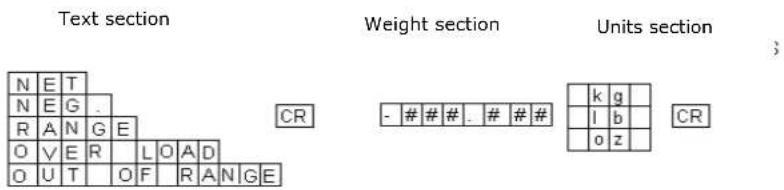
text_image
Text section Weight section Units section N E T N E G . R A N G E O V E R . L O A D O U T . O F . R A N G E CR - # # # . # # # k g l b o z CRThis function is permanently activated when the scale is on, and only when you do not have the ac/dc power supply connected to the scale. When you do not use the scale for a period of time approximate to 15 minutes, it will automatically turn off. To turn on the scale again, just press the

key
The power off timer function permit you to save electricity and avoid constant battery recharges.
14 ENGLISH
USE OF THE BATTERY
The scale can operate with an ac/dc power supply, or with a battery (6 volt included). The battery is rechargeable using the ac/dc power supply and the procedure is the following.
recharge: to make this operation, just connect the scale to the ac/dc power supply for a period of time approximate to 10 hours with the scale turned off. The energy stored in the battery during a recharge can last up to 100 hours of continuos operation. When you recharge the battery for some hours, but the battery can not get enough charge to turn on the scale, then you must change the battery by a new one. In this case you can contact to your authorized distributor.
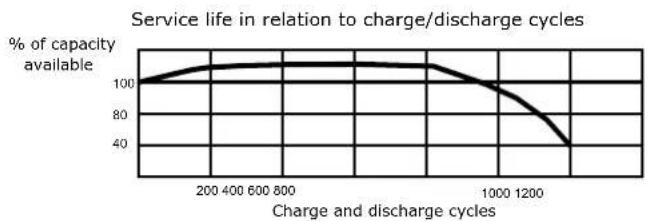
LIFE TIME OF THE RECHARGEABLE BATTERY
line
| Charge and discharge cycles | % of capacity available | | --------------------------- | ----------------------- | | 0 | 100 | | 200 | 105 | | 400 | 108 | | 600 | 109 | | 800 | 110 | | 1000 | 108 | | 1200 | 80 | | 1400 | 40 |The charging capacity of the rechargeable battery in this scale decreases according to the number of charge/discharge cycles, this causes that the service life is reduced to 1000 cycles. For this reason the warranty period for the battery is limited to six months after the purchase date of the scale.
"LOW BATTERY" INDICATOR
If the battery does not have enough energy to keep the scale operating for a long time, a low battery indicator appears in the view finder. This is the first warning signal indicating that it is necessary to recharge the battery.
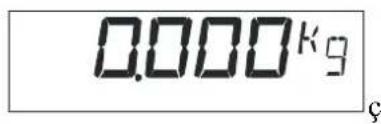
text_image
0.000k₉ çEven with this signal, it is possible for the scale to keep on operating for a short period of time (30 minutes), but after a second warning signal appears ("low bat") in the display, the scale stops itself and does not respond to the instructions.
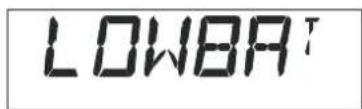
text_image
LOWBA TTo eliminate any of the two indicators and continue using the scale without any concern, connect the ac/dc power supply to the scale. And remember to recharge the battery.
Connection to the car's lighter (optional)
VIII.-OTHER IMPORTANT MESSAGES THAT APPEAR IN THE SCALE / OTROS MENSAJES IMPORTANTES QUE APARECEN EN LA BÁSCULA
OVRLOAd
This message indicates that a weight that exceeds the maximum capacity has been placed on the scale. To correct this, simply remove the over weight.
HELP
This message appears in two different situations:
A) when the scale is turned on with an excessive weight on the plate. To correct this situation remove the weight that is on the scale, turn off the scale and then turn it on again.
B) when the scale was handled roughly and/or got hitted during the shipment, which caused irreversible damages in this operation. In this case call your authorized distributor.
NE6.
This message indicates a negative weight, this could happen if you lift or remove the scale's plate. To correct this put the plate back in its place and press the ⏻ key or turn the scale off and then turn it on again.
IX.-MAINTENANCE AND CLEANING / MANTENIMIENTO Y LIMPIEZA
- One of the greatest advantages of purchasing this scale model is that it requires minimum maintenance and it is very simple to keep it in favorable conditions.
- Do not use a flow of water to clean your scale. Use a damp rag and clean each of this components daily: plate, turret, and keyboard.
- To remove oil and greasy substances, use a dry and clean rag, rubbing the dirty area several times.
- Do not use detergents or corrosive liquids while cleaning.
• Do not place the scale where there is a lot of moisture and/or dust. - When you clean the scale make sure that there are not any papers, pieces of meat or any other kind of material under the plate or under the plate-holder that could obstruct the adequate operation of your scale.
- Periodically check the jack (where the ac/dc power supply is inserted) to make sure it is in good condition.
- Periodically check the ac/dc power supply to make sure the ends are in good condition and that the cable is not twisted or tangled.
- Regularly check the scale to assure it is correctly leveled, that the four leveling bases had being well supported.
- Do not expose your scale to temperatures below -10 °c (14 °f) or above 40 °c (104 °f).
• Never press the keyboard with objects such as pencils, pens, knives, etc. - Do not drop hard the product to be weighted on the plate of the scale because with the time it could damage the load cell.
Before you call for service to your authorized distributor because of a malfunction in your scale, we suggest you first check this manual again to avoid a misunderstanding of the operation and use of the functions. If everything is correct, then try to correct the problem according to the following list since a simple checkup or a small adjustment could eliminate it. If you do not find the problem, contact your authorized distributor.
| Problem Possible cause Solution | ||
| There is not electric current. | With a multimeter, check if there is electric current in the outlets. | |
| It does not operates | Ac/dc power supply cable has a false contact. | Check that the ac/dc power supply terminals, if it is possible, check with another ac/dc power supply. |
| Low | battery Connect the ac/dc power supply if the scale operates, then recharge the battery | |
| The scale shows different weights when the same product is weighed several times. | Material under the plate holder is obstructing the correct movement | Check that there are not materials under the plate holder. If there are, remove them and check the operation again |
| The word "help" appears in the indicator. | The scale was turned on with a big weight on the plate | Remove the weight and turn off the scale and then turn it on again |
| The word "unload" appears in the indicator. | The scale was turned on with weight on the plate or without the plate. | Turn off the scale, take off the weight of the plate or put the plate back on its place and turn on the scale. |
XI.- TECHNICAL SPECIFICATIONS / ESPECIFICACIONES TECNICAS
MODEL L-EQ 4 L-EQ 8 L-EQ 10
MAX. CAPACITY 4 kg 8 kg 10 kg
MIN. DIV. 0.001 kg 0.002 kg 0.005
MAX. TARE (SUGGESTED) -4 kg -8 kg -9.995 kg
OPERATION TEMPERATURE RANGE 14 TO 104 °F (-10 TO 40 °C)
STORAGE TEMPERATURE RANGE -4 TO 122 °F (-20 TO 50 °C)
AC/DC POWER SUPPLY :
OUTPUT 9 Vd.c. 300 mA.
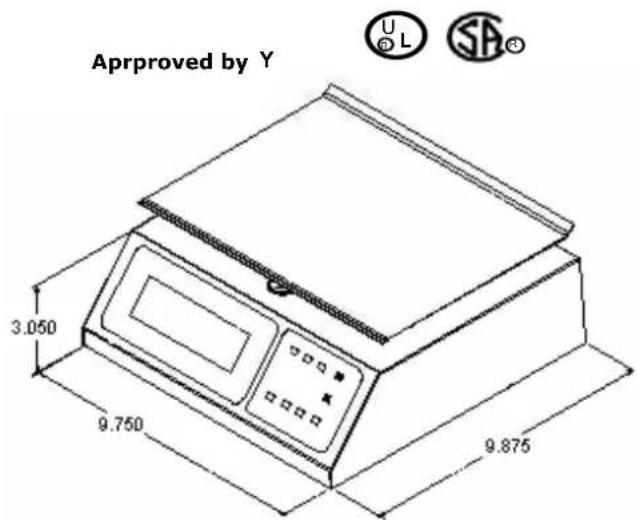
text_image
Approved by Y 3.050 9.750 9.875Note : This product's serial number can be found on the cabinet. We suggest that you write down that serial number and the corresponding model in the following blanks and keep them as permanent proof of your acquisition, to help in the identification in case of loss or further consultations.
DISTRIBUTOR:
ADDRESS:
TELEPHONE:
DATE OF PURCHASE:
MODEL:
SERIAL NUMBER:
IV Accessoire (fourni) 5
natural_image
Cartoon illustration of a computer with a scroll and a document, no text or symbols present
natural_image
Cartoon illustration of a soldering iron with scissors and pliers (no text or symbols)
natural_image
Cartoon illustration of a computer with a sad face and pointing at it, no text or symbols present
natural_image
Cartoon illustration of two anthropomorphic devices interacting with a screen, no text or symbols present
natural_image
Cartoon illustration of a money billowing a rain umbrella with raindrops falling (no text or symbols)
natural_image
Cartoon illustration of a computer with speech bubbles and floating objects (no text or symbols)
text_image
PUM4 FRANÇAIS
natural_image
Illustration of a bottle pouring liquid into a container with a mouse nearby (no text or symbols)
natural_image
Illustration of a hand reaching toward a device with spray, no text or symbols present
natural_image
Cartoon illustration of a distressed electric stove with smoke and a broom (no text or symbols)
text_image
ONLY AUTHORIZED PERSONNELIII.-INSTRUCTIONS D'INSTALLATION
natural_image
Illustration of two cartoon characters with limbs and wheels, no text or symbols present
text_image
THREE... TWO... ONE... ZERO... !! READY !!natural_image
Line drawing of a connected electrical device with a cable and terminal (no text or symbols)natural_image
Illustration of four electronic devices: a bowl, a switch, a connected device with a cable, and a floppy disk (no text or symbols)VI.-NOM ET EMPLACEMENT DES PIÈCES IMPORTANTES
VUE AVANT
text_image
Diagram of a printer with numbered parts for identification and assembly referenceCOMMENT PESER UN PRODUIT
text_image
NEG. NET NEG. TAREtext_image
DB9 N/C 1: RXD 2: :2 TXD TXD 3: :3 RXD DTR 4: :4 RTS GND 5: :5 CTS DSR 6: :6 DSR RTS 7: :7 GND CTS 8: :20 DTR N/C 9:text_image
DB9 N/C 1: :1 N/C RXD 2: -2 RXD TXD 3: -3 TXD DTR 4: -4 DTR GND 5: -5 GND DSR 6: -6 DSR RTS 7: -7 RTS CTS 8: -8 CTS N/C 9: -9 N/Cnatural_image
Cartoon illustration of a computer with a scroll and a document, no text or symbols present
natural_image
Cartoon illustration of a soldering iron with scissors and a tool, no text or symbols present
text_image
Cartoon illustration showing a hand pointing at a document with text and arrows, depicting a sad face on the table.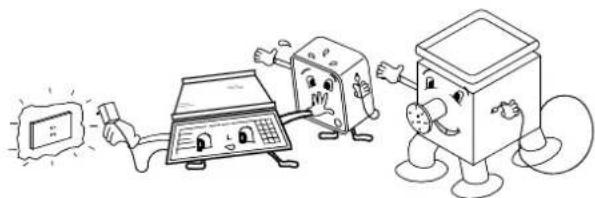
natural_image
Cartoon illustration of a computer and a book character interacting with a screen (no text or symbols present)
natural_image
Cartoon illustration of a megaphone spraying water with raindrops, emitting rain (no text or symbols)
natural_image
Cartoon illustration of a computer with speech bubbles and floating objects (no text or symbols)
text_image
PUMnatural_image
Illustration of a bottle pouring liquid into a container with a person lying on the ground (no text or symbols)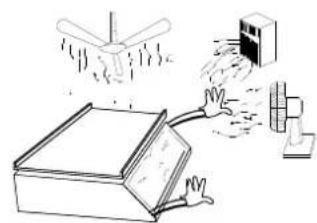
natural_image
Illustration of a hand spraying liquid into a container with a spray bottle nearby (no text or symbols)
natural_image
Cartoon illustration of a steamer with steam clouds and a broom (no text or symbols)
text_image
ONLY AUTHORIZED PERSONNELnatural_image
Two identical line drawings of a mechanical device with arms and legs, shown from different angles (no text or symbols)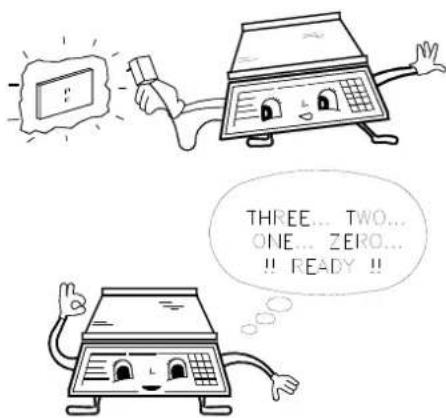
text_image
THREE... TWO... ONE... ZERO... !! READY !!natural_image
Line drawing of a connected electrical device with a cable and terminal (no text or symbols)natural_image
Illustration of four electronic devices: a bowl, a switch, a connected cable, and a floppy disk (no text or symbols)text_image
Diagram of a printer with numbered parts for identification and assembly referencePC "SERIELLE" KOMMUNIKATION
text_image
DB9 N/C 1: RXD 2: :2 TXD TXD 3: :3 RXD DTR 4: :4 RTS GND 5: :5 CTS DSR 6: :6 DSR RTS 7: :7 GND CTS 8: :20 DTR N/C 9:Konfiguration serieller Kabel