USER MANUAL INSTAX MINI 70 FUJIFILM
User's Guide/Trouble shooting/Safety precautions
Attaching the hand strap. 6
Attaching the shoulder strap (separately purchased) 6
Inserting Batteries 8
Loading the INSTAX mini Film Pack 9
Taking Pictures 11
For one shot self timer 13
For 2 continuous photo self timer 14
Taking Pictures with Various Shooting Mode 15
Selecting a Shooting Mode. 15
Shooting Mode. 15
Self Portrait (Selfie mode) 17
SPECIFICATIONS. 18
TROUBLE SHOOTING. 19
IMPORTANT SAFETY NOTICE 23
Parts Name
Front
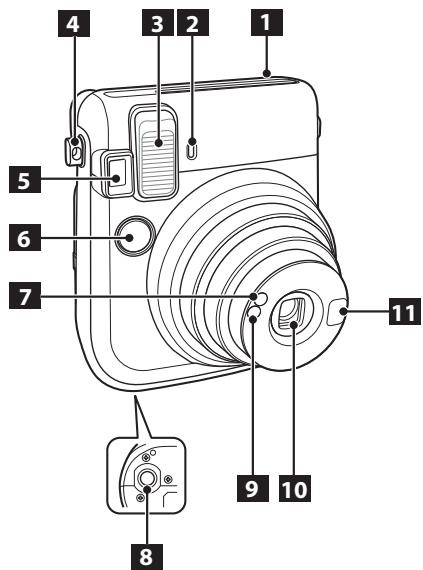
1 Film ejection slot
Self timer lamp
3 Flash lampface
4 Strap eyelet
5 Viewfinder
6 Shutter button
7 AE light sensor window
8 Tripod socket (Tripod sold separately)
9 Flash sensor window
10 Lens/Lens cover
Self-portrait mirror
Parts Name (Continued)
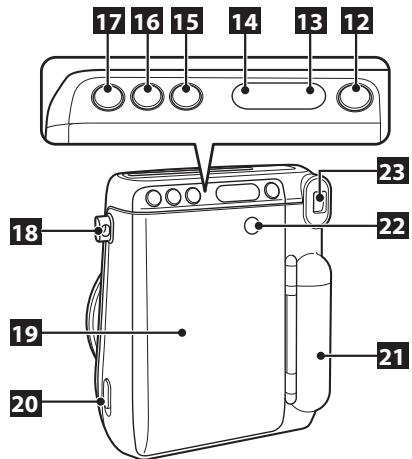
Rear
12 Power button
13 Film counter
14 LCD display
15 MODE (mode) button
16 Self timer button
Selfie button
18 Strap eyelet
19 Back cover
20 Back cover lock
21 Battery lid
22 Film pack confirmation window
23 Eyepiece
Attaching the Strap
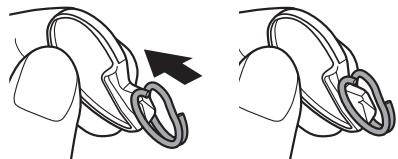
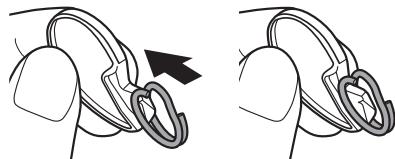
Attaching the hand strap
Attach the strap as illustrated below.
- When you carry or use the camera, put the strap around your wrist so that the camera does not drop.

Attaching the shoulder strap (separately purchased)
Attach the strap clips to the camera, then attach the shoulder strap.
1 Open a strap clip.
Use the clip attaching tool to open a strap clip as shown.
Keep the tool in a safe place. You will need it to open the strap clips when removing the shoulder strap.
Attaching the Strap (Continued)
Place the strap clip on each strap eyelet. Hook the strap eyelet in the clip opening. Remove the tool using the other hand to keep the clip in place.
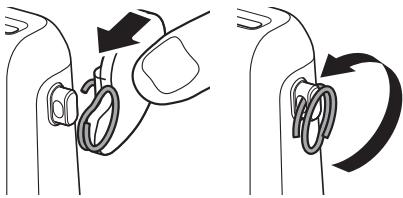
3 Pass the clip through each strap eyelet.
Rotate the clip fully through the eyelet until it clicks closed.
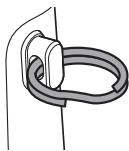
Pass the strap through each clip.
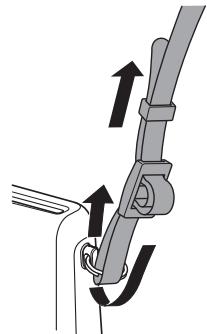
Caution
- Use the strap only as a shoulder strap. Do not put the strap around your neck.
- Be careful so that the strap does not obstruct the film ejection slot.
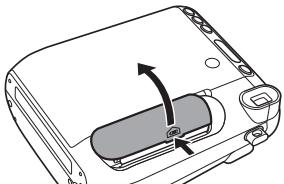
Inserting Batteries
Caution
- Use two new CR2 lithium batteries. (All the batteries should be new and be the same brand/type.)
- Insert the batteries before you load the INSTAX mini film pack.
- The battery performance may be reduced when it is cold. In this case, warm up the batteries to room temperature before using this camera.
1
Open the battery lid.
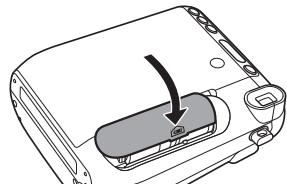
3
Close the battery lid.
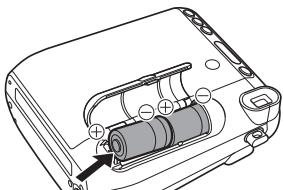
2
Insert the batteries.
- Insert two CR2 lithium batteries matching the and polarities.
Do not open the back cover until you have used up the film; otherwise, the rest of the film may be exposed and ruined for use.
- When you load the film pack, never press the two rectangular holes on the back of the film pack.
- Never use a film pack beyond its shelf life; otherwise, it may damage the camera.
Use FUJIFILM INSTAX mini film only. (No other type of film can be used.)
"-" is displayed on the counter when the film pack is not loaded.
Notes on the film pack
- The FUJIFILM INSTAX mini film pack contains 1 black film protective cover and 10 film sheets.
- Do not remove the film pack from its inner bag until immediately before loading it into the camera.
For details, refer to the instructions and warnings on FUJIFILM INSTAX mini film.

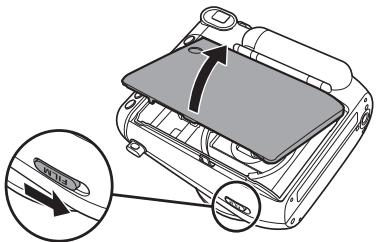
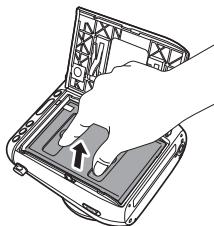
Press down the back cover lock to open the back cover.
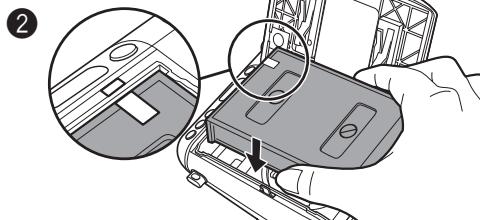
Hold both sides of the film pack, align the yellow marks on the camera and the film pack, then insert it straight.
Continued on the next page.
Loading the INSTAX mini Film Pack (Continued)
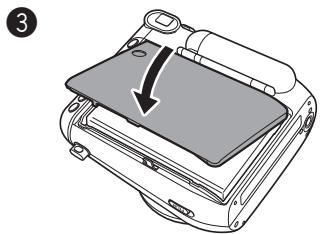
Close the back cover until the back cover lock clicks into place.
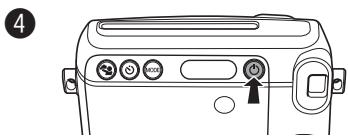
Press the POWER button to turn the camera on.
- Do not hold the lens cover when you are turning the camera on, otherwise; the lens cover does not open.
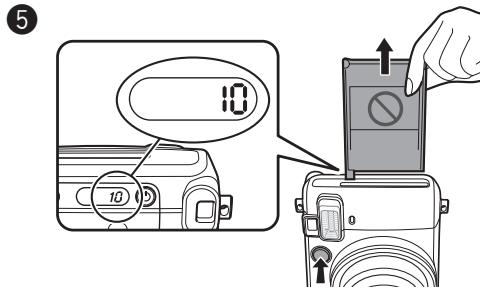
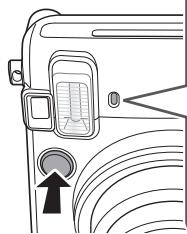
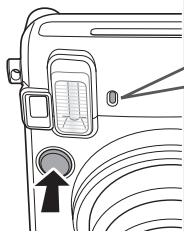
Press the shutter button.
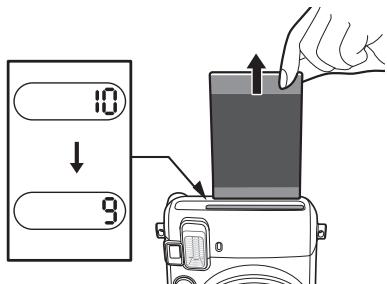
The film cover (black) is ejected and "10" is displayed on the film counter on the back of the camera. Carefully remove the film cover.
Taking Pictures

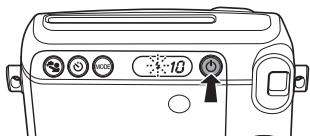
Press the POWER button to turn the camera on.
- Do not hold the lens cover when you are turning the camera on, otherwise; the lens cover does not open.

Vertical image
Horizontal image


Hold the camera and confirm the desired composition of the final image.

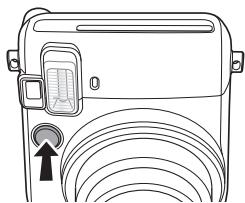
Press the shutter button.
- The shutter does not release while the flash is charging. (The icon on the LCD display is flashing.)
- For horizontal image, hold the camera with the flash lampface at the top.
- Be careful so that your fingers or the strap do not cover the flash lampface, flash sensor window, AE light sensor window, lens, or film ejection slot.
- Look into the viewfinder so that the "O"mark appears in the center.
- Be careful not to touch the lens surface when you press the shutter button.
Taking Pictures (Continued)
4
Every time you take a photo, the number on the film counter decreases from "10" to reflect the number of remaining photos, and "0" is displayed when you have used up the film pack.
When the film has been ejected (the camera stops making a sound), grasp the edge of the film, then take it out.
- For details on taking out the film, refer to the instructions and warnings on the FUJIFILM INSTAX mini film pack.
- The developing time is approximately 90 seconds. (The time varies depending on the ambient temperature.)
When finished using the camera, always switch off to maintain battery life. If the camera is left switched on for 5 minutes without being used, it will automatically switch off.
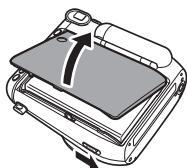
When "0" is displayed on the film counter, unload the film pack following the procedure below.
1
Press down the back cover lock to open the back cover.
2
Grasp the rectangular holes on the film pack, then pull it out straight.
For one shot self timer
- You can use the self timer in combination with each shooting mode.

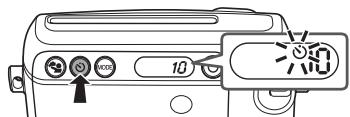
Press the self timer button once.
The self timer icon (left) appears on the LCD
display.


Lit about 7 seconds
Flashes about 3 seconds
If you press the shutter button, the self timer lamp is lit about 7 seconds. After that, the lamp flashes about 3 seconds and the shutter is released.
※ To cancel the self timer, press the self timer button while the self timer lamp is lit or flashing.
Using the Self Timer (Continued)
For 2 continuous photo self timer
- You can use the self timer in combination with each shooting mode.
- 2 continuous photo self timer is selectable only when 2 or more films remain.
- When the second film is ejected, it may push the first one out.
1
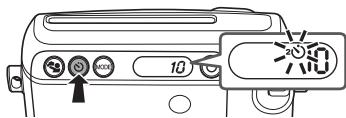
Press the self timer button once.
The 2 continuous photo self timer icon (left) appears on the LCD display.
2
1st frame

Lit about 7 seconds

Flashes about 3 seconds
2nd frame

Lit about 3 to 6 seconds

Flashes about 3 seconds
If you press the shutter button, the self timer lamp is lit about 7 seconds. After that, the lamp flashes about 3 seconds, the shutter is released, and the 1st frame is photographed.
When the 1st film is ejected, the self timer lamp is lit about 3 to 6 seconds. After that, the lamp flashes about 3 seconds, the shutter is released, and the 2nd frame is photographed.
※ To cancel the self timer, press the self timer button while the self timer lamp is lit or flashing.
Taking Pictures with Various Shooting Mode
You can select settings according to the subject or purpose.
Selecting a Shooting Mode
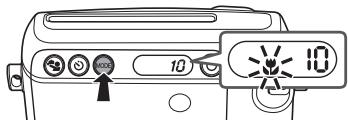
Press the MODE (mode) button.
The mode icon appears.
- Taking a photo does not change the settings.
- Turning off the power returns to the Auto mode.
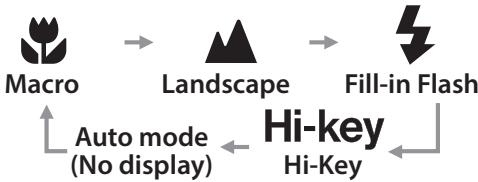
Each time you press the MODE button, the shooting mode changes as follows.
Shooting Mode
- In a dark place, the slow shutter is used except when using the Fill-in Flash mode. Hold the camera securely to prevent camera shake.
- The background may look bluish-green or reddish depending on the lighting condition.
Auto mode (No display)
Select for normal photography.
- As the flash fires with slow shutter (slow synchro) in a dark place, the background is photographed brightly.
- The flash does not fire in a bright place.
Taking Pictures with Various Shooting Mode (Continued)
Shooting Mode (Continued)

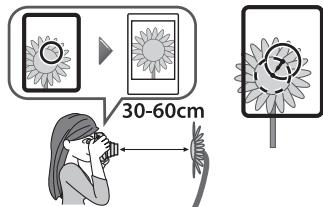
Macro
Select when shooting a subject at close range (30-60 cm).
- Hold the camera so that the "O" mark in the viewfinder is on the upper right of the center of the subject (see the illustration below), then take a photo.

Landscape
Select when shooting a distant subject (3m )

Fill-in Flash
You can force flash to be used. Select when you want to use a flash regardless of the brightness. The subject is photographed sharply with backlighting.
- Camera shake can be prevented without selecting the slow shutter mode even in dark places. (Shutter speed 1/30 seconds) However, background depiction may be dark.
Hi-key Hi-Key
The whole picture looks brighter.
Select to lighten the next picture if the picture is coming out too dark.
- Surrounding brightness or temperature affects the brightness of the whole picture.
- If the picture is coming out too bright, take a picture with the Auto mode.
Self Portrait (Selfie mode)
You can take a self portrait using the self portrait mirror. Using this mode applies an appropriate brightness and shooting distance for self portrait.

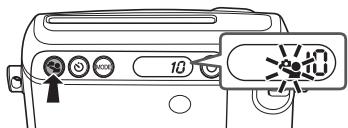
Press the Selfie button.
The Selfie mode icon above appears.
- Pressing the MODE button or Selfie button returns to the Auto mode.

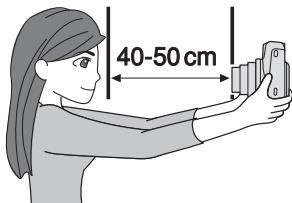
Hold the camera securely keeping 40~cm to 50~cm between you and the edge of the lens.
- Hold the camera securely especially in a dark place, as the camera is subject to blurring.

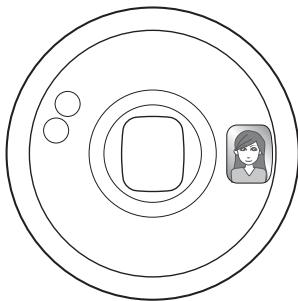
Confirm the composition using the self-portrait mirror, then take a photo.
- When you take a photo, do not look at the flash; otherwise, an afterglow may interfere with your view temporarily.
- If you press the shutter button while the flash is charging, the shutter release does not trip.
- Taking a photo does not change the settings.
- Turning off the power returns to the Auto mode.
SPECIFICATIONS
| Film | FUJIFILM INSTAX mini film |
| Picture Size | 62 mm x 46 mm |
| Lens | Retractable lens, 2 components, 2 elements, f = 60 mm, 1:12.7 |
| Viewfinder | Real image finder, 0.37 x, with target spot |
| Focusing | Motor-driven 3-range switching (0.3 m - 0.6 m/0.6 m - 3 m/3 m and beyond), Macro Mode (0.3 m - 0.6 m) Normal Mode (0.6 m - 3 m) Landscape Mode (3 m and beyond) |
| Shutter Release | Programmed electronic shutter release, 1/2 sec - 1/400 sec. |
| Exposure Control | Automatic, Interlocking range (ISO 800) : LV 5 - LV 15.5, Exposure compensation (Hi-Key): +2/3 EV |
| Film Feeding Out | Automatic |
| Film Developing Time | Approximately 90 seconds (Varies depending on the ambient temperature) |
| Flash | Built-in, automatic electronic flash, Charging time: 0.2 sec - 7 sec (using a new battery), Flash charging indicator, Fill-in Flash Mode, Effective flash lamp range: 0.3 m - 2.7 m |
| Self-Timer | Electronically controlled, approx. 10 second delay, Continuous shooting mode, can be stopped mid-run |
| Liquid Crystal Display(LCD) | Exposure counter (number of unexposed films), Shooting mode (Selfie, Macro, Land-scape, Fill-in Flash, Hi-Key), Self-timer Mode (1 frame/2 frames continuous shooting) |
| Power Supply | Two CR2/DL CR2 lithium batteries |
| Capacity: Approximately 40 INSTAX mini 10-pack film packs with new CR2/DL CR2 lithium batteries |
| Others | Film pack confirmation window, tripod socket (tripod sold separately) |
| Dimensions & Weight | 99.2 mm (W) x 113.7 mm (H) x 53.2 mm (D) (not including protrusions)/ 281 g (without battery, strap, and film pack) |
- Specifications are subject to change without notice.
TROUBLE SHOOTING
★When to replace the batteries
① When the lens does not work when the power is switched on.
② When it takes a while for the flash to be charged.
③ When pressing the shutter button turns off the camera.
- Replace both CR2 batteries with new lithium batteries of the same brand/type.
TROUBLESHOOTING
During operation
| Problems | Possible Causes | Solutions |
| The shutter release won't trip. | ① The battery power is low.
② The batteries are not inserted correctly.
③ The icon on the LCD display is flashing, or the self timer lamp is flashing rapidly.
④ The exposure counter is showing "E" sign.
⑤ The power is not turned on. | ① Replace both batteries with new batteries.
② Insert the batteries correctly.
③ The flash is charging. Please wait until the icon turns off.
④ Unload the film pack, and load a new film pack.
⑤ Press the POWER button to turn on the power. |
| "E" is flashing on the film counter or all icons on the LCD display are flashing. | ● The camera has some trouble. | ① Remove the batteries and reinsert them with the items on the LCD display flashing.
② If ① does not resolve the problem, contact a FUJIFILM authorized distributor. |
| The film pack won't load into your camera, or won't load into your camera smoothly. | ① The film pack is not for your camera.
② You are not loading the film pack correctly. | ① Use FUJIFILM INSTAX mini film only. (No other films can be used.)
② Match the yellow line on the film pack with the yellow positioning mark in your camera. Follow the INSTAX mini film pack instructions. |
| The film cover cannot be ejected. | ● The battery power is low. | ● Replace both batteries with new batteries and load the film pack again. |
| The LCD looks black. | ● The camera is too hot for operation. | ● Put the camera in a cool place. The LCD should return to normal once it cools down. |
| The battery becomes exhausted quickly. | ● The batteries are not the same type. | ● Replace both batteries with new CR2 lithium batteries of the same brand/type. |
Printed pictures
| Problems | Possible Causes | Solutions |
| Part or whole finished print is white. | ● The back cover is opened before you have used up the film. | ● Do not open the back cover until you have used up the film; otherwise, the rest of the film is exposed and ruined for use. |
| The finished print looks over exposed. (White in color) | ① The ambient temperature is low (below +5°C/+41°F).
② The AE light sensor window or flash sensor window is blocked. | ① Before taking pictures, place your camera in a warm place to bring it to room temperature.
② Be careful not to block the AE light sensor or flash sensor window, or so that nothing blocks it. |
| The finished print looks under exposed. (Dark) | ① The ambient temperature is high (above +40°C/+104°F).
② The picture was taken facing the light.
③ The flash lampface, AE light sensor window or flash sensor window was covered.
④ The background is too bright in comparison with the subject.
⑤ The flash light did not reach the subject.
⑥ The flash light reflected back from a mirror or window glass. | ① Keep camera, film (exposed prints) away from excessive heat (+40°C/+104°F).
② Take pictures with the light behind you, or take pictures using Fill-in Flash Mode.
③ Be careful not to cover the flash lampface, AE light sensor window, or flash sensor window.
④ Take pictures using Hi-Key Mode.
⑤ Take pictures closer than 2.7 m from the subject.
⑥ Take pictures at an angle not facing the mirror or window glass. |
| The picture is out of focus. | ① The shooting distance is not appropriate.
② The lens is not clean.
③ Your camera was shaken when taking the picture. | ① Select the shooting mode according to the distance.
② Please contact a FUJIFILM authorized distributor.
③ Hold your camera firmly and press in the shutter release button gently. Since the slow shutter is selected when shooting indoors or dark outdoors, fixing the camera using a table, tripod, etc. is recommended. When the camera is not fixed, shoot in the Fill-in Flash Mode. |
EN
| Problems | Possible Causes | Solutions |
| The picture is blurred. | ① Picture was not permitted to develop without touching, pressure being applied or other interference once it ejected from the camera.
② The picture did not come out smoothly. | ① Do not press onto or fold the picture.
② Do not block the film exit with your finger. |
| The subject in the viewfinder has shifted in finished print. | ● The shooting distance is close to the subject. | ● When you take pictures using Macro Mode, see page 16 for notes on using the mode. |
Manufacturer: FUJIFILM Corporation
Address, City: 7-3, Akasaka 9-Chome, Minato-ku, Tokyo
Country: JAPAN
Authorized representative in Europe:
FUJIFILM EUROPE GMBH
Address, City: Dusseldorf Heesenstrasse 31, 40549
Country: Germany
FUJIFILM North America Corp.
200 Summit Lake Drive
Valhalla, New York 10595, USA
FUJIFILM Canada Inc.
600 Suffolk Court, Mississauga, Ontario L5R 4G4
IMPORTANT SAFETY NOTICE
This product has been designed with safety in mind, and to provide safe service when handled correctly and in accordance with the User's Guide and instructions. It is important that both the product and the INSTAX film are handled properly and used only to take pictures as instructed in this User's Guide and in the INSTAX mini film instructions. For your ease and safety, please follow what is written in this User's Guide. It is also a good idea to keep this User's Guide in a safe, easy to find place where you can refer to it if needed.
WARNING
This symbol indicates danger, which could result in injury or death. Please follow these instructions.
WARNING
Never attempt to take this product apart. There is a danger of an electric shock.
If this product is dropped or damaged so that the inside is showing, do not touch it. There is danger of an electric shock.
If the camera or the batteries inside become hot, begin to smoke, make a burning smell or show any sign of unusual condition, remove the batteries right away. Use gloves to keep from burning your hands. Not removing batteries could result in burns or fire.
Using a flash too close to a person's eyes may for the short term affect the eyesight. Take care when taking picture of infants and young children.
If your camera gets wet or if something such as pieces of metal get inside, remove the batteries right away to avoid heat buildup or a fire starting inside the camera.
Do not use this camera in places where there is flammable gas or near open gasoline, benzene, paint thinner or other unstable substances which can give off dangerous vapors. Doing so could result in explosion or fire.
Store your camera out of the reach of infants and young children. Failure to do this could result in serious injury. (For example, the strap could become wrapped around a child's neck and cause choking.)
Never take apart the batteries. Do not subject them to heat, throw them into an open fire, or attempt to short-circuit them. Doing so could result in the batteries exploding or splitting open causing burns or fire.
WARNING
Only use specified batteries in this product. Use of incorrect type of batteries could cause explosion. Dispase of used batteries according to battery disposal instructions.
Make sure batteries are stored in a safe, secure place and well out of the reach of any infants, young children or pets. Improper storage could result in a child swallowing a battery. (If a child swallows a battery, call a doctor or a hospital right away.)
Never get this product wet or handle it with wet hands. Doing so may result in an electric shock.
Never take flash photographs of people riding bicycles, driving cars or riding a horse. The flash can distract the driver and frighten the animal, possibly causing an accident.
Make sure that the battery and polarities are installed correctly in the camera. A damaged battery or electrolyte leakage may cause a fire, injury, and contaminate the environment.
Do not touch moving parts inside the camera. You may be injured.

The "CE" mark certifies that this product satisfies the requirements of the EU (European Union) regarding safety, public health, environment and consumer protection.("CE" is the abbreviation of Conformité Européenne.) This product is in conformity with Directive 89/336/EEC.
EEE Complies with Directive.
For customers in the USA:
FCC Statement
This device complies with part 15 of the FCC Rules. Operation is subject to the following two conditions: (1) This device may not cause harmful interference, and (2) this device must accept any interference received, including interference that may cause undesired operation.
CAUTION
This equipment has been tested and found to comply with the limits for a Class B digital device, pursuant to Part 15 of the FCC Rules. These limits are designed to provide reasonable protection against harmful interference in a residential installment.
tion. This equipment generates, uses, and can radiate radio frequency energy and, if not installed and used in accordance with the instructions, may cause harmful interference to radio communications. However, there is no guarantee that interference will not occur in a particular installation. If this equipment does cause harmful interference to radio or television, which can be determined by turning the equipment off and on, the user is encouraged to try to correct the interference by one or more of the following measures:
Reorient or relocate the receiving antenna
- Increase the separation between the equipment and receiver
- Connect the equipment into an outlet on a circuit different from that to which the receiver id connected
- Consult the dealer or an experienced radio/TV technician for help
Changes or modifications not expressly approved by FUJIFILM responsible for compliance could void the user's authority to operate the equipment.
For customers in Canada :
CAUTION: This Class B digital apparatus complies with Canadian ICES-003.

Disposal of Electric and Electronic Equipment in Private Households
Disposal of used Electrical & Electronic Equipment
(Applicable in the European Union and other European countries with separate collection systems)
This symbol on the product, or in the manual and in the warranty, and/or on its packaging indicates that this product shall not be treated as household waste.
Instead it should be taken to an applicable collection point for the recycling of electrical and electronic equipment.
By ensuring this product is disposed of correctly, you will help prevent potential negative consequences to the environment and human health, which could otherwise be caused by inappropriate waste handling of this product.
If your equipment contains easy removable batteries or accumulators, please dispose these separately according to your local requirements.
The recycling of materials will help to conserve natural resources. For more detailed information about recycling of this product, please contact your local city office, your household waste disposal service or the shop where you have purchased
the product.
In Countries outside of EU: If you wish to discard this product, please contact your local authorities and ask for the correct way of disposal.
COMMON SENSE CAMERA CARE
CAMERA CARE
① Your camera is a precision instrument. Do not get it wet or drop it. Also, do not expose to sand.
② Do not use a strap made for cellular phones or other similar electronic products. These straps are usually too weak to hold your camera securely. For safety, use only straps designed for your camera, and use only as specifically intended and instructed.
③ When using a tripod, check the strength of the tripod and then mount the camera by turning the tripod instead of the camera body. When mounting the camera to a tripod, be sure not to turn the tripod screw excessively, apply unreasonable force, etc. Also, do not carry the camera while it is mounted to the tripod. Personal injury or camera damage may result.
If you are not using your camera for a long interval, unload the batteries and keep it where it will be safe from heat, dust, and moisture.
⑤ Remove soil and dust from the lens, viewfinder window, etc. with an air blower and by wiping lightly with a piece of soft cloth.
⑥ Do not use solvent such as thinner and alcohol to remove soil.
⑦ Keep the film chamber and camera interior clean to avoid damaging films.
In hot weather, do not leave your camera in a closed car or on the beach, and do not leave it in moist places.
⑨ Moth repellent gas such as naphthalene adversely affects your camera and films. Avoid keeping your camera or films in a chest with mothballs.
_0 Your camera is computer-controlled. If you should experience an operational issue, remove the batteries and then reload them.
① Note that the temperature range within which your camera can be used is +5^ / +41^ to +40^ / +104^ .
See FUJIFILM INSTAX mini film for film use instructions. Follow all instructions for safe and proper use.
① Keep the film in a cool and dry place. Do not leave the film in a place where the temperature is extremely high (e.g., in a closed car).
② When you load a film pack, use the film as soon as possible.
③ If the film has been kept in a place where the temperature is extremely high or low, bring it to room temperature before starting to take pictures.
④ Be sure to use the film before the expiration or "Use Before" date.
⑤ Avoid airport checked luggage inspection and other strong X-ray illumination. The effect of fogging, etc. may appear on unused film. We recommend that you carry the camera and/or the film onto the aircraft as carry-on luggage. (Check with each airport for more information.)
⑥ Avoiding strong light, keep the developed prints in a cool and dry place.
⑦ Do not puncture, tear, or cut INSTAX mini film. If film becomes damaged, do not use.
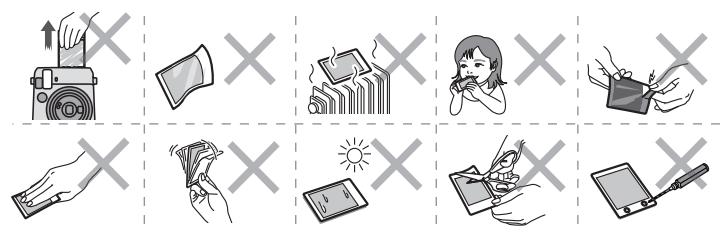
Cautions on handling the film and prints
For details, refer to the instructions and warnings on FUJIFILM INSTAX mini film.
MEMO
DEUTSCH
Inhalt
1 ShtreKgLcIeUySsiO.
龙泉部奉请将之录用于其祠庙。
Antranh JI. 1000.
Streltgogdach (1)
2 那드라구명에드라울리부chtsahlSoml.
FrogoLgRmS KneTKeT RerIeRz, 1/2\~1/400
上
Notch boy-gen (Hi-Key): +2/3 EV
日
徒
日
[en] If you have any inquiries about this product, please contact a FUJIFILM authorized distributor, or access the website below.