
LWP277V - Washing machine LG - Free user manual and instructions
Find the device manual for free LWP277V LG in PDF.
User questions about LWP277V LG
0 question about this device. Answer the ones you know or ask your own.
Ask a new question about this device
Download the instructions for your Washing machine in PDF format for free! Find your manual LWP277V - LG and take your electronic device back in hand. On this page are published all the documents necessary for the use of your device. LWP277V by LG.
USER MANUAL LWP277V LG
Installation Instructions Pedestal
For washer, dryer, and combo
LG 27" 2p
IMPORTANT: Read and follow these instructions.
NOTICE
The installer must have electrical and mechanical training and acceptable knowledge in the required work.
Safety is foremost---both your own and that of other people. Many important safety instructions are provided in this instruction and your appliance. Always read and observe all safety instructions.

WARNING
Excessive Weight Hazard
Two or more people may be needed to install and move the appliance and pedestal assembly. Do not allow children to play on the drawer. Do not step on the handle.
NOTE
A firm, solid floor is even more critical to a front-loading washer than to a top-loader. If your floor is wooden and /or frame construction, you may need to reinforce it. Front-loaders have substantially faster spin speed than top-loaders, causing greater vibration. If the floor is not solid, your washer will vibrate.
NOTE
If a drip pan must be used, take extra care to follow the
instructions provided with the drip pan and make sure the leveling feet
are adjusted for firm and even contact with the pan. Use of drip pans and failure to properly level the machine may result in increased vibration and noise during operation.
Included Accessories
4 Holder

eighteen 4x20mm
Truss taptite Drawer Divied
Tools Needed
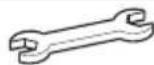
11/16" or 17mm Open End Wrench
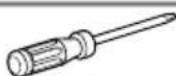
Phillips
screwdriver
WASHER/COMBO INSTALLATION
1 Remove pedestal, installation hardware, and instructions from the shipping carton.
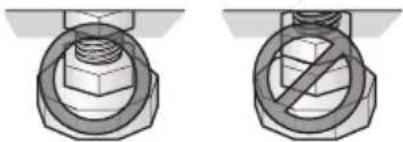
2 Before installing the pedestal, remove foreign objects on the floor clean the floor. Dust, water, oil, detergent and so on could cause vibration due to bad contact of legs with floor.

natural_image
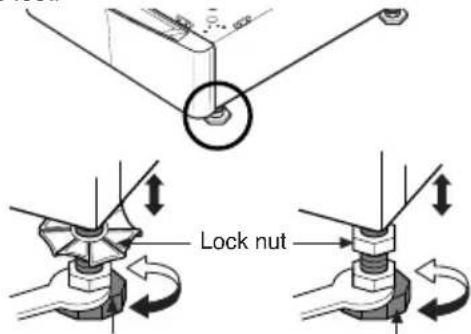
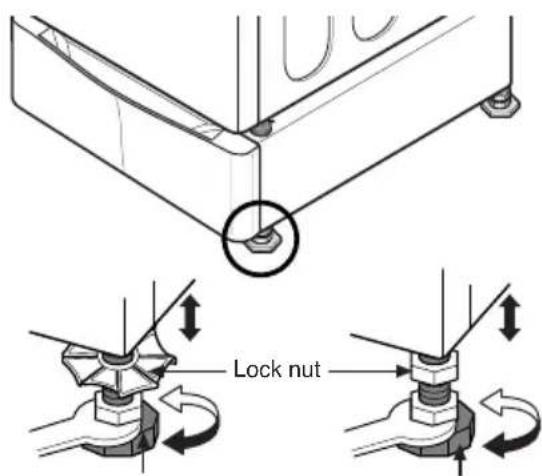
Two diagrams showing a valve with a prohibition symbol, one with no text or labels, the other with a crossed-out circle (no text or symbols present)3 Level the pedestal on the clean place by adjusting the feet.
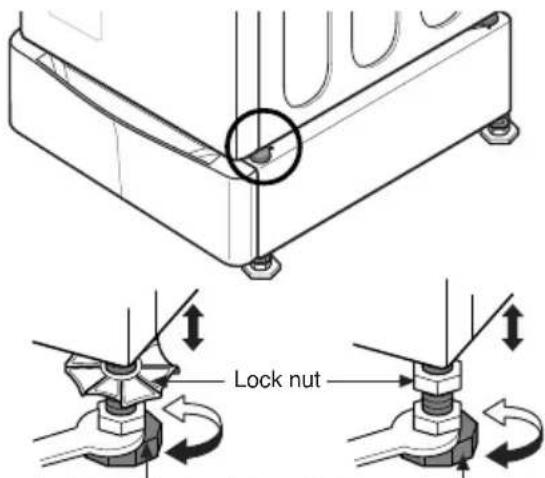
text_image
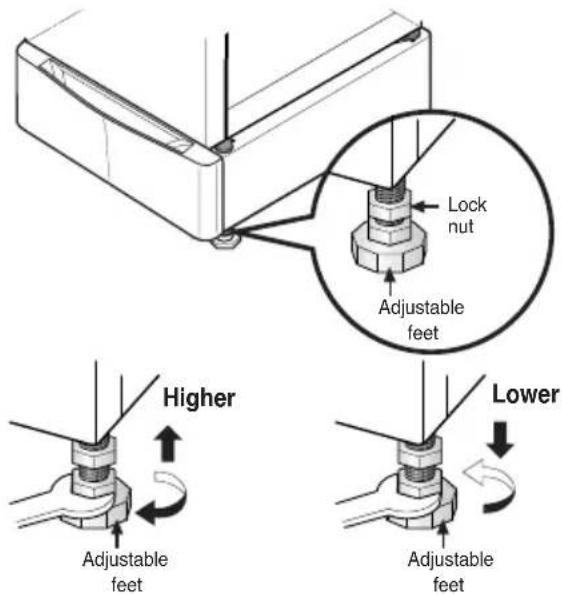
Lock nutAdjustable feet Adjustable feet
NOTE
Do not extend the legs no more than necessary to level the washer. The more the legs are extended, the more the washer will vibrate.
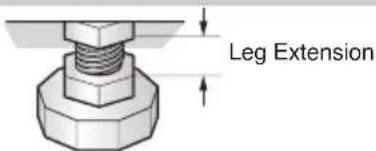
text_image
Leg Extension▶ After the washer is leveled, tighten the lock nuts up toward the base of the washer using the wrench. All four lock nuts should be tightened.
natural_image
Two technical illustrations of a bolt and nut assembly, showing no text or symbols (no readable labels or symbols)4 Position the washer/combo on top of the pedestal.
NOTE
Because of the weight of the washer/combo, two or more people may be needed.
NOTE
If the washer or combo was previously installed, unplug it, disconnect the inlet hose (s) from the faucet (s), disconnect the drain hose, and drain all hoses.
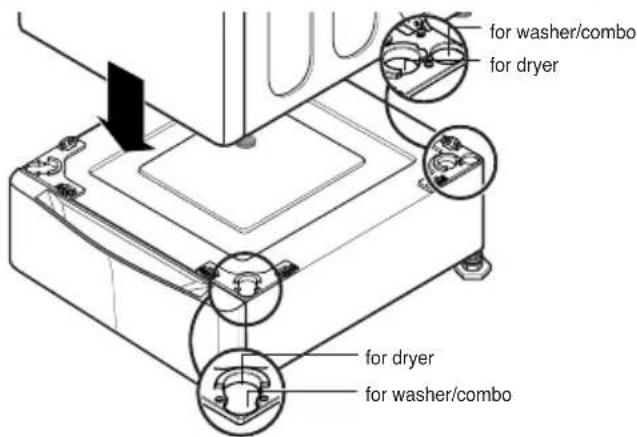
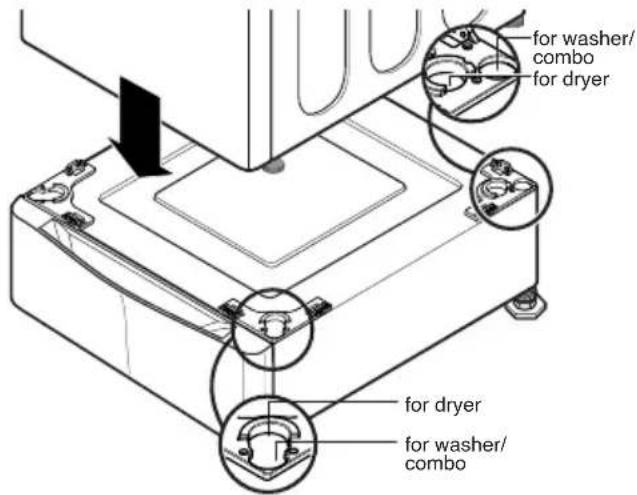
text_image
for washer/combo for dryer for dryer for washer/combo5 Level the washer/combo on the pedestal by adjusting the feet.
text_image
Lock nutAdjustable feet Adjustable feet

natural_image
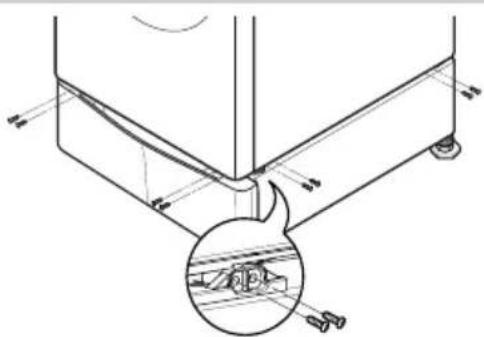
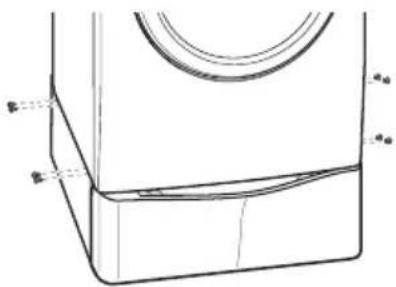
Four technical diagrams showing mechanical assembly with no visible text or symbols6 Make sure the holes on the pedestal align with the holes in the appliance, then install 4 screws at each corner to securely attach the appliance to the pedestal.
NOTE
If the screws are not installed properly, noise and vibration may result.
For WASHER: 16 SCREWS
For DRYER: 8 SCREWS
natural_image
Technical line drawing of a mechanical assembly with a magnified inset showing a detail (no text or symbols)7 Move the washer/combo to the desired place.
NOTE
The appliance and pedestal assembly must be placed on a solid and level floor for proper operation. Adjust the legs of the appliance and pedestal by turning with a wrench. Then, adjust the lock nut toward the pedestal while holding the pedestal leg using a wrench.
text_image
Lock nutAdjustable feet Adjustable feet
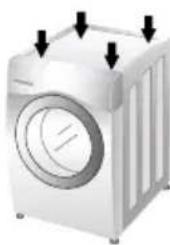
natural_image
Illustration of a silver washing machine with black arrows pointing to top and side panels (no text or symbols)NOTE
Diagonal Check
When pushing down the edges of the washing machine top plate diagonally, the machine should not move up and down at all. (Please check both directions.) If the machine rocks when pushing the machine top plate diagonally, adjust the feet again.
NOTE
To make sure that the washer is properly level, run the washer with a test load: place approximately 6 Pound/2.7Kg of laundry in the machine. Then press POWER, press RINSE+SPIN, and then press the START/PAUSE button. See the following sections for additional information on cycle selection and operation. Verify that the washer does not rock or vibrate excessively during the spin cycle. If the washer vibrates or shakes, adjust the leveling feet until the washer is stable and retest.
DRYER INSTALLATION
1 Remove pedestal, installation hardware, and instructions from the shipping carton.
2 Insert the T-clip of the 4 retainers into the dryer base as shown. Press up on the back of the clip and pull outward to lock into place.
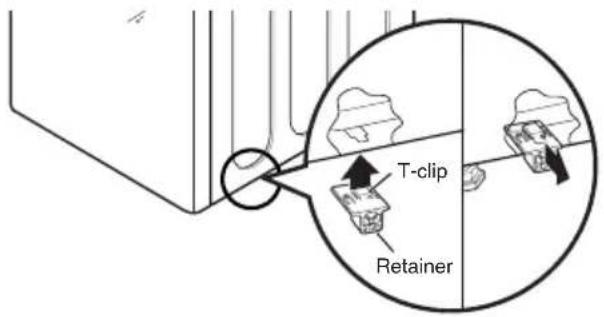
text_image
T-clip Retainer3 Position dryer on top of the pedestal.
NOTE
Because of the weight of the dryer, two or more people may be needed.
NOTE
If dryer was previously installed, uninstall it as follows:
A. Uninstalling an electric dryer:
1) Unplug the power supply cord,
2) Pull the dryer away from the wall enough to loosen the vent clamp. Loosen the clamp and carefully remove the exhaust vent from the dryer exhaust outlet.
B. Uninstalling a gas dryer:
1) Unplug power supply cord.
2) Turn off the gas supply.
3) Pull the dryer away from the wall enough to loosen the vent clamp. Loosen the clamp and carefully remove the exhaust vent from the dryer exhaust outlet.
text_image
for washer/ combo for dryer for dryer for washer/ combo4 Make sure the holes on the pedestal align with the holes in the appliance, then install 2 screws at each corner to securely attach the appliance to the pedestal.
NOTE
If the screws are not installed properly, noise and vibration may result.
natural_image
Technical line drawing of a mechanical component with no visible text or symbols5 Move the dryer to the desired place.
NOTE
The appliance and pedestal assembly must be placed on a solid and level floor for proper operation. Adjust the legs of the appliance and pedestal by turning with a wrench. Then, adjust the lock unt toward the pedestal while holding the pedestal leg using a wrench.
text_image
Lock nut Adjustable feet Higher Lower Adjustable feet Adjustable feetnatural_image
Two diagrams showing a valve mechanism with no symbols, one without and one with a cross symbol (no text or labels)natural_image
Four technical diagrams showing mechanical assembly with no visible text or symbolsnatural_image
Technical line drawing of a mechanical assembly with a magnified inset showing a detail (no text or symbols)natural_image
Illustration of a white washing machine with black arrows pointing to top and side panels (no text or symbols)REMARQUE
Verification diagonale
natural_image
Technical line drawing of a mechanical component with no visible text or symbolstext_image
Safety warning symbols for a valve and pump, indicating no protection or no leakagenatural_image
Two technical illustrations of a bolt with a circular nut and a cross-shaped no-smoking symbol (no text or labels)4 Coloque la lavadora/combo encima del pedestal.
NOTA
natural_image
Four technical diagrams showing a bolt and nut assembly with no text or symbols, including prohibition signs (no readable text or labels)natural_image
Technical line drawing of a mechanical assembly with a magnified inset showing a detail of a component (no text or symbols present)natural_image
White washing machine with black arrows pointing to top and side panels (no text or symbols)NOTA
Verificacion Diagonal
2 Insert the T-clip of the 4 retainers into the dryer base as shown. Press up on the back of the clip and pull outward to lock into place.

natural_image
Technical line drawing of a mechanical component with no visible text or symbolstext_image
Diagram showing two methods of removing a valve, with no text labels and symbols indicating removal or rejection.3
Richten Sie sockel.
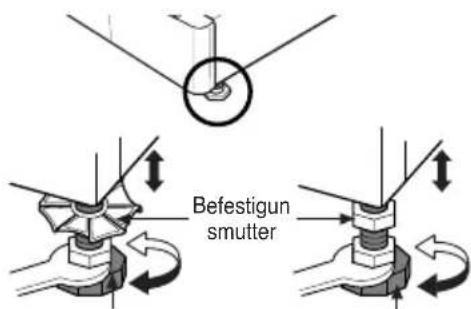
text_image
Befestigun smutternatural_image
Four technical diagrams showing mechanical assembly with no visible text or symbolsnatural_image
Technical line drawing of a mechanical assembly with a magnified inset showing a detail of a component (no text or symbols present)natural_image
Illustration of a washing machine with arrows pointing to top and side panels (no text or symbols)HINWEIS
Diagonalprüfung
natural_image
Technical line drawing of a mechanical component with no visible text or symbolstext_image
Diagram showing two methods of removing a valve, with one method marked by a crossed-out circle and the other by a crossed-out rectangle.natural_image
Two technical illustrations of a bolt and nut assembly, one with a no-smoking symbol (no text or labels)natural_image
Four technical diagrams showing a bolt and nut assembly with no text or symbols, including prohibition signs (no readable text or labels)natural_image
Technical line drawing of a mechanical component with a magnified inset showing internal components (no text or symbols)natural_image
Illustration of a white washing machine with black arrows pointing to top and side panels (no text or symbols)OBS
Diagonalkontroll
natural_image
Technical line drawing of a mechanical component with no visible text or symbols5 Placera torktumlaren på önskad plats.
OBS
1 Remove pedestal, installation hardware, and instructions from the shipping carton.
natural_image
Two diagrams showing a valve with a prohibition symbol, one above and one below, against a textured background (no text or symbols)3
Juster bena sokkel.
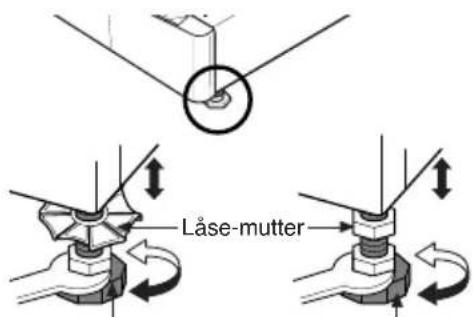
text_image
Låse-mutterJusterbare ben Justerbare ben
MERK
natural_image
Two technical illustrations of a bolt with a circular hole and a diagonal line indicating no force or resistance (no text or symbols present)4
Plasser vaskemaskinen/kombimaskinen på sokkelen.
MERK
Grunnet vaskemaskinens/kombimaskinens vekt, kan det være at det behøves to personer.
MERK
natural_image
Four technical diagrams showing mechanical assembly with no visible text or symbolsnatural_image
Technical line drawing of a mechanical component with a magnified inset showing a detail (no text or symbols)natural_image
Illustration of a white washing machine with black arrows pointing to the top frame (no text or symbols)MERK
Diagonal kontroll
3 Position dryer on top of the pedestal.
MERK
natural_image
Technical line drawing of a mechanical component with no visible text or symbols5 Flytt tørketrommelen dit den skal stå.
MERK
1 Remove pedestal, installation hardware, and instructions from the shipping carton.
text_image
Safety warning illustration showing no prohibition symbols on a pipe fitting, with text indicating incorrect safety measures.natural_image
Four technical diagrams showing a bolt and nut assembly with no visible text or symbolsnatural_image
Technical line drawing of a mechanical assembly with a magnified inset showing a detail of a component (no text or symbols present)natural_image
Illustration of a white washing machine with black arrows pointing to top and side panels (no text or symbols)HUOMIO
natural_image
Technical line drawing of a mechanical component with no visible text or symbolsIMPORTANT: Read and follow these instructions.
NOTICE
The installer must have electrical and mechanical training and acceptable knowledge in the required work.
Safety is foremost---both your own and that of other people. Many important safety instructions are provided in this instruction and your appliance. Always read and observe all safety instructions.

WARNING
Excessive Weight Hazard
Two or more people may be needed to install and move the appliance and pedestal assembly. Do not allow children to play on the drawer. Do not step on the handle.
BEMÆRK
1 Remove pedestal, installation hardware, and instructions from the shipping carton.
text_image
Safety warning illustration showing a crossed-out valve symbol with no text, surrounded by debris and symbols.natural_image
Four technical diagrams showing a bolt and nut assembly with no visible text or symbolsnatural_image
Technical line drawing of a mechanical assembly with a magnified inset showing a component detail (no text or symbols)natural_image
Illustration of a white washing machine with black arrows pointing to its top panel (no text or symbols)BEMÆRK
Diagonal kontrol
text_image
T-clips Holdernatural_image
Technical line drawing of a mechanical component with no visible text or symbols5 Anbring den tørretumbler det ønskede sted.
BEMAERK
natural_image
Two diagrams showing a pipe knot with a prohibition symbol, no text or labels present3 用扳手調整機器和基座的腳架。
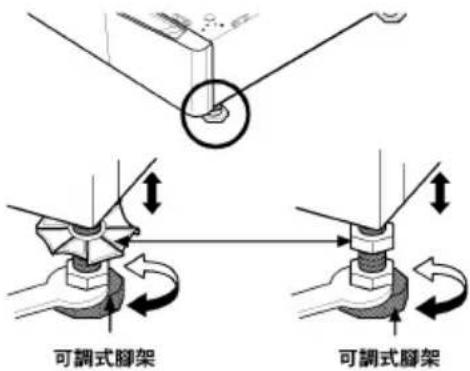
natural_image
Two technical illustrations of a bolt and nut assembly, showing no text or symbols (no readable labels or symbols)4 將洗衣機/複合機置於基座上。
注意
text_image
Technical diagram showing a mechanical assembly with labeled dimensions and an inset close-up of a component detail.7 將洗衣機/複合機搬至理想位置。
注意
natural_image
Illustration of a washing machine with arrows pointing to the top panel (no text or symbols)注意
对角检查
text_image
Diagram showing two methods of removing a valve, with no text labels and symbols indicating removal or prohibition.natural_image
Four technical diagrams showing mechanical assembly with no visible text or symbolsnatural_image
Technical line drawing of a mechanical assembly with a magnified inset showing a component detail (no text or symbols)natural_image
Illustration of a white washing machine with black arrows pointing to top and side panels (no text or symbols)NOTA
1 Remove pedestal, installation hardware, and instructions from the shipping carton.
natural_image
Technical line drawing of a mechanical component with no visible text or symbolstext_image
Safety warning illustration showing a crossed-out valve symbol with no text, accompanied by a magnified view of the device.natural_image
Two technical diagrams showing a bolt and nut assembly with no text or symbolsnatural_image
Four technical diagrams showing mechanical assembly with no visible text or symbolsnatural_image
Technical line drawing of a mechanical assembly with a magnified inset showing a detail (no text or symbols)natural_image
Illustration of a white washing machine with black arrows pointing to its top panel (no text or symbols)LET OP
Overdwar controleren
natural_image
Technical line drawing of a mechanical component with no visible text or symbolsnatural_image
Two diagrams showing a pipe with a prohibition symbol, one with a crosshair and the other with a circle (no text or labels)natural_image
Four technical diagrams showing mechanical assembly with no visible text or symbolsnatural_image
Technical line drawing of a mechanical component with a magnified inset showing a detail (no text or symbols)natural_image
Illustration of a silver washing machine with black arrows pointing to top and side panels (no text or symbols)주의
대각선 점검 방법
세탁기 월 면을 대각선 방향으로
잡고 누른 후 반대 방향도 눌러서
세탁기의 흔들림을 확인하세요.
흔들림이 생기는 쪽의 수평조절
다리를 조절하면서 대각선 방향으로
놀러보세요.수평이 완전히 맞춰질
때 까지 반복해 주세요.
주의
natural_image
Technical line drawing of a mechanical component with no visible text or symbolstext_image
25.4" (64.5cm) 18.4" (46.7 cm) 3" (7.7cm) 27" (68.6cm) 13.6" (34.5cm)*Specifications are subject to change by manufacturer.
*Las especificaciones son sujetas a cambio por el fabricante
* Données techniques sujettes à changement sans préavis

MEMO

LG
Life's Good